Vulnerability data must be tracked in order to ensure remediation – or vulnerabilities can fall through the cracks leaving your organization exposed. Most vulnerability data comes from scanners, though the most important vulnerability data often comes from humans. In this third post of a four-part series on threat and vulnerability management tools, we provide guidance on how to effectively track vulnerability data in the context of orchestration.
Several non-optimized tools commonly used for tracking vulnerability remediation include the following, each of which has significant limitations:
Excel and SharePoint: Companies often use Excel or SharePoint to track remediation from a central list of findings – a single spreadsheet file where dozens of users comb through thousands of vulnerabilities. Tracking remediation this way certainly presents challenges, because spreadsheet tools are not designed to help manage such complicated data sets and team collaboration. The information often gets overwritten or marked improperly. The accuracy of the data is questionable, making reporting difficult.
JIRA: Alternately, some companies use JIRA for tracking software vulnerabilities, which helps ensure that processes are followed. Unfortunately, most organizations have many JIRA instances across their development environments. Distributing the results across many JIRA instances leads to an inability to effectively report on the data. Storing the results in a central JIRA system has advantages, but getting stakeholders to take the time to login and review the findings in a different system than they use daily can be difficult.
ServiceNow: Some companies attempt to use ServiceNow, which has the advantage of more robust ticketing, to track vulnerabilities on the networking side. Unfortunately, some of the same ingestion challenges exist, and you lose the fidelity of having all of the vulnerabilities in a single place.
Home-built: Other companies have built systems that connect to other internal systems. While they work, home-built tools are difficult to maintain and often are maintained less formally than normal development efforts, as they are unrelated to the core business purpose. These systems are often just databases with a minimal user interface, not fully optimized for the purpose.
Best Practices Checklist: Security Orchestration for Vulnerability Remediation
Best practices for threat and vulnerability management require a system for remediation workflows that can handle the following seven tasks:
Ingestion of various data formats with flexible normalization
Reviewing of normalized data for changes and modifications as needed
Distribution of normalized data to various external systems
Tracking the data distributed externally to keep a central listing up to date
Ensuring policy is adhered to across the various systems where the data is tracked
Sending notifications for users and keeping humans involved in the process, especially when vulnerabilities become overdue
Reporting on the outcome of vulnerabilities by group, business unit, or globally across the organization
As a result, a checklist for a security orchestration tool for vulnerability remediation includes these six capabilities:
Serve as a central clearinghouse of vulnerability data
Automate many steps of the remediation process
Coordinate varying processes based on the organization’s internal structure and environment
Integrate with a large number of systems via API
Define a workflow with decision points based on data criteria
Notify key users when something is not right
Make sure any threat and vulnerability management tool you consider can check these six boxes before you try it out.
In the post Are You Flooded with Vulnerabilities?, we explored the ever-growing mountain of data that organizations face in managing their vulnerabilities. While software is at the root of the vulnerability problem, it’s also the solution. As individuals approach large volumes of data, software can support better decision making, collaboration, tracking, and visualization.
The key to a mature threat and vulnerability management program is to set up and consistently follow an established process that tracks each vulnerability throughout its life cycle. Given a best-practices process, the challenge becomes its real-world implementation. Two important capabilities work together to help you implement your process in the real world: automation and security orchestration.
Automation eliminates the normal human effort to accomplish a task. Simple, commonplace tasks, such as retrieving data or opening a ticket can be automated. A script encodes a task for software to complete.
However, automation is not a complete solution. When humans operate automation routines, the process tends to break down quickly – and the cost of overhead adds up. Clunky, manual steps may remain, and humans running the automation routines make mistakes. Tribal knowledge tends to get lost over time and consistency is difficult to achieve. This is where security orchestration comes to the rescue.
What is Security Orchestration?
Let’s first explore the term. Security orchestration connects multiple systems and automation in a way that provides a consistent process for data to follow. Orchestration is, for example, an automated car assembly line where multiple robots each help build the vehicle as it advances through the manufacturing process. But robots alone are not enough. Like an automation script, each robot only does a specific task. Building a reliable car also requires the overall coordination of individual tasks, which is called orchestration.
At inflection points, decisions can be made on individual records automatically, based on data. Automation scripts can be triggered to perform complex data-parsing tasks. Tool integrations allow for automated data retrieval and synchronization among systems. When human analysis is needed, the process can wait for human input.
Beyond consistent implementation, an even greater benefit of a security orchestration platform is that it allows you to minimize the human overhead and maximize the human capacity for analysis.
Differences Between Security Orchestration and Automation
In review of the differences, here are the points you need to understand when determining if a tool does orchestration, automation, or both:
Automation
Security Orchestration
The tool can be configured to calculate values based on input variables
The tool can make decisions and perform different actions based on those decisions
The tool can connect to various external system APIs
The tool can pause and wait
The tool can create or update large data sets from various sources
The tool can execute sequential automation routines over a time period
The tool can run scripts or routines in some format
The tool allows configuration of automation steps, decisions, and pauses within a custom workflow
During different types of assessments (web app, network, cloud), we will run into situations where we obtain domain credentials that can be used to log into Azure subscriptions. Most commonly, we will externally guess credentials for a privileged domain user, but we’ve also seen excessive permissions in web applications that use Azure AD for authentication.
If we’re really lucky, we’ll have access to a user that has rights (typically Owner or Contributor) to access sensitive information in the subscription. If we have privileged access, there are three specific areas that we typically focus on for gathering credentials:
Key Vaults
App Services Configurations
Automation Accounts
There are other places that application/domain credentials could be hiding (See Storage Account files), but these are the first couple of spots that we want to check for credentials.
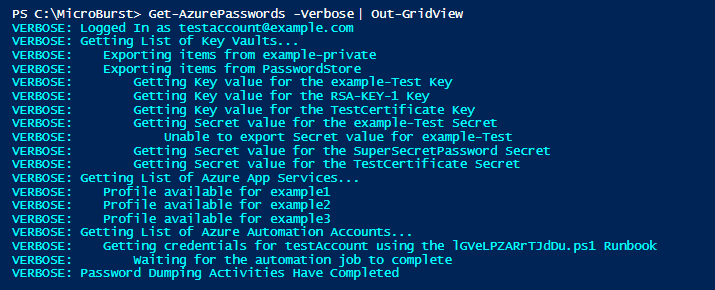
In this post, we’ll go over the key areas where credentials are commonly found and the usage of a PowerShell script (a part of MicroBurst) that I put together to automate the process of gathering credentials from an Azure environment.
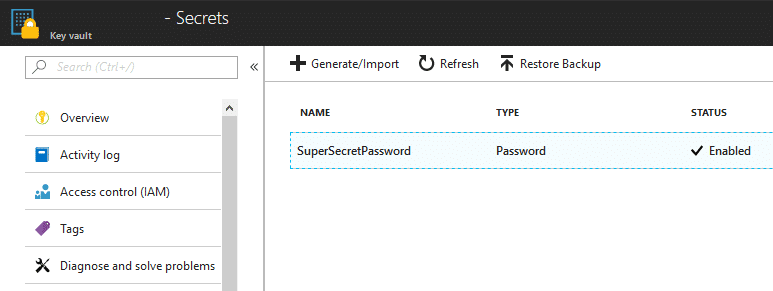
Key Vaults
Azure Key Vaults are Microsoft’s solution for storing sensitive data (Keys, Passwords/Secrets, Certs) in the Azure cloud. Inherently, Key Vaults are great sources for finding credential data. If you have a user with the correct rights, you should be able to read data out of the key stores.
For dumping Key Vault values, we’re using some standard Azure PowerShell commands:
Get-AzureKeyVaultKey
Get-AzureKeyVaultSecret
If you’re just looking at exporting one or two secrets, these commands can be run individually. But since we’re typically trying to access everything that we can in an Azure subscription, we’ve automated the process in the script. The script will export all of the secrets in cleartext, along with any certificates. You also have the option to save the certificates locally with the -ExportCerts flag.
With access to the keys, secrets, and certificates, you may be able to use them to pivot through systems in the Azure subscription. Additionally, I’ve seen situations where administrators have stored Azure AD user credentials in the Key Vault.
App Services Configurations
Azure App Services are Microsoft’s option for rapid application deployment. Applications can be spun up quickly using app services and the configurations (passwords) are pushed to the applications via the App Services profiles.
In the portal, the App Services deployment passwords are typically found in the “Publish Profile” link that can be found in the top navigation bar within the App Services section. Any user with contributor rights to the application should be able to access this profile.
For dumping App Services configurations, we’re using the following AzureRM PowerShell commands:
Get-AzureRmWebApp
Get-AzureRmResource
Get-AzureRmWebAppPublishingProfile
Again, if this is just a one-off configuration dump, it’s easy to grab the profile from the web portal. But since we’re looking to automate this process, we use the commands above to list out the available apps and profiles for each app. Once the publishing profile is collected by the script, it is then parsed and credentials are returned in the final output table.
Potential next steps include uploading a web shell to the App Services web server, or using any parsed connection strings included in the deployment to access the databases. With access to the databases, you could potentially use them as a C2 channel. Check out Scott’s post for more information on that.
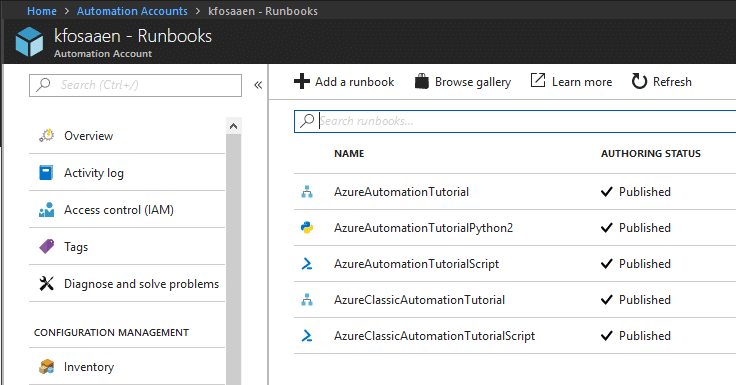
Automation Accounts
Automation accounts are one of the ways that you can automate tasks on Azure subscriptions. As part of the automation process, Azure allows these accounts to run code in the Azure environment. This code can be PowerShell or Python, and it can also be very handy for pentesting activities.
The automation account credential gathering process is particularly interesting, as we will have to run some PowerShell in Azure to actually get the credentials for the automation accounts. This section of the script will deploy a Runbook as a ps1 file to the Azure environment in order to get access to the credentials.
Basically, the automation script is generated in the tool and includes the automation account name that we’re gathering the credentials for.
This Microsoft page was a big help in getting this section of the script figured out. Dumping these credentials can take a minute, as the automation script needs to be spooled up and ran on the Azure side.
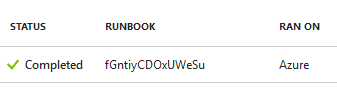
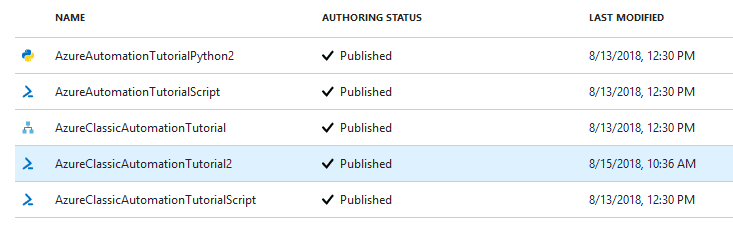
This method of grabbing Automation Account credentials is not the most OpSec safe, but the script does attempt to clean up after itself by deleting the Runbook. As long as the Runbook is successfully deleted at the end of the run, all that will be left is an entry in the Jobs page.
To help with obscuring these activities, the script generates 15-character job names for each Runbook so it’s hard to tell what was actually run. If you want, you can modify the jobName variable in the code to name it something a little more in line with the tutorial names, but the random names help prevent issues with naming conflicts.
Since the Automation Account credentials are user generated, there’s a chance that the passwords are being reused somewhere else in the environment, but your mileage may vary.
Script Usage
In order for this script to work, you will need to have the AzureRM and Azure PowerShell modules installed. Both modules have different ways to access the same things, but together, they can access everything that we need for this script.
Install-Module -Name AzureRM
Install-Module -Name Azure
The script will prompt you to install if they’re not already installed, but it doesn’t hurt to get those installed before we start.
*Update (3/19/20) – I’ve updated the scripts to be Az module compliant, so if you’re already using the Az modules, you can use the Get-AzPasswords (versus Get-AzurePasswords) instead.
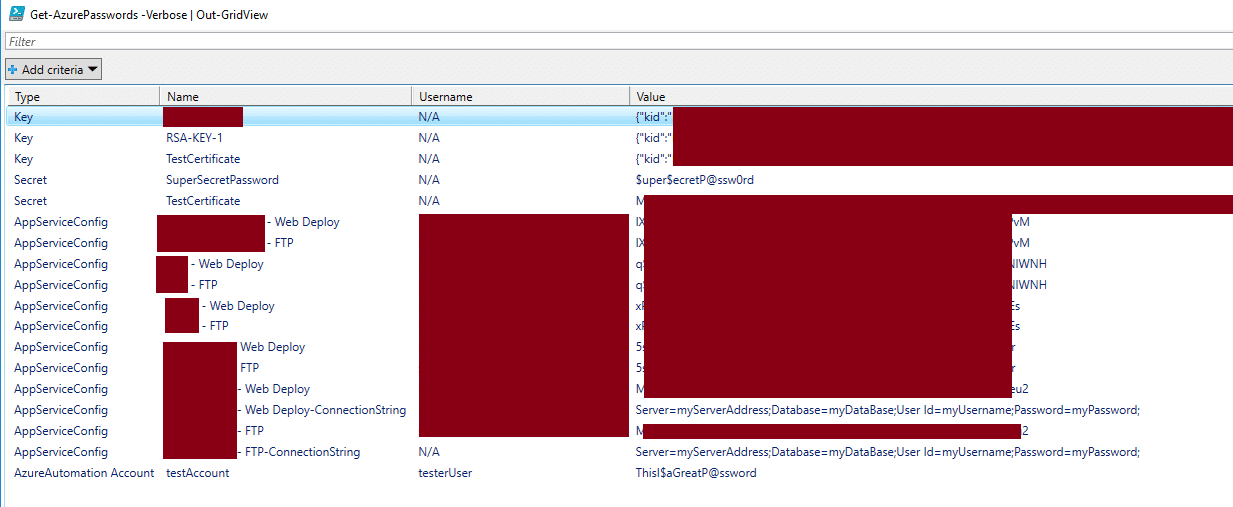
*The PowerShell output above and the Out-Gridview output has been redacted to protect the privacy of my test Azure subscription.
Alternatively, you can pipe the output to Export-CSV to save the credentials in a CSV. If you don’t redirect the output, the credentials will just be returned as data table entries.
Conclusion
There’s a fair number of places where credentials can hide in an Azure subscription, and there’s plenty of uses for these credentials while attacking an Azure environment. Hopefully this script helps automate your process for gathering those credentials.
For those that have read “Pentesting Azure Applications“, you may have noticed that they call out the same credential locations in the “Other Azure Services” chapter. I actually had most of this script written prior to the book coming out, but the book really helped me figure out the Automation account credential section.
If you haven’t read the book yet, and want a nice deep dive on Azure security, you can get it from no starch press – https://nostarch.com/azure
Burp Suite’s cookie jar is an incredibly handy tool that makes a penetration tester’s life much easier in many situations. It makes for a no hassle way to reissue requests in Repeater as a different user, scan requests which were originally issued in a previous session, and other fun things. But what happens when you need to change more than just cookies? Sometimes an application requires an anti-CSRF token, an updated expiration time, or maybe a session is tracked in an Authorization header instead of cookies. Normally with Burp, this could cause a major headache and a match/replace might be used, or it could be worth struggling through setting up a macro. Both methods requiring a good amount of manual intervention.
Burp Extractor as an Easy-to-Use Solution
Burp Extractor is intended to be a pain killer for these headaches. This extension allows penetration testers to select a string to extract from responses using a regular expression-based matching mechanism, and insert that string into any request with a similar matching mechanism, effectively making a cookie jar for whatever dynamic information the tester needs.
Using Burp Extractor
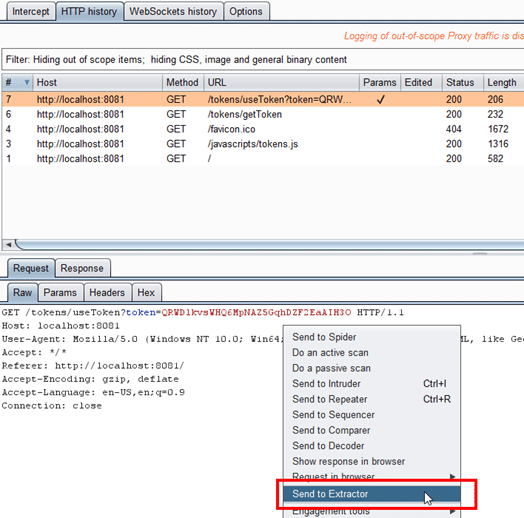
If a request requires a value from a response, right click on that request and select “Send to Extractor”. Then find a response where the client receives this value from, and select “Send to Extractor”.
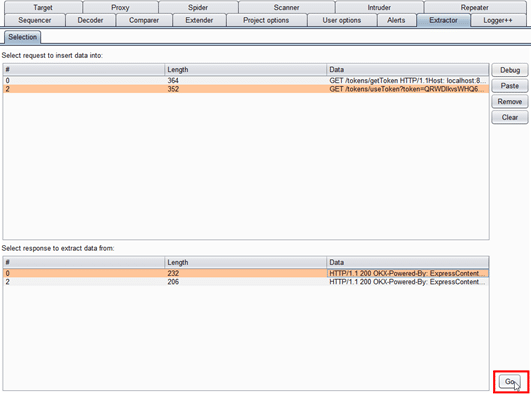
Go to the Extractor tab to view a Comparer-like interface, and select the request and response needed, then click “Go”.
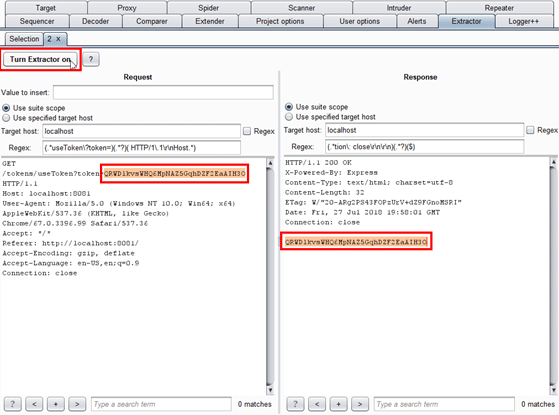
Within the newly created tab, highlight the content of the request which needs to be replaced, and the content of the response which contains the value to be inserted. Adjust the scope as necessary, and click “Turn Extractor on”.
Once turned on, Extractor will look for occurrences of the regex listed in the request and response panels, and extract or insert data appropriately. It will also update the “Value to insert” field with the newest value extracted.
Check out the demonstration below to see an example usage of the extension, and grab the extension off GitHub! Hopefully this tool will help ease some pains when dealing with web apps that use tokens or authentication that Burp is not always well-equipped to cope with.
Minneapolis, Minnesota – NetSPI LLC, the leader in orchestrated vulnerability management and security testing, announced today its participation at Black Hat USA 2018, Aug. 8-9 (booth 1643) in Las Vegas, NV. NetSPI will both present and exhibit at the conference to showcase their solutions that improve an organization’s security posture. Event attendees will have the opportunity to see first-hand how NetSPI’s portfolio is designed to address the most critical vulnerability challenges that security organizations face. NetSPI’s security experts will be providing best practices and insights during their presentations and will also be available to meet 1:1. To schedule your sessions, click here.
When: Thursday, Aug. 9, 2018 at 10:00 a.m.
Where: Business Hall (Oceanside), Arsenal Station 4
Who: Scott Sutherland and Antti Rantasaari of NetSPI
Session Summary: This session includes training on functions supporting SQL Server discovery, weak configuration auditing, privilege escalation on scale, and post exploitation actions such as OS command execution. The tool includes additional functions used by administrators to quickly inventory the SQL Servers in their Active Directory Server (ADS) domains, and perform common threat hunting tasks related to SQL Server. PowerUpSQL enables red, blue, and purple team in automating day to day tasks involving SQL Server.
When: Thursday, Aug. 9, 2018 at 3:50 p.m.
Where: Jasmine Ballroom
Who: Chad Rikansrud, NetSPI’s Mainframe Partner of RSM Partners
Session Summary: Talk to a Fortune 500® who is running mainframe and they’ll tell you two things: (1) without their mainframes they’d be out of business, and (2) they do not conduct any security research on them, let alone vulnerability scans. This session is focused on providing various tools that exist on the platform to help you in doing your own reverse engineering, followed by detailed steps on how to start your own exploit development.
In addition to these presentations, attendees will have the opportunity to learn more about the following:
Application & Infrastructure Security Testing Services: See how NetSPI’s security testing services are designed to address bandwidth, expertise gaps, and compliance needs. NetSPI provides penetration testing services encompassing everything from mobile and web apps to cloud, network, mainframe, IoT, and more. Additional strategic services include Threat & Vulnerability Management Assessments, and attack simulation services which encompasses red team, social engineering, detective controls testing, and more.
NetSPI Resolve™ Vulnerability Orchestration Software: Learn how NetSPI Resolve removes the risk of managing vulnerabilities in spreadsheets, and arduous administrative tasks that cause large-scale inefficiencies. The software provides a system of record for all application and infrastructure vulnerabilities through its scanner-agnostic integration engine that also brokers cross-departmental workflow and communications. NetSPI Resolve reduces your risk by providing the visibility needed to actively manage your remediation efforts while increasing your security testing coverage by over fifty percent without adding additional staff.
Click here to sign up for a 1:1 security advisory session or a software demo.
About NetSPI
NetSPI LLC is the leading provider of application and network security testing solutions that support organizations in scaling and operationalizing their threat and vulnerability management programs. The solution portfolio includes program development, security testing, and a software platform for application and infrastructure vulnerability orchestration. Trusted by seven of the top 10 United States banks, two global cloud providers, and many of the Fortune® 500, NetSPI has deep expertise in financial institutions, healthcare providers, retailers, and technology companies. NetSPI is headquartered in Minneapolis, Minnesota with additional offices in Dallas, Denver, Portland, and New York. For more information about NetSPI, please visit netspi.com.
Necessary cookies help make a website usable by enabling basic functions like page navigation and access to secure areas of the website. The website cannot function properly without these cookies.
Name
Domain
Purpose
Expiry
Type
YSC
youtube.com
YouTube session cookie.
52 years
HTTP
Marketing cookies are used to track visitors across websites. The intention is to display ads that are relevant and engaging for the individual user and thereby more valuable for publishers and third party advertisers.
Name
Domain
Purpose
Expiry
Type
VISITOR_INFO1_LIVE
youtube.com
YouTube cookie.
6 months
HTTP
Test
test.com
Testing
7 days
HTTP
Analytics cookies help website owners to understand how visitors interact with websites by collecting and reporting information anonymously.
We do not use cookies of this type.
Preference cookies enable a website to remember information that changes the way the website behaves or looks, like your preferred language or the region that you are in.
We do not use cookies of this type.
Unclassified cookies are cookies that we are in the process of classifying, together with the providers of individual cookies.
We do not use cookies of this type.
Cookies are small text files that can be used by websites to make a user's experience more efficient. The law states that we can store cookies on your device if they are strictly necessary for the operation of this site. For all other types of cookies we need your permission. This site uses different types of cookies. Some cookies are placed by third party services that appear on our pages.
Cookie Settings
Discover how the NetSPI BAS solution helps organizations validate the efficacy of existing security controls and understand their Security Posture and Readiness.