Four Ways to Bypass Android SSL Verification and Certificate Pinning
Gone are the days when mobile applications stoically ignored all manner of SSL errors and allowed you to intercept and modify their traffic at will. Instead, most modern applications at least check that the certificate presented chains to a valid, trusted certificate authority (CA). As pentesters, we’d like to convince the app that our certificate is valid and trusted so we can man-in-the-middle (MITM) it and modify its traffic. In this blog I’ll go through 4 techniques you can use to bypass SSL certificate checks on Android:
- Adding a custom CA to the trusted certificate store
- Overwriting a packaged CA cert with a custom CA cert
- Using Frida to hook and bypass SSL certificate checks
- Reversing custom certificate code
These range from fairly simple to quite advanced in execution – this blog will try to cover each one without getting too bogged down in situation-specific details.
SSL MITM – Why?
Why do we need to pay special attention to SSL MITM conditions for mobile applications? In order to view and fuzz a mobile app’s web service calls, we need to use an intercepting proxy such as BurpSuite or ZAP. When intercepting SSL traffic using a proxy, the SSL connection from the client is terminated at the proxy – whatever certificate the proxy sends to identify itself is evaluated by the mobile app as if the proxy were the web service endpoint. By default, the self-signed certificate generated by tools such as Burp won’t have a valid trust chain, and if the certificate can’t be verified as trusted, most mobile apps will terminate the connection instead of connecting over a potentially insecure channel. The techniques below all share the common goal of convincing a mobile application to trust the certificate provided by our intercepting proxy.
Technique 1 – Adding a Custom CA to the User Certificate Store
The simplest way to avoid SSL errors is to have a valid, trusted certificate. This is relatively easy if you can install new, trusted CAs to the device – if the operating system trusts your CA, it will trust a certificate signed by your CA.
Android has two built-in certificate stores that keep track of which CAs are trusted by the operating system – the system store (holding pre-installed CAs) and the user store (holding user-installed CAs). From developer.android.com:
By default, secure connections (using protocols like TLS and HTTPS) from all apps trust the pre-installed system CAs, and apps targeting Android 6.0 (API level 23) and lower also trust the user-added CA store by default. An app can customize its own connections using base-config (for app-wide customization) or domain-config (for per-domain customization).
What does this mean to us? If the application we’re trying to MITM targets Android 6.0 or lower, we can simply add our CA to the user-added CA store. When the application validates the trust chain for our custom certificate, it will find our custom CA in the trust store and our certificate will be trusted. If the application targets Android versions later than 6.0, however, it won’t trust the user-added CA store. To get around this, we can edit the application’s manifest and force it to target Android 6.0. The targeted API level is specified in the ‘platformBuildVersionCode’ attribute of the ‘manifest’ element in the AndroidManifest.xml file.
<manifest xmlns:android="https://schemas.android.com/apk/res/android" package="com.test.app" platformBuildVersionCode="25" platformBuildVersionName="7.1.1">
The above manifest element targets ‘platformBuildVersionCode=25’, we need to change that to 23.
<manifest xmlns:android="https://schemas.android.com/apk/res/android" package="com.test.app" platformBuildVersionCode="23" platformBuildVersionName="6.0">
When the application is repackaged with this updated manifest, it will trust the user-added CA store.
Alternatively, if running on a specific platform version is required, we can define specific trust anchors in the ‘/res/xml/network_security_config.xml’ configuration file of the APK. For example, the following file defines a new trusted CA that needs to be stored at /res/raw/my_ca (from https://developer.android.com/training/articles/security-config.html):
<?xml version="1.0" encoding="utf-8"?>
<network-security-config>
<base-config>
<trust-anchors>
<certificates src="@raw/my_ca"/>
</trust-anchors>
</base-config>
</network-security-config>
If the application is only validating that the presented certificate is valid, this technique should allow you to establish a successful MITM condition.
Technique 2 – Overwrite Packaged CA Certificate with Custom CA Certificate
What if you successfully install your certificate to the user-added CA store, the application is targeting Android 6.0, and your certificate shows up as valid when you try and browse other SSL-protected resources, but the application still dies with SSL errors? It’s possible that the developers have taken additional steps to restrict the set of CAs trusted by the application. Recall from technique 1 we defined a custom trust anchor and provided a path to a CA certificate – this is intended functionality that may be used by developers to attempt to protect their application from SSL interception.
If a custom certificate chain is being distributed with an application, extracting the APK and overwriting the provided CA with our custom CA should be enough to cause our intercepting certificate to be trusted. Note that in some cases, additional verification of the trust chain may be happening, so this method may yield mixed results.
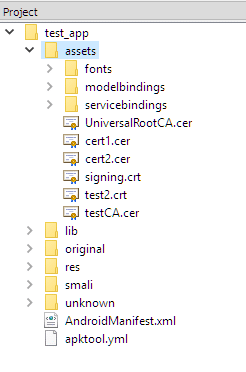
Opening the APK with a tool such as APK Studio makes the presence of certificates bundled with the deployed application obvious. In the image above, the certificates are located under the ‘assets’ directory. Overwriting the aptly-named ‘UniversalRootCA’ certificate with our custom CA should allow us to trick the application into accepting our certificate.
Technique 3 – Frida Hook
If installing your own CA isn’t enough to successfully proxy SSL traffic, it’s possible that the application is performing some kind of SSL pinning or additional SSL validation. Typically, to bypass this type of validation we need to hook the application’s code and interfere with the validation process itself. This type of interference use to be restricted to rooted/jailbroken phones, but with the help of Frida Gadget, it’s now possible to instrument an Android application and gain access to the full suite of Frida functionality without rooting a device.
If you’ve performed mobile application penetration testing before, you’re likely familiar with the Frida framework. Fully covering Frida’s functionality is outside the scope of this blog, but at a high level it’s a framework that allows you to tamper with an application’s code at runtime. Typically, Frida will run on the operating system as a stand-alone program – but that requires rooting a device. To avoid that, we can inject Frida Gadget into the target APK. Frida Gadget contains most of the functionality of Frida, but encapsulated in a dynamic library that gets loaded by the target app at runtime, allowing you to instrument and modify the target app’s code.
To load Frida Gadget, we need to extract the APK, insert the dynamic library, edit some smali code so our dynamic library is the first thing that gets called at application startup, then re-package the APK and install it. This entire process has been documented in great detail here by John Kozyrakis, and it’s worth going through it manually at least once to get a feel for how everything works together. To save time, however, there’s yet another tool we can use – Objection. Objection automates this entire process, and requires only the target APK to be provided on the command line.
C: >objection patchapk -s test_app.apk
No architecture specified. Determining it using `adb`...
Detected target device architecture as: armeabi-v7a
Github FridaGadget is v10.6.28, local is v10.6.13. Updating...
Downloading armeabi-v7a library to C:.objectionandroidarmeabi-v7alibfrida-gadget.so.xz...
Unpacking C:.objectionandroidarmeabi-v7alibfrida-gadget.so.xz...
Cleaning up downloaded archives...
Using Gadget version: 10.6.28
Unpacking test_app.apk
App already has android.permission.INTERNET
Reading smali from: C:Temptmp8dxqks1u.apktempsmalicom/test/app/TestMainActivity.smali
Injecting loadLibrary call at line: 10
Writing patched smali back to: C:Temptmp8dxqks1u.apktempsmalicom/test/app/TestMainActivity.smali
Creating library path: C:Temptmp8dxqks1u.apktemplibarmeabi-v7a
Copying Frida gadget to libs path...
Rebuilding the APK with the frida-gadget loaded...
Built new APK with injected loadLibrary and frida-gadget
Signing new APK.
jar signed.
Signed the new APK
Performing zipalign
Zipaling completed
Copying final apk from C:UserscwassAppDataLocalTemptmp8dxqks1u.apktemp.aligned.objection.apk to current directory...
Cleaning up temp files...
After this, we should have a file named ‘test_app.objection.apk’ in our working directory – objection, by default, appends ‘.objection’ to the name of the original APK. We can install this APK as we would any other APK – adb install test_app.objection.apk should push it to our connected device. After the objection-altered APK has been installed on our target device, running the app should result in a pause at the application startup screen. At this point, we can connect to a Frida server that should be listening on the device. If you prefer using the Frida utilities:
C:>frida-ps -U
PID  Name
----  ------
6383  Gadget

C:>frida -U gadget
____
/ _ | Frida 10.3.14 - A world-class dynamic instrumentation framework
| (_| |
> _ | Commands:
/_/ |_| help -> Displays the help system
. . . . object? -> Display information about 'object'
. . . . exit/quit -> Exit
. . . .
. . . . More info at https://www.frida.re/docs/home/

[Motorola Moto G (5) Plus::gadget]-> Java.available
true

Alternatively, Objection supports interaction with the listening Frida server by using the ‘explore’ command:

C:>objection explore
___| |_  |_|___ ___| |_|_|___ ___
| . | . | | | -_|  _|  _| | . |   |
|___|___|_| |___|___|_| |_|___|_|_|
|___|(object)inject(ion) v1.2.2

Runtime Mobile Exploration
by: @leonjza from @sensepost

[tab] for command suggestions
com.test.app on (motorola: 7.0) [usb] # android hooking search classes TrustManager
android.security.net.config.RootTrustManager
android.app.trust.ITrustManager$Stub$Proxy
android.app.trust.ITrustManager
android.security.net.config.NetworkSecurityTrustManager
android.security.net.config.RootTrustManagerFactorySpi
android.app.trust.TrustManager
android.app.trust.ITrustManager$Stub
com.android.org.conscrypt.TrustManagerImpl
com.android.org.conscrypt.TrustManagerImpl$ExtendedKeyUsagePKIXCertPathChecker
com.android.org.conscrypt.TrustManagerImpl$TrustAnchorComparator
com.android.org.conscrypt.TrustManagerFactoryImpl
javax.net.ssl.TrustManagerFactory$1
javax.net.ssl.TrustManager
javax.net.ssl.TrustManagerFactory
javax.net.ssl.X509TrustManager
javax.net.ssl.TrustManagerFactorySpi
javax.net.ssl.X509ExtendedTrustManager
[Ljavax.net.ssl.TrustManager;
At this point, you should be able to benefit from the built-in SSL pinning bypass functions:
com.test.app on (motorola: 7.0) [usb] # android sslpinning disable
Job: 2f633f86-f252-4a57-958e-6b46ac8d69d1 - Starting
[6b46ac8d69d1] [android-ssl-pinning-bypass] Custom, Empty TrustManager ready
Job: 2f633f86-f252-4a57-958e-6b46ac8d69d1 – Started
Technique 4 – Reversing Custom Certificate Validation Code
Lastly, it’s possible that a developer would choose to provide their own SSL libraries instead of relying on the system libraries to handle the SSL certificate validation. If this is the case, we’ll likely want to extract the APK and convert the smali back to Java so we can look for the code responsible for handling the certificate validation.
Using ‘dex2jar’, the syntax is as follows:
C:>d2j-dex2jar.bat "C:test_app.apk"
dex2jar C:test_app.apk -> .test_app-dex2jar.jar
The resulting .jar file should be openable in your favorite Java reversing tool (such as JD-GUI).
Once you identify the code responsible for certificate validation, you can choose to either patch it out completely or hook the desired function using Frida. To avoid re-building the entire application, it’s typically more efficient to hook the functions responsible for the certificate validation. Using the steps from technique #3 will allow you to instrument the application – from there, you should be able to hook a function using either the Frida command-line tools or the Objection interface, whichever you’re more comfortable with.
Conclusion
The techniques mentioned above should allow you to intercept Android SSL traffic and bypass some of the more common defenses employed by developers. In addition, this blog provided a brief introduction to Objection and Frida – the ability to bypass SSL pinning and other defenses only scratches the surface of the staggering amount of functionality provided by these tools. I hope this blog was an accessible introduction to various techniques that can be used during Android mobile application security testing, and illustrated the importance of having multiple ways to bypass a given security control.