Linux Hacking Case Studies Part 5: Building a Vulnerable Linux Server

This blog will share how to configure your own Linux server with the vulnerabilities shown in the “Linux Hacking Case Studies” blog series. That way you can practice building and breaking at home. Similar to the rest of the series, this blog is really intended for people who are new to penetration testing, but hopefully there is a little something for everyone. Enjoy!
Below are links to the first four blogs in the series:
- Linux Hacking Case Study Part 1: Rsync
- Linux Hacking Case Study Part 2: NFS
- Linux Hacking Case Study Part 3: phpMyAdmin
- Linux Hacking Case Study Part 4: Sudoers Horror Stories
Below is an overview of what will be covered in this blog:
- Lab Scenarios
- Kali VM and Dependencies
- Lab Setup: Rsync
- Lab Setup: NFS
- Lab Setup: phpMyAdmin
- Lab Setup: SUDO
Lab Scenarios
This section briefly summarizes the lab scenarios that you’ll be building which are based on this blog series.
| # | REMOTE VULNERABILITY | LOCAL VULNERABILITY | ESCALATION PATH |
|---|---|---|---|
| 1 | Excessive privileges configured on a Rsync Server | Excessive privileges configured on a Rsync server. Specifically, the server is configured to run as root. | Create a new privileged user by adding lines to the shadow, passwd, groups, and sudoers files. |
| 2 | Excessive privileges configured on a NFS Export | Insecure setuid binary that allows arbitrary code execution as root. | Review setuid binaries and determine which ones have the direct or indirect capability to execute arbitrary code as root. |
| 3 | Weak password configured for phpMyAdmin | Excessive privileges configured on a script that is executed by a root cron job. Specifically, the script file is world writable. | Write a command to the world writable script that starts a netcat listener. When the root cron job executes the script the netcat listener will start as root. Then its possible to connect to the netcat listeners remotely to obtain root access.Reverse shell alternatives here. |
| 4 | Weak password configured for SSH | Insecure sudoers configurations that allows arbitrary code execution as root through sudo applications. | Review sudo applications to determine which ones have the direct or indirect capability to execute arbitrary code as root. Examples include sh, VI, python, netcat, and the use of a custom nmap module. |
Kali VM and Install Dependencies
For this lab, we’ll be building our vulnerable services on a standard Kali image. If you don’t already have a Kali VM, you can download from their site website to get you setup. Once your Kali VM is ready to go you’ll want to install some package that will be required for setting up the scenarios in the lab. Make sure to sign as root, you’ll need those privilege to setup the lab.
Install Required Packages
apt-get update
apt-get install nfs-kernel-server
apt-get install nfs-common
apt-get install ufw
apt-get install nmap
Clear Firewall Restrictions
iptables --flush
ufw allow from any to any
ufw status
With that out of the way let’s dive in.
Lab Setup: Rsync
Attack Lab: Linux Hacking Case Study Part 1: Rsync
In this section we’ll cover how to configure an insecure Rsync server. Once you’re logged in as root execute the commands below.
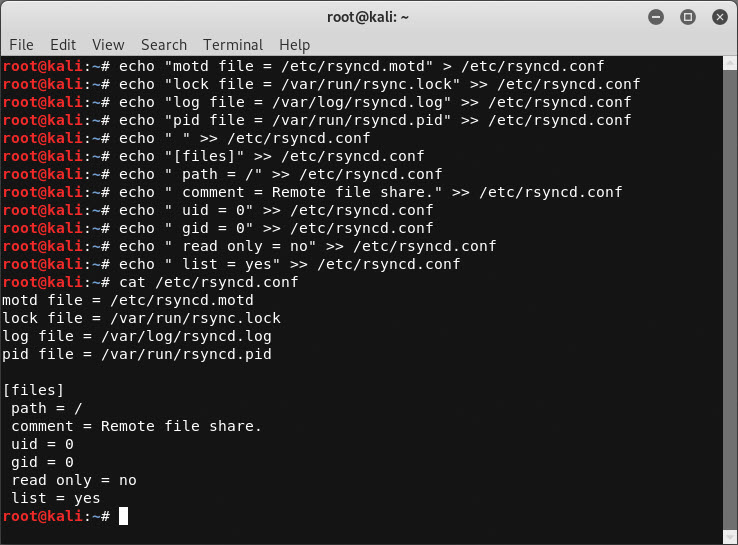
Let’s start by creating the rsyncd.conf configuration file with the commands below:
echo "motd file = /etc/rsyncd.motd" > /etc/rsyncd.conf
echo "lock file = /var/run/rsync.lock" >> /etc/rsyncd.conf
echo "log file = /var/log/rsyncd.log" >> /etc/rsyncd.conf
echo "pid file = /var/run/rsyncd.pid" >> /etc/rsyncd.conf
echo " " >> /etc/rsyncd.conf
echo "[files]" >> /etc/rsyncd.conf
echo " path = /" >> /etc/rsyncd.conf
echo " comment = Remote file share." >> /etc/rsyncd.conf
echo " uid = 0" >> /etc/rsyncd.conf
echo " gid = 0" >> /etc/rsyncd.conf
echo " read only = no" >> /etc/rsyncd.conf
echo " list = yes" >> /etc/rsyncd.conf
Next, let’s setup the rsync Service:
systemctl enable rsync
systemctl start rsync
or
systemctl restart rsync
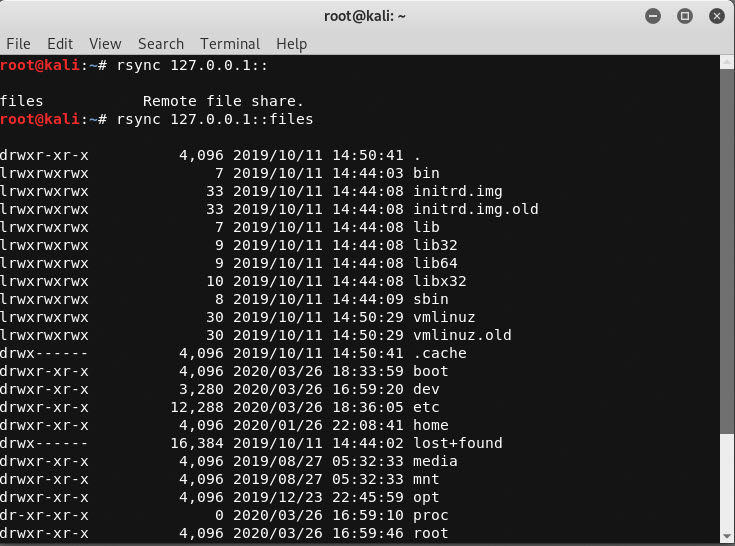
Verify the Configuration
rsync 127.0.0.1::
rsync 127.0.0.1::files
Lab Setup: NFS
Attack Lab: Linux Hacking Case Study Part 2: NFS
In this section we cover how to configure insecure NFS exports and an insecure setuid binary. Once you’re logged in as root execute the commands below.
Configure NFS Exports
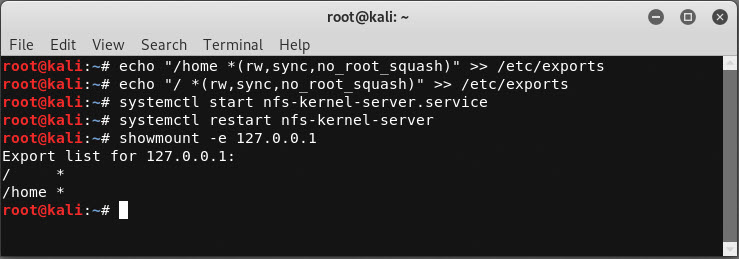
Create NFS Exports
echo "/home *(rw,sync,no_root_squash)" >> /etc/exports
echo "/ *(rw,sync,no_root_squash)" >> /etc/exports
Start NFS Server
systemctl start nfs-kernel-server.service
systemctl restart nfs-kernel-server
Verify NFS Export
showmount -e 127.0.0.1
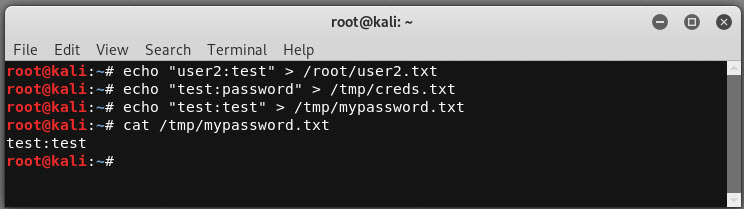
Create Password Files for Discovery
echo "user2:test" > /root/user2.txt
echo "test:password" > /tmp/creds.txt
echo "test:test" > /tmp/mypassword.txt
Enable password authentication through SSH.
sed -i 's/PasswordAuthentication no/PasswordAuthentication yes/g' /etc/ssh/sshd_config
service ssh restart
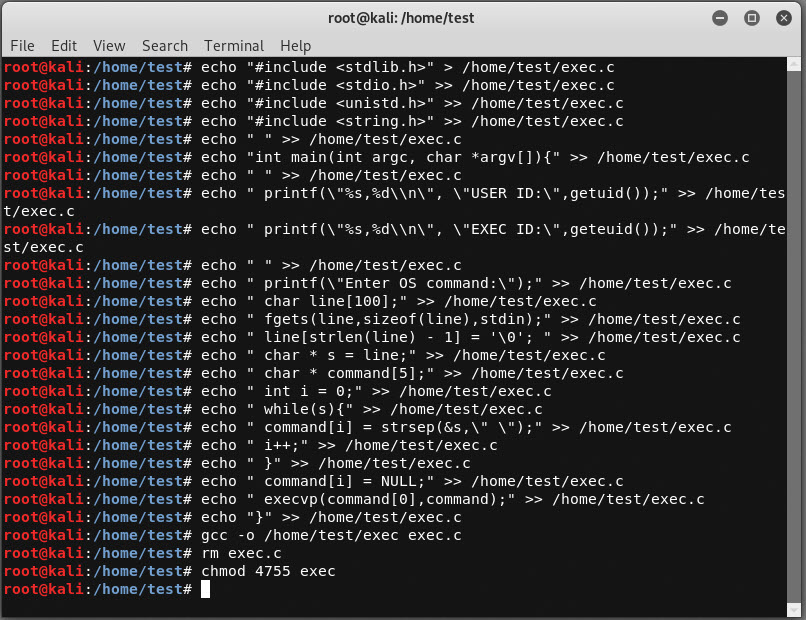
Create Insecure Setuid Binary
Create the source code for a binary that can execute arbitrary OS commands called exec.c:
echo "#include <stdlib.h>" > /home/test/exec.c
echo "#include <stdio.h>" >> /home/test/exec.c
echo "#include <unistd.h>" >> /home/test/exec.c
echo "#include <string.h>" >> /home/test/exec.c
echo " " >> /home/test/exec.c
echo "int main(int argc, char *argv[]){" >> /home/test/exec.c
echo " " >> /home/test/exec.c
echo " printf("%s,%dn", "USER ID:",getuid());" >> /home/test/exec.c
echo " printf("%s,%dn", "EXEC ID:",geteuid());" >> /home/test/exec.c
echo " " >> /home/test/exec.c
echo " printf("Enter OS command:");" >> /home/test/exec.c
echo " char line[100];" >> /home/test/exec.c
echo " fgets(line,sizeof(line),stdin);" >> /home/test/exec.c
echo " line[strlen(line) - 1] = ' '; " >> /home/test/exec.c
echo " char * s = line;" >> /home/test/exec.c
echo " char * command[5];" >> /home/test/exec.c
echo " int i = 0;" >> /home/test/exec.c
echo " while(s){" >> /home/test/exec.c
echo " command[i] = strsep(&s," ");" >> /home/test/exec.c
echo " i++;" >> /home/test/exec.c
echo " }" >> /home/test/exec.c
echo " command[i] = NULL;" >> /home/test/exec.c
echo " execvp(command[0],command);" >> /home/test/exec.c
echo "}" >> /home/test/exec.c
Compile exec.c:
gcc -o /home/test/exec exec.c
rm exec.c
Configure setuid on exec so that we can execute commands as root:
chmod 4755 exec
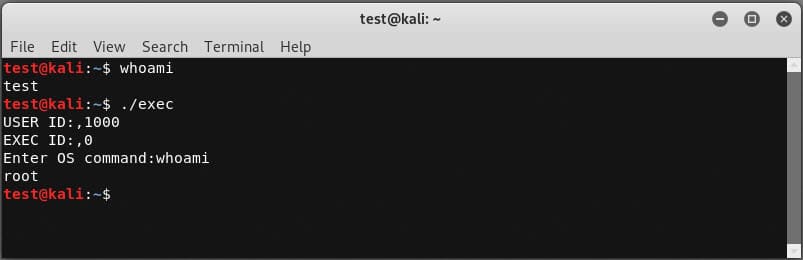
Verify you can execute the exec binary as a least privilege user.
Lab Setup: phpMyAdmin
Attack Lab: Linux Hacking Case Study Part 3: phpMyAdmin
In this section we’ll cover how to configure an insecure instance of phpMyAdmin, a root cron job, and a script that’s world writable. Once you’re logged in as root execute the commands below.
Reset the root Password (this is mostly for existing MySQL instances)
We’ll start by resetting the root password on the local MySQL instance. MySQL should be installed by default in Kali, but if it’s not on your build you’ll have to install it first.
# Stop mysql
/etc/init.d/mysql stop

# Start MySQL in safe mode and log in as root
mysqld_safe --skip-grant-tables&
mysql -uroot

# Select the database to use
use mysql;

# Reset the root password
update user set password=PASSWORD("password") where User='root';
flush privileges;
quit

# Restart the server
/etc/init.d/mysql stop
/etc/init.d/mysql start

# Confirm update by logging in with new password
mysql -u root -p
exit
Install PHPMyAdmin
Alrighty, time to install phpMyAdmin.
apt-get install phpmyadmin
Eventually you will be presented with a GUI. Follow the instructions below.
- Choose apache2 for the web server. Warning: When the first prompt appears, apache2 is highlighted, but not selected. If you do not hit Space to select Apache, the installer will not move the necessary files during installation. Hit Space, Tab, and then Enter to select Apache.
- Select yes when asked whether to use dbconfig-common to set up the database.
- You will be prompted for your database administrator’s password, which should be set to “password” to match the lab.
After the installation we still have a few things to do. Let’s create a soft link in the webroot to phpmyadmin.
ln -s /usr/share/phpmyadmin/ /var/www/phpmyadmin
Then, let’s restart the required services:
service apache2 restart
service mysql restart
Next, let’s add the admin user we’ll be guessing later.
mysql -u root
use mysql;
CREATE USER 'admin'@'%' IDENTIFIED BY 'password';
GRANT ALL PRIVILEGES ON *.* TO 'admin'@'%' WITH GRANT OPTION;
exit
Finally, configure excessive privileges in the webroot just for fun:
cd /var/www/
chown -R www-data *
chmod -R 777 *
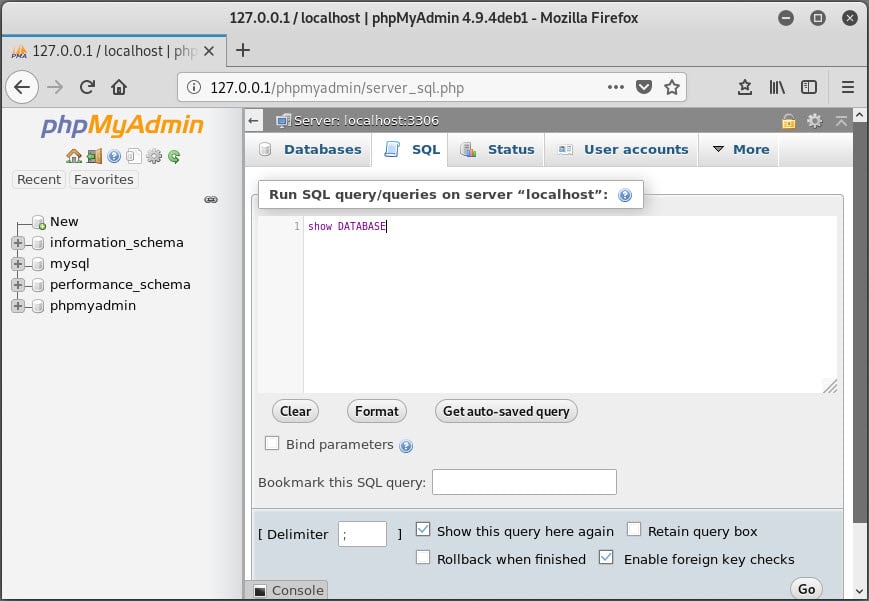
Web it’s all done you should be able to verify the setup by logging into https://127.0.0.1/phymyadmin as the “admin” user with a password of “password”.
Create a World Writable Script
Next up, let’s make a world writable script that will be executed by a cron job.
mkdir /scripts
echo "echo hello world" >> /scripts/rootcron.sh
chmod -R 777 /scripts
Create Root Cron Job
Now, let’s configure a root cron job to execute the script every minute.
echo "* * * * * /scripts/rootcron.sh" > mycron
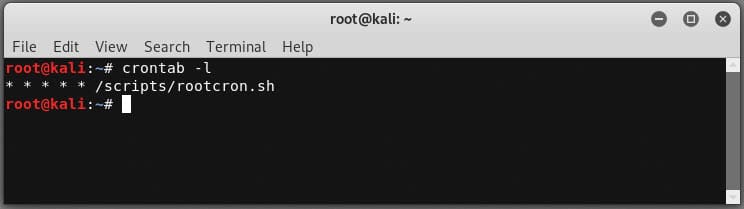
You can then verify the cron job was added with the command below.
crontab -l
Lab Setup: Sudoers
Attack Lab: Linux Hacking Case Study Part 4: Sudoers Horror Stories
This section outlines how to create a sudoers configuration that allows the execution of applications that can run arbitrary commands.
Create Encrypted Password
The command below will allow you create create an encrypted password for generating test users. I originally found this guidance from https://askubuntu.com/questions/94060/run-adduser-non-interactively.
openssl passwd -crypt test
Next you can add new users using the generate password below. This is not required, but handy for scripting out environments.
useradd -m -p O1Fug755UcscQ -s /bin/bash test
useradd -m -p O1Fug755UcscQ -s /bin/bash user1
useradd -m -p O1Fug755UcscQ -s /bin/bash user2
useradd -m -p O1Fug755UcscQ -s /bin/bash user3
useradd -m -p O1Fug755UcscQ -s /bin/bash tempuser
Create an Insecure Sudoers Configuration
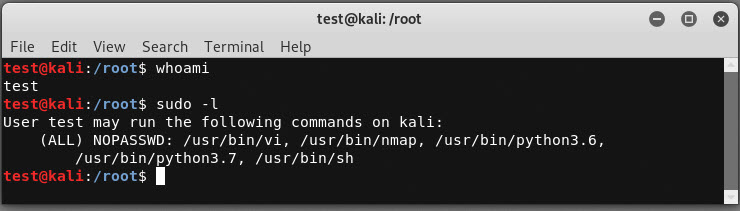
The sudoers configuration below with allow vi, nmap, python, and sh to be executed as root by test and user1.
echo "Cmnd_Alias ALLOWED_CMDS = /usr/bin/vi, /usr/bin/nmap, /usr/bin/python3.6, /usr/bin/python3.7, /usr/bin/sh" > /etc/sudoers
echo "test ALL=(ALL) NOPASSWD: ALLOWED_CMDS" >> /etc/sudoers
echo "user1 ALL=(ALL) NOPASSWD: ALLOWED_CMDS" >> /etc/sudoers
When its all done you can log in as the previously created test user to verify the sudo application are available:
Wrap Up
In this blog we covered how to configure your own vulnerable Linux server, so you can learn in a safe environment. Hopefully the Linux Hacking Case Studies blog series was useful for those of you who are new the security community. Stay safe and hack responsibly!
Explore More Blog Posts

CVE-2026-0300 Palo Alto Networks PAN-OS Buffer Overflow Overview & Takeaways
Palo Alto Networks has disclosed a critical zero-day vulnerability in PAN-OS, tracked as CVE-2026-0300, affecting PA-Series and VM-Series firewalls with the User-ID Authentication Portal (Captive Portal) enabled. The flaw is a pre-authentication buffer overflow that allows an unauthenticated, remote attacker to execute arbitrary code with root privileges on affected devices.

CVE-2026-41940 cPanel & WHM Authentication Bypass Overview and Takeaways
cPanel has disclosed a critical authentication bypass vulnerability affecting cPanel & WHM and WP Squared, tracked as CVE-2026-41940 (CVSS 9.8). The flaw allows a remote, unauthenticated attacker to gain root-level administrative access by injecting arbitrary values into a server-side session file, effectively bypassing all credential checks.

Walking Through an Attack Path with ForceHound
In Part 2 of the series, Weylon covers how to use ForceHound to visualize Salesforce attack paths in BloodHound CE, identify transitive privilege escalation, and legacy Connected App exposures.