GPU Cracking: Setting up a Server
Last week Karl Fosaaen described in his blog the various trials and tribulations we went through at a hardware level in building a dedicated GPU cracking server. This week I will be doing a complete walkthrough for installing all the software that we use on our box. This includes the operating system, video drivers, oclHashcat-plus, and John the Ripper. Because we have AMD video cards, the driver installation and compiling John the Ripper sections will be tailored for AMD, sorry Nvidia users.
Installing the OS:
For an operating system, Linux and Windows are going to be the way to go. For a headless server however, Linux is the best way to go. The only downside with Linux is that driver support among video cards, especially AMD, is somewhat lacking to its Windows counterpart. However, the good news is that both AMD and Nvidia have been increasing their support for Linux drivers in recent years.
Any Linux distribution will do, but for our server, we opted for Ubuntu 12.10 64-Bit server edition to do the most minimal setup. Much of the information for the next few sections is from the hashcat wiki.
To start off, download the Ubuntu 12.10 server edition ISO from Ubuntu. We don’t have a cd drive on our server, so we had to copy the ISO to a flash drive. YUMI and UNetbootin make this process painless on Windows and Linux, respectfully. Otherwise, the ISO can be burned to a disc.
Boot up the Ubuntu image, choose your language, and select Install Ubuntu Server.

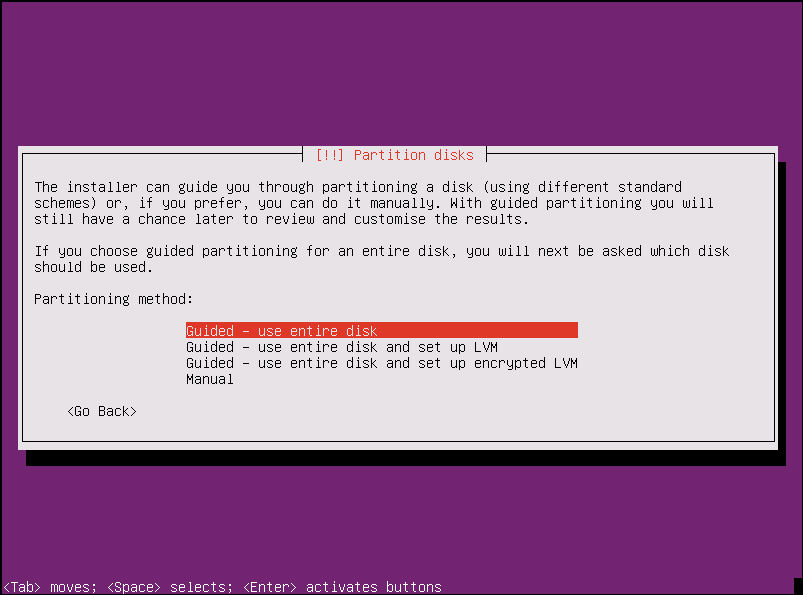
Navigate through the installation options and select your preferences. For most people, the defaults should be sufficient. Then create your user when the dialog comes up. When the installation reaches the “Partition Disks” section, either manually set them up (if you know what you’re doing) or just use the “Guided – use entire disk” option. We choose not to use LVM on our box, but the option is up to you.
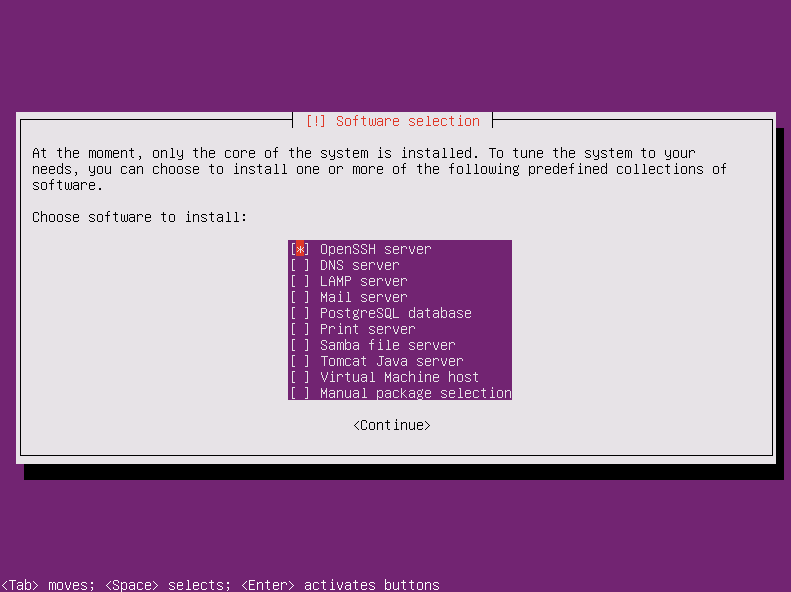
After you are done partitioning your hard drive, write the changes to the disc. If you have an HTTP proxy, enter the information when the dialog appears. If not, then just continue. Next, select if you would like to have automatic updates enabled. We opted not to, but it’s entirely up to you. When the software selection appears, select OpenSSH server by navigating to it with the arrow keys and pressing spacebar to select the option.
None of the other packages are required unless you need them. Press enter to install the software. When the installation is finished, install GRUB to the master boot record and reboot. You should now be booted into your new Ubuntu server!
Setting Up Ubuntu:
Before we install the video drivers, we have to setup our Ubuntu server with X11. This is because the AMD drivers require X11 to interact with video cards to obtain fan speeds and GPU temps, which are very important to know when cracking away.
To begin, ssh into your server and update Ubuntu with the following command:
sudo apt-get update && sudo apt-get upgrade
After Ubuntu has updated, we will need to install a minimal X11 environment that our user can automatically login to when the server is rebooted. This is to ensure that the xserver will always be running and in turn allow continuous cracking without any hiccups.
To keep it simple, a light weight window manager is recommend. Openbox, fluxbox, and blackbox are three simple light weight window managers that we can use. You are by no means restricted to a window manager. If you want gnome, xfce, or kde, those can be installed too. For this installation, we will install fluxbox with lightdm as the display manager. To install these, run the following command:
sudo apt-get install fluxbox lightdm-gtk-greeter x11-utils
This should install all the necessary packages for an X11 environment to run. Now that we have an X11 environment installed, we need to let applications from the console know which display we are using. To do this, we set the DISPLAY variable to our current display. The format for the DISPLAY variable is hostname:display. For a local instance, the hostname can be omitted. The default display is usually going to be 0. Run the command below to set your current display to 0.
export DISPLAY=:0
Add the above command to your bashrc to make it persistent whenever your user logs in. I have run into many issues because I did not have this set. So make sure your bashrc is setup with your correct display location.
Now that our X11 environment is setup, we can install the AMD drivers.
Installing AMD Drivers:
To begin installing the AMD drivers, we need to install some prerequisites. First install unzip with the following command
sudo apt-get install unzip
Next, we need to install the dependencies for fglrx, which is the proprietary Linux driver for AMD on Ubuntu’s repositories. The only difference between fglrx and AMD’s Catalyst drivers is that the latter is newer, but they both require the same dependencies. Run the following command to install the fglrx dependencies:
sudo apt-get build-dep fglrx
If the fglrx dependencies are not installed, the AMD driver installation will fail with this fglrx error:

Now we can grab the latest version of the AMD Catalyst drivers from the AMD Catalyst™ Proprietary Display Driver page.
The latest version at this time is 13.1. It should also be noted that oclHashCat-plus requires a specific version of Catalyst installed, which at this point is 13.1. So we’re good there.
Fetch the AMD driver with wget and then unzip it:
wget https://www2.ati.com/drivers/linux/amd-driver-installer-catalyst-13.1-linux-x86.x86_64.zip
unzip amd-driver-installer-catalyst-13.1-linux-x86.x86_64.zip
There should now be a .run file in the directory. Execute the file while running as root.
sudo sh amd-driver-installer-catalyst-13.1-linux-x86.x86_64.run
Select the default options on all the dialog boxes and let the driver install.
After it is done, create a new xorg.conf by running:
sudo amdconfig –adapter=all –initial -f
Then we are going to setup our user to automatically login to fluxbox when the server boots up.
Open the lightdm.conf file in /etc/lightdm/ as root and add the following lines:
[SeatDefaults]
greeter-session=lightdm-gtk-greeter
user-session=fluxbox
autologin-user=USER
autologin-user-timeout=0
Reboot the server and your user should be automatically logged into fluxbox.
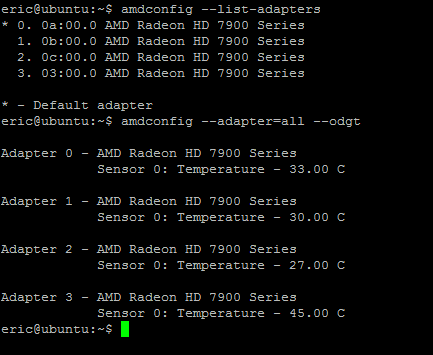
When the server boots up run
amdconfig –list-adapters
and
amdconfig –adapter=all –odgt
to verify that all your cards and their temperatures can be seen.
Now that the AMD drivers are installed, we can install our cracking software.
Installing oclHashcat-plus
Download the latest oclHashcat-plus. We will just wget the latest version to our box.
wget https://hashcat.net/files/oclHashcat-plus-0.14.7z
oclHashcat-plus comes in a 7z format. So we need to install p7zip to extract it.
sudo apt-get install p7zip
Run p7zip with the –d flag to extract a 7z file.
p7zip -d oclHashcat-plus-0.14.7z
Navigate to the newly extracted ocl directory and run one of the Example.sh scripts to test run the cracking process.
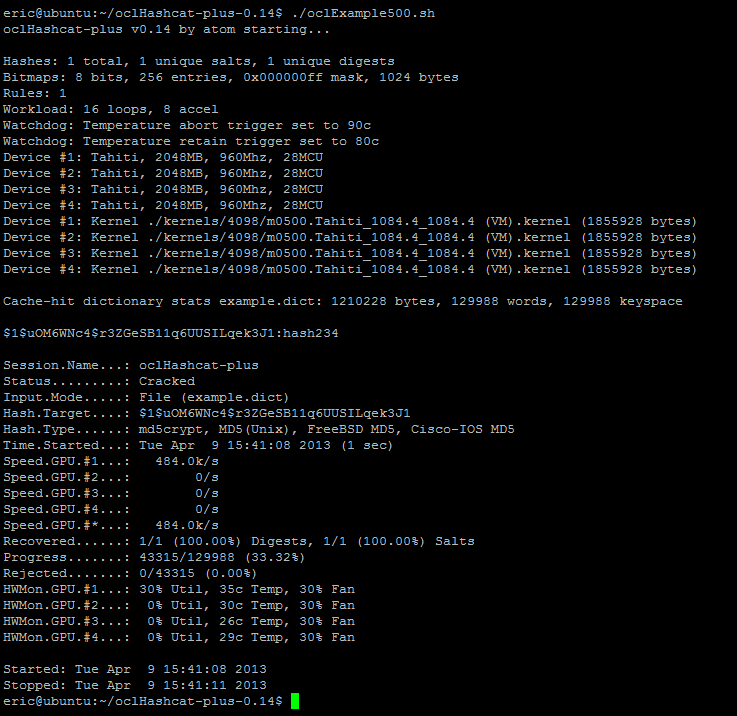
If all goes well you should see your cards loading up and the hash getting cracked! If you do not see all your cards being recognized, make sure that your xorg.conf was created properly. Try running the amdconfig command above again to regenerate an xorg.conf.
Next we will install John the Ripper with OpenCL support
Installing John the Ripper
Like oclHashcat-plus, John also supports cracking hashes on GPUs, but it must be compiled with the options to do so. Much of the information here is taken from the john GPU wiki (https://openwall.info/wiki/john/GPU).
First download the Accelerated Parallel Processing SDK from AMD. 32 bit and 64 bit are supported, so make sure you download the correct one for your architecture.
Copy the file to your server with scp or if you’re on Windows, WinSCP.
Next, extract the APP SDK file.
tar xvf AMD-APP-SDK-v2.8-lnx64.tgz
Then run the Install-AMD-APP.sh as root.
sudo ./Install-AMD-APP.sh
Reboot the server.
After the APP SDK has been installed, download the latest version of John. We will be using the jumbo version.
wget https://www.openwall.com/john/g/john-1.7.9-jumbo-7.tar.gz
Extract john with the following command:
tar xvf john-1.7.9-jumbo-7.tar.gz
Next, install the libssl-dev package from apt-get so that John compiles correctly.
sudo apt-get install libssl-dev
Navigate to the john src directory. Compile john with OpenCL for either 32 bit or 64 bit with
make linux-x86-opencl
and
make linux-x86-64-opencl
respectfully. John can also be compiled with CUDA support if you have Nvidia cards. The information on how to do that is located on their wiki.
If you get openssl headers not found during compilation, install the libssl-dev package.
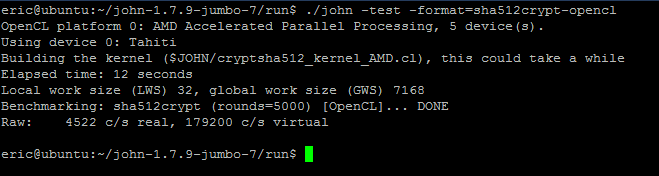
Navigate back to the run directory and your newly compiled john binary should be there. You can test that John can use your GPUs by running a test command.
Conclusion
This is guide details one of many possible setups for a GPU cracking server. When all is done, our cracking server built with these specifications works very well. In Karl’s blog here, he describes common ways to obtain hashes to crack on Windows, Linux, and web applications.