Four Ways to Bypass iOS SSL Verification and Certificate Pinning
A couple months ago, Cody Wass released a blog on how to bypass SSL verification and certificate pinning for Android. I thought it would be a great idea to write up some techniques that I’ve found to work well for iOS. To reiterate from Cody’s blog, being able to perform man-in-the-middle (MITM) attacks is a crucial part of any standard penetration test. This allows us to intercept and fuzz all HTTP requests and find any security vulnerabilities. In the examples below, I will be using Burp Suite as my web proxy. This blog assumes that the reader is somewhat familiar with iOS, Xcode, and setting up their phone and Burp to intercept mobile HTTP traffic in iOS. In this blog Ill cover the following four techniques to bypass SSL verifification and certificate pinning in iOS:
- Installing your own CA
- Installing Software to iOS Device
- Using Objection and Frida
- Using disassemblers to modify IPA file
Technique 1 – Installing Your Own CA
Installing your own CA is the first step to getting rid of SSL errors. Installing your CA is relatively easy inside of iOS. The first step is to get the CA onto the device. This could be done through opening an email attachment or downloading the certificate. First off, configure your mobile device and web proxy to be able to intercept web traffic. Specifically, for Burp Suite, you can simply browse to https://burp and click on “CA Certificate”.
Next you will be prompted to “Install” the certificate as seen below.
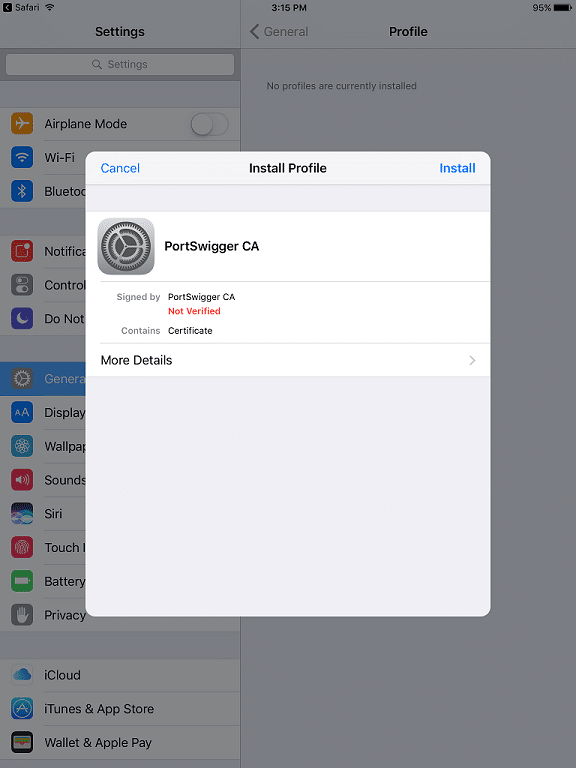
Clicking on install prompts a warning that the certificate you are going to install will be added to the list of trusted certificates.
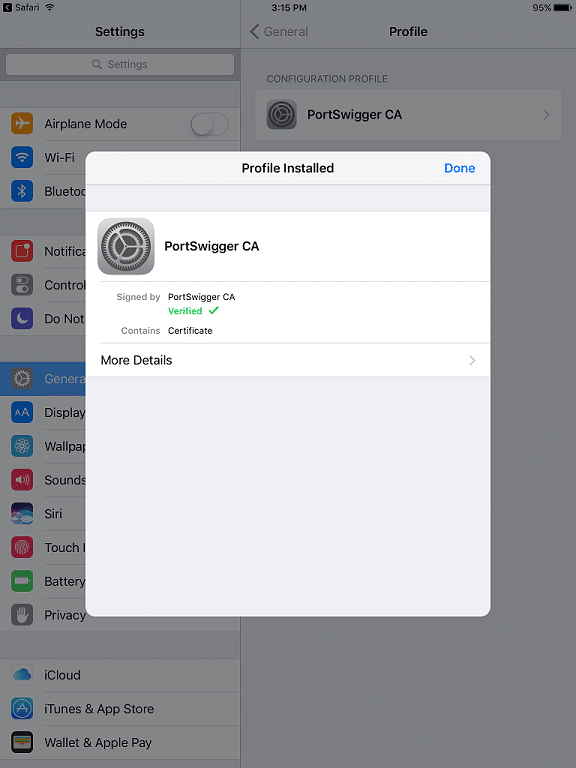
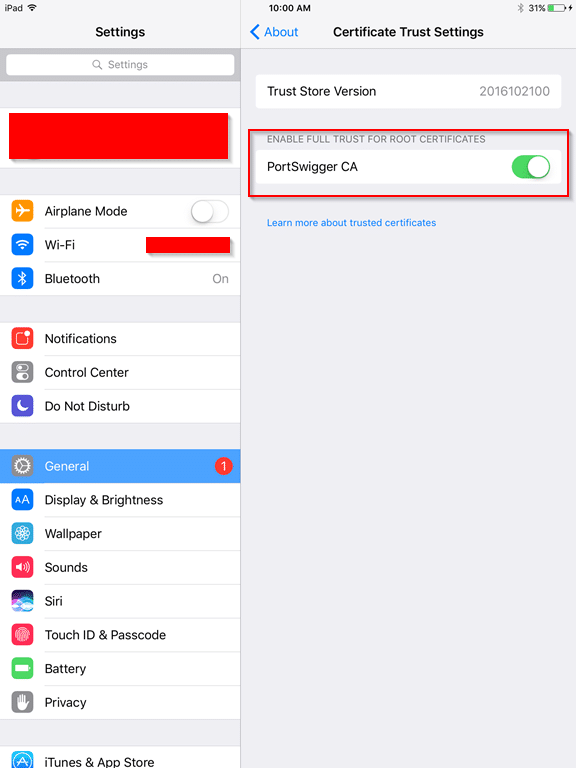
You can verify that the certificate is installed by going into Settings > General > Profile. In iOS 10.3 and later, you will need to manually trust the installed certificate by going to Settings > General > About > Certificate Trust Settings and enable trust for that certificate.
Technique 2 – Installing Software to iOS Device
If you’re still getting SSL errors, or the application itself dies waiting for a connection, there is a chance the application server is using some sort of TLS chain validation or SSL certificate pinning. The simplest method to bypass SSL certificate pinning is to install software that does all the hard work for us. The tools listed below are easy to setup and get running.
Installation instructions are listed on each of the webpages. However, with these methods, a jailbroken iOS device is required. In recent years, having a jailbroken device with the current iOS version has become increasingly difficult.
Technique 3 – Using Objection and Frida
Another proven method is to use Frida hooks and Objection. At a very high-level, Frida is a framework that allows you to interfere with an application’s code at runtime. Specifically, interfering with the logic behind certificate validation. This is limited to using jailbroken devices. However, we can use the Frida Gadget, which has the full arsenal of the framework, but we do not need a jailbroken device. Even more good news, Objection is a wrapper for this framework and will do all the hard work for us!
First off, you will need a valid provisioning profile and a code-signing certificate from an Apple Developer account. You can create a valid provisioning profile by creating a test application within Xcode and you can register for a free developer account here.
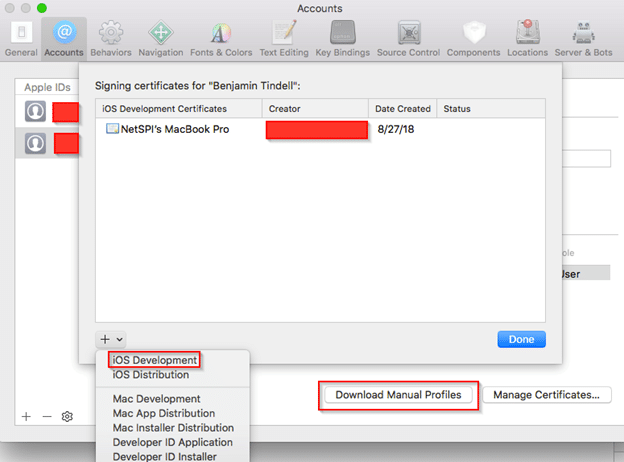
Once the test project is created, the next step is to setup the code-signing certificate. First, open Xcode preferences and then select “Accounts”. To add your Apple ID account click on the plus sign in the lower left-hand corner and sign into your account. Next click on “Manage Certificates” in the lower right-hand corner.
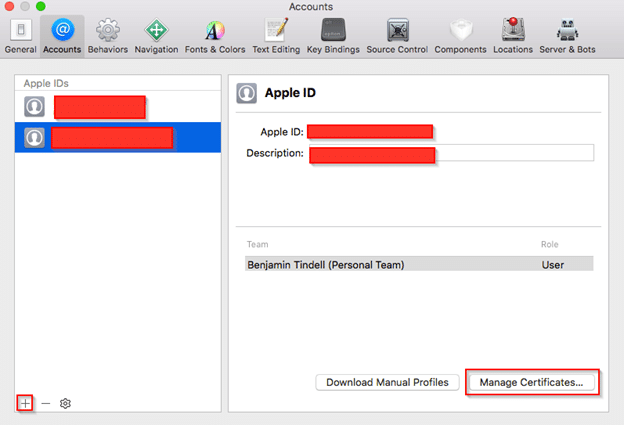
Clicking on that button brings us to the screen below. To create a certificate, click on the plus sign in the lower left-hand box and select “iOS Development”. Once that loads, click “Done” and then “Download Manual Profiles” which then loads the certificate onto the computer.
Once you have the code-signing certificate loaded onto your computer, you can find it by running the following command:
NetSPIs-MacBook-Pro:Test netspi$ security find-identity

Policy: X.509 Basic
Matching identities
1) A[REDACTED]1 "iPhone Developer: [REDACTED]@netspi.com ([REDACTED])"
2) 0[REDACTED]C "iPhone Developer: [REDACTED]@netspi.com ([REDACTED])"
2 identities found

Valid identities only
1) A[REDACTED]1 "iPhone Developer: [REDACTED]@netspi.com ([REDACTED])"
2) 0[REDACTED]C "iPhone Developer: [REDACTED]@netspi.com ([REDACTED])"
2 valid identities found
We want to load the Frida Gadget dynamic library to be able to modify the application at runtime. In the context of an iOS application, we want to extract the IPA file, modify the binary to load the FridaGadget.dylib, code-sign the binary and dylib, then repackage the updated IPA file. As mentioned previously, we can use Objection to automatically do all this work. This can be done with the simple command below where -s is the IPA file and -c is the code-signing certificate.
NetSPIs-MacBook-Pro:NetSPI netspi$ objection patchipa -s netspi_test.ipa -c 0[REDACTED]C
Using latest Github gadget version: 12.0.3
Remote FridaGadget version is v12.0.3, local is v12.0.1. Downloading...
Downloading from: https://github.com/frida/frida/releases/download/12.0.3/frida-gadget-12.0.3-ios-universal.dylib.xz
Downloading iOS dylib to /Users/netspi/.objection/ios/FridaGadget.dylib.xz...
Unpacking /Users/netspi/.objection/ios/FridaGadget.dylib.xz...
Cleaning up downloaded archives...
Patcher will be using Gadget version: 12.0.3
No provision file specified, searching for one...
Found provision file /Users/netspi/Library/Developer/Xcode/DerivedData/test-fbleootdcdwdyafhyzjmvihvfiga/Build/Products/Debug-iphoneos/test.app/embedded.mobileprovision expiring in 307 days, 1:40:03.015176
Found a valid provisioning profile
Working with app: NetSPI.app
Bundle identifier is: com.netspi.test
Codesigning 13 .dylib's with signature 0[REDACTED]C
Code signing: libswiftDarwin.dylib
Code signing: libswiftUIKit.dylib
Code signing: libswiftCoreImage.dylib
Code signing: libswiftos.dylib
Code signing: libswiftObjectiveC.dylib
Code signing: libswiftCoreGraphics.dylib
Code signing: FridaGadget.dylib
Code signing: libswiftCore.dylib
Code signing: libswiftCoreFoundation.dylib
Code signing: libswiftMetal.dylib
Code signing: libswiftQuartzCore.dylib
Code signing: libswiftFoundation.dylib
Code signing: libswiftDispatch.dylib
Creating new archive with patched contents...
Codesigning patched IPA...
Cannot find entitlements in binary. Using defaults

Copying final ipa from /var/folders/1k/mw7w1kfd4c96jkvkw5mp3qfm0000gn/T/netspi_test-frida-codesigned.ipa to current directory...
Cleaning up temp files...
Once the command has finished running, we have a new IPA file called netspi_test-frida-codesigned.ipa which we can then use to deploy to the iOS device. There is a handy tool called
ios-deploy which can work with non-jailbroken iOS devices. There are several different options you can use depending on what you want to accomplish e.g.(run a debugger, deploy app over USB, etc.).
To use ios-deploy, unzip the IPA file and run the ios-deploy command. In the example below, I specified I want to deploy the application over USB (-W) and I specified the bundle I want to deploy (-b).
NetSPIs-MacBook-Pro:NetSPI netspi$ ios-deploy -W -b ./Payload/NetSPI.app
[....] Waiting for iOS device to be connected
[....] Using 3ff9c90d2b23beadeefdf7bc240211730c84adef (P105AP, iPad mini, iphoneos, armv7) a.k.a. 'MAPen's iPad'.
------ Install phase ------
[ 0%] Found 3ff9c90d2b23beadeefdf7bc240211730c84adef (P105AP, iPad mini, iphoneos, armv7) a.k.a. 'MAPen's iPad' connected through USB, beginning install
[ 5%] Copying /Users/netspi/test/NetSPI/Payload/NetSPI.app/META-INF/ to device
[TRUNCATED]
[ 52%] CreatingStagingDirectory
[ 57%] ExtractingPackage
[ 60%] InspectingPackage
[ 60%] TakingInstallLock
[ 65%] PreflightingApplication
[ 65%] InstallingEmbeddedProfile
[ 70%] VerifyingApplication
[ 75%] CreatingContainer
[ 80%] InstallingApplication
[ 85%] PostflightingApplication
[ 90%] SandboxingApplication
[ 95%] GeneratingApplicationMap
[100%] Installed package ./Payload/NetSPI.app
Now we have the app installed on our iOS device, next is to open the application and connect to it via Objection.
NetSPIs-MacBook-Pro:NetSPI netspi$ objection explore
_ _ _ _
___| |_ |_|___ ___| |_|_|___ ___
| . | . | | | -_| _| _| | . | |
|___|___|_| |___|___|_| |_|___|_|_|
|___|(object)inject(ion) v1.3.0

Runtime Mobile Exploration
by: @leonjza from @sensepost

[tab] for command suggestions
com.netspi.test on (iPad: 9.0.1) [usb] #
Now all that is left is to run the built-in command that bypasses the certificate validation and you can begin proxying traffic.
com.netspi.test on (iPad: 9.0.1) [usb] # ios sslpinning disable
Job: b748974e-ed6d-4aaf-b5ea-3fb35a13720a - Starting
[3fb35a13720a] [ios-ssl-pinning-bypass] [NSURLSession] Found 1 matches for URLSession:didReceiveChallenge:completionHandler:
[3fb35a13720a] [ios-ssl-pinning-bypass] [NSURLConnection] Found 5 matches for connection:willSendRequestForAuthenticationChallenge:
[3fb35a13720a] [ios-ssl-pinning-bypass] Hooking lower level method: SSLSetSessionOption
[3fb35a13720a] [ios-ssl-pinning-bypass] Hooking lower level method: SSLCreateContext
[3fb35a13720a] [ios-ssl-pinning-bypass] Hooking lower level method: SSLHandshake
Job: b748974e-ed6d-4aaf-b5ea-3fb35a13720a - Started
Technique 4 – Using disassemblers to modify IPA file
If the above techniques fail, or you would like to try something more difficult, there is always the option to use disassemblers to be able to modify the IPA file to bypass any certificate validation. Disassembling an iOS application is out of scope for this blog, but some of the more common disassemblers are Hopper and IDA. Once the binary has been loaded into the application, following the logic behind what functions are called when the mobile application attempts to make an SSL connection with the application server can point you in the right direction of where the certificate pinning is taking place. Modifying the IPA will most likely break the signed application and it cannot be installed on an iOS device. Resigning the IPA file will allow you to install the mobile app.
Conclusion
Being able to view and modify HTTP requests sent to the server from the mobile application is an essential part of any penetration test. This allows us testers to get an inside view of how application functionality works. The methods described in this blog are the ones we use during our assessments to view and manipulate traffic when presented with SSL certificate errors and pinning. If you have any questions or have techniques that work for you, comment below!
References
- https://www.nccgroup.trust/us/about-us/newsroom-and-events/blog/2015/january/bypassing-openssl-certificate-pinning-in-ios-apps/
- https://dji.retroroms.info/howto/iosfrida
* Edit 10/18/18: Added additional step to technique 1 for iOS 10.3 and later.