Windows Events, Sysmon and Elk…oh my! (Part 2)
Overview
In the previous post we walked through on how to setup an ELK instance and forward event logs using Winlogbeat. If you haven’t setup an ELK instance, I would first read the previous blog post Windows Events, Sysmon and Elk…oh my! and get an instance of ELK running. If you are just setting up ELK, don’t worry about setting up Winlogbeat as referenced in the article. We will be making specific configuration changes for Winlogbeat for forwarding events. In this post, we will be working through:
- Setting up a log collector for Windows Event Forwarding
- Creating a GPO to support Windows Event Forwarding
- Creating a GPO to deploy SYSMON
- Creating event subscriptions
- Forwarding events using Winlogbeat to ELK
- Generating events
Disclaimer: Prior to beginning, you should already be familiar with creating and configuring Group Policy Objects. It is also recommended that you work through the instructions referenced in a lab environment.
Environment
Much like my lab environment described in the previous post, I am running Hyper-V with two Windows 10 hosts, two Windows 2012 Servers, and an Ubuntu Server 16.04.3. I setup the Windows hosts into a small Windows Domain . I have tested the same setup with VMware Workstation and things worked just fine.
1. Log Collector Setup
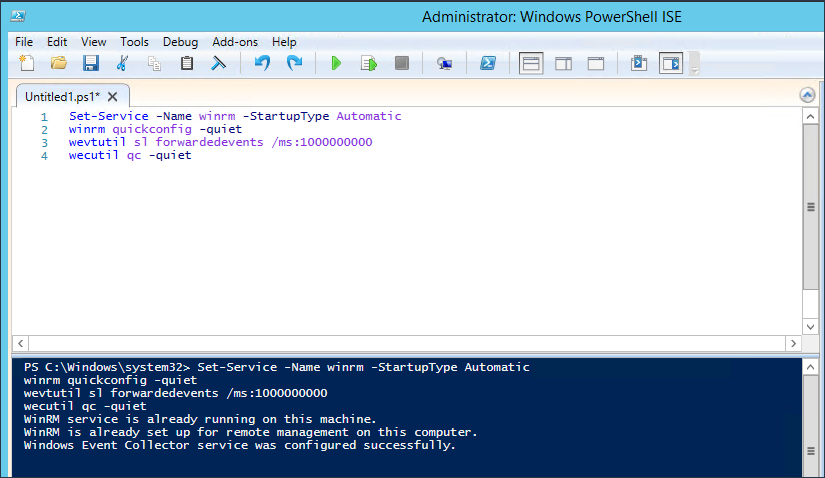
I have seen several blogs describing how to setup log collectors, but probably the best article I have seen to date is Jessica Payne’s Microsoft Virtual Academy video entitled Event Forwarding and Log Analysis. I highly recommend watching the video as it will provide additional context for event forwarding. I will borrow from Jessica’s instructions and have you run the following commands from an elevated command prompt on the server you wish to be your log collector.
Set-Service -Name WINRM -StartupType Automatic
WINRM quickconfig -quiet
wecutil qc -quiet
To quickly break down what is going on, the commands setup WINRM to run on system startup, configures the machine to accept WS-Management requests, and configure the Windows Event Collector service. Surprisingly enough that is ALL that is needed to setup a Windows log collector.
Depending on the size of your environment, you will likely need to expand the size of the Forwarded Events log. This can be done by issuing the following command from an elevated command prompt to allow the log to grow to 1 GB.
wevtutil sl forwardedevents /ms:1000000000
In a future blog post we might get into specifics about log event size and setting up custom log event buckets, but that will be outside the scope of this post. You can deep dive into this topic here:
2. Winlogbeat Setup
Links:
- Winlogbeat – https://www.elastic.co/downloads/beats/winlogbeat
Winlogbeat will be used to forward collected events to the ELK instance. Download a copy of Winlogbeat and place the unzipped folder on the Desktop. Now edit the winlogbeat.yml within the Winlogbeat folder to include capturing Sysmon events, disabling Elasticsearch locally, and forwarding Logstash output to the Ubuntu Sever. The following snippets will show you what to edit.
Winlogbeat specific options – Before
winlogbeat.event_logs:
  - name: Application
    ignore_older: 72h
  - name: Security
  - name: System
We will remove all other specified log files and specify the Forwarded Events log.
Winlogbeat specific options – After
winlogbeat.event_logs:
  - name: ForwardedEvents <strong><--- Add this </strong>
Elasticsearch output – Before
output.elasticsearch:
  # Array of hosts to connect to.
  hosts: ["localhost:9200"]

  # Optional protocol and basic auth credentials.
  #protocol: "https"
  #username: "elastic"
  #password: "changeme"
Elasticsearch output – After
#output.elasticsearch: <strong><--- Comment this out </strong>
  # Array of hosts to connect to.
  # hosts: ["localhost:9200"] <strong><--- Comment this out</strong>

  # Optional protocol and basic auth credentials.
  #protocol: "https"
  #username: "elastic"
  #password: "changeme"
Logstash output – Before
#output.logstash:
  # The Logstash hosts
  #hosts: ["localhost:5044"]

  # Optional SSL. By default is off.
  # List of root certificates for HTTPS server verifications
  #ssl.certificate_authorities: ["/etc/pki/root/ca.pem"]

  # Certificate for SSL client authentication
  #ssl.certificate: "/etc/pki/client/cert.pem"

  # Client Certificate Key
  #ssl.key: "/etc/pki/client/cert.key"
Logstash output – After
output.logstash: <strong><--- Uncomment this</strong>
  # The Logstash hosts
  hosts: ["UbunterServerIPAddressHere:5044"]<strong> <--- Uncomment this and add IP Address for your Ubuntu Server</strong>

  # Optional SSL. By default is off.
  # List of root certificates for HTTPS server verifications
  ssl.certificate_authorities: ["C:/Users/username/Desktop/winlogbeat/ELK-Stack.crt"] <strong><--- Uncomment this and add path to the ELK cert</strong>

  # Certificate for SSL client authentication
  #ssl.certificate: "/etc/pki/client/cert.pem"

  # Client Certificate Key
  #ssl.key: "/etc/pki/client/cert.key"
We now need to get a copy of the SSL certificate created during the ELK installation using PSCP.exe. The following command can be used, but you will replace the relevant areas with the correct usernames and IP address.
Links:
PSCP.EXE username@IPAddress:/etc/pki/tls/certs/ELK-Stack.crt C:\Users\Username\Desktop\winlogbeat\ELK-Stack.crt
Now we can install Winlogbeat.
Install Winlogbeat
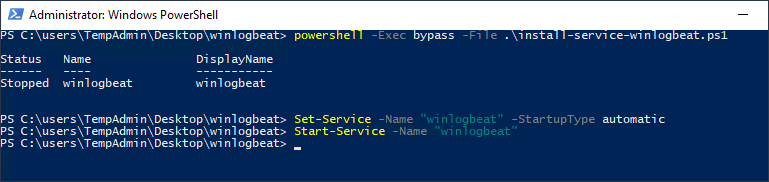
From an administrator PowerShell prompt, navigate to the Winlogbeat folder on your desktop and issue the following commands:
powershell -Exec bypass -File .\install-service-winlogbeat.ps1
Set-Service -Name "winlogbeat" -StartupType automatic
Start-Service -Name "winlogbeat"
Now that the service is running, all events that are sent to the Forwarded Events Log will be sent to the ELK instance. First, we need to setup some GPOs and setup subscriptions to tell hosts in the domain what events we want for them to send.
3. Group Policy Objects (GPO)
GPO #1 – Event Log Forwarding
Setting up group policies is critical for our event forwarding to work correctly. The GPO we are about to setup will tell hosts in the domain where to send logs, allow the Network Service to access log data, and configure WINRM to ship off the data and run on startup.
On the domain controller, open an MMC console with the Group Policy Management snap-in console, and create a GPO entitled Event Log Forwarding. I have entitled the GPO Event Log Forwarding because I am extremely creative. Open the GPO for editing and navigate to Computer Configuration –> Policies –> Administrative Templates –> Windows Components –> Event Forwarding.
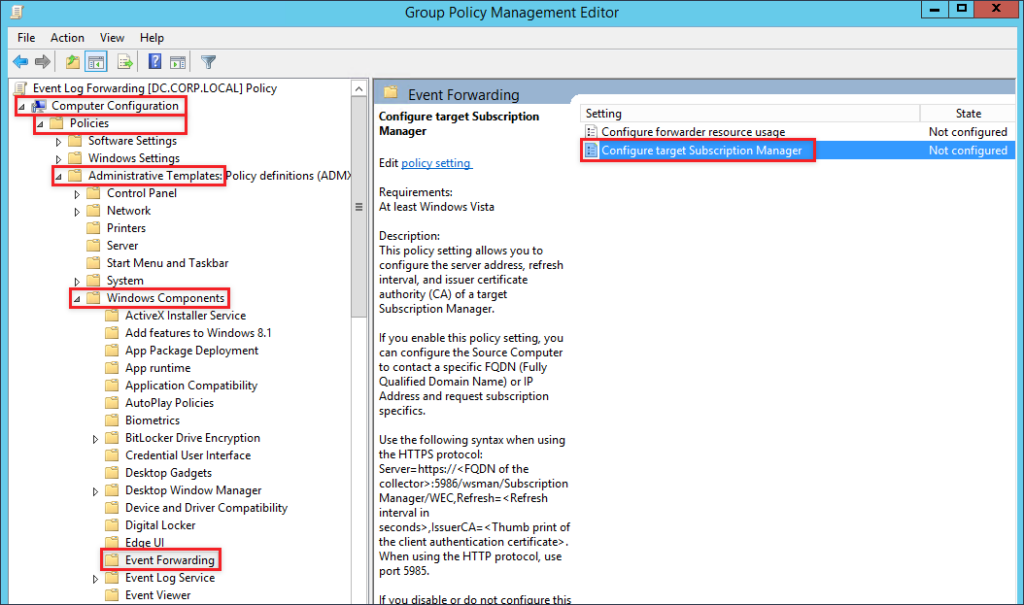
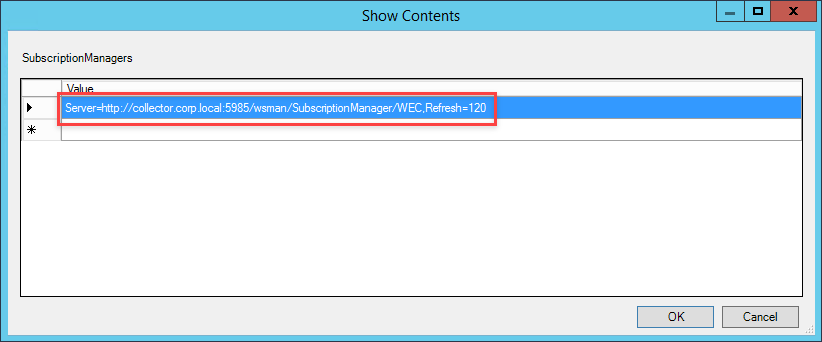
Edit to the value for Configure target Subscription Manager by selecting Enabled and click Show next to SubscriptionManagers.
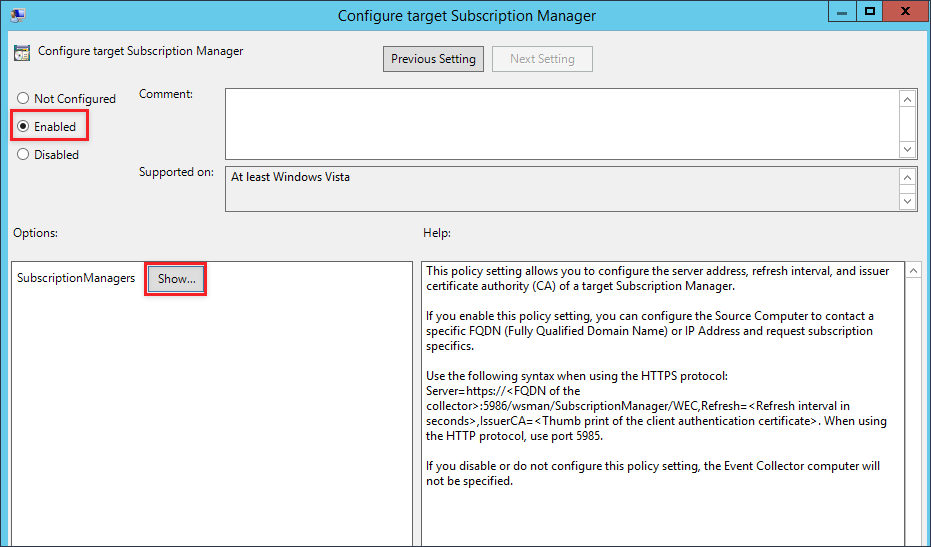
In the new window that will pop up, enter the FQDN for the collector. We will also specify the time interval we want hosts to check in with the collector for subscription information. The refresh interval is in seconds, so this line will require hosts to check in every two minutes.
Server=https://<FQDN of the collecter>:5985/wsman/SubscriptionManager/WEC,Refresh=120
The input should end up looking similar to the screenshot below.
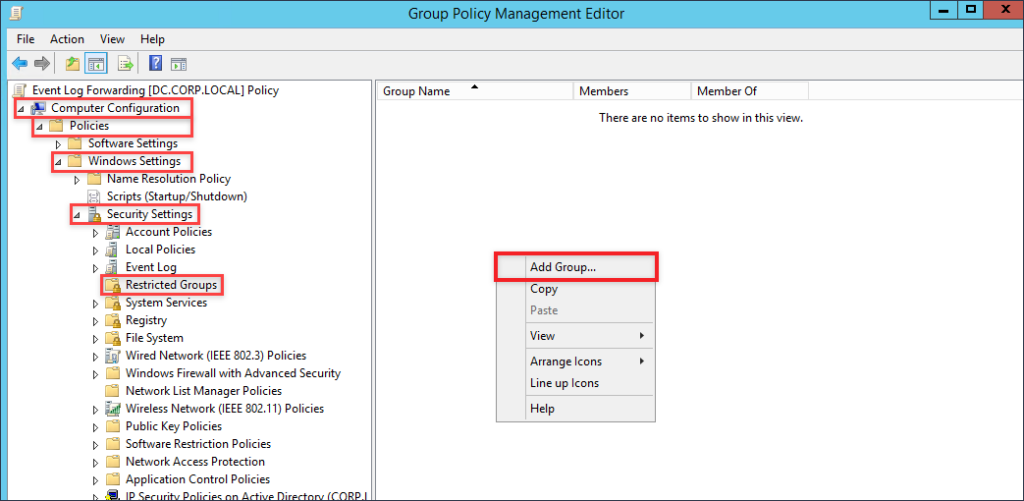
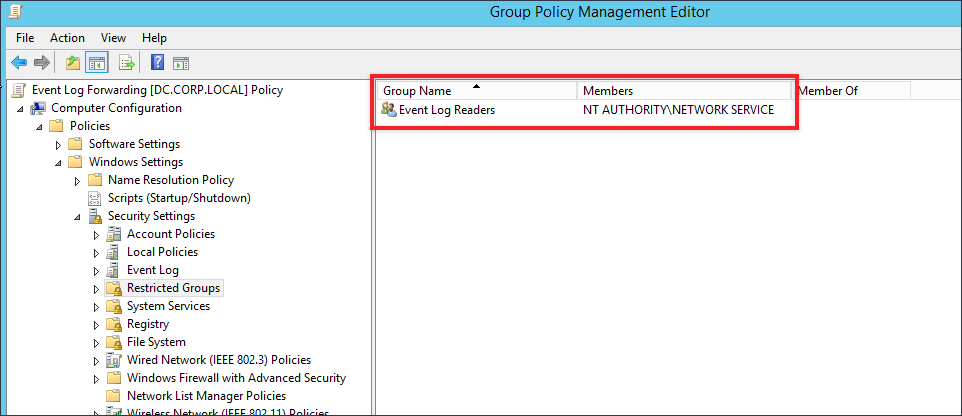
Apply your changes to save the configuration changes you have just made. The next configuration that we will make to this GPO is to give the Network Service user the ability to read event logs. This prevents us from having to use wevtutil to edit permissions on the log file to allow WINRM to read and send log data to the collector. Navigate to Computer Configuration –> Policies –> Windows Settings –> Restricted Groups. Right-click within the window and select Add Group.
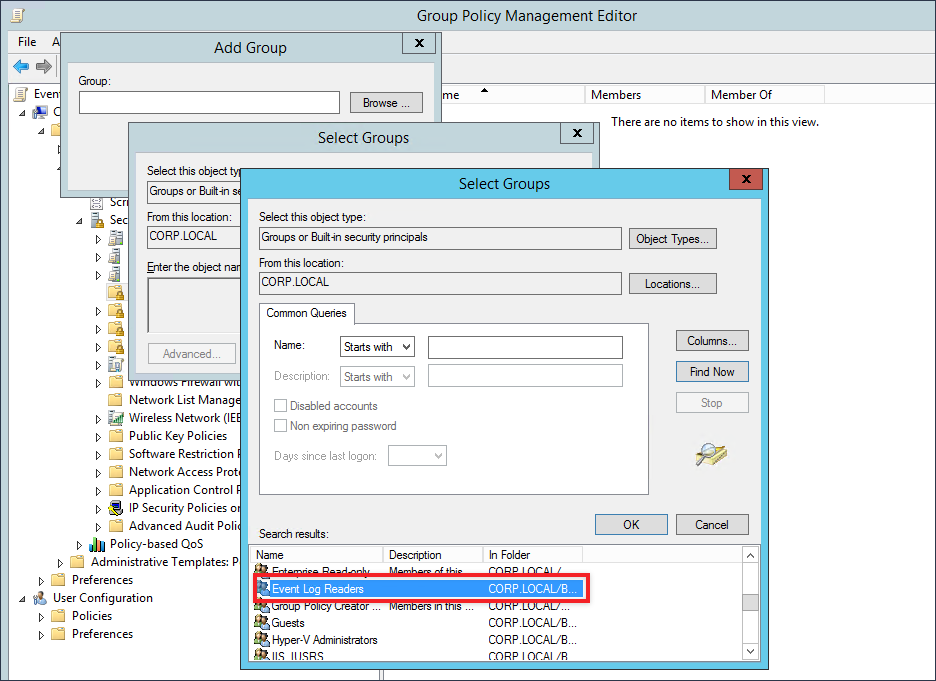
A new window will pop open, click on Browser then on Advanced and finally on Find Now. Select the Event Log Readers group and then click the OK buttons till the Event Log Readers Propertieswindow is displayed.
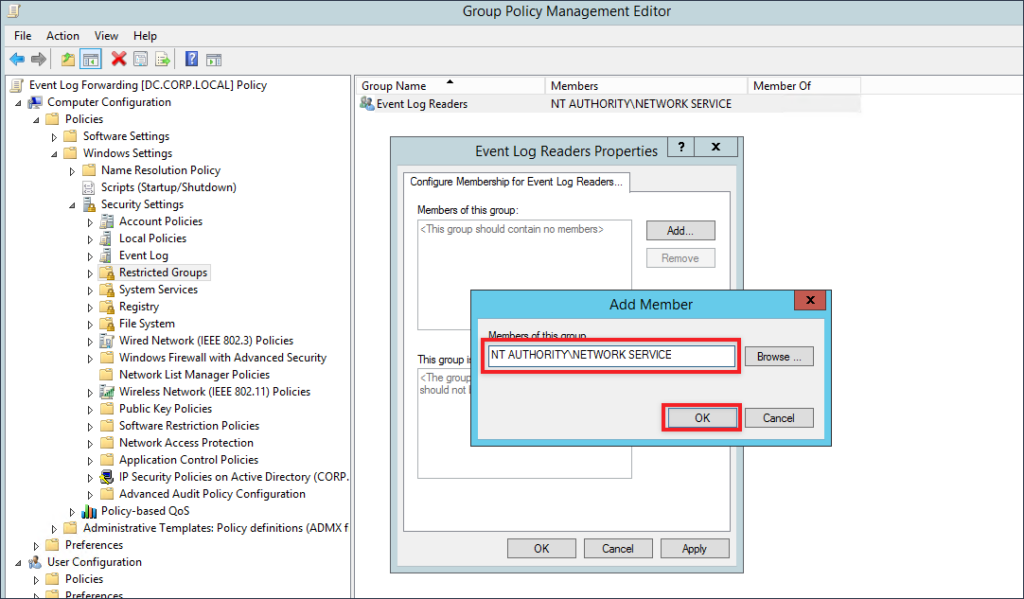
From Event Log Readers Properties click on Add, and within the text box provided type or paste in the following:
NT AUTHORITY\NETWORK SERVICE
Your result should appear like the screen shot below
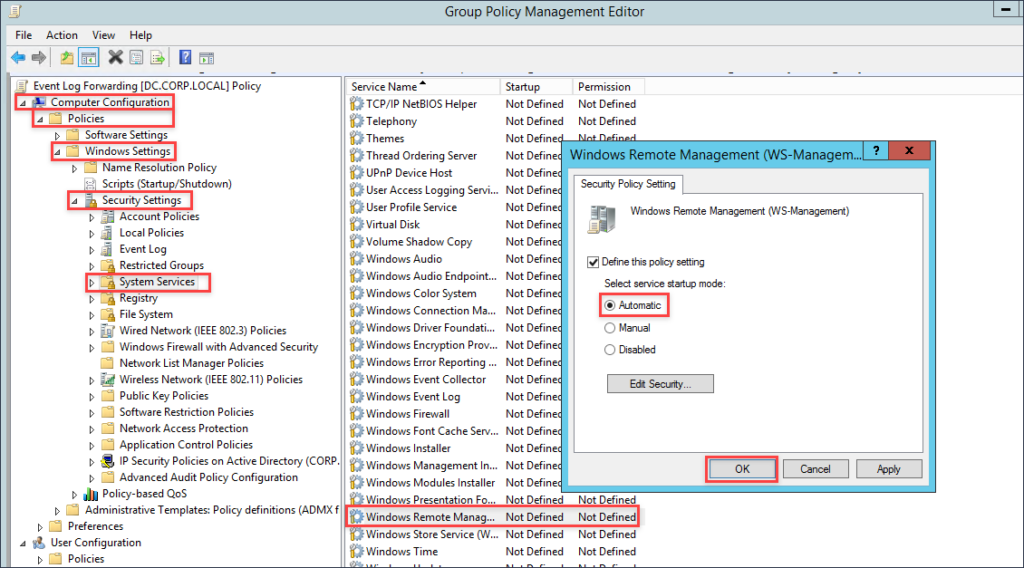
The last thing we will need to do for this GPO is to set WINRM to start automatically. Navigate to Computer Configuration –> Policies –> Windows Settings –> System Services. Find the Windows Remote Management service, and edit it so the Policy is defined and the radial button is set at Automatic.
Now we can begin linking the GPOs to the appropriate groups. In my Windows domain I have three OUs, Domain Controllers, Domain Servers and Domain Workstations with the appropriate hosts assigned in each. You can now link the GPO we have created to the OUs you wish to collect events from.
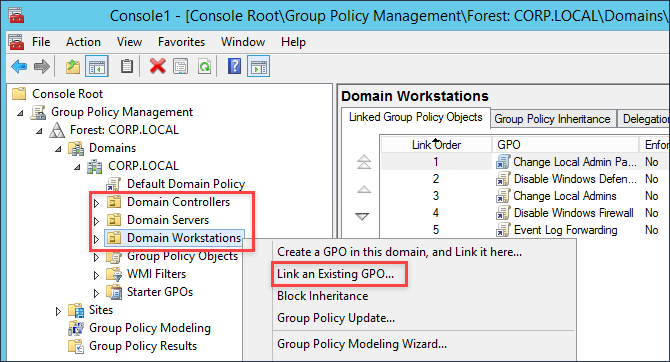
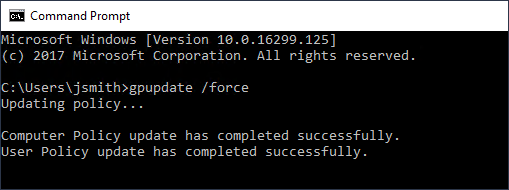
Since I am in a lab environment, I can easily connect to hosts within my OUs and run the command gpupdate /force to quickly apply the GPO.
GPO #2 – Sysmon
Links:
- SYSMON Binary – https://docs.microsoft.com/en-us/sysinternals/downloads/sysmon
- Sysmon config – https://github.com/SwiftOnSecurity/Sysmon-config
- SYSMON Startup Script – https://gist.github.com/silentbreaksec/8972f8c9dce151aebbef0a58313f3971
If you do not have any end point management software, deploying software can become fairly tricky. For deploying SYSMON I have opted to push it out via GPO. The goal will be to create a logon script that will pull the SYSMON binary and the SYSMON config from the SYSVOL folder then copy both locally and initiate the installation.
To prep for the GPO we need to place SYSMON, the SYSMON config, and the startup script within the SYSVOL folder on the domain controller. Yes, you could create a separate folder on a file share, but you need to ensure that the correct permissions are set on that folder so that no regular user can easily write to that location. Since the startup script launches as SYSTEM, this would provide a great way for someone to gain elevated privileges on a host if they are able to replace or backdoor the SYSMON.exe binary. You have been warned.
Within the SYSVOL folder on your Domain Controller, create a new folder entitled Sysmon. Next, download a copy of SYSMON from Microsoft and place both the Sysmon.exe and Sysmon64.exe in the newly created Sysmon folder. Grab a sample Sysmon config from Swift on Security’s GitHub page (@SwiftOnSecurity). Rename the file to Sysmonconfig.xml and make the following edits to enable us to monitor for LSASS events.
Before
<!--Sysmon EVENT ID 10 : INTER-PROCESS ACCESS [ProcessAccess]-->
   <!--EVENT 10: "Process accessed"-->
   <!--COMMENT: Can cause high system load, disabled by default.-->
   <!--COMMENT: Monitor for processes accessing other process' memory.-->
   <!--DATA: UtcTime, SourceProcessGuid, SourceProcessId, SourceThreadId, SourceImage, TargetProcessGuid, TargetProcessId, TargetImage, GrantedAccess, CallTrace-->
   <ProcessAccess onmatch="include">
   </ProcessAccess>
After
<!--Sysmon EVENT ID 10 : INTER-PROCESS ACCESS [ProcessAccess]-->
   <!--EVENT 10: "Process accessed"-->
   <!--COMMENT: Can cause high system load, disabled by default.-->
   <!--COMMENT: Monitor for processes accessing other process' memory.-->

   <!--DATA: UtcTime, SourceProcessGuid, SourceProcessId, SourceThreadId, SourceImage, TargetProcessGuid, TargetProcessId, TargetImage, GrantedAccess, CallTrace-->
   <ProcessAccess onmatch="include">
      <TargetImage condition="is">C:\Windows\system32\lsass.exe</TargetImage>
   </ProcessAccess>
   <!-- Processes that you wish to exclude -->
   <ProcessAccess onmatch="exclude">
      <SourceImage condition="is">C:\Program Files (x86)\VMware\VMware Workstation\vmware-authd.exe</SourceImage>
   </ProcessAccess>
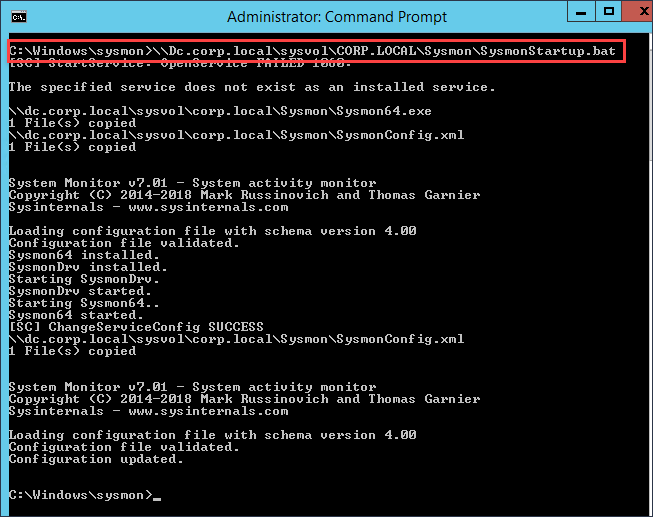
Download a copy of SysmonStartup.bat and change the DC and FQDN to match your domain information. Be careful of spaces when entering the information. After you are done editing the script, pace it in the newly created Sysmon folder.
SysmonStartup.bat- Before
:: Enter the full name of the domain controller, and FQDN for the domain.
:: Be EXTEREMLY careful of spaces!!
:: Example: DC=dc.corp.local
:: Example: FQDN=corp.local

SET DC=
SET FQDN=
SysmonStartup.bat- After
:: Enter the full name of the domain controller, and FQDN for the domain.
:: Be EXTEREMLY careful of spaces!!
:: Example: DC=dc.corp.local
:: Example: FQDN=corp.local

SET DC=dc.corp.local
SET FQDN=corp.local</span
Now that we have all the files within the Sysmon folder within SYSVOL, we can now create the GPO to perform the deployment. Take the following steps to create the GPO:
- Create a new GPO and title it SYSMON Deploy
- Navigate to Computer Configuration –> Policies –> Windows Settings –> Scripts (Startup/Shutdown)
- Right-click on top of Startup and select Properties.
- In the Startup Properties window, click on Add, then on Browser and navigate to the SysmonStartup.bat
- Click the OK buttons to save and close.
- Lastly, linked the GPO to all the OUs you wish to deploy Sysmon to.
Just like before I will login to a host with the applied GPO and run gpupdate /force to apply the newly created Sysmon GPO. We will need to now reboot the host after we apply the GPO to get Sysmon to install. If you are impatient like me, from an administrative command prompt you can run the batch file from the SYSVOL folder on the DC to install Sysmon. You will also take this approach for installing Sysmon onto hosts that rarely reboot.
Note: You will need to either reboot a host with the applied GPO or install Sysmon manually to work through the Event Subscriptions section below.
4. Event Subscriptions
Event subscriptions are the way for the log collector to advertise to hosts which events they should be sending. A few different approaches can be taken for telling hosts within the domain which events to send. We can do a catch-all and have hosts send everything, or we can get pretty specific in telling the hosts to send send only events that match a specified criteria. To specify the criteria we will use XPath queries. XPath queries are alone their own topic of discussion and outside to scope of this article. You can use the links below to deep dive into the topic, but this article will show you how to find events related to Mimikatz and PowerShell network connections below.
- https://blogs.technet.microsoft.com/kfalde/2014/03/24/xpath-event-log-filtering
- https://blogs.technet.microsoft.com/askds/2011/09/26/advanced-xml-filtering-in-the-windows-event-viewer
To create a subscription, open an elevated MMC console on the Windows Server you have configured to be your log collector and add the Event Viewer snap-in. When prompted if you want to connect to another computer, leave the radial button selected for Local computer and proceed through the rest of the prompts.
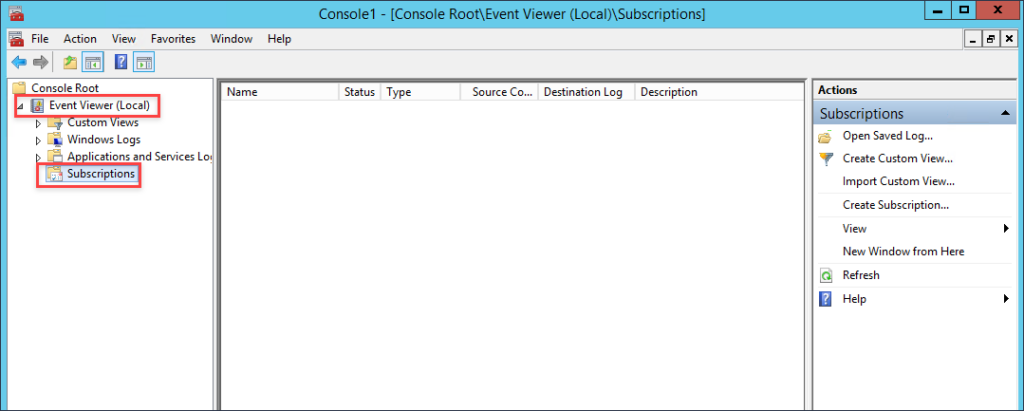
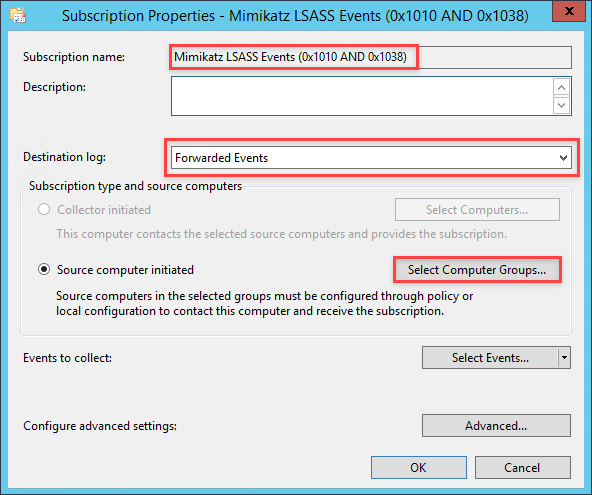
In the far right pane within the MMC window, click on Create Subscription. In the Subscription Name field enter Mimikatz LSASS Events (0x1010 AND 0x1038). Set the destination log to be Forwarded Events. Next, select the radial for Source computer initiated then click the button for Select Computer Groups
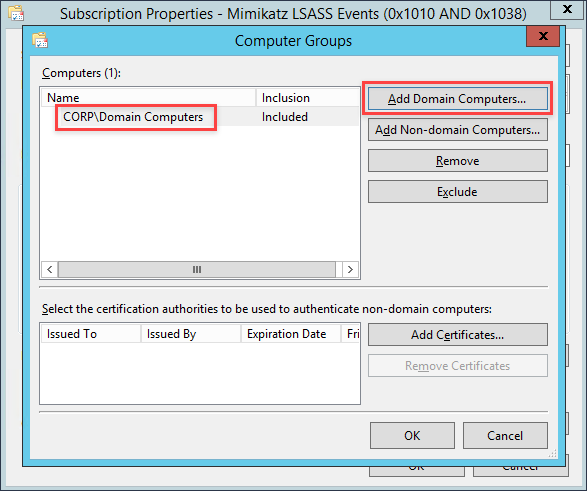
Click on Add Domain Computers and add the group for computers you want to collect Mimikatz events for
Unfortunately we are only able to add computers using group membership and not OUs. (Q: Why is this the case? A: No freaking clue). By default in windows domains all workstations and servers are part of the Domain Computers group. At this point, you can create some group memberships and add computers or you can just choose to add Domain Computers.
After adding the group, click the OK button to close down the Computer Groups window.
In the Subscription Properties window click on Select Events then click on the XML tab.
Near the bottom of the XML tab window, select the checkbox for Edit query manually. A prompt window will open to confirm that you want to manually enter an XPath query. Click Yes to proceed.
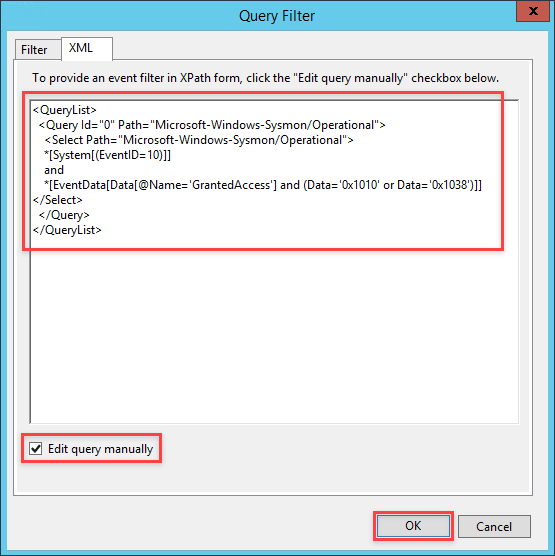
Copy and paste the following XPath query into the text area provided for the query.
Mimikatz XPath Query
<QueryList>
  <Query Id="0" Path="Microsoft-Windows-Sysmon/Operational">
    <Select Path="Microsoft-Windows-Sysmon/Operational">
    *[System[(EventID=10)]]
    and
    *[EventData[Data[@Name='GrantedAccess'] and (Data='0x1010' or Data='0x1038')]]
</Select>
  </Query>
</QueryList>
To describe what is going on with this query, we are looking within the SYSMON event log for Event ID 10, events dealing specifically with LSASS.exe. We will then be looking for when that event data has a specific value for the GrantedAccess field. When Mimikatz dumps credentials from LSASS it will give itself access to LSASS by giving itself PROCESS_QUERY_LIMITED_INFORMATION (0x1000) and PROCESS_VM_READ (0x0010) rights. Combining both values with a bitwise OR operation we end up with a value of 0x1010. If you are curious how I came to this, read the previous blog post about this topic. So as we can see with the XPath query, we will be searching for when GrantedAccess has a value of 0x1010. Now for Pass-The-Hash events, we can search for a value of 0x1038. When Mimikatz performs its PTH operation, it gives itself PROCESS_QUERY_LIMITED_INFORMATION (0x1000), PROCESS_VM_READ (0x0010), PROCESS_VM_WRITE (0x0020) and PROCESS_VM_OPERATION (0x0008). Resulting in a combined value of 0x1038
Click Ok to save the query, and click Ok to close the Subscription Properties window.
How do we know if this subscription is working? If you right-click within the Subscriptions window and select Refresh, the field Source Computers will go from 0 to however many computers you have applied the GPO for Windows Event Forwarding to. In my case, I have 3 hosts that are currently checking in. It may take a minute or two for hosts to check in and pickup the subscription.

5. Generating Events
Link
From a host where Sysmon is installed, we will execute Mimikatz to generate events to ensure they are being collected. However, we will first need to disable Windows Defender to execute Mimikatz.
Disable Windows Defender
Open the MMC console with Administrator access and add the Local Group Policy Object snap-in console. Navigate to Computer Configuration > Administrative Templates > Windows Components > Windows Defender Antivirus. Change the policy for “Turn off Windows Defender Antivirus” to “Enabled” and apply the changes. After you have it disabled, check the running services and ensure that none of the Windows Defender services are running.
Mimikatz
Download a copy of Mimikatz from the link provided above and execute Mimikatz from an elevated command prompt. Once Mimikatz is running issue the following commands.
privilege::debug
token::elevate
sekurlsa::logonpasswords
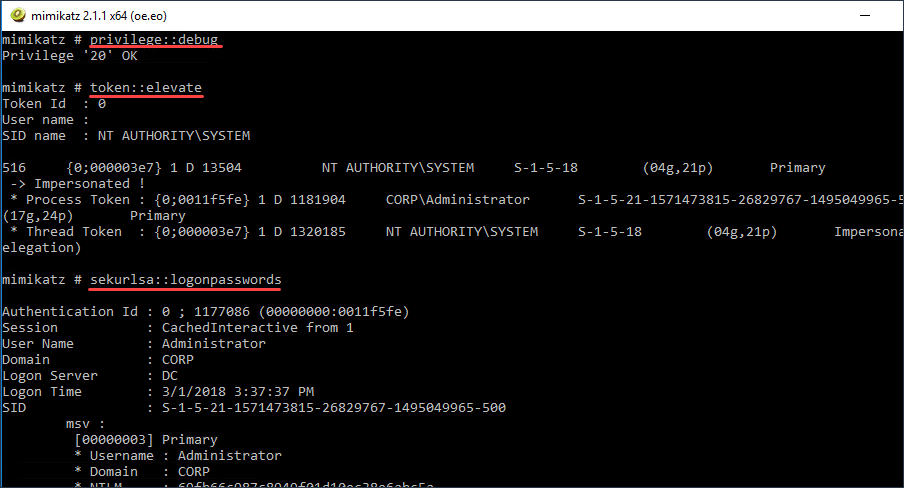
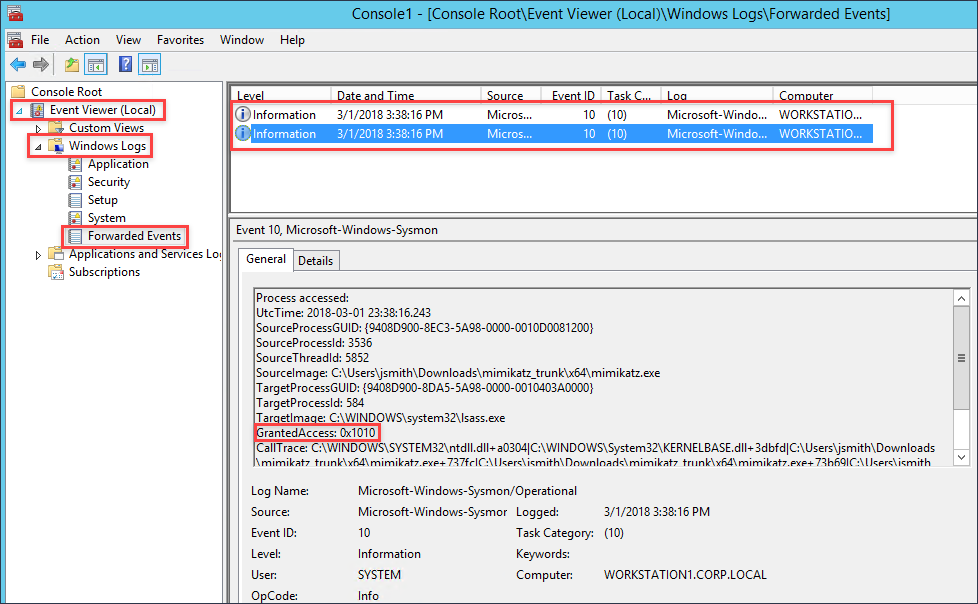
Next, go to the log collector and check the Forwarded Events log file within the event viewer and see the Mimikatz event with the GrantedAccess value of 0x1010.
Now that we have generated an event, we can now open Kibana and search for these events.
6. Defining Search Indexes – ELK
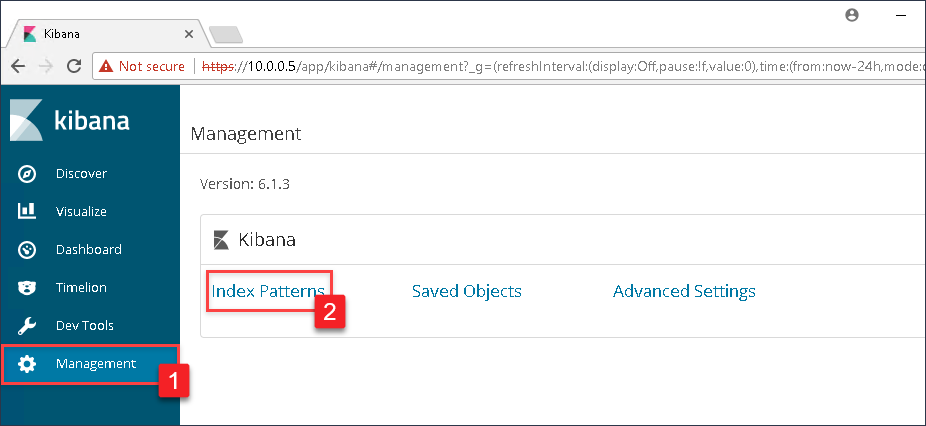
Now that we have events going to the Forwarded Events log, if Winlogbeat was correctly setup then there should be events being sent to our ELK instance. However, to search these log events we need to specify the log files we want to index. Navigate to the IP address of your ELK instance and login with the credentials used during the setup process. Once logged in, click on Management in the left menu, and then select Index Patterns.
In the Index pattern text box, type in winlogbeat*. As you begin to type, Kibana will begin a search of all available indexes and will present a successful message if it sees the Winlogbeat indexes. If successful, click the Next step button.
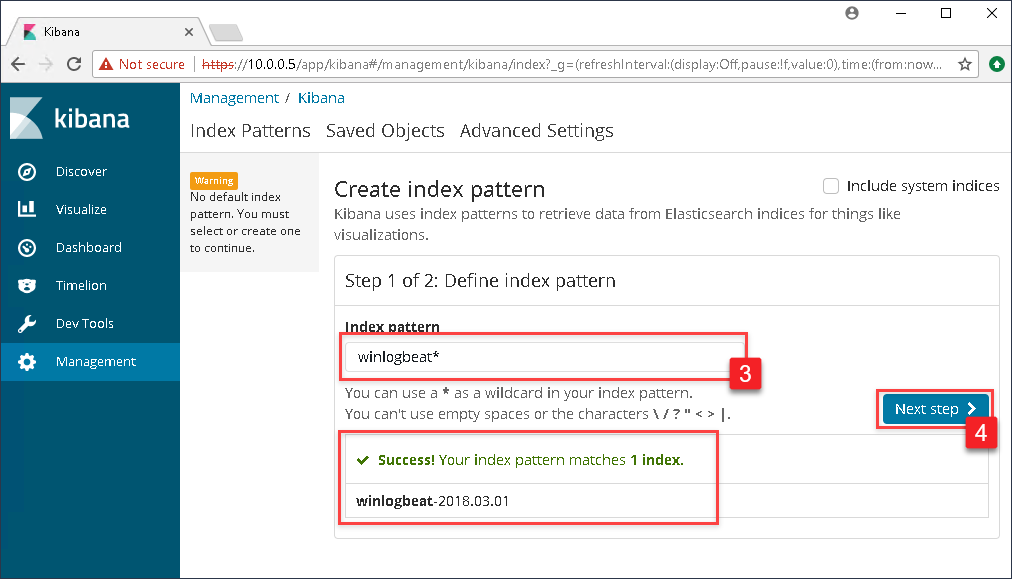
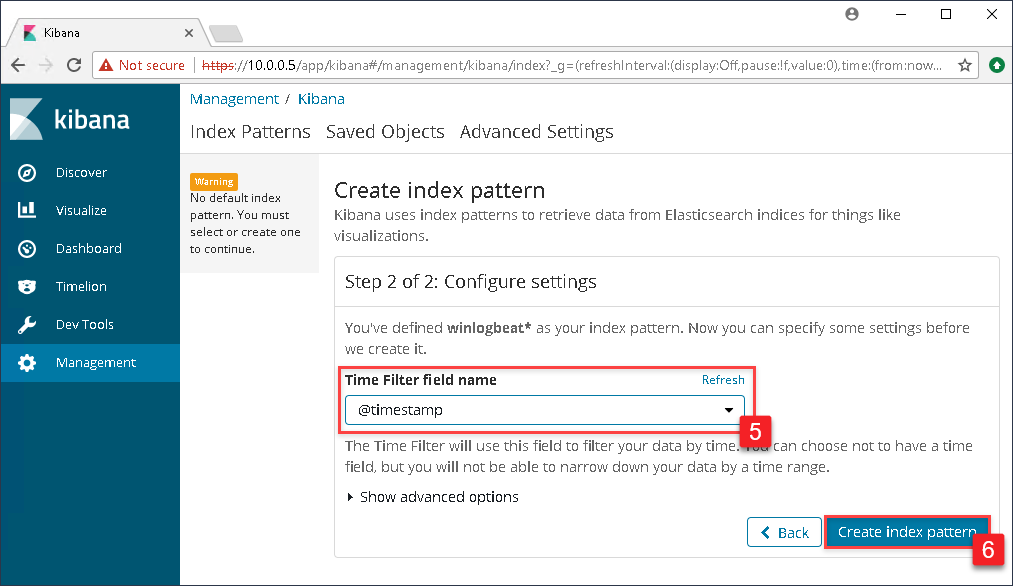
In the drop down box under Time Filter field name select @timestamp and click the Create index pattern button.
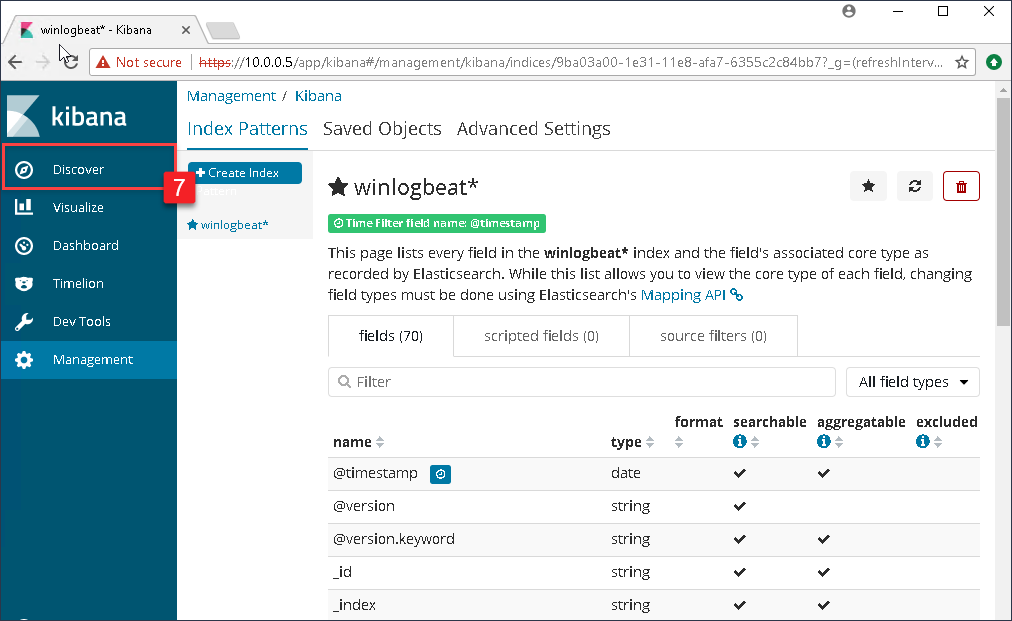
The next page that will display will be the index pattern page showing all the fields that Kibana has currently indexed. To see the Windows events, click on Discover in the left menu.
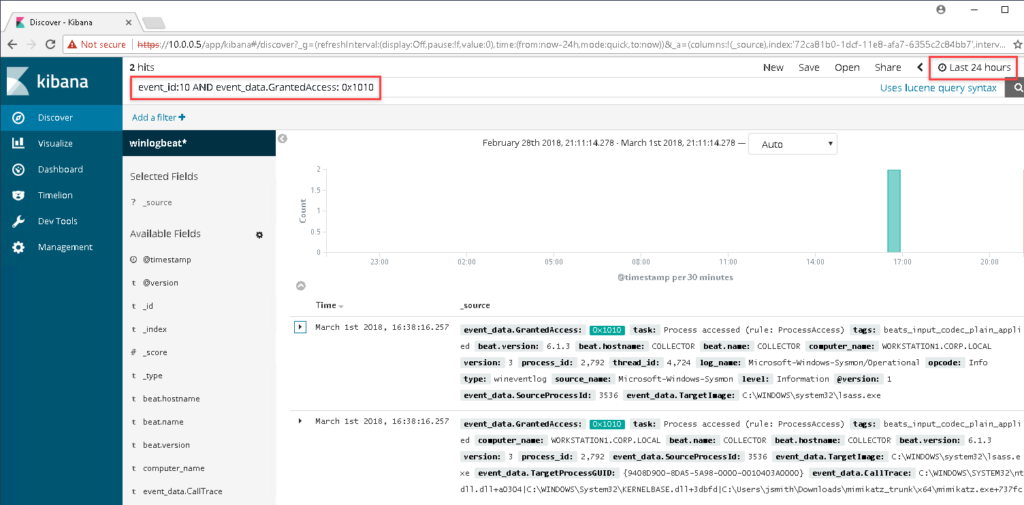
In the search bar within the Kibana dashboard, enter the following search string:
event_id:10 AND event_data.GrantedAccess: 0x1010
Though we only have the one index, and very few events, you will see that the ELK instance has correctly indexed the log files and made the fields that we care about easily searchable! If you are not seeing any events, you might need to change the time frame for searching events by clicking on the date/time in the top right.
In the next blog post, we will get into dashboard creation within Kibana and how to make effective visualizations for greater situational awareness. We will also cover how to create additional event subscriptions for gathering more events.
References
Jessica Payne @jepayneMSFT
Event Forwarding and Log Analysis
https://mva.microsoft.com/en-US/training-courses/event-forwarding-and-log-analysis-16506
Swift on Security @SwiftOnSecurity
https://github.com/SwiftOnSecurity/Sysmon-config.git
Benjamin DELPY @gentilkiwi
https://github.com/gentilkiwi/mimikatz